THE FOUNDATION AND MAINSTAY of French charcuterie is pork in all its forms, from sausages and stuffings to hams, pâtés, and terrines. Chair cuite, meaning meat that is cooked, was obviously the derivation of this marvelous keystone of French civilization, but modern charcuterie shops, like American delicatessens, have branched out and sell all manner of edibles, such as aspics and ready-to-heat escargots, heat-and-serve lobster dishes, ready-made salads, mayonnaise, relishes, canned goods, fine wines, and liqueurs. In the best establishments, all the cooking is done on the premises; they cure their own hams, make their own salt pork and fresh and smoked sausages, have their own formulas for their beautiful display of pâtés. Let us all pray that this delicious way of life will long remain, because there are few things more satisfying to the soul than the look and smell of a French charcuterie.

With the virtual disappearance of European-style neighborhood charcuteries in this country, it behooves every serious cook to have a few sausage formulas on hand for such delicious concoctions as saucisson en croûte, saucisson en brioche, saucisson chaud et pommes à l’huile—that wonderfully simple dish of hot, sliced sausages and potato salad—little pork sausages for breakfast and garnitures, and those lovely white-meat sausages with truffles, boudins blancs. A sausage is only ground meat and seasonings, a mixture no more complicated than a meat loaf, and for fresh unsmoked sausages you need no special equipment at all. An electric meat grinder and a heavy-duty mixer will make things easier, but a sausage-stuffing mechanism and sausage casings are not necessary because you can use other means to arrive at the sausage shape. In French terminology a saucisse is primarily a small and thin sausage, usually fresh, and a saucisson is a large sausage usually smoked or otherwise cured; the one may be called the other, however, if it is a question of size. Here are directions for forming them in casings and a practical substitute for casings, as well as a short discussion on caul fat.
Natural sausage casings, the flexible, tubular membrane that holds the sausage together and forms its skin, are made from the thoroughly scraped and cleaned intestines of hogs, cattle, and sheep, of the stomachs of hogs, and of the bladders of all three. Sheep casings are the most valuable and expensive of all, and also the most fragile; varying in diameter from ⅝ to 1 inch, they are used mostly for fresh pork breakfast sausages and the small cocktail or garnishing sausages called chipolatas. Beef casings are for large sausages like bolognas, salamis, and blood sausages, and middle sizes like cervelats and mettwursts. Hog casings come in various lengths and widths: bungs (gros boyaux), or the large intestine; hog middles (fuseaux), or the middle intestines; small casings (les menus), which are the small intestine.
The most practical and easily obtainable for the home sausage stuffer are small hog casings, the kind your butcher uses to make his fresh pork sausages or fresh Italian sausages. If he cannot supply you with a few pieces, he can order them for you; or look up in the classified telephone directory under Sausage Casings or Butcher’s Supplies. Ask for a set of small hog casings, medium width. You will get a bundle of 16 to 18 casings, each 20 feet long, which are twisted into a complicated swirl resembling wet spaghetti. To disentangle the pieces, unwind the set on a very large table. Then start with one piece from the middle and gently pull it through the maze, first on one side, then on the other. Disentangle all the pieces, winding each up on your fingers as you do so, like string. Pack the pieces between layers of coarse salt in a large screw-top jar and store in the refrigerator. They will keep safely for years as long as they are well covered with salt.
Before using a piece of casing, wash it off in cold water, then soak for one but not more than two hours in cold water. Any casing you do not use may be thoroughly rinsed inside and out, wound up again, and repacked with salt in your casing container.
Casing is ideal for sausages because it holds the meat in perfect symmetry; the problem is finding a way to get the meat into these marvelous containers. Professionals use a stuffing machine, poussoir, which is a large cylinder with a pushing plate at one end and a nozzle at the other: the meat goes into the cylinder, the casing is slid up the outside of the nozzle, and a crank operates the plate, pushing the meat from the cylinder through the nozzle and into the casing, which slowly and evenly fills with meat as it slides off the nozzle. There are home models available from some butcher supply houses and mail-order sources; anyone going into serious sausage making should certainly have one, since alternatives can only be makeshift and more or less successful depending on your sausage mixture. Here are the alternatives, including hand stuffer, meat grinder, and pastry bag. You will work out your own system.
Whichever of the three methods you choose, you will need a nozzle of some sort onto the outside of which you slide the sausage casing. This can be a funnel, the metal tube that fits a professional-size pastry bag, or a regular sausage stuffing nozzle; whatever it is, we shall call it by its official name, stuffing horn. After the sausage casing has soaked for an hour in cold water, cut it into 2- to 3-foot lengths so it will be easy to deal with.
Wet horn in cold water; fit one end of a piece of casing onto the small end. |
|
|
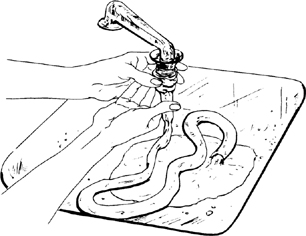
Hold the large end of the horn under a slowly running faucet of cold water, and push casing up outside with your fingers, being careful not to tear casing with your fingernails. If you have cut casing into lengths, string them all onto the horn, one after the other. To permit freedom of action, always leave 3 to 4 inches of empty casing dangling from end of horn and, unless your sausage mixture is very soft and liable to dribble out, do not knot end of casing until the whole length is filled. |
With the casing in place, you are now ready to stuff it. Have in mind how long you want your sausages to be, how many, if any, you want linked together, and if they are to be linked, whether the meat mixture is soft enough so that you can safely twist the filled casing into lengths without bursting it. This is mostly a matter of trial and error; if you want no errors and have plenty of casing, fill and either link or cut and tie one sausage at a time. To minimize air spaces and bubbles, watch casing carefully as you are filling it; when air spaces develop, push filled casing against end of horn to force air back into stuffer. In severe instances, when you are making linked sausages, you will have to cut the casing, tie it, and start a new series of links.
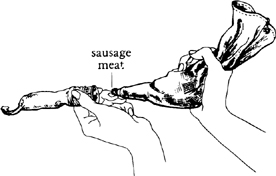
A pastry bag works surprisingly well for either stiff or soft sausage mixtures. You will need 2 metal tubes 2 inches long with ½-inch openings at the small end. One is holding the casing around its outside; the other is fitted inside a 12- to 14-inch bag. |
|
|
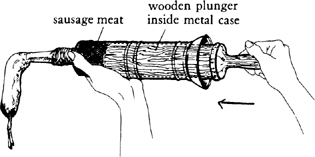
This oversize hypodermic consists of wooden plunger, cylinder, and detachable horn. It works well for soft mixtures like the boudin blanc. |
For stiffer blends, you have to brace the end of the tube against the edge of a table. A pastry bag is easier in this case.
|
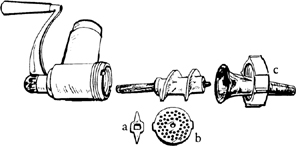
A stuffing horn of plastic or metal 4 inches long, ¾ inch in diameter at the small end, and 2¼ at the large end fits most grinders of the type illustrated here. They often come as extra equipment, or can be ordered from butcher or mail-order houses. |
Sometimes the grinder is operated with cutting knife (a) and disk (b) as well as horn (c), and sometimes not; if you have no instructions, you will have to try both ways. Some meat grinders work fairly well as sausage stuffers; others are maddeningly unsatisfactory.
Operate meat grinder at slow speed if it is electric, and hold casing horizontal with horn as meat goes in; this is to avoid air bubbles. When sausage meat has gone into casing, slip a free 3 or 4 inches of empty casing from horn and cut off with scissors. |
|
|
Tie a knot in the casing close against the meat at each end. For linked sausages, twist slowly and carefully to make the separations. Tie a piece of white string at each separation. |
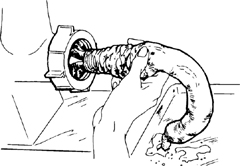
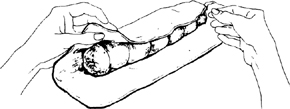
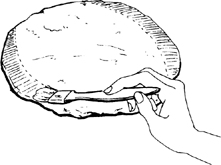
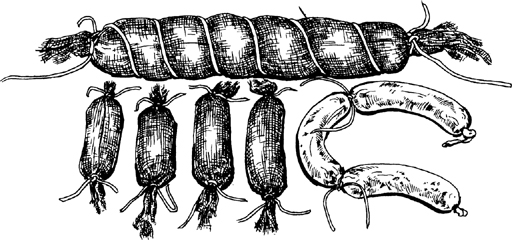
Cheesecloth works very well indeed as an alternative to professional casing when it is of no aesthetic importance that the sausage be perfectly symmetrical, such as those to be baked in pastry, served in slices, or crumbed and broiled. The following illustrations are for small sausages; large ones are formed in the same way.
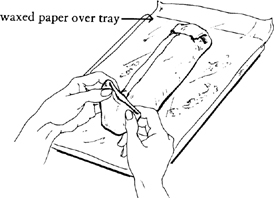
As an example, for 5-inch sausages, provide yourself with sufficient pieces of well-washed, damp, double-thickness cheesecloth about 8 inches square, and sufficient 4-inch pieces of white string to secure the 2 ends of each. Form sausages one at a time. Start by spreading cheesecloth on a tray and painting it with melted lard or shortening. |
|
|
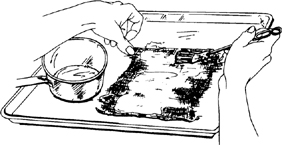
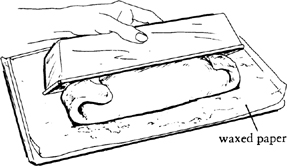
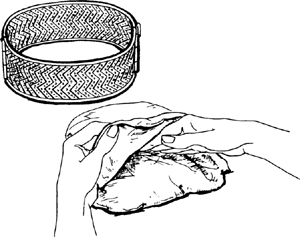
Form a neat rectangular loaf of sausage meat 5 inches long on lower end of cheesecloth. |
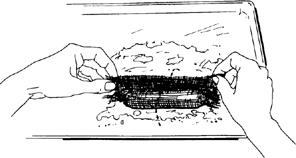
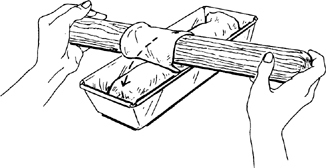
Smooth meat into a cylindrical shape; roll up tightly and neatly in cheesecloth. |
|
|
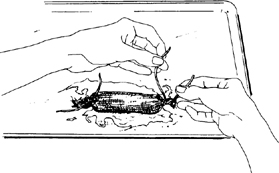
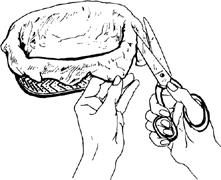
Tie one end securely with white string. Twist other end of cheesecloth to pack meat into place, tie it with string, and the casing is finished. These sausages are often refrigerated for 2 hours or so to firm them up before anything else is done to them. |

A marvelously useful product of the hog is its caul fat (crêpine, toilette), the spider-web-like membrane laced with fat that lines the visceral cavity. Caul fat makes a perfect and perfectly edible container for the fresh sausage patties called saucisses plates or crêpinettes. You can use caul fat instead of casing for boudins, for the large sausages you bake in brioche dough, and it is marvelous for wrapping up the stuffed tenderloin, meats roasted in a cloak of mushroom duxelles, or the noisettes de veau. Although American manufacturers use it for the occasionally made Devonshire sausages, caul fat is so little known to the general public in this country that unless you have a European butcher in your shopping area, you will have to order it. As caul fat will keep 2 months or more in the freezer, get several pieces while you are at it; each will average 30 inches square.
Seasoning is always an important part of sausage making and of charcuterie in general, since this is what gives the meat character, making your own brand different from any other. Furthermore, the salt and spices that enter into the preparation retard oxidation in the meat and are thus preservatives. French recipes often specify simply épices, sel épicé, or quatre épices, meaning use your own spice formula. The old standby, quatre épices, is a bottled mixture available everywhere in France; the four spices are usually pepper, clove, ginger or cinnamon, and nutmeg. Sel épicé is spiced salt that is usually 2 parts white pepper and 2 parts mixed spices for every 10 parts of salt.
You will find it useful to have your own spice mixture that you can keep at hand in a screw-top jar. Use it not only for sausages but for pâtés, meat loaf, as a marinade before cooking pork chops, and so forth. Here is a suggested formula: be sure all items are fresh-tasting and fragrant.

1 Tb each: bay, clove, mace, nutmeg, paprika, thyme
1½ tsp each: basil, cinnamon, marjoram or oregano, sage, savory
½ cup white peppercorns
If ingredients are not finely ground, either pulverize in an electric blender or a coffee grinder (finest grind), then pass through a fine-meshed sieve, and repulverize any residue.
For each 6 cups (3 lbs.) of meat mixture: Suggested proportions of spice and salt
1 level tsp (2 grams) épices fines
Plus other flavors such as more pepper, garlic, more of a specific herb, and so forth, depending on your taste and recipe
For fresh sausages, pâté mixtures, and stuffings: 1 level Tb (½ ounce) table salt
For sausages that are to be air-dried 2 or more days: 1½ Tb table salt
NOTE: These proportions are what seem correct to us. Salts and spices vary in strength, and you may find you prefer a little more or a little less per pound.
Sausages, and charcuterie in general, are a byproduct of butchering. If you raise your own hogs and do your own butchering, you will have all the lean meat you need out of the trimmings from hams, loins, necks, and other large pieces. You will have, as well, the various types of fat, such as the hard fat from the back of the hog between the meat of the loin and the skin; this is the fatback, which is used not only for sausages and pâtés but also for larding roasts. You will have the leaf lard, almost impossible to find nowadays, which comes from inside the hog around the kidneys. You will have fat from the jowl, the neck, the belly, the hams, and the shoulders. Those of us not so fortunate have to buy retail cuts from the butcher or the supermarkets; our sausages will be a little more expensive to make, but they will be far better than anything we can buy because we will be using fresh meat of the best quality.
Unless your market goes in for foreign or regional cuts or you live in a pork-eating area, you may have only the loin to work with. However, you can buy a large piece from the shoulder end, bone it out, roast or sauté the lean pieces, and turn the rest into sausage.
Rather than the difficult-to-find fatback, you may use fat trimmed from the outside of a loin roast; it works well because it is neither too soft nor too hard. Fat trimmed from the outside of fresh hams and shoulders is less desirable because a little soft, but it is quite usable when you have no alternatives. If you have a fat-and-lean cut like boneless shoulder butt, make a guess at the proportion of fat to lean and add whichever is lacking according to your recipe requirements. One cup of meat or of fat is approximately ½ pound.
[Plain Pork Sausage Meat—for Sausage Cakes, Breakfast Sausages, Chipolatas, and as a Stuffing Ingredient for Pâtés, Poultry, and So Forth]
It is so easy to make your own sausage meat and it is so good that you will wonder, once you have made it, why you ever were so foolish as to buy it. Usual French proportions of fat to lean are one to one; you may cut it down to 1 part fat and 2 parts lean, particularly when you are using the retail pork cuts suggested here rather than trimmings; less fat than this will give you less tender sausages.
For 6 cups (3 lbs.) sausage-meat mixture
1) The sausage mixture
2 lbs. (4 cups) lean fresh pork meat such as fresh ham, shoulder, or loin
1 lb. (2 cups) fresh pork fat, such as fatback, fat trimmed from loin roast, or fresh leaf fat
A meat grinder
A heavy-duty mixer with flat beater blade, or large bowl and wooden spoon
1 Tb salt
1 tsp épices fines or ½ tsp white pepper and ½ tsp pulverized mixed herbs and spices to your taste
Put meat and fat through finest blade of meat grinder; for a very smooth mixture, you may put it through the grinder again. If you have a heavy-duty mixer, beat thoroughly with the seasonings until very well blended. Otherwise, blend thoroughly with a wooden spoon and/or your hands, first dipping them in cold water. To test for flavor, sauté a small spoonful for several minutes until cooked through; taste, and add more seasoning if you feel it necessary, but remember that the spice flavor will not develop to its full in the meat for 12 hours or more.
Sausage Cakes or Sausage Roll. Either form into sausage cakes with a wet spatula on waxed paper, or with your hands, dipping them in cold water frequently; then, if you wish, wrap cakes in caul fat. Or form into a cylinder 2 inches in diameter in cheesecloth as illustrated at the beginning of this section and chill; then unwrap and cut into cakes. Sauté slowly in a frying pan until nicely browned and thoroughly cooked through.
Sausage Links and Chipolatas. For these you should have narrow sheep casings ⅝ inch in diameter, if you can get them. Breakfast links are usually 3 inches long; chipolatas, the tiny sausages used for cocktails and garnitures, 1½ to 2 inches. Form as illustrated at the beginning of this section. To cook, prick in several places with a pin and place in a frying pan with ½ inch of water, cover and cook at just below the simmer for 5 minutes or until sausages have stiffened slightly. Pour off water and sauté, turning frequently, until nicely browned.
[White-meat Sausages—Chicken and Veal or Chicken and Pork Forcemeat Stuffing]
White-meat sausages abound across the Atlantic, from the German and Swiss bratwursts and weisswursts to England’s quaintly titled white puddings. It has even been suggested that the French boudin and the English pudding sprang from a single etymological root. The boudin is more like a quenelle than a sausage, delicate in flavor and texture. In France, where a truffled boudin is traditional at the midnight Reveillon of Christmas and New Year, mashed potatoes is the accompaniment. However, you may treat them like roast chicken or roast veal, adding green vegetables to the platter, such as creamed spinach, broccoli, peas, braised endive, or whatever else you feel appropriate.
For about 6 cups, making 10 to 12 boudins, 5 by 1¼ inches
1) The sausage mixture
the pork fat:
½ cup (4 ounces) fresh pork leaf fat, outside loin fat, or fatback
A meat grinder with finest blade
An 8-inch frying pan with cover
Put the pork fat through the grinder. Return half to top of grinder. Cook the rest in the frying pan over low heat for 4 to 5 minutes until it has rendered 2 to 3 tablespoons of fat but has not browned at all.
3 cups (¾ lb.) sliced onions
(If you wish a mild onion flavor, drop them into 2 quarts of boiling water and boil 4 minutes; drain, rinse in cold water, and thoroughly shake off excess water.) Add onions to pork fat and fat pieces in frying pan, cover and cook very slowly, stirring frequently, for 15 minutes or more; they should be perfectly tender and translucent, but no more than a pale cream in color.
la panade:
½ cup (1½ ounces pressed down) stale white crumbs from unsweetened homemade-type bread
1 cup milk
A heavy-bottomed 2-quart saucepan
A wooden spoon
The large bowl of your electric mixer, or a 3-quart bowl
Meanwhile, bring the bread crumbs and milk to the boil and boil, stirring constantly with wooden spoon to prevent scorching, for several minutes until mixture is thick enough almost to hold its shape on the spoon. (This is now a panade, in the true and original sense of the word.)
the final mixture:
½ lb. (1 cup) skinless and boneless raw breast of chicken
½ lb. (1 cup) lean fresh veal or pork from shoulder or loin
2 tsp salt
⅛ tsp each: nutmeg, allspice, and white pepper
1 egg
⅓ cup egg whites (2–3 egg whites)
½ cup heavy cream
Optional: A 1-ounce truffle and juices from the can
When onions are tender, pass them with the remaining pork fat, the chicken, and the veal or pork through grinder twice. Place in mixing bowl, add seasonings, and beat vigorously in the electric mixer or by hand until well blended. Beat in the egg and continue beating for 1 minute, then beat in half the egg whites, and in another minute the remainder of the egg whites. Finally, beat in the cream 2 tablespoons at a time, beating a minute between additions. If you are using a truffle, mince it into ⅛-inch pieces and beat it in along with juices from the can.
To check seasoning, sauté a small spoonful until cooked through, taste, and add more if you feel it is necessary, but remember that the boudin is supposed to be rather delicate and mild in flavor.
Form either in small hog casings or in cheesecloth. Sausages will improve in flavor if refrigerated at least 12 hours before cooking.
(*) STORAGE NOTES: May be refrigerated for 2 to 3 days, or may be frozen for a month or so.
3) Preliminary cooking
(If you have formed the boudins in sausage casing, prick them in several places with a pin.) Arrange boudins in a baking pan, roaster, or large frying pan at least 3 inches deep, and on a rack or grill if you have one that fits. Measure in enough quarts of boiling water or half-and-half boiling water and milk to cover boudins by 1½ inches. Add 1½ teaspoons salt for each quart of liquid, and lay 2 imported bay leaves on top. Bring liquid barely to the simmer and poach uncovered at just below the simmer for 25 minutes. Remove from liquid and cool on several thicknesses of paper towels. If you have used cheesecloth casings, cut off the two ends with scissors and peel the sausages while still warm. (Sausage-casing boudins are peeled just before final cooking.)
(*) AHEAD-OF-TIME NOTE: If the boudins are not to have their final cooking promptly, wrap and refrigerate when cool. They will keep 3 to 4 days in the refrigerator, a month or so in the freezer.
4) Final cooking and serving
Of the several cooking methods available, oven baking is not recommended because it toughens the outside of the boudins before they have had time to brown. Dredging in flour and browning slowly in a frying pan in clarified butter or rendered pork fat is preferable, but the best method, we think, is under the broiler as follows: Roll the peeled boudins in fresh white bread crumbs, pressing the crumbs in place with your fingers. Arrange in a buttered baking dish and dribble on droplets of melted butter. Broil slowly, turning and basting with fat in pan several times, for 10 to 12 minutes, until boudins are nicely browned. Arrange on a hot platter, over a bed of hot mashed potatoes if you wish, and decorate with sprigs of parsley or watercress. Serve as soon as possible.
 SAUCISSON À CUIRE—Saucisson de Ménage, Saucisson de Toulouse, Saucisson à l’Ail, Saucisson Truffé, Cervelas de Paris
[Large Fresh Sausages to Cook and Serve with Potatoes, Sauerkraut, Cassoulet, or to Bake in Brioche or Pastry Dough]
The following formula produces a fine substitute for those marvelous creations you read about but cannot find except in a French charcuterie. This recipe is for the home sausage maker, and requires no special equipment; for that reason you cannot call your product a saucisson de Lyon, which is hung for 8 days in a drying shed, or a saucisson de Morteau, which finishes in a smokehouse. Any of the names in the title, however, will do, and any Frenchman you invite for a meal will think you brought it back from the old country.
The sausages will develop their best flavor when you are able to hang them in a dry, airy part of the room at a temperature of 70 to 80 degrees for 2 to 3 days before cooking. If the weather is very damp, or much over 80 degrees, however, omit the hanging; several days in the refrigerator instead will help develop flavor. The saltpeter (potassium nitrate), which you should be able to buy at any prescription counter, is omitted if you are not hanging the sausages; its role is to give the meat an appetizing, rosy color that only develops after several days of hanging. Use the coarse or the fine blade of your meat grinder, whichever you prefer, but the coarse grind is more typical of a sausage that is to be hung.
French sausages of this type are not madly spiced and peppered, like some of the Spanish and Italian varieties. We have suggested 3 special flavorings, and you will eventually develop the proportions or other additions that will make your own sausage le saucisson de chez nous.
For 6 cups (3 pounds) sausage-meat mixture, making 10 to 12 sausages 5 by 1¼ inches, or 2 sausages 12 by 2 inches
1) The sausage mixture
4 cups (2 lbs.) lean fresh pork such as fresh ham, shoulder, or loin
2 cups (1 lb.) fresh pork fat such as fatback, fat trimmed from a loin roast, fresh leaf fat
Either 1 tsp épices fines plus ¼ tsp white pepper;
Or ¾ tsp white pepper and ½ tsp pulverized herbs and spices of your choice
1 Tb salt
¼ cup Cognac
Put meat and fat through grinder. With either a heavy-duty mixer and flat beater, or your hands and/or a wooden spoon, mix in the rest of the ingredients to blend vigorously and completely. Sauté a small spoonful to cook through thoroughly, taste, and correct seasoning, if necessary.
if you are to hang the sausage:
¼ tsp saltpeter, ¾ tsp sugar, and
1½ tsp more salt
Either 1) A 1- to 2-ounce can of truffles and the juice from the can;
Or 2) ¼ cup chopped pistachios and 1 small clove mashed garlic;
Or 3) 2 or 3 medium cloves mashed garlic and ½ tsp cracked peppercorns
2) Forming and curing the sausages
Form the sausages either in casings or in cheesecloth as illustrated at the beginning of this chapter. If you are forming a 12- by 2-inch sausage in cheesecloth, wind a spiral of string around the length to keep it in shape; if you are hanging cheesecloth-wrapped sausages, paint again with melted lard after forming and tying. Hang sausages up on a nail or hook, in the dry airy part of your kitchen where the temperature is generally around 70 degrees and rarely over 80. After 2 to 3 days, they are ready for cooking.
(*) STORAGE NOTE: After curing, sausages may be wrapped securely and refrigerated for a week, or frozen for a month.
3) Cooking and serving suggestions
Saucissons à cuire need 30 to 40 minutes of slow cooking in liquid, and if you have formed them in casings, prick them in several places with a pin so that the fat will run out. When you are braising sauerkraut or cabbage, doing a bean or lentil dish or a pot au feu, add the sausages to the dish 30 to 40 minutes before the end of the cooking period. When you wish to serve them separately, as with French potato salad, or baked in brioche or pastry dough, poach them at just below the simmer for 30 to 40 minutes in a wine-flavored beef bouillon, selecting a container, such as a bread pan or casserole, that will just hold them easily. There is no need to brown them afterwards, but if you wish a more elegant presentation for sausages formed in cheesecloth, roll them in fresh bread crumbs, dribble on melted butter, and brown them under the broiler.
You can make delicious fresh sausages out of the all-purpose pork and veal pâté mixture in Volume I on page 565, plus, if you wish, diced ham, diced marinated bits of veal or game, or diced and briefly sautéed liver, as suggested in the pâté mixtures following it. You may also adapt any of the pâté mixtures in the next section of this chapter. Form and cook the sausages as described in the preceding recipe; this type of sausage, and the chicken-liver sausage in the next recipe, are particularly good when baked in brioche or pastry dough.
[Pork and Veal Sausages with Truffles and Foie Gras or with Chicken Livers—Especially for Baking in Brioche or Pastry Dough, or as a Stuffing for Pâtés, Poultry, Chaussons]
For about 4½ cups, making two 12 by 1½-inch sausages
2 Tb pork fat, chicken fat, or butter
¼ cup minced shallots or scallions
Either ¾ lb. (1½ cups) chicken livers;
Or a mixture of chicken livers and block canned foie gras, half-and-half if you wish to pay the price (foie gras is used in next step)
Heat the fat or butter in an 8-inch frying pan, add the shallots or scallions and the chicken livers (not the foie gras); toss over moderately high heat for several minutes until liver has just stiffened to the touch; it should feel springy, but remain rosy inside. If you are using chicken liver only, cut half into ¼-inch dice and place in a bowl.
If you are using foie gras, cut into ¼-inch dice and place in a bowl. Fold foie gras or liver gently with the Cognac and flavorings and let marinate until needed.
¼ cup (¾ ounce pressed down) stale white crumbs from unsweetened homemade-type bread
½ cup milk
Simmer bread crumbs in milk, stirring constantly, for several minutes until thick enough to mass on a spoon. Scrape into large bowl of mixer, or a large mixing bowl. (This is a panade.)
½ lb. (1 cup) lean veal
Either 1 lb. (2 cups) chair à saucisses;
Or ½ lb. lean pork loin, shoulder, or fresh ham and ½ lb. fresh pork fatback or outside loin fat
The sautéed undiced chicken livers
Put meats, fat, and chicken livers through finest blade of meat grinder and add to mixing bowl.
The marinade from the diced foie gras or chicken livers
2 tsp salt
Either ¾ tsp épices fines and ¼ tsp white pepper;
Or ½ tsp white pepper and big pinches each allspice and nutmeg
¼ tsp thyme
Either ¼ cup peeled pistachio nuts, quartered lengthwise;
Or 1 or 2 diced truffles and their canned juices
1 egg
¼ cup dry port wine or Sercial Madeira
The marinated foie gras or diced chicken livers
Beat in the marinade, salt, flavorings, pistachios or truffles and juice, and egg. When well blended, gradually beat in the wine. Finally, fold in the diced foie gras or chicken livers, being careful not to break the diced shapes. Mixture will be fairly soft. Sauté a spoonful and taste; correct seasoning as necessary. Form into sausages using either casings or cheesecloth. (If you are using the mixture for a filling or stuffing that is to be baked later, pack into a covered bowl.) Flavor will improve when refrigerated a day or two before cooking.
Cook and serve sausages as suggested in preceding Master Recipe, or bake in brioche dough as in the following recipe.
(*) STORAGE NOTE: Sausages may be frozen for a month or so.
[Chicken-liver Sausage for Baking in Brioche Dough—Chicken-liver Pâté—Chicken-liver Spread or Filling]
This all-purpose liver mixture is so versatile it can serve as a sausage, a pâté, a spread for sandwiches and hors d’oeuvre, a filling for poultry or meat, and can generally be used anywhere you need the depth and strength of a liver accent. Liver alone is such a concentrated flavor that you must have something else with it to temper the taste: the sausage uses cream cheese and bread crumbs, while the pâté includes cheese and butter, and the filling, farce à gratin, calls for the traditional pork fat. Two other liver pâtés or spreads are the pork-liver pâté and the mousse of chicken livers in Volume I, page 559.
The basic chicken-liver mixture
⅓ cup very finely minced onions
3 Tb chicken fat or butter
¾ lb. (1½ cups) chicken livers
Either ¼ tsp épices fines;
Or a big pinch each of allspice, mace, and white pepper
A big pinch thyme
¼ tsp salt
⅓ cup Cognac
Optional: ½ cup diced fresh mushrooms, squeezed dry and sautéed in 1 Tb butter
Cook the onions slowly in the fat or butter for 12 to 15 minutes, until very tender but not brown. Add livers and seasonings, and toss over moderately high heat just until stiffened slightly, 2 to 3 minutes; livers should remain rosy inside. Pour in the Cognac, heat to bubbling, and flame with a lighted match; in 1 minute, extinguish flames with a cover and remove pan from heat. Stir in optional mushrooms. The liver mixture is now ready to be used either in brioche dough or in another form as follows.
½ cup (1 ounce pressed down) dry white crumbs from unsweetened homemade-type bread
4 ounces (½ cup) cream cheese
The basic chicken-liver mixture
Stir the bread crumbs and cheese into the liver mixture, and purée through a food mill, meat grinder, or blender. Correct seasoning. Roll into a cylindrical shape in aluminum foil and chill until firm; however, bring to room temperature before encasing it in the dough so that dough will rise easily.
For liver spread or pâté
The basic chicken-liver mixture
4 ounces (½ cup) softened butter
4 ounces (½ cup) cream cheese
Purée liver mixture through a food mill, meat grinder, or blender, then beat in softened butter and cream cheese. Correct seasoning. If you plan to use this as a pâté, pack into a covered jar or mold, and chill.
For farce à gratin—to use as a spread, filling, or pâté
The basic chicken-liver mixture but substitute: 6 ounces (¾ cup) fresh pork fatback or outside loin fat for the butter
Rather than using butter for cooking the onions and chicken livers, use the ¾ cup pork fat as follows: grind or mince it, and cook slowly for 8 to 10 minutes in the sauté pan until pieces of fat are translucent but not browned, and ⅓ cup or so of fat has rendered. Then proceed with the recipe. Purée in a blender, food mill, or meat grinder, pack into a jar or decorative bowl, and chill.
(*) STORAGE NOTE: Any of these will keep for 4 to 5 days in the refrigerator, and they freeze successfully for several months.
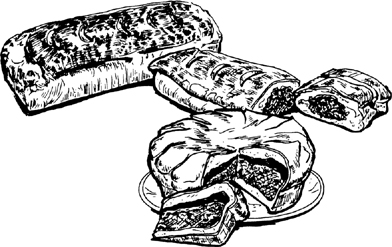
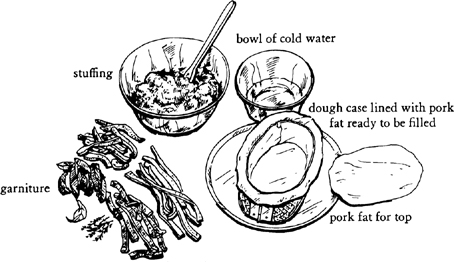
When you want to be dramatic and dressy with sausage, bake it in a brioche case. For cocktails, slice it warm and thin and serve on little plates. When it is a hot first course or the mainstay for luncheon or supper, include a succulent brown sauce to pour over each serving. Although reminiscent of pâté en croûte, sausage in brioche is usually served warm, and is lighter in general impression. Unlike the real pâté, which goes raw into its covering of dough for baking, the sausage or meat mixture that is enclosed in brioche dough has already been cooked, and remains in the oven only long enough to heat through as the brioche bakes.
The rectangular loaf shape that encloses a large cylindrical sausage is the most typical form, and the one we shall illustrate. With your own sausage or cooked meat mixture, however, you may make it round, square, heart-shaped, or whatever you wish.
Because you are working with live dough, that is, yeast dough, you may run into one problem that does not occur with pastry dough: this is a sometimes ugly space between the meat and the brioche that only reveals itself when you are slicing through the structure to serve.
It is particularly true of home-cured or store-bought sausages, less true of soft mixtures like chicken livers, and more liable to be troublesome with sausages baked in a pan than with those formed on a pastry sheet. One way to minimize the gap or eliminate it completely is to be sure that the sausage is very hot at the moment you enclose it in the dough. Heat kills the yeast in a thin layer of dough, about ⅛ inch, all around the sausage, and this layer should cling to the sausage while the rest of the dough rises around it. Another way to close the gap is to bake the sausage in a closed pan, as suggested in a variation at the end of the Master Recipe. We are only giving prominence to this problem so that you will be aware of it and pleased with yourself when you have avoided it but not unduly disturbed when you have not. In such instances, however, when you want to serve a cold liver pâté en brioche, you will welcome the gap because you can siphon a deliciously flavored aspic into that space between meat and brioche, which will add immensely to the taste and appearance of the pâté slices when you serve them.
With your brioche dough made the day before, and your sausage or meat mixture ready for pre-cooking, you should count on 2½ to 3½ hours from the time you start the process until the time you can serve. You will need 40 minutes for poaching, if you are using a sausage, an hour for the dough-with-sausage to rise before baking, an hour for baking, and 20 to 30 minutes for meat and brioche to settle before slicing. Remember that you can control the rising of dough, and you can keep the baked result warm; thus you may arrange your schedule as you wish.
SAUCISSON EN BRIOCHE[Sausage Baked in Brioche Dough]
This is for a large sausage about 12 inches long and 1½ to 2 inches in diameter, such as the saucisson à cuire and the liver or foie gras sausage following it, or for a store-bought sausage that is to be cooked and served hot, like a Polish sausage (kielbasa) or Italian cotechino. You may also use the cooked chicken-liver sausage mixture; in this case, omit Step 2 in the following recipe.
For a 12-inch case, serving 6 as a hot first course, 4 as a main course, or 18 slices for a cocktail appetizer
1) The brioche dough—started the day before you plan to serve
Either the pain brioché dough;
Or the richer pâte à brioche fine (proportions for ½ lb. flour in either case)
Make the brioche dough, giving it one rise at room temperature and a second rise that finishes in the refrigerator. Dough must be well chilled before you form it in Step 3.
2) Poaching the sausage—about 40 minutes; omit this step if you are using the already cooked chicken-liver sausage mixture
The sausage (see introductory paragraph)
A loaf pan just large enough to hold the sausage (loaf shape recommended)
½ cup dry white wine or dry white French vermouth
3 or more cups beef bouillon simmering in a saucepan
1 imported bay leaf
Salt and pepper
Useful: a meat thermometer
Prick the sausage in several places with a pin and place in pan. Pour in the wine and enough simmering bouillon to cover sausage by 1 inch. Add seasonings and bring liquid to just below the simmer (water is shivering and almost bubbling). Cover loosely and maintain liquid at this state for 40 minutes. Remove sausage, peel off casing, and return to liquid until you are ready to proceed to Step 3. Sausage should be hot (around 165 degrees) for next step; reheat if necessary.
3) Achieving the free-form brioche shape
The chilled dough
The hot, cooked, and peeled sausage (or room-temperature chicken-liver sausage)
A large pastry sheet or tray 16 by 24 inches, covered with lightly floured waxed paper
A lightly buttered pastry sheet at least 12 by 16 inches in diameter
Rapidly roll the chilled brioche dough into a rectangle approximately 24 by 10 inches. With a pastry wheel or knife, cut off a 4- by 10-inch strip and refrigerate it. Roll remaining dough up on your pin and unroll it onto the waxed-paper-covered sheet or tray.
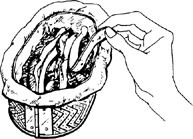
Center sausage on dough and quickly fold the two sides up over it; they should overlap by about 2 inches. |
|
|
Working rapidly, fold over the 2 ends of the dough to enclose the sausage completely. Then to prevent sausage from breaking through dough, turn the buttered pastry sheet upside down on top of it, and reverse the two so that sausage will unmold itself seam-side down on the buttered sheet. |
Brush off any flour on top of dough. Roll out reserved and refrigerated strip to about 15 by 4 inches in diameter; roll up on pin and then unroll over sausage. |
|
Trim off excess dough from 2 ends, and press dough cover in place lightly with fingers. Set uncovered at a temperature of no more than 75 to 80 degrees. Let dough rise until it feels light and spongy-springy when touched—40 to 60 minutes. (Preheat oven in time for next step.)
4) Baking—about 1 hour; oven preheated to 425 degrees
1 egg beaten with 1 tsp water in a small bowl
A pastry brush
Scissors
A cooling rack
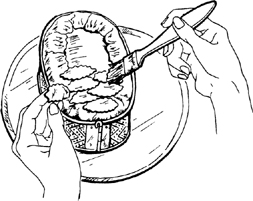
Just before baking, paint top of dough with egg glaze; let set a moment, and paint again.
Clip top of dough with scissors, going in at a slant about ⅜ inch deep and 2 inches across. |
|
Set in middle level of preheated 425-degree oven and bake for 20 minutes, or until brioche has risen about double its height and begun to brown. Turn oven down to 350 degrees for 30–40 minutes more. It is done when you can begin to smell the sausage cooking, and when the brioche itself feels solid and makes a rather dry thumping noise when tapped. (Cover lightly with foil or brown paper if it is coloring too much before it is done.) Slide off pastry sheet onto rack, and let cool 20 to 30 minutes before serving.
5) Serving suggestions
Serve the sausage hot, warm, tepid, or cold (although a sausage is usually better warm or tepid than cold). When serving it hot as a first or main course, you can make a delicious brown sauce with the sausage-poaching liquid, using any of the suggestions in Volume I, pages 73–6.
(*) AHEAD-OF-TIME NOTES: You may keep the sausage warm for an hour or more in a 120-degree oven. If for some reason you cannot serve it when baked, let cool, then wrap airtight; reheat uncovered on a lightly buttered pastry sheet in a 400-degree oven for 20 minutes or so.
VARIATIONS
For a 12- by 2-inch sausage you will need the long, rectangular 2-quart pan called an angel loaf, about 12 by 3¼ inches bottom diameter and 2½ inches deep. Follow Steps 1 and 2 in the Master Recipe, butter the inside of the loaf pan, then wrap the hot sausage in the dough on a paper-covered pastry sheet or tray as illustrated.
Turn a buttered 12-inch loaf pan upside down over the sausage. Reverse tray with sausage onto pan, unmolding sausage seam-side down into pan. |
|
|
Brush off any flour from top of dough, and unroll reserved dough strip over sausage. |
Press dough cover into place with fingers, pushing it lightly down against top, sides, and ends of sausage. |
|
Let rise at a temperature of no more than 75 to 80 degrees for 40 to 60 minutes, until dough is light and springy; it will fill the pan by about three quarters. Glaze, clip top with scissors, and bake as described in preceding Master Recipe.
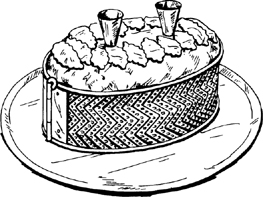
When you want to be sure there is no gap between meat and brioche, follow the preceding recipe, but rather than glazing and clipping the top of the dough when it has risen, cover the pan as described and illustrated for pain de mie. This works because the risen dough fills the pan only by three fourths; then, while it bakes, the dough will not only fill the covered pan completely, but will also press itself against the sausage meat. You may use any shape of pan you wish, including a fluted brioche tin. The imported hinged cylindrical mold shown in the illustration can easily be adapted for sausage in brioche.
Sausages, to our mind, are at their best when served hot or warm in brioche dough, while liver mixtures are delicious cold. We suggest the chicken-liver mixture, or the cooked pork and liver pâté with onions. Follow any of the preceding methods you wish; when the meat is fully encased and ready to rise, make a hole in the top of the dough and insert a well-oiled cone of foil or the tube from a pastry bag, letting its end touch the meat. After rising and baking, and when completely cold, pour in through the cone as much almost-set wine-flavored meat-jelly aspic as the case will hold. (See illustrated directions in the pâté en croûte section.) Then remove cone, wrap pâté airtight, and chill several hours or overnight. Pâté should be eaten within 4 to 5 days.
[Sausage Baked in Plain Pastry or in Puff Pastry]
Equally delicious, though naturally different in texture, is any one of the suggested sausages poached in bouillon, peeled, and baked in plain pie crust dough or in that wonderfully high-rising flaky dough known as French puff pastry. Use the pâte brisée à l’oeuf, or the demi-feuilletée. Form the dough around the sausage as described in the free-form system, Master Recipe. Paint top with beaten egg, press on decorative pastry cutouts, and bake exactly as described in the Master Recipe. (Illustrated directions for decorating this type of pastry are in Volume I, pages 574–5.)
CAILLETTES—GAYETTES[Pork and Liver Sausages with Greens]
These hearty green and brown sausages are made in the countryside where hogs are slaughtered, and the farmer uses every edible morsel for some specialty. His recipe usually includes lungs and spleen as well as the heart and liver we have specified, and, if he lives in Provence, he puts in plenty of garlic. Swiss chard (blettes) is the preferred green, but because it is not always to be had in this country, we have suggested kale or collards (chou vert non-pommé) and spinach as substitutes. Traditionally the sausages are formed into cushion or dumpling shapes 2 to 3 inches in diameter, wrapped in caul fat, and baked in a big pottery dish. You may also form them like regular sausages, like sausage cakes, or turn the whole mixture into a meat loaf. (NOTE: flavor will improve if you can make the mixture a day before cooking.)
Serve with mashed or scalloped potatoes and broiled tomatoes, or an eggplant and tomato casserole, or the ratatouille in Volume I, page 503, or simply a green salad and French bread. A rosé wine or a domestic red would go nicely.
For 6 cups of sausage mixture, making a dozen sausages
1) The greens
1 cup minced onions
2 Tb pork fat or olive oil
A heavy-bottomed saucepan with cover
Either 1½ to 2 pounds fresh Swiss chard, kale, collards, or spinach;
Or 1½ packages frozen greens defrosted in a basin of cold water
A large kettle of boiling salted water
The large bowl of an electric mixer, or 3-quart mixing bowl
Cook onions and oil in covered pan over moderate heat, stirring occasionally, for 10 minutes or so, until tender and translucent. Meanwhile, pick over fresh greens, wash thoroughly, and if you have chard use both the green leaves and the white stems; drop into boiling water and boil uncovered until wilted and just edibly tender—1 minute for spinach, 5 or more for other greens. Drain immediately, refresh in cold water, and drain again. (Fresh and defrosted greens may now be treated alike.) A smallish handful at a time, squeeze to extract as much water as possible; chop roughly with a big knife. You should have about 1½ cups. Stir into the onions, raise heat, and stir for several minutes to evaporate excess moisture. Scrape into mixing bowl.
2) The sausage mixture
Either 1½ lbs. (3 cups) fat-and-lean fresh pork shoulder butt;
Or ¾ lb. lean pork from fresh ham or loin, and ¾ lb. fresh pork fatback or fat trimmed from outside loin
Either ½ lb. (1 cup) fresh liver (pork, lamb, or beef) and ¼ lb. (½ cup) heart (pork, lamb, or calf);
Or liver only
1 Tb salt
Either ¾ tsp épices fines, ¼ tsp pepper and ¼ tsp savory;
Or ⅛ tsp allspice, ⅛ tsp mace, ⅛ tsp bay leaf, ¼ tsp savory, and ½ tsp pepper
Optional: 1 or more cloves of garlic, finely minced or mashed
Put meat, fat, and liver once through the coarsest blade of the meat grinder, or chop by hand into ¼-inch pieces. Add to bowl along with the seasonings, and mix thoroughly by electricity or by hand. Sauté a small spoonful until thoroughly cooked, taste, and correct seasoning if necessary. (Whether you form the sausages now or later, their flavor will improve if you wait 24 hours before cooking.)
(*) STORAGE NOTE: May be refrigerated for 2 to 3 days; may be frozen for a month or two.
3) Forming and cooking
Caul fat. Form sausage mixture into a dozen balls or cylindrical shapes, wrap in caul fat, arrange in one layer in a greased baking dish, and baste with melted lard or butter. Bake for 40 to 45 minutes in the upper third of a preheated 375-degree oven until nicely browned.
Sausage casings. Form in sausage casings, prick in several places with a pin, and either bake as described in preceding paragraph or poach in almost simmering water for 5 minutes, then brown in a frying pan.
Sausage cakes. Form into sausage cakes with dampened hands. Just before cooking, dredge lightly in flour; sauté slowly in lard or cooking oil for 6 to 8 minutes on each side until nicely browned.
Meat loaf. (This is particularly recommended when you want something to serve cold.) Either grease a 6-cup loaf pan or baking dish and pack the sausage mixture into it; or form the mixture into a loaf shape, wrap in caul fat, and place on a greased baking dish. Bake in upper third of a preheated 375-degree oven, basting several times with melted fat for an hour or more, or until juices, when meat is pricked deeply, run clear yellow with no trace of rosy color (180 to 185 dgrees on a meat thermometer).
VARIATION
[Provençal Sausages of Leftover Braised Beef and Greens]
The naked ones, les tous nus, are sausages without casings, and a Provençal specialty. These are formed by hand, rolled in flour, and dropped for a moment in boiling water before they are baked in a shallow dish with a spicy tomato sauce. They are so fragrant and appetizing that you will find yourself braising beef just as an excuse for making les tous nus with the leftovers.
For about 4 cups, serving 4 to 6 people
1) The sausage mixture
1 cup blanched and squeezed greens
¼ cup minced onions cooked with 2 Tb olive oil
2 cups ground cooked beef, preferably braised
Optional, to flavor boiled or roast beef: ¼ cup raw sausage meat and 1 Tb Cognac
1 tsp salt
Either ¼ tsp épices fines;
Or allspice and mace
¼ tsp savory or oregano
¼ tsp pepper
Big pinch of Cayenne or drops of Tabasco
2 large cloves of garlic, minced or puréed
⅓ cup grated Parmesan cheese
¼ to ⅓ cup beaten egg (1 to 2 eggs)
(If you have chard, use green leaves only.) Blanch, squeeze, and chop the greens as described in Step 1 of the preceding recipe, and cook with the onions 2 to 3 minutes until all liquid has evaporated; greens must be as dry as possible. Blend them in a large mixing bowl with the beef, seasonings, and cheese. Beat in 3 tablespoons of egg; beat in driblets more egg, moistening only enough so that mixture will hold its shape for forming. Sauté a spoonful and taste; correct seasoning as necessary.
2) Forming the sausages
1 cup flour on a large tray
A large frying pan full of boiling water
A skimmer
A rack, or paper towels on a tray
1 or 2 shallow, greased baking dishes
2 to 3 cups good tomato sauce, or Volume I, pages 76 or 78
¼ cup grated Parmesan cheese
1 to 2 Tb olive oil
Take up a 3-Tb gob of the mixture and roll into a sausage shape ¾ inch in diameter; roll in flour and set aside. When all the sausages are formed, drop half into the boiling water, bring back to the simmer for ½ minute. Dip out onto rack and continue with the rest. Arrange closely together in baking dish or dishes. Pour over the tomato sauce, which should barely cover them. Sprinkle on the cheese and dribble the oil over it.
(*) AHEAD-OF-TIME NOTE: May be completed a day in advance to this point.
3) Cooking the sausages—oven preheated to 425 degrees
About 30 minutes before serving, bring to simmer on top of stove, then set in upper third of oven until sauce has browned and crusted lightly on upper part of sausages, and is bubbling underneath.
Like the caillette mixture in the Master Recipe, Step 3, the tous nus mixture may also be formed in caul fat or sausage casings, or may become sausage cakes or meat loaf.
Jambon persillé is the traditional Easter ham of Burgundy. Simmered in wine, then cut up or shredded and packed into a big bowl between layers of chopped parsley, aspic, and seasonings, each slice when served is beautifully patterned with wavy lines of bright green. It is a marvelous dish for cold lunches, supper parties, and receptions. The real Burgundian recipe is made with salt-cured ham, known in France as jambon demi-sel; this is the same process used in America for the dry-curing of salt pork. Although you may certainly use regular ham for the dish, the salt cure is so easy—all you need is 2 weeks of refrigerator space for the large bowl that holds the meat—we highly recommend that you try it. It is not only that you will have the authentic meat for jambon persillé, but also that you can cure a loin of pork for chops or roasting, since salted pork makes a delicious change from ordinary pork and is broiled or roasted in exactly the same way. At the same time, if you can find any hog jowls or bellies, you can also make your own salt pork.
[Home Dry-curing of Pork]
The object of curing pork is not only to preserve it but to give it that special maturity of taste that only comes through salting. For our purposes here, we are more concerned with taste than with preservation. There is no need for brines, vats, and smokehouses, only for saltpeter, sugar, spices, and salt. Saltpeter imparts an attractive rosy color to the meat, sugar develops its flavor and counteracts the drying effects of saltpeter, spices play their habitual role, and salt preserves the meat while it matures. The following 15-day cure is for the boned fresh ham or shoulder that may be used for jambon persillé, and for loin roasts and salt-pork cuts; these are all pieces, in other words, that are no thicker than 4 to 5 inches.
Curing should take place at around 38 degrees Fahrenheit, which is the range of most refrigerators. At temperatures over 40 degrees, the meat may spoil before the salt can penetrate, and at below 36 degrees the salt penetration is too much slowed down.
For jambon persillé you may use either fresh ham (leg of pork) or fresh shoulder-arm; shoulder is usually cheaper and weighs around 6½ pounds, or half as much as a ham. Many markets do not carry either of these fresh pork cuts, and you will have to order them. Before curing, remove the rind, which is to be cured and cooked along with the meat, and slice off as much fat from rind and outside of meat as you easily can; bone the meat as neatly as possible so that you do not end up with any more small pieces of meat than necessary. Render the fat, if you wish, and use it for general cooking. Simmer the bones with vegetables and herbs as for an ordinary meat stock, and store in the freezer until it is finally time to cook the meat. If you want to add a loin roast of pork to the cure, bone it or not, as you choose, and slice off all but a ⅛-inch layer of covering fat. Pork jowls, belly, and fatback are cut into whatever sizes you find convenient, and are cured as is, with the rind left on.
The amount of usable meat you will get from a bone-in fresh ham or shoulder-arm is roughly 60 per cent. In other words, a 6½-pound shoulder-arm will yield approximately 4½ pounds of meat, which, when cooked and trimmed, usually amounts to 6 cups.
10 lbs. fresh pork prepared as described in preceding paragraph (include rind if making jambon persillé)
A glazed or enameled bowl or casserole large enough to hold meat closely packed
1½ cups salt (sea salt, coarse salt, or table salt)
¼ cup sugar
1 tsp saltpeter (potassium nitrate from a pharmacy)
1½ tsp crushed juniper berries
Either 1½ tsp épices fines;
Or ¾ tsp white pepper, ¼ tsp allspice, and ¼ tsp each: pulverized thyme and bay leaf
A bowl to mix salt and spices in
A large tray to salt meat on
Plastic wrap, a large plate, and a 7- to 10-pound weight, meat grinder, brick, stone, or other heavy object
Prepare the pork as described and be sure curing bowl is the right size. Stir the salt and other ingredients thoroughly in the small bowl and divide in two, reserving ½ for later salting. Starting with the largest pieces of meat, rub salt thoroughly into all sides, corners, and crevices. Pat a 1⁄16-inch layer over meat and pack into bowl. Continue with the smaller pieces and end with the rind, if you are using it, placing it fat side down over the meat. Cover meat with plastic wrap, plate, and weights. Refrigerate (or place in cold room) at 36 to 40 degrees for 5 days. Then remove meat, leaving accumulated brine in bowl, resalt with reserved mixture, and return to bowl with plastic, plate, and weight on top. Refrigerate for 10 days more, turning meat once or twice to be sure everything is well salted; meat is then ready to use.
(*) STORAGE NOTE: Meat may remain in cure for 6 to 8 weeks in all, but be sure all pieces are well covered with salt.
COOKING NOTE: Salted meat must be de-salted before cooking—soak in several changes of cold water overnight if cured 15 days, 24 hours if cured several weeks.
JAMBON PERSILLÉ[Mold of Parslied Ham in Aspic]
As described in the introduction to this section, jambon persillé is a Burgundian creation. Inevitably when dealing with well-known regional specialties, there are dozens of variations and minor versions, and always hundreds of very definite opinions on how to conduct each step. Among the considerable number of serious and trustworthy formulas we have studied, this is the one we prefer.
If you are not using home-cured ham, buy 6½ to 8 pounds of bone-in, ready-to-bake, mild-cured smoked ham or picnic shoulder. Omit Step 1, proceeding directly to the simmering in Step 2; skin and bone the ham after cooking.
For 2½ to 3 quarts of ham, serving 12 to 16
1) Soaking the ham—12 to 24 hours
4 to 6 pounds of boned, home-salted fresh ham or shoulder-arm, and the salted ham rind (preceding recipe; or see preceding note)
Soak the ham and the rind in a large basin of cold water, changing water 2 to 3 times. Overnight is enough for ham cured about 15 days; soak for 18 to 24 hours if ham has cured longer. (Soaking removes the preserving salt, not the flavor.)
2) Simmering the ham
A kettle just large enough to hold ham comfortably
Either 1 bottle best quality, young, strong, dry white wine (Côtes du Rhône or Pinot Blanc);
Or 3 cups dry white French vermouth
3 cups bouillon (made from fresh ham bones, or a mixture of beef and chicken bouillon)
Necessary water
1 tsp thyme, 2 Tb tarragon, 4 allspice berries, 2 imported bay leaves, and 2 large cloves of garlic tied in washed cheesecloth
1 large onion, roughly chopped
1 medium carrot, roughly chopped
1 celery stalk
Place soaked ham (and rind) in kettle, add wine, bouillon, and enough water to cover by an inch. Add rest of ingredients listed, bring to the simmer, and skim for several minutes until scum ceases to rise. Cover partially and maintain at the simmer until ham is tender when pierced with a sharp knife (about 2 hours for boned, home-cured ham). Let ham cool in liquid an hour or two.
While still warm, remove rind from kettle (or from bone-in ham), scrape off and discard as much fat as possible, and purée rind through coarse disk of food mill or fine blade of meat grinder; reserve in a 1-quart bowl. Tear ham apart with your fingers, discarding fat and gristle. Cut ham into pieces about ½ inch thick and 1½ to 2 inches square, and place in a 2-quart bowl along with any meat scraps. Moisten with a tablespoon or so of cooking stock, and set aside. Thoroughly degrease cooking stock, boil down rapidly to concentrate flavor if necessary, and correct seasoning.
3) The aspic—for about 4 cups
5 cups thoroughly degreased ham-cooking stock in a saucepan
2 to 3 egg whites (½ cup)
Optional for added flavor: ½ to 1 cup minced green tops from leeks or scallions
2 packages (2 Tb) powdered unflavored gelatin
Following directions in Volume I, pages 111–13, clarify the cooking stock with the egg whites, add optional greenery, strain, and then dissolve the gelatin in it.
4) The parsley and aspic flavoring
The bowl of puréed rind
1 cup (lightly pressed) chopped fresh parsley
1 clove of garlic, mashed
1 Tb dried tarragon or 3 Tb fresh minced tarragon leaves
1 Tb wine vinegar
Salt and pepper to taste
1 cup of the aspic, cool but not set
Mix all ingredients except the aspic in the bowl, and just before assembling the ham in Step 5, stir in the cup of aspic. (You will have 2 to 2½ cups when all is blended.)
The following assembly method is informal: the meat is packed into a bowl, and slices are cut and served directly from it. If you want a dressier presentation, line the bowl with aspic before filling it, and unmold onto a platter for serving.
A 2½- to 3-quart serving bowl, casserole, or crock (this can be of clear glass through which you can see the design of the ham and parsley)
The parsley and aspic mixture
The cooked and cut ham
A rack and/or plate that will fit into the bowl
A weight of some sort
The remaining aspic, cool but not set
Chill the bowl and spread a layer of parsley-aspic in the bottom. Then pack with layers of ham and of parsley-aspic. When filled, cover with rack and/or plate and weight, and chill for an hour or so, until set. (If you do not weight down the ham, it will be difficult to cut into slices later.) Remove the rack and so forth, scumble the top a bit with a fork (to disguise plate or rack marks), and pour on the cool aspic. Cover and chill until serving time.
To serve, cut into slices, like a large pie.
(*) STORAGE NOTE: Jambon persillé will keep nicely for a week under refrigeration. It may be frozen, but will lose character after 2 to 3 weeks.
PRESERVED GOOSE
(And the Disjointing of Fowl and the Rendering of Fat)
Like the salting of pork, the preserving of goose is an age-old method for keeping meats during the winter months, and is typical of the foie gras regions in France, where geese are raised to produce those magnificent livers. The goose for confit is given a brief preliminary salting, then is slowly simmered in its own fat, a process that not only cooks it but also renders out most of the heavy layer of fat under the skin, just as most of the fat is rendered out of bacon when you cook it. Traditionally, the cooked pieces of goose are then packed in crocks and sealed in the fat for storage. The taste of preserved goose, like the taste of salted pork, has a very special quality quite unlike fresh goose or pork, and it is an easy process as well as an interesting one to do. Besides having goose to eat in the numerous ways described at the end of the recipe, you will have its big carcass for soup and, during the weeks to come, a goodly supply of the best cooking fat imaginable, which is marvelous for browning meats and sautéing potatoes, for basting roasts, frying eggs, and broiling chickens, as well as for flavoring vegetables like cabbage and sauerkraut.
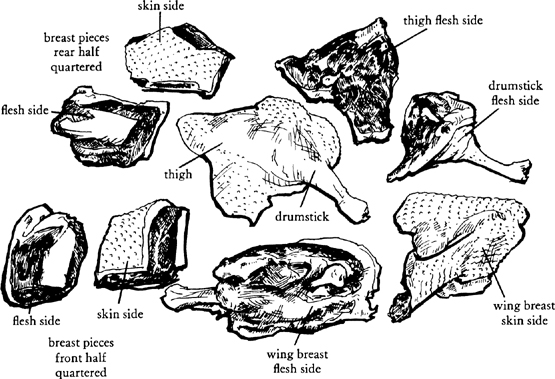
In the following directions, the goose is cut so that each wing makes a serving portion, the breast is halved lengthwise, and the drumstick-second-joint pieces are left intact for separation before serving.

Pull all fat out of cavity; you will have about 2 cups from a ready-to-cook store-bought goose, 4 or more from a farm goose. Cut off wings at elbows and save for the stock pot, along with the neck and gizzard; save the heart and liver for the sausage suggestion at the end of the confit recipe. As a preliminary to disjointing the goose, slit skin the length of the back, going down to the bone from neck opening to beginning of tail piece. Then place goose in front of you, its legs to your left.
So that the wing will make an adequate serving, you want to include the lower third of the breast with it as follows. Starting an inch to the right of where second joint is attached to hip, in the drawing, cut through breast meat to bone in a shallow semicircle reaching up to the joint where wing is attached to shoulder. Bend wing at a right angle away from breast and then down toward back, to break open the joint; cut through joint to free wing, and scrape breast meat off carcass from initial cut down toward backbone to free the entire section.
Follow end of drumstick with your finger to find knee. Holding knee in your left hand, slit around it from vent to ribs (where wing section was removed). Again with your finger, follow second joint (thigh) from knee to hip, to locate ball joint attaching it to the hip bone. At either side of this joint along the hip are two nuggets of meat, the oysters, which should come off as part of the drumstick-second-joint section: scrape this meat from hip bone up to and around joint. Then bend knee away from carcass at a right angle and down toward backbone to break open ball joint at hip. Cut through joint to detach it, then cut drumstick-second-joint from carcass. Remove wing-breast piece and drumstick-second-joint from other side of goose.
You now have only the upper two thirds of the breast meat left on the carcass. Cut through ribs just below breast meat on either side. Then, grasping tail end (at left in drawing), lift breast structure up at right angles and bend it toward neck end, to break it free at shoulder. Chop off the 2 tusk-shaped shoulder-blade bones at neck end and trim off excess skin.
Locate ridge of breastbone with your finger, then slit down through skin to bone close along one side of ridge. With cleaver and mallet, chop the breastbone in half along this slit. (You may then wish to chop each piece in half, crosswise, if you are serving the goose in a ragoût rather than a confit.)
Trim fatty edges of skin from each piece of goose; feel with your fingers for any knobs of fat buried under the flesh at edges of breast, wings, second joints, and remove them. You will have 3 or more cups of fatty skin pieces to add to the fat from inside the goose. Cut into ½-inch pieces with shears, and reserve all of this for rendering, Step 2 in the recipe.
Ideally the goose is cooked in goose fat and fresh pork leaf fat (also called fresh leaf lard), which comes from around the pork kidneys. This is very difficult to find unless there is a pork-slaughtering business in your area: substitute fresh pork fatback or the fat from a loin roast. If you have no success in finding this, render only the fresh fat and skin from the goose, and after you have strained it, add store-bought leaf lard, which you can usually buy in 1-pound packages. Failing this, use white vegetable shortening.
[Preserved Goose—Disjointed and Salted Goose Cooked in Its Own Fat—Also for Pork, Small Game, Duck, and Turkey]
Modern refrigerators and freezers have made changes in the confit traditions. In the old days you had to simmer the goose for at least 2½ hours, until every bit of moisture had evaporated and a straw would pierce the meat with ease; you then were sure it would keep through the winter, packed in its jars of fat in your cold-room or cellar. For our purposes, since we are more interested in taste than tradition, the goose is cooked only until done, and is stored in its fat in the refrigerator, or is wrapped and frozen.
NOTE: Pork, small game, duck, and turkey are done exactly the same way after being cut into serving pieces. Use pork fat only for the rendering and cooking.
For a 10- to 12-pound ready-to-cook roasting goose (thaw if frozen, and disjoint as described and illustrated in preceding directions; you will have 5 to 6 pounds of goose)
1) Salting the goose—24 hours
Half the ingredients for the dry-salt cure, or add goose to the cure along with the pork you are doing
Follow directions for salt curing but leave goose in the cure for 24 hours only. (If you have to leave it longer, you may desalt the meat by soaking the goose pieces several hours in cold water before cooking.)
6 lbs., or about 12 cups, fresh fat (goose fat and fatty skin pieces, plus fresh pork leaf fat, other fresh pork fat, or see notes preceding recipe)
A heavy 6-quart kettle or casserole (which may also serve to cook the goose)
1¼ cups water
A deep-fat-frying thermometer
Pull papery filaments from pork leaf fat if you are using it, and chop all fat into ¼-inch pieces. Place in kettle with water, cover loosely, and set over low heat so that fat liquefies slowly. When it reaches 212 degrees it will crackle and spit as water content evaporates. When it stops spitting, in about 25 minutes, remove cover and raise heat slightly to 250 degrees. (Do not ever allow fat to go over 325 degrees or it will lose its clear, pale-yellow color.) In 20 to 30 minutes more, the fat pieces will be lightly golden brown, and the fat may be considered rendered. Strain through a fine sieve, pressing liquid fat out of browned residue. (Save residue for frittons, at end of recipe.) Return fat to kettle. Cover when cool, and set in a cool place or refrigerate.
3) Cooking the goose—1¼ to 1½ hours for a roaster goose
The kettle of rendered fat
The salted goose
More fat if needed
The thermometer
Set kettle over low heat to liquefy fat. Meanwhile, wipe off salt and dry the goose with paper towels; place goose in kettle. (Fat should cover goose pieces by at least an inch.) Start timing when fat begins to bubble quietly and temperature is between 200 and 205, where it should remain throughout cooking.
Goose is done when meat is tender if pierced with a knife and when juices run clear yellow; meat and skin should color no more than a deep golden yellow and fat should remain pale yellow. Remove goose. Raise heat slightly and cook fat for 5 to 6 minutes (but not over 325 degrees) until it stops crackling, which indicates all liquid has evaporated and fat has clarified. Strain through a fine sieve, pressing fat out of residue. Save residue for frittons.
You may serve the goose as is, hot or cold, and it is delicious when freshly cooked. It will keep 4 to 5 days in a covered dish in the refrigerator, or you may wrap it airtight and freeze for 6 to 8 weeks. However, it seems to retain its best flavor, if you wish to preserve the meat for some time, when you pack it into a bowl and cover completely with the liquid fat in which it cooked; when fat has cooled and congealed, cover airtight with plastic wrap, and refrigerate. It will keep 2 to 3 months at least. To remove pieces of goose, set bowl at room temperature for several hours so that fat will soften enough for you to remove as many pieces of goose as you wish with a wooden spoon. Be sure the remaining pieces are completely covered with fat when you cover and refrigerate them again.
Any fat not being used to preserve the goose will keep for a month or more in covered jars in the refrigerator.
Besides the cabbage soup of Béarn, garbure, and the baked beans of Toulouse and Castelnaudary, cassoulet, you may add the goose to warm up in a casserole of lentils or beans, or in the braised sauerkraut or red cabbage in Volume I, pages 496 and 498. Another idea is to warm the goose in a covered dish in a 350-degree oven for 10 to 15 minutes, until it is hot and tender, then roll it in bread crumbs, sprinkle with goose fat and brown under a hot broiler; serve with the purée of beans and squash, the turnip and rice purée, the garlic mashed potatoes or rice and onion soubise in Volume I, pages 520 and 485, or with sliced potatoes sautéed in goose fat. Accompany with Brussels sprouts or broccoli and a light red wine or a rosé.
Arrange cold goose on a platter garnished with lettuce, watercress, or parsley, and accompany with French potato salad, cold mixed vegetables, or a tossed green salad, and beer or chilled dry white wine.
[Cracklings]
All the residue from rendering the fat and cooking the goose goes into this spread for toast or crackers, which you can serve with cocktails or accompanying a green salad and cold meats.
The fat-rendering and goose-cooking residue
Salt, pepper, and épices fines or allspice to taste
An attractive jar or pot
Melted goose fat
Pound the cracklings in a mortar or put through a meat grinder, then warm briefly in a frying pan. Season to taste and pack tightly into jar or pot. Chill, and when cold, pour on a ¼-inch layer of melted goose fat. Cover and refrigerate. Will keep for a month or so.
[Goose-Neck Sausage]
If you have a farm goose, you can ask that the whole neck from head to backbone be saved for you intact and as is. Pluck and singe skin thoroughly, then peel it off the neck in one piece, turning skin inside out as you go. Sprinkle with salt and pepper, turn it skin side out, and it is ready to be a sausage casing. Use the truffled pork, veal, and liver formula, substituting goose liver and heart for chicken liver. Tie or sew the two ends, and poach the sausage in fat along with the goose.
The French are famous for the splendor of their pâtés and terrines, those glorious looking, intoxicating smelling, rich, and unforgettable mixtures of pork, veal, chicken, duck, truffles, liver, foie gras, wines, and spices that are packed into long earthen dishes in the charcuterie, or in great round bowls, or are formed in cunningly decorated brown crusts. No other cuisine has developed the art quite like the French, and no other formulas are quite as delicious and subtle. However, if you have done some of the recipes in Volume I beginning on page 564, you will know how easy it is to make a terrine: it is only a matter of grinding up meat, seasoning it, slicing or dicing a garniture, and packing everything into a fat-lined dish before setting it in the oven. You know also that your own is almost invariably better than anything you can buy because you are using the best ingredients rather than scraps, and that most pâtés and terrines are expensive to buy and just as expensive to make. They come in the category of necessary luxuries.
An excellent pork-liver pâté starts off this new series in a fairly economical manner. This is followed by a pâté de campagne, then a pâté baked in bread dough, and an unusual porkless terrine. The section closes with fully illustrated directions on how to form and bake pâtés en croûte.
Almost all pâté mixtures have something in addition to meat to bind them together, preventing the meat from crumbling when the pâté is sliced. Eggs are usually present, sometimes bread crumbs, and rice can also serve. The following panade is an alternative to the bread-crumb type of panade used for the boudin sausages.
For about 1 cup
⅓ cup plain raw white rice
1 cup or more of meat stock or bouillon
3 Tb butter
A heavy-bottomed 6-cup saucepan (no-stick recommended)
Simmer the rice in the liquid and butter for 25 to 30 minutes, or until it is very tender. Add a little more bouillon if necessary, to keep rice from sticking, but liquid should be entirely absorbed when rice is done.
Purée in an electric blender, food mill, or meat grinder along with any liquids or egg you are using. (Your recipe will direct you.) Any leftover panade may be frozen.
Full notes on what to bake a pâté in, and so forth, are discussed in Volume I, pages 564–5, and in the Master Recipe for terrine de porc, veau, et jambon, also in Volume I, starting on page 566. Our only additional comment here is on pork fat. Except in the case of the porkless pâté, which uses suet or chicken fat, all of the following recipes call for fresh pork as part of the meat mixture as well as a liner for the baking dish. We realize how difficult it is to find fresh pork fatback (lard gras). For the fat in the meat mixture itself, you can use fat-and-lean pork from the fresh shoulder butt, or fat from the outside of a loin roast; outside fresh ham- and shoulder-fat are less satisfactory because softer, but perfectly possible. Although you can line the mold with blanched salt pork or bacon, fresh pork fat is very much better both in taste and appearance. Lacking fresh fatback, you can pound strips of fresh outside loin fat between 2 sheets of waxed paper, to reduce them to ⅛ inch thickness and to weld them together.
Down on the farm, you naturally use every bit of the hog for something, and some of the very best pâtés contain pork liver, either as the main ingredient or combined with other meat. These have far more character than the chicken-liver pâtés so popular in this country, and your own homemade mixture is always surprisingly better than anything you seem to be able to buy, even in the best French charcuterie.
You may substitute beef liver for pork liver; we have not found any significant difference in effect. Calf’s liver is lovely but insanely expensive for this type of dish.
TERRINE DE FOIE DE PORC[Pork-liver Pâté]
To translate a terrine de foie de porc into familiar language, it is like the very best liverwurst; you could easily mistake it for pâté de foie gras. Simple to make, it consists only of liver, pork fat, flavorings, plus an egg and either rice or bread crumbs to bind everything together. Of all the mixtures, this necessarily contains the most fat; if you used any less you would not achieve perfection. Serve slices of pâté and French bread or toast as a first course; it is also delicious as a spread for sandwiches or cocktail appetizers.
For a 6-cup baking dish (18 to 20 slices)
The pâté dish: a 6-cup terrine or baking dish (rectangular, round, oval) or bread pan
A pan of water
Sheets of pork fat to line pâté dish
Preheat oven to 350 degrees and place rack in middle level. Set pâté dish in pan to check water level: it should come ⅔ up outside of dish. Remove dish and place pan of water in oven. Line bottom and sides of pâté dish with strips of pork fat ⅛ inch thick. (See notes preceding this recipe as well as illustrations.)
1 lb. fresh pork fatback or fat from outside a loin roast (2 cups)
12 ounces liver (pork, beef, or calf) (1½ cups)
1 cup rice panade
A meat grinder
An electric mixer with large bowl
2 eggs
2 Tb Cognac
2½ tsp salt
Either 1 tsp épices fines;
Or ½ tsp pepper and big pinches of allspice, nutmeg, and cayenne
Optional: A 1-ounce truffle, minced, and its juice
Put the pork fat, liver, and rice panade through the finest blade of meat grinder and into the bowl. Beat in the rest of the ingredients. Sauté a spoonful and taste; correct seasoning as necessary. Turn mixture into pâté dish.
A piece of fresh pork fat to cover the meat
1 imported bay leaf
A branch of thyme, or ¼ tsp dried thyme
Sufficient aluminum foil to cover pâté with 1 inch extra all around
Cover with the fat, lay the thyme and bay leaf on top, and then the foil. Cover, and set in pan of water in oven. Bake for 1¼ to 1½ hours or longer; pâté is done at a temperature of 160 degrees, or when juices and fat surrounding pâté are clear yellow with no trace of rosy color (press pâté with a spatula to check on this).
A cover for the dish, or a pastry sheet and weight
Useful: a meat thermometer
When done, remove pâté dish from pan, discard water, and return dish to pan. Cover with board, or pan and weight (to press meat together and prevent air pockets) and let cool to room temperature. Remove board and weights and refrigerate.
Pâté will improve in flavor after 2 to 3 days. Cut slices ⅜ to ½ inch thick directly from dish; or heat bottom of dish gently, run a knife around between pâté and dish, and unmold on a serving plate or board.
Pâté will keep nicely for 8 to 10 days under refrigeration. It may be frozen, and results are more successful for liver pâtés than for meat pâtés.
VARIATIONS
[Pork and Liver Pâté with Veal or Chicken]
These pâtés vary in content and flavor throughout France, but always contain pork liver, pork, and sometimes other meats, as well as pork fat, a binder, and the usual seasonings. The following formula is one we like; whether you serve it in its baking dish or unmold it, the name is always pâté de campagne and never terrine.
For a 6-cup baking dish
8 ounces (1 cup) fat-and-lean fresh pork (such as shoulder butt or loin, or the chair à saucisse)
8 ounces (1 cup) fresh pork fatback or fat from outside a loin roast
8 ounces (1 cup) raw lean veal, or raw chicken meat
8 ounces (1 cup) liver (pork, beef, or calf)
½ cup rice panade
⅓ cup minced onions cooked until soft in 2 Tb pork fat or butter
1 egg
2 Tb Cognac
1 medium clove of garlic, mashed
Either 1 tsp épices fines;
Or ½ tsp pepper and big pinches of ground allspice, thyme, bay leaf
½ tsp additional pepper
1 Tb salt
Be sure all gristle, bones, skin, or other extraneous matter have been trimmed from meat before weighing. Pass meats, fat, and liver through finest blade of meat grinder along with the panade. Beat in rest of ingredients. Sauté a spoonful and taste. Correct seasoning as necessary. Pack into a fat-lined dish, and bake as in the Master Recipe.
[Pork and Pork-liver Pâté Baked in Brioche Dough]
This is a pâté baked in brioche dough in a round pan. It is always dramatic because the dough rises luxuriously and the whole effect is one of effulgent gourmandise. The pâté is served cold, and it must be baked at least a day ahead of serving so that the meat will settle, which means that you will probably need to make the dough a day before baking.
For a 9- by 1½- to 2-inch round mold, serving 12 to 16 people
1) The pâté ingredients
The pain brioché dough mixture, chilled and ready to form
8 ounces (1 cup) fresh pork fatback or fat from outside a loin roast
A 12-inch frying pan
2 cups minced onions
8 ounces (1 cup) fresh pork shoulder or loin
1 lb. (2 cups) liver (pork, beef, or calf)
1 medium clove of garlic, mashed
Either 1 tsp épices fines;
Or ½ tsp pepper and big pinches of ground allspice, thyme and bay leaf
¼ tsp additional pepper
2 tsp salt
¼ cup (pressed down) dry white crumbs from homemade-type unsweetened bread, moistened in a small bowl with 3 Tb heavy cream and 1 Tb Cognac
Prepare the dough the day before baking. Put the pork fat through the medium blade of the meat grinder. Place half in bowl of electric mixer and heat other half slowly in frying pan until fat has rendered. Add onions to pan and cook slowly about 15 minutes until tender and translucent. Meanwhile, grind the pork and set aside, then the liver, and set aside separately. When onions are done, add the pork and cook 4 to 5 minutes, stirring, until meat is gray rather than rosy. Add the liver and cook for several minutes until somewhat stiffened and puffed, and beginning to look grayish-ruddy-brown. Scrape into mixing bowl and beat in all the rest of the ingredients. Sauté a spoonful and taste; correct seasoning as necessary.
2) Forming the pâté en brioche
A buttered 9- by 1½-inch (6-cup) false-bottomed cake pan or fluted mold; or a flan ring set on a baking sheet
The chilled dough
A piece of floured waxed paper on a small baking sheet
The hot meat mixture
A pastry brush
Cold water
A 2-inch chimney, such as a small, buttered metal funnel or the metal tube from a pastry bag
On a lightly floured board, roll ¼ of the dough into a circle the diameter of your pan or mold, set on floured paper, and chill until needed. Rapidly roll out the rest of the dough into a circle about ¼ inch thick and 12 inches in diameter. Lightly press it into the pan or mold, letting edges overhang all around. Turn the hot meat mixture into the dough-lined pan; fold the edges of the dough over onto the meat. Paint dough lightly with cold water, and unroll reserved circle of dough on top, pressing edges lightly with your fingers to seal. Make a hole in the center top of the dough and insert chimney. (You will probably have enough dough left over for a small loaf of bread.)
3) Rising—about 1 hour
Set the pâté in a draft-free place at a temperature of no more than 75 to 80 degrees until top of dough feels spongy-springy when touched and the whole structure has risen half an inch or more up from the rim of the mold. Preheat oven in time for next step.
Egg glaze (1 egg beaten in a small bowl with 1 tsp water)
Sharp-pointed scissors
Useful: a meat thermometer
Just before baking, paint top (not sides) of dough with egg glaze; in a moment, paint it again. Make scissor clips 1½ inches apart all around top circumference of dough, going in at a slant ¾ inch deep and 2 inches wide. Set pâté in middle level of preheated 425-degree oven and bake for 18 to 20 minutes, until brioche has risen and begun to brown nicely. Reduce heat to 350 degrees, baking about 40 minutes more. Pâté is done when fat is bubbling up in funnel; temperature on meat thermometer should be 160–5 degrees.
5) Cooling
Remove from oven and let cool in mold for half an hour, then unmold onto a rack. When thoroughly cold, cover airtight and refrigerate for at least 12 hours before serving.
6) Serving suggestions
Serve as is, cutting it into wedges like a pie. When you wish an even more attractive dish, pour almost-set aspic into chilled pâté through chimney hole, and chill an hour or more before serving. (This is described in the pâté en croûte section.)
A PORKLESS VARIATION
[A Porkless Pâté]
Slice into this unusual pâté, and it is a beautiful green with decorations of white and brown. It has a meaty, hearty taste, yet is made without a trace of pork meat or pork fat: it is veal, chicken, and calf’s brains spiced with onions, garlic, herbs, and Cognac, garnished with chicken breasts and livers, and turned green with spinach. The fat is either veal- or beef-kidney fat, or goose or chicken fat. Bake the pâté at least 2 and preferably 3 days before serving, so that all the flavors may blend into perfect harmony.
For an 8-cup terrine, serving 12 to 16
1) The pâté mixture
Cut the breast meat and the chicken livers into strips ⅜ inch wide; place in a bowl with the Cognac and a sprinkling of salt and pepper. Let marinate while preparing rest of pâté mixture.
The terrine: an 8-cup mold, baking dish, or bread pan of any shape, although a rectangular one is easy for serving
1 lb. (2 cups) fresh veal-kidney fat, beef suet, or goose fat or chicken fat
A meat grinder
An electric mixer with large bowl
Chill terrine in freezer. Trim off any filaments or extraneous matter, and put fat through fine blade of meat grinder. Place half in large bowl of mixer and render the rest of the fat. (See directions.) When strained, cooled, and almost congealed, spread ¾ of it inside the chilled terrine. Refrigerate terrine until you are ready to fill it.
½ lb. (1 cup) boneless raw light or dark meat from a frying chicken
½ lb. (1 cup) raw, lean veal
1 lb. (2 cups) brains (calf, beef, or lamb), blanched and peeled (they need not be trimmed of tubes and extraneous matter)
1 cup minced onions
Either 2 cups blanched, chopped fresh spinach;
Or 1½ packages frozen spinach, thawed (squeezed dry)
1 medium clove garlic, mashed
2 eggs
1 Tb salt
Either 1 tsp épices fines;
Or ½ tsp thyme, ¼ tsp allspice, and ¼ tsp nutmeg
¾ cup dry white crumbs from homemade-type unsweetened bread moistened with ¼ cup chicken broth or milk
Grind the chicken, veal, and brains into the mixing bowl along with the ground raw fat. In 2 Tb of the rendered fat, cook the onions for 8 to 10 minutes over low heat until tender and translucent, then blend in the spinach and stir several minutes to evaporate excess moisture. Add spinach and onions to mixing bowl, along with the eggs, salt, seasonings, and bread crumbs. Beat vigorously to blend all ingredients. Sauté a spoonful until cooked through, taste, and correct seasoning.
The marinating strips of chicken breast and chicken livers
The pâté mixture
The chilled, fat-lined terrine
The remaining rendered fat
1 imported bay leaf
1 branch thyme, or ¼ tsp dried thyme
2 sheets of aluminum foil
A cover for the terrine (or pastry sheet and weight, such as a brick)
A pan of boiling water in middle level of pre-heated oven
Beat the Cognac marinade into the pâté mixture. Spread ⅓ of the pâté mixture in the terrine, cover with half of the chicken meat and livers in alternating strips. Spread with half the remaining pâté mixture, then with the remaining strips of chicken and liver, ending with the last of the pâté. Spread reserved and rendered fat over the pâté, and top with the bay leaf and thyme. Fold the foil closely over top of terrine to enclose it completely; set on the cover, and place in pan of boiling water in oven. Bake for about 1½ hours, or until pâté starts to shrink from sides of mold, and when pressed with the back of a spoon no rose-colored juices exude. (Temperature on a meat thermometer should be 160–5 degrees.)
3) Cooling and serving
Cool under a board or pan and weight, then refrigerate, covered, for 2 to 3 days before serving as described in the Master Recipe.
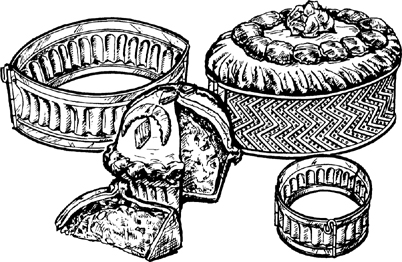
When it appears in pastry dough, any pâté mixture becomes a pâté en croûte, certainly one of the great visual delights of French charcuterie. A hinged metal pâté mold provides the most professional as well as the easiest system for pâté en croûte, and you can buy a variety of shapes in most import stores. The mold, which sits on a baking sheet when filled, has neither top nor bottom, only 2 sides hinged at one end and closed by a removable pin at the other. It is a kind of corset, which actually molds the pâté dough in its decorative embrace, and holds it tight while it bakes and cools. If you have no mold, the workable alternative described produces an equally attractive result; it is a baked bottom case of dough, which you fill as though it were a pâté mold and top with a decorated cover of dough. A third alternative is the free-form shape, pâté pantin, baked on a pastry sheet like the sausage in brioche. The first two methods are outlined in the following directions.
A pâté always develops more taste 2 to 3 days after baking. Allowing 2 days for the maturing process, you will need at least 1½ days for baking, cooling, chilling: start the pâté, then, 4 to 5 days in advance of any date you wish to serve it. The finished pâté will keep 7 to 10 days under refrigeration.
Although you may use any of the preceding pâtés for pâté en croûte, the more traditional mixture is the all-purpose pork and veal stuffing in Volume I, page 565, and a garniture of strips of veal and ham, or of game such as rabbit, hare, partridge, or pheasant, or of duck, turkey, or chicken. Follow one of the recipes in Volume I, starting on page 566, and including the duck pâté on page 571. For an 8-cup mold you will need approximately 4 cups of stuffing and 2 cups of garnishing strips. You will also need sheets of fresh pork fat for lining the dough.
For pâtés molded in a hinged form, use the pâté à croûstades, Formula Number 6, which contains flour, butter, lard, and egg yolks. When you are forming the dough on an upside down case, use Formula Number 7, with whole eggs. These are both excellent doughs for pâtés; they hold their shape through the long baking, and are also good to eat. Either one is easy to make in an electric mixer as described in “Electric Mixer Pie Dough”; it is best to prepare the dough several hours ahead or the day before forming and baking, so that it will be well chilled, rested, and easy to roll.
1) Lining the mold with dough
Your first step is to line the bottom and sides of the mold with an even ⅜ inch layer of dough. An ingenious professional method is to form ¾ of the dough into a pouch, the bottom and sides of which fit neatly against the mold with a minimum of wrinkles while the open top falls around the outside leaving the mold open for filling. In French this is a calotte, a skull cap. (The following illustrations are for an oval mold; adapt the same system for rectangular and round molds.)
A hinged 6- to 8-cup pâté mold
A piece of heavy paper to serve as a pattern
Sheets of fresh pork fat ⅛ inch thick, enough to line bottom, sides, and top of mold
Using pâté mold as a guide, cut a pattern out of the paper to fit the opening of the mold. Cut 2 pieces of pork fat, using pattern, and set aside; these will line bottom and top of pâté later. Reserve pattern for dough cover, later.

Place ¾ of the chilled dough on a lightly floured marble or board and roll into a circle about 1 inch thick and 2 inches larger in diameter than the long side of the mold—dough must be very thick at this point so that when you are through rolling and forming it you will still have a ⅜-inch layer lining the mold.
Paint a 1-inch strip down each side, right and left, with water.
As the first step in making the pouch shape, dough is to be folded in half and corners are to be bent down as follows. Except at the 2 sides, sprinkle circle of dough liberally with flour to prevent sticking when folded in half.
Bring top down to bottom, making a semicircle with its curved side facing you. Gently press two sides, right and left, together to seal them, then pull the two corners (right and left at top of fold) down toward you as illustrated. Now, rather than a semicircle, you have a pocket, or the beginning of a pouch. |
|
|
Starting with open side facing you, and making several passes with your pin, roll dough away from you to deepen pouch, so that when it is spread into the mold you will have an overhang of 2 inches: for a mold 4 inches high and 5 inches across, the pouch should be 8½ to 9 inches deep. |
Be very careful here that you roll the dough evenly and that the final combined thickness of top and bottom layers is no less than ¾ inch; when the dough is thinner you risk breakage and leakage problems later on. (If by any chance you muff this on your first try, briefly knead dough into a ball, chill an hour or more to relax it, and start over again.)
2 to 3 Tb lard or shortening
A baking sheet with raised edges (to catch cooking juices)
Scissors
Grease inside of mold and baking sheet, and set mold on sheet. Fold dough lightly in half lengthwise and center in mold. Unfold and ease it gently into place by lifting sides of dough, being careful always that you do not stretch the dough and make it thinner at any point. Clip off a gob of extra dough and use it as a tampon, rather than your fingers, to press dough against pastry sheet and sides of mold.
Leaving a 1½- to 2-inch overhang, trim off excess dough with scissors. |
|
The sheets of fresh pork fat
|
Place an oval of pork fat on the bottom of the mold, and line the sides. This fat is your insurance against crust-cracking. |
2) Filling the mold
The pâté mixture and the strips of garniture (see notes preceding recipe) The lined pâté mold A bowl of cold water |
|
With your pâté mixture made, your garniture in strips, and your mold ready, you can now assemble the pâté. Have a bowl of cold water handy to dip your hands into when you spread in the meat mixture. Preheat oven to 375 degrees.
Fill the mold, starting with a layer of pâté, then a layer of garniture strips, a layer of pâté, another of garniture, and a final layer of pâté mixture. Fill mold just to rim, making only a slightly domed shape in center: if mold is too full, juices will bubble out over crust during baking. |
|
1 imported bay leaf
A sprig or 2 of thyme (or ¼ tsp dried thyme)
The second oval of fresh pork fat
Place bay leaf and thyme on top of pâté; cover with the second oval of pork fat.
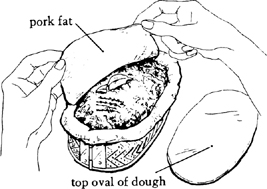
The reserved dough (or chilled leftover dough)
The paper pattern (size of mold opening)
A pastry brush and cold water
A table fork
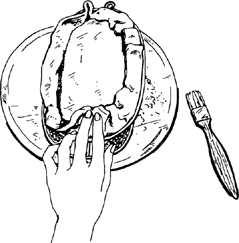
Roll the reserved dough out ½ inch thick, cut into an oval following pattern, and place on top of pork-fat oval. Paint circumference with cold water and fold edges over, pressing first with fingers to seal, and then with the back tines of a table fork.
(NOTE: Cover must be thick so that it will rise only a little, otherwise you will have too large a gap between meat and top of crust after baking. Another reason for making it thick is that it will barely cook through and thus will not crumble when you eventually slice the pâté.)
Pastry cutouts made from leftover dough Egg glaze (1 egg beaten with 1 tsp water) |
|
Make pastry cutouts of any shape you wish. (Illustrations are in Volume I, page 574.) One by one, paint bottoms of cutouts with egg glaze and press in place on top of pâté, completely covering seam where edges of pastry overlap.
2 greased chimneys 1½ inches high, such as metal funnels, metal tubes from a pastry bag, or aluminum foil |
|
With a sharp-pointed knife, make 2 holes ¼ inch in diameter in top of pâté, going down through to touch the meat; insert chimneys. They allow cooking steam to escape rather than to gather in the crust, possibly bursting it. Just before baking, paint top of pâté with egg glaze, being careful none drips down into mold. |
(*) AHEAD-OF-TIME-NOTES: Pâté mixture, garniture, and dough may be made a day or two in advance of baking, or pâté may be assembled (but not glazed), covered, and refrigerated for a day or two if meat is fresh. Add 20–30 minutes more to baking time if pâté has been chilled before going into oven.
3) Baking—1½ to 2 hours; oven preheated to 375 degrees
Useful: A meat thermometer
A pan, spoon, and bulb baster for removing fat from pan
Place in lower middle or middle level of oven and bake for 20 to 25 minutes until crust begins to color, then lower thermostat to 350 degrees for rest of baking. Inspect pâté every 20–30 minutes: suck up fat from baking sheet with bulb baster and wipe off sheet with paper towels. An accumulation of fat can burn bottom of pâté, and it also smokes up the kitchen.
Pâté is done when juices begin bubbling up into funnel; they should be clear yellow. Check temperature by removing funnel and inserting meat thermometer, which should read between 160 and 165 degrees.
3) Cooling the pâté—the aspic
Remove pâté from oven, but do not attempt to slide pâté off baking sheet or to remove mold from pâté at this point, since you might tear or crack the crust, which must remain intact. Let cool completely for several hours or overnight, then chill in refrigerator for at least 4 hours.
4 cups wine-flavored aspic (2 Tb gelatin dissolved in ¼ cup port or Cognac combined with 3¾ cups beef bouillon)
A bowl of cracked ice
During baking, the meat shrinks slightly from the top and sides of the crust, and you want to fill this space with aspic, which is delicious both visually and gastronomically. When pâté is thoroughly chilled, and with the mold still in place, insert funnel in a chimney hole in top of pâté. Being sure aspic has been well tested for consistency so that it will hold its shape when cold, stir over cracked ice until almost syrupy and on the point of setting; pour through funnel into pâté, tilting pâté in all directions, allowing aspic to run all over and around it. Chill again for several hours.
Finally, when aspic has chilled, remove pin from mold and carefully nudge sides of mold from sides of pâté. Once mold is off, pâté will hold its shape perfectly. |
|
4) Serving
To serve, cut pie-shaped wedges going around circumference of pâté. For a rectangular pâté, cut straight across, as though it were a loaf of bread.
5) Storing
Pâté en croûte will keep a week to 10 days at 37 degrees. It is the aspic that might go off first, and then the crust with the meat juices in it. If you wish to keep leftovers a little longer, remove the crust, scrape off the aspic and the fat-covering, and wrap the meat in plastic or foil. A cooked pâté can be frozen, but will never have the same fresh texture again.
Although the hinged mold is easier to manage, baking a bottom case of dough to act as a mold works very nicely and is not difficult to do. The dough is formed on an upside-down casserole or bread pan, upon which it is baked, just as upside-down pastry shells are formed and baked. The baked case is then lined with fat, filled with the pâté, draped with a close-fitting sheet of dough, decorated, and baked as usual.
1) The bottom case of dough
The pâté à croustades à l’envers, Formula 7, for 20 ounces of flour
A 6-cup mold, such as an oval casserole or bread pan, greased on the outside with lard or shortening
Roll ⅔ of the dough into a circle 2 inches more in diameter than the length of your mold, and 1½ inches thick. Form a pouch exactly as thick and exactly as illustrated for the spring-form mold. Press lightly onto mold and trim off excess dough with a knife or pastry wheel. Cover and chill 2 hours or overnight (to relax dough and prevent shrinkage during baking). Set as is, mold still upside down, on a baking sheet in a preheated 425-degree oven for 12 to 15 minutes, until pastry is starting to color. Turn thermostat down to 350 degrees and bake 10 minutes more, or until pastry just loosens from mold but is not cooked through: it holds its shape but is not browned. Cool 15 minutes on mold, then unmold carefully onto a rack and cool 30 minutes until pastry is firm and set.
2) Filling the case
Lard or shortening
A baking sheet
Pâté ingredients listed in preceding recipe, including sheets of pork fat and paper pattern
Grease just the area where pastry case will sit on baking sheet, and set case on sheet. Following directions in preceding recipe, cut pork fat to fit bottom, sides, and top of pâté, line the case with the pork fat, and fill with pâté mixture, topping with a sheet of pork fat.
3) The cover, and finishing the pâté
Chilled leftover dough and remaining dough
Egg glaze, pastry brush, pastry cutouts, chimneys, as described in preceding recipe
To discourage a gap from developing between top of meat and crust after baking, roll out a preliminary cover of dough ¼ inch thick, to fit top of pork fat. Set in place on pâté. Then roll remaining dough into a sheet ¼ to ⅜ inch thick and large enough to cover top of pastry case and to fall ⅔ the way down the case all around. Paint sides of case with egg glaze and arrange covering sheet of dough over pâté. Trim edges all around with scissors, then press dough in place against sides of case. Decorate with cutouts, insert chimneys, glaze, bake, cool, chill, and fill with aspic as described and illustrated in preceding recipe.