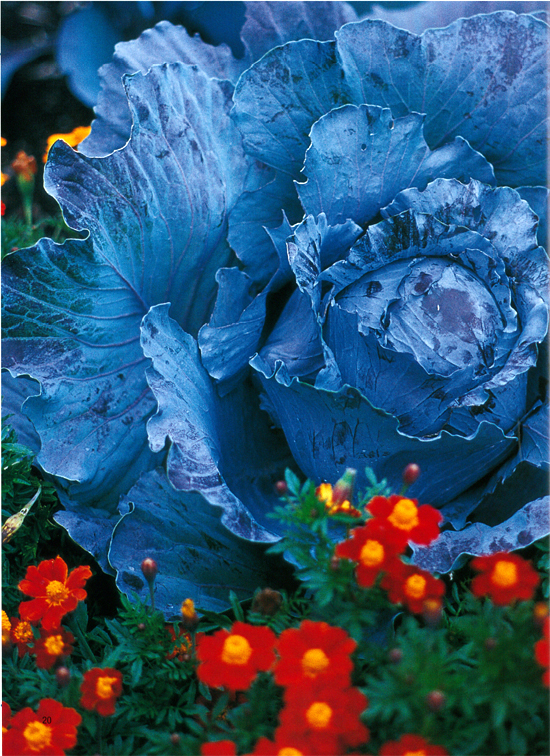
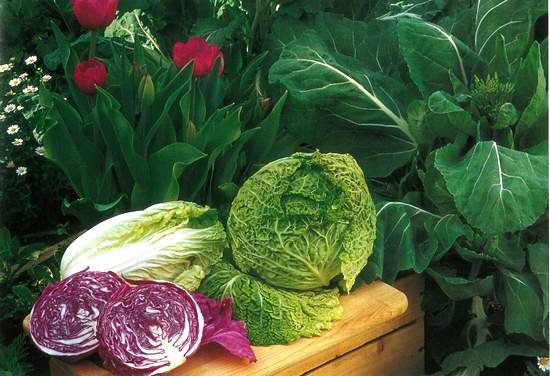
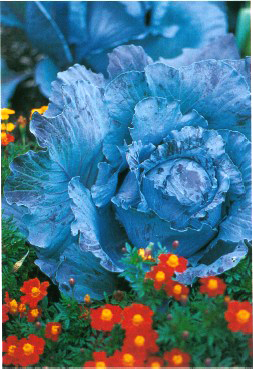
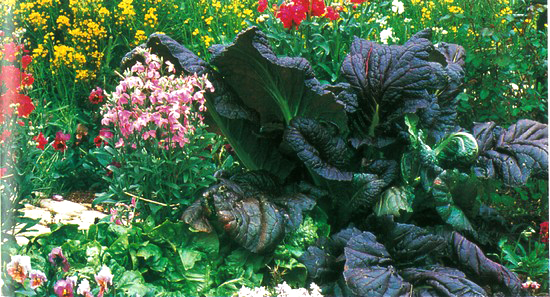
‘Fire Dance’ cabbage is one of many varieties of red cabbage that can brighten a garden corner.
The vegetable varieties I have chosen for this encyclopedia are those that are the most colorful, whether it be in the garden, in the kitchen, or both.
For me, vegetable gardens are beautiful and the addition of especially colorful varieties often makes them even more lovely. Further, given their beauty, many of these plants are suitable for edible landscapes—in a flower border say, or in containers on the patio.
Growing colorful vegetables is a rather new phenomenon, and unlike their more common relatives, some “rainbow” vegetable varieties are hard to obtain, available only from one or two seed sources, say. I have noted sources for many of the unusual varieties.
In the average kitchen there are already many colorful vegetable varieties—red beets and orange carrots come to mind. In this encyclopedia, however, I have ignored the familiar ones, my emphasis instead is with vegetables that by today’s standards are considered eccentric or to be unusually colored. (As an aside, food color biases change from culture to culture and with the times, so for example, 200 years ago in Europe instead of red tomatoes and beets, people preferred yellow varieties and instead of white cauliflower they favored purple.)
The colors in vegetables are the result of different pigments. The presence of particular carotenoids, for instance, will cause a carrot to be orange and certain anthocyanins are responsible for a cabbage being red. Some of these pigments are stable, others are destroyed by heat or are water soluble, and in the latter cases the vivid color disappears. Further, some vegetables turn brown when cut and exposed to the air. As the emphasis in this book is to feature vivid colors on the table, where possible, I have included this type of information.
The color of a vegetable often correlates to its nutrition content and I have included some of this information as well. For an overview of how pigments and the color of vegetables respond to cooking, see the section on “Cooking with Colors” on page 64, and for more information on the nutrients in vegetables, see page 62.
For the basic information on soil preparation, mulching, composting, irrigation, and organic controls for pests and diseases see Appendices A and B on pages 90 and 96.
AMARANTH
Amaranthus hypochondriacus, A. cruentus, A gangeticus, A. tricolor
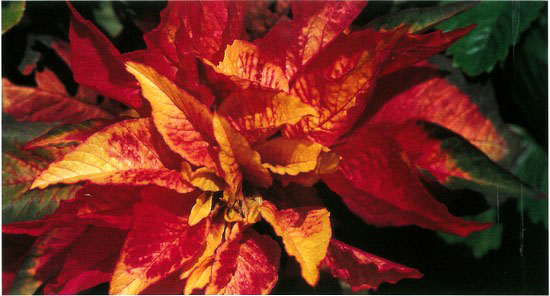
‘Illumination’ amaranth
Amaranth is beautiful in the garden and nutritious in the kitchen. The leaves and seed heads can be red, purple, green, cream, or a combination. Use the tall varieties in the back of vegetable and flower beds and the shorter ones in the middle of the border.
How to grow: Amaranth glories in warm weather. Start seedlings after any danger of frost has passed. Plant seeds ⅛ inch deep, 4 inches apart, in full sun, in rich, well-drained soil. Plant the large-grain amaranths in blocks with the rows 1 foot apart to prevent lodging. Thin the plants to 1 foot apart and keep the plants fairly moist. Generally, amaranth grows with great enthusiasm. The leaf-types grow to 2 feet, some of the grain varieties to 6 feet. Cucumber beetles are occasionally a problem.
Harvest the leaf-types when they are young. Harvest the grains after the first frost in the North; in mild-winter areas wait until seeds begin to drop. Lay harvested tops on a tarp in the sun to dry for about a week; protect against rain and heavy dew. Thresh the grains by laying the heads on sheets—then step on them, to knock the seeds free (or rub the seed heads with on a screen; wear gloves to prevent your hands from being stained when processing the red varieties). Use an electric fan to separate the seeds from the lighter chaff as you pour them into a container.
Varieties
The leaves and seeds of all varieties can be eaten, but the leaf-types have the tastiest leaves and the grain-types have more seeds.
Grain Amaranths
‘All Red’: 5 feet tall; extremely deep red leaves with red plumes; does not readily fall over
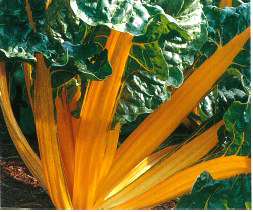
‘Golden Giant’: 110 days; 6 feet tall with beautiful golden stems and flower heads; grown for its white grain and edible young leaves; high yielding
‘Hopi Red Dye’ (‘Komo’): 120 days; to 6 feet tall; reddish-purple
‘Purple Amaranth’: 110 days; 6 feet tall; green-red variegated foliage; reddish-purple and green seed heads
Leaf Amaranths
‘Illumination’: spectacular magenta, pink, to crimson leaves born upper third of plant, grows to 5 feet; often used as a garnish
‘Joseph’s Coat’ (tricolor): 70 days; a spectacular tricolor variety from India with red, cream, and green leaves
‘Merah’: 75-80 days; leaf-type with crinkled green and red leaves
How to prepare: In theory, because the red pigments in amaranths are betacyanin like red beets, the color should be stable when cooked, but I find the red amaranth leaves I’ve cooked often turn pale and grayish. Obviously there is more to learn about amaranth colors. To enjoy red amaranth leaves I select young, tender leaves from the leaf-types and use them raw in salads or as a spectacular garnish. I cook the green varieties as I would spinach. The leaves are very nutritious and high in calcium and iron.
Amaranth grain has a mild and nutty flavor, is high in protein, and contains essential amino acids. It can be cooked and eaten alone or mixed with other ingredients. It contains no gluten so must be combined with wheat flour to make risen breads. The seed can be popped like popcorn; stir ½ cup of seeds in a hot frying pan for about 30 seconds or until popped. Mix with honey to create a traditional confection from Mexico.
ARTICHOKES, PURPLE
Cynara scolymus

‘Violetta’ artichoke
The artichoke is a giant thistle whose flower buds, when cooked, are deliciously edible. The plant is fountain shaped and grows to about 4 feet tall and almost as wide. The flower buds are usually green, but some varieties have purple buds.
How to grow: Artichokes prefer cool, moist summers and mild winters but tolerate summer heat if the soil is kept moist. Give them full sun in mild areas and partial shade in hot-summer climates. Below 28°F they need winter protection, for example an overturned basket filled with leaves placed above the roots. In coldest-winter areas bring the roots inside during winter and keep them moist and cool. In hot, early summers the artichoke buds open too soon and are tough.
Green varieties of artichokes are started when bare root from plants are offered in spring. (Bare-root plants are dug up while dormant and sold with their roots wrapped in plastic.) In contrast, the purple variety of artichoke is usually started from seeds. In cold climates, sow seeds indoors eight weeks before your last spring frost date, about ¼ inch deep and ¼ inch apart. In mild climates, fall plantings work well too. When sowing, soil temperature should be between 70°F to 80°F. Transplant seedlings to 4-inch pots. Grow at cooler temperatures (70°F during the day, 60°F at night). Transplant to the garden when 8 weeks old. (Spring plantings need at least 250 hours of temperatures under 50°F to induce budding.) Protect from frost.
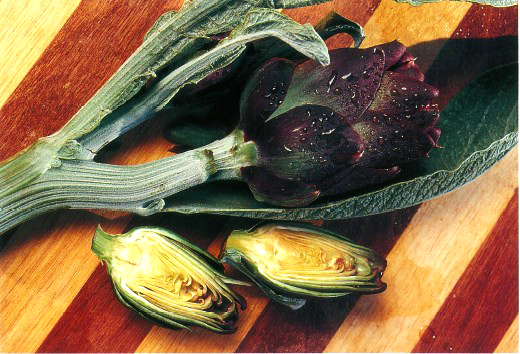
‘Violetta’ artichoke buds
Artichokes require rich, moist, well-drained soil with plenty of organic matter. They respond well to deep mulches and manure. Extra nitrogen should be added halfway through the growing season and after harvest. Dig up and thin plants every three years. Aphids, earwigs, and snails are sometimes a problem.
When harvesting, cut off young artichoke buds, about 4 inches below the bud, well before they start to open. The younger the bud, the more tender it is and the more of it that is edible.
Varieties
The Cook’s Garden, Redwood City Seed Company, and The Gourmet Gardener carry seeds of purple artichokes.
‘Purple Sicilian’: produces bronzy-purple buds
‘Violetto’: Italian variety; produces medium-sized, purple buds
How to prepare: The anthocyanins in purple artichokes lose their color when cooked, so serve them raw to emphasize the color. Raw artichokes once cut and thus exposed to the air, quickly turn brown. So to use them raw, keep them in water with added lemon juice to prevent discoloring.
How to prepare: In French kitchens, immature purple artichokes are traditionally served raw: the slightly bitter bud is cut into quarters, the stem end is dipped in salt, and the dish is accompanied by bread and sweet butter. In Italy, pieces of young, tender raw artichokes are dipped in olive oil as part of an antipasto, or the heart is thinly sliced and served drizzled with lemon juice, olive oil, and salt.
Young fresh buds can be eaten without removing the choke (fuzzy, inedible center). Most mature artichokes must have the choke removed, but homegrown ones, if harvested while still young, do not.
To prepare a mature artichoke bud, cut off the top inch or so of the leaves. Then, with your hand, peel back the outside layer of leaves to where they break readily. If there is a fuzzy choke at the bottom, scrape it out with a sharp spoon. Immediately soak them in acidulated water until you are ready to cook them.
Whole artichokes can be stuffed and baked, steamed, or boiled in water with the juice of two lemons. Cook them until a knife inserted in the bottom of the choke is tender and present them whole. To eat a whole artichoke, pull off the outside leaves and use your teeth to scrape out the flesh. The remaining heart, or bottom, is cut into bite-size pieces and relished.
Artichokes may also be incorporated into many cooked dishes. Trim tender small bulbs lightly and use whole or use the hearts of larger bulbs cut in pieces in salads or casseroles.
ASPARAGUS, PURPLE
Asparagus officinalis
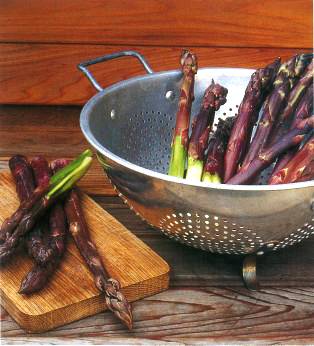
‘Purple Sweet’ asparagus
Asparagus is an herbaceous perennial that goes dormant in winter; its edible spears appear in spring. Asparagus shoots, whether they are green or purple, not cut for eating develop into airy, ferny foliage plants 5 feet high that can line a walkway or serve as a billowy background in a flower bed.
How to grow: Asparagus grows in all but the most hot and cold climates. The green varieties, and one purple variety are available as one-year-old rooted crows (the base of the plant plus roots). A family of four will need thirty to forty plants. Because asparagus plants remain in one place for many years and are heavy feeders, the soil must be prepared very well. Asparagus needs a deep organic soil, with a pH of 6.5. Excellent drainage is critical. Asparagus plants also need full sun.
In the early spring, prepare the soil and remove any perennial weeds. For thirty to forty plants, spade up the area as follows: dig two trenches 6 inches deep (a foot in coldest areas), 12 inches wide, about 20 feet long, and 3 feet apart. Amend the soil in the trenches with compost or aged manure and 4 pounds of bone meal worked 8 inches into the soil. Then place the crowns in the bottom, 15 inches apart with their roots well spread out. Cover with 2 inches of soil. As the shoots emerge, continue to fill the trench with soil. Once the trenches are full, mulch with 4 inches of an organic mulch.
On normal soil, annual applications of compost or modest amounts of chicken manure is all that is needed for fertilizer. After the first season, only moderate amounts of water are needed during the growing season. In the arid Southwest, to encourage dormancy do not irrigate in winter.
Asparagus beetles are generally the most serious pest. Diligent hand picking of the beetles in early spring as soon as they appear helps reduce the population. If the beetles are taking over, knock them off into a bucket of soapy water or use a Bt (Bacillus thuringiensis) developed for their control and apply it according to directions. Further, fall cleanup removes some of the breeding adults. If the bed is free of beetles from planting time on, use floating row covers to keep them out.
A fungus disease called asparagus rust can be a problem in damp weather. Cercospora leaf spot can be a serious problem in the Southeast. Where gophers are numerous they can destroy the whole bed. Plant the crowns in wire baskets to protect them. Perennial weeds can quickly take over and crowd out a bed of asparagus, so remove all weeds and keep the bed mulched.
Harvest the spears by snapping them off an inch above soil level. No harvest is recommended the first year. In the second year, limit the harvest to three weeks. In subsequent years, harvest for six to eight weeks, and until the spears begin to thin to a pencil thickness.
Fertilize with fish meal after the harvest. In mild climates, cut down plants when they turn brown; in cold climates wait until early spring as the stalks help maintain a snow cover.
Varieties
‘Purple Sweet’ (‘Sweet Purple’): old variety; large, tender, deep burgundy spears; sweet flavor; Park Seed Company and R. H. Shumway’s carry this variety as rooted crowns
How to prepare: The purple pigments in asparagus are anthocyanins and they fade quickly when cooked. Young shoots are delicious raw in salads or served with flavorful dips. If you cook the purple asparagus, simmer it in an inch of water with ¼ cup of lemon juice to help maintain some of the color, the longer you cook it the more color it loses, so whenever possible serve them al dente.
BASIL
Ocimum basilicum

‘Red Rubin’ basil and Lemon Basil
While there are many types of basil, the ones we are interested here have purple foliage.
How to grow: Basils are annual herbs that glory in hot weather and wither with frost. Plant it in full sun in fertile, well-drained soil with much organic matter. Start basil seeds inside a month before the weather warms up in spring, or use transplants from the nursery. Place plants about 1 foot apart and keep them moist during the growing season. Fertilize with a balanced organic fertilizer every six weeks and after a large harvest.
Occasional pests are slugs and snails, and cucumber and Japanese beetles. When harvesting, leaves are picked by hand or cut. Keep the flower-heads continually cut back or the plant will go to seed and give few leaves.
Varieties
‘Osmin Purple’: purple leaves and stems; glossy, slightly ruffled leaves; fragrant; lavender flowers
‘Red Rubin’: purple leaves; fragrant; pink flowers; similar to the old standby ‘Dark Opal’ but more uniform
‘Purple Ruffles’: dark purple, ruffled leaves; fragrant; lavender flowers; seedlings are variable, select most colorful plants as you thin
How to prepare: The purple basils are high in anthocyanins. To best enjoy the color, use these basils raw in salads, sandwiches, and as a garnish. They will lend some of their pink color to vinegars and apple jelly. If you cook, puree, or mince purple basils though, they turn a disappointing brown.
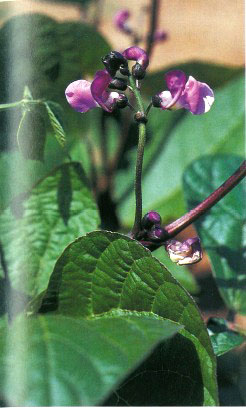
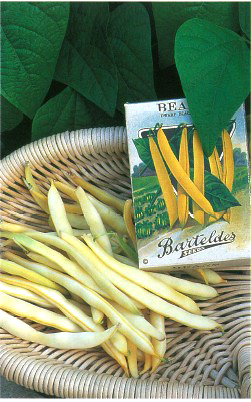
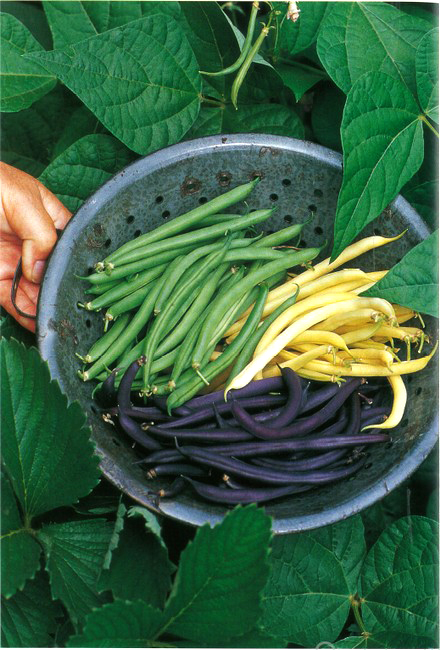
BEANS
PURPLE AND YELLOW SNAP BEANS
Phaseolus vulgaris
‘Royalty Purple Pod’
‘Dragon’s Tongue’
‘Wax Romano’
Purple and yellow snap beans are more popular with children than their green cousins.
How to grow: Beans are adaptable annuals and are planted after all danger of frost is past. Purple and wax varieties can tolerate colder soil than most green snap beans. They need full sun and a good, loose garden loam with plenty of added humus. Sow seeds of bush beans 1 inch deep in rows 18 inches apart; thin to 6 inches. Pole beans need a strong trellis to climb on. Plant the seeds 1 inch deep; thin to 8 inches apart. If the plants look pale midseason fertilize with fish emulsion. Beans are best watered deeply and infrequently.
Beans have their share of pests, including bean beetles, beanloopers, whiteflies, aphids, mites, and cucumber beetles. Anthracnose and leaf spots diseases are most prevalent in humid climates.
Harvest snap beans when the seeds inside are still very small and the pods are tender. Make sure to keep all beans harvested or the plants stop producing.
Varieties
Renee’s Garden offers a combination package of green, purple, and yellow beans in retail stores.
Purple Snap Beans
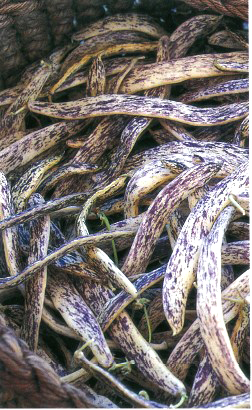
‘Hopi Purple String Beans’: purple bean with black crescent-moon-shaped stripes; can be grown with little or no irrigation; available from Native Seeds/SEARCH
‘Purple Queen’: 55 days; bush; purple pods and flowers; sweet flavor; common bean mosaic-virus tolerant
‘Royal Burgundy’: 51 days; bush; dark purple pods; vigorous
‘Royalty Purple Pod’ (‘Royalty’): bush; deep-purple pods and flowers; vigorous; some resistance to Mexican bean beetles
‘Trionfo’ (‘Trionfo Violetto’): 65 days; pole; deep purple pods and lavender flowers; vigorous
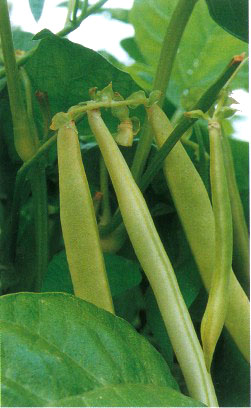
Yellow Snap Beans
‘Cherokee’: 55 days; bush; sweet, wax bean; early; high yielding; widely adapted; rust and common bean mosaic-virus resistant
‘Dragon’s Tongue’ (‘Dragon Langerie’): 65 days; bush; unusual creamy yellow wax bean with purple stripes; available from Bountiful Gardens
‘Pencil Pod Wax’
‘Pencil Pod Black Wax (‘Pencil Pod’): 53 days; bush; tender yellow pods with black seeds; early
‘Roc D’or’: 57 days; bush; slender yellow pods; productive; resistant to common bean mosaic virus and anthracnose
‘Wax Romano’: 58 days; bush; light yellow pods with meaty texture; vigorous
Yellow Anellino (‘Gancetto Burro’): 80 days; pole; small, crescent-shaped pods; rich bean flavor
Renee’s rainbow collection beans: green slenderette, ‘Roc D’or,’ and ‘Purple Queen’
How to prepare: Yellow wax beans keep their color when cooked and are used as you would any snap bean, boiled or steamed until just tender, though cooking times are short as the beans turn to mush quickly. Try them in a three-bean salad garnished with raw purple beans. The purple beans get their color from anthocyanins and loose the purple color and turn a vivid green when boiled for two minutes—like magic—kids love to watch. (No guess work to know if your purple beans are properly blanched for freezing, when the color changes from purple to green they are perfect.) Even marinating them in vinegar or lemon juice will eventually turn them green. In my experience, making them into a pureed soup creates a decidedly unappetizing gray soup.
To preserve the deep purple color, serve the young beans raw in salads or on a festive dip platter mixed with other colorful vegetables.
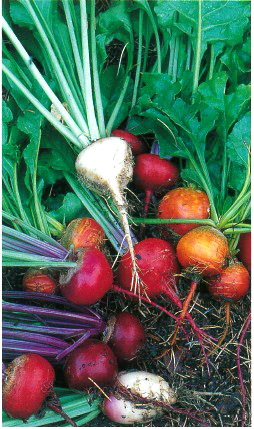
BEETS
Beta vulgaris
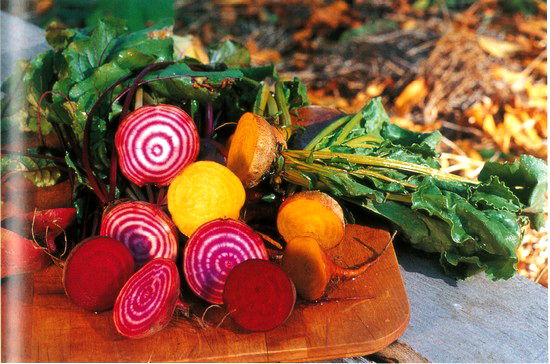
Three colors of beets from Renee’s Garden
The ancient greeks and Romans appreciated both red and white beets; and yellow beets were popular in Europe for centuries.
How to grow: Sow beet seeds directly in rich, well-drained soil, in early spring or fall, in full sun. They can take some frost. Plant the seeds V4 inch deep in wide rows or broadcast over a 3-foot-wide bed. I like to mix colors of beet varieties in the same bed so I can combine them in a recipe. Plant extra seeds of the golden beets as they germinate poorly. Beet seeds are actually a cluster of seeds; therefore, they must be thinned to 3 inches apart for full size beets—2 inches for babies. Fertilize midseason with a balanced organic fertilizer and water evenly.
Occasionally, leaf miners tunnel through the leaves. A fungus disease cercospora flourishes in humid conditions and makes orange spots on the foliage. A rust fungus can also be a problem.
Harvest when the beets are 3 inches across or less.
Varieties
Renee’s Garden carries three colors of beets in the same package.
‘Albina Verduna’ (‘Snow White’): 65 days; pure white; large and sweet
‘Bull’s Blood’: 60 days, a beet grown for its deep red leaves as well as the roots; some resistance to leaf miner; the “greens” retain most of their color when cooked; available from Garden City Seeds
‘Chioggia’: 50 days; red on outside, red and white peppermint-striped rings inside; sweet
‘Burpee’s Golden’: 60 days; delicious, sweet yellow beets; leaf midribs are golden; low germination rates
How to prepare: The red pigments in beets are betacyanins; the yellow, betaxanthins. These pigments are fairly stable, though they do fade and change if food is overcooked. (If I boil my borscht too long it turns from a rich red to a dull reddish-brown.) Use beets raw or cooked in salads, cooked in soups and stews, or simply boiled or steamed and served with butter. The yellow, white, and the striped ‘Chioggia’ beets will not bleed and discolor the other ingredients in a cooked dish as do the red varieties and are great roasted in the oven with a little olive oil and garlic. To highlight yellow beets, serve them julienned with red ones or as baby beets. Note: pureed yellow beets sometimes oxidize, turning yellow-brown.

‘Chioggia,’ ‘Burpee’s Golden,’ and ‘Cylindra’
‘Albino Verduna’ and ‘Detroit Dark Red’
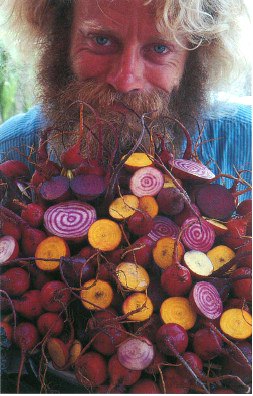
Doug Gosling and beet harvest
‘Bull’s Blood’ greens are deep red and are one of the few “red” greens to retain their color and are a meltingly rich vegetable if steamed briefly. When the leaves are very young they are beautiful when added raw to a mixed salad.
CABBAGES AND THEIR KIN
BROCCOLI
Brassica oleracea var. italica and B. oleracea. var. botrytis
BRUSSELS SPROUTS
B. oleracea var. gemmifera
CABBAGE
B. oleracea var. capitata and B. oleracea var. bulata
CAULIFLOWER
B. oleracea var. botrytis
KALE
B. oleracea var. acephala
KOHLRABI
B. oleracea var. gongylodes
Most of this family of vegetables has green leaves and buds, but it is the purple or pink varieties we are most interested in here.
How to grow: These vegetables are grown as cool-season annuals. They can bolt and become bitter-tasting in extremely hot weather. All need full sun, or light shade in hot climates.
Start most seeds indoors eight weeks before your last average frost date. Transplant them into rich soil filled with organic matter about two weeks before the last average frost date. (Start cauliflower a little earlier, as it grows more slowly; start Brussels sprouts four weeks before the last frost date and transplant them in a month.) Most can also be planted in midsummer for a fall crop. Sow cabbage, broccoli, Brussels sprouts, and cauliflower seeds 3 inches apart, ½ inch deep; thin or transplant small cabbages 12 inches apart and the larger cabbages, broccoli, Brussels sprouts, and cauliflower 24 inches apart. As they all tend to be top-heavy, when transplanting, place them lower in the soil than you would most vegetables—up to their first set of true leaves (the first leaves after the seed leaves). Plant kale seeds ½ inch deep, 1 inch apart, and thin to about 1 foot. Unlike most cole crops, kohlrabi is best seeded in place, rather than started indoors. In early spring or late summer, sow kohlrabi seeds ¼ inch deep, 1 inch apart, thin to 4 inches for baby kohlrabi and 6 inches for full size. Work compost and one cup of a balanced organic fertilizer into the soil around each plant at planting time. A month after planting, side dress an organic nitrogen fertilizer scratched into the soil around the plants. Mulching helps retain moisture.
Chinese elogated cabbage, green drumhead, and red ‘Ruby Perfection’ cabbages
Most cabbage-family plants are susceptible to the same pests and diseases. (Kale tends to have far fewer problems than most.) Flea beetles, imported cabbageworm, cabbage root fly, and cutworms are potential problems. Use floating row covers to prevent these pests. You can also prevent the cabbage root fly from laying her eggs by placing black plastic directly over the roots of the plant. Rotate members of the cabbage family with other vegetable families to prevent diseases.
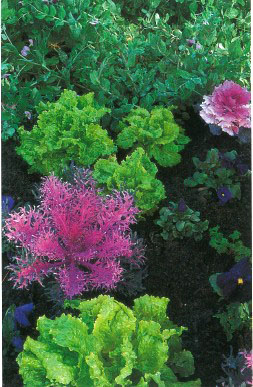
‘Red Peacock’ kale among lettuces
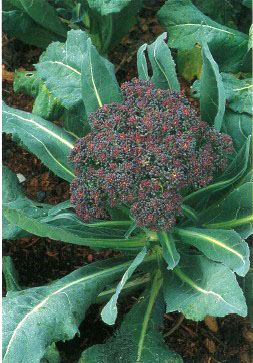
Purple sprouting broccoli
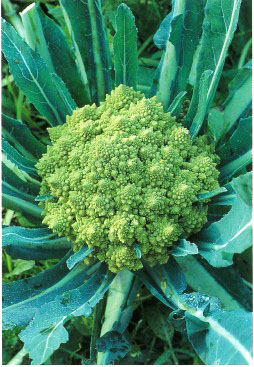
‘Romanesco’ broccoli
Harvest cabbages anytime after they have started to form a ball, but before they split. If a hard freeze is expected, harvest all cabbages and store them in a cool place. Harvest broccoli when the buds begin to swell but before they open; once the primary head is harvested, smaller heads may form. Cauliflower heads are traditionally protected from the sun to keep the curds white and tender. In contrast, the orange and purple varieties we are interested in need direct sunlight to develop their colors. Harvest cauliflower heads at the base when they are full but before the curds begin to separate. Harvest a few very young kale leaves as they are needed and use them raw for salads. Use the more mature kale leaves for cooked dishes. Many varieties of kale winter over in most climates. Start harvesting kohlrabi bulbs once they are an inch across. The young small bulbs are best for eating raw.
Harvest Brussels sprouts in the fall or winter. Cold weather causes the purple color to be more vibrant and the flavors to mature. If the plants are kept well mulched with straw, sprouts often develop and mature well into the winter. Brussels sprouts mature up the stem, from the bottom to the top, so harvest in that direction when they are no larger than one inch in diameter.
Varieties
Broccoli
‘Purple Spouting’ (‘Early Purple Sprouting’): 120 days; purple-green leaves and purple flower buds; to 3 feet high; very hardy
‘Romanesco’: 85 days; heads are an attractive, chartreuse, conical whorl of mild, sweet florets; large plant; extremely variable in form
‘Violet Queen’: 60 days: purple buds; early; uniform
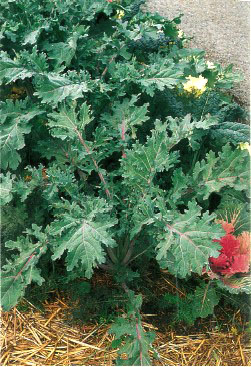
‘Red Russian’ kale
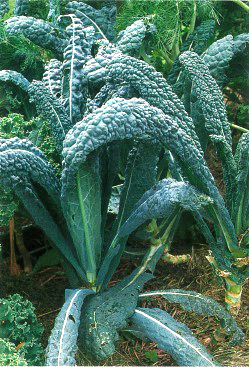
‘Lacinato’ kale
Brussels Sprouts
‘Rubine’ (‘Rubine Red’): clusters of red sprouts; red foliage; large; late; hardy; popular in Europe, carried by Bountiful Gardens
Cauliflower
Purple and orange cauliflowers are easier to grow than white varieties as they do not require garden blanching (covering the leaves to prevent the sun from reaching them and making them tough).
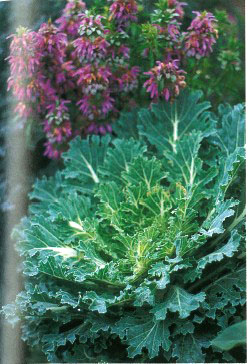
‘White Peacock’ kale
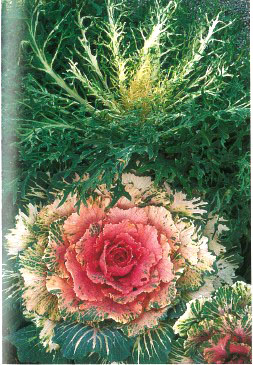
‘Miniature Flowering’ cabbage and ‘White Peacock’ kale
‘Orange Bouquet’: 58 days; pastel orange heads; the orange color is from carotene; sunlight intensifies the color, so blanching is not recommended; available from Johnny’s Selected Seeds
‘Purple Cape’: rich purple heads with excellent flavor; hardy; carried by Bountiful Gardens
‘Sicilian Purple’: 85 days; deep purple, large heads; turns bright emerald green when cooked; available from Nichols Garden Nursery
Kale
Cold weather intensifies the colors of these kales.
‘Lacinto’: 70 days; blue-green strap leaves, tender; available from Shepherd’s
‘Nagoya Garnish Red’: 60 days; ornamental kale; frilly leaves with red centers and green edges; available from Johnny’s Selected Seeds and Harris Seeds and Nursery
‘Red Russian’: 55 days; tender, frilly gray-green leaves with red veins; withstands summer heat
‘Red Peacock’: 60 days mature; ornamental kale; red center; feathery leaves; excellent for baby salad greens; ‘White Peacock’ is a white version; both available from Johnny’s Selected Seeds
Kohlrabi
‘Kolibri’: 55 days; hybrid, purpleskinned kohlrabi, crunchy, sweet flesh; heat tolerant
‘Purple Vienna’: purple bulbs; old favorite; available from Landreth
Red Cabbage and Flowering Cabbage
‘Lasso’: 75 days; open pollinated; firm, bright red-purple, good tasting heads; early; available from Garden City Seeds and Pinetree Garden Seeds
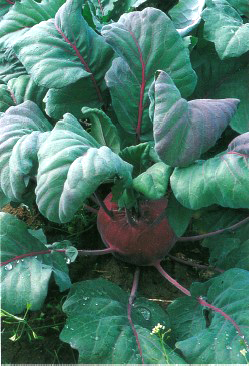
‘Purple Vienna’ kohlrabi
‘Red Fire Dance’ cabbage
Miniature Flowering Cabbage, Tokyo Series: showy 12-inch heads; pink, white, and red, with green edges; cold resistant; available from Nichols Garden Nursery
‘Red Drumhead’: red Savoy-type cabbage; sweet crinkled leaves; hardy, widely adaptable; available from Seeds of Change and Bountiful Gardens
‘Rougette’: 80 days; red French variety; 3 pound heads; available from The Gourmet Gardener
‘Ruby Perfection’: 80 days; purple cabbage with great taste; available from The Cook’s Garden
How to prepare: The purple pigments in the cabbage family are anthocyanins and in many cases are not stable when cooked. In particular, the purple in broccoli, cauliflower and kale turns green. However, if not cooked too long, red cabbage and Brussels sprouts can be colorful, especially if vinegar, lemon juice, or as is popular in much of Europe, red wine are added. With the addition of an acid they go from purple to a lovely bright magenta (see the discussion on acids and anthocyanins in “The Chemistry of Cooking” on page 60, and the recipe for Braised Red Cabbage on page 76). If cooked too long, however, both red cabbage and Brussels sprouts turn a dull red-gray.
To keep its color best, use the young leaves of kale raw in salads or as a garnish. Mature leaves are best cooked but lose purple coloring.
The purple pigments in broccoli, cauliflower, and kohlrabis turn green when cooked. To preserve their color, use them raw in salads and with dips. Romanesco broccoli keeps its lovely chartreuse color and the light orange cauliflower varieties stay colorful as well, as long as neither is overcooked.
CARROTS
Daucus carota var. sativus
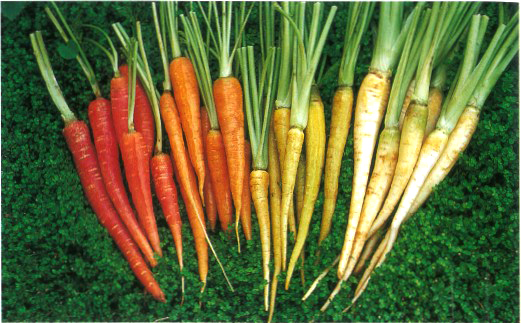
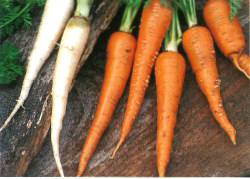
‘Nutri-Red,’ ‘Danvers Long,’ ‘Sweet Sunshine,’ and ‘Belgium White’
Ancient carrots came from Afghanistan and the roots were mainly purplish or red. Our familiar orange-colored carrots are relative newcomers having been bred in Holland in the 1600s.
How to grow: Plant carrots in early spring as soon as your soil has warmed, or plant late summer for a fall crop. Cultivate and loosen the soil 1 foot deep to make room for the roots. Sow seeds ½ inch apart in rows or wide beds and keep the seed bed evenly moist. Thin to 2 inches. In most parts of the country, once sprouted, carrots are easy to grow. When the plants are about 3 inches tall, fertilize with fish emulsion.
Once the seedlings are up, protect plants from slugs. In the upper Midwest, the carrot rust fly maggot tunnels its way through carrots. Floating row covers and crop rotation help. Alternaria blight and cercospora blight can also be a problem.
‘Long Orange’ and ‘Red Surrey’
Most carrot varieties are ready for harvesting when they are at least ½ inch across and starting to color (except in the case of white carrots). The optimal time to harvest carrots is within a month after they mature, less in warm weather. Harvest when the soil is moist to reduce breaking off the roots in the ground.
Varieties
‘Belgium White’ (‘White Belgium’): 75 days; white roots with green shoulders; 10 inches long; productive; in cool weather these carrots have a sweet, carroty flavor; in hot weather the flavor becomes too strong and “soapy”; best when eaten cooked
‘Dragon’: 75 days; red-to-purplish exterior, yellow to orange interior; sweet, spicy flavor; the purplish exterior is high in anthocyanin; available from Garden City Seeds
‘Lubina’: 70 days; bright yellow-gold with green shoulders; hearty, sweet flavor; vigorous grower; available from Garden City Seeds
‘Nutri-Red’: 118 days; deep-red carrot; high in lycopene, a precursor to beta-carotene; tastes best cooked
‘Sweet Sunshine’: 72 days; striking true yellow; tender, extra-sweet, 7 inch carrots; available from Burpee
How to prepare: The yellow and orange colors of carrots are carotenoids and are quite stable when cooked. In contrast, the purple pigments in purple carrots, because they are anthocyanins turn an unappetizing gray. To take advantage of the color and the extra nutrients in these purplish carrots, enjoy them raw. Serve baby purple carrots whole or cut mature ones into carrot sticks—combining them with the orange and yellow carrots makes a striking plate.
Cook the white, yellow, and red-orange carrots as you would the familiar orange varieties. To accent their colors, combine the different colors julienned on a plate, sprinkled over a salad, on a dip platter, or as baby cooked carrots with a vinaigrette or herb butter. Carrots, if peeled or grated and thus exposed to the air, eventually turn brown; sprinkle with lemon juice or vinegar to prevent discoloring or add your vinaigrette immediately to stop the oxidation.
CELERY
Apium graveolens var. dulce
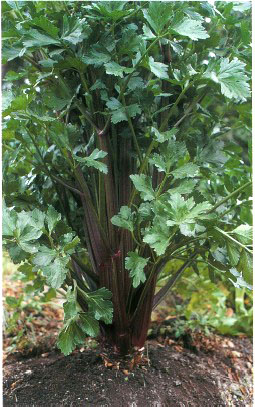
‘Red Celery’
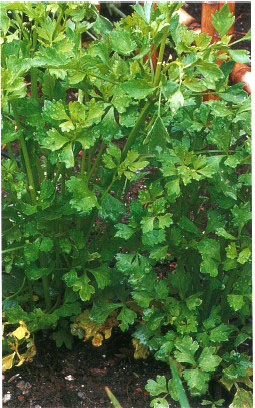
‘Chinese Golden’ celery
Red celery has been grown for many years and is fairly popular in England. Golden celerys are enjoyed in Asia.
How to grow: Celery is a cool-season vegetable that grows best in the spring or fall, or as a winter crop in warm-winter areas. Celery needs full sun (or partial shade in hot areas) and a highly organic soil that drains quickly. Start celery indoors 10 weeks before planting outdoors. Germination takes up to 20 days. After the weather has warmed to the upper 50s (Fahrenheit), move seedlings into the garden and place them 1 foot apart in all directions. Celery requires applications of fish fertilizer every four weeks and a continually moist soil—an organic mulch is helpful. Celery takes 3 to 4 months to mature.
Parsleyworms (the caterpillar of the eastern black swallowtail butterfly), carrot rust fly maggots, and carrot weevil larvae feed on celery. If they are a problem, protect plants with floating row covers. Celery may be afflicted with early blight fungus a disease that grows and spreads in cool, damp weather. Yellows, another disease, is spread by leafhoppers. Practice crop rotation, and rid the garden of all diseased plant residue over the winter.
Some gardeners elect to gardenblanch their red celery. When you blanch celery it becomes less stringy but much lighter in color and contains fewer nutrients. To blanch: after the plants start to mature, exclude light by wrapping the stalks with burlap or straw, surround the bundles with black plastic, and then tie them with string.
Celery is harvested as soon as the stalks are large enough to pull off. New stalks will continue to form from the plant’s center, and thus harvesting can be continuous. Or harvest the whole head by cutting the plant off at the ground with a sharp knife.
Varieties
‘Chinese Golden’: 60 days, small leaves, tender narrow stalks; available from Evergreen Y. H. Enterprises
‘Golden Self-Blanching’: 115 days; a popular, open-pollinated, early, dwarf variety with pale gold color; available from Seeds Blüm and Bountiful Gardens
‘Red’: has bronzy-colored green stalks until the frost brings out the dark red color; a splendid variety with very solid heads; cold tolerant; stays fairly red when cooked
How to prepare: The red pigments in red celery are anthocyanins. To preserve the color, use it raw on a crudities platter, for dips, and for stuffing with flavored soft cheeses. Red celeries often need to have the strings removed before serving them. Gold celery keeps its color and can be used raw or cooked.
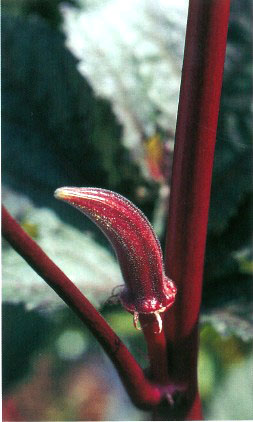
CHARD
(Swiss chard, leaf chard) Beta vulgaris var. flavescens
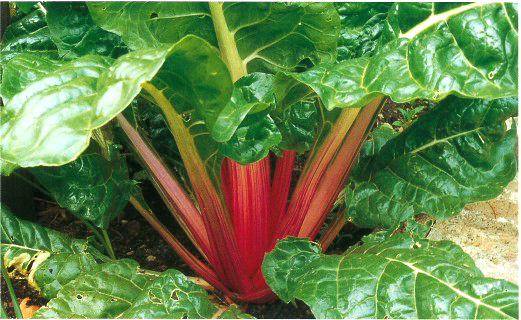
Pink chard
The new stained-glass colors of chard promise to add real pizzazz to the garden and lots of color to the table.
How to grow: Chard can be grown in a vegetable garden but it is equally at home in a flower border. When planting the color mix start the seeds in flats and choose the color of plants you want by waiting until the seedlings are a few inches tall and show their colors.
Swiss chard tolerates a lot more heat than most greens and is moderately hardy. Start in early spring or late summer for mild-winter areas. Plant chard seeds ½ inch deep, 6 inches apart, and thin to one foot. Plant in full sun and neutral soil with lots of added organic matter. For tender succulent leaves, keep plants well watered. Mulch with a few inches of organic matter. When plants are about six weeks old, fertilize with ½ cup of balanced organic fertilizer for every 5 feet of row.
A few pests and diseases bother chard, mainly slugs and snails (especially when the plants are young), and leaf miner, a fly larvae.
To harvest chard, remove the outside leaves at the base; tender new leaves keep coming throughout the season.
Varieties
‘Bright Lights’: 55 days; a mix of vividly colorful plants with stems and midribs of red, gold, orange, purple, white, pink—and tender leaves from green to bronze; mild flavor
‘Ruby Red’ (‘Rhubarb’): 6o days; solid red (sometimes dark pink) stems and midribs, and dark green leaves
How to prepare: The pigments in chards are the same as in their close cousin beets—namely betacyanins for the red, and betaxanthins for the gold colors. These pigments are fairly stable if not cooked very long. One caveat: cut raw chard stems oxidize and soon turn brown if not treated with an acid solution such as a vinaigrette or citrus juice.
For the brightest colors use the chard stems raw. For example, just before serving, julienne the stems of different colored chards into match-sticks and sprinkle them over a winter salad in place of the usual red cabbage. Or pickle the stems and serve them as a relish with roasted meats or mushrooms (recipes, page 66). You can also use the colorful leaves to garnish platters and large salad bowls. Young chard stems can be stuffed with cheese mixtures as you would celery.
Colorful chards can also be added to traditional chard tarts (recipe, page 87) and the leaves can be stuffed with a risotto stuffing and steamed.
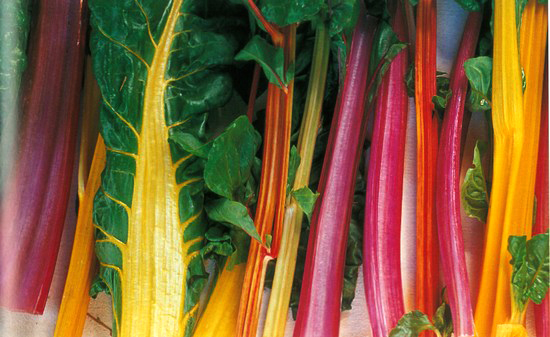
Stalks of ‘Bright Lights’ chard
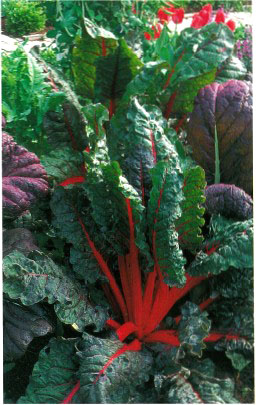
‘Ruby’ chard

closeup of the leaf of ruby red chard
CORN (MAIZE, INDIAN CORN)
DENT CORN
Zea mays var. indentata
POPCORN
Z. m. var. everta
SOFT CORN (FLOUR CORN)
Z. m. var. amylacea
SWEET CORN
Z. m. var. saccharata
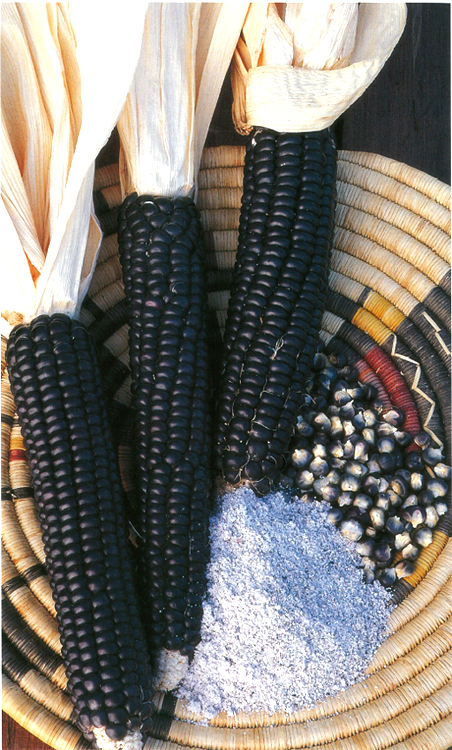
‘Hopi Blue’ corn
Corn has many dimensions. In simple terms, sweet corn is the one that bears those luscious ears we smother with butter; dent and soft corns are used primarily for grinding into corn meal or corn flour; dent varieties are also used as roasting ears; and popcorn for popping.
How to grow: Corn requires summer heat and full sun and is best sown directly in the garden. Corn pollen is transferred by the wind, from the male flower (the tassel) onto the pistil of the female flower (the silk). If corn is planted in long single rows, the silks won’t be well pollinated. Instead plant corn in a block of shorter multiple rows, at least four rows deep. Plant seeds in rich soil, 1 inch deep, 4 inches apart; thin to 1 foot apart.
Fertilize sweet corn with organic nitrogen fertilizer at planting time and when plants tassel (when the flower stalks produce pollen). Grinding corns are lighter feeders and more drought tolerant than the sweet corns. With all corn, however, extra water is needed at tasseling time, to guard against poorly filled out ears.
Birds steal seeds out of the ground so cover newly planted seeds with floating row covers until 1 foot tall. The most common insect pests are corn ear-worms. Other insect pests include corn borers; southern corn rootworms; corn flea beetles, and seed corn maggots. The most common corn diseases are Stewart’s bacterial wilt, root rot, corn smut, and southern corn leaf blight.
Sweet corn is ready to eat when the silks are dry and brown and the ears are well filled out. Test for ripeness by tasting a few kernels. Grinding corns and popcorn should be left on the plant until the kernels are dry. If the weather is very wet, cut the stalks after the husks begin to turn brown; store them in a dry place. When the corn is completely dry—which can take weeks— husk the ears and store them in a dry place, or remove the kernels and store them in sealed jars.
Varieties
Some colored varieties of dry corn will be white in the milk stage and only color up when ripe.
Sweet Corn
‘Ruby Queen’: 75 days; deep red, 8-inch-long ears; sweet, tender kernels; available from Burpee
Grinding Corns
‘Bloody Butcher’: 100 days; dent corn, large ears of red kernels; makes pink cornmeal; plants grow to 12 feet; available from Fox Hollow Seeds and Seeds Blüm
‘Hopi Blue’ (“Sakwa-pu”): 90 days; flour corn with blue kernels; ground use for blue cornbread; drought tolerant; available from Redwood City Seed Company, Native Seed/SEARCH
Popcorn
‘Strawberry’: 80-110 days; small, deep red ears, to 3 inches long and strawberry-shaped; plants 5 feet tall; resistant to corn earworm; available from Fox Hollow Seeds and The Cook’s Garden
How to prepare: The red color in ‘Ruby Queen’ is from anthocyanin and the color fades and changes unless you microwave it. Serve it as you would any sweet corn or after microwaving it, cut it off the cob and sprinkle the kernels over tacos (recipe, page 85), salads, and chowders. Use ‘Strawberry’ popcorn as you would regular popcorns (it pops up white). Anthocyanins are also the pigments in blue corn. Use the grinding corns for corn meal as you would in most recipes (See the recipes on pages 88-89). Have some fun experimenting. ‘Bloody Butcher’ makes a very flavorful red-flecked cornbread. You can use ‘Hopi Blue’ for bread that retains its bluish-purple color when baked in blue cornbread and blue tortillas (though it usually gets a greenish-hue from the baking powder). Combining ‘Hopi Blue’ cornmeal with white flour makes a bluish-gray pie crust with a nutty crunch.
If you have only small amounts of corn, grind dry corn in a hand-powered grain mill. For larger amounts of corn, it’s possible to purchase grain-grinding attachments to fit popular models of stand mixers.
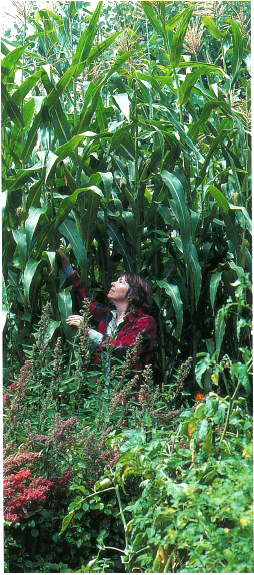
‘Bloody Butcher’ corn growing in my garden
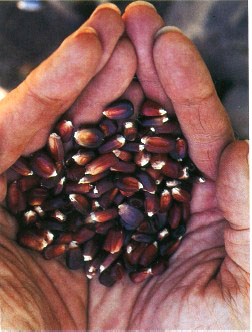
and a closeup of the corn kernels
CUCUMBERS
Cucumis sativus
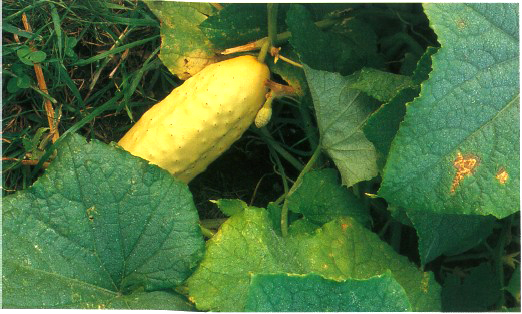
‘White’ cucumber
Cucumbers are an ancient vegetable that originated in India.
How to grow: Cucumbers are warm-season annuals and tolerate no frost. Plant the seeds when the soil and weather are warm, about 1 inch deep, 6 inches apart in rows. Thin to 2 feet apart. Cucumbers grow on vines and are grown on trellises put in place at the time of planting.
Cucumbers need rich, humus-filled soil and ample water during the growing season. Work bone meal and blood meal into the soil before planting. If plants are pale, apply fish emulsion.
Young cucumber plants are susceptible to cutworms and snails, and striped and spotted cucumber beetles can destroy young vines as well as carry serious diseases. Powdery mildew is a common problem, particularly late in the season. More serious diseases are mosaic virus, scab, and anthracnose; pull up affected plants as there is no cure for any of these conditions.
Harvest cucumbers when they are young and firm but filled out. For best eating, pick lemon cucumbers when about the size of a lime and don’t let them get too yellow. Pick white cucumbers when about 5 inches long and ivory white. Harvest regularly and pick off all overripe or damaged fruits or when plants stop production.
Varieties
‘Lemon’: 65 days; round, yellow fruits; mild flavor; drought- and rust-resistant plants
‘White’: 60 days; crisp, slicing cucumber with white skin and flesh; skin eventually turns yellow-orange; available from Landis Valley and Seed Savers Exchange
How to prepare: Use cucumber slices raw as you would green cucumbers. To emphasize the colors try alternating green, white, and yellow cucumbers on the top of a salad or buffet plate.
EGGPLANTS
Solanum melongena var. esulentum, S. integrifolium
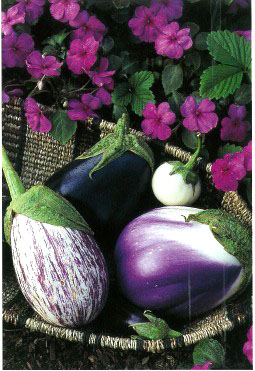
Many variations of eggplant colors
Eggplants are generally purple but there are pink, white, green, and red varieties as well.
How to grow: Eggplants are tender perennials grown as annuals. They tolerate no cold. Start seeds indoors weeks before the average date of your last frost. The seeds germinate best at 80°F. Plant the seeds ¼ inch deep, in flats. When all danger of frost is past and the soil has warmed, transplant into the garden 24 inches apart and water well. Grow eggplants in full sun, in rich well-drained garden loam that has added nitrogen. To increase yield and to keep the plants healthy, feed them about three times during the growing season with fish emulsion. If you are growing eggplants in a cool climate, cover the soil with black plastic to retain heat. Eggplants need moderate watering.
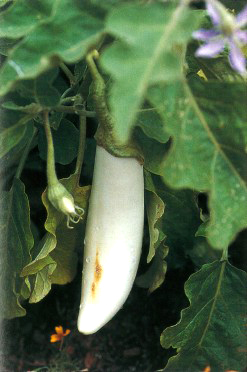
‘Snowy White’ eggplant
Flea beetles, spider mites, and whiteflies can be a problem. Flea beetles often appear early in the season, right after transplanting. Spider mites can be a nuisance in warm, dry weather. Nematodes are sometimes a problem in the South. Verticillium wilt and phomopsis blight are common disease problems in humid climates.
Eggplant is ready to harvest when the skin is full-colored but has not yet begun to lose any of its sheen. Press down on the eggplant with your finger, if the flesh presses in and bounces back, it is ripe.
Varieties
‘Asian Bride’: 70 days; white skin streaked with lavender; to 6 inches long, 1 inches diameter; creamy flesh; productive, lavender flowers; available from Shepherd’s
‘Rosa Bianca’: 75 days; large, rose-lavender and white fruit with creamy flavor; one of the most beautiful eggplants, productive; available from Shepherd’s
‘Snowy White’: 70 days; pure white color and great eating quality; 5 inches long, 2½ inches diameter; early; available from Shepherd’s
‘Turkish Italian Orange’: small orange-red fruits; 4 feet tall, spineless plants; high yielding; available from Southern Exposure
‘Violette De Firenze’: 80 days; spectacular, Italian; large oblong lavender fruits, often with wide white stripes; available from The Cook’s Garden
How to prepare: The color of these eggplants will be enjoyed most in the garden, because in preparation the skin is either peeled off or discolors when cooked. Even though the skin changes color, eggplants are wonderful grilled on a barbecue along with other colorful vegetables. Use these colorful eggplants as you would the purple ones in stews, stir-fried, grilled in sandwiches, and pureed with garlic for a dip.
HUÀUZONTLI
Chenopodium nuttaliae
The bushy spears of this tall plant’s seed heads are edible and used in Mexico as a pot herb.
‘Aztec’ red spinach—Huàuzantli
How to grow: Huàuzontli is an annual plant that is started from seed in spring and grows to 3 feet in height. Keep the plant fairly moist during the growing season. In autumn its leaves turn red.
How to prepare: The mild-tasting shoots are eaten like spinach. Traditionally, shoots covered with seed heads are blanched in boiling water; then small bunches are put together with cheese, dipped in egg batter, and fried. According to Craig Dremman of Redwood City Seed Company, it looses little of its fall red color if cooked briefly.
LETTUCE
Lactuca sativa
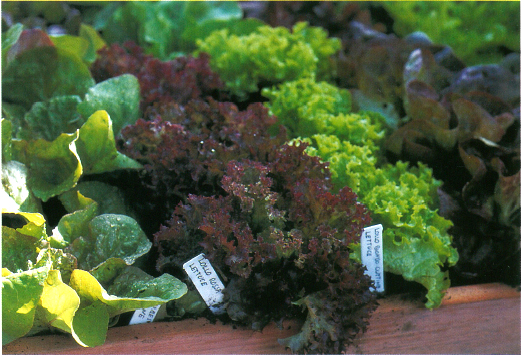
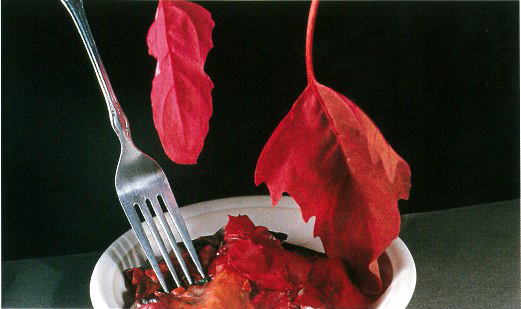
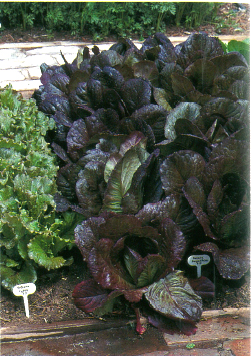
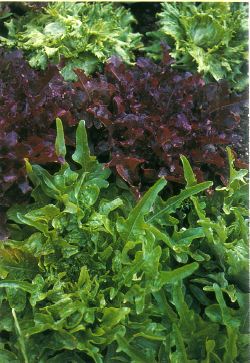
‘Lollo Rossa’ and ‘Cerise’ red lettuces
Red lettuces are especially showy in the garden and can be interplanted among flowers.
How to grow: Lettuce is a cool-season annual crop. Most will go to seed or become bitter rapidly once hot weather arrives. In warm weather, lettuce grows better with afternoon shade. In mild-winter areas, lettuce will grow through the winter.
Lettuce prefers soil high in organic matter, needs regular moisture, and profits from light feedings of fish fertilizer every few weeks. Sow seeds ⅛ inch deep outdoors, start seeds indoors in flats, or buy transplants. You can start lettuce outside as soon as you can work the soil in spring. Plant seeds 2 inches apart and ⅛ inch deep. Keep seed beds uniformly moist until seedlings appear. Thin seedlings to between 6 and 12 inches apart, depending on the variety. Failure to thin seedlings can result in disease problems.
Protect seedlings from birds, slugs, snails, and aphids with floating row covers and by hand picking pests. Botrytis, a gray mold fungus disease, can cause the plants to rot off at the base. Downy mildew, another fungus, will cause older leaves to get whitish patches that eventually die.
You can harvest lettuce at any stage. Leaf lettuces can be harvested one leaf at a time or in their entirety. Heading lettuces are generally harvested by cutting off the head at the soil line.
Varieties
Most of the following red varieties are carried by The Cook’s Garden, Johnny’s Selected Seeds, and The Gourmet Gardener.
‘Brunia’: 62 days; a beautiful red oak-leaf; leaves dark green with red-brown; large frilly heads
‘Cerise’: 30 days baby, 48 days full size; deep red color; good for baby lettuces; matures to an iceberg type
‘Rouge d’Hiver’ red romainee
Red and Green Oak leaf lettuces
‘Impuls’: 55 days; intensely red ‘Lollo Rossa’ type; 6- to 8-inch circular mound of frilled leaves
‘Mighty Red Oak’: 50 days; bronzy-red oakleaf; to 16 inches across; productive; slow to bolt; available from Burpee
‘Red Sails’: 52 days: burgundy-red fringed and ruffled leaves: fast growing; heat tolerant; deepens in color as it matures
‘Red Salad Bowl’ (‘Red Oak Leaf): 50 days; pale red color increases to deep red with maturity; withstands heat well
‘Rouge d’Hiver’: 60 days; deep red romaine; sow in early fall; if you plant earlier it may bolt prematurely
How to prepare: Red lettuces are higher than their green cousins in anthocyanins. Red lettuces are spectacular when used to line a platter and filled with any type of filling imaginable. They are lovely by themselves with a simple vinaigrette or combined with raspberries or sliced pears. All of these colorful lettuces enhance a mixed salad with their color.
MUSTARD, JAPANESE RED
Brassica juncea var. rugosa
‘Red Giant Mustard’
Japanese red mustards are tangy, handsome plants with crinkled, wine-red leaves that are enjoyable as baby greens or when fully mature.
How to grow: Mustards are cool-season crops. Plant seeds ¼ inch deep, 2 inches apart in early spring or fall in full sun and rich loam. Thin to 1 foot apart if growing to maturity. Or broadcast the seed in a wide bed and grow for cut-and-come-again baby greens. Water regularly or leaves become too hot to eat. Mulch with an organic mulch. Mustards are occasionally plagued by the pests that bother cabbages (see the “Cabbages” entry). Harvest a few leaves at a time as needed. The younger the mustard leaf, the less bite it has.
Varieties
‘Osaka Purple’: 40 days; 3-foot plants; purple leaves with white veins; mild; great for baby greens
‘Red Giant Mustard’ (‘Giant Red’): 45 days; purple-red, savoyed leaves; tangy; 4 feet tall; great for baby greens
How to prepare: The pigments in mustards are anthocyanins that fade when cooked. Use the leaves raw in sandwiches and salads—they add zing! Baby mustards are fairly mild; they add texture, color, and a slight tang to mesclun salads. Use mustard leaves sparingly in light salads or pair them with other strong-flavored greens in a hearty fall or winter salad with a rich dressing. Though they’ll lose most of their color, enjoy the leaves in omelets or stir-fries.
OKRA, RED
Abelmoschus esculentus (Hibiscus esculentus)
‘Red’ okra
With its red pods and stems and yellow blossoms, red okra is a showy plant.
How to grow: Okra must have hot weather and full sun. Plant seeds 6 inches apart in warm, organic-filled, well-drained soil; thin plants to 2 feet. Apply fish fertilizer after the pods begin to set and once again midway through the season. Okra requires about 1 inch of water a week. In cool-summer areas, mulch plants with black plastic for extra warmth.
Okra is susceptible to a few pests, namely, Japanese beetles, caterpillars, and stinkbugs. Nematodes, verticillium wilt, and fusarium wilt are occasional problems.
Okra pods are usually best harvested before they are 3 inches long or they become woody and the plants stop producing. Use clippers to cut a pod off at its base.
Varieties
‘Burgundy’: 49 days; stems, leaf veins, and pods are deep red-maroon; plants average 4 feet; pods stay tender until nearly 8 inches; not very disease resistant; carried by Southern Exposure Seed Exchange and Bountiful Gardens
‘Red’: 55-65 days; tender, tasty red pods; 5 feet tall, yellow-and-red flowers; carried by Abundant Life Seed Foundation
‘Red Velvet’: 60-70 days; scarlet pods, stems, and leaf veins; 5 feet tall; carried by Seeds of Change
How to prepare: Red okra pods turn greenish-brown when cooked but keep their color when pickled. Use red okra pickled and with marinades.
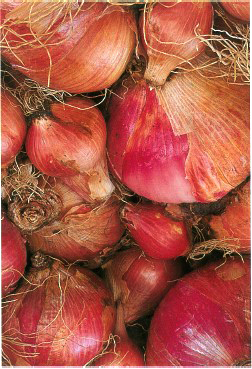
ONIONS, RED
Allium cepa
PINK SCALLIONS
A. cepa
Red onions and scallions are usually milder than most yellow and white versions.
How to grow: Onions prefer cool weather, particularly in their juvenile stage. They grow best in a neutral, well-drained soil rich in organic matter and phosphorous. They like even watering.
Onions and scallions are generally grown from seeds or sets. For full-size onions, select the right variety for your climate and time of year because bulbs are formed according to day length. Short-day onions bulb when they get 10 to 12 hours of light per day, best for spring planting in southern latitudes. Long-day onions require about 16 hours of sun to bulb and are best for northern areas. Medium-day onions require 12 to 14 hours of light a day and do well in most parts of the country.
Start seeds inside in late winter or sow them ¼ inch deep outside in spring (or fall in mild climates). Plant them in rows or wide beds. Fertilize onions with a balanced organic fertilizer when plants are about 6 inches tall and are beginning to bulb. Large bulbing onions should be thinned to give each plant adequate room for unhampered development. Use the red onion thinnings as pink scallions.
I enjoy serving pink, pearl-type onions in colorful dishes. Some varieties are bred to produce these small onions. You can also produce small onions from large red varieties by forcing them as you would to make your own onion sets. To produce small onions (sets), plant seeds in poor soil and sow the seeds thickly. (I’ve had success sowing them in a shallow nursery flat.) The crowding and lack of nourishment force the plants to bulb up prematurely. ‘Red Weathersfield’ is a variety especially suitable for this process. (Don’t be tempted to cook with the red onions sets available from the nursery; they have probably been doused with fungicides to prevent them from rotting when planted.)
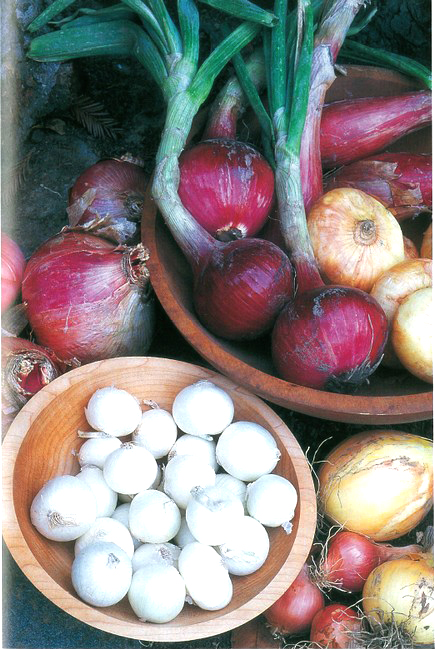
Red, yellow, and white onions
‘Stockton Red’ onions
The most common pests of onions are the onion maggot (a fly larvae) and thrips. Since scallions are harvested at a younger stage, they tend to have fewer problems with these pests.
Harvest scallions just as the bulbs begin to swell by pulling the entire plant out of the ground. Onions may be harvested anytime from the scallion stage to mature bulb formation.
Varieties
Red Onions
Onions may be hotter in one part of the country than in another or when grown in different soil.
‘Italian Blood Red Bottle’: 120 days; day-neutral; large, red, bottle-shaped onion; tangy; available from Nichols Garden Nursery
‘Red Burgermaster’: 102 days; long-day; reddish-purple skin; spicy; vigorous; stores well
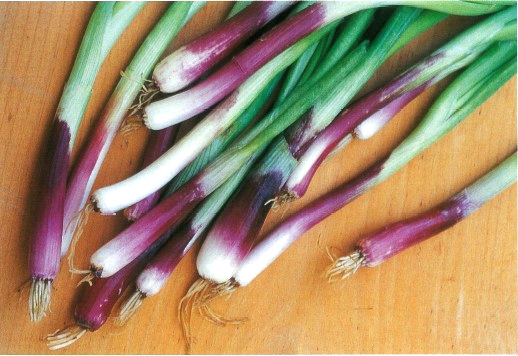
‘Purplette’ pink scallions
‘Red Torpedo’: 75 days; medium-day; deep purple outside, white to pink interior; sweet; available from Pinetree Garden Seeds
‘Red Weathersfield’: 105 days; for northern growing areas, a large, flat, purplish-red, pungent onion; best known for the production of onion sets; available from Lockhart
‘Stockton Red’: 188 days; medium-day; less sensitive to day length than most onions; available from The Cook’s Garden and Lockhart
Pink Scallions
‘Deep Purple’: 60 days; very attractive; for spring or summer sowing; available from Johnny’s Selected Seeds
‘Purplette’: 60 days; purple skin, pinkish flesh; if allowed to mature, it forms small pearl onions that turn pastel-pink when cooked or pickled; Johnny’s Selected Seeds and Seeds Blüm
How to prepare: The onion’s red color comes from anthocyanins that tend to fade when cooked, especially for any length of time. For the brightest colors, use red onions chopped or sliced over green salads and tomato salads, in sandwiches, and in omelets and frittatas. My favorite way to feature the pink onion color is with the small, round baby pearl onions that are pickled; pink, pearl onions or cooked to just tender and served with other colorful vegetables in a vinaigrette. My friend Jesse Cool, chef and owner of Flea Street Cafe in Menlo Park, California, pickles these little onions in dry vermouth and uses them in martinis.
Enjoy pink scallions as you would any scallions. They are particularly nice served raw on colorful appetizer platters, with dips, and sliced and sprinkled over salads and cream soups.
ORACH
Atriplex hortensis
This attractive plant has green and red cultivars. Unlike most greens, orach tolerates fairly warm weather.
How to grow: Plant orach seeds ¼ inch deep in good soil 6 to 8 weeks before the last expected spring frost date. Thin to 18 inches apart if growing to maturity. Or grow orach as a baby cut-and-come-again “green” by planting seeds in wide rows and thinning plants to only a few inches apart. Mulch to conserve moisture, as plants should be kept moist but not soggy. Orach has few pests and diseases.
Start to harvest leaves in about 6 weeks. If kept pinched back, plants will produce until the weather gets hot. They go to seed if not pruned.
Varieties
‘Red Orach’: 37 days; red leaves; to 6 feet; available from Garden City Seeds and Bountiful Gardens
How to prepare: Harvested leaves add a vibrant pink-purple to mixed salads. They have a mild flavor that’s a good foil for strong-flavored greens. Orach is a delicious midsummer spinach substitute but it looses much of its color when cooked.
PEAS, SHELLING
GARDEN PEAS, SOUP PEAS
Pisum sativum
PEAS, EDIBLE-PODDED
SUGAR SNAP PEAS, SNOW PEAS
P. sativum var. macrocarpon
Most peas are green, of course, but there a few colorful podded ones that are fun to try.
How to grow: Pea plants are either short bushes or long, climbing vines. Peas require well-drained, organic soil; full sun; high humidity; and cool weather. They tolerate some frost but do poorly in hot weather. Seeds should be planted 1 inch deep, 4 inches apart, in rows 1 foot apart. Most varieties need some form of support that’s best placed at planting time. Peas need only a light fertilizing at midseason, but they benefit from regular and deep watering—1 inch per week is ideal.
Seedlings succumb to slugs, snails, and birds, so it’s best to cover them until they are 6 inches high. Control pea weevils by lightly dusting wet foliage with lime.
Ideally, peas should be harvested daily during the mature-pod stage. Harvest snow peas when the pod becomes full size but before the seeds enlarge. Left past maturity, they lose sweetness and their production declines. For dry peas, allow pods to ripen and turn brown on the vine. If the weather is very wet or heavy frosts are predicted, bring the vines into a dry barn or porch to dry.

‘Golden Sweet’ peas
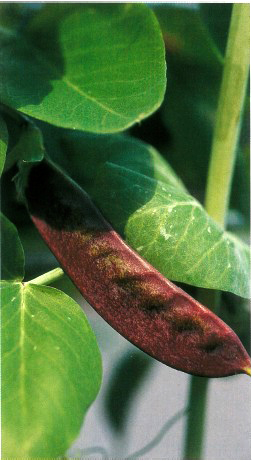
‘Capucijner’s Purple Pod’ peas
Varieties
‘Golden Sugar’: flat snow-pea type of pea with light golden pods; available from Seeds Blüm
‘Golden Sweet’: 70 days; beautiful, lemon-yellow edible pods; two-tone lavender flowers; harvest for pods or for soup peas; available from the Seed Savers Exchange
‘Capucijner’s Purple Pod’ (‘Blue Podded’): 80 days; vining; purple pods and lavender blossoms; best for soup peas; available from Abundant Life Seed Foundation and the Seed Savers Exchange
How to prepare: Use yellow snow pea pods sliced in salads or whole on a dip platter. They hold their color and make a delightful stir-fry with colorful peppers and carrots. The purple-podded pea is primarily a dry pea, tasty in a creamy winter soup.
PEPPERS
Capsicum spp.
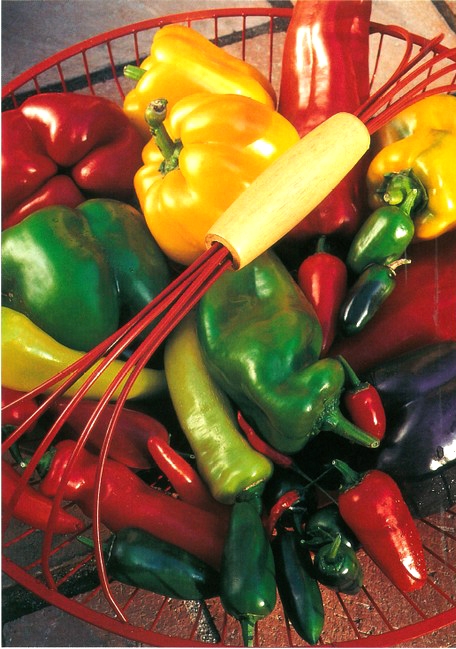
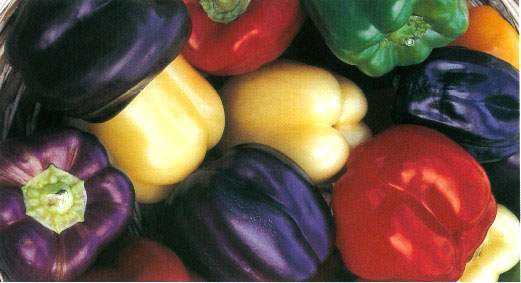
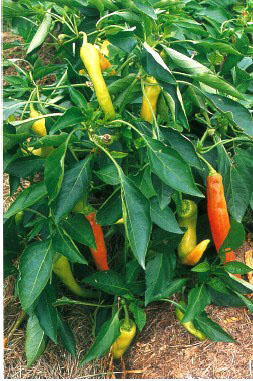
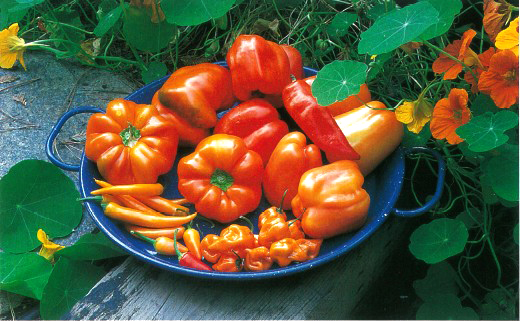
Peppers—both sweet and hot—come in every color but blue
Peppers in the garden are a virtual rainbow unto themselves. There just may be more color variations in peppers than in any other vegetable.
How to grow: Peppers are a warm-weather crop. They cannot tolerate frost and won’t set fruit unless the temperature is between 65°F and 80°F. Start seeds indoors in flats eight weeks before the average last frost date. When all danger of frost is past and the weather is warm, transplant seedlings into the garden. Transplant peppers 2 feet apart, in full sun (or partial shade in hot climates). They require deep, rich soil, and regular watering. Peppers are fairly heavy feeders so apply fish fertilizer midseason.
Young pepper plants can fall victim to snails, slugs, aphids, and cutworms. Peppers are occasionally prone to the same diseases and pests that afflict tomatoes, although peppers succumb less often.
When peppers are nearly full size, pick them at any color stage. Cut, rather than pull, peppers from the plant’s stem.
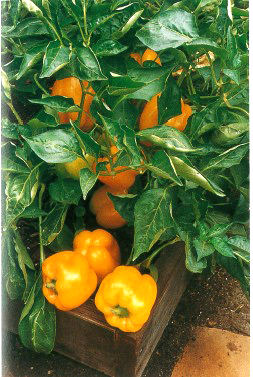
‘Golden Bell’ peppers
Burpee’s Giant Golden
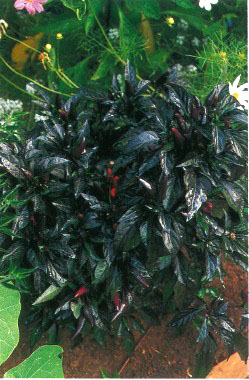
‘Pretty Purple’ pepper
Varieties
Mail-order suppliers The Pepper Gal, Totally Tomatoes, and Tomato Growers Supply Company carry most of the listed varieties. A number of seed companies carry “rainbow” collections of peppers including W. Atlee Burpee & Co., Park Seed Company, Renee’s Garden, and in retail stores.
Sweet Peppers
‘Albino’ (‘White Bullnose’): 80 days; creamy-white a long time before going red-orange
‘Chocolate Bell’: 75 days; large, dark brownish-red fruits
‘Golden Bell’: many blocky, golden, thick-walled varieties at your local nursery or in catalogs may be generically labeled as simply ‘Golden Bell’
‘Golden CalWonder’: 72 days; a golden bell type that is TMV resistant
‘Gypsy’: 60 days; from pale yellow to orange-red; tasty elongated fruits; early; productive; performs well in both hot and cold regions; TMV resistant
‘Hungarian Sweet Banana’ (‘Sweet Banana,’ ‘Long Sweet Hungarian’): 52 days; yellow to flaming orange; 4 to 7 inches long; cylindrical shaped; dependable, high yields; very ornamental
‘Mandarin’: 74-78 days; green to red to deep red-orange; flavor is best at orange stage; high yields
‘Lilac Bell’: 70 days; ivory to lavender to crimson with extended lavender stage; blocky fruits with thick sweet flesh; vigorous plants; TMV resistant
‘Purple Beauty’: 70 days, green to deep purple to red blocky bell, productive, TMV resistant
‘Romanian Rainbow’: 60 days; ivory to orange then to red bells, often all three colors are on the plant at one time
‘Valencia’: 72 days; from green to deep tangerine-orange; large, blocky bell; productive; TMV-resistant
‘Yellow Belle’: 65-75 days; yellow to yellow-orange to crimson red; ‘CalWonder’ type; thick flesh; productive and reliable; in southern areas, fully ripe peppers may develop fungus in the seed cavity during hot weather
‘Yellow Cheese Pimiento’: 73 days; green to yellow to orange; large, squash-shaped fruits
Hot Peppers
‘Bolivian Rainbow’: 75 days; purple, yellow, and red fruits; purple leaves; tall plant, fruits early; productive; available from Seeds of Change
‘Cayenne, Golden’: 60 days; dark green to golden; from Renee’s Garden
‘Long Red Cayenne’ (‘Long Cayenne’): 75 days; slim, 5-inch-long peppers; very hot
‘Purple Cayenne’: slim, purple peppers to 5 inches; available from Renee’s Garden
‘Poinsettia’: 90 days; 2-foot plants bearing 2-inch, upright, pointed fruits from green to purple to red; available from Fox Hollow Seeds and W. Atlee Burpee & Co.’s Heirloom Seed catalog
Orange peppers—both hot and sweet
‘Pretty Purple’: 75-90 days; green to lavender to red fruits; foliage and flowers are purple; available Southern Exposure Seed Exchange
‘Variegata’: 65 days; green, purple, and red fruits; spectacular dwarf plants; leaves variegated green, white, and purple
How to prepare: Red and orange peppers have more vitamins A and C than the unripe green, ivory, and purple ones. The primary pigments in peppers are various carotenoids that are quite stable when cooked. The purple and lilac peppers, however, must derive their color from anthocyanins because they fade quickly when cooked. I feature the purple peppers by serving them raw in salads and presenting them on dip platters.
To accent the colors of the red, orange, yellow, and white bell peppers, prepare them as containers for dips on a buffet table, or stuff them with risotto or bread stuffings. Also cut them into rings or match sticks to decorate a salad or serving platter. All colors of peppers, raw or cooked, are tasty in combination on pizzas and in frittatas, pasta salad, peperonata, and tacos. They are delicious pickled, roasted, and marinated in olive oil, and are splashy and tasty garnishes.
Roast and puree the cooked red and orange peppers and use them in cream soups or sauces. These colorful peppers also can be dried and ground to make different colors of either hot or sweet “paprikas”; sprinkled on potato salads, cream soups, and stuffed baked potatoes; and blended into soft cheeses. For an unusual and healthy appetizer, mix the paprika with salt and dip slices of jicama or white baby turnips into the spicy mixture.
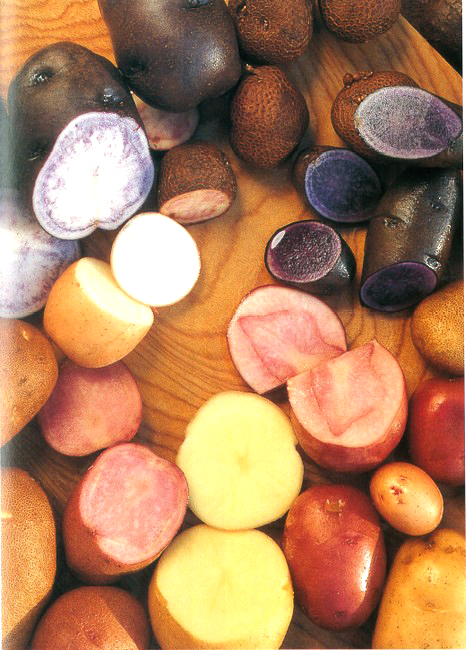
POTATOES
Solanum tuberosum
Potatoes generally have white flesh but there are lovely varieties with blue or red flesh as well.
How to grow: Potatoes prefer cool weather so plant them in the spring as soon as the soil has warmed. Potatoes are generally started by planting pieces of the tuber that contain at least one “eye.” Set them out as soon as the ground can be worked in the spring. If hard frosts are expected, protect the young plants with floating row covers. Potatoes are best grown in well-drained, fertile, organic soil. For an easy and large harvest, plant potatoes in a trench 6 inches wide by 6 inches deep. Space tubers about 1 foot apart and cover with 4 inches of soil. As the potatoes begin to sprout, fill the trench with more soil until it is level with the existing bed or taller. For highest production, keep the plants moist. If planted with plenty of finished compost, potatoes generally require little fertilizer.
Colorado potato beetles, flea beetles, and aphids can attack potato foliage; wireworms and white grubs damage tubers. The tuber pests are best controlled by regular crop rotation. In highly alkaline soil potatoes may develop a disease called scab, so raise the soil pH to 6. If a plant shows signs of wilt or viral disease, remove and discard it. When potato foliage has died back, dig tubers from one plant to check the crop for tuber size. To avoid damaging underlying tubers, dig carefully and at some distance from the plant’s crown.
Varieties
Becker’s Seed Potatoes and Ronniger’s Seed & Potato Company are mail-order sources specializing in potatoes; they carry both varieties.
‘All Blue’ (‘Purple Marker’): more than 80 days; purple-blue flesh; medium-sized potatoes good for mashing, steaming, and baking
‘All Red’: more than 80 days; brilliant red skin and pink flesh; medium tubers; good for steaming and boiling
How to prepare: While the pigments in these colorful potatoes are primarily anthocyanins, the deep blue potatoes particularly can be coaxed to keep much of their color. However, if you start with pale blue or very light pink potatoes, the finished dish will probably have little or no color—or in the worst case, turn an unappetizing gray. To retain as much color as possible, boil potatoes with a little vinegar or lemon juice in the water; or microwave them until they are just tender (over-cooking fades the color). To feature the blue and pink varieties in salads, use colorless vinaigrettes instead of creamy dressings. Adding acidic ingredients like vinegar or citrus juices changes the color. The blue potatoes become a bright, deep, magenta-purple; the pink ones turn more red. Combine these dramatic potato slices with yellow and green zucchini, red and orange bell peppers. Top with a spicy dressing—and Olé!—an instant fiesta dish.
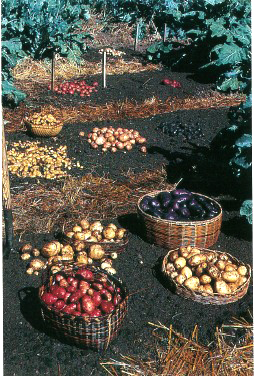
‘All Blue’ and ‘All Red’ Potatoes in a harvest with many types of white potatoes.
While colorful potatoes are interchangeable with white potatoes in most recipes, potato salads (recipe, page 75), lavender or pink mashed potatoes, and vichyssoise (recipe, page 65) are among the most successful presentations.
Caution: Dispose of all portions of a tuber that show any green coloration; they are toxic.
RADISHES
Raphanus sativus
I’m including two types of colorful radishes. The standard European types are usually red but they also come in purple, white, and pink. Asia is the home of a type of daikon called “beauty heart” radishes. Large with colorful pink or green flesh, “beauty hearts” are especially popular in northern China.
How to grow: Standard radishes grow easily and can be planted after the last frost in spring and again in early fall. The “beauty hearts” are a bit more difficult to grow. The resulting roots are quite variable; some have deep color and others remain pale. The Asian radishes are best planted in August in cold-winter areas and from September through December in mild-winter areas for fall and winter harvests.
Plant all radish seeds directly in the garden ½ inch deep. Thin the standard radishes to 2 inches and the beauty hearts to 8 inches. All radishes can be planted in rows or wide beds. The soil should be light and well-drained with a generous dose of compost. Radishes are light feeders so they need little fertilizer. Keep the young radishes constantly moist to avoid cracking and a “too-hot” taste.
In some areas of the country, radishes are bothered by root maggots, a pest best controlled by rotating crops. Flea beetles also can be a considerable problem.
Generally, standard radishes mature within 30 days. They’re best harvested when about the size of cherries—¾ inch in diameter—or 1 inch across for the long, narrow type, usually within 30 days. “Beauty hearts” take about 2 months to mature and are ready when they have reached full size. In cool weather, they can be left in the ground for weeks. Insulate radishes with straw if a hard freeze is expected. If left in the ground too long, short-season radishes have a tendency to get hot and fibrous.
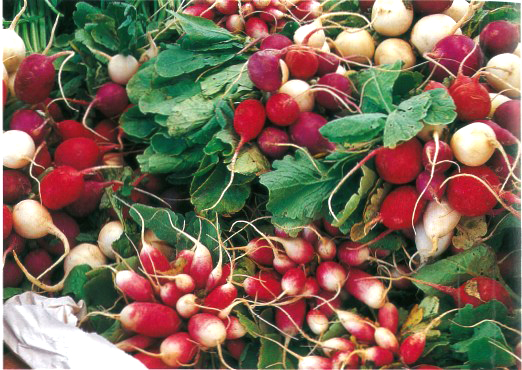
‘Easter Egg,’ ‘French Breakfast,’ and ‘Sparkler’ radishes
Varieties
Short-Season European Radishes
‘Easter Egg’: 28 days; flavorful and crunchy; produces a mixture of purple, lavender, pink, and white radishes
‘Plum Purple’ (‘Purple Plum’): quick growing; with deep purple skins and crisp, white flesh; heat tolerant; available from The Cook’s Garden

‘Easter Egg’ radishes
Long-Season Asian Radishes
‘Chinese Misato Rose Flesh’: 65 days; mild; 4-inch round roots; creamy outside and rosy pink inside; stores well; available from Park Seed Company
‘Green Meat’: usually ready about 60 days after sowing; 10-inch root with white skin and green flesh; available from Evergreen Y. H. Enterprise
‘Misato Green’: usually ready about 60 days after sowing; for autumn and winter crops; cylindrical Chinese radish with green flesh; juicy and sweet; easier to grow than the red beauty hearts; available from Nichol’s Garden Nursery
‘Shinrimei’: The name translates to “beauty heart;” Chinese round radish with white skin, green shoulders, and red flesh; needs some late-summer heat to grow well; available from Evergreen Y. H. Enterprises
How to prepare: Serve standard radishes sliced raw in salads, as garnishes, on hors d’oeuvre platters, and with butter on bread or crackers (see the radish salad recipe, page 71). The pink color from anthocyanins fades when cooked. The “beauty heart” radishes are traditionally carved into flowers like water lilies, peonies, and chrysanthemums and are beautiful garnishes on buffet dishes. Crisp and succulent, they are often enjoyed raw—frequently julienned to show off their colors. Sometimes they are sprinkled lightly with sugar. They’re also served western style with a light herb dressing or cut into fancy shapes for a dip platter.
SQUASH, SUMMER
Cucurbita Pepo var. melopepo
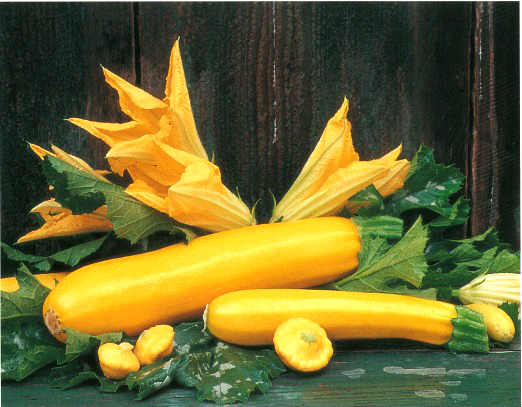
‘Gold Rush’ and ‘Sunny Delight’ squash
Summer squashes are colorful additions to your garden and your table.
How to grow: Squashes are warm-season annuals. In short-summer areas, start seeds indoors. Transplant into hills about 3 feet across and 5 feet apart, placing 3 plants to a hill. Squash needs rich humus soil, full sun, and ample water during the growing season. They also benefit from regular applications of a balanced organic fertilizer that is not too high in nitrogen. Keep young plants well-weeded and don’t let them dry out.
Squash may be afflicted with squash bugs as well as the spotted and the striped cucumber beetles. East of the Rockies, squash vine borers can be a problem. Mildew is the most common disease so expect it by season’s end.
Pick summer squash when it’s quite young and tender; or in its “adolescent” stage when the blossoms have just withered, indicating that the squash is still tender but has developed its flavor; or when it is more mature but still tender. Harvest the fruits regularly, or the plant drastically slows its production.
Varieties
‘French White’: 50 days; bush; white zucchini with mild flavor; firm meat with few seeds; available from Nichols Garden Nursery
‘Gold Rush’: 52 days; delicious golden zucchini on a vigorous plant
‘Golden Dawn II’: 45 days; golden zucchini; uniform fruits; productive plants; high in lutein; available from Garden City Seeds
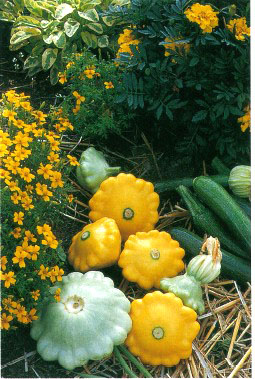
Yellow and pale green pattypan squash
‘Sunburst’: 50 days; beautiful, bush-type plant with vivid golden, scalloped pattypan squashes; high in lutein, squashes are mild and tender; available from Nichols Garden Nursery
‘Sunny Delight’: an improved ‘Sunburst’-type; golden, scalloped pattypan
How to prepare: The skins of most summer squash are high in lutein. For maximum nutrition, harvest summer squash while they’re quite young so the skins don’t need to be peeled. Slice them raw for salads or for dipping or serve them grilled with a tasty marinade or stuffed and baked. Mix the yellow and white varieties with the dark green varieties to feature the contrast of colors in cooked dishes (recipe, page 78). Grilled baby squash with their flowers intact are an exquisite treat when served with a marinade or sauce.
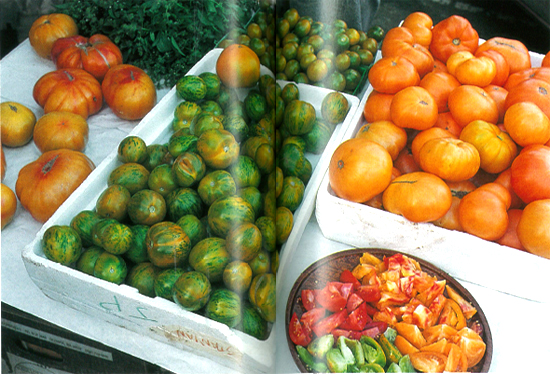
TOMATOES
Lycopersicon esculentum
CURRANT TOMATOES
L. pimpinellifolium
No rainbow garden would be complete without tomatoes—red, orange, yellow, gold, white, and green.
How to grow: Tomatoes are heat-loving plants. Though perennials, tomatoes are grown as warm-weather annuals as they cannot tolerate frost. Extreme heat can sunburn the fruit, though, so it is necessary to protect them in extremely hot climates. Many varieties, especially the big heirloom, beefsteak types, do not set fruit well in temperatures higher than 96°F or lower than 50°F. Start plants from seed about six weeks before the last average frost date; sow seeds ¼ inch deep in good potting soil. Keep seedlings in a very sunny window or under grow lights. Transplant seedlings when they are about 6 inches tall and after there’s any danger of frost. Place plants in full sun, about 4 feet apart in well-drained soil amended with a lot of organic matter. Place the transplants deep; the soil should reach the first set of new leaves. Stake or trellis plants to save space and keep the fruit from spoiling on the ground. After transplanting and again when the fruit begins to set, fertilize tomatoes with fish meal, chicken manure, or a premixed, organic fertilizer formulated for tomatoes. Be careful not to apply excess nitrogen fertilizer, as it favors leaf growth at the expense of the fruit. A form of calcium is often needed to prevent blossom-end rot. If you have acidic soil, adding lime may be necessary every few years because tomatoes prefer a soil pH of about 6.5. Water mature plants infrequently but deeply. Mulch with compost after the soil has warmed thoroughly.
‘Big Rainbow,’ ‘Green Zebra,’ ‘Green Grape,’ and ‘Yellow Brandywine’ tomatoes
Major pests that afflict tomatoes include tomato hornworms, cutworms, tobacco budworms, nematodes, and whiteflies. A number of diseases are fairly common to tomatoes; they include fusarium wilt, verticillium wilt, alternaria blight, and tobacco mosaic virus. Control diseases by rotating crops, planting resistant varieties, and practicing good garden hygiene.
Harvest tomatoes as they ripen. A rich color and a slight give to the fruit indicate ripeness. Harvest with a slight twist of the wrist or with scissors or shears.
Varieties
Medium to Large Tomatoes
Most of the following recommended varieties are available from Tomato Growers Supply Company and Totally Tomatoes.
ps36912: a new variety that is very orange; bred to contain more lycopene and more beta-carotene than other varieties; look for it soon (with a fancy name) from the breeders, Seminis Seeds
‘Big Rainbow’: 90-100 days; indeterminate; bicolored, beefsteak-type fruit weighing 2 pounds or more; golden orange fruits with ruby red radiating from the blossom end; sweet and meaty; ‘Pineapple, Georgia Streak,’ and ‘Striped German’ are very similar varieties
‘Caro Rich’: 80 days; determinate; slightly flattened, 5- to 6-ounce, deep orange fruits have ten times the provitamin A as other tomatoes
‘Cherokee Purple’: 72 days; short vines; unusually colored purplish, red-brown tomato; full of flavor; available from Southern Exposure Seed Exchange
‘Green Zebra’: 75 days; indeterminate; 2-inch amber-green fruits with darker green stripes; light green flesh
‘Italian Gold’ VF: 70 days; determinate; a golden ‘Roma’ paste tomato, pear-shape; compact plants; prolific
‘Mandarin Cross’: 77 days; indeterminate; succulent 3-inch orange fruits; late to ripen; for gardeners with long growing seasons
‘Taxi’: 64 days; determinate; early; meaty, 3-inch lemon-yellow fruits; compact plants; available from Johnny’s Selected Seeds
‘White Beauty’ (‘Snowball’): 85 days; mild, meaty, creamy white fruits averaging 8 ounces
‘Yellow Brandywine’: 100 days; indeterminate; yellow fruit with creamy texture; extremes of temperature may cause the fruit shape to vary
‘Yellow Stuffer’: 76 days; indeterminate; a hollow, yellow tomato perfect for stuffing; tall, productive vines
Cherry Tomatoes
‘Green Grape’: 70 days; determinate; l-inch, yellow-green, juicy fruits; short, compact plants
‘Sun Gold’: 57 days; indeterminate; 1-inch, bright orange fruits with delicious flavor; vigorous plants with long clusters of fruits
‘Sweet Gold F1’: 60 days; indeterminate; yellow-gold, ½-ounce fruits; vigorous and productive vines; available retail from Renee’s Garden
‘Yellow Pear’: 78 days; bite-size, yellow tomatoes shaped like small pears; low in acid; vigorous vines; disease resistant
Currant Tomatoes
Currant tomatoes are huge plants that sprawl and reseed.
‘Yellow Currant’: 62 days; indeterminate; related to the wild, yellow currant tomato of South America; vines produce hundreds of ½-inch, sweet, tart fruit; thick-skinned, disease resistant, hardy; available from Harris
How to prepare: To fully enjoy the different colors of tomatoes, serve them raw. The pigments in tomatoes are carotenoids, however, and are fairly stable when cooked. The red pigment lycopene in tomatoes has been found to lower the risk of prostate cancer.
The large-fruited, gold, red, orange, yellow, purple, and green tomatoes are lovely sliced on the salad plate or on top of a fresh tart (recipe, page 77). They can be cut in wedges and arranged on a platter or around a dip plate or on a pizza. Use the rainbow of colorful cherry tomatoes in salads, with dips, as hors d’oeuvres. Sauté briefly in olive oil and garlic and arrange over cheese toasts (recipe, page 68), on a green salad, or in pasta. These colorful little tomatoes can also be dried; they keep much of the color. Try white tomatoes mixed with other colors on a salad plate. Or “mess” with people’s minds and make a mystery marinara sauce for pasta (recipe, page 86), or pour a white Bloody Mary.

‘Mandarin Cross’; ‘Yellow Stuffer’; ‘Striped Cavern.’
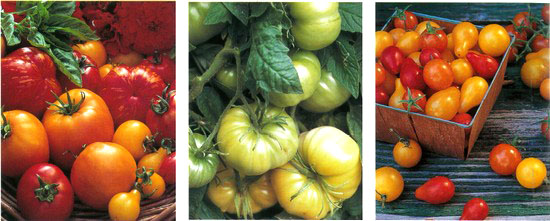
harvest of ‘Taxi,’ ‘Yellow Pear,’ and ‘Caro Rich’ tomatoes; ‘White Beauty’; mix of cherry tomatoes.
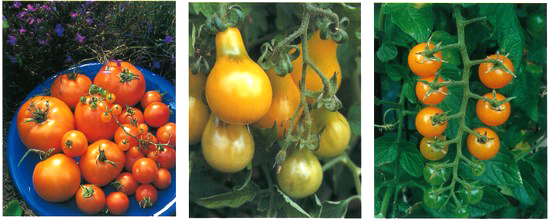
Harvest of orange tomatoes; ‘Yellow Pear’; ‘Sungold’
WATERMELON
Citrullus lanatus
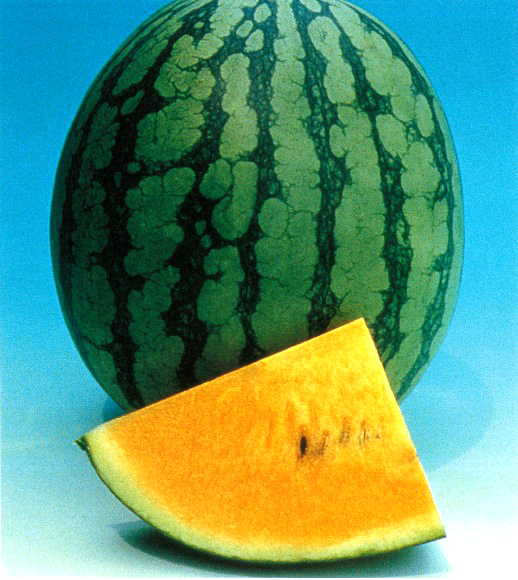
‘New Queen’
Watermelon flesh can be red, orange, yellow, peach, even white.
How to grow: For general growing information about watermelons, see the “Cucumber” entry on page 40. Melons are more sensitive to cool conditions than cucumbers, so in cool-summer areas use a black plastic mulch to raise the soil temperature. Reduce watering toward harvest time; too much water then results in insipid fruits and split melons.
Watermelon is ripe when the fruit’s surface skin is dull, tough, and difficult to puncture with your fingernail; the bottom of the melon has changed from green to yellow; and the tendrils on the stem near the fruit are brown.
Varieties
‘Moon and Stars’: 100 days; to 30 pounds, pinkish-red flesh, fine flavor; leaves and green rind are covered with golden splotches (moons) and small gold speckles (stars)
‘New Orchid’: 80 days; 8 to 10 pounds, bright orange flesh; available from Johnny’s Selected Seeds
‘New Queen’: 75 days; orange flesh; 6 pounds; spreads to 9 feet; a 1999 All American selection; available from Park Seed Company
‘Yellow Doll’: 68 days; crisp, sweet, yellow flesh; oval, 4 to 7 pounds
How to prepare: Lycopene is one of the carotenoids that gives watermelon its red color. The lovely yellow, orange, and red flesh of watermelons lends itself to endless colorful party dishes. Create sunset salads with cubes of red, orange, and yellow melons drizzled with a sweet lime dressing. Make them into margaritas—cubes stacked in a goblet and sprinkled with a mixture of lime, sugar, and tequila. Arrange colorful melon balls in a buffet fruit salad or a rainbow of watermelon cubes sprinkled with a spicy Thai mixture of roasted peanuts, chilies, nam pla (a fish sauce used like soy sauce), and cilantro. Lay out different colors of watermelon slices or strips on platters to create a color shift from yellow to orange to red or stand them up around the edges of a crystal bowl filled with crab salad.
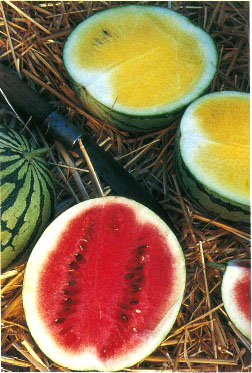
‘Yellow Doll’ and ‘Tiger Baby’ icebox watermelons (below)