 GROW WHAT YOU CAN’T BUY. Concentrate on crops that you can’t find at your local supermarket and ones that offer unusual color or taste.
Q As a new gardener I’m completely overwhelmed by all the choices on the seed racks and in the catalogs. How do I narrow down my choices?
A Every gardener — beginning and advanced alike — has trouble deciding what to grow, since each selection seems a little better than the last. And although each gardener approaches this problem a little bit differently, here are some guidelines that may be helpful.
 GROW WHAT YOU CAN’T BUY. Concentrate on crops that you can’t find at your local supermarket and ones that offer unusual color or taste.
 PLANT CROPS YOU LOVE. If you adore tomatoes or peppers, grow several cultivars of those. Try to avoid growing the same selections offered in the grocery store.
 TRY CROPS YOUR NEIGHBORS SWEAR BY. It helps to know what crops are easy to grow in your area — and when they’re easiest to grow. Ask your neighbors, along with experts at garden centers, garden clubs, or the local Cooperative Extension Service.
 BE ADVENTUROUS. Experimentation is one of the most enjoyable aspects of having a garden. Try growing some unusual edibles just for fun — purple-fleshed potatoes, white pumpkins, or kohlrabi, for example.
Q I see vegetables marked “hybrid” and “heirloom” in catalogs. What’s the difference? And what are OP vegetables?
A A hybrid vegetable is the result of cross-pollination between two genetically different parent plants. Plant breeders develop hybrids to increase disease resistance, to improve yield, or to select for special fruit characteristics such as color, flavor, or shipping quality.
Heirloom vegetables are cultivated forms of crops that have been perpetuated by gardeners who save seed (or propagate by some other means such as taking cuttings) from year to year. Some heirloom vegetable varieties have been around for more than a century! Gardeners have kept these varieties growing for generations because the crops performed well in a particular area or because they have outstanding flavor, unusual color, or other appealing characteristics.
OP stands for open-pollinated, meaning that wind, bees, or other insects, rather than plant breeders, transferred the pollen to fertilize the flowers. While all heirloom vegetables are open-pollinated, not all OP vegetables are heirlooms, since all seed companies offer modern-day varieties of vegetables that have been pollinated by wind or other means.
Q I’ve checked with experts, both at my Cooperative Extension office and at a local garden center, and I’m also planning to ask some local, dirt-under-their-fingernails gardeners for advice about what to grow. What else I should ask them?
A Gathering information on local gardening — sources, schedules, problems, and events — is a great way to benefit quickly from the experience of others. Gardeners are nearly always happy to share what they know. Here are some subjects that are worth asking local gardeners about:
 SCHEDULES. When do they plant spring crops like peas or cabbage and warm-season ones like peppers and tomatoes? Have they tried growing fall crops?
 FAVORITE CROPS. Do they grow your favorite crop? What are their favorite cultivars? Any problems?
 SOURCES. What are the best garden centers around? Where else do gardeners buy seed or transplants? Is there a good free or cheap source for finished compost, compost ingredients, or mulch around?
 PROBLEMS. What pests are the most bothersome? What other major problems cause headaches?
The crop descriptions in seed company catalogs and Web sites include lots of abbreviations — such as V, A, DM, and VF. Most, but not all, refer to disease resistance or tolerance. Look for a guide to symbols at the beginning of the catalog or at the beginning of each crop entry. Here are some common abbreviations you’ll encounter:
| AAS | All-America Selections Winner |
| A | Anthracnose |
| CMV | Cucumber mosaic virus |
| DM | Downy mildew |
| F | Fusarium wilt |
| F1 | Hybrid variety |
| LB | Late blight |
| N | Nematodes |
| OP | Open-pollinated |
| PM | Powdery mildew |
| TMV | Tobacco mosaic virus |
| V | Verticillium wilt |

Q I want my first vegetable garden to be a big success. What are the easiest crops to grow?
A While the list of easiest crops varies from region to region, there are a few super-simple standouts. Radishes and green beans top most gardeners’ “no fail” lists. Other easy crops include cucumbers, summer squash, zucchini, garlic, leaf lettuce, snap peas, Swiss chard, and kale. Tomatoes are a bit harder but not by much. The newer compact hybrid tomatoes developed for patio culture are especially easy.
Q What’s a good size for a first garden?
A Carefully managed, even a 4'×4'/1.2Ö1.2 m plot (16 sq. ft./2.4 sq. m) will produce quite a bit of food and will leave you time to learn about and enjoy caring for a vegetable garden. If you have lots of space and want to try a larger garden, make it no more than 10'×20'/3Ö6 m (200 sq. ft./18 sq. m). Keep in mind that the ideal size for your garden depends on the types of crops you want to plant, too. Crops like bush beans, lettuce, spinach, peppers, and carrots are perfect for a small garden, since the plants are small enough to allow you to fit in a variety of crops in the available space. However, if pumpkins and winter squash are high up on your planting list, you’ll need to prepare a bigger garden, since just one of these plants can cover an entire 4'×4'/1.2Ö1.2 m plot.
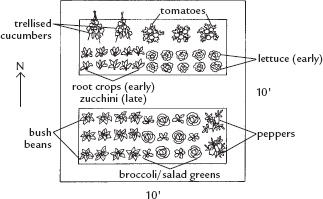
Q I had a small garden last year, but it still got out of control. How do I keep my garden manageable?
A Even in the smallest garden, an important technique for keeping the work manageable is to plant in dribs and drabs: Plant a little lettuce seed now and a little more 2 weeks later. While there are crops you’ll want to plant all at one time — like peppers or tomatoes — planting small batches of many crops is a good garden habit to cultivate. Whatever size garden you tend, you’ll find that staggering the planting spreads out the harvest and much of the attention that plants need in between, too. Instead of having a 20'/6 m-long row of lettuce or beets to thin on a given day, you’ll have only a foot or two of seedlings to thin. In part 2, you’ll find staggered planting recommendations for many crops. Use them as you cultivate the habit of planting a little at a time. Cover soil that’s not yet planted with plastic to help it warm up, or cover it with grass clippings to keep it moist and suppress weeds. Or let the weeds germinate as a short-term cover crop and then slice them off before you plant your seeds.
Q I plan to keep my first garden small, but I’m really excited about having a big food garden in the future. Is there something I can do this year to make it easier to have a big garden next year?
A If you want to enlarge your garden next season, mark out the additional space you plan to plant, then start improving the soil and getting weeds under control this season. Set up compost bins on the site so you’ll have plenty of compost at hand once you’re ready.
SEE ALSO: For no-dig strategies you can use to start preparing soil for next year, pages 83–84.
Q I have a small backyard plot, but I want to grow as much of my own food as I can. How should I go about that?
A You can produce an amazing amount of food in even a small garden if you use some of the principles from the various forms of intensive gardening, also called biodynamic or French intensive gardening. Intensive gardening involves using raised beds, wide rows or close spacing between crops, succession planting, companion planting, and crop rotation. You’ll also need to follow a soil-improvement schedule like the one outlined on page 78 to ensure rich, well-drained conditions.
Intensive gardening can be complicated, and it does demand some initial extra work to build the beds, enrich the soil, and plan out your planting scheme. It’s best to switch your garden over gradually, and there are any number of ways you can do that. For example, start with a soil-improvement system, then try experimenting with succession plantings and wide rows during the first growing season. Add raised beds the first fall, and then work out a basic crop-rotation system the following winter. You’ll find more information on row spacing, succession planting, and crop rotation later in this chapter.
SEE ALSO: For companion planting ideas, page 139; for instructions for building raised beds, pages 81–85.
Q How do I decide where to put my vegetable garden? I have a good-size yard and live outside Indianapolis, Indiana.
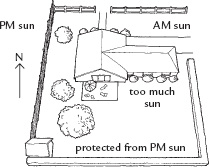
A To find a great site, start by looking for a site that receives full sun, ideally at least 8 hours a day. Also take the following into account:
 WELL-DRAINED SOIL. The site should drain well after a rain, since wet soil is difficult to work, most vegetables don’t like wet feet, and wet soil also is very late to warm up in spring. Plan on installing raised beds if your site doesn’t drain well.
 EASY WATER ACCESS. Carrying water is no fun. You’ll want a site that you can reach with a hose.
 LEVEL IS BEST. Look for a site that’s fairly level. Plan on terracing if you don’t have a level site.
 KEEP IT CLOSE. While you probably want a garden that’s not smack-dab in the center of everything, you also may not want one that’s out on the back forty. A spot you routinely pass daily makes it easy to pull a weed or two, check to see if plants need watering, or pick a few ripe tomatoes.
 OUT OF HARM’S WAY. Locate your garden out of the center of the yard and away from play areas and walk-ways, so it doesn’t have to compete with softball games, barbecues, and foot traffic to other parts of the yard.
 CONSIDER UNDERGROUND PROBLEMS. Consider the location of underground wires or cables as well as plumbing and septic systems. Also, stay away from sites where tree roots will compete with your vegetables.
 CONSIDER FENCING POTENTIAL. If deer and other pests are active in your neighborhood, choose a site that you can fence.
 PLANT PROTECTION. Select a site protected from prevailing winds, or plan to create some kind of windbreak.
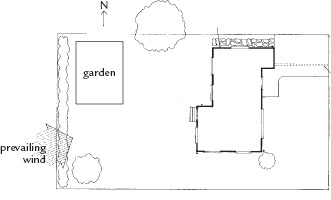
Hedge at left blocks the wind
Q I live near Dallas, Texas. What kind of site will be best for my conditions?
A In the South, vegetables like tomatoes will produce acceptable crops with less than full sun. Locating your garden where at least some of it receives partial shade may actually be a bonus, since shade (especially afternoon shade) will protect plants from searing summer heat. You’ll still want a spot with well-drained soil that’s away from play areas and traffic and protected from prevailing winds. In hot southern areas, access to water is even more important than it is in cooler regions.
Q Since my yard is tiny and the only sunny spot is on my deck, I’ll have to grow vegetables in containers on the deck. If that will work, what are the best vegetables to try?
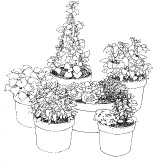
A Vegetables make great container plants, and you can locate containers anywhere there is a patch of sun — on a deck or terrace, alongside a garage, or even along the driveway. Keep in mind that the larger the container the better the results. Fill containers with a purchased potting mix or make a batch of your own mix. For 12"–18"/30.5–45.7 cm containers, consider beans, broccoli, Brussels sprouts, cabbage, bush-type cucumbers, eggplant, peas, peppers, Swiss chard, and dwarf tomatoes. If you’re using tubs or really large pots, you can plant dwarf or bush-type muskmelons, squash, or watermelons as well as full-size tomatoes. Beets, lettuce, radishes, spinach, and all sorts of salad greens will do fine in 10"–12"/25.4–30.5 cm pots. You can even combine crops in a large pot: Plant dwarf tomatoes with a ground cover or lettuce or other greens, for example, or even combine edible flowers with a mix of salad crops.
SEE ALSO: For potting soil recipes, page 31.
Q My grandparents always planted their garden in straight rows with paths in between, but they lived on a farm and had much more space than I have. Is there another way to organize my garden so I can fit in more plants?
A Straight, single-crop rows with paths in between make laying out the garden a simple, straightforward matter. It’s a very practical system if you use a tiller or tractor to prepare the soil. However, it isn’t the most space-efficient system, since you’ll end up with as much ground devoted to pathways as to crops. Instead, consider creating either wide rows or beds to use space more efficiently.
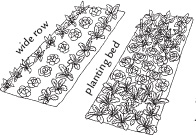
Crops grown in wide rows are arranged with two, three, or more rows of crops planted close together without pathways in between. Fairly wide paths run between each set of closely spaced rows to provide access for weeding and harvesting. The number of plants in a single wide row varies according to how far the gardener can reach. For example, it’s easy to reach across several rows of lettuce to harvest, but larger plants like cabbage are probably best planted two abreast so that you don’t need to reach too far into the row.
These are similar to wide rows, but the plants are arranged in bands rather than rows. Creating planting beds is the most space-efficient way to organize a garden, since only about one-third of the space is devoted to pathways and two-thirds to crops. Beds make it easier to concentrate soil-improvement, feeding, and watering in areas where plants will be growing, instead of on pathways. Beds can be raised, with the soil surface several inches above the surrounding area, or created so their surface is level with the surrounding soil surface or even below it.
Q Why go to the trouble of starting seeds myself when I can buy transplants everywhere in spring?
A Starting your own plants from seeds gives you greater control over what you grow, since you don’t have to settle for what is usually a very limited local selection of transplants. Starting plants from seed is also a great way to experiment with unusual and/or heirloom vegetables. Raising your own seedlings is very enjoyable, and a great many gardeners look forward to filling pots and sowing seeds every year.
Another reason to grow your own is to ensure that you have a supply of healthy, vigorous transplants, and that can be an important issue if you don’t have local suppliers who grow their own plants. However, if you can’t grow vigorous transplants yourself due to lack of a good setup or lack of time, then don’t do it at all. Spindly, home-raised vegetable seedlings are usually a big disappointment, producing little or no harvest.
Q Is it difficult to start vegetable transplants from seed? What do I need?
A Growing your own vegetable transplants is relatively easy. You’ll need seed-starting mix, pots, and labels, along with the following:
 WORKSPACE ESSENTIALS. You’ll need an indoor area where it’s okay for things to get a bit dirty and possibly wet. For starters, look for a cool but heated space where it doesn’t matter that there’s a bit of soil on the floor. You’ll need an old table or unused countertop for filling containers with soil and for growing seedlings. If you have a table that doesn’t have a waterproof top, cover it with a sheet of plastic or a tarp to avoid damaging it.
 GOOD LIGHT. You don’t need to have a greenhouse to grow great transplants, but you do need a source of bright light. Without it, you will never be able to raise healthy, stocky transplants.
 HEAT FOR SEEDS AND SEEDLINGS. You need to be able to regulate the temperature in your seed-starting area, but seedlings are happiest in fairly cool conditions. For cold-tolerant crops like cabbage and broccoli, temperatures between 50–60°F/10–15.5°C are fine. Keep seedlings of heat-loving plants between 65–75°F/18.3–23.8°C. Temperatures can be 10 degrees cooler at night.
LIGHT IS AN ESSENTIAL INGREDIENT for any seed-starting effort. If you have a greenhouse or cold frame, great, but there are other options. For example, you can set up a seed-starting area on a cool but heated sunporch, placing your flats on heat mats especially designed for warming soil to stimulate seed germination (they’re available from garden centers and mail order suppliers). Many gardeners simply find a spot in a spare room or their basement where they can install a bank of fluorescent lights. Don’t bother buying specially made lights for growing plants or invest in a more expensive system until you’re sure you’ll be doing lots of seed starting; ordinary shop lights are fine for most seed-starting efforts. Position the lights no more than 2"–4"/5–10 cm above the leaves of the seedlings (suspend lights from S-hooks and chains, so you can adjust the height of the lights as the plants grow) and give seedlings 16 hours of light per day. Use a timer to turn lights on and off automatically.
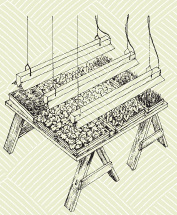
Shop lights provide supplemental light for seedlings.
Q I’ve never started transplants from seeds before but want to try it this year. What are easy, fool-proof crops for a beginner to try?
A Some of the easiest transplants for home gardeners to grow are broccoli, Brussels sprouts, cabbage, cauliflower, leeks, lettuce, okra, onions, peppers, and tomatoes.
Q The instructions on seed packets refer to starting seeds or transplanting seedlings a certain number of weeks before the last frost date. What is this?
A Gardeners mark the growing season according to the last spring and first fall frost dates for their area. The last spring frost date is the average date when temperatures dip below freezing for a particular area. It is a useful benchmark for timing when to start seeds so transplants will be ready to move to the garden at the proper time. The last spring frost date is also useful for timing transplanting: Cold-tolerant crops like cabbage can be transplanted to the garden several weeks before the last spring frost, whereas heat-loving plants like peppers shouldn’t be moved outdoors until several weeks after it. The first fall frost date is the date when temperatures typically dip below freezing for the first time. It is used to time sowing and planting for fall crops.
Keep in mind that these dates are based on averages, and the last spring or first fall frost in your garden in any given year may occur before or after the published dates for your area. Check the Internet or your local Cooperative Extension Service for information on your area.
Q What if I can’t start my seeds at the right time? We’re going to be away for the first 3 weeks in March, but our frost date is May 8.
A Sowing and transplanting schedules are recommendations, and you don’t need to treat them like hard-and-fast rules. It’s more important to start seeds when you have time to care for them properly than to start them on a particular calendar date. For example, even though sowing seeds indoors 6 to 8 weeks before the last frost may be the recommended schedule for tomatoes, they can also be sown 4 or 5 weeks before if your schedule is crazy earlier in the season. The same goes for transplanting: The ranges listed in this book and on seed packets are guidelines most often geared toward the earliest transplant date. Crops that thrive in warm temperatures will do just fine if transplanted a little bit late; cool-season crops like peas can be moved earlier, especially if you can protect them from unusually cold weather.
Q Is it a good idea to start early and grow extra-big transplants?
Q In most cases, you’re far better off if you don’t try to get a head start on the schedule, because larger transplants aren’t necessarily better. They’re more likely to be spindly or potbound. Smaller, stockier transplants grown according to recommended schedules will generally outperform them in the garden because they experience far fewer problems with transplant shock than large plants do.
SEE ALSO: For more on repotting seedlings, page 39; for more on transplanting problems, pages 50–55.
Q How can I tell if leftover seed is still good? I have some half-full seed packets that are two or three years old.
A Seeds that are a year old will still germinate well provided they haven’t been stored badly (in a hot, humid place, for example). Bean, pea, squash, and pumpkin seeds last three years if properly stored, while pepper and tomato seeds last four. Cabbage seed can be stored successfully for five years. You can plant stored seed and see how it performs or test it for germination before going ahead with a full-scale planting.
Here’s how to do a germination test:
1. Write the name of the cultivar on a paper towel, and then moisten the paper towel and place ten seeds on it.
2. Fold or roll up the towel.
3. Place the rolled towel in a plastic bag and seal it with a twist-tie. Place the bag in a warm (70°F/21.1°C) spot.
4. Check daily to see if there are signs of sprouting. To determine the germination percentage, divide the number of seeds that sprout by the number that you started with.

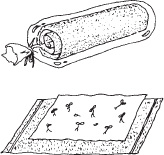
If you don’t want to discard the sprouted seeds, you can try planting them in moistened potting medium to produce transplants.
Q A friend of mine has some seeds he saved from his garden last year that he’ll give me. Are they okay to use?
A That depends on what he saved and how he saved it. Seeds saved from hybrids — cultivated varieties that are the result of crossing two distinct parents — will not “come true” from seed. This means that the plants that grow from the seeds may not exhibit any of the fruit or foliage characteristics their parents featured. For this reason, they will probably yield disappointing results in your garden. If your friend grows heirloom and open-pollinated cultivars and saves seed from plants that did well in his garden, they’re a good choice, since they will come true.
The other concern about saved seed is how it was stored. For best germination, seed needs to be stored in a cool, dry, dark place. While you can try to germinate seeds that have been stored in other conditions, germination will probably be poor, and you’re far better off spending your time and effort on new seeds.
A “PART” CAN BE A CONTAINER of any size, from a clean cottage-cheese container to a large bucket. Even if you need a considerable amount of mix, however, make several small batches and then mix them together in a larger container. Otherwise, it’s difficult to blend the ingredients. Use your hands or a trowel to mix everything together. Be sure to wear a dust mask to avoid inhaling any of the dusty ingredients these mixes contain.
Note that recipes made without compost don’t contain any nutrients, so you will have to begin feeding seedlings with dilute organic fertilizer as soon as seedlings produce their first true leaves.
2 parts peat moss
1 part vermiculite
1 part perlite
1 part vermiculite
1 part perlite
1 part milled sphagnum moss, peat moss, or screened compost
2 parts commercial potting soil
1 part perlite
1 part screened compost or peat moss
SEE ALSO: For more on feeding seedlings, page 38.
Q What kind of supplies do I need to start seeds?
A You don’t need many supplies. For indoor sowing, in addition to seeds, you’ll need pots, labels to keep track of what’s planted where, and seed-starting mix. Since most seeds germinate fastest with a little bottom heat, a heat mat is a good investment. They’re available from garden suppliers. You also can set seed flats on top of a refrigerator or in another spot that radiates mild heat. Keep in mind that in most cases you want to warm the soil to about 70°F/21.1°C, so you want a spot that’s warm, not hot.
Q Do I have to buy seed-starting mix? What about garden soil for starting seedlings?
A While your crops eventually will be perfectly happy growing in garden soil, it isn’t suitable for germinating seeds or growing seedlings indoors. Specially mixed potting soils and seed-starting mixes yield far better results because they are relatively sterile and minimize problems with diseases and pests. They also hold water well and provide ideal growing conditions for seedlings.
QI always have trouble trying to moisten dry potting soil, and seed-starting mix is even worse. The water just seems to roll off the surface. What’s the secret?
A The night before you plan to sow seeds, plant, or transplant, dump the mix into a 5-gallon/8.9 L bucket — the type that drywall compound comes in is fine, but wash out the bucket thoroughly first — or a clean garbage can. Then add water. You’ll need about 1 gallon (3.8 L) of water for every 2 gallons/7.6 L of mix. By the next day the mix should have soaked up all the water and should have the moistness of a damp sponge. If the mix is sopping wet, just add more dry ingredients and stir until they’re absorbed. If it’s still on the dry side (test a handful; if you squeeze, some moisture should come out of the mix but not much), add more water. If you want to plant the same day, use hot water. Wait until it cools down, then stir, and all the mix should be wet.
QI hate buying pots! Do I have to buy new ones, or can I use recycled coffee cups or something else?
A New containers are an option, but there are others. Smaller (2½"–3"/6.4–7.6 cm) pots that annuals or perennials come in are fine, and you can also reuse cell packs. For best results, wash previously used pots thoroughly and soak them in a 10 percent bleach solution (1 part bleach to 9 parts water) to kill any disease organisms they may harbor.
You also can grow great seedlings in all kinds of recycled containers, provided they’re clean and you punch a hole in the bottom of each one so water can drain out of the potting mix. Consider using coffee cups, yogurt containers, cottage-cheese containers, and sawed-off milk cartons or bottles. One thing to keep in mind, though: Your seedlings will be easier to care for if they’re all in the same kind of container. That’s because they’ll all have the same soil volume and drainage and will need watering at similar times.
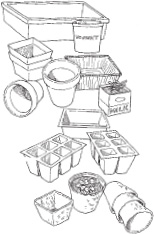
Containers for seed-starting
Q What about using peat pots? That way, you don’t end up with all the plastic pots to throw away.
A Peat pots are a good option, too. Just be sure to tear the top edge off the pot when you transplant it into the garden, because if it sticks above the soil surface it will wick water out of the area around the seedling, forming a barrier that’s hard for roots to penetrate. Just toss the torn pot edges onto the soil or into the compost.
QWhat’s the best way to sow seeds in pots?
A Fill the pots with premoistened medium to within about ½"/1.3 cm of the top, then sprinkle three or four seeds per pot. (Once seedlings are up, you’ll thin to the most vigorous seedling in each pot.) Press the seeds onto the soil surface, and cover them lightly with moistened mix. Covering to a depth equal to the width of the seed (this isn’t very much!) is a good general guideline. Just press tiny seeds onto the soil surface. Keep the medium evenly moist.
If you need a few dozen plants of a particular crop for your garden, consider sowing more seeds per pot or sow into small trays or flats. Then transplant seedlings into individual pots when they have at least one true leaf. (To sow more than one cultivar in a single flat, make short furrows and sow along them.) Be sure to mark each pot, flat, or furrow with a label that lists the crop name and the Transplanting a seedling date it was sown.
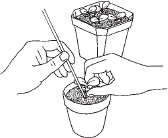
Transplanting a seedling
Q Do I need to keep my seedlings warm to get them to grow well?
A Actually, once seedlings have germinated, they grow best if they’re kept on the cool side, although seeds germinate best if they are in warm soil, between 75–85°F/23.8–29.4°C. The best way to do this is to provide bottom heat, either by placing pots on the top of a refrigerator or other warm spot, or better yet, by using a heat mat designed for germinating seedlings. Move pots off heat mats once seedlings have appeared, and then aim for an air temperature of about 60–70°F/15.5–21.1°C, and 10 degrees cooler at night. Keep cold-weather-loving crops like cabbages slightly cooler — 50–65°F/10–18.3°C. Seedlings that are kept too warm tend to be spindly, and while ones kept on the cool side will be smaller and slower growing, they will be stockier and make better transplant candidates.
QDo I really have to thin my seedlings? There’s something about throwing away all those baby plants that I just hate.
A Overcrowded seedlings don’t make the best candidates for producing high yields, so steel yourself and thin your seedlings. Think of yourself as being kind to the plant you are leaving rather than cruel to the ones you’re removing, if that helps. Overcrowded seedlings devote a considerable amount of energy to stretching for light or competing for nutrients, and thinning directs that energy toward producing healthy roots, short stocky stems, and vigorous roots.
The easiest way to thin is simply to snip off extra seedlings with scissors; this method minimizes disruption to the remaining plant. If you can’t bear thinning, you can sow several seeds per pot and then when each seedling has at least one true leaf, carefully uproot and separate them, then plant each one in its own individual pot. If you end up with more transplants than you have room for, share the extras with friends and neighbors who garden, or offer them to a local community garden.
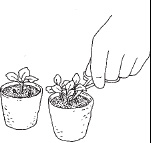
Using nail scissors to thin seedlings
Q What’s the best way to water? I accidentally flooded my pots, and I think some of the seeds washed away.
A A fast, efficient way to deliver water to your seedlings is to set pots in a tray of water and let the water soak up from the bottom. Watering seedlings from the bottom keeps even the smallest seeds in place, and it also helps prevent damping off, which rots the stems just at the soil line. To bottom water, place individual pots or entire flats in a shallow tray or larger flat that holds water, then let the water soak up to the soil surface. If you don’t have time to bottom water, use a small container so you can easily tip a small amount of water into each pot. Or use a watering can with a rose that sprinkles. Use room-temperature water to avoid shocking your seedlings.
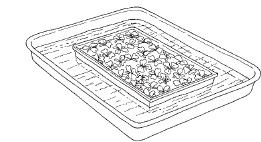
Bottom watering a flat of seedlings
SEE ALSO: For more on damping-off, pages 40–41 and 156.
Q What’s the best way to feed the seedlings?
A If you’re germinating seedlings in a mix that doesn’t contain any nutrients — one with peat and vermiculite, for example — feed them once a week after germination. Water with a weak fertilizer solution: Mix fish emulsion or other balanced organic fertilizer at half the strength recommended on the bottle. Weak compost tea is also effective. After the first 3 weeks, feed with full-strength fertilizer every 2 weeks. If you are growing seeds and seedlings in a certified organic potting mix or a homemade mix that contains compost, you probably don’t need to fertilize at all.
SEE ALSO: For details about compost tea, pages 120–121.
Q I bought seedlings this year, but they already seem too big for their pots. They’re growing in little cell packs, and I can’t move them outside for another week or two. What should I do?
A You’re right to be concerned about seedlings that seem too big for their pots. Chances are they’re becoming potbound, which means that the plant’s roots have filled all the space available in the pot. When this happens, the plants can become stressed, and they won’t perform as well as plants whose growth is unchecked. The best thing you can do is to repot your seedlings, putting each one into its own 2"–3"/5–7.6 cm pot (choose a pot that provides about 25 percent more root space than the seedlings have right now). This goes for purchased seedlings as well as homegrown seedlings that have gotten a bit too large for their cell packs or pots. The plants benefit from the extra root room, even if they receive only a week of extra time for growing and hardening off before being moved to the garden. True, repotting is extra work, but it allows seedlings to continue growing without interruption, which means better transplant success and better yields once plants are in the garden. If you can’t plant outdoors on schedule and don’t have time to repot, water with a half-strength dilution of liquid fertilizer.

Repotted seedling
Q My seedlings wilted today while I was away at work. How do I tell when it’s time to water, before my plants are really suffering?
A Expert gardeners use a few different techniques. Lift a dry pot in your hand, then water it and lift it again. You should be able to tell the difference in the weight, since wet pots are heavier than dry ones. Or lift an entire flat of pots to judge the weight. (Either way, this technique underscores the value of using all the same pots for starting seeds, since they’ll all weigh the same when wet and dry.) Another option is to stick a finger into the soil in a pot. It’s okay if the surface is slightly dry, but the soil should be moist just under the surface. Keep in mind that seedlings in warm, dry portions of your house will need watering more often than ones in cooler, more humid areas.
Q The seedlings in two of my pots fell over last night. The tops look okay, but the stems are dark right at the soil line. Is there anything I can do to save them?
A If the stems are rotted at the base, just where the stem enters the soil, your seedlings have been felled by a disease called damping-off and can’t be saved. Remove the afflicted pots and discard the potting medium. To prevent the problem from spreading to more pots, eliminate crowding by spreading out pots and thinning seedlings. A small fan will help improve air circulation, but avoid pointing it directly at seedlings. Disinfect the pots with a 10 percent bleach solution (1 part bleach, 9 parts water) before you reuse them. You may want to try a pasteurized seed-starting mix if the problem recurs. Pasteurizing ensures that the mix is free of pathogens that can cause damping-off.
SEE ALSO: For more on damping-off, page 156.
Q My seedlings are pretty tall, and they look stringy, not stocky. What did I do wrong?
A Insufficient light is probably the culprit. Suspend fluorescent lights 2"–4"/5–10 cm above the seedlings and keep them on for 14 to 16 hours per day. If you’re using a windowsill, consider supplementing the light your seedlings receive by adding artificial light. High temperatures can also cause stringy seedlings, so move yours to a cooler spot to slow down growth. Directing a fan on your seedlings also helps keep them stocky (although this won’t improve them if insufficient light is the culprit). Strangely enough, brushing plant leaves lightly with a cardboard wrapping-paper tube or a broom handle has a similar effect. Brush for 1½ minutes twice a day for best results.
Q I have room for only one shop light inside, and that’s not enough space for all the seedlings I want to start. I can’t afford a greenhouse, either. Is there another option?
A A cold frame may be just the ticket for increasing your seed-starting capacity. It’s basically a bottomless box with a glass or Plexiglas top. Cold frames are great for starting seedlings of cool-weather crops like cabbages, and they’re also useful for hardening off seedlings that are on their way to the garden. You can purchase premade cold frames from many nursery catalogs, but they’re easy to make (search the Internet for plans with details on how to build them). Because a cold frame lid traps solar heat inside, the temperature inside the frame can build up quickly on sunny days. You can release excess heat by propping open the lid manually, but it’s worth your money to invest in a solar-powered vent opener, which will open the lid and ventilate the seedlings automatically for you.
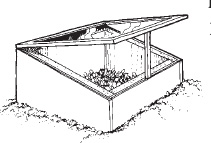
Venting a cold frame
SEE ALSO: For an explanation of hardening off, page 54.
Q What do I need to do to prepare my garden soil so I can sow seeds?
A Soil that’s rich in organic matter is perfect for sowing seeds, so use the recommendations in chapter 2 to amend your soil as necessary. To prepare an ideal seedbed for sowing, rake the soil smooth and break up any clods of soil. Remove any rocks and weeds.
Q After preparing my soil, do I just “plunk in” the seeds? Are there tips to make things easier?
A For larger seeds, plunking them in is just what you do. The traditional way to plant a straight row of seeds is to put a stake at each end of the row and run a string between the stakes. Then use a corner of your hoe to make a shallow furrow. An even easier method is to simply lay the handle of your hoe on the soil where you want the seeds to grow, and press it down to make a straight, perfect furrow in a single step.

Using a hoe handle to make furrows
Once the furrow is made, just place the seeds at the proper spacing, then use your hand or hoe blade to cover them lightly with soil. If you’re sowing in wide rows or are sowing a crop such as lettuce, which has small seeds, lightly scatter the seeds over the top of the bed or sprinkle them along the furrows.
Q I always end up with seeds that are too crowded or with all the seeds on one side of the bed. How can I spread them out more evenly?
A To space out large seeds, try using a board with marks on it or notches cut out of it every 3"/7.6 cm. Use the notches to place seeds at their proper spacing. For tiny seed, try mixing it with a bit of builder’s sand, then broadcast seed and sand together. There also are a variety of mechanical seeders available that help you sow seed and also reduce the need to thin out excess seedlings, from inexpensive handheld seeders to mechanical devices you push along the row to dig a furrow, seed, and cover all in one pass.
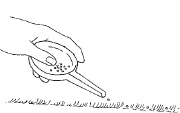
Handheld seeder for sowing small seeds
Q Is there any other way to space out seeds?
A You can make your own seed tapes. This is a great activity for late winter or early spring when there’s not much you can do outside in the garden.
1. Rip off a 5'/1.5 m-long section of connected paper towels and cut lengthwise strips ¾”/1.9 cm wide.
2. Dissolve a tablespoon of cornstarch in a cup of water. Heat it until it boils, stir constantly to prevent lumps, and let it cool.
3. In a plastic sandwich bag, combine 1–2 teaspoons/4.9–9.9 ml of cooled cornstarch solution with ¼ teaspoon/1.2 ml of seeds.
4. Lay out a strip of paper toweling, and on it write the name of the crop you’re sowing.
5. Cut a tiny hole in one corner of the plastic bag, and squeeze out tiny droplets of the solution along a strip of toweling. Space the drops according to the spacing of the crop you’re growing. Making a seed tape
6. Let the paper dry, then roll it up and store it in a plastic bag in a cool, dry place.
7. When it’s time to plant, just unroll your homemade seed tape in a furrow and cover it with soil.

Making a seed tape
THE BEST TIME TO SET UP SUPPORTS for vegetable crops is before or at planting time. When they have support, pole beans, peas, and tomatoes will produce a better-quality crop that’s also easier to pick. String trellises and freestanding teepees are fun and easy to set up.
String trellises with simple teepees as the end supports work well for supporting pole beans. Use three bamboo poles or 6'/1.8 m-long garden stakes for each teepee. Place another pole across the top that runs from one teepee to the other. Run strings between the outside legs of the tee-pee. Then tie strings vertically from the top pole down to the strings that run across the bottom. Plant transplants or seeds at the bottom of each vertical string. At the end of the season, cut down all the strings; roll them up, plants and all; and add them to the compost pile.
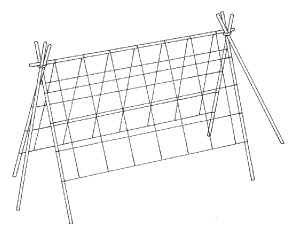
Double-teepee string trellis
Teepees are a great option for trellising pole beans as well as cucumbers and peas, all of which either climb by twining or clasping supports with tendrils. They’re easy to make, inexpensive, and quite handsome. Make them from bamboo poles, 1"x2"/2.5Ö5 cm wooden stakes, or even saplings. Use five or more poles that are about 8'/2.4 m long and tie the tops together with heavy twine. Add twine between poles for extra support. Be sure to stick the base of each pole 4"–6"/10–15.2 cm into the soil so the teepee is sturdy.
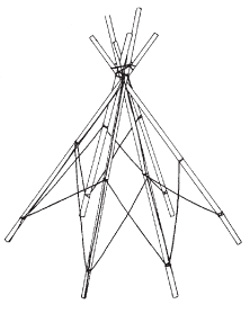
Pole-and-twine teepee
Q I’m ready to plant my garden and will be growing a few things that need staking or trellising. Do I plant first or put up the trellises first?
A While it is possible to gently insert a small stake next to a new transplant without damaging it, you definitely want to install trellises before you sow seed or move transplants. Otherwise, it’s far too easy to crush baby plants, break off branches, or damage roots. If plants aren’t in the picture yet, once you’ve installed supports it’s easy to fluff up the soil and add a bit of extra compost to repair any damage caused by stepping on the soil by mistake.
Q Do I need to water the garden after I’ve sown seeds?
A If you are planting in spring, the soil usually is moist enough for seeds to germinate without much supplemental watering. But don’t just think of sowing as a springtime activity! Ideally, you’ll be planting new batches of seed throughout the season, from spring to fall, to keep the garden producing and to spread out the harvest. For best results whenever you sow, give seeds a little extra TLC, and you’ll be rewarded by bumper crops later on. Consider the following:
 COVER NEWLY SOWN SEEDS with potting mix instead of garden soil, then cover the sown area with floating row covers. Potting mix is lighter and less prone to crusting than garden soil, and it will let seedlings break through to the surface more easily. Floating row covers protect seedlings from wind, pests, and other problems.
 IF THE SOIL IS DRY, water the row at planting time and sprinkle the area regularly to keep it evenly moist but not wet. In summer you may need to sprinkle newly sown seeds daily or every other day. Try placing a full watering can in view as a reminder. If you forget to water and the soil dries out once seeds have begun to germinate, the seedlings can die.
 ONCE SEEDLINGS ARE UP and growing, check them frequently, and water as necessary to keep the soil evenly moist.
Q What other care do seedlings need?
A Thin plants to their final spacing when they have a few sets of true leaves, either by cutting them off or pulling them up. If you pull up the extra seedlings, be sure to gently press down the soil around the remaining seedlings. It’s also a good idea to cover sown seedbeds with floating row covers (see pages 134–136) to help protect emerging plants from all types of insect pests. See chapter 4 for more on preventing problems with pests.
Q I don’t want to bother with seeds this year, so how do I make sure I buy healthy transplants?
A First, you’re better off buying transplants from a garden center than from a grocery store or bigbox store, where they may or may not get adequate watering or other care. Look for bushy, compact plants that have healthy green leaves. Check the roots, too, by gently dumping a plant out of its pot while holding the top of the root-ball between your fingers. Avoid plants that show any of the warning signs of poor quality, as described on page 52.
If you decide to buy larger plants, pick off any fruits that have already started forming. This redirects the plants’ energy into producing roots, which it will need for the long haul. If the nursery or garden center you usually shop at only offers seedlings in market packs, and you don’t want to grow six plants of a single cultivar, try one of these options:
 SHOP AT A LOCAL FARMERS’ MARKET in spring. Local growers often offer vegetable seedlings for sale.
 SHOP FOR SEEDLINGS ONLINE. There are Internet companies that sell single transplants.
 BUY MARKET PACKS of all the cultivars you want to grow, and share excess seedlings with friends and neighbors. Or see if a local community gardening group, garden club, or food pantry would be able to use the extras.
 ASK IF THE NURSERY WILL LET YOU “SWITCH OUT” cultivars in a market pack.
 BUY ALL THE CULTIVARS YOU WANT to grow, and toss the extra plants on the compost pile.
Q I bought plants growing in 4"x6"/10Ö15.2 cm plastic containers with eight plants in each container. How should I transplant them?
A A few days before you’re ready to transplant, water them, then use a sharp knife to cut between the individual plants. Don’t take them out of the containers; just leave them where they are. This technique, called blocking, encourages roots to branch so the plants will be ready to go into the garden. It will be easy to slip the individual plants free of the container on planting day.
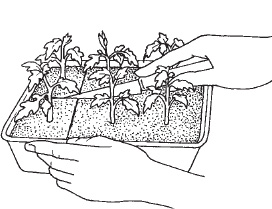
Blocking a container of transplants
Before you buy, check each and every six pack for these warning signals. If you see any of them, it’s buyer beware!
 OVERGROWN PLANTS that are very tall but whose roots are still contained in tiny pots
 PLANTS THAT ARE POTBOUND, with loads of roots circling the rootball
 DRIED-OUT ROOTBALLS or soggy rootballs with dark roots
 SICKLY LOOKING, yellow, or purplish leaves
 CRISPY, DEAD LEAVES or signs that the plants have been allowed to dry out and wilt between waterings
 SIGNS OF BUG INFESTATIONS: Put on your reading glasses if you need them to spot tiny pests like aphids. Also look for webs on the uppermost leaves and stem tips, yellow spots on foliage, a sticky coating on leaves that may be covered by sooty mold, or clouds of insects that fly up when disturbed.
Q What’s the best way to transplant my veggie starts? Will they need special care right after planting?
A Once you’ve hardened off your plants as described on page 54, water them thoroughly on the day they’re going to go into the garden. Starting at one end of the row, begin digging holes and setting plants in place. Make each planting hole about the same depth as but slightly wider than the transplant’s soil ball, and firm the soil gently around each plant when you set it in the ground. Leave a shallow depression around each transplant, so water can collect. If the soil is at all dry or the weather is sunny (transplanting on a cloudy or rainy cool day is best), water each plant as you go. Especially if the weather is sunny, provide shade to protect transplants until they’ve adjusted. Upturned bushel baskets, pieces of lattice propped along the row, or burlap draped over supports are all easy ways to provide a bit of shade. If you haven’t been watering each plant as it went into the ground, be sure to water the entire row thoroughly once you’re finished. It’s also a good idea to install a cutworm collar around each seedling as you plant.
SEE ALSO: For more on cutworms, page 157.
SEEDLINGS THAT HAVE BEEN PROTECTED INDOORS aren’t
ready for the rigors of the garden just because the last frost date has passed. Drying winds, intense sun, variations in soil moisture, and other extreme conditions cause a condition called transplant shock, which leads to wilted and even dead seedlings. Before you move homegrown veggies (or purchased transplants) to the garden, be sure to harden them off by gradually exposing them to the outdoors. Hardening off helps toughen plants so they can handle the vagaries of weather outdoors. Set the seedlings outdoors in the following sequence:
DAY 1. In a spot with bright light, but not direct sun, for an hour or so.
DAY 2. In the same spot for about 3 hours.
DAY 3. In a partly sunny spot for about 5 hours.
DAY 4. In a partly sunny spot for the day.
DAY 5. In the morning and leave them out for the day and overnight.
Protect your seedlings from animal pests throughout this process. When they’re fully hardened, transplant, ideally on a day when the weather is cloudy, overcast, or even rainy.
Q The calendar says it’s time to start planting, but it still seems pretty chilly in the morning. What can I do to protect my seedlings from the cold?
A Preheating the soil by covering it with black plastic mulch is a great way to improve conditions in the garden and get plants growing on time in spring. Floating row covers (pages 134–136) provide a bit of protection for transplants but not more than a couple of degrees. For more protection, cut the bottoms from milk jugs and place them over transplants (remove the caps during the day for ventilation), or place wire hoops over the rows and cover them with ventilated clear plastic. You can even use paper bags or fold hats out of newspaper and place them over seedlings for protection during an unexpected cold snap.
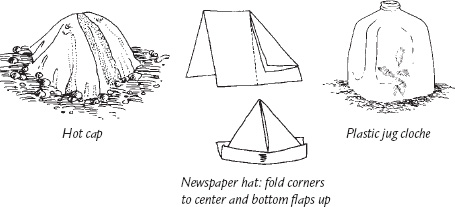
SEE ALSO: For more on plastic mulch, pages 105–106.
Q As I begin to read about individual vegetables, I am overwhelmed by the number of different dates and schedules. How do I keep track of what to plant when?
A One of the simplest systems is to jot a schedule down on a calendar, preferably one that you use every day so you’ll see reminders regularly. First, list the crops you want to grow on a sheet of paper or in a garden notebook. Next, determine your average last spring frost date, by calling your local Cooperative Extension Service office or checking the Internet.
Start your planting schedule with the first crop on your list. Check the seed packet(s) or the sowing and transplanting recommendations in Part Two to determine how you are going to grow it. Let’s use tomatoes as an example. The seeds need to be started indoors 6 to 8 weeks before the last spring frost date and transplanted out once the weather warms up. To determine when to sow seeds, count back 6 to 8 weeks from your frost date, then jot a note, such as “sow tomatoes,” on your calendar. Make a similar note for the recommended transplant date, 2 weeks after the last frost date.
Repeat the process for each crop you are planning to grow. If you end up with too many crops to sow or transplant on a particular date, simply move some of them to another date that works for you. The end result is an organized plan of attack for your spring gardening activities.
Q I live in central Florida, and it’s just too hot in the summertime to garden — both for me and for most of the vegetables I grow. Should I just let everything die and wait for cooler weather?
A Many gardeners in hot climates simply split their growing season in half. They grow crops in spring and early summer, and then again from fall to winter. You can let everything die out and start over once the weather is a bit cooler, since plants that have been stressed by the heat and disease likely won’t produce as well as fresh new transplants. If you do decide to replant everything, it’s best to pull out or cut down the plants from your spring garden (especially if they’re diseased) and take steps to protect the soil from the blazing summer sun. Either plant a cover crop, or cover the soil with a layer of mulch to protect it until you can replant. If your crops such as tomatoes and peppers don’t seem stressed by the midsummer heat, prune them back, sidedress with compost, and water them deeply to give them a jump start for the second half of the season.
SEE ALSO: For cover crops, pages 68–69.
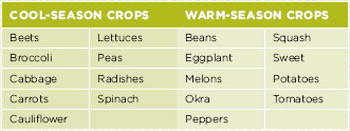
DEPENDING ON THE TEMPERATURES they prefer, vegetables fall into two general groups: warm season or cool season. Warm-season plants, such as tomatoes, peppers, eggplants, and beans, thrive in hot summertime weather, are started around the same time in spring, and are planted out on or around the last spring frost date. (In southern zones, where summers are hot, they’re often grown in spring and early summer, then again in fall and early winter.) While none tolerate cold weather, they don’t share everything in common. Beans can be moved to the garden when the soil is 55°F/12.7°C, but peppers or eggplant require a minimum of 60°F/15.5°C.
Cool-weather vegetables — cabbage, broccoli, lettuce, kale, and spinach — are the plants to grow in spring and fall. Start in spring for an early summer crop or in late summer for fall harvest. (In mild climates, grow over winter.) While temperatures in the 60s and 70s/15.5–26.1°C are ideal, they also adapt to cooler temperatures and can be grown under plastic tunnels or other season-extending devices.
Q I had a nice lettuce crop this year, but the weather is too hot for another lettuce planting now. I don’t want to just pull it up and leave the space empty. What should I plant next?
A Following one crop with another is called succession planting, and it’s a great way to increase the harvest from your vegetable garden without making the garden any bigger. You can follow a crop of spring lettuce with heat-loving tomatoes, peppers, or eggplants. Bush beans are another option. Late in the season, follow these warm-weather crops with cool-season greens such as lettuce or spinach.
Q I live in Helena, Montana, and our growing season is really short. Is it even possible to do succession plantings?
A Gardeners in Helena (Zone 4) have about 95 frost-free days in the growing season. Add the number of days to maturity together for the crops you want to grow to see if your season is long enough. In areas where the season is short, you probably have time for only two crops — peas followed by a fall crop of lettuce, for example. Gardeners in Zone 5 have a little more time and can probably fit in three crops — lettuce followed by tomatoes, followed by kale in fall, for example. In contrast, gardeners in Picayune, Mississippi (Zone 8 or 9), who have approximately 221 frost-free days in which to grow, can produce a succession of crops from late winter to late fall.
Keep in mind that as fall approaches, plants grow more slowly than they do in spring. They may be as much as 2 to 3 weeks later than the days-to-maturity indicated on the seed packet. (On the other hand, if fall weather is warm, they might beat the days-to-maturity by a week.) To make sure there’s enough time for a harvest, add 2 weeks to the days to maturity for fall crops to compensate for declining light and cooler temperatures later in the growing season.
For extra insurance in fall, plan on installing season-extension devices over late crops: Hoops covered with polyethylene give good protection, but be sure to vent or remove them during the day when temperatures are warmer. You can also wrap polyethylene around tomato cages or cover crops with floating row covers to protect them.
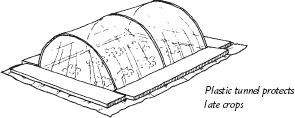
Plastic tunned protects late crops
SEE ALSO: For more on zones, page 170.
Q I’ve spaced out my cabbage and broccoli plants, but there’s a lot of unplanted soil between them. Can I use it to grow other plants?
A Interplanting — planting a fast-growing crop in between a slower-growing one — is an excellent way to use that unplanted space. It also boosts yields without expanding your garden. To use this technique, first plant a slower-growing, longer-season crop, such as onions, leeks, peppers, tomatoes, Brussels sprouts, or eggplant, using the standard recommended spacing. Then fill the space in between the slower-growing plants with fast-to-mature crops such as leaf lettuce, radishes, beets, bush beans, or spinach. The fast-growing crops will be ready for harvest by the time the slower-growing ones have grown large enough to need all the space.
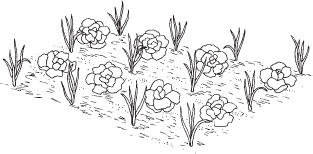
Onions interplanted with lettuce
Q How does rotating crops help my garden?
A Rotating crops makes it easier to maintain soil fertility, because some crops are heavy feeders and others are not. Also, different crops remove different amounts of the various minor nutrients, such as iron and magnesium, from the soil. So by rotating crops, you’ll make the most efficient use of the nutrient reservoir in your soil.
Q Is there a really simple crop-rotation plan I can follow?
A Yes. To keep the soil fertile, pay attention to how each crop affects the soil. Crops can be heavy feeders, light feeders, or soil builders. Heavy feeders include tomatoes, broccoli, cabbage, corn, lettuce and other leafy vegetables, eggplant, and beets. Alternate heavy feeders with either light feeders or soil builders. Light feeders include garlic, onions, peppers, potatoes, radishes, rutabagas, sweet potatoes, Swiss chard, and turnips. Soil builders include peas, beans, and cover crops like clover.
Q My garden is tiny, so I don’t have many places where I can plant different crops. Will my garden fail if I don’t rotate crops?
A No, it won’t, especially if you add plenty of compost in spring and/or fall to ensure that nutrients used up by heavy-feeding crops like corn or tomatoes are replaced. You may also want to consider planting some living mulches or green manures to add additional organic matter and nutrients. Try sowing legumes such as dwarf white clover or hairy vetch around tomatoes, for example, or plant these crops immediately after pulling up your tomatoes for the year. Till the residue into the soil in spring.
SEE ALSO: For more information on living mulches and green manures, pages 68–69.