Chapter Three
Hive Bodies and Supers
Making your bee boxes is pretty simple. It involves cutting parts to size and making rabbets that your store-bought bee frames will rest on. You’ll have joint options for assembling the boxes. By attaching angled handholds to the outsides of the boxes, you’ll create a slip-free grip, which is important when it comes to working the hive.
Hive Terminology
Some new beekeepers are confused by beekeeping lingo, and nowhere is there more confusion than with the terms hive bodies, brood chambers, and supers. They are all boxes of the same length and width. The only difference is the height, or “depth,” as it’s known. Many beekeepers refer to the deep boxes, or “deeps,” which are about 95⁄8" high, as the brood chambers. They call medium and shallow boxes “supers” or “honey supers.”
As a general rule, no matter what height the box is, if a beekeeper is using it for raising brood, it’s referred to as a hive body; if it’s used for collecting honey, it’s called a honey super. In this book we call the deep boxes the hive bodies and the medium and shallow boxes honey supers.
You can use any size of box for raising brood or storing honey. Personally, I’ve shifted toward having more room for brood. I’ve been leaving two 10-frame deeps and one medium on the hive year-round. These hives seem to do better. By leaving that extra super of honey on in the fall, there is less chance of the bees dying of starvation, and any honey not used gives them a good start in the spring as the queen kicks into gear. More room in the summer means more room for the queen to lay and less swarming. And more bees in the hive means more resiliency and better honey production. (See 10-Frame vs. 8-Frame Boxes on page 36 for more information.)
The thought of building your own hive boxes can be intimidating to some people. After all, the commercially made ones you see have those pretty, tight-fitting box joints and nicely cut, rounded handholds. For the most part, this is done on some very expensive, often computerized machinery. I watched a video of a machine that could make one end of a hive body in less than 10 seconds; the cost of the machine was a paltry $80,000, plus tooling. It’s going to take us a little longer to build our hive boxes, but the cost won’t break the bank.
Hive Body with Butt Joints
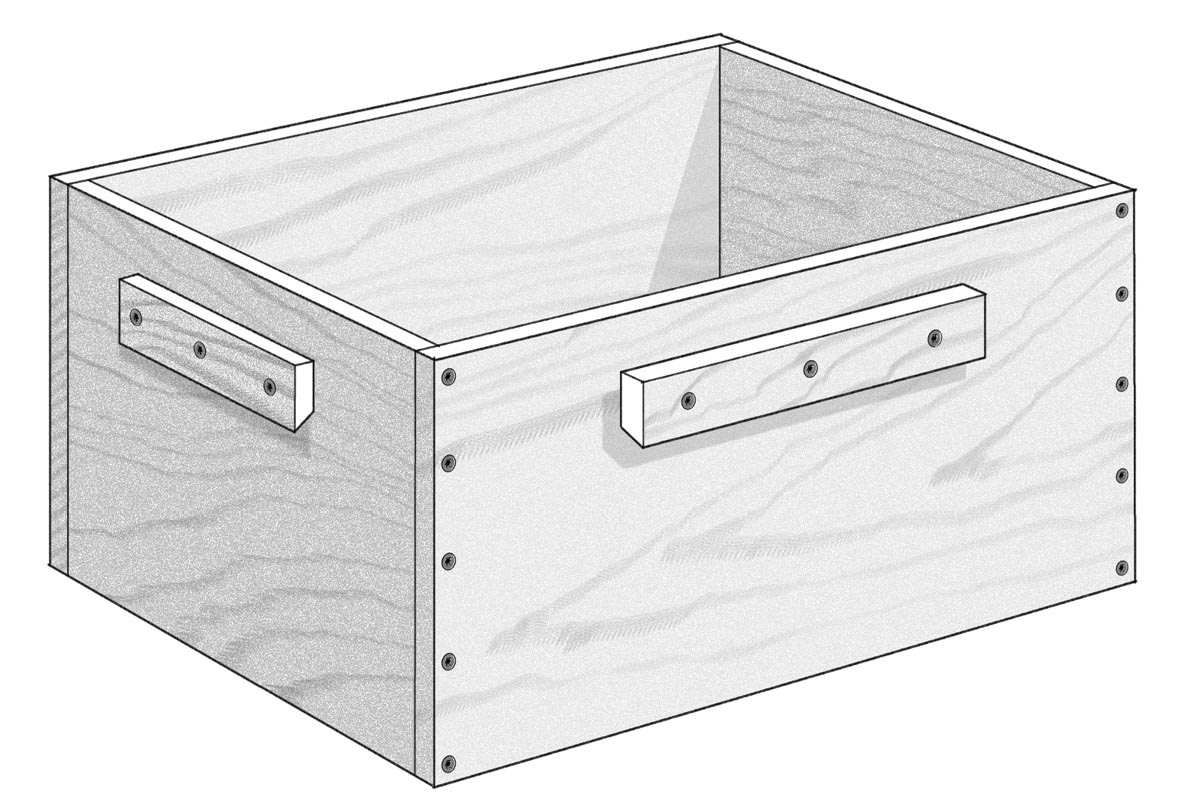
With the modern glue and screws available today, we can make a perfectly strong and good-looking hive body using a simple butt joint. The project on page 37 is virtually the same but uses rabbet joints for a slightly fancier treatment. So what are we waiting for? Let’s get going. The hive body consists of two sides, two ends, and either two or four handholds.
Tools
- Circular saw
- Table saw
- Combination square with protractor head (see step 3)
- Drill with combination drill/countersink bit
- Framing square
- Pipe or bar clamps
Materials
- One 6-foot pine 1×12 (you can also edge-glue narrower boards to get the width you need)
- Twelve 11⁄4" deck screws
- Twenty 2" deck screws
- Waterproof glue
- Sandpaper
1. Cut the side and end pieces.
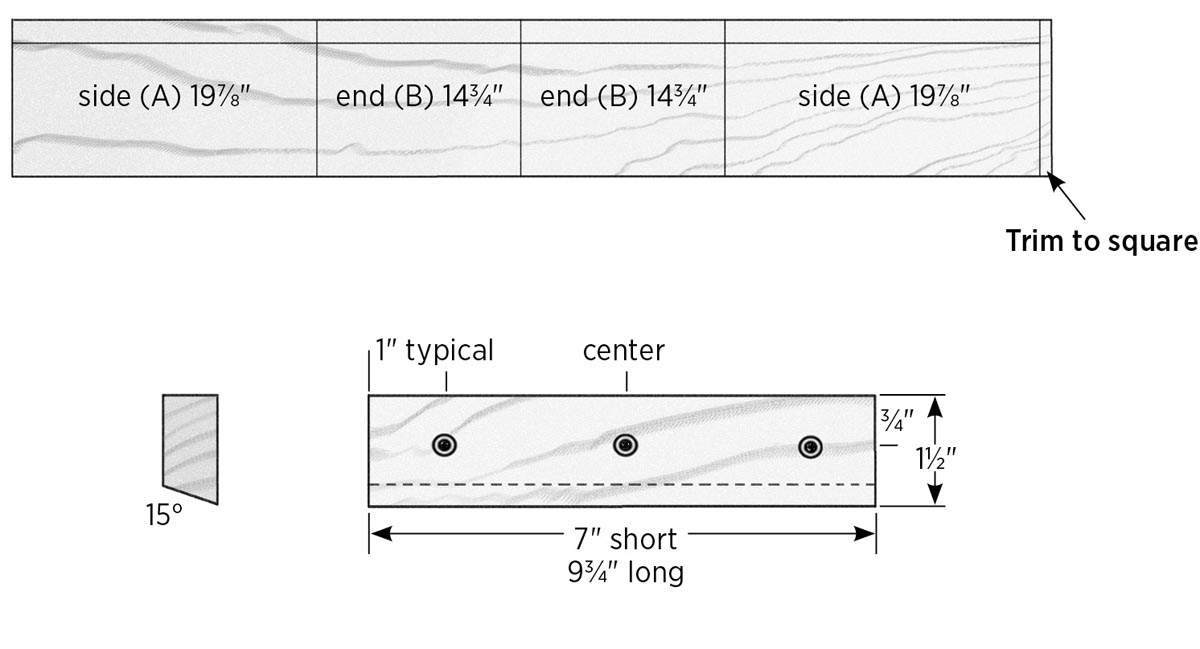
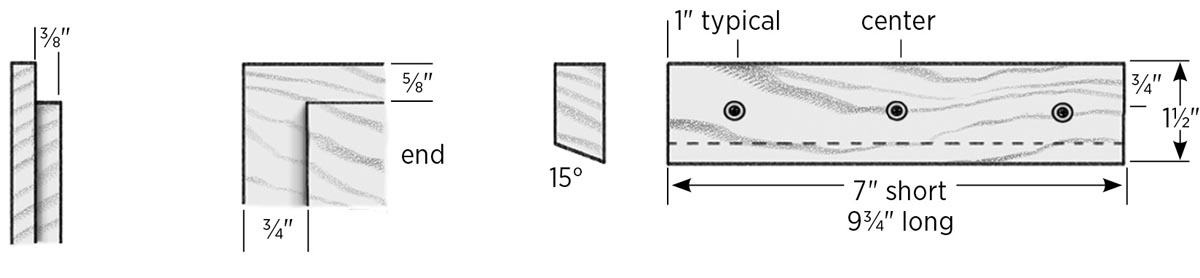
Check the end of the 1×12 board with a square and trim it square, if necessary. Cut two pieces to length at 197⁄8". Cut two more pieces to length at 143⁄4". Set the fence on the table saw and rip all four pieces to 95⁄8". The longer pieces are the sides (A), and you’re done with them. You’ll use the leftover strips later for the handholds.
Work tip: For crosscutting the wide boards, a circular saw and an accurate crosscut guide will work. If you are using the table saw to cut the sides to length, it’s best to cut the boards in half first. These shorter boards are easier and safer to handle, and you can get one side and one end from each piece.
2. Rabbet the end pieces.
The 143⁄4" × 95⁄8" end pieces (B) each get a rabbet in their top inside edges to create rests for your store-bought frames. To cut the rabbets with a standard blade on a table saw, set up the saw with a zero-clearance fence (see page 16). Set the saw blade height to 3⁄8", and set the saw fence so it’s 5⁄8" from the wood fence board to the far side of the saw blade.
Make a test cut in a piece of scrap, check the dimensions, and adjust as necessary. Make the shoulder cut (at 5⁄8") on both end pieces, then make the waste cuts by gradually moving your fence closer to the blade until the rabbet is finished.
3. Create the handholds.
The leftover pieces from the ripped 1×12 are around 11⁄2" wide, a good size for the handholds. First, set up the saw: Remove the zero-clearance fence. Using a combination square with a protractor head or whatever tool you have for measuring an angle, tilt your saw blade to approximately 15 degrees. Set the saw fence so that it’s about 11⁄4" to the nearest part of the saw blade.
Ideally, when you make the cut, there will be a small flat left on the top, as shown in Butt-Joint Hive Body Parts and Cutting Plan, on previous page. If you end up without a flat spot, just use some sandpaper to take off the sharp edge.
Make the beveled cut on enough material for four pieces at 7" long and four pieces at 93⁄4" long, then crosscut the pieces to length. (You can save the extras to use on your honey supers; see page 39.) If desired, you can make your handholds shorter; the handhold cutouts on commercially made hives are about 41⁄2".
Sand the edges of the handholds for smoothness. Mark each piece for three screws, as shown as shown on the previous page, then drill a countersunk pilot hole at each mark. Size the holes for 11⁄4" deck screws.
Safety note: As careful as I am with a table saw, I use extra caution when making any cut with the blade tilted. Always be aware of where the blade is and where your fingers are; you don’t want the two to meet. Always use all appropriate guards, push sticks, and other safety devices.
4. Assemble the hive body box.
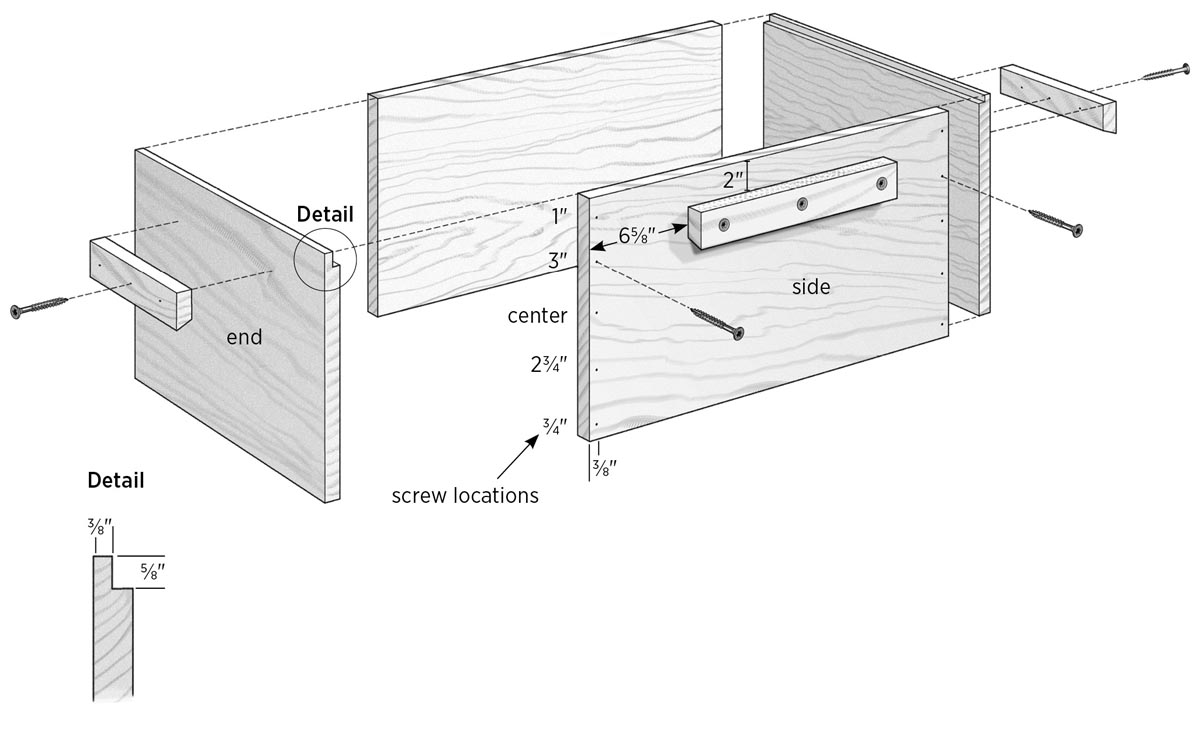
Mark each side piece for screws, as shown in Butt-Joint Hive Body Assembly, on page 35, and drill countersunk pilot holes at the marks, sizing the holes for 2" deck screws.
Apply a generous amount of glue on the ends of the end pieces, and clamp the box together, as shown. It’s nice to have a helper for this step, or you can do one side at a time, if you wish. Tighten the clamps enough to hold things together, then check that all edges are flush and the box is square. It’s also a good idea to make sure the frames you are using fit nicely with a little bit of play end-to-end.
Tighten the clamps. You should get some glue squeezed out. Confirm that the box is square and edges are still flush. Drill countersunk pilot holes on your marks and fasten the box with 2" deck screws. The hardest part about making the box with butt joints is dealing with warped boards; sometimes you have to start with one or two screws, then work the edge as you go, tapping the pieces one way or the other to keep them flush. Let the glue cure and remove the clamps.
Work tip: I used my table saw top to assemble my hive bodies. I lowered the blade and put a sheet of plastic down so the glue wouldn’t stick or mar the surface. Also, the fence is perfect for use as a backstop when you line up and clamp everything together.
5.Install the handholds.
Use a combination square to draw layout lines for the handholds, 2" below the top of the box, near the center of each side. Then, mark the center of each side of the box on that line. Apply glue to the side of the handle that will go against the box. Position each handhold so its top edge is on the layout line and its center hole is over the center mark (the short handholds go on the end pieces). Fasten each handhold to the box with three 11⁄4" deck screws.
Congratulations. You have finished your first hive box. You must be dying to get some bees to put in it, but what’s a house without a roof? We’re not quite ready for bees yet. We still need to build inner and outer covers. See page 40 to get started.
10-Frame vs. 8-Frame Boxes
Here in the Northeast, the tradition has been to use two deep, 10-frame boxes year-round for the bees, and add medium or shallow boxes for comb and extracted honey. But nowadays many new beekeepers, young and old, are leaning toward using all medium boxes, or using 8-frame hives (see page 121). Both are lighter to lift than the 10-frames, and there are other theories about the benefits of using 8-frame boxes:
- They are more similar to the shape and size of a hollow tree, where bees might nest if they were feral.
- The boxes are narrower, so as the bees naturally move up during the winter, they don’t have to spread out as much to access the food supply. This can be a plus when the weather remains cold and the cluster is tighter.
Hive Body with Rabbet Joints
This deep hive body has the same overall dimensions as the butt-joint version (page 33), but it has rabbets on the end pieces (for joining the ends to the sides), as well as for the frame rests on the hive body. The different construction means the cutting list is somewhat different from that of the butt-joint body.
The advantages of a rabbet joint over a plain butt joint include a larger surface area for gluing and a solid surface to help line up the boards during assembly. When the sides are clamped together, any cupping is pulled in tight to the joint.
The tools and materials needed for this project are the same as for the butt-joint body, and the steps here follow many of the same techniques, so be sure to read that project first before starting this one.
Tools
- Circular saw
- Table saw
- Combination square with protractor head (see step 3)
- Drill with combination drill/countersink bit
- Framing square
- Pipe or bar clamps
Materials
- One 6-foot pine 1×12 (you can also edge-glue narrower boards to get the width you need)
- Twelve 11⁄4" deck screws
- Twenty 2" deck screws
- Waterproof glue
- Sandpaper
1. Cut the box parts.
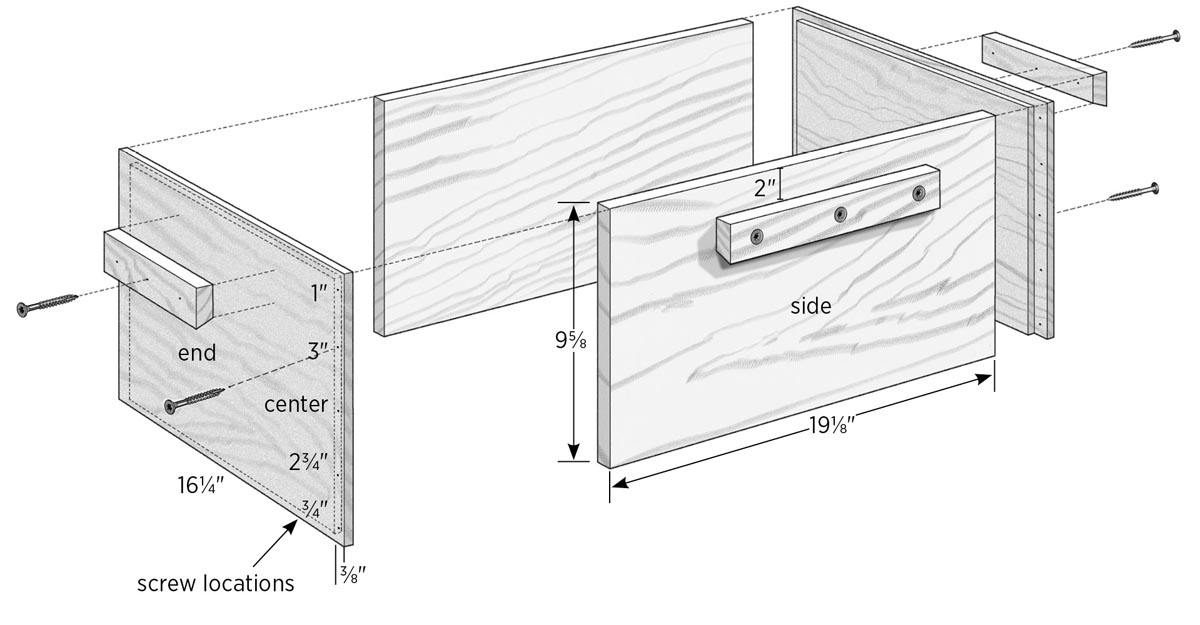
Cut the two end pieces to length at 161⁄4", and cut the two sides at 191⁄8". Rip all of the pieces to a width of 95⁄8", saving the cutoff strips for the box handholds.
2. Cut the rabbets.
Set up the table saw with a zero-clearance fence (see page 16), and set the table saw height at 3⁄8". Position the saw fence and cut a 5⁄8"-wide rabbet along one long edge of each end piece; these rabbets are the frame rests.
Reset the saw fence and cut a 3⁄4"-wide rabbet along both short edges of each end piece; these are for the joints with the side pieces, so the width must match the thickness of the side pieces. Touch up any rough edges with sandpaper.
3. Assemble the hive box.
Dry-assemble the box with pipe or bar clamps to check the fit, then drill countersunk pilot holes, following the layout shown below.
Disassemble the box and apply glue to the rabbet joints. Clamp the box back together and drive 2" deck screws to complete the assembly. Let the glue dry as directed.
4. Cut and install the handholds.
Create four handholds using the cutoffs from the side/end pieces, following step 3 on page 35. Install the handholds as described in step 5 on page 36.
Medium and Shallow Supers
Now that you’ve seen two methods for making hive bodies, you can use the same techniques to build your supers. It’s nice to build one box each way so you get the hang of it. Once you’ve got it down, building more than one box at a time will really make things go faster. You can cut all of your boards and then set up just once for each operation, such as cutting the frame rests or making the rabbets for the sides.
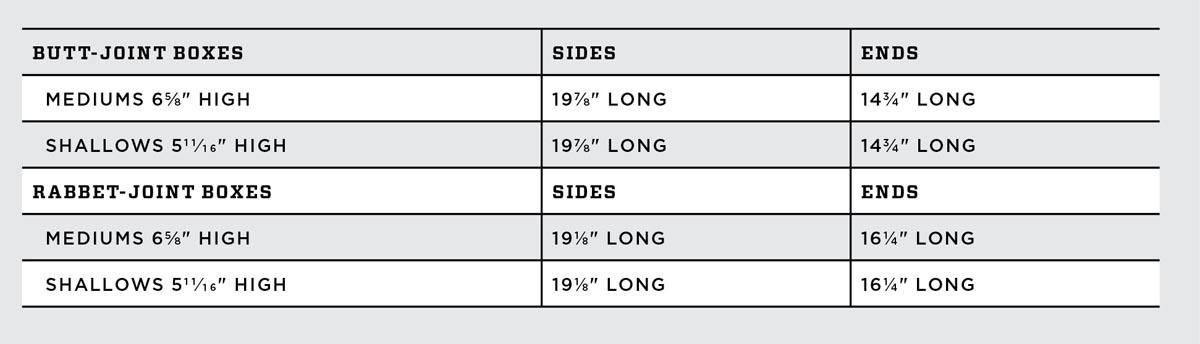
Medium and shallow boxes are made exactly like the deep hive bodies described in the other projects in this chapter. The only differences lie in the heights of the boxes. The chart here shows cutting sizes for making supers with either butt-joint or rabbet-joint construction. The only additional wood you might need is for making the handholds. If you make short handholds for the deep boxes, you may have enough leftover material for your supers. Another option is to start with a board one nominal size wider than you need, leaving plenty over for handholds and possibly a few other items. The medium and shallow supers call for 1×8 boards. The leftover strips from making shallow boxes will be enough for handholds.
Supers Cutting Chart