Chapter Nine
Building 8-Frame Hives and Nucs
Many beekeepers choose to go with 8-frame hives instead of 10-frames, primarily because of weight: Traditional 10-frame hives are just plain heavy, often weighing in at 70 or 80 pounds. The process for building an 8-frame is exactly the same as with a 10-frame, but with 8-frames everything is narrower. For some reason, commercially available 8-frame boxes seem way out of proportion; you can actually fit 9 frames into the ones I looked at. My box is proportioned to fit 8 frames, and this chapter includes everything else you need to set up a complete 8-frame hive.
8-Frame Deep Hive Body
It’s easiest to make all of your boxes at one time because the joint cuts will be the same for all of them (see Building 8-Frame Supers, on facing page). In our area of the Berkshires, in western Massachusetts, I recommend running three deep boxes for brood and adding honey supers on those. Check with local beekeepers in your area for recommendations on how many frames total you should have for brood.
I recommend using Doone’s Double-Hive Stand (page 65) for your 8-frame hive. Even if you plan to have only one hive, this will give you a place to set boxes while you’re working — and if you decide to expand to two hives in the future, you’ll be set to go.
See pages 84 and 87 for instructions on building an 8-frame escape board so you can harvest all of that sweet honey.
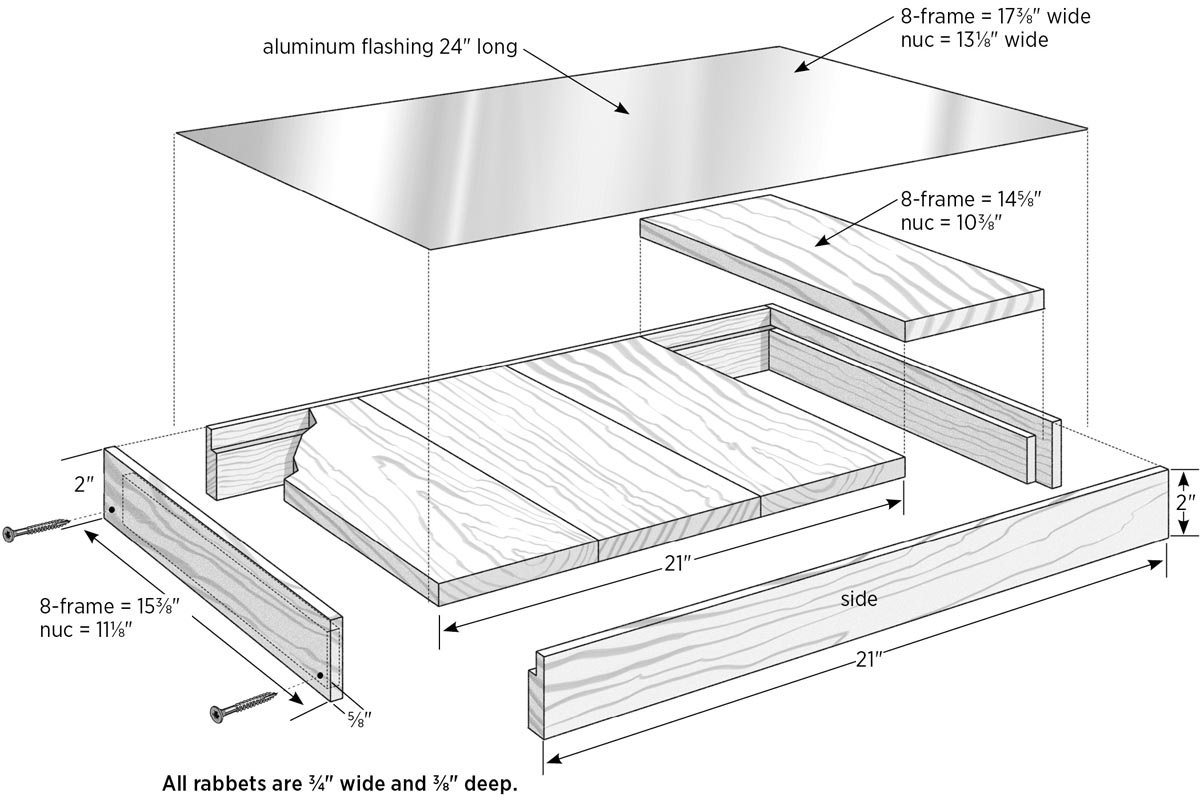
Box Dimensions
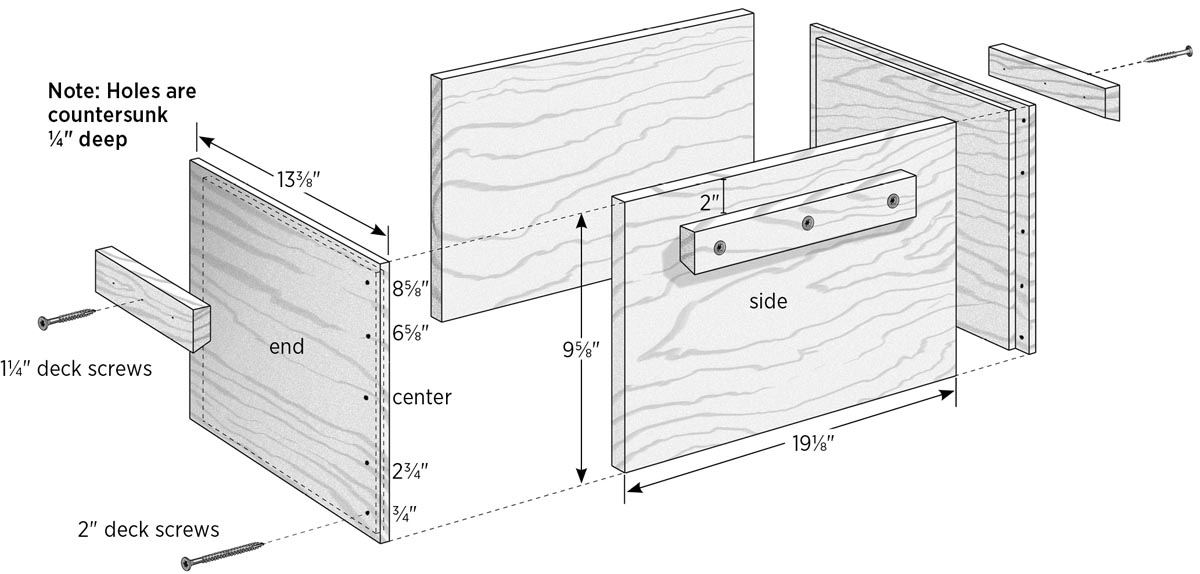
For the 8-frame and nuc hive box construction, we will use a rabbet joint as with the 10-frame boxes, so the sides of these boxes are exactly the same as for our 10-frame and nuc boxes. For a deep box, the height is 95⁄8" high; for a medium it’s 65⁄8", and for a shallow it’s 511⁄16". For our 8-frame boxes the two dimensions that will remain constant are the length of the sides (191⁄8") and the width of the ends (133⁄8").
Tools
- Table saw
- Bar or pipe clamps with 24" capacity
- Framing square
- Combination square
- Drill and combination drill /countersink bit
Materials
- One 6-foot pine 1×12
- Waterproof glue
- Sixteen 2" deck screws
- Twelve 11⁄4" deck screws
1. Cut the main parts.
Cut two pieces of 1×12 to length at 191⁄8" for the sides and two pieces at 133⁄8" for the ends.
Tilt the table saw blade to 15 degrees (accuracy isn’t critical), and set the fence so that the blade won’t quite cut the full edge of the board. Cut an angle along one edge of each of the side and end pieces; these are for the handles. There will be plenty of extra material to use for other boxes, and it’s safest to cut the angled edges while the boards are still full width.
Rip all four pieces to a width of 95⁄8". The sides are done. Save the cut scraps to make handles.
2. Rabbet the end pieces.
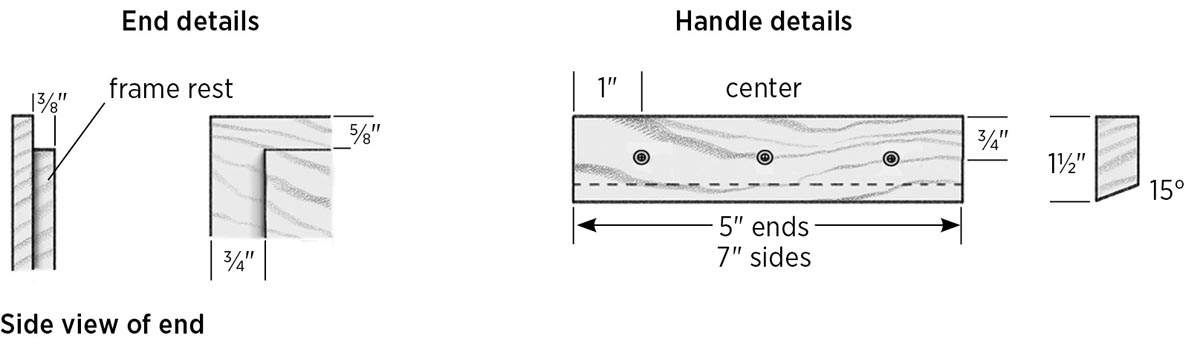
The 133⁄8" end pieces get rabbeted ends to accept the side pieces, as well as a rabbet along their top inner edges to create a recess for the frame rest in. Cut the rabbets 3⁄8" deep × 3⁄4" wide on each side edge of the end pieces. Then, cut a rabbet 3⁄8" deep × 5⁄8" wide across the top to make the frame rests.
3. Assemble the box.
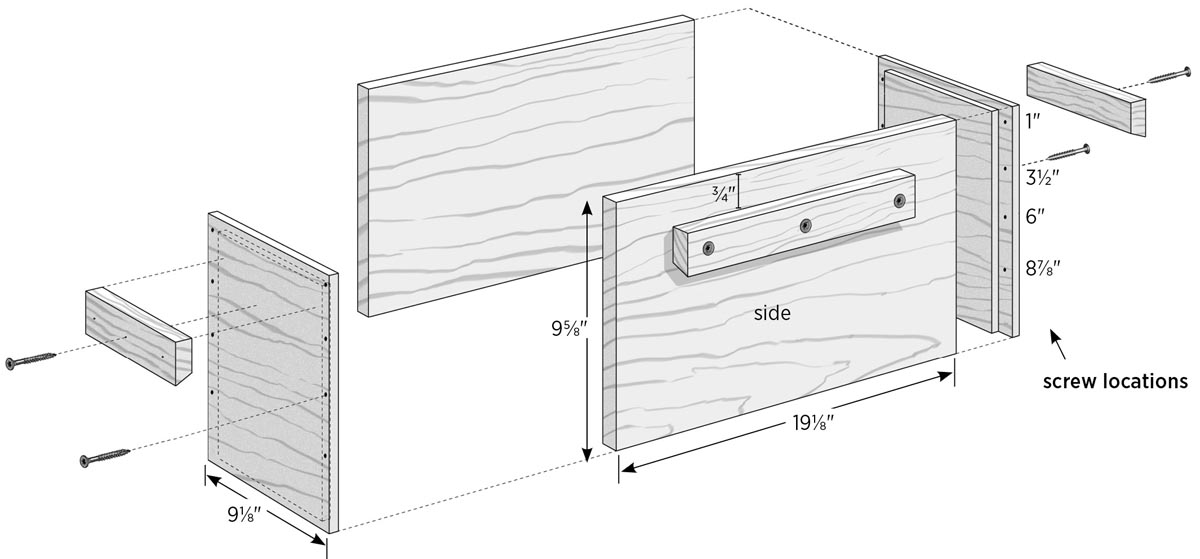
Test-fit the sides and ends by dry-assembling the box. Apply glue to the side rabbets of both end pieces, then clamp the box together and check it with a framing square. Drill countersunk pilot holes 3⁄8" from the side edges of the ends (so they’re centered over the side boards) and drive 2" deck screws through the ends and into the sides at ¾", 2¾", centerline, 65⁄8", and 85⁄8" for a total of five screws in each joint.
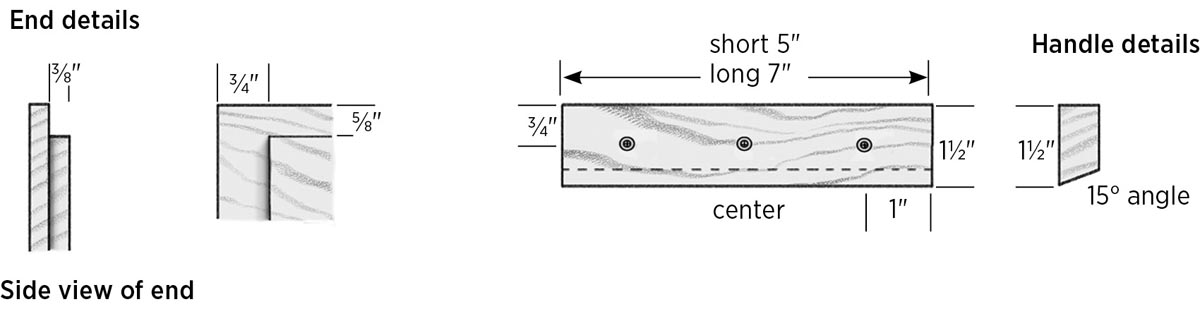
4. Add the handles.
Using your leftover angled strips, cut two pieces to length at 5" and two at 7" (I like fairly long handles for a good grip). Drill three countersunk pilot holes into each handle, as shown in 8-Frame Hive Bodies and Supers, below. Mark the center along of each side of the box, 2" down from the top, then use a combination square to extend a reference line about 3" on each side of the center.
Apply glue to the back (the narrower side) of each handle and position it so its top edge is on the horizontal reference line and the center pilot hole is on the center mark. Fasten the handle in place with 11⁄4" deck screws. By having the bottom of the handles angled, your fingers will be drawn into the box as you lift it.
Building 8-Frame Supers
Supers are the exact same thing as hive bodies — they’re just shorter — so build them all at the same time and save from having to repeat setups. To make a medium or shallow super, follow the instructions here for the 8-Frame Deep Hive Body. You’ll need a 6-foot 1×8 for each super. To build a medium, rip the board to width at 65⁄8"; for a shallow, rip it at 511⁄16".
Note: With a medium super, there isn’t enough material to make handles, so don’t cut the angle on those boards. Shallow supers will have plenty, so you can use that material (plus any left from the deeps) to make enough handles for everything.
8-Frame Solid Bottom Board
In chapter 2, we made a solid bottom board for a 10-frame hive. The same information about materials and methods holds true for an 8-frame solid bottom board. The only difference is that the 8-frame will be a few inches narrower.
Tools
- Table saw
- Drill with combination drill/countersink bit
Materials
- One 2-foot pine 1×5
- One pine 1×5 and one pine 1×8, approximately 26" (see step 2)
- Waterproof glue
- 2" deck screws (see step 3)
- Three 3d galvanized nails
1. Cut the sides.
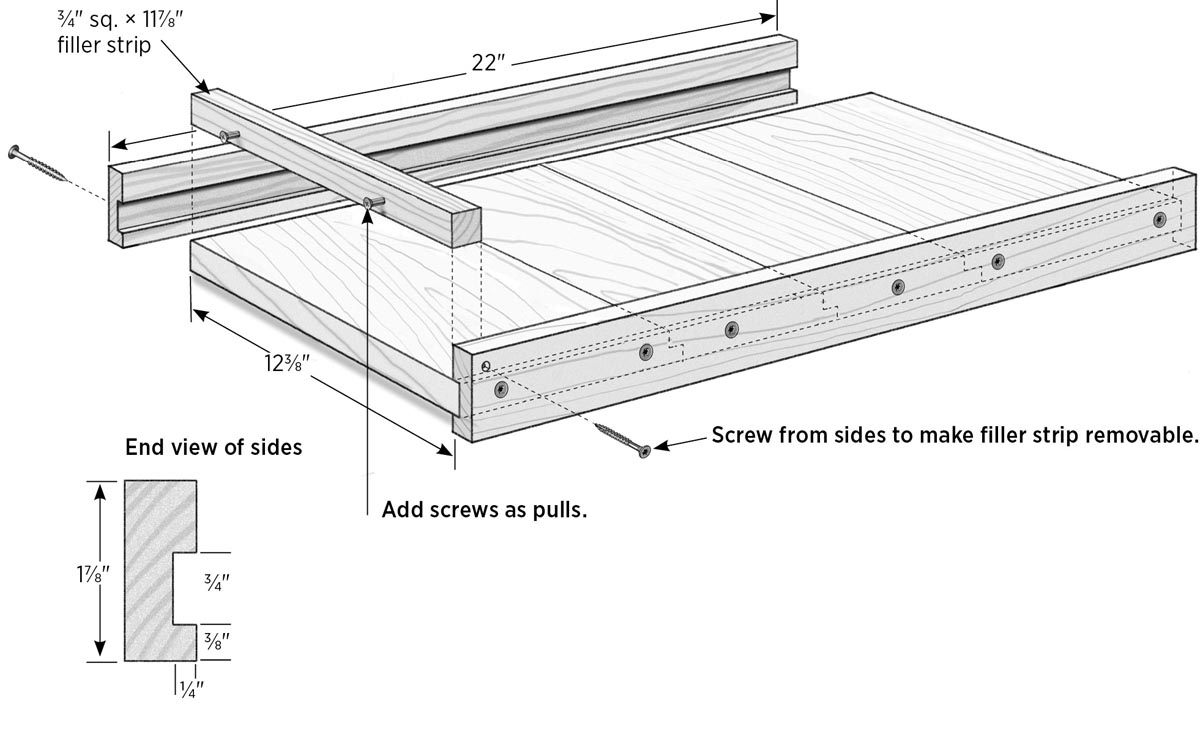
Cut the 2-foot 1×5 to length at 22". Cut two 1⁄4"-deep × 3⁄4"-wide dadoes into the same face of the board, each 3⁄8" from a long edge. Confirm that the boards for the platform (see step 2) fit into the dadoes. Rip the dadoed sections to width at 17⁄8" to create the two side pieces, as shown in 8-Frame Solid Bottom Board Assembly, on facing page. Set the leftover piece aside.
2. Prepare the platform.
You can use any suitable material you have on hand (including 3⁄4" plywood) to make a finished platform that’s 123⁄8" wide × 22" long. (I used one piece of 1×8 and one 1×5.) Boards can be joined with simple butt joints, tongue-and-groove joints, or half-laps (see page 19).
3. Assemble the board.
Apply waterproof glue generously to the dadoes of the side pieces, then assemble and clamp the sides and platform. Drill pilot holes and drive 2" deck screws through the sides and into the platform boards, centered on the dadoes. I used one screw at each end of the narrow boards and two for the wider boards.
4. Add the filler strip.
Cut a piece from the leftover pine strip to length at 117⁄8". This fills in the space across the back of the bottom board. Fit the strip in place and fasten it with a pair of 3d nails or screw from sides, and add screw pulls for removal as in the illustration.
8-Frame Screened Bottom Board
We’ll build an 8-frame screened bottom board the same way as the 10-frame. Bees in an 8-frame hive will still have the same issues with varroa mites, so a screened bottom board is handy to use.
Tools
- Table saw
- Drill with combination drill/countersink bit
- Tin snips
- Staple gun
Materials
- One 5-foot pine 1×5
- Waterproof glue
- Six 2" deck screws
- Ten 11⁄4" brads
- #8 mesh galvanized hardware cloth, 12" × 20" minimum
- 3⁄8" staples
- Two 11⁄4" deck screws
- Six 1" galvanized box nails
1. Cut the sides.
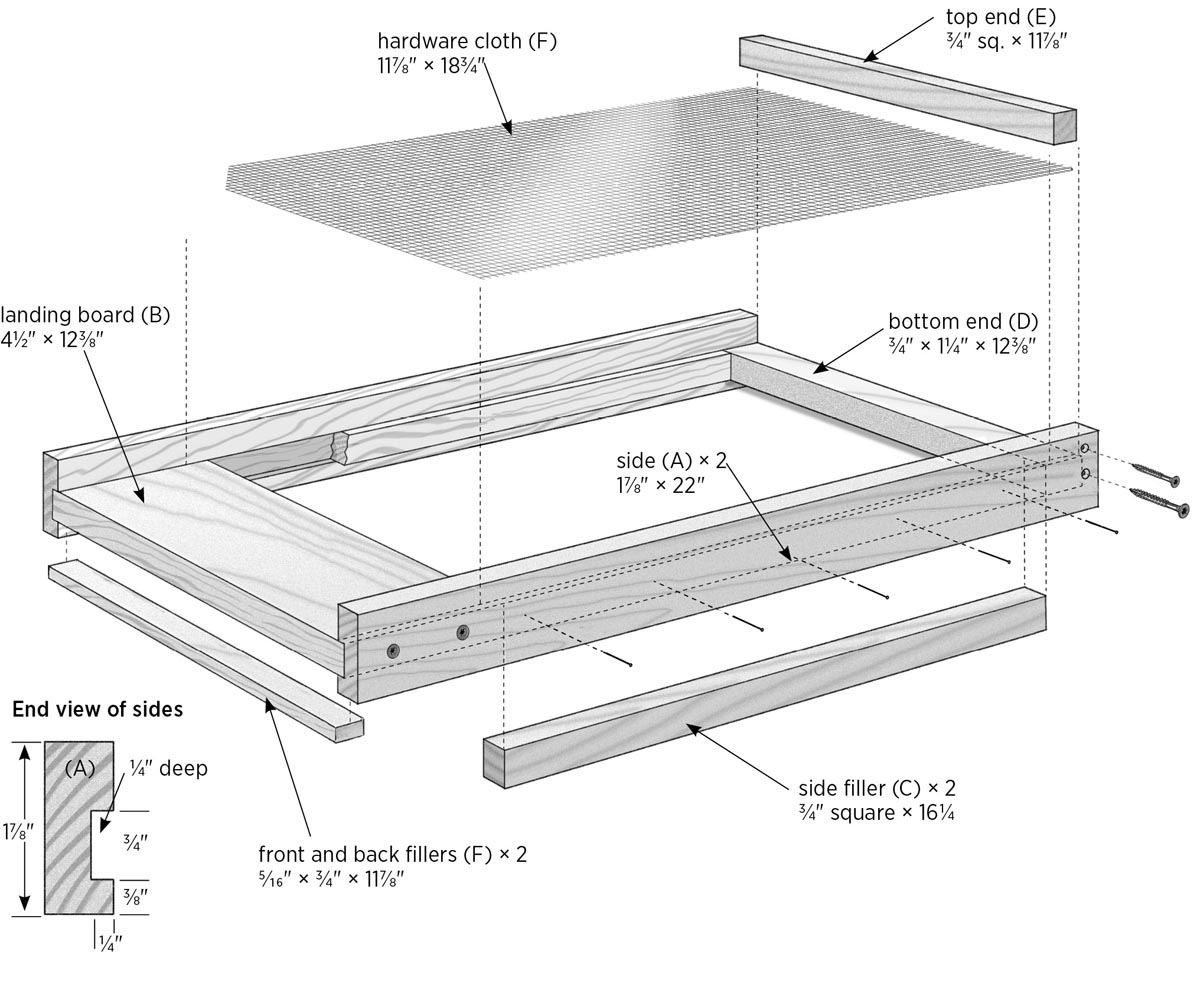
Cut one piece of 1×5 to length at 22". Dado and rip the board to create the two side pieces (A), following the same process used for the 8-Frame Solid Bottom Board (step 1, page 124).
2. Cut the remaining wood parts.
Cut one piece of 1×5 to length at 123⁄8" for the landing board (B).
Cut the following parts from the remaining piece of 1×5:
- one bottom end (D) at 11⁄4" wide × 123⁄8"
- two side fillers (C) at 3⁄4" wide × 161⁄4" long
- one top end (E) at 3⁄4" wide × 117⁄8" long
- two pieces at 5⁄16" wide × 117⁄8" long; these will fill the front and back spaces on the bottom (F)
3. Assemble the board.
Apply glue to the side dados and assemble the sides, landing board, side fillers, and bottom end as shown in 8-Frame Screened Bottom Board, on facing page. Fasten the landing board and bottom end piece with 2" deck screws driven through pilot holes. Fasten each side filler with five evenly spaced 11⁄4" brads.
4. Add the screen.
Cut the 1⁄8" mesh to size at 117⁄8" × 183⁄4", using tin snips. Attach the screen to the landing board side fillers and bottom end piece with four staples each. Attach the top end piece using two 11⁄4" screws, as shown in 8-Frame Screened Bottom Board, on facing page. Attach the two 5⁄16" filler strips, one to the bottom front of the landing board and one to the bottom of the bottom end piece with glue and 1" nails, and you’re done.
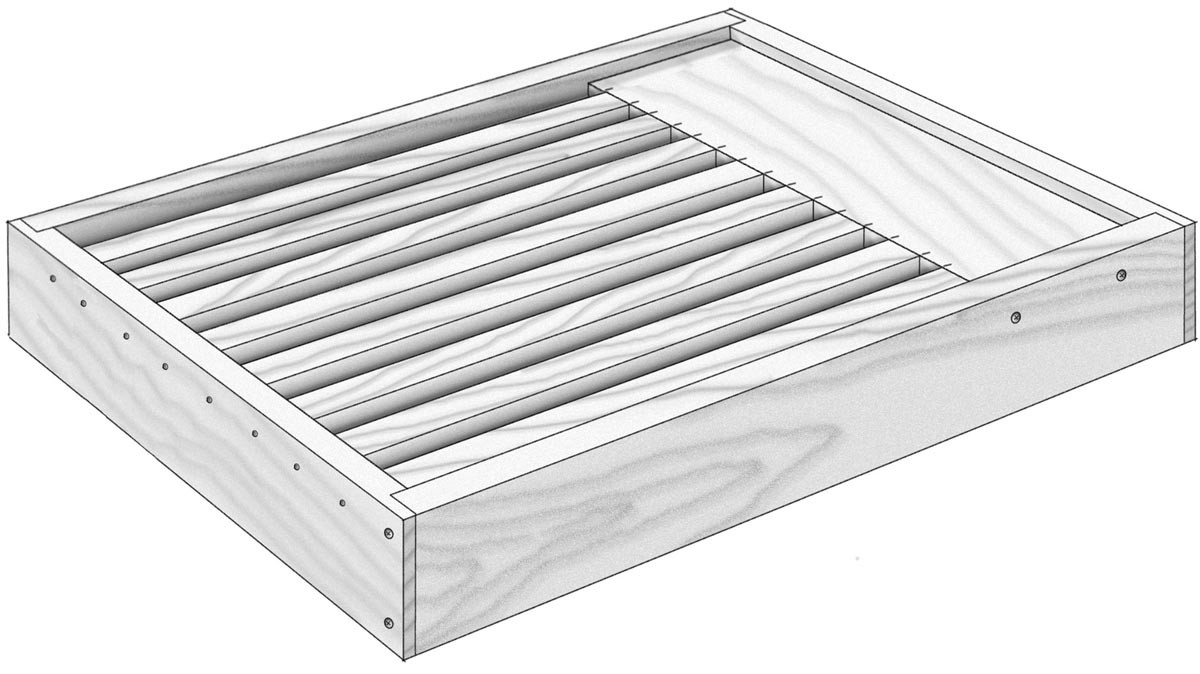
8-Frame Slatted Rack
Build this slatted rack to give your bees some extra hang-out space on hot days, so they don’t feel as crowded, and to keep brood at the bottom of the frames out of the cold on chilly days and nights.
Tools
- Table saw
- Drill with combination drill/countersink bit
Materials
- One 3-foot pine 1×6
- One pine 1×5, 13" minimum
- One pine 1×8, 16" minimum
- Waterproof glue
- Eleven 2" deck screws
- Eight 3d box nails or sixteen 11⁄4" brads
- Sixteen 3⁄4" brads
1. Cut the ends and sides.
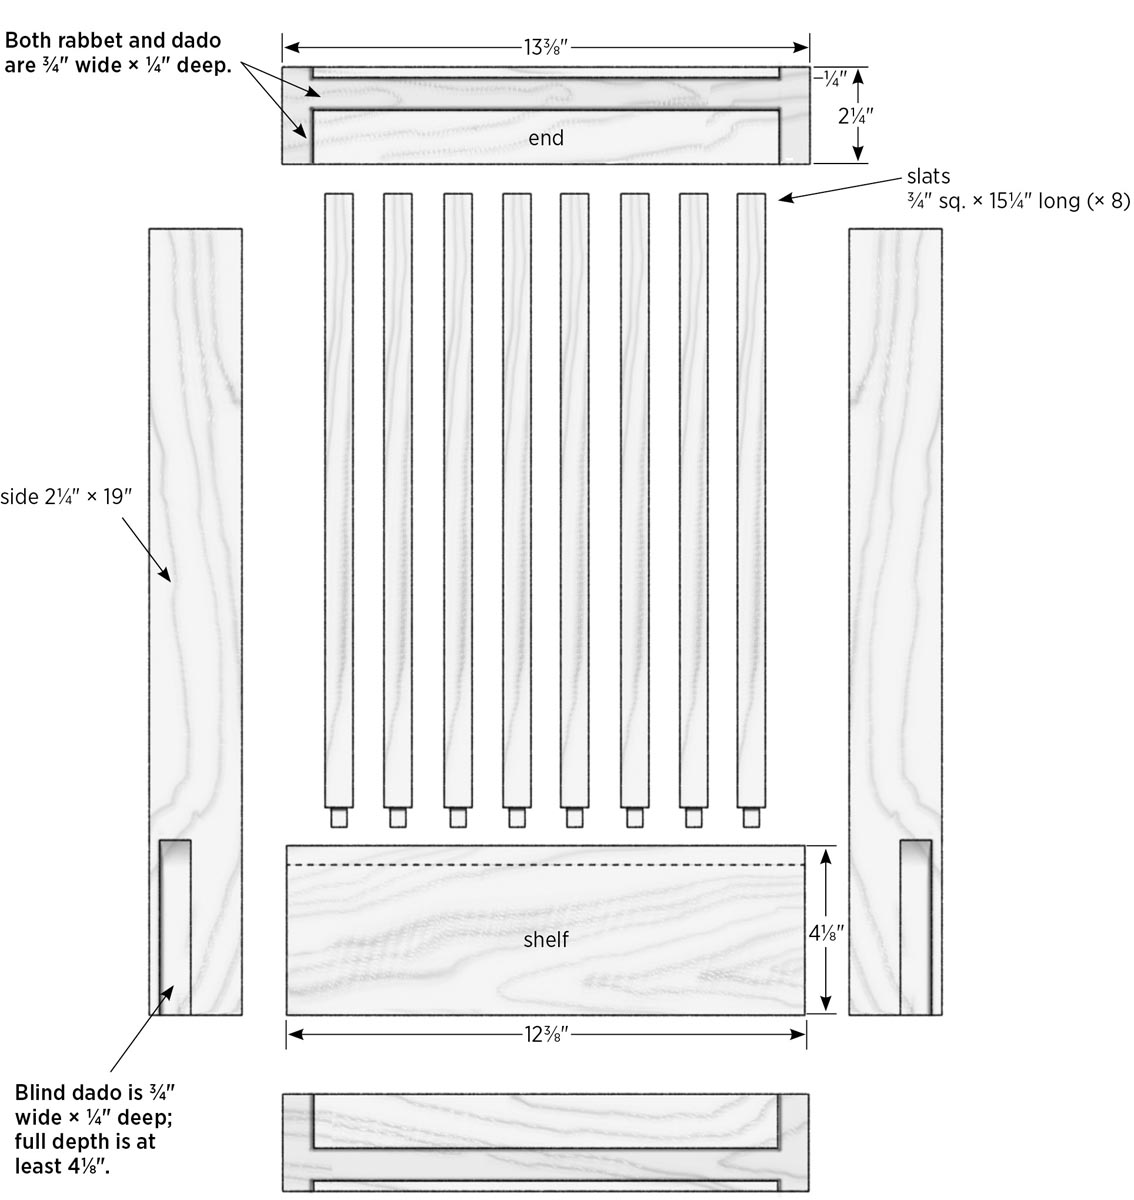
Cut one piece of 1×6 to length at 133⁄8" for the ends, and cut one piece at 19" for the sides. Rip each board into two pieces that are 21⁄4" wide.
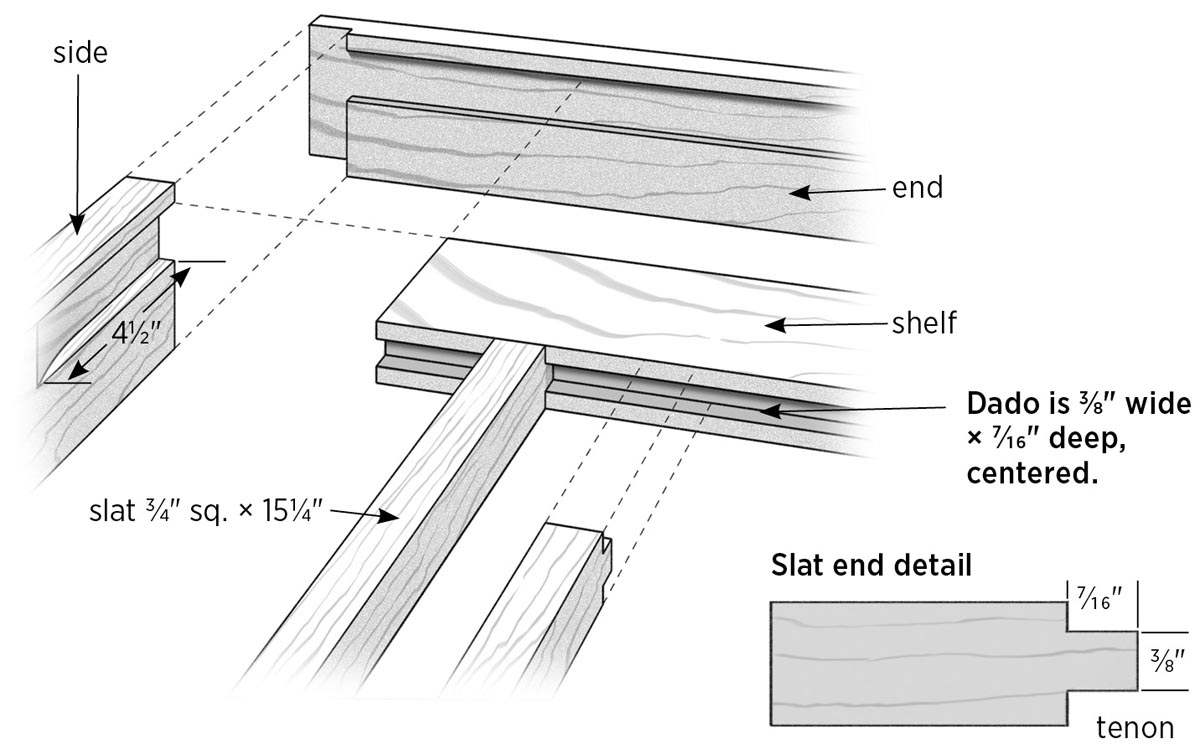
2. Dado and rabbet the end pieces.
Cut a 3⁄4"-wide × 1⁄4"-deep dado into each end piece, 1⁄4" from one long edge of each end piece. Then, cut a 3⁄4"-wide × 1⁄4"-deep rabbet at both ends of each piece.
3. Dado the side pieces.
The sides are a left and right mirror image with a blind dado for the shelf. Cut the dado 1⁄4" deep × 3⁄4" wide, 1⁄4" from the top edge of each piece. The full depth of the dado should extend about 41⁄4" from the end, as shown. You can do this by setting a stop on your saw fence 41⁄4" from the high point on the blade. Dado the side piece, then move your fence to the other side of the blade to cut the dado on the other side piece.
4. Cut the shelf.
Cut the shelf to length at 123⁄8" from 1×5 pine. Cut a 3⁄8"-wide × 7⁄16"-deep dado, centered along one long edge of the board. Then, rip this board to width at 41⁄8".
5. Prepare the slats.
Cut the 1×8 to length at 151⁄4". Cut 3⁄16"-deep × 7⁄16"-wide rabbets along both sides of one end of the piece. The resulting tenon should be 3⁄8" thick. Rip the board into eight 3⁄4"-wide slats.
Note: This process works best if the 1×8 is flat to begin with. If it’s not flat, it’s easier to rip the slats first, then cut the tenons in each one to maintain the 3⁄16" depth of cut.
6. Assemble the project.
Set one end piece on the workbench with the dado toward the top and facing you. Mark the top of the board at 11⁄16" from the right end. Set the shelf on the bench with the dado facing you. Mark the top of this board at 9⁄16" from the left end. From these starting points, measure and mark both boards every 3⁄4" until you reach the other ends. These will be the slat locations.
Dry-assemble the sides, ends, shelf, and a couple of slats to make sure everything fits. Apply glue to the blind dadoes of the sides and to the rabbets and dado where the shelf will fit into the end piece. No glue is needed where the slats will go. Assemble the sides, ends, and shelf, and clamp the frame together. Fasten the shelf and adjoining end with 2" deck screws. Attach the other end, but don’t drive the screws all the way in.
Loosen the clamps enough to slide the eight slats into the shelf dado. Set the slats in place on their layout marks, then retighten the clamp and finish driving the screws on the end piece.
On the outside face of the end piece without the shelf, draw a line 5⁄8" down from the top edge, centered over the dado. Nail through the end piece and into the end of each slat with one 3d box nail or two 11⁄4" brads, nailing on the reference line. On the shelf end, use two 3⁄4" brads to fasten the tenon end of each slat.
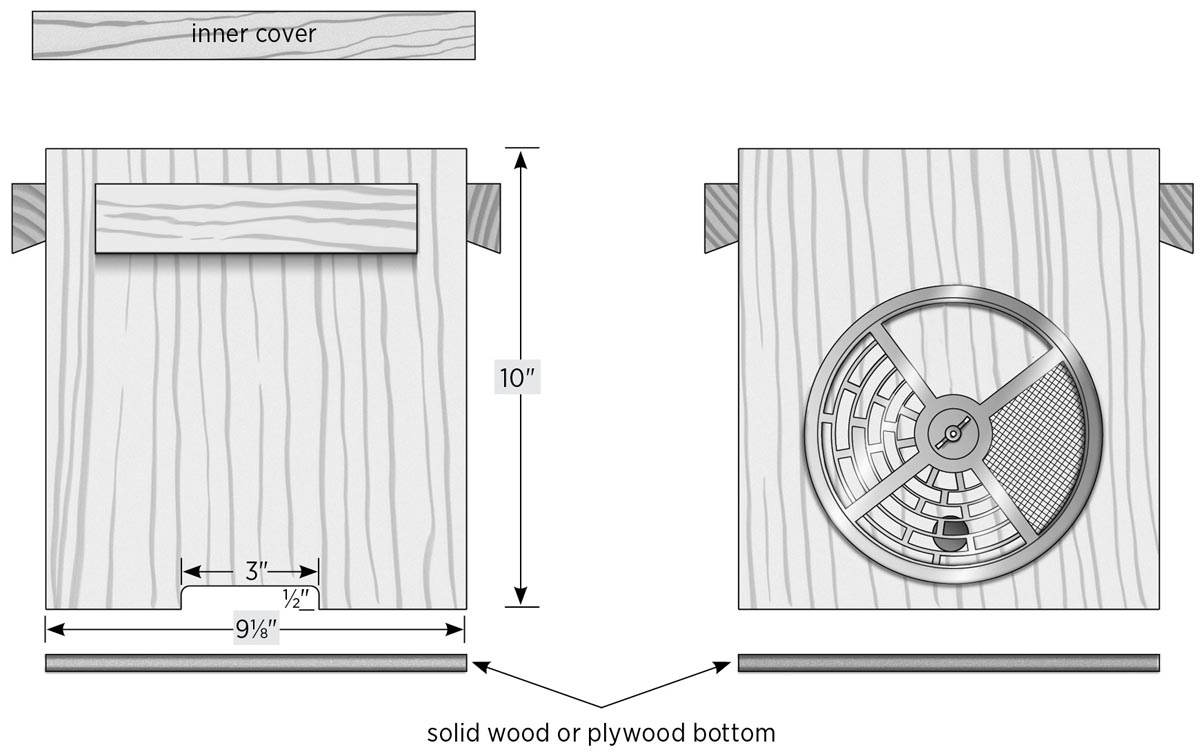
8-Frame Inner Cover
As with any size of Langstroth-style hive, an inner cover keeps the telescoping outer cover from having comb attached to it or being propolized to the box. It can also act as an upper entrance or a sturdy place to rest feeders on, allowing you to check syrup supplies without disturbing the hive.
Tools
- Table saw
- Drill with combination drill/countersink bit
- 11⁄4" Forstner bit, spade bit, or hole saw
- Jigsaw
Materials
- One 3-foot pine 1×4
- One 12" × 18" piece 1⁄4" lauan plywood, minimum
- Waterproof glue
- Four 13⁄4" deck screws
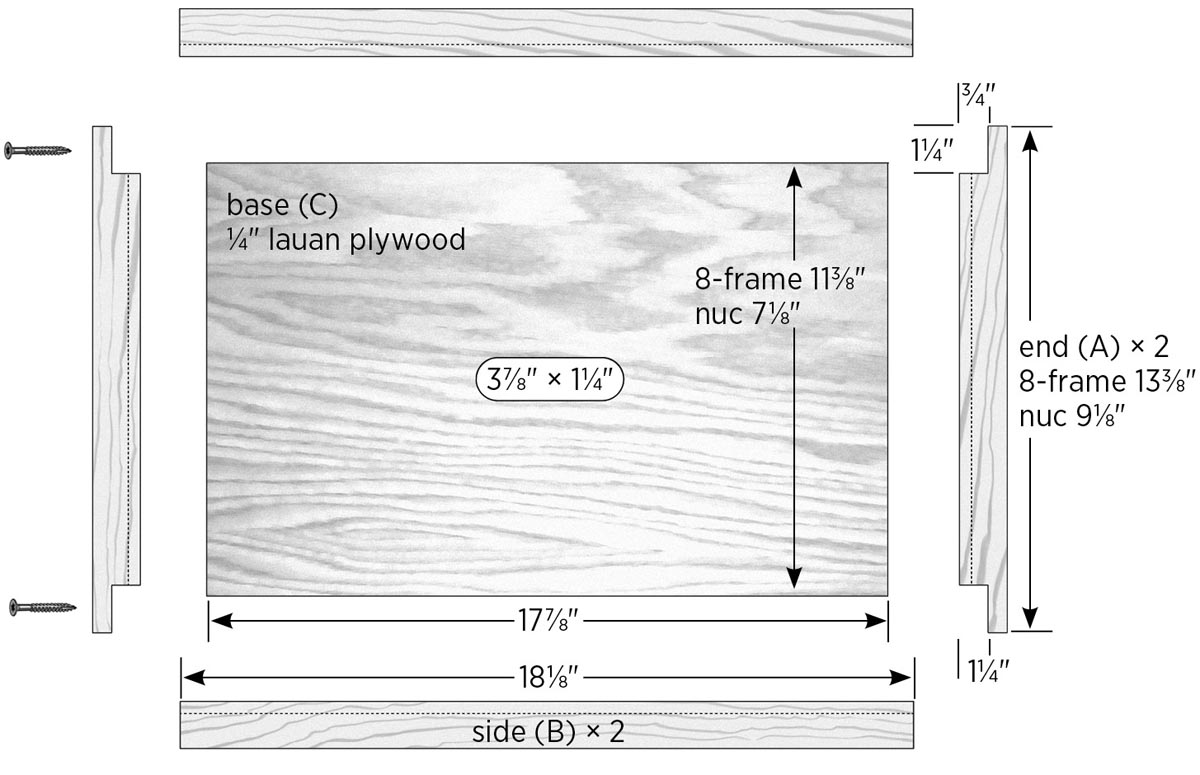
1. Cut the side and end pieces.
Cut a 1⁄4"-wide × 5⁄16"-deep dado centered along both edges of the 1×4. Confirm that the plywood fits the slot. Rip the board into two pieces at 11⁄4" wide. From these pieces, cut the two ends (A) to length at 133⁄8" and two sides (B) at 181⁄8".
2. Rabbet the end pieces.
Cut 3⁄4"-wide × 1⁄4"-deep rabbets into the ends of the end pieces, on the slot side, to accept the side pieces.
3. Prepare the base.
Cut the plywood base to size at 113⁄8" × 177⁄8". Mark the panel’s center, then draw a line lengthwise down its center. Measure 15⁄16" up and down from the center, along the line, and make a mark. Drill a 11⁄4" hole at both marks, using a Forstner bit, spade bit, or hole saw. Cut between the holes with a jigsaw to create a slot that is 11⁄4" wide × 37⁄8" long.
4. Assemble the cover.
Apply glue to the rabbets on the end pieces, assemble the frame around the plywood base, and clamp the assembly. Fasten the ends to the sides with a 13⁄4" deck screw at each joint.
8-Frame Telescoping Outer Cover
It’s time to put a roof on our hive. To make my cover, I used 1×8 boards for the wood top. Another option is to combine boards of different widths or substitute with a single piece of plywood.
Tools
- Table saw
- Drill with combination drill/countersink bit
- Tin snips
- Bar or pipe clamps (at least 24" long)
- Two scrap boards at least 22" long
- Rubber mallet or hammer and wood block
- Screwdriver with flat, wide blade
Materials
- One 6-foot pine 1×5
- One 4-foot pine 1×8 (or equivalent material; see step 3)
- Waterproof glue
- Four 2" deck screws
- Twenty-four 5d galvanized box nails
- One 0.016"-thick aluminum sheet, 18" × 24" minimum
- Twenty 3d galvanized box nails
1. Cut the sides and ends.
Cut one piece of 1×5 to length at 133⁄8" and one piece at 21". Cut a 3⁄8"-deep rabbet along each long edge of each board (each piece gets two rabbets); the width of the rabbet should match the thickness of the material you use for the wood top.
Cut a 3⁄4"-wide rabbet on each end of the 153⁄8"-long board (or 111⁄8" board if you are making the nuc cover).
Rip a 2"-wide strip from each side of both boards, creating the two side and two end pieces.
2. Assemble the frame.
Apply glue to the end joints, assemble and clamp the frame, and check it for square. Fasten the frame with one 2" deck screw at each joint.
3. Add the wood top.
Cut boards or plywood to fill the 145⁄8" × 21" space of the cover frame. Apply glue to the top rabbets and set the wood top into place and fasten it with 5d nails (I used one nail for each board end). You will add additional nails when you attach the metal top.
4. Create the metal top.
Cut the aluminum sheet to size at 173⁄8" × 24". Follow steps 6 through 8 on page 56 for bending and fastening the metal top to the cover assembly.
Nuc Boxes
I consider nuc boxes to be essential beekeeper’s equipment. They can help you increase the number of hives you have, and can also help save the day if you have queen problems with a hive. Keeping a few nuc hives around is like having a free insurance policy.
If you accidentally roll a queen on a frame and kill her, or need a new queen for whatever reason, you have a replacement ready and waiting to go.
You can pull a couple of frames from a hive, and if there are fresh eggs, pollen, nectar, and nurse bees, they will produce a queen. This is a great way to use surplus brood and bees in a colony that is getting crowded. You can also pull a frame that already has queen cells on it and let the new queen hatch in the nuc box. If you are in a hurry, you can purchase a queen and put capped brood in a nuc box and start like that. I’ve even bought a 3-pound package of bees and an extra queen and split them into two nuc boxes.
Another good practice, learned courtesy of Michael Palmer (an amazing and well-known beekeeper in St. Albans, Vermont), is starting some nuc hives around July by taking bees and brood from your weaker hives that aren’t going to produce surplus honey. Split these hives into nucs with new queens and build them up so that they are strong enough to overwinter. This increases your odds of having more hives make it through to spring.
When Michael gave a presentation on this method to our bee club, the Northern Berkshire Beekeepers Association, I was surprised to hear it. I always thought you needed two deeps loaded with bees and honey to get through a Northeast winter. Here was someone telling us a 5-frame nuc box can make it as well.
Well, Mike has the credentials to back up his methods. He runs 700+ hives, raises all his own queens, and produces an average of 40 tons of honey per year. I decided to give nucs a try a few years ago, and it worked. They didn’t all survive the winter, but one of those hives was my best honey producer the following year, yielding 125 pounds of surplus. Believe me, you need to start a nuc hive, even if you only plan on keeping a couple of regular hives.
Nuc Hive Body
You can make nuc boxes to fit any number of frames you want. This box is designed for 5 deep frames. You can use pine or plywood or a combination of both. I’ve made them out of leftovers by gluing narrow boards edge-to-edge to give me the depth I needed. I’ve used two different styles of box.
The first is exactly like a full-size hive body, being open on the bottom and using a bottom board. It measures 95⁄8" high (see Box Dimensions, on page 122). The other type is 10" high and has a piece of wood nailed on for a bottom. The width and length are the same for both boxes.
With a 10" solid-bottom box, you can cut an entrance in the front near the bottom, drill a hole, or use a plastic disc entrance; see Entrance Options for a Solid-Bottom Nuc Hive, on page 137. So, let’s get down to business and build some nuc boxes.
Tools
- Table saw
- Drill and combination drill/countersink bit
- 24" bar or pipe clamps
- Combination square
Materials
- One 6-foot pine 1×12
- Additional 1× lumber for 10" nuc (see step 1)
- Waterproof glue
- Sixteen 2" deck screws
- Twelve 11⁄4" deck screws
1. Cut the box pieces and handle material.
Cut two pieces of 1×12 to length at 191⁄8" for the sides and two pieces at 91⁄8" for the front and back.
Now we’re going to jump ahead and make the angle cuts for the handles, because it’s safer to do this with larger pieces. Tilt your table saw blade to 15 degrees (accuracy isn’t critical here). Set the fence so that the blade won’t quite cut the full edge of the board. If you’re making the 95⁄8" nuc, cut an angle along one edge of each of the side, front, and back pieces; these are for the handles, and there will be plenty of extra. If you’re making the 10" nuc (with attached bottom), cut the angle on a separate board about 20" long that is wide enough to cut safely.
Rip the side, front, and back pieces to width at 95⁄8" (for a standard nuc) or 10" (for a 10" nuc). The leftover pieces are the handle material, measuring about 11⁄2" wide. Rip similar strips for the 10" nuc. Set aside the handle pieces for now.
2. Rabbet the front and back boards.
Cut a 3⁄8"-deep × 3⁄4"-wide rabbet along the sides of the front and back pieces, to mate with the sides. Cut a 3⁄8"-deep × 5⁄8"-wide rabbet wide along the top of the front and back pieces to create rests for the frame.
3. Assemble the box.
Check the fit of the box parts, then apply glue to the side rabbets (not the top) of the front and back pieces. Assemble and clamp the box. Drill pilot holes and fasten each joint with four 2" deck screws driven through the ends at 1", 31⁄2", 6", and 87⁄8" down from the tops and 3⁄8" from the side edges.
4. Add the handles.
Using the angled strips you made in step 1, cut two piece to length at 5" and two pieces at 7". Sand the edges and drill countersunk pilot holes in the locations shown in 5-Frame Nuc Parts, on previous page.
Mark the center of each side of the box, 3⁄4" down from the top. Use a combination square to extend a reference line about 3" to each side of the center. Apply glue to the back of each handle (the narrower side). Line up the top of the handle on reference line so the center pilot hole is even with the center mark. Screw the handles in place with three 11⁄4" deck screws.
Work tip: If you’re building a 10" solid-bottom nuc, see Entrance Options for a Solid-Bottom Nuc Hive (facing page) for details on creating an entrance and installing the bottom and handles.
Nuc Inner Cover and Telescoping Outer Cover
Just like on the other hives, the nuc inner cover will have a 11⁄4"-wide frame and 1⁄4" plywood center. The sides will still be 187⁄8" long. To build a nuc inner cover, you need one 5-foot pine 1×4 and a 71⁄8"-wide × 177⁄8"-long piece of lauan plywood. Follow the instructions for the 8-Frame Inner Cover (page 131), making the end pieces 91⁄8" long. For nucs, I usually just cut a 11⁄4" hole in the plywood instead of making a slot.
To build a 5-frame telescoping cover, follow the instructions for the 8-Frame Telescoping Outer Cover (page 132), but make the ends 111⁄8" long and the sides 21" long. The top boards are 103⁄8" long. Cut the aluminum for the metal top to size at 131⁄8" × 24".
Entrance Options for a Solid-Bottom Nuc Hive
For a 10"-high nuc, cut a piece of wood to size at 91⁄8" x 197⁄8" and screw or nail it to the bottom of the nuc box. You have two options for the entrance:
- A) One is to cut out an entrance (about 1⁄2" x 3") at the bottom of the front board, using a jigsaw, before attaching the bottom to the hive.
- B) The other is to use a round, plastic disc entrance (available from bee supply houses), which you mount on the front of the hive with the telescoping cover in place, then drill a 1" to 11⁄4" entrance hole. In this case, you make the nuc box without the front and back handles.
5-Frame Nuc Bottom Board
This is the bottom board you will use if you made the 95⁄8" nuc box that’s open on the top and bottom. The following instructions are for using 1×8 boards for the platform. Alternatively, you can make the platform from a single piece of 1×10 pine cut to 81⁄8" × 22" and adding cleats to the bottom to prevent it from warping.
Tools
- Table saw
- Drill and combination drill/countersink bit
Materials
- One pine 1×5, 24" minimum
- One pine 1×8, 25" minimum
- One pine scrap (see step 3)
- Waterproof glue
- Twelve 2" deck screws
- Three 11⁄4" deck screws or 3d galvanized box nails
1. Cut and dado the sides.
Cut the 1×5 to length at 213⁄4". Cut a 3⁄4"-wide × 1⁄4"-deep dado, 3⁄8" from each long edge of the board. Rip the board into two pieces 17⁄8" wide.
2. Prepare the platform boards.
Cut three pieces of 1×8 to length at 81⁄8". Place them side-by-side and rip the last board as needed so the combined width of the boards is 213⁄4".
3. Complete the project.
Apply glue to the side dadoes and assemble the pieces using two 2" deck screws driven though the sides and into each end of the platform boards.
Cut a strip of scrap pine to size at 3⁄4" wide × 3⁄4" high × 75⁄8" long. Nail or screw the strip across the back platform board so that the bees have only one entrance.