Chapter 8
Growing Your Facebook Page’s Fan Base
IN THIS CHAPTER
 Prepping your Page for prime time
 Making your Page easy to find
 Attracting fans fast from your existing network of friends
 Benefiting from email marketing, webinars, ads, and blogs
After you’ve created a Facebook Page that has all the elements you need, you can begin promoting it. The power of using a Facebook Page for marketing exists in the Facebook social graph: the network consisting of hundreds of billions of friendships, Pages, and Page updates. But at the point where you might lack any presence on Facebook, you have to use resources outside Facebook to promote your Page.
In this chapter, we show you how to begin with existing marketing assets (such as direct mail, email lists, and your website) for a strong initial push to send your Page into the Facebook stratosphere. We tell you why your Page needs content that’s optimized for Facebook users and why that content must be unique. We also give you strategies such as using incentives and hidden content (accessible only by fans) to build your Facebook Page fan base. Finally, we tell you how to use other channels, such as blogs and YouTube, to promote your brand-new Facebook Page.
Mapping a Launch Strategy for Your Facebook Page
Many marketers refer to the initial stage of a promotion as the launch, whether the product is a book, the newest model of a car, or an event. At a launch, you might announce a widely covered and highly anticipated product, such as the latest iPhone, or distribute free samples to promote the opening of a local restaurant. But in all cases, a launch is the beginning; it’s the takeoff.
Launch is an appropriate word for creating a Facebook Page. It’s even similar to the basic stages of launching a rocket ship:
- Preparation: Like a rocket ship, your Facebook Page presence requires a strategy to steer its course. It also needs a main image, applications, and a Welcome tab to provide function and features for Facebook users.
- Countdown: Set goals for your Page, and estimate a deadline for launching it to essentially force yourself to prepare everything for success.
- Initial thrust: When you start with no Facebook fans, you have to fight gravity to thrust your “vehicle” up and away from Earth, using assets such as a huge email list or an announcement at a conference about a special attendees-only promotion on your Page. Throughout this chapter, we show you several strategies for leveraging existing marketing assets.
- Second-stage thrust: After you’ve acquired a fair number of fans of your Facebook Page and achieved a healthy amount of engagement on it, you can fire off a second round of “thrusters,” such as featuring Facebook-sponsored ads that leverage your fans’ friend networks or conducting a cross-promotional campaign with another Facebook Page.
- Orbit: At this stage, slightly ahead of a tipping point, you must simply navigate and continuously refresh your attitude and creativity so that fans stay interested.
Fostering a Sense of Enchantment on Your Facebook Page
To create a Facebook presence, you must establish a vibrant brand identity, in the form of a Page, publish content that inspires conversation, and respond quickly and thoroughly to comments from fans.
In other words, to create a Facebook presence, create enchantment with your Facebook Page so that fans are naturally inspired to share your Page with their friends.
How can you achieve this goal? Well, it’s not easy, but it’s doable if you understand that all marketing ultimately boils down to developing a brand identity that people know, like, and trust:
- Know: You clearly communicate who you are, the benefits your business offers, and how you can be reached. All this information should be included in your Facebook Page profile and within the content you publish, such as by adding your logo or your brand on all photos and cover images.
- Like: Ultimately, people do business with people they like. If price, features, and benefits are indistinguishable, customers usually choose the brand they like the most. Facebook can’t make people like your Facebook Page or its content unless they like you in real life.
- Trust: People do business with people they trust. It’s an absolute requirement! You build trust by being responsive, cheerful, and dependable.
Peet’s Coffee and Tea (https://www.facebook.com/peets) is known for its desire to be socially responsible and also give back to its customers. To get customers to engage and trust the company, it provides coffee rewards to loyal customers ("Peetniks"). It also creates charitable campaigns, as shown in Figure 8-1. Through these and other strategies, the organization has developed a base of fans who know, like, and trust Peet’s Coffee and Tea.
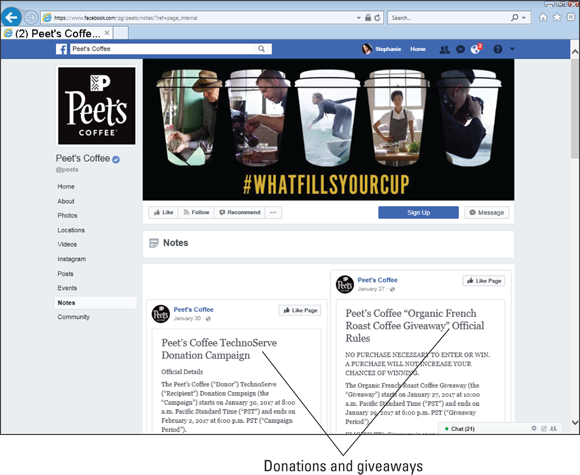
FIGURE 8-1: Engaging Facebook users with rewards and donations.
So, after you have worked to get your customer to know, like and trust you, what do you do next? Altimeter analyst Brian Solis says that you need to create an experience that customers “have, remember, and share” (http://www.briansolis.com/2017/10/customer-experience-defined-experience-customers-remember-share/). When customers have a meaningful experience, they remember it. It fosters loyalty and repeat engagement, as well as encourages them to share it with others, thereby becoming an important influencer for your company. As you know, sharing is the gold standard for Facebook marketers. If you focus on creating outstanding, customer-centric experiences, you will find that your investment in these experiences will deliver great rewards.
Answer a few questions to help set your Facebook Page apart from your other marketing channels:
- How can you bring the unique voice of your business to life in a compelling and personal way?
- In what specific ways do current customers like to connect with your business? What content do they find useful, valuable, or interesting?
- In addition to building awareness for your business, how important is it for you to use Facebook to drive sales?
The more clearly you can answer these questions, the clearer your brand messaging will be to Facebook users.
Preparing Your Facebook Page for Launch
Before you launch your Page, it should be ready to make a good first impression, which is often the only impression you get to make. Follow these tips for your Page:
- Pick an appropriate name for your Page. You can boost the ranking of your Page in search engines by choosing a Page title that includes the name of your brand.
- Display an attractive avatar or a main image that reflects your brand. This image is displayed in a variety of sizes (and as small as 32 pixels square), so keep it simple. Omit the name of your business, in fact, because the page name appears wherever your Page avatar appears on Facebook (in News Feeds, Timelines, and hovercards, for example).
- Add a cover image or video that tells a story. Make sure that it tells a story involving your business, but try not to be too “salesy.” A restaurant, for example, could show a festive Friday night in the dining room.
- Create a username at
http://facebook.com/username. - Add compelling posts to your Page. New fans should see content to like, comment on, and share after they arrive.
Enhancing Your Facebook Page with Content before Launch
Before you promote your Facebook Page, you have to seed it with photos, videos, and links that new fans can share, comment on, and like.
Again, when fans engage with your Page stories, their friends see that activity. Via this fundamental connection, awareness about your business slowly (but surely) penetrates the vast network of Facebook users.
Two charts within the Insights application show both the relationships among Facebook users who engage with Page updates and how their friends see that engagement. The Reach report contains two charts that show how engagement influences reach.
Figure 8-2 shows the number of Facebook users engaging with your Page (Likes, comments, shares) and how that engagement creates more reach.
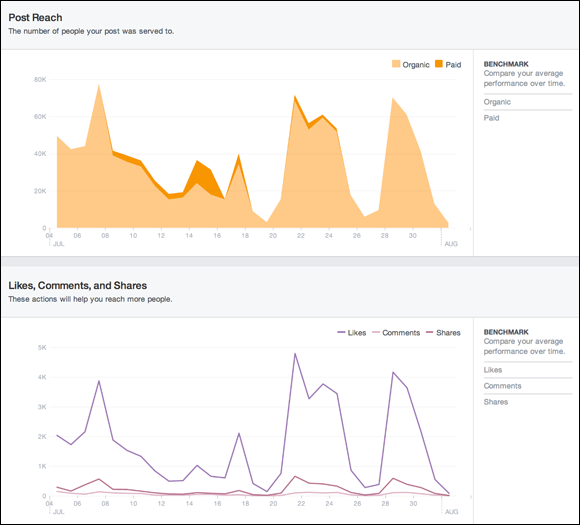
FIGURE 8-2: Fans who engage with your Page content create viral reach.
Adding a Compelling Reason for Users to Like Your Page
Users are unlikely to like a Page for the simple pleasure of liking it. Telling customers and prospects that you’re now on Facebook isn’t a compelling reason for them to like your Page. Facebook users are people like you and us; they need a good reason to like it. The exchange of value has to be clear. Why should they like your Page? Do they like you and your business in real life? If not, being on Facebook won’t fix this problem.
Here are a few ideas to help you start developing compelling reasons for Facebook users to like your Page:
- Offer a discount. In exchange for people liking your Page, create a custom tab to display and manage a discount (see Chapter 6).
- Focus on the community. Communicate the value of the community of Facebook users and share it on your Page. Buffer (
http://buffer.com), an online app, conducts meetups with its users around the country and displays its fan photos, as shown in Figure 8-3. - Offer exclusive content. The best way to offer value may be to publish content that can’t be found on your website, in your Twitter feed, or on any other channel. The Museum of Fine Arts in Boston frequently posts behind-the-scenes photos of exhibits being assembled.
- Highlight contrast. Research your competitors’ efforts, and offer a benefit that’s unique by comparison. A hair salon might post short how-to videos on quick, do-it-yourself trims that you can do in a pinch.
- Post Timeline contests. Facebook allows marketers the opportunity to conduct contests in updates by offering a giveaway to anyone who likes or comments on a specific update.

FIGURE 8-3: Fans of Buffer displayed on its Facebook Page.
Adding photos and videos
You can upload an unlimited number of albums, and as many as 1,000 photos per album, to your Facebook Page. You can reorder photos, rotate them, and acknowledge Facebook members by tagging (identifying) them in photos. I explain how to tag photos in the later section “Tagging photos to promote your Page to your friends.”
To upload a single photo or video, follow these steps:
-
Click the Photo/Video link in the Publisher.
A box pops up, giving you the option to upload photos/videos or to create a photo album.
- Click the Upload Photos/Video link (see Figure 8-4) and navigate to the image on your computer.
-
Double-click the photo or video when you locate it on your computer.
Facebook automatically uploads the photo or video.
 To inject personality into your Page, add images and photos that communicate who you are and what your business is about. Select photos that you want customers to see, not the holiday party at which everyone had a few too many cocktails.
 -
If you’re uploading a single photo, describe the photo.
After you select a photo or video, write a short but compelling description in the Say Something About This field above the file.
-
Click the Publish button.
When you upload a video, you have to wait. Facebook needs time to upload the file and displays a process bar while the video uploads.
-
When the video finishes uploading, edit the title and description.
You can tag the Page in the video, add a location and title, and write a description, as shown in Figure 8-5.
- Click Save to publish the video on your Page Timeline.
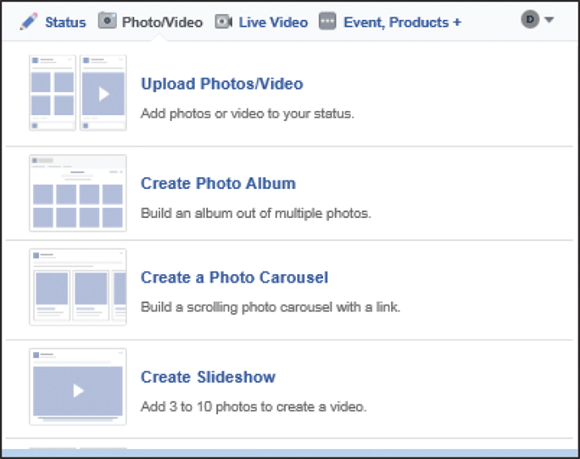
FIGURE 8-4: Uploading new photos for a Page.
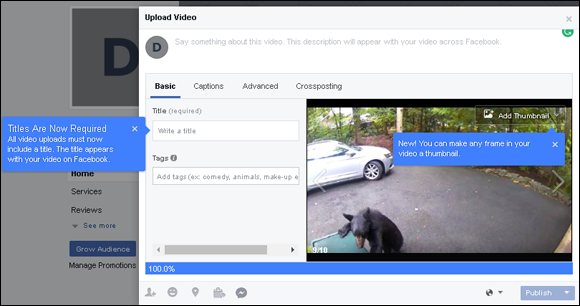
FIGURE 8-5: Editing the details of a video.
Adding photo albums
Facebook lets you create photo albums that contain multiple photos, which is an excellent way to organize content based on specific topics for your fans to enjoy. The National Wildlife Federation has created several albums containing photos submitted by fans, including the one shown in Figure 8-6.
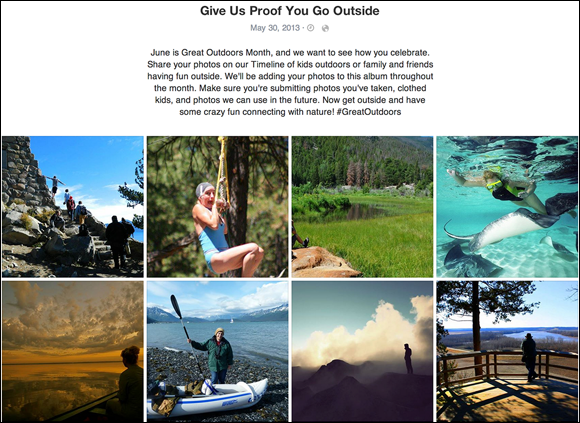
FIGURE 8-6: A photo album is a useful way to get fans engaged.
To create a photo album, follow these steps:
- Click the Photo/Video link in the Publisher.
-
Click the Create Photo Album link (refer to Figure 8-4).
Facebook opens a new window, prompting you to select photos to upload.
-
Select photos on your computer and click Save.
It would be useful to add a description to each photo so that photos are easier to find.
-
Add a title, location, and description to the album.
You can rearrange the order of photos in the album by dragging them to new locations in the album.
Adding milestones
The Facebook Pages milestone feature lets users easily view important moments in your business’s history. Examples of milestones are opening a new store, releasing a new product, and winning an award.
To view a company’s milestones, users will click your About tab to the left of your Timeline. They’ll see your milestones listed by date, which lets Facebook users quickly navigate to different years in your Page Timeline, as shown in Figure 8-7.

FIGURE 8-7: Facebook users can navigate to specific milestones in your Timeline.
To add milestones to your Page, follow these steps:
- Click the Events, Products, Job+ link in the Timeline and then click add a Milestone to your page (see Figure 8-8).
-
In the pop-up window, add an event title and a photo, date, location, and description, as shown in Figure 8-9.
Add the title of the event, such as Opened for Business, along with the opening date, a location and description, and a photo. The dimensions of a milestone photo are 843 x 403 pixels.
- Save the milestone by clicking the Save button.
-
(Optional) Hide the milestone from News Feed, if you want.
Select the Hide from News Feed check box if you’re adding several milestones at a time and don’t want your fans to see it in their News Feeds.
After you save the milestone, fans will see it when they look at your About page.
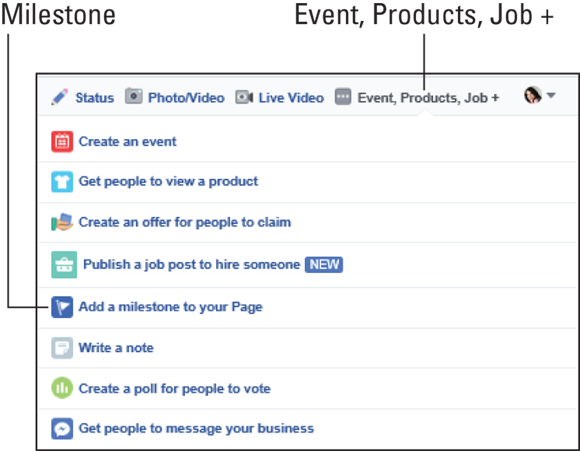
FIGURE 8-8: Create milestones directly in the Timeline.
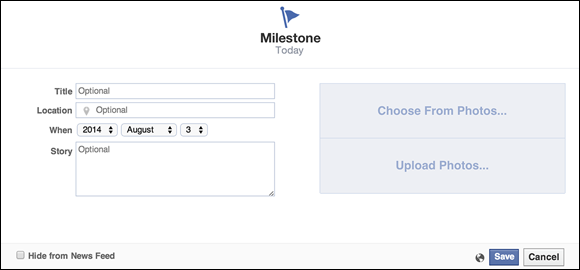
FIGURE 8-9: Milestones should include an event name, photo, date, and location (if applicable).
Making Your Facebook Page Easy to Find in Search Engines
Anyone, regardless of whether person is a Facebook member, can find and access your Facebook Page by using Facebook’s internal search feature or search engines such as Google and Microsoft’s Bing. A Facebook Page can improve your search engine rankings so that people can more easily find both your Facebook Page and your website.
All Facebook Pages are public, so search engines such as Google include them in search results. Build a positive image for your brand and engage readers so that they engage with you and return to your Page often.
By publishing a steady stream of links to your company’s blog posts and other pages on your company’s website within Facebook, you allow search engines to find you more easily. This process is known as search engine optimization (SEO). Simply by having a Facebook Page, you increase the number of relevant links to your site — and, therefore, your site’s SEO.
Adding links to your Facebook Page is only a start. Those links should include relevant keywords related to your business. Additionally, the content within the linked article should have relevant keywords. An auto repair garage, for example, would post links to articles about do-it-yourself auto-repair tips on its Facebook Page.
Here are seven ways to optimize your Facebook Page for both Google and Facebook search:
- Decide on a page category. Select the best possible category for your Page. You can edit the category in the Page Info admin panel.
- Refine the subcategories on your Page. If you have a Facebook Place (a local place or business), you can add or update as many as three subcategories within the Page Info admin panel.
- Complete your address. Graph Search allows users to search for local nonprofit organizations that their friends like, for example, so supply the complete and current address.
- Fill out the About section. The information you share in this section helps people find your Page in search results — both on Facebook and search engines, particularly if you insert keywords at the beginning of specific fields.
- Tag photos. A photo is a primary content type that’s displayed in Graph Search results. Tag every photo with your Page name and any location that’s associated with the photo.
- Pay attention to photo descriptions. Include appropriate keywords in the description of each photo or video you post to your Page. A photo of an adoptable dog at an animal shelter, for example, should have the breed of dog and the words for adoption in the description.
- Create a username. If you haven’t done so already, create for your Page a custom URL (in the format
www.facebook.com/username) that includes the name of your organization to improve its SEO for both Facebook and Google.
For in-depth coverage of SEO (there’s way too much information about it to cover in this book), check out SEO For Dummies, 6th Edition, by Peter Kent (Wiley).
Networking with Friends to Launch Your Facebook Page
As we mention at the beginning of this chapter, one challenge of launching a brand-new Facebook Page is users’ lack of awareness of your Page within Facebook. Often, the first step that many administrators take in launching their Pages is leveraging their existing networks of friends, such as personal connections developed via email and personal Facebook profiles.
Encouraging your friends to share your Page with their friends
The Share button, which appears at the bottom left of the cover image on every Facebook Page (see Figure 8-10), lets people invite their Facebook friends to check out your Page.
Follow these steps to post an update about your Page to your Timeline:
-
Click the Share link on the left side of the Page.
The Share This Page dialog box appears.
-
Write a compelling message about your Page.
Though the message can be as long as you’d like, keep it short and sweet. Be sure to add a call to action, such as “Share this Page with your friends!”
-
Click the Post link.
A story is published in the News Feeds of many of your friends and on your personal Timeline.

FIGURE 8-10: The Share feature on a Page.
Promoting your Page to friends with the Invite feature
People who have become friends with you on Facebook may not realize that you’ve set up a Page specifically for your business. Facebook makes it easy for you, as a Page admin, to let people in on the good news. Follow these steps:
-
Click the Invite Friends link from the … (ellipsis) button below your Facebook cover.
The Invite Friends dialog box appears, as shown in Figure 8-11.
- Scroll through your friends’ pictures and click the Invite button of each person you want to invite, or type a friend’s name in the Search All Friends box at the top to find a specific friend quickly.
-
Click the Send Invites button at the bottom of the dialog box.
The Success dialog box appears, letting you know that your recommendations have been sent. Get ready for all the new Likes to roll in!
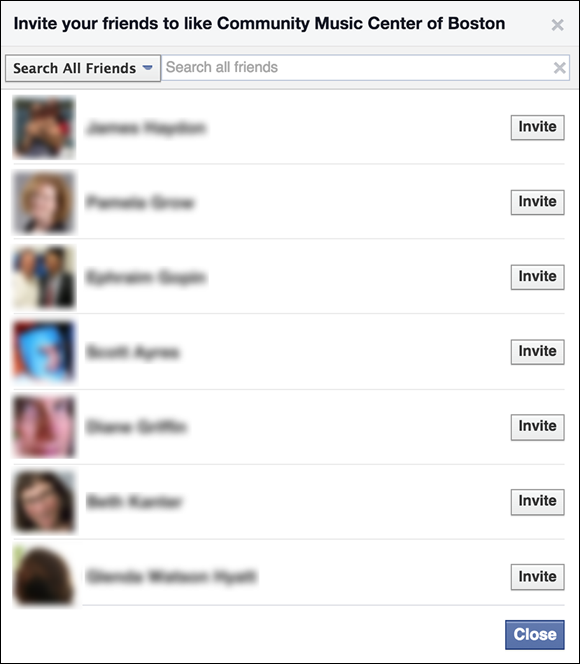
FIGURE 8-11: Sharing a Page with friends by using the Invite Friends feature.
Using Tagging and Mentions on Facebook to create engagement
Facebook lets you tell people and businesses you are talking about them by using two different methods: Tagging and Mention (the terms are often used interchangeably, but they have differences). We discuss the different ways to use them in the following sections.
Tagging
Tagging Facebook users can only be done from your personal profile. If you tag a person by identifying her in a post (“I’m with this person”) or a photo (“I’m identifying this person”), she receives a notification. You can tag only a person you are connected to on Facebook. Using this method, you can alert your friends that you’re saying something about them and hopefully encourage them to engage and share.
To tag a photo or person on your personal profile:
-
Click the What’s on Your Mind area in your Timeline.
A screen pops up, showing you tagging choices, including Tag Friends and Tag Events. (The Tag Events choice is not shown in the figure.)
-
For this example, click Tag Friends, shown in Figure 8-12.
You see a space under your post that says “With."
-
Start typing the name.
A list pops up, allowing you to choose the friend you are talking about.
-
Click the person’s name.
The name is inserted into the post. Finish the post as you normally do.
- Click Post.

FIGURE 8-12: Tagging a friend on a Facebook profile.
Mention
A mention can only be done from your Page. Mentions are used to comment about a Page or people you aren’t connected to. You mention a person or Page using the @ sign. When you mention a business Page or person, the person or Page receives a notice.
To mention Pages or a person, log in as your Page by following these steps:
-
Click the arrow icon in the top-right corner of the page.
The Use Facebook As drop-down menu appears, displaying all the Pages you manage.
-
Choose the Page that you want to log in as.
When you’re logged in as your Page, you can mention Pages or Facebook users.
-
Start creating a new post or commenting on an existing post by entering the @ sign.
A list of choices pops up.
-
Click the Page or name and it is inserted into the post.
Finish the post as you normally do.
- Click Publish.
Leveraging Existing Marketing Assets to Launch Your Facebook Page
After you attract an initial boost of personal friends to your Page, as described in the preceding section, start promoting your Page — perhaps by using marketing channels and assets that you’ve been building for years.
Chances are good that you already have these types of marketing assets:
- A large following: You may have attracted a following because you’re well known in your community or because you’ve been around longer than anyone else.
- Attention: This asset is often a matter of time and place. Restaurants can garner the most attention when people are eating in the establishment; online retailers, by way of email; and nonprofit organizations, at fundraising events.
The following sections describe how to use existing marketing assets to promote your presence on Facebook.
Your email signature
Suppose that every email you sent in the course of doing daily business included a link to your Facebook Page! Adding an anchor link in your email signature that connects with your Facebook Page is relatively easy to do in most email programs, such as Outlook, Gmail, and Apple Mail. If you want to enhance your email signature you may want to check out a service like WiseStamp (www.wisestamp.com). WiseStamp allows you to do such things as to add a Like button or provide other links in your email signature so that you can drive traffic to your channels. WiseStamp has a free version and premium plans.
Your email list
You can promote your new Facebook Page in many ways, but the easiest way to attract new connections is to use your email list — an asset that you may have been growing over the past few years.
Facebook users share useful information with their friends and click the Like button on Pages that help them achieve that goal. If they receive an email saying “We’re now on Facebook; please like our Page,” they’re likely to delete it unless they’re hardcore fans. If they ask “What’s in it for me?” and don’t receive an answer, no perceived value exchange takes place.
When you’re emailing your current list about your Facebook Page, keep these tips in mind:
- Focus on the value to the recipient, not to your business. Prospective customers and customers are always asking “What’s in it for me?”
- Write the message in the second person, using you and your to speak directly to the customer. This approach gives the email a more personal feeling.
- Present the benefits in a concise list of bulleted items (as we’ve done in this list). Bullet points are easy to scan and read, allowing recipients to find what they’re looking for fast.
- Tell recipients that they’ll meet other people who have similar interests and ideas. They’ll feel that they’re joining a community, not just another Facebook Page.
- Make messaging the same. Don’t confuse people by using different messaging in email and in Facebook content. When the messaging is consistent across your channels, the results are more effective. An email subscriber who reads an email about a recent sale will be more likely to act after seeing a Facebook update about that sale, for example.
- Make the content different across channels. Email subscribers may wonder why they should become Facebook fans when they already subscribe to the email list, for example. You can use email to share customer stories about your product or service and use Facebook to share photos and videos from those stories.
- Consistently cross-promote each channel. Within your email newsletter, for example, include links to the photo album that are related to stories covered in the newsletter.
Printed marketing materials
The best way to promote your Facebook Page in print, such as in annual appeals or newsletters, is to create a custom URL (as described in Chapter 4). A custom URL is much shorter than the default Facebook Page URL, which no one is likely to take the time to type from a printed page. Use this custom URL on every single piece of printed material that you send.
Your blog
Write a blog post that describes the launch of your Page, followed by a few posts that elaborate on the best comments on your Page updates. Include a link to your Page or the Page update (or both).
Webinars
If your business regularly holds webinars, make your Facebook Page’s Timeline the place where you announce events and send people to your landing page to register for webinars.
YouTube
As you may know, YouTube is the top video-sharing website in the world. Posting videos there is a way to promote your business to millions of people. If you already have a presence on YouTube, you can leverage that asset to promote your Facebook Page. Nimble, a Customer Relationship Management (CRM) software app, uses its call to action (CTA) button to link to its large collection of software demos (see Figure 8-13). CRM software helps you manage information about each of your customers so that you can communicate with them and help them use your products.
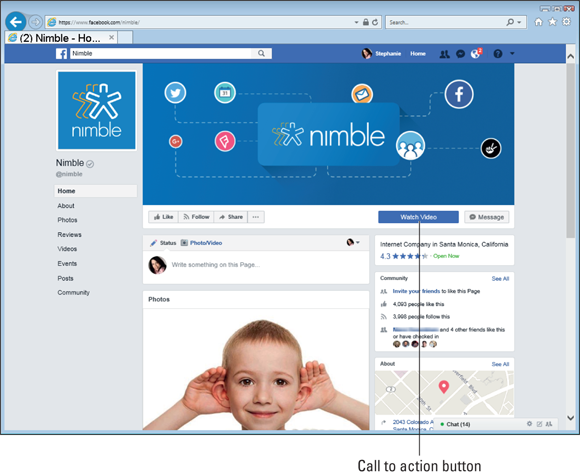
FIGURE 8-13: Nimble uses its CTA button to send users to demos of its software.
Promoting Your Facebook Page in Your Store
When people visit your business and have a positive experience, they naturally want to share that experience with their friends (a type of word-of-mouth advertising that has been going on for eons). When you launch your Facebook Page, promote it in your store. If people check in to your place on their mobile devices, those posts provide additional exposure for your business in their News Feeds.
Promoting Your Facebook Page by Using Facebook Ads
One way to acquire Facebook fans is to use Facebook Page Ads to promote your Page to the friends of your existing fans.
These ads appear in the sidebar on Facebook and in the News Feeds of Facebook users. The powerful aspect of these ads is that they leverage the social graph — the Facebook network of friends.
Facebook Ads are different from traditional online ads or Google ads in four ways:
- They can target friends of your current fans to take advantage of the idea that “birds of a feather flock together.”
- A user’s friends who have already liked your Page are displayed this way: “John, Bill, and Barbara like the National Wildlife Federation.” Facebook users are more likely to take action when they see that their friends have already taken that action.
- Users can like the Page directly in the Sponsored Story. This setup eliminates any potential abandonment that may occur when people click a link to visit your Page and then decide not to like it.
- The names of new fans are displayed in the Likes report within Facebook Insights so that you see how these Sponsored Story ads compare with other methods of acquiring fans.
For more on using Facebook Ads, see Chapter 11.
Promoting Your Facebook Page by Using an Integrated Approach
In the typical business or non-profit organization, the marketing communications include various channels, such as direct mail, email, social media, traditional public relations, print assets, and online and offline advertising. Using these methods shows that your business or organization has made an effort to embrace a wide variety of channels, hoping to engage people from every angle.
As you may have already experienced, the results from any single promotional channel or approach are much less significant than the results from an integrated approach, in which all channels are combined into a single communications plan. To start creating an integrated plan, ask yourself these questions:
- How do people typically find out about my business or nonprofit? (From a Facebook friend? From searching on Google? From a road sign? From a newspaper ad?)
- What is the next step for someone to take with my business after becoming a Facebook fan? (Joining an email list? Redeeming a coupon in my store?)
- Where do people usually begin their relationship with my business? (Searching? Joining my email list?)
- Which channel do most of my new customers join? (Email? Direct mail?)
- How can my customers easily tell their Facebook friends about a new purchase?
- Where do I have a lot of natural attention? (In my store? At events and conferences?)
After you’ve jotted down a few ideas for the channels mentioned in this chapter, use the answers to these questions to start mapping a way for all your channels to work together as a whole.
 On an Android or iOS device, you can take a photo or video and immediately upload it to your Facebook Page by using the Facebook Pages Manager app.