Chapter 4
Getting Started with a Facebook Page
IN THIS CHAPTER
 Introducing Facebook Pages for your business
 Creating and customizing your Facebook Page
 Getting the most from Facebook’s marketing resources
 Understanding Facebook’s terms and conditions
Facebook Pages give your business a presence on Facebook where you can promote your products or services. Facebook Pages are the business equivalent of a Facebook member’s Timeline.
Facebook users can like your Facebook Page, find out about new products and promotions, post content (photos, videos, and links), send you private messages, and even converse with others in comments on your Page posts. You can also add branded custom tabs with various features to engage customers, capture email addresses, and even sell your products or services, such as the shop tab offered by Dollar Shave Club (see Figure 4-1).
With all these features as well as exposure to thousands of potential customers, the Facebook Page has become a central tool in the marketing toolbox of thousands of brands. In fact, Facebook has added lots of features that turn your static Page into an interactive one. You can now swap out your Page photo for a video (covered in Chapter 7) and communicate with your customers using Facebook Live and Messenger (detailed in Chapter 16.)
In this chapter, you find out what Facebook Pages are all about and what that means for your business. We walk you through creating a Facebook Page and give you tips on how to set up your Page so that you convert more visitors to fans. We also help you understand how to make the most of Facebook marketing resources.
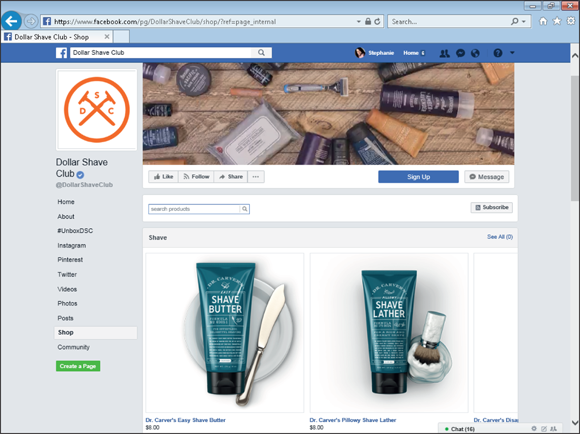
FIGURE 4-1: Dollar Shave Club enhanced its customer experience on Facebook with an e-commerce app.
Understanding the Differences among Pages, Timelines, and Groups
One of the most common mistakes businesses make when they start using Facebook is using the wrong Facebook tool. Many start by creating a profile, which is really intended for people to share personal information on Facebook. Or they start by creating a group, which is intended for people to connect with one another on very specific goals and interests.
Each of these Facebook tools serves a very different purpose:
- Timelines: Timelines (otherwise known as Facebook profiles) represent people. They allow Facebook users to connect with friends, upload and share videos and photos, and store their activities over time. If you use Facebook personally, you’re using a Timeline.
- Pages: Pages represent businesses, brands, nonprofit organizations, public figures, and celebrities. Pages allow you to create awareness of your product or service within the Facebook community, engage with customers and products, and even sell your products or services.
- Groups: Groups allow people (using Timelines) to organize around shared goals or topics of interest. People can join groups; Pages can’t.
Many businesses start with the wrong Facebook tool because they may be comfortable using a Timeline and don’t know anything else, or they received no clear direction from Facebook or a marketing expert. Lucky for you that you’re reading this book!
Timelines are personal, not business
Timelines limit the number of friends to 5,000. This makes sense, because no human being could actually be friends with an unlimited number of people.
A business, on the other hand, might suffer under such limitations. Your business can post updates to your Page at any time without any concern about a limit on the number of people you can reach.
From one perspective, Facebook users who like your Page are like email subscribers, with Facebook providing the infrastructure for you to reach those subscribers via Page updates, message replies, and the ability to target specific fan segments with updates and ads.
Here are four more key differences between a Facebook Page and a Facebook Timeline:
- Timelines don’t have any marketing analytics. Facebook Pages give marketers a powerful tool called Insights that allows you to see how users engage with your Facebook Page updates.
-
Friending a Timeline is very different from liking a Page. When Facebook users send friend requests, they’re essentially asking that user for access to her photos, her list of friends, her phone number, her relationship status, and other very personal information.
Facebook Pages offer no such functionality for marketers, which is actually a good thing for both parties. In the real world, a business would never make such personal requests of customers and prospects. Brands that use a Facebook Timeline to market their businesses often unknowingly cross this social boundary. Asking a user to like your Page, on the other hand, doesn’t cross any such boundary. Instead, users like Pages (see Figure 4-2).
 Facebook allows Timelines to activate a subscribe feature, allowing Facebook users to subscribe to public updates from that person. This feature is the only marketing feature Timelines have, which is still extremely limited compared with the features offered in a Facebook Page. (Read more about the subscribe feature in Chapter 11.)
 -
Using a Facebook Timeline to market your organization is a violation of the Facebook terms and conditions (
www.facebook.com/legal/terms). Facebook terms state: “You will not use your personal timeline primarily for your own commercial gain, and will use a Facebook Page for such purposes.”Facebook terms also state: “If you violate the letter or spirit of this Statement, or otherwise create risk or possible legal exposure for us, we can stop providing all or part of Facebook to you.” This means that even after you spend a lot of resources to build a large number of friends — say, 5,000 — Facebook can simply delete your Timeline.
- Facebook Timelines have bad search engine optimization (SEO). The last key difference between Facebook Pages and Timelines is that Facebook Pages are public by default. This means that anyone can search and find your Page with the Facebook search engine and with Internet search engines (such as Google and Yahoo!), thereby helping your business gain visibility and broadening your audience beyond just Facebook.
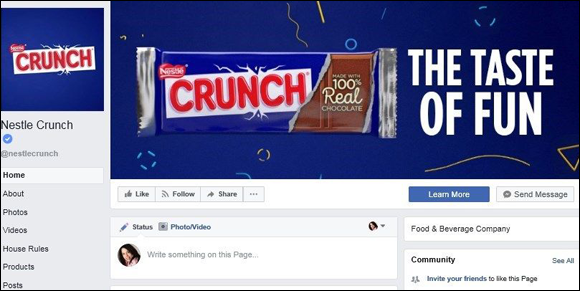
FIGURE 4-2: Facebook Pages require users to like the Page, not request friendship, as personal Timelines do.
If you created a Timeline to market your business and want to switch to a Page, here’s the good news: Facebook gives you the opportunity to convert your existing Timeline to a Page. When you do so, your Timeline picture remains, and all your friends become fans of the new Page.
To begin converting a Timeline to a Page, go to https://www.facebook.com/pages/create/migrate and then follow the steps for creating a Facebook Page outlined later in this chapter (see Figure 4-3).
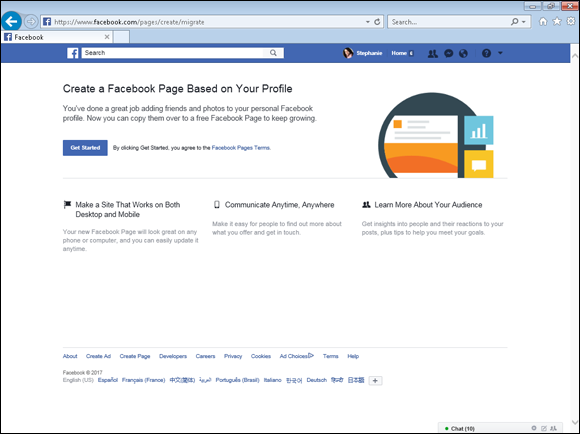
FIGURE 4-3: Facebook allows users to convert a Timeline to a Page.
Groups are for connection, not promotion
Another very common mistake businesses make is creating a Facebook Group to market their products or services. The problem with this action is that groups are intended for Facebook users to connect with one another — not to receive notifications about promotions or new products from businesses.
Most groups are very small and used as tools for people to communicate in real-life social circles. Members of an extended family, for example, can use Facebook Groups to keep in touch with one another, organize family events, and collect and share photos and videos.
Now, this isn’t to say that businesses shouldn’t use groups. Biggerplate (http://biggerplate.com), a mind-mapping company, uses several groups to engage users (see Figure 4-4).
Groups can be valuable for businesses, but here are three reasons that Facebook Groups aren’t as good as Facebook Pages for your business:
- Groups offer no capability to add custom applications. One thing that people love about Facebook Pages is that you can add a lot of custom tabs to conduct polls, create photo contests, and collect emails, among other ways to keep prospects and customers connected. You can even add storefront e-commerce applications to a Facebook Page!
- Facebook Groups have no viral features. When users post updates in groups, they’re shared only with other members of that group. Pages, on the other hand, automatically generate viral reach each time a person likes, comments on, or shares updates from that Page.
- Facebook Groups have no hierarchy. All members of a Facebook Group are generally seen as being equal players who contribute to a common cause or interest. This situation is different from Facebook Pages in which brands set the agenda for the Page. For this reason, the group members — not a brand — dictate what topics are discussed.
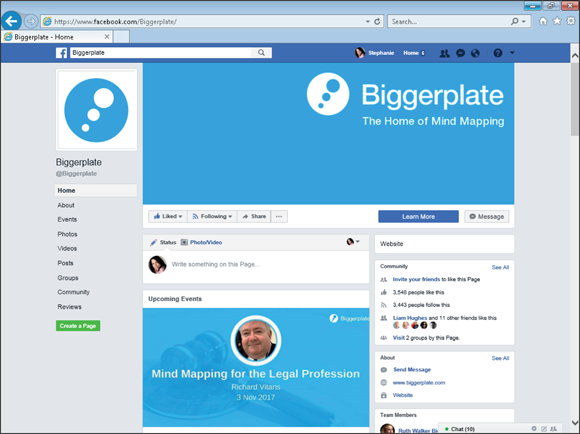
FIGURE 4-4: Biggerplate uses Facebook Groups to engage its community.
In Chapter 13, we go into more depth about Facebook Groups. For now, just know that they’re not the best choice for marketing your business.
Understanding the Anatomy of a Facebook Page
Before showing you how to create your own Facebook Page in the following section, we briefly look at its structure. Understanding the structure of a Page makes it easier for you to determine what you want to include on your own business Page. Even though you have probably seen hundreds of Pages, it can be intimidating to decide what to put on your Page if you’re not familiar with the layout. Figure 4-5 shows you the main parts that make up a Page as well as how one software company presents its business. You can find this Adobe Page at https://www.facebook.com/adobe.
-
Top center: This area includes your profile picture, username, and cover photo or video. These items tell users what your business is about and gives them visual clues about you. Note that Adobe uses a black-and-white picture and cover photo. As a design software company, Adobe wants to set the stage for the colorful content that will populate this page.
Type of content to consider: You need to choose an exciting photo or video that represents your business, as well as choose a profile picture that includes your logo or represents your brand.
-
Area beneath the cover photo/video: Right under the cover photo and to the left are the following buttons: Like, Follow, Recommend, and an ellipsis (…) button. When you click the … button, several other options appear. People who want to become fans can click the Like button, or they can follow you or recommend you to others. To the right is what’s known as the call to action (CTA) button (in this case, it’s Watch Video). We discuss the CTA button in the “Adding a button (CTA) to your Facebook Page” section, later in this chapter. Adobe uses its Watch Video to show off its latest software innovations. Next to that CTA button is a message button, which is optional. The message button allows users to send you a private message. Adobe uses this button to provide support.
Type of content to consider: For the CTA button, you need to decide what action you want your customer to take and then choose from the options that Facebook provides for that button that aligns with the action you’ve chosen. You also need to decide whether you’ll include a message button. If you offer any kind of customer support, you probably want to consider using this button.
-
Left column: Here you find the links that people will use to navigate through your content. The default list will be determined by the Facebook template you choose when you set up your Page. This is also where you add custom tabs and apps. Notice that Adobe takes full advantage of this by adding apps for its Instagram and Pinterest feeds and custom tabs called World of Adobe and Adobe.
Type of content to consider: This is an important section because it will house any apps you decide to include (such as a Pinterest feed) and any custom tabs that will show specific content. You need to decide what content you want to highlight, such as photos or videos, and include them here.
-
Right column: In this column, the user sees the designation you use for your business. In this case, Adobe chose Product/Service. Next comes the Community box, which gives users a link to invite friends. It also shows how many people like and follow this page, and it provides the specific name of one of your followers who likes the page. Underneath that box is the company About box, which is where you put important links. Below that is a list called Pages liked by this Page.
Type of content to consider: You can’t control the number of likes that display, but you can give careful consideration to the About content that populates this area. Also, you need to determine which Pages you want to like that will show up here.
-
Center column: This is the timeline area, which is the heart of your Facebook Page. This is where your company posts ongoing updates and where fans can post their content if you choose to allow it. This is also where people comment on your content.
Type of content to consider: Before you publish your Page, make sure that you’ve thought about how often you’ll be posting and what goals you have for that content.

FIGURE 4-5: Adobe Facebook Page.
Next, you look at how to set up your own Facebook Page.
Creating a Facebook Page from Scratch
Here are the steps for creating a Facebook Page (we recommend reading all the steps before you begin):
- Go to
www.facebook.com/pages/create. -
Select the business type that best describes your business.
You can choose among six types of Facebook Pages (see Figure 4-6):
- Local Business or Place: These Pages are meant for businesses that would benefit from a strong local market presence: a museum, a pizza shop, or a movie theater.
- Company, Organization, or Institution: These Pages are meant for large national businesses, which could include nonprofit organizations and large companies. Apple and Dell are good business-to-consumer examples; Avaya and Oracle are good business-to-business examples.
- Brand or Product: These pages are meant for large brands. Think Starbucks and Coca-Cola.
- Artist, Band, or Public Figure: These Pages are good for politicians, artists, TV celebrities, or musical groups, such as Jimmy Kimmel, Barack Obama, and Lady Gaga.
- Entertainment: These Pages are meant for brands and companies in the entertainment industry, such as Broadway shows and cable TV networks.
- Cause or Community: Community Pages are intended for Facebook users who like a topic or experience and are owned collectively by the community connected to it. Because you want to have administrative control of your business presence on Facebook, we don’t recommend using a Community Page as a primary way to market on Facebook.
-
Type your business name in the Company Name field to secure your organization’s name on Facebook.
 When you name your Page, it’s much more difficult to change after you’ve acquired 100 fans. (After you have 100 fans, you can request a name change by clicking a “request change” link next to your page name on the basic information tab, but it’s up to Facebook whether to grant the request.) So, choose a name that you want your fans and customers to associate with your business (see Figure 4-7). In most cases, this name will be the name of your business.
If you select a Local Business or Place, you also need to enter your address and phone number.
-
Select a category for your Page.
Depending on the Page type you select (refer to Figure 4-6), you have a variety of choices regarding your Page category. Choose a category based on how your customers think about your business rather than how you think about your business. A museum of science would choose Museum as its category even though its executive director might think of the museum as being a nonprofit organization, which is another category choice. Choosing a customer-oriented category makes it easier for users to find your business on Facebook.
 Although you can always change the category of your Facebook Page, try to get it right from the start.
 -
Click the Get Started button.
When you click Get Started, you automatically agree to the Facebook Pages Terms. Read the terms for Pages at
https://www.facebook.com/page_guidelines.php.
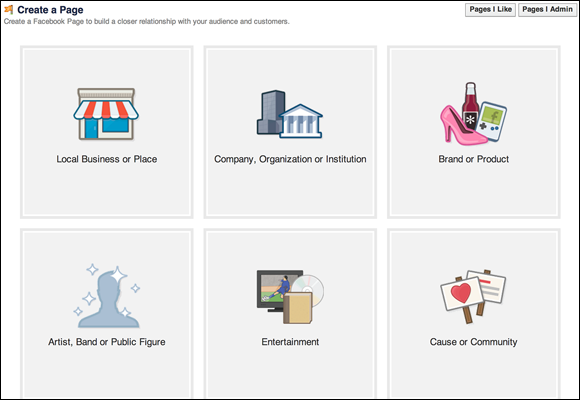
FIGURE 4-6: Facebook offers six types of Pages.
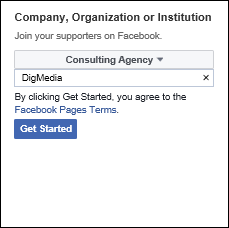
FIGURE 4-7: Select the name and category of your Facebook Page.
Congratulations! You’ve just created your Facebook Page, as shown in Figure 4-8. The next sections show you how to upload and add your picture and cover image, and add items to make your Page enticing to new customers.
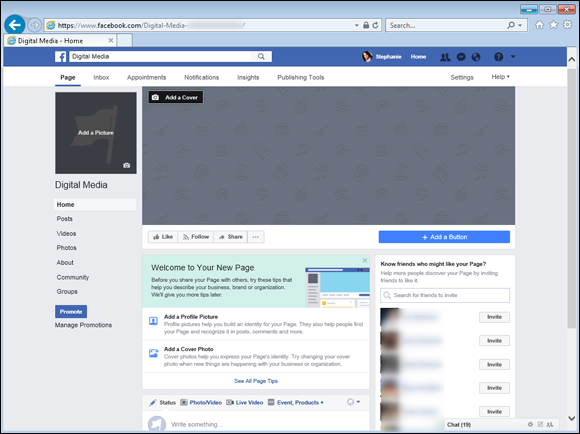
FIGURE 4-8: This is what your new Page looks like.
Uploading your profile picture
Your next step in creating a new Page is uploading a profile picture. A good way to start making your Page unique is to upload your company logo or a photo of your product. This picture represents your business on Facebook, so make it a good one. If you’re a services company, you can have photos of happy people using your service.
To upload the first picture for your Page, follow these steps:
-
Click Add a Picture (see Figure 4-9).
You are shown three choices: Choose From Photos, Take Photo, and Upload Photo.
-
Make your choice and browse to the picture you’re looking for; then click the Open button to start the process. (You can also double-click the picture in your browser to open it.)
After choosing the picture, you see a pop-up screen, shown in Figure 4-10, that asks you to add a description, resize, crop, or edit to get the picture the way you want it.
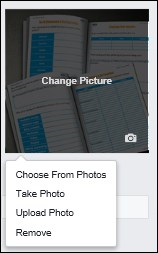
FIGURE 4-9: Choices for adding a profile picture to your new Page.

FIGURE 4-10: Editing your new profile picture.
Editing your Facebook Page’s profile picture
When you first create your Page, you are asked to upload a picture or video to be used as your profile picture. To change it, simply follow these steps:
- Mouse over your profile picture and click Change Picture.
-
On the drop-down menu, your choices are Choose From Photos, Take Photo, Upload Photo, or Remove, as shown in Figure 4-11.
Make your selection, and a pop-up window appears.
-
In the pop-up window, select the new profile picture from your desktop.
Again, as you did when adding your first picture you have the option to add a description, edit, and crop.
-
When you have made your changes, click Save.
Your new profile picture automatically replaces the previous profile picture.
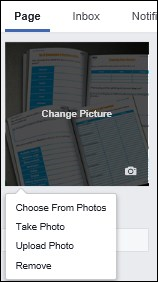
FIGURE 4-11: Options for changing your profile picture.
Adding a cover photo to your Facebook Page
The most powerful way to engage Facebook users is to use images. Facebook allows you to upload a cover photo, video, a photo/video or slideshow that appears at the top of your Facebook Page.
Think of your cover image as the primary way to create a powerful first impression when someone visits your Page. You can also use it as another tool to engage your most passionate fans.
To upload a cover image, click the Add a Cover camera icon. You will see the following choices, as shown in Figure 4-12: Choose From: Photos, Choose From Videos, Upload Photo/Video, and Create Slideshow.
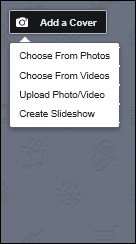
FIGURE 4-12: You have several formats that you can choose for your cover.
Adding a button (CTA) on your Facebook Page
A key way to engage your audience on Facebook is to make it easy for people to take some action to interact with your community. You want to encourage them to click links and buttons and, you hope, buy your products or services. A good approach is to use a call to action (CTA) button, which Facebook provides under your cover photo or video, to the right. For example, Stella & Dot (https://www.facebook.com/stelladot/), an entrepreneurial jewelry company, put a Sign Up button on its Facebook Page, as shown in Figure 4-13. When users click the button, they’re taken to the company’s website, where they learn about joining the company.

FIGURE 4-13: Stella & Dot has a Sign Up button on its Facebook Page.
Facebook offers several prepopulated button options to choose from, including the following categories:
- Book with you
- Contact you
- Learn more about your business
- Shop with you or make a donation
- Download your app or play your game
- Join your community
As you can see, these choices invite action and are easy to set up. Make sure to select one to include for when your Page goes live. Then monitor the response with Insights to see how well it works.
Limiting access to your Page until launch
Before you go live with your Page, you may want to consider limiting access to admins only until you’re ready to launch your Page.
You limit access by choosing the Settings tab at the top of your Page and then clicking Page Visibility in the General tab. Selecting Unpublish Page will hide it from all users, including your customers and prospects (see Figure 4-14).

FIGURE 4-14: You can keep your Page hidden from view by keeping your setting as Page Unpublished.
Only the administrators of the Page can view the Page while it’s unpublished. Your Page won’t be visible to users until you change this setting to Page Published.
Adding More Information about Your Business
The About tab contains detailed info about your business. Which details appear in these areas depends on which category and business type you choose when you create your Page. To add or edit information about your business, simply choose the About tab on your Facebook Page. (See Figure 4-15.)
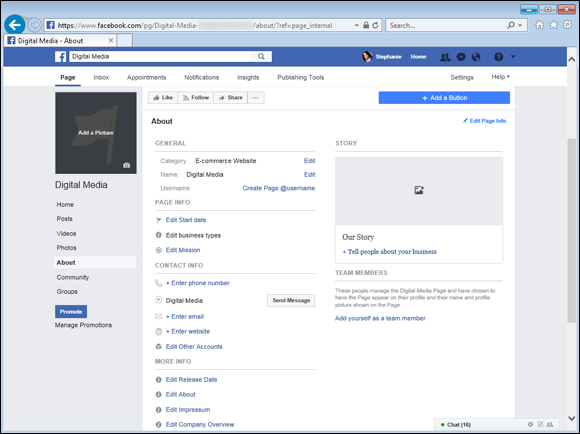
FIGURE 4-15: You can edit your info in the About section of your Page.
Here’s a general rundown of some of the various sections within the About section including:
- Contact: Here you enter your basic contact information, such as a phone number, email, and website URL. For bands, for example, this information would include band members’ names and the type of music the band plays.
- Company Overview and Description: Add your company’s boilerplate text about who you are and what you do. Or you can add content that’s more social and less “corporate” to give your Page more personality.
- Page Info: Add your mission statement. You don’t have to enter one if you don’t have one, or you can make up something provocative.
- Products: Add a listing of your products or services.
- Our Story: This section asks you to tell people about your business.
Be sure to click the Save Changes button when you finish entering information or editing an item within the About tab.
Adding Tabs to and Removing Tabs from a Facebook Page
Facebook allows you to configure or rearrange your Page tabs, which include a Video tab, an Events tab, and a Photos tab.
To add these tabs to your page or remove them, follow these steps:
- Choose the Settings link at the top of your Page.
- Click Edit Page (on the left side of the screen) and scroll down to Tabs.
-
Click the Settings button to the right of the tab and make your changes.
A pop-up window appears.
-
Add or remove the tab by selecting the appropriate option.
You can also change the order of your Facebook Page tabs views by positioning your mouse on the dotted area to the left and dragging each tab into the desired order.
- Click Save.
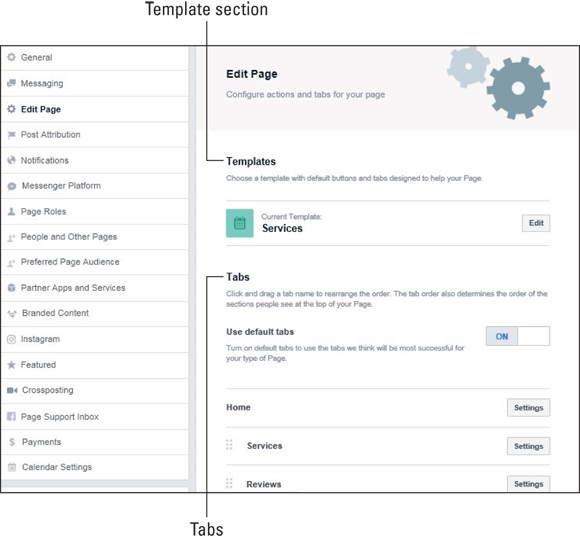
FIGURE 4-16: You can add, revise, or remove Tabs on your Facebook Page in the Tabs section of your Page.
Adding more apps to your Facebook Page
In addition to the apps that are included with your Facebook Page (Photos, Videos, Notes, and Events), you can choose among thousands of free and premium apps. These apps allow you to add further functionality — such as promotions, videos, and e-commerce — to your Page. One way to do this is to search Facebook for an app and add it to your Page by following these steps:
-
Type the name of the app in the Facebook search bar at the top of the screen.
If you don’t have a specific app in mind, simply search for the type of app you’re looking for. Type the phrase contact to search for contact form applications, for example, and then select any apps that appeal to you.
-
In the search results, click the Use Now button for the app you want to use, as shown in Figure 4-17.
In some cases, you will be taken directly to a permissions box.
-
Follow the prompts to add the app to your Page.
These prompts are different for each application.

FIGURE 4-17: Facebook allows you to search for additional applications for your Facebook Page.
For more on applications, see Chapter 6.
Adding Page Administrators
Facebook Pages allow businesses to add multiple administrators (see Figure 4-18). We recommend adding other admins to the Page, for several reasons:
- Additional administrators can share the workload of managing a Facebook Page.
- Having additional administrators on the Page helps ensure that someone replies to comments quickly. The last thing you want is to be left waiting for the only administrator of your Facebook Page to come back from vacation.
- Additional administrators can help promote your Facebook Page through their personal networks.
Adding admins to your Facebook Page takes just five steps:
- Choose the Settings tab at the top of your Page and then the Page Roles tab on the left.
- Enter the email address or name of the person whom you want to add as an admin.
- Select one of the five levels of administrative access you’d like this user to have:
- Admin: Can manage admin roles, send messages and create posts as the Page, create ads, and view Insights
- Editor: Can edit the Page, send messages and create posts as the Page, create ads, and view Insights
- Moderator: Can respond to and delete comments on the Page, send messages as the Page, create ads, and view Insights
- Advertiser: Can create ads and view Insights
- Analyst: Can view Insights
- Live Contributor: Can go live as the Page from a mobile device
- Click Add.
-
In the pop-up window, enter your Facebook password to confirm the addition of administrators.
 Manager roles have full control of your Page, so make sure you know the people whom you make managers very well!
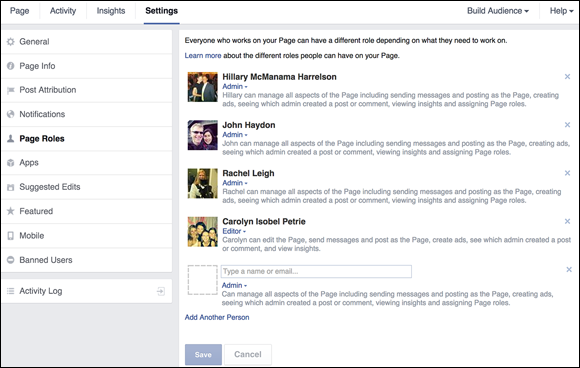
FIGURE 4-18: Adding administrators can make managing Facebook Pages easier.
Getting the Most from Facebook Marketing Resources
Probably one of the best resources on Facebook for marketers is the Facebook IQ Tools — Resources Page (https://www.facebook.com/iq/tools-resources). This Page includes several useful links for marketers and includes the following areas:
- Several Facebook Insight analytic categories: These sections include Insights to Go, Cross Border Insights Finder, Audience Insights, and Insights Partners. The sections provide detailed information about each of these Insight programs.
- Creative Hub: Here you can mock up your ads and get feedback from real users.
- Facebook Business: This area links to a plethora of information about creating ads and Pages.
- Instagram Business: Here you are served the latest information about marketing and growing your brand with Instagram ads.
- Facebook Blueprint: In this section, you find detailed information about all the marketing tools and services in the form of free online courses.
- Stay in the Know: Here you can sign up to get an email delivered to your Inbox that contains updated insights from Facebook IQ.
In addition to Facebook, you should check out amazing websites, including the following:
- Social Media Examiner: This website helps businesses use social media tools like Facebook, Twitter, Google+, and LinkedIn to connect with customers, generate more brand awareness, and increase sales. The site is helmed by Michael Stelzner and articles are written by Facebook marketing thought leaders such as Mark Schaefer and Amy Porterfield. Go to
www.socialmediaexaminer.com. - Mari Smith: Another amazing online resource for Facebook expertise is the website of Mari Smith. Her fans have called her the Queen of Facebook because of her comprehensive approach to learning and her exuberant style. Go to
https://www.marismith.com/.
Understanding Facebook’s Terms and Conditions
If you’re a business owner, one thing that you care about, in addition to marketing your business, is protecting your business. This is why you need to understand Facebook’s terms and conditions, at www.facebook.com/terms.php.
These terms and conditions set guidelines on the following areas:
- You’re responsible for the content you post on Facebook. Any copyright violation or other legal consequences are your responsibility.
- Anyone younger than 13 can’t use Facebook.
- You can’t misrepresent your relationship with Facebook to other people.
- You can’t spam users on Facebook.
- Facebook reserves the right to delete any of your content and even delete your account if you violate the terms of service.
You have nothing to worry about if you read the terms of service and practice common-sense business ethics. If you already do (and we hope you do), the terms and conditions should be of little concern, and you can focus your efforts on building your business with Facebook!