Now it's time to turn some of that Motion Editor theory to practice. By now, you know how to tween dimensions (Tweening a Symbol's Dimension Properties) and position (Making It Move with Motion Tweens); now you'll learn how to change the transparency of a tweened symbol. As shown in Figure 8-18, the Missing CD file 08-5_Tween_Alpha.fla shows an animated sign for a car company, but you can use your own symbol if you prefer. In the sample file, the sign spins and bounces as it gets bigger, giving the impression that it's coming at the audience. In the following steps, you adjust the transparency so that the sign goes from an alpha value of 20 percent to a value of 100 percent, making it completely opaque at the end of the motion.
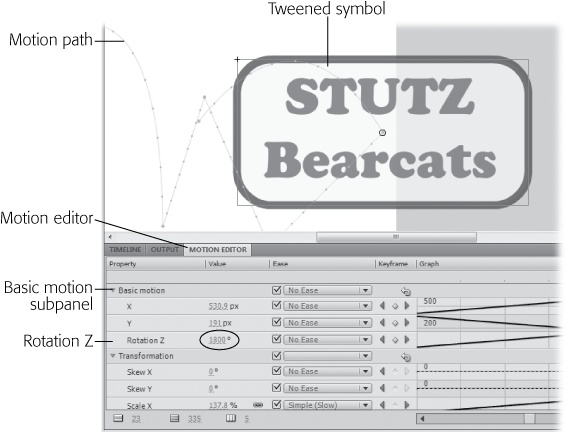
Figure 8-18. The Motion Editor is made up of numerous subpanels. Each subpanel gives you access to tweenable properties. Here the Rotation Z property is set to 1800. You can click and type a value or drag to "scrub in" a value.
Note
Techies often refer to transparency as the alpha channel. Typically, computer video has RGB channels for red, green, and blue. To store information about the opacity and transparency of an image, programmers needed another channel, and they dubbed it the alpha channel, because they needed another letter and why not start at the beginning of the alphabet?
Drag the playhead to Frame 1, and then click the layer to make sure that the motion tween is selected.
Your sign is back to its starting position on the motion path. When you select the motion tween, the words Motion Tween appear at the top of the Properties panel.
Click the Motion Editor tab next to the Timeline tab.
If you don't see the Motion Editor tab, choose Window→Motion Editor to make it visible, as shown in Figure 8-19.
Figure 8-19. The Motion Editor is Command Central for tweaking every little detail in your motion tween. It's made up of several panels that give you access to properties, effects, and filters. Click the triangles to expand and collapse the different panels. Click the + and – buttons to add and remove effects and filters.
In the Motion Editor window, find the Color Effect section, and then click the + to add an alpha color effect to the tween.
If some of the panels are expanded, you may not see the Color Effect panel right away. Either close the open panels by clicking their expand/collapse triangles, or use the scroll bar to find the Color Effect panel. When you click the + button, a shortcut menu gives you four color-related choices: Alpha, Brightness, Tint, and Advanced Color. After you choose Alpha, a new subpanel opens, showing an alpha amount as a percentage.
Next to "Alpha amount", change the value to 20%.
You can click the number and type 20, or you can scrub the value until 20 appears in the box. Notice how the graph to the right changes as you change the value.
Click the Timeline tab, and then drag the playhead to the last frame.
By moving the playhead to a new location, you can enter a different alpha value to create the tween.
Click the Motion Editor tab, and then change the Alpha amount to 100%.
Setting the Alpha amount to 100% makes the sign symbol completely opaque.
Test your animation in Flash or using the Flash Player.
At this point, the animation looks pretty much the same whether you run it inside Flash (Enter) or you compile the animation and test it in the Flash Player (Ctrl+Enter or ⌘-Return). Position, size, and alpha properties are all visible inside Flash, but that's not always the case with some filters, components, timeline effects, and ActionScript code.
