Chapter 31. Physical and Logical Security
This chapter covers the following A+ 220-1002 exam objectives:
• 2.1 – Summarize the importance of physical security measures.
• 2.2 – Explain logical security concepts.
Welcome to the first chapter on security. Everyone should have some basic knowledge of information security. Computers and computer networks are constantly at risk, and new risks are always rearing their ugly heads.
This chapter is broken into two parts: physical security, and logical security. Simply stated, an attacker might try to break into a facility physically, or hack into a system logically. And I use the terms “break” and “hack” loosely—the methods used to accomplish those ends can vary. The goal of this chapter is to present some basic options for securing against a person who would: 1. Attempt to unlawfully enter a building or other location; and 2. Attempt to unlawfully gain access to a computer network, and individual systems. We’re also securing against the tools, software, and computers, that a person might employ.
Know this: Nothing is 100% secure. It is impossible to completely secure something. Attackers and hackers are always finding ways to get around security solutions—it just takes time and persistence. So, what we are interested in are solutions that are relatively secure. Powerful security methods that won’t break the bank so to speak, or bring our computers and networks to a crawl; all while staying within budget. That’s the essence of a good security plan. To repeat, nothing is 100% secure. Keep that in mind as we progress through these security chapters.
Note
Remember that the CompTIA A+ is not a security certification, but because security is such an important part of the IT world, it is given a substantial percentage of the exam. As such, we will spend several chapters on security topics.
2.1 – Summarize the importance of physical security measures.
ExamAlert
Objective 2.1 concentrates on the following: mantrap, badge reader, smart card, security guard, door lock, biometric locks, hardware tokens, cable locks, server locks, USB locks, privacy screens, key fobs, and entry control roster.
Physical security has to do with the tangible, visible, and hands-on methods of preventing access to a home, building, server room, data center, or any other location. There are lots of ways to accomplish an acceptable level of physical security. Let’s start with one of the most important —yet often overlooked —methods: the lock.
Physical Locks
The physical lock and key is one of the oldest security methods used as a deterrent against unlawful entry. In addition to main entrances, you should always lock server rooms, wiring closets, labs, and other technical rooms when not in use. It should be documented who has the keys to server rooms, data centers, and wiring closets. Locks should be changed out and rotated with other locks every so often. This keeps things dynamic and harder to guess at. Another type of lock is the cipher lock, which uses a punch code to unlock the door. These physical methods might be used by themselves or combined with an electronic system.
It’s important to use a lock for the room that the servers are in, but the servers themselves can also be locked up. Consider placing them in a well-ventilated, lockable cabinet. Special cable locks can also be installed for PCs, laptops, and servers. Some PC cases come with built-in locks. Configure the BIOS to log when someone opens the case of the computer. This is logged as a chassis intrusion notification. Use a USB lock to stop people from removing USB devices or to block the physical ports.
Entry Systems
The most common electronic entry system is the cardkey system. These use proximity-based door access cards that you simply press against, or near, a transmitter next to the door handle. They are often RFID-based Although these are common, they are not the most secure option (smart cards can be more secure, as we will discuss in a moment). But because they are less expensive than other systems, you will see them quite often. Other electronic systems use key cards that incorporate a photo ID (a worker’s badge). These can contain information about the identity of the user, which in combination with a badge reader, ultimately authenticates the user. These don’t have to be cards; they can come in smaller form factors, such as key fobs, which can be attached right to a user’s keychain. These systems will sometimes offer entry control, which will limit someone’s ability to enter or exit during certain times of the day and identify and check names against an authenticated roster or an entry control roster.
Moving on to the next level of security, let’s talk briefly about the smart card. These are cards that have a nano-processor and can actually communicate with the authentication system. Examples of these include the Personal Identity Verification (PIV) card used by U.S. government employees and contractors and the Common Access Card (CAC) used by DoD personnel. These cards identify the owner, authenticate them to areas of the building and to computers, and can digitally sign and encrypt files and e-mail with the RSA encryption algorithm (using an RSA token). Because these are physical items a user carries to gain access to specific systems, they are known as hardware-based tokens. A token might also display a code that changes, say, every minute or so; these are known as one-time password (OTP) tokens. When a person wants access to a particular system, such as the accounting system or other confidential system, that person would have to type the current code that is shown on the token into the computer. This is a powerful method of authentication but can be expensive as well.
Some organizations will design what is known as a mantrap, which is an area with two locking doors. A person might get past a first door by following someone else in (tailgating/piggybacking), but might have difficulty getting past the second door, especially if there is a security guard in between the two doors. If the person doesn’t have proper authentication, he or she will be stranded in the mantrap until authorities arrive.
Biometrics
Biometrics is the science of recognizing humans based on one or more physical characteristics. Biometrics is used as a form of authentication and access control. It is also used to identify persons who might be under surveillance.
Biometrics falls into the category of “something a person is.” Examples of bodily characteristics that are measured include fingerprints, retinal patterns, iris patterns, and even bone structure. Biometric readers (for example, fingerprint scanners) are becoming more common in door-access systems and can be found integrated with mobile devices or used as external USB devices that connect to the computer. Biometric information can also be combined with smart card technology. An example of a biometric door-access system is Suprema, which has various levels of access systems, including some that incorporate smart cards and biometrics, together forming a multifactor authentication system. One example of biometric hardware for a local computer is a USB-based fingerprint scanner.
Biometrics can be seen in many movies and TV shows. However, some biometric systems are easily compromised. It has only been of late that readily available biometric systems have started to live up to their hype. Thorough investigation and testing of a biometric system is necessary before purchase and installation. In addition, it should be used in a multifactor authentication scheme. The more factors, the better, as long as your users can handle it. (You would be surprised what a little bit of training can do.) Voice recognition software has made great leaps and bounds since the turn of the millennium. A combination of biometrics, voice recognition, and pin access would make for an excellent three-factor authentication system. But, as always, only if you can get it through budgeting!
Protecting Data Physically
Confidential documents should never be left sitting out in the open. They should either be properly filed in a locking cabinet or shredded and disposed of when they are no longer needed. Passwords should not be written down and definitely not left on a desk or taped to a monitor where they can be seen. Many organizations implement a clean desk policy that states each user must remove all papers from his or her desk before leaving for lunch, breaks, or at the end of the day. Anything that shows on the computer screen can be protected in a variety of ways. To protect data while the person is working, you can use a privacy screen, or install a privacy filter, which is a transparent cover for PC monitors and laptop displays. It reduces the cone of vision, usually to about 30 degrees, so that only the person in front of the screen can see the content shown on the screen. Many of these are also antiglare, helping to reduce eye stress of the user. Also, users should lock their computers whenever they leave their workstations. Windows can also be automatically set to lock after a certain amount of time, even if users forget to do so manually.
Cram Quiz
Answer these questions. The answers follow the last question. If you cannot answer these questions correctly, consider reading this section again until you can.
1. Which of the following is the science of recognizing humans based on physical characteristics?
![]() A. Mantraps
A. Mantraps
![]() B. Biometrics
B. Biometrics
![]() C. Tailgating
C. Tailgating
![]() D. CAC
D. CAC
2. You have been tasked with preventing unwanted removal of a webcam. Which of the following tools should you implement?
![]() A. Smart card
A. Smart card
![]() B. USB fingerprint scanner
B. USB fingerprint scanner
![]() C. USB lock
C. USB lock
![]() D. Privacy filter
D. Privacy filter
Cram Quiz Answers
1. B. Biometrics is the science of recognizing humans based on physical characteristics. In the authentication world, it falls into the category of “something a person is.” Mantraps are areas of a building implemented in an effort to stop tailgating. CAC stands for Common Access Card used by defense personnel such as DoD employees.
2. C. Use a USB lock to prevent the removal of USB-based devices such as external USB hard drives, keyboards, mice, and webcams. Smart cards and USB-based fingerprint scanners are ways to authenticate a user to the computer or network. A privacy filter is used to prevent shoulder surfing —when a person attempts to watch what a user is typing/performing in the system —by reducing the viewing angle.
2.2 – Explain logical security concepts.
ExamAlert
Objective 2.2 focuses on: Active Directory concepts (such as login scripts, organization units, and so on); software tokens, MDM policies, port security, MAC address filtering, certificates, antivirus/anti-malware, firewalls, user authentication/strong passwords, multifactor authentication, directory permissions, VPN, DLP, access control lists, smart card, e-mail filtering, trusted/untrusted software sources, and principle of least privilege.
Logical security has to do with operating systems, programs and data. It will be less tangible than physical security, but when combined with the physical, and if implemented properly, can provide for a high level of security. A lot of what we will discuss is within the realm of authentication. Let’s start with that.
Authentication
Unauthorized access can be prevented through the use of authentication, which is the verification of a person’s identity. It is a preventative measure that can be broken down as the following categories:
• Something the user knows (for example, a password or PIN). These are known as knowledge factors.
• Something the user has (for example, a smart card or other security token). These are known as possession factors.
• Something the user is (for example, the biometric reading of a fingerprint or retina scan). These are known as inherence factors.
• Something the user does (for example, a signature or speaking words)
• Somewhere the user is (for example, at work, or at home)
The first three categories (or factors) are the most common. A powerful security methodology is to combine two or more of these factors together. When this is done, it is known as multifactor authentication (MFA). An example of this is the combination of a password (knowledge factor) and a smart card (possession factor). Or, combining a fingerprint (inherence factor) with a soft token that has been installed to a user’s smartphone (possession factor). Both of these are two-factor authentication schemes that you will probably see in the field. The beauty of MFA is that if one factor is defeated or compromised by a malicious person, then the second factor still stands. Think about it for a couple of minutes. Imagine some scenarios where two-factor authentication can help to prevent a security breach. Of course, efficient and effective multi-factor user authentication only works well if it is strong: complex passwords, powerful biometric systems, and updated smart card systems.
ExamAlert
When two or more authentication factors are combined, the result is multifactor authentication (MFA).
Principle of Least Privilege
This principle says that a user should have access to only what is required. If a user needs to update Excel files and browse the Internet, that user should not be given administrative access. You might think of this as common sense, but it should not be taken lightly. When user accounts are created locally on a computer and especially on a domain, great care should be taken when assigning users to groups. Also, as many programs are installed, they request who can use and make modifications to the program; quite often, the default is All Users. Some technicians just click Next when hastily installing programs, without realizing that the user now has full control of the program —control that you might not want to provide them. Just remember, keep users on a need-to-know basis; give them access only to what they specifically need to do their job.
One example of a Microsoft technology that is based on this principle is User Account Control (UAC). It is a security component of Windows that keeps every user (besides the actual Administrator account) in standard user mode instead of as an administrator with full administrative rights —even if the user is a member of the administrators group. It is meant to prevent unauthorized access and avoid user error in the form of accidental changes. With UAC enabled, users perform common tasks as non-administrators and, when necessary, as administrators, without having to switch users, log off, or use Run As.
Basically, UAC was created with two goals in mind: first, to eliminate unnecessary requests for excessive administrative-level access to Windows resources. And second, to reduce the risk of malicious software using the administrator’s access control to infect operating system files. When a standard end user requires administrator privileges to perform certain tasks (such as installing an application), a small pop-up UAC window appears, notifying the user that an administrator credential is necessary. If the user has administrative rights and clicks Continue, the task will be carried out; if the user does not have sufficient rights (and can’t provide an administrative password), the attempt fails. Note that these pop-up UAC windows do not appear if the person is logged on with the actual Administrator account.
Active Directory
We don’t cover too much concerning servers in this book, but this is an exception. Get ready for a crash course on Active Directory!
A Microsoft domain is a network of Windows computers that is controlled by a Windows Server which has Active Directory installed —that server is a domain controller. Active Directory (AD) is a Microsoft directory service that centralizes the management of user accounts, computer accounts, and so on, for the domain.
ExamAlert
Know that a domain is Microsoft’s implementation of a client/server network which centralizes the management of users and computers.
For a user to log on to the domain, that person must have a user account on the domain controller, and the user must know the username, password and the domain to be logged on to; for example, dpro42.com. In addition, the Windows client computer must have been configured to connect to the domain previously.
The user account is stored within the domain in one of two places: within the Users folder (which is the default), or within an organizational unit that the administrator has created. Figure 31.1 shows an example of this.
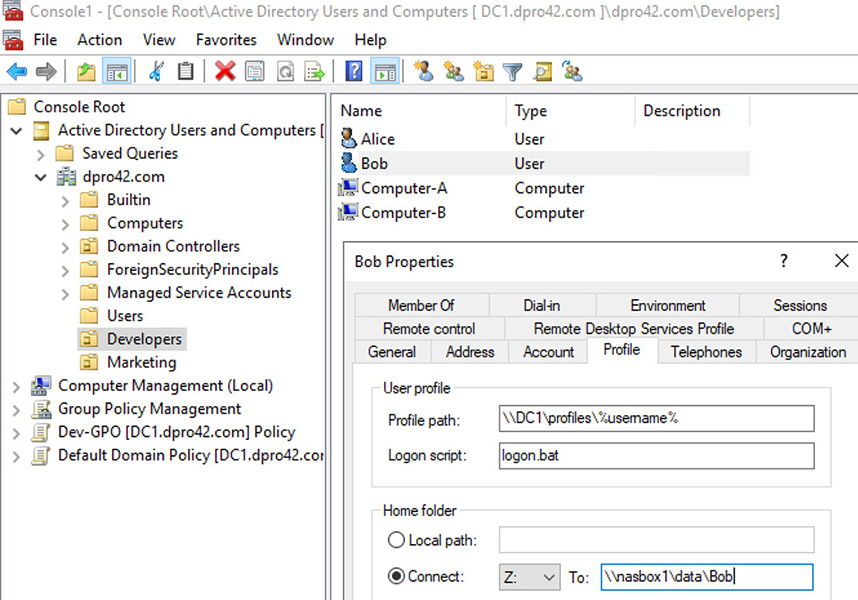
Figure 31.1 User account stored on a Domain Controller in Active Directory
I packed a lot of stuff into Figure 31.1. Here we have a Windows Server that is acting as a Domain Controller (which means it has AD installed). We are working within Active Directory Users and Computers, which as the name implies, is where you would go to add, remove, and configure user accounts and computer accounts. I actually added it to an MMC along with a few other snap-ins. By default, users are created within the Users folder which you can find by following the path: Active Directory Users and Computers > Domain Name > Users. Dpro42.com is the domain name I chose for this Microsoft network (I own the domain as well.) The Users folder has lots of built-in users and groups for you to work with.
However, as I mentioned, you can also add users to an organizational unit (OU). The OU is a container that you can use to categorize your users and computers. Also, you can apply separate group policies for each OU. This allows you to configure different rules for each set of users, groups, and computers, from one OU to the next. There’s a lot more to it, but that should suffice for the A+ exam.
Generally, I set up OUs to mimic an organization’s departments. So, here I’ve created two OUs: Developers and Marketing. In the figure, we have the Developers OU highlighted, and on the right you can see that there are two users and two computers within that OU: Alice, Bob, and Computer A and B; all of which I created.
Furthermore, the user account “Bob” is highlighted, and you can see that I have opened the Properties page for Bob. We are looking at the Profile tab. This is where you can set up a profile path, logon script, and home folder for the account. Let’s discuss each one briefly.
User Profiles
Every user account gets a profile, which is a group of folders and settings based on how the user configures his or her desktop environment: Start menu options, desktop icons, background color, and so on. By default, when a user first logs onto a computer, a local profile is created and stored on that computer. In Windows 10, this profile is stored in C:\Users\%userprofile%, where %userprofile% is a variable for whichever user is currently logged on. You can get to the currently logged on user’s profile folder by going to Run and typing %userprofile%, or %homepath%. That displays the profile folders and —if you are showing hidden files —the NTUSER.DAT file which is what Windows actually uses to store the profile data.
Now, if you would like a user’s profile to follow the user from one computer to the next on a domain, what you want is a roaming profile. That’s a profile that is stored on a server. And that’s where the Profile path field in Figure 31.1 comes in. In the figure we have configured the location of this user’s roaming profile as \\DC1\profiles\%username%. DC1 is the computer where the profile is stored. In this case it is the domain controller that we are working on, but it might be stored somewhere else, and it’s probably a good idea to do so. profiles is the sharename for the folder where all the user profiles are stored. %username% is another variable, which takes the place of the account name. (We could have used “Bob” if we wanted to with the same result, but you can appreciate the power of a variable, especially if you will be working with a lot of accounts.) As long as the path to the profile is valid, the domain controller will store it there, and the user can log onto various computers on the network while the profile follows the user around.
Logon Script
A logon script is used to assign tasks that are executed when the user logs on to the domain. It could include running programs, mapping network drives, setting variables, updating anti-malware applications, running commands, and calling other scripts. The idea is to automate the configuration process of a user’s environment and workflow so that the user can simply sit down, log on, and start working. In Figure 31.1 the script is called logon.bat. Who knows, maybe some command-line functionality is included in the script, for example a static ARP entry is created to a server (arp -s), or perhaps a particular program such as Excel is opened up. Imagine the power of scripting! In the figure we chose logon.bat as the name which means it is a batch file, but you could use Visual Basic or the PowerShell to create scripts. Whatever you use, the file has to be stored; either in the default location on the server (NETLOGON), or if it is elsewhere, then the path to the file location has to be entered into the field in addition to the file name.
Home Folder
The home folder is where a user will store documents by default. If you select the Local path option, then stored documents will end up at the local computer that the user is sitting at. However, the idea behind having a Microsoft Domain is so that you can centrally store files. So, in many cases you will select “Connect:” and use a mapped network drive (such as Z:), to a path. Back in Figure 31.1, we are mapping Z: to nasbox1 which has a share called data, and a finally to a folder named Bob. This way, regardless of the computer that Bob logs on to, data will be stored to that Z: drive.
Note
The last three concepts (profile, logon script, and home folder) can be used on a local Windows system as well. Just go to Computer Management > System Tools > Local Users and Groups > Users, right-click the user in question and select Properties, then go to the Profile tab. The same options are there, but they will be limited without the use of a domain. The whole concept here is that having a domain allows you to centralize data, profiles, and home folders — everything is more organized and more easily monitored, and that usually equates to more security.
Group Policy
Group policies are part of Windows, whether you are working at a local system or within a domain. They house all of the rules that users must abide by within the OS. For example, what programs they can use, and when passwords have to be changed. There are hundreds of policies that can be modified to secure the system. In a domain environment, there is a default domain policy which is stored on the domain controller; it affects all typical users that are created. However, you can create separate policies for users that are organized into OUs. In Figure 31.1 you will see a policy named “Dev-GPO [DC1.dpro42.com] Policy”. That is a policy that I created just for the Developers OU, with its two users and two computers. It could be that I want those users to have even longer passwords then the rest of the users on the domain. That can be accomplished by modifying the Dev-GPO policy.
On the local system you can modify the group policy by going to Run, and typing gpedit.msc, which opens the Group Policy Editor. Some of the most common policies that you will modify include the Password Policy and Account Lockout Policy (to name a couple). These can be accessed quicker by going to Run and typing secpol.msc which brings you to the Local Security Policy console window; a subset of the entire Group Policy. Figure 31.2 shows an example of this window on a Windows 10 Pro computer, with the Password Policy opened. Policy modification is essentially the same regardless of whether the policy is stored on a local Windows client or on a Windows Domain Controller.
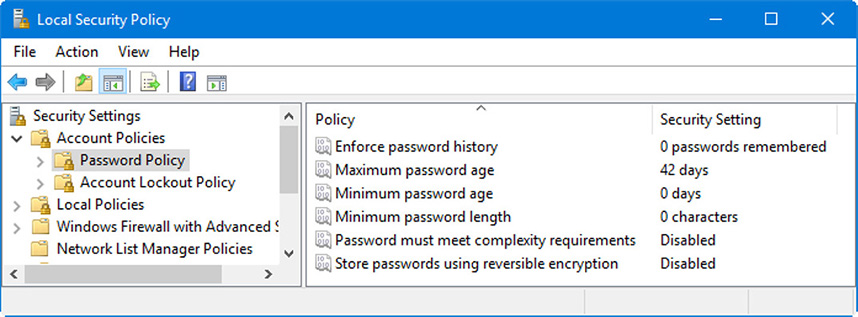
Figure 31.2 Local Security Policy opened to the Password Policy
ExamAlert
Know how to access and configure the Group Policy Editor (gpedit.msc) and the Local Security Policy (secpol.msc).
Firewalls
The Windows Defender Firewall is meant to protect client computers from malicious attacks and intrusions, but sometimes it can be the culprit when it comes to certain applications failing. You can access the firewall in Windows by going to Control Panel > Windows Defender Firewall or by accessing the Run prompt and typing firewall.cpl. From here you can enable or disable the firewall for the Private network profile and the Public/Guest network profile. By default, these are on, or “connected”.
When the firewall is on, the default setting is to shield all inbound ports (effectively closing them). This is a type of default port security, and it means that certain applications that need to communicate with a remote host might not work properly. Or if the client computer wanted to host some services (such as FTP or a web server), the firewall would block them. That’s where exceptions come in. You can still use the firewall, but you can specify applications that are exceptions to the rule. Figure 31.3 shows an example of exceptions made on a Windows 10 Pro computer. To create exceptions, click the Allow an app or feature Through Windows Defender Firewall link.
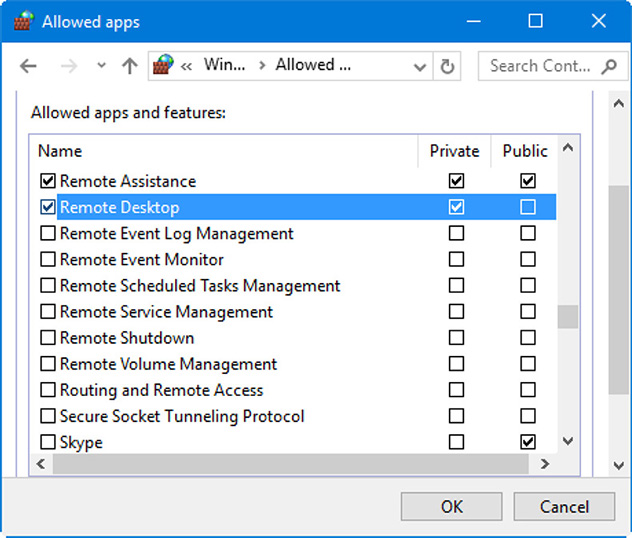
Figure 31.3 Firewall exceptions
In this example, we have two applications that are not blocked from incoming connections. Remote Assistance is not blocked at all, not on the Private profile nor on the Public profile. However, Remote Desktop is allowed only on the Private profile (listed as Home/Work Private Network in Windows 7). So as long as the firewall is enabled, this computer can make remote assistance calls to other users on the Internet. But if a person wanted to connect to this system through Remote Desktop without an invitation, that person would have to be on the LAN. This way, we aren’t sacrificing the entire security of the system. All other incoming connections will be blocked.
We can get more in-depth with the firewall settings. By clicking the Advanced Settings link, we can make use of the Windows Defender Firewall with Advanced Security (also available in Administrative Tools and as a snap-in in the MMC). You can also get to this by opening the Run prompt and typing wf.msc. From here, you can create inbound and outbound rules for individual applications based on the private network, the public network, or both. You can also configure the firewall with the netsh command or within the PowerShell. For more information follow this link,: https://tinyurl.com/WFDAS.
If the firewall gives you errors when attempting to either update the firewall settings, add exceptions, or access the advanced settings, make sure the Windows Firewall service is enabled and running in services.msc.
Essentially, the firewall is a packet filter which uses access control lists (ACLs) to specify what packets can pass through. ACLs are composed of source and destination IP addresses and ports, as well as the type of packets to be allowed or denied. ACLs are written differently depending on what device or program you are using. In Windows they can be written using the PowerShell, or configured graphically using the Windows Defender Firewall with Advanced Security.
VPN
We discussed virtual private networks (VPNs) briefly in Chapter 7, “Networked Hosts and Network Configuration” and 29, “Windows Networking and Application Installation.” In essence, this is a way of tunneling through the Internet securely, instead of relying on the security (or lack thereof) of your ISP. Microsoft Windows VPN connections can be made with the following protocols: Point-to-Point Tunneling Protocol (PPTP), Layer Two Tunneling Protocol (L2TP), Secure Socket Tunneling Protocol (SSTP), or Internet Key Exchange version 2 (IKEv2) protocols. During the writing of this book, the preferred methods for Windows clients are SSTP and IKEv2. Certain Windows VPN security features only work with IKEv2, such as LockDown VPN, which secures the computer in a way where traffic can only flow over the VPN connection, and no other network connections or adapters while the VPN session is active. You can also configure traffic filtering rules based on protocols, and using port and IP address ranges.
When signing into a VPN from a Windows client, you need to know the server name or its IP address (often a public IP), and you need to configure the VPN type (IKEv2 and so on). Then you have to specify the sign-in information, which could be the typical username and password, or it might use a smart card, an OTP, or a certificate.
ExamAlert
Know that VPNs use secure tunneling protocols to connect secure private networks (or devices) together through the public (unsecured) Internet.
Note
Some organizations use VPN servers or appliances that are not quite compatible with the Windows VPN client. In those cases, always-on VPN services such as OpenVPN can be used, but a separate client has to be downloaded and installed to the Windows computer.
Note
We’ll be covering antivirus, anti-malware, MAC filtering, and e-mail filtering in Chapter 32, “Wireless Security, Malware, and Social Engineering.”
Additional Security Considerations in Windows
This is a catch-all for the remainder of the topics in this objective, so we’ll be jumping from one concept to the next quickly. Let’s start with data loss prevention.
DLP
Are you concerned with the risk of data loss? Enter DLP. Not me! (I just happen to share the same initials.) Data loss prevention (DLP) is a concept that refers to the monitoring of data in use, data in motion, and data at rest. A DLP system performs content inspection and is designed to prevent unauthorized use of data as well as prevent the leakage of data outside the computer (or network) that it resides in. DLP systems can be software or hardware-based solutions that are installed on the client computer, on storage devices, or as part of the network (or cloud). Cloud-based DLP solutions are offered by most cloud providers to protect against data breaches and misuse of data. These often integrate with software, infrastructure, and platform services, and can include any of the systems mentioned previously.
Microsoft has a variety of DLP-based technologies depending on the software used, for example Windows Server, or Exchange Server. For Windows 10 (as of version 1607), Microsoft offers Windows Information Protection (WIP) which protects against the accidental leakage of data. However, it is not designed to protect against malicious attackers. The usage of this and several other security tools from Microsoft requires Intune or the System Center Configuration Manager (SCCM).
MDM Policies
For large organizations that have many mobile devices, a Mobile Device Management (MDM) suite can be implemented. An MDM can take care of pushing updates and configuring hundreds of mobile devices from a central location. Decent quality MDM software will secure, monitor, manage, and support multiple different types of mobile devices across the enterprise.
Let’s not forget that Windows 10 runs on many mobile devices, and they can be administered from a centralized MDM solution such as Microsoft Intune, VMware AirWatch Cisco Meraki, and Soti MobiControl. Elements that you might administer and enforce include device setup, policy acceptance, profile distribution, device tracking, roaming mitigation, remote lock, remote wipe, and so on. We’ll discuss more MDM in Chapter 34, “Mobile Device Security.”
Trusted & Untrusted Software Sources
There are trusted and untrusted examples of all kinds of software, from OSes to applications, and more. Some organizations trust more software than others. But when it comes to Windows, it’s important to think about applications and drivers.
You can block untrusted software using a variety of approaches. You can use tools from third-parties or tools built into Windows. For example, in Windows 10 (version 1703 and higher), go to Settings > Apps > Apps & Features. At the top you will see a drop-down menu with some options where you can specify what apps are allowed (from the Microsoft Store only, warn before installing apps, and allow from anywhere). In a smaller environment, you can also use Microsoft Family and Safety to block apps and games from being installed.
A good administrator should also think along the lines of policies, permissions, and user account types, and not allow a typical user to install programs at all. One way to do this is to block users from installing and running programs in the Local Group Policy Editor (gpedit.msc). Navigate to Computer Configuration > Administrative Templates > Windows Components > Windows Installer. From here you can disable the Windows Installer altogether, prevent users from working with the Windows Installer, and so on.
In addition, make sure that UAC is enabled on the computer so that it will require administrative privileges to open particular programs. Going beyond this, an admin can block specific applications. One way to do this is in the Local Security Policy (secpol.msc) > Software Restriction Policies. By creating a new policy here, you can whitelist applications, set enforcement rules, designate file extension types, and set rules for trusted publishers of programs.
Finally, programs such as Windows Defender and Intune can be instrumental in blocking the installation of unwanted programs from unknown sources.
We mentioned previously in the book that driver signing is important because it helps to eliminate the chance of installing device drivers that might interfere with, or crash, the operating system. So, driver signing is enabled by default in Windows, and it will prevent the installation of unsigned drivers. However, you might find a computer where driver signing has been disabled. Unless the computer is being used by a professional (engineer, developer, and so on), and it was turned off for a reason, then you will want to enable it. To do this in Windows 10, reboot the computer to Startup Settings, enter the Command Prompt and type: bcdedit /set nointegritychecks off. That’s a double-negative, and so it will enable driver signing. We’ll discuss Startup Settings in Chapter 36, “Troubleshooting Microsoft Windows.”
Certificates
Certificates are used to encrypt data sessions that are initiated by a web browser or other application. Certificates are stored on the client computer —without them, the corresponding applications will either display an error, or run in an insecure manner.
Certificates for I.E/Edge can be viewed, imported, and removed from within the Internet Properties dialog box > Content tab > Certificates button. Other web browsers —such as Firefox —will access them differently. For example, Firefox version 65.0.2 (March 2019) allows import/export and other modifications at: Settings > Privacy & Security > Certificates > View Certificates.
To view all certificates installed to Windows, go to the Certificate Manager (Run > certmgr.msc). From here you can view Trusted Root Certification Authorities, Trusted Publishers, and so on. Certificates can be deleted, exported, and more. If there is a security issue with a program or connection to the Internet, and the corresponding certificate, this is one place where you would go to fix the problem.
Train users to avoid websites that do not use a valid certificate. For example, a user might attempt to connect to a website, and receive a message that says, “Your connection is not private”. This means either the certificate is invalid, or there is no certificate, and an HTTPS session cannot be initiated. That means that any information that passes through from the client to the server can be captured by an attacker. See an example of this at the innocuous site: https://untrusted-root.badssl.com/. A user can get past this by clicking Advanced, and allowing the session, but they should be trained otherwise. In addition, you can configure the browser (or anti-malware program) to block access altogether if this, and similar errors occur. Note that some browsers will allow these connections by default (if the user goes to Advanced and proceeds through). This is an example of an inherent lack of security, which will always exist to some extent. That’s why user education is so important. Train your users!
Cram Quiz
Answer these questions. The answers follow the last question. If you cannot answer these questions correctly, consider reading this section again until you can.
1. When is a Windows 10 computer completely secure?
![]() A. When you have updated to the latest version.
A. When you have updated to the latest version.
![]() B. When you have locked down the Local Security Policy.
B. When you have locked down the Local Security Policy.
![]() C. When Microsoft releases the latest update.
C. When Microsoft releases the latest update.
![]() D. Never.
D. Never.
2. Which of the following is a built-in security component of Windows 10?
![]() A. UAC
A. UAC
![]() B. Firefox
B. Firefox
![]() C. Active Directory
C. Active Directory
![]() D. MFA
D. MFA
3. You have been tasked with configuring a user account so that its folders and settings will follow the user to whatever computer the user logs on to within the domain. Which of the following should you configure?
![]() A. OU
A. OU
![]() B. Roaming profile
B. Roaming profile
![]() C. Logon script
C. Logon script
![]() D. Home folder mapped to a network drive
D. Home folder mapped to a network drive
4. You need to block users from installing programs in Windows 10. Of the following, what tool should you select?
![]() A. wf.msc
A. wf.msc
![]() B. IKEv2
B. IKEv2
![]() C. WIP
C. WIP
![]() D. gpedit.msc
D. gpedit.msc
![]() E. certmgr.msc
E. certmgr.msc
Cram Quiz Answers
1. D. Neither Windows 10, nor any other technology for that matter, is ever completely secure. It is impossible. But we can reduce risk to a certain extent by configuring the system properly and by using technology wisely —ultimately providing relative security. Updating to the latest version is often a good idea (if done according to company policy), but we can’t rely on software updates alone. Using the Local Security Policy can help to “lock down” the system to a certain extent, but again, it is only one method. It’s the combination of security updates, security configurations, and user education that should be part of an overall security plan.
2. A. User Account Control (UAC) adds a layer of security to Windows to protect against malware and user error and conserve resources. Firefox is considered by many to be a secure web browser, but it is not included in Windows 10, nor can it be called a “security component”, it is a browser. Active Directory runs on Windows Server (though it can be accessed remotely form a Windows 10 client); while it can increase the security of an organization’s Windows network, it isn’t a security component per se. Multifactor authentication (MFA) is when two types of identification are required to be authenticated to a system, network, or facility. It is not a built-in security component of Windows 10, but it can be accomplished on a Windows 10 system, for example by using the default username/password scheme (something the person knows) and adding a USB-based fingerprint scanner (something the person is), and configuring them to both be used during logon to Windows.
3. B. Configure a roaming profile for the user. The roaming profile is configured at the domain controller and allows the user to move from one computer to the next, while the user profile follows —as long as the user is logging on with the same username and password, and logging on to the domain. Refer to Figure 31.1 for the paths and naming conventions. OU stands for organizational unit —a way of organizing users, computers and policies. The logon script is designed to execute programs, features, and actions when the user logs on. As long as the user logs on to the domain, it will be initiated. The home folder is simply the default location where a user will save and download files: it can be local or mapped to a network drive, the latter is preferred on a domain.
4. D. Use the Group Policy Editor (gpedit.msc) to make modifications to how (and if) programs are installed to Windows. (There are a variety of other ways as well.) wf.msc brings up the Windows Defender Firewall with Advanced Security. Internet Key Exchange version 2 (IKEv2) is a preferred protocol for use with the Windows VPN client. Windows Information Protection (WIP) protects against accidental data leakage; it’s a type of DLP. Certmgr.msc brings up the Certificate Manager where you can import, export, and delete encryption certificates.
Yowza, that was a lot of content. Great job so far!