The backbone enables you to bend forward, backward, and sideways, and it also allows you to twist. You perform all these motions every day, but you may do them unconsciously and without adequate muscular support. Yoga uses the natural movements of the spine to train the various muscles supporting it, which contributes to a healthy back and prevents back pain.
This chapter presents a variety of yogic bends. Think of them as simple extensions of the breath. Inhalation takes you naturally into a back bend, and exhalation takes you into a forward bend (for more on breath and movement, flip to Book II, Chapter 1). You can perform bending postures from many different positions — standing, kneeling, sitting, lying, or even turned upside-down (see Book II, Chapter 6). Because the upright bending postures are covered in Book II, Chapter 3, and the most popular bends for warm-up in Book II, Chapter 2, this chapter highlights the classic bending postures that you do on the floor.
 From a yogic point of view, the spine is the physical aspect of a subtle energetic pathway that runs from its base to the crown of the head. This pathway is known as the central channel, or sushumna-nadi (“gracious conduit,” pronounced soo-shoom-nah nah-dee). In traditional Hatha Yoga and Tantra Yoga, the awakened “serpent power,” or kundalini-shakti, rises through this channel. When this power of pure consciousness reaches the crown of the head, you experience a sublime state of ecstasy.
Bending over Backward
Daily life entails a lot of forward bending: putting on a pair of pants, tying shoelaces, picking things up from the floor, working at your computer, gardening, playing sports, and so on. A forward bend closes the front of the torso, shortens the front of the spine, and rounds the back. This closing and rounding is exaggerated by the unhealthy habit of bending forward from the waist rather than from the hip joints. Bending forward in the wrong way day in and day out can lead to spinal problems.
Over the years, this waist-bending habit leads to what is often called a stoop, characterized by a sunken chest, a forward-leaning head, aches and pains, and shallow breathing. The antidote for the cumulative effects of forward bending is the regular practice of yoga back bends, which stretch the front of the torso (and spine). Back bends are expansive, extroverted postures that can trigger powerful emotions. (See for yourself: Take a deep inhalation right now and notice how your torso and spine naturally extend during this active, opening phase of the breathing cycle, inviting you to bend backward.)
The major back bends usually come toward the middle of a yoga routine so that you have plenty of time to prepare for these movements and to compensate afterward (see Book II, Chapter 10 for more on preparation and compensation). The next section presents some of the classic floor back bends.
 When you lie face down on the floor, raise your chest and head, and use your arms in some fashion, you’re doing some form of the cobra posture. When you raise just your legs, or a combination of your legs, chest, and arms, you’re performing some form of the locust posture. To make these cobra and locust postures easier, place a small pillow or a folded blanket underneath you between your abdomen and your chest. You can move the blanket a little forward or backward to suit your needs.
Move slowly and cautiously in all the cobra and locust postures. Avoid any of the postures that cause pain in your lower back, upper back, or neck.
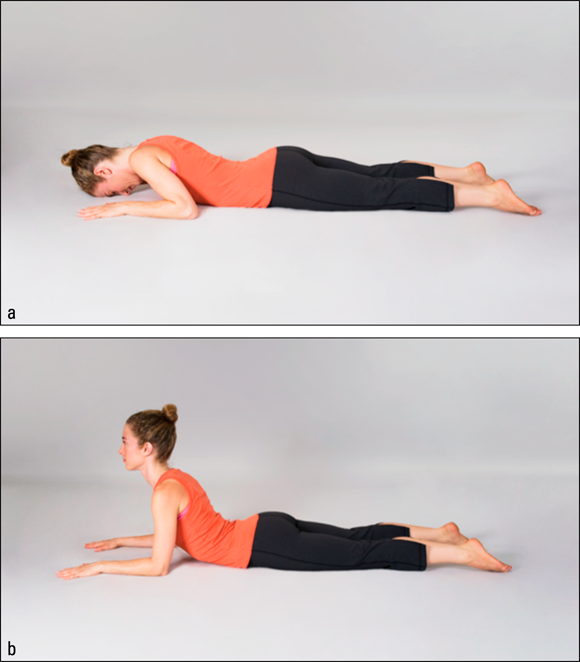
Cobra I: Salamba bhujangasana
The cobra posture increases the flexibility and strength of the muscles of the arms, chest, shoulders, and back. Cobra I especially emphasizes the upper back. The cobra opens the chest, increases lung capacity, and stimulates the kidneys and the adrenals. When doing cobra postures, try keeping the buttocks soft; this method can be more therapeutic to the back.
 This first cobra posture is also called the sphinx. It’s a variation of bhujangasana, which is described in the next section. To see how to move into this posture, check out the video at
 www.dummies.com/go/yogaaiofd.
- Lie on your abdomen, with your legs spread at hip width and the tops of your feet on the floor.
- Rest your forehead on the floor, and relax your shoulders; bend your elbows and place your forearms on the floor, with your palms turned down and positioned near the sides of your head (see Figure 7-1a).
-
As you inhale, engage your back muscles, press your forearms against the floor, and raise your chest and head.
Look straight ahead, as in Figure 7-1b. Keep your forearms and the front of your pelvis on the floor, make sure your bent elbows are directly below or slightly in front of your shoulders, and be mindful of relaxing your shoulders.
-
As you exhale, lower your torso and head slowly back to the floor.
- Repeat Steps 3 and 4 three times, and then stay in Step 3 (the last raised position) for 6 to 8 breaths.
If you have lower back problems, separate your legs wider than your hips, let your heels turn out, and let your toes turn in.
Cobra II: Bhujangasana
This posture rewards you with most of the same benefits as cobra I, described in the preceding section. In addition, cobra II emphasizes flexibility in your lower back.
- Lie on your abdomen, with your legs spread at hip width and the tops of your feet on the floor.
- Bend your elbows and place your palms on the floor, with your thumbs near your armpits; rest your forehead on the floor and relax your shoulders, as in Figure 7-2a.
-
As you inhale, press your palms against the floor, engage your back muscles, and raise your chest and head; look straight ahead (see Figure 7-2b).
Keep the top front of your pelvis on the floor, and relax your shoulders. Unless you’re very flexible, keep your elbows slightly bent.
- As you exhale, slowly lower your torso and head back to the floor.
- Repeat Steps 3 and 4 three times, and then stay in Step 3 (the last raised position) for 6 to 8 breaths.
Note:
In the classic (traditionally taught) posture, the inner legs are joined and the knees are straight. The head is in alignment with the spine, and the eyes look forward. The palms are on the floor close to the sides of the torso near the navel, the elbows are slightly bent, and the shoulders are relaxed.
If you move your hands farther forward, you make the cobra less difficult; if you move your hands farther back, you increase the difficulty.
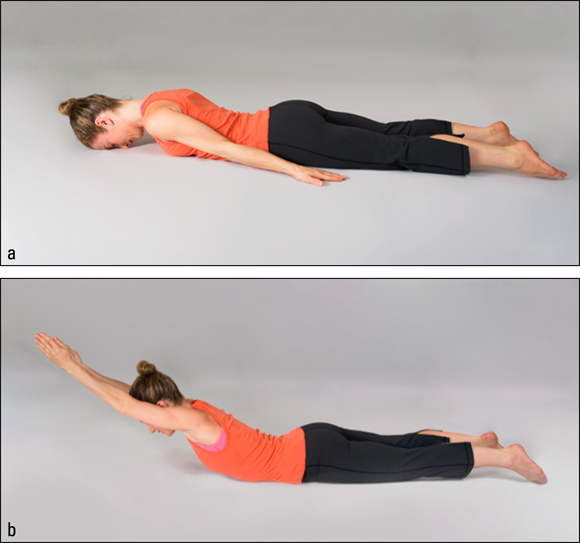
Cobra III
Cobra III, which is another version of the classic bhujangasana, is unique because it doesn’t ask you to place your hands on the floor. The emphasis is on strengthening both the lower and upper back.
- Lie on your abdomen, with your legs spread at hip width and the tops of your feet on the floor; rest your forehead on the floor.
- Extend your arms back along the sides of your torso, with your palms on the floor, as in Figure 7-3a.
-
As you inhale, raise your chest and head, and sweep your arms like wings out to the sides and then all the way forward; your palms can touch or face each other a few inches apart.
Keep your legs on the floor, as in Figure 7-3b.
-
As you exhale, sweep your arms back, and lower your torso and your head slowly to the floor.
- Repeat Steps 3 and 4 three times, and then stay in Step 3 (the last raised position) for 6 to 8 breaths.
Locust I: Shalabhasana
The locust posture strengthens the entire torso, including the lower back and the neck, as well as the buttocks and the legs. It also improves digestion and elimination. In locust postures, the buttocks are firm.
- Lie on your abdomen, with your legs spread at hip width and the tops of your feet on the floor; rest your forehead on the floor.
-
Extend your arms along the sides of your torso, with your palms on the floor.
To make the pose easier, try turning the palms up.
-
As you inhale, raise your chest, head, and one leg up and away from the floor as high as is comfortable for you (see Figure 7-4a).
Consider trying this posture with blankets for more personal comfort. Figure 7-4b shows you the basic blanket positioning, although you can shift it as necessary.
- As you exhale, lower your chest, head, and leg together slowly to the floor, and repeat Steps 3 and 4 with the other leg.
- Repeat Steps 3 and 4 three times, and then stay in Step 3 (the last raised position) for 6 to 8 breaths.
You can increase the level of difficulty by raising both legs at the same time in Step 3.
Note:
In the classic posture, the inner legs are joined and the knees are straight.
Locust II
This posture, which is another variation of shalabhasana, also teaches the two sides of the body how to work independently of one another. Many back problems result from imbalances in the muscle system on each side of the spine. Health professionals often call this situation an asymmetrical problem. Locust II helps bring your back into symmetry again and also improves your coordination.
- Lie on your abdomen, with your legs spread at hip width and the tops of your feet on the floor; rest your forehead on the floor.
- Extend your right arm forward, with your palm resting on the floor; bring your left arm back along the left side of your torso, with the back of your hand on the floor (see Figure 7-5a).
- As you inhale, slowly raise your chest, head, right arm, and left leg up and away from the floor as high as is comfortable for you; try to keep your upper right arm and ear in alignment, and raise your left foot and right hand to the same height above the floor (see Figure 7-5b).
-
As you exhale, slowly lower your right arm, chest, head, and left leg to the floor at the same time.
- Repeat Steps 3 and 4 three times, and then stay in Step 3 for 6 to 8 breaths.
- Repeat Steps 1 through 5 with opposite pairs (left arm and right leg).
 Be careful with locust variations that lift just the legs. Lifting only the legs increases interabdominal and chest pressure, heart rate, and tension in the low back and neck.
Locust III: Superman posture
This posture, a further variation of shalabhasana, gets its name from the image of Superman flying through the air at warp speed, with his arms extended out in front leading the way. It’s the most strenuous back bend because fully extending your arms and legs as in Figure 7-6 puts quite a load on your entire back. Use this pose only when you’re comfortable with locust I and II.
This posture is physically challenging. Don’t attempt it if you have back or neck problems.
- Lie on your abdomen, with your legs spread at hip width and the tops of your feet on the floor; extend your arms back along the sides of your torso, with your palms on the floor, and rest your forehead on the floor (see Figure 7-6a).
-
As you inhale, raise your chest, legs, and head; sweep your arms like wings out to the sides and then all the way forward, as Figure 7-6b illustrates.
In the beginning, try sweeping your arms only halfway forward in a T position; it allows your back muscles to gradually become accustomed to the posture’s physical demands.
- As you exhale, sweep your arms back and slowly lower your torso, legs, and head to the floor at the same time.
- Repeat Steps 2 and 3 three times, and then stay in Step 2 (the last raised position) for 6 to 8 breaths.
Bending from Side to Side
The spinal column can move in four basic ways: forward (flexion), backward (extension), sideways (lateral flexion), and twist (rotation). The side bend is often the least practiced in yoga. This missed opportunity is unfortunate because side bends help stretch and tone the muscles along the sides of the abdomen, rib cage, and spine to keep your waist trim, your breathing full, and your spine supple. A true side bend fully contracts one side of the body while expanding the other. This section covers some safe, creative ways to use side bends on the floor.
Seated side bend
This seated side bend is a great way to ease into the position if you’re not used to bending from side to side. Just follow these steps:
- Sit comfortably in a simple cross-legged position; place your right palm on the floor, near your right hip.
Check out Book II, Chapter 2 for some appropriate seated positions.
- As you inhale, raise your left arm out to the side and above your head beside your left ear.
-
As you exhale, slide your right hand across the floor out to the right, letting your torso, head, and left arm follow as you bend to the right (see Figure 7-7).
Don’t let your buttocks come off the floor as you bend.
- As you inhale, return to the upright position (as you were at the start of Step 2).
- Repeat Steps 2 through 4 three times, and then stay in the bent position (Step 3) for 6 to 8 breaths.
- Repeat Steps 1 through 5 on the other side.
All-fours side bend
Many people with back or hip problems have a hard time sitting upright on the floor. The all-fours position gives the spine more freedom and is an easier side bend from the floor.
-
Start on your hands and knees, with your knees below your hips and your hands below your shoulders, with your palms on the floor.
Straighten your elbows, but don’t lock them. Look straight ahead.
- As you exhale, bend your head and torso sideways to the right, and look toward your tailbone (see Figure 7-8).
- As you inhale, return to the starting position in Step 1.
- Repeat Steps 2 and 3 three times, and then stay in Step 2 for 6 to 8 breaths.
- Repeat Steps 2 through 4 on the other side.
Folded side bend
The Sanskrit word bala (pronounced bah-lah) means “child.” This practice was inspired by a baby’s folded position in the womb. The benefits of this side bend, which is a variation of balasana, the child’s posture (see Book II, Chapter 10 for this posture), are the same as for the seated side bend earlier in this chapter.
- Sit on your heels with your toes pointing back, and fold forward by laying your abdomen on your thighs and your forehead on the floor; extend your arms forward with your palms on the floor, as in Figure 7-9a.
-
As you exhale, stay in the folded position and slide your upper torso, head, arms, and hands to the right as far as possible, as in Figure 7-9b; wait for a few seconds and, again, with another exhalation, slide farther to the right if you can do so without straining.
- Return to center and repeat the sequence to the left side, staying in Step 2 for 6 to 8 breaths on each side.
Bending Forward
Forward bends are usually a good way to begin any movement routine (unless you’re dealing with spinal disc injuries or certain other back problems). Back bends are the lively extroverts of the asana family, and forward bends are the retiring introverts; you always perform them with an exhalation — the passive, contracting phase of the breathing cycle.
Be very careful of all the seated forward bends if you have disc-related back problems.
If you have a problem sitting upright on the floor in the seated forward bend or in any of the following forward-bending postures, raise your hips with folded blankets or firm pillows.
Seated forward bend: Pashcimottanasana
The seated forward bend intensely stretches the entire back side of the body, including the back of the spine and legs. It also tones the muscles and organs of the abdomen and creates a calming and quieting effect.
- Sit on the floor, with your legs at hip width and comfortably stretched out in front of you; bring your back up nice and tall, and place your palms on the floor near your thighs.
-
As you inhale, raise your arms forward and overhead until they’re beside your ears, as in Figure 7-10a.
Keep your arms and legs soft and slightly bent in Forgiving Limbs, described in Book I, Chapter 3.
-
As you exhale, bend forward from the hips; bring your hands, chest, and head toward your legs; rest your hands on the floor or on your thighs, knees, shins, or feet.
If your head isn’t close to your knees, bend your knees more until you feel your back stretching (see Figure 7-10b).
- Repeat Steps 2 and 3 three times, and then stay folded (Step 3) for 6 to 8 breaths.
Note:
In the classic posture, the inner legs are joined, the knees are straight, and the ankles are extended so that the toes point up. The chin rests on the chest, the hands hold the sides of the feet, the back is extended forward, and the forehead is pressed against the legs.
Head-to-knee posture: Janushirshasana
The head-to-knee posture keeps your spine supple, stimulates the abdominal organs, and stretches your back, especially on the side of the extended leg. It also activates the central channel (sushumna-nadi). As the introduction to this chapter explains, the central channel is the pathway for the awakened energy of pure consciousness (called kundalini-shakti), which leads to ecstasy and spiritual liberation.
Follow these steps to achieve this posture:
- Sit on the floor, with your legs stretched out in front of you, and then bend your left knee and bring your left heel toward your right groin.
-
Rest your bent left knee on the floor (but don’t force it down), and place the sole of your left foot on the inside of your right thigh.
The toes of the left foot point toward the right knee.
-
Bring your back up nice and tall; as you inhale, raise your arms forward and overhead until they’re beside your ears, as Figure 7-11a shows.
Keep your arms and your right leg soft and slightly bent in Forgiving Limbs, described in Book I, Chapter 3.
-
As you exhale, bend forward from the hips, bringing your hands, chest, and head toward your right leg; rest your hands on the floor or on your thigh, knee, shin, or foot.
If your head isn’t close to your right knee, bend your knee more until you feel your back stretching on the right side (see Figure 7-11b).
-
Repeat Steps 3 and 4 three times, and then stay in Step 4 (the final forward bend) for 6 to 8 breaths.
- Repeat Steps 1 through 4 on the opposite side.
Keep your back muscles as relaxed as possible.
The great seal: Mahamudra
Ancient Hatha Yoga texts give high praise to the volcano posture. It strengthens the back, stretches the legs, and opens the hips and chest. This posture is unique in that it has qualities of both a forward bend and a back bend. When used with special locks (bandhas) that contain and channel energy in the torso, this technique has both cleansing and healing effects.
- Sitting on the floor, with your legs stretched out in front of you, bend your left knee and bring your left foot toward your right groin.
-
Rest your bent left knee on the floor to the left (but don’t force it down), and place the sole of your left foot on the inside of your right thigh, with your heel in your groin.
The toes of the left foot point toward the right knee.
-
Bring your back up nice and tall; as you inhale, raise your arms forward and overhead until they’re beside your ears.
Keep your arms and the right leg soft and slightly bent in Forgiving Limbs, described in Book I, Chapter 3. Refer to Figure 7-11a in the preceding section, if necessary.
- As you exhale, bend forward from the hips, lift your chest forward, and extend your back without letting it round; place your hands on your right knee, shin, or toes, and look straight ahead (see Figure 7-12).
- Repeat Steps 3 and 4 three times, and then stay in Step 4 for 6 to 8 breaths.
- Repeat the same sequence on the opposite side.
Note:
In the classic posture, the front leg and the arms are straight, and the hands are holding the toes of the front leg. The back is extended, and the chin is pressed onto the chest. The abdominal muscles are pulled up into the abdominal cavity, and the anal sphincter is tightened.
Wide-legged forward bend: Upavishta konasana
The wide-legged forward bend stretches the backs and insides of the legs (hamstrings and adductors) and increases the flexibility of the spine and hip joints. It improves circulation to the entire pelvic region, tones the abdomen, and has a calming effect on the nervous system. Note, though, that muscle density may make this posture difficult for most men.
-
Sit on the floor, with your legs straight and spread wide apart (but not more than 90 degrees).
Because this posture is challenging, give yourself an advantage by pulling the flesh of the buttocks (you may know them as “cheeks”) out from under the sits bones (the bones directly under that flesh; they’re also known as the ischial tuberosities) and bending your knees slightly. Alternatively, sit on some folded blankets.
-
As you inhale, raise your arms forward and overhead until they’re beside your ears.
Keep your elbows soft and your legs slightly bent in Forgiving Limbs, described in Book I, Chapter 3. Bring your back up nice and tall (see Figure 7-13a).
-
As you exhale, bend forward from the hips and bring your hands, chest, and head toward the floor.
Rest your extended arms and hands palms down on the floor. If you have the flexibility, place your forehead on the floor as well, as in Figure 7-13b.
-
Repeat Steps 2 and 3 three times, and then stay in Step 3 (the folded position) for 6 to 8 breaths.
Note:
In the classic posture, the legs are straight, with the toes vertical; the chin and chest are on the floor; and the arms are extended forward, with the palms joined.
The wide-legged forward bend is also called the lifetime posture because it can take a whole lifetime to master. But don’t worry if you don’t quite reach mastery. Some yogis believe that if you don’t master the pose in this lifetime, you can try again in the next lifetime.