16
How the Mash Works
The technology behind malting and brewing is one of the oldest in the history of humankind. Through time, brewing scientists helped develop the microscope, pH, pasteurization, and a whole host of other technologies. And yet, it could be argued, we know more about flying than we do about the biochemistry of beer. Making beer is so easy that people have been just doing it for thousands of years; they didn’t need to know how it worked, it just worked. And if it works, what more is there to know?
The short answer to that question is given below and, if you want, you can just read the “Mashing in a Nutshell” section and skip to chapter 20 to brew your first all-grain batch. This chapter and the three that follow will teach you how to control and manipulate the mashing process to fine-tune your beer’s character, adapting the process to your recipe (or vice versa), and to optimize your yield.
Mashing in a Nutshell
Mashing is actually a continuation of the malting process, that is, making the barley starches accessible to enzymes and converting them to fermentable sugars. In fact, most breweries historically had malting houses attached, they weren’t separate facilities. Farmers would deliver the barley and the brewery would malt it and mash it to make the beer.
Mashing is the term for the hot water steeping process that hydrates the malt, gelatinizes its starches, releases its enzymes, and leads to the conversion of the starches into fermentable sugars. It is the core of the brewing process.
During mashing, malt is crushed to facilitate hydration, and infused with 160–165°F (71–74°C) water at a ratio of 2 qt. per pound of grain (4 L/kg) to achieve a mash temperature of 149–155°F (65–68°C). The mash is typically held at that temperature for one hour, although a half hour is usually sufficient for conversion. The mash is slowly drained of wort and rinsed with hot sparge water. This step is called lautering, and sparge means to sprinkle (from the German). When the spent grains are sufficiently rinsed, the lautering is stopped and the wort is ready to be boiled.
Almost any temperature between 149°F and 162°F (65–72°C) will make wort, although it is important to understand that the temperature does have a significant effect on fermentability. To generalize, warmer temperatures will produce a more dextrinous wort, lower temperatures will make the wort more fermentable. The temperature of your mash can drift downward during the hour, but as long as it doesn’t get below 140°F (60°C) it’s fine. The starches will be converted to fermentable sugars, and you will have made wort.
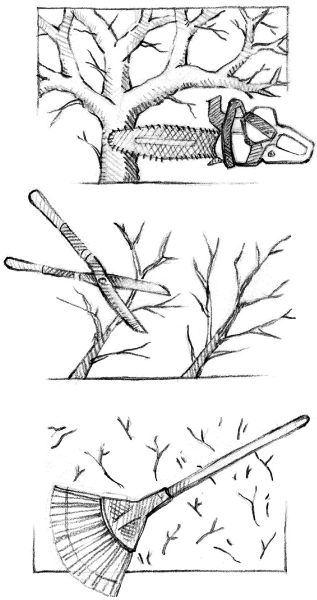
Figure 16.1. The tree is broken down into small pieces during the mash by the various tools (enzymes).
An Allegory of a Mash
Cast of Characters
- You: Amylase, the starch converter.
- Brother: Beta-Glucanase, the gum breaker.
- Sisters: Proteinase & Peptidase, they share the work.
- Dad: Limit Dextrinase, cuts the branch points.
- Mom: Gelatinization Temperature, tells you when you can start.
Our Story
There has been a big windstorm that has blown down a big tree and a lot of other branches in the backyard. Your parents decide that some yard work will build character—yours. Your task is to cut as much of it as you can into two-inch lengths and haul it out to the road. You have two tools to do this with, a hedge trimmer and a pair of hand-held clippers. The hedge trimmer is in the garage, but the last time anyone saw the clippers they had been left outside in the grass, which has since grown knee high. Plus, there are a lot of brambles growing around the tree that will make access difficult. Fortunately, your dad has decided that your sisters and older brother should take part in this too, and will send them out there with two lawn mowers and a weed whacker right now to mow the grass, clear away the brambles, and find the clippers. Likewise, Dad will fire up the chainsaw and be ready to cut through the big limbs at the joints as you work. This will ensure that you won’t leave any long pieces behind. As soon as the grass and brambles are cut, you can find your clippers and get to work.
Your tools are rather limited for the amount of work you have to do. The hedge trimmer will be really useful for cutting all of the twig ends off, but will quit working once you get back toward the thicker branches. The clippers will be useful then—they will be able to cut the middles of all the branches, but aren’t strong enough to cut through the joints, and that’s where your dad will help. When you are done, there will be a lot of odd branched pieces left over in addition to your little pieces. Your success will be measured by how many little pieces make it out to the road. A large part of your success is going to depend on how well your siblings do their job in making the tree accessible to you. If you leave a lot of the tree behind, and if the stuff you get out to the road consists of a lot of big pieces instead of the small pieces your dad wanted, then you won’t have done the job correctly. You had better plan your activity carefully.
Okay, your brother and sisters have done their work, and your dad is ready and waiting, but just as you are ready to get started your mom says that you have to wait until it warms up to 65 degrees outside, because she doesn’t want you to catch a cold. It’s more likely to get too hot to finish the job later on, but you still have to wait until it warms up to 65 degrees before you can get started.
Defining the Mash
The allegory above attempted to illustrate all the activity that goes into converting malt starches into fermentable sugars (fig. 16.1). There are several key enzyme groups that take part in the conversion (more details follow in the “Starch Conversion, or Saccharification, Rest” section below, and in table 16.2). During malting, beta-glucanase (weed whacker) and proteolytic enzymes (lawn mowers) do the majority of their modification work, opening the protein matrix and giving access to the starches for hydration and gelatinization. A small amount of further modification can occur during the mash, but the main event is supposed to be the conversion of starch molecules into fermentable sugars and non-fermentable dextrins by the diastatic enzymes (your clippers and hedge trimmer, and Dad’s chainsaw).
Each of these enzyme groups can be influenced by different temperature and pH conditions; temperature is the primary influence, and pH secondary. You can adjust the mash temperature to favor each successive enzyme’s function and thereby customize the wort to your taste and purpose.
Both malted and unmalted grains have their starch reserves locked in a tightly packed protein-carbohydrate matrix that prevents the enzymes from being able to physically access the starches for conversion. The starches must be gelatinized and liquefied before the starches can be efficiently converted to sugars. Crushing or rolling the grain helps expose the starch granules to hydration during the mash. Once hydrated, the starches will begin to gelatinize (i.e., swell as they become hydrated) from a combination of heat and enzyme action. Alpha-amylase is able to work on the surface of ungelatinized starch, but that is not very effective.
Gelatinized starch is much more accessible to diastatic enzyme action. The average temperature range for barley starch gelatinization is between 140°F (60°C) and 149°F (65°C), but it can occur between 131°F and 153°F (55–67°C) depending on barley variety and growing conditions. Gelatinization is a gradual process, starting at the bottom of the temperature range and finishing at the top. One reason for the range of temperatures for gelatinization is that there are two types of starch granules embedded in the matrix, small granules and large granules. The large granules are more easily gelatinized (i.e., at lower temperatures), while the small granules are harder and require higher temperatures. Going back to the jelly beans in a box metaphor (see chapter 15), the large granules are the jelly beans, and the small granules are the hard candies. Jelly beans dissolve more easily in hot water than hard candies.
In addition, some cereal starch adjuncts, like oats and corn, contain a small amount of lipids (fats) that are associated with the starch, making the starch more resistant to degradation, that is, it requires a longer time at temperature to fully gelatinize. The best way to ensure accessibility of high-gelatinization temperature adjuncts is by cooking the grain before adding it to the mash to pre-gelatinize the starch. This can be done by steam cooking and rolling (as is done for flaked oats), or by simply boiling. Table 16.1 lists starch gelatinization temperatures for barley and various unmalted grains.
After gelatinization, alpha-amylase is better able to break up the long starch chains into smaller starch chains (dextrins), which greatly reduces the mash viscosity. This stage is called “liquefaction.” These dextrins are now fully accessible to the other diastatic enzymes in the malt (beta-amylase, limit dextrinase, and alpha-glucosidase), so conversion of these shorter gelatinized starches begins.
Table 16.1—Starch Gelatinization Temperature Ranges
|
Barley |
136–149°F |
58–65°C |
|
Wheat |
136–147°F |
58–64°C |
|
Rye |
135–158°F |
57–70°C |
|
Oats |
135–162°F |
57–72°C |
|
Sorghum |
156–167°F |
69–75°C |
|
Corn (maize) |
162–172°F |
72–78°C |
|
Rice |
158–185°F |
70–85°C |
Notes: Barley, wheat, oats, and rye can be gelatinized in the mash, because their temperature range is below or mostly below the saccharification temperature range. Corn and rice need to be pre-gelatinized by cooking or hot rolling into flakes before they can be utilized in the mash. The degree of gelatinization depends on how hot the starch gets during the rolling or flaking process. The gelatinization temperature of a starch does not change significantly with malting, but is a natural property of the grain that can vary due to botanical variety and growing conditions.
Source: Hertrich (2013).
Acid Rest
Before the turn of the nineteenth century (and perhaps even the twentieth), when the interaction of malt and water chemistry was not well understood, brewers used an acid rest in the temperature range of 86–126°F (30–52°C) to help acidify the mash when using pale malts. There are two reasons why this temperature rest helped. First, these temperatures are ideal for growing lactobacilli bacteria, which are commonly found coating the outside of all base malts. A few hours at these temperatures was sufficient to grow the lactobacilli such that they produce a sufficient, but tasteless, quantity of lactic acid to lower the pH by one or two tenths, e.g., from 5.8 to 5.6, (although bear in mind the pH scale as we know it today was not invented until 1924). The problem with growth of “wild” Lactobacillus species is that it is difficult to predict, and there are often other, less beneficial, bacteria present as well, such as Pediococcus.
The second reason for using these temperatures is the further production of phosphates from malt phytin (a.k.a. phytate, or phytic acid). Malt is rich in phytin, which is the primary storage form of phosphorus for the barley plant. During malting, the enzyme phytase breaks down phytin into phosphates and myo-inositol (a vitamin) that could be used by the developing plant. In the mash, the phosphates react with calcium and magnesium in the brewing water to form insoluble phosphate compounds, releasing two hydrogen ions in the process that lower the mash pH. Actually, this reaction will occur with or without the phytase enzyme, but the enzyme helps as long as there is sufficient calcium in the water.
The acid rest is not used nowadays, because the desired mash pH range can be achieved from the outset through knowledge of water chemistry and appropriate mineral and acid additions.
Doughing-In
To the best of my knowledge, the acid rest is no longer used for lowering the mash pH by any commercial brewery. However, that same temperature regime is sometimes used by brewers for “doughing-in.” Doughing-in involves mixing the grist with 95–113°F (35–45°C) water to allow time for the enzymes to be distributed and help liquefy the mash. The use of a short rest at temperatures near 104°F (40°C) can improve the total yield by a couple of points, but is considered to be optional.
However, there is a problem when doughing-in at those temperatures, because long-chain fatty acids can be oxidized by the enzyme lipoxygenase. These oxidized fatty acids can cause the formation of oxidized flavors in the beer later on (e.g., trans-2-nonenal, which is an oxidation product that has the taste and aroma of old paper). This reaction is part of a phenomenon known as “hot side aeration,” which is thought to cause faster staling in beer. Doughing-in at a higher temperature, 140°F (60°C) or greater, will denature lipoxygenase and its effects will be greatly reduced. The whole issue of hot side aeration and its effects on flavor stability is still being investigated at the time of this writing. Several researchers believe that its effects can be mitigated by a strong fermentation.
Current opinion across many sources is that mashing-in at lower temperatures with modern, well-modified malts may have more negative consequences than positive.
Beta-Glucanase Rest
The other enzymes that are active at lower temperatures are the beta-glucanases and cytases, part of the cellulase enzyme family, which can be used to break up the beta-glucans (non-starch polysaccharides) in unmalted barley, rye, oatmeal, and wheat. These beta-glucan polysaccharides (i.e., the allegorical brambles) are natural gums that are partly responsible for the stiffness of the mash; therefore, if not broken down, beta-glucans will cause lautering difficulties. Most of the beta-glucan in barley is degraded during malting (from 4%–6% by weight to less than 0.5%), so beta-glucan viscosity is usually not a problem for well-modified malts. The same applies to malted wheat, oats, and rye. Oats and rye typically have 2%–3% beta-glucan by weight, and wheat typically has 1%–2% by weight. Corn and rice do not contain significant levels of beta-glucan compared to the other cereal grains.

Figure 16.2. Temperature and pH ranges for beta-glucanases and proteases. A graphical representation of the activity ranges for the proteolytic enzymes and beta-glucanases. The boxed areas within each range indicate a preferred or higher activity region.
Resting the mash at 104–118°F (40–48°C) for 20 min. will break down these gums (fig. 16.2). This rest is recommended to improve lautering when using more than 20% of unmalted or flaked barley, oatmeal, rye, or wheat in the grain bill. A beta-glucan rest is optional when using 10%–20% unmalted adjunct, and amounts less than 10% can usually be handled by just increasing the temperature at lautering time (mash-out). In addition, beta-glucan in the wort acts as a non-Newtonian fluid, meaning the viscosity decreases as you stir it, just like ketchup. So, if your mash is not lautering well, give it a few stirs to thin it. However—and this is a big however—if you overstir at the starch conversion temperatures, that is, if you stir too vigorously for too long, the beta-glucan polysaccharide molecules will straighten out, link up, and become very viscous.
Protein Rest and Modification
Barley contains many amino acid chains (peptides) that are used to synthesize the proteins needed by the germinating plant. During malting and mashing, amino acids are cleaved from these peptide chains by proteolytic enzymes, and these liberated amino acids are subsequently used by the yeast for their own growth and development during fermentation.
The two main proteolytic enzyme groups are the proteases and peptidases. There are at least 40 different enzymes that belong to these two groups. Some work by cleaving the large, generally insoluble protein chains into smaller soluble proteins, which can enhance the head retention of beer but are also involved in haze formation. Other proteolytic enzymes “snip” amino acids from the ends of the protein chains to produce small peptides and individual amino acids, which are the wort nutrients that can be used by the yeast. These enzymes do the majority of their work during the malting process.
Most base malt in use in the world today is well-modified or even highly modified. See the sidebar, “Malt Modification in a Nutshell,” for a discussion of the distinctions. Modification is the term that describes the degree of breakdown of the cell walls and protein-carbohydrate matrix of the endosperm during malting. Moderately modified malts benefit from a protein rest to allow the proteolytic enzymes to break down any remaining large proteins into smaller proteins and amino acids, as well as to release even more starch from the endosperm. Well-modified malts have already made use of these enzymes and do not benefit from the protein rest regime. In fact, using a long (>30 min.) protein rest at 122°F (50°C) on well-modified malts tends to remove some of the body from the final beer and reduce its foam stability, but this warning tends to be overstated.
Moderately modified malts allow the brewer to take more control of the mashing process to tailor the fermentability and body of the wort to their own specifications. Craft brewers claim these malts allow them to produce fuller, maltier flavors than single-temperature mashing with well-modified malt. Moderately modified malts work better with multiple-temperature rest and decoction mashing than well-modified or highly modified malts.
The active temperature and pH ranges for protease and peptidase enzymes overlap. Both types of enzyme are active enough between 113°F and 152°F (35–67°C) that talking about an “optimum range” for each is irrelevant. At one time it was thought that protein rests at higher temperatures favored proteases and lower temperatures favored peptidases, but more recent studies have shown that is not true. All the protein degradation reactions happen concurrently.
There are a several different enzymes within each group, and these specific enzymes are active across a wide range of temperature and pH. The total activity of the proteolytic enzymes is highest at lower pH levels (3.8–4.5), but the difference is only about 15% more than the activity at a typical mash pH of 5.2–5.6.1
The recommended temperature and time for a protein rest is 122°F (50°C) for 15–30 min., but the enzymes will still be active for some time in the conversion temperature range of 140–155°F (60–67°C).2
Historically, the main purpose of a protein rest was to help free up more of the starch from the endosperm. The secondary purpose was to provide free amino nitrogen (FAN) to the wort. Less-modified and moderately modified malts have less soluble protein than well-modified malts. Unmalted grains have the least of all, with only small amounts. Thus, worts made from a large proportion of unmalted grains, particularly corn (maize) and rice but also flaked barley, can be deficient in FAN due to lack of soluble protein for peptidases to act on.
Raw barley has less than 13.5% total protein by weight. During malting, about 50% of this total is solubilized, and 20% or less is solubilized later during the mash. More importantly, only about 3% of the total solubilized protein will be converted to FAN by the end of malting and mashing. A protein rest need only be used for moderately modified malts, or when using well-modified malts with more than 20% of unmalted wheat, rye, or oats (unmalted wheat contains twice as much high molecular weight protein as barley malt). A beta-glucanase rest can be combined with a protein rest by resting at 113–122°F (45–50°C) for 15–30 min. to help break up the highly viscous beta-glucans in unmalted grains (fig. 16.2).
The necessity of a protein rest to improve head retention has been overstated for many years. A short protein rest will aid head retention, but it will also promote the formation of haze-active proteins. The proteins that really enhance foam (i.e., head retention) are released at temperatures greater than 140°F (60°C). Unless you are using less-modified malt or moderately modified malt, the clarity and head retention of your beer will be better without a protein rest.
Starch Conversion, or Saccharification, Rest
Finally, we come to the main event, which is converting the starch reserves into sugars, a process known as saccharification. To understand the starch conversion, or saccharification, process, it helps to remember that the basic building blocks of starch are glucose molecules that are chemically bonded together and arranged in long chains. A single straight-chain starch molecule is called an amylose, and these amylose chains are typically hundreds or thousands of glucose units long. An amylopectin is a very large molecule, which can be considered to be composed of a multitude of amylose chains branching off from one another. Actually, amylose molecules can be branched as well, but the difference is essentially a couple pieces of string tied together versus the head of a mop.

Figure 16.3. Temperature and pH ranges for Amylase and Dextrinase. A graphical representation of the activity ranges of the diastatic enzymes. The boxed areas within each range indicate a preferred or higher activity region.
Breaking the chemical bond between any two of the glucose building blocks requires the addition of two atoms of hydrogen and one of oxygen, in other words, H2O. Therefore, the breaking of these bonds to separate the molecules is known as hydrolysis. The diastatic enzymes break up starch molecules into sugars by hydrolyzing different parts of a starch molecule, as will be explained.
Diastatic Enzymes
The various enzymes that break down starch are collectively known as diastatic enzymes. There are a grand total of four types of diastatic enzyme that hydrolyze starches into sugars: alpha-amylase, beta-amylase, limit dextrinase, and alpha-glucosidase.3 Each of these enzymes has several forms. Each form of an enzyme may have a slightly different pH and temperature range.
Let’s go back to our yardwork allegory for a second. You have three tools to make sugars with: a pair of clippers (alpha-amylase), a hedge trimmer (beta-amylase), and a chainsaw (limit dextrinase). While beta-amylase and some limit dextrinase are pre-existing, alpha-amylase and more limit dextrinase are synthesized within the aleurone layer during malting. In other words, we start with the hedge trimmer and chainsaw in the garage ready to grab, but the clippers are out in the grass and brambles somewhere. In a well-modified malt, the combined work of your brother (beta-glucanase) and sisters (proteolytic enzymes) is completed during malting, which allows you to get all of your tools together in order to cut the branches into little pieces. All of the diastatic enzymes are available in the mash, and act concurrently to break down the starches.
The amylase enzymes work by hydrolyzing the bonds between the individual glucose molecules that make up the amylose and amylopectin straight chains, but they work differently. Beta-amylase can only work on “twig” ends of the chain, not the “root” end. Beta-amylase removes one maltose sugar unit (a disaccaharide, i.e., two glucose molecules joined together) at a time, so it works sequentially down the starch chains. On an amylopectin, with its many branches, there are many twig ends available, and beta-amylase can remove a lot of maltose very efficiently, like our allegorical hedge trimmer. However, due to the size and structure of the enzyme itself, beta-amylase cannot get close to the branch joints. It will stop working about three glucose units away from a branch joint, leaving behind a small, branched sugar chain. Because this small branched piece represents the limit of beta-amylase’s activity it is called “beta-amylase limit dextrin.”
Unlike beta-amylase, alpha-amylase can attack the bonds between glucose units anywhere along the chains that make up amylose and amylopectin, much as you can with a pair of clippers. Alpha-amylase is instrumental in breaking up large amylopectins into smaller amylopectins and amyloses, creating more ends for beta-amylase to work on. Alpha-amylase is able to get within one glucose unit of an amylopectin branch, which leaves behind an “alpha-amylase limit dextrin.”
The branched joints of the limit dextrins that alpha- and beta-amylase cannot break can be hydrolyzed by the enzyme limit dextrinase. The action of limit dextrinase serves to cut up the branched sections into smaller chains, much like the allegorical chainsaw can be used to make more manageable pieces of tree branch. Once the limit dextrinases have done their work, we are left with small unbranched chains that are now more accessible to the alpha- and beta-amylases. This further round of action by the amylases leads to the formation of glucose, maltose, and maltotriose units. In other words, much of the original starch has now been converted to fermentable sugars.
The other diastatic enzyme, alpha-glucosidase, makes glucose out of both starches and dextrins. Alpha-glucosidase does not seem to play a significant role in the overall conversion, although it is more heat stable than beta-amylase and will act along with alpha-amylase to produce fermentable sugars after beta-amylase has been denatured. In all likelihood, alpha-glucosidase is very useful to a growing barley plant, but it doesn’t seem to help us make beer.
Enzyme Thermostability in the Mash
The temperatures most often quoted for starch conversion are in the range 149–153°F (65–67°C). This is a compromise between the completion of starch gelatinization and thermal denaturing of the beta-amylase and limit dextrinase enzymes. Collectively, the diastatic enzymes work best from 131–149°F (55–65°C), but remember, the generally accepted range for gelatinization is between 140–149°F (60–65°C) and may go as high as 153°F (67°C) depending on barley variety and growing conditions. Alpha-amylase works best at 140–158°F (60–70°C), while beta-amylase works best between 131–149°F (55–65°C).
Table 16.2—Major Enzyme Groups Involved During Malt Modification and Starch Conversion
| Enzyme | Active temp. range | Preferred temp. range | Active pH range | Preferred pH range | Function |
|---|---|---|---|---|---|
|
Phytasea |
86–126°F 30–52°C |
95–113°F 35–45°C |
5.0–5.5 |
4.5–5.2 |
Helps lower the mash pH, but not required. |
|
Beta-glucanaseb,c |
68–122°F 20–50°C |
104–118°F 40–48°C |
4.5–6.0 |
4.5–5.5 |
Best gum breaking rest for unmalted adjuncts. |
|
Proteasesd |
68–149°F 20–65°C |
113–131°F 45–55°C |
4.5–6.0 |
5.0–5.5 |
Solubilize insoluble barley storage proteins. |
|
Peptidasesd |
68–153°F 20–67°C |
113–131°F 45–55°C |
4.5–6.0 |
5.0–5.5 |
Produce free amino nitrogen (FAN) from soluble proteins. |
|
Alpha-glucosidasee |
140–158°F 60–70°C |
Unknown |
4.5–6 |
5.0–5.5 |
Cleaves maltose and larger sugars into glucose. Negligible effect on total yield. |
|
Limit dextrinasef |
140–153°F 60–67°C |
140–149°F 60–65°C |
4.5–5.8 |
4.8–5.4 |
Cleaves limit dextrins. |
|
Beta-amylasec |
131–149°F 55–65°C |
131–149°F 55–65°C |
5.0–6.0 |
5.4–5.5 |
Produces maltose. |
|
Alpha-amylasec |
140–167°F 60–75°C |
140–158°F 60–70°C |
5.0–6.0 |
5.6–5.8 |
Produces a variety of sugars and dextrins, including maltose. |
Note: The pH ranges are quoted at 25°C. The active temperature range for each enzyme indicates substantial measured enzyme activity under laboratory conditions. In the case of the diastatic enzymes, the preferred range begins where the starch becomes soluble during gelatinization so that it is most accessible for efficient enzyme action, without being inactivated. The enzymes will be active outside the indicated ranges, but will become denatured as the temperature increases above each range.
Sources: a. Lee (1990); b. Muller (1995); c. Kunze (2014); d. Jones and Budde (2005); e. MacGregor and Lenoir (1987); f. Stenholm and Home (1999).

Figure 16.4. These curves plot the fermentable sugar profiles of four different base malt samples of similar diastatic power tested under the same procedure. Test mashes were conducted at nine different mash-in temperatures and compared to the fermentable sugar profile and apparent attenuation limit (AAL) of a Congress mash for the same malts. Each data point is the mean of four different base malts.
Notes: The Congress mash consists of mashing-in at 45°C (113°F) for 30 min., then increasing at 1°C/min. to 70°C (158°F), and holding for 60 min. before cooling. The samples with mash-in temperatures ≤70°C (≤158°F) were held at the noted temperature for 50 min. and then raised to 70°C for 10 min. before cooling. The samples with mash-in temperatures >70°C (>158°F) were held isothermally for 60 min.
(Data extracted from Evans et al. [2005].)
The higher the temperature, the faster an enzyme will work, and the faster it will denature as it exceeds its preferred temperature range. Denaturing means that the shape of the enzyme changes and it will no longer function as the “lock” to the enzyme target’s “key.” (Author’s note: I know this sounds backwards, but enzyme molecules are usually larger than the target molecules.) This is true of all enzymes, so even though beta-amylase is denaturing at 149°F (65°C), it is also working faster. The specific rate of both activity and denaturing for beta amylase will depend on the particular malt and mashing conditions, but as an example, it has been shown that in typical brewery mashing conditions the initial level of beta-amylase activity was reduced by 75% after 30 min. at 149°F (65°C) and by 90% of its original activity after 60 min.4
While there appears to be much less limit dextrinase in the mash than beta-amylase, studies examining limit dextrinase in actual mashes suggest that it is more heat and pH stable than beta-amylase, working better at lower mash pH (4.8–5.4) and maintaining 60% of initial activity after an hour at 149°F (65°C). Between beta-amylase and limit dextrinase activities, maltose generally makes up between 60% and 70% of the wort sugars.
Generally, many of the thermostability and thermal optima numbers cited in textbooks and scientific papers were made using purified enzymes acting on a suitably buffered substrate, not in an actual mash. The information presented above comes from work published in the last 20 years using actual barley starch in real-world mashing conditions. This helps explain the discrepancy between what past laboratory data told us shouldn’t work versus what we have been able to do for the past 5,000 years.
Understanding the thermostability and temperature optima of diastatic enzymes (see fig. 16.3 and table 16.2) allows us to customize the fermentability of the wort by changing the final proportions of fermentable sugars. A lower mash temperature of 144–149°F (62–65°C) favors beta-amylase and yields a lighter-bodied, more attenuated beer. A higher mash temperature of 154–162°F (68–72°C) favors alpha-amylase and yields a more dextrinous, less attenuated beer. Temperatures in between produce a range of fermentability.
As a practical example, see figure 16.4, which illustrates data from a study5 that looked at the fermentable sugars profiles produced by conducting two-step mashes, where the primary temperature rest was conducted at temperatures ranging from 131°F to 169°F (55–76°C) for 50 min., and the second rest was at 158°F (70°C), for 15 min., followed by forced cooling. If the mash-in temperature was greater than or equal to 158°F (70°C), the mash was simply held at that same temperature for the total time of 1 hour. The sugar profiles were compared to that of a Congress mash, which is a standard malt test for determining the maximum percentage of extract by weight (see chapter 15). While the mash profile of the Congress mash has a basis in actual lager brewing practice, it was originally designed for moderately-modified malts, and utilizes a 30 min. rest at 113°F (45°C) that combines a beta-glucanase and protein rest. However, the Congress mash schedule is the reference standard for total soluble extract, and thus its fermentable sugar profile is included for comparison.
The chart in figure 16.4 shows that the percentage of maltose and degree of attenuation is highest at 149°F (65°C) and that this percentage falls as the primary mash temperature increases. The presence of maltose for primary mash temperatures >158°F (>70°C) is best explained by the action of alpha-amylase and limit dextrinase, because beta-amylase is rapidly denatured at 158°F (70°C). The degree of fermentability was expressed as the apparent attenuation limit (AAL). The AAL was determined by measuring the OG and FG of the worts, which were subjected to an agitated fermentation with a high pitching rate according to industry standards (apparent attenuation is discussed in chapter 7). A maximum AAL of about 90% is typical. It is interesting to note how fast the AAL falls when mash temperatures go above 149°F (65°C) and beta-amylase is denatured. It doesn’t take a large shift in mash temperature to produce a big change in wort fermentability. Based on this data (which is consistent with my experience), mashing in at 158°F (70°C) instead of 149°F (65°C) would raise a 1.050 OG wort’s FG from 1.005 to 1.011.
Mash-Out
Even though the brewing process does not require it, many brewers perform a mash-out before the wort is drained from the mash and the grain is rinsed (sparged) of residual sugars. Mash-out is the term for raising the temperature of the mash to 170°F (77°C) prior to lautering. This stops all of the enzyme action, preserving your fermentable sugar profile, and makes the grain bed and wort more fluid. For most mashes with a ratio of 1.5–2.0 qt. of water per pound of grain (3–4 L/kg), a mash-out is not needed, because the grain bed is loose enough to flow quite well. For a thicker mash, or a mash composed of more than 25% of wheat, rye, or oats, a mash-out may be helpful to prevent a set mash or stuck sparge, that is, where there is no flow. A mash-out helps prevent this by making the sugars more fluid, like the difference between cold and warm honey. If your mash has cooled during the hour and dropped below 140°F (60°C), beta-glucans, pentosans, and any unconverted starches will turn gummy and make lautering very difficult. The mash-out step can be done using external heat or by adding hot water according to the multi-rest infusion calculations (multi-rest infusion mashes are covered in chapter 17). Most homebrewers tend to skip the mash-out step without consequence, but if you do have lautering problems a mash-out is the first thing to try.
Other Factors Affecting Starch Conversion
There are four other factors besides temperature that affect amylase enzyme activity to a lesser extent. These are the mash pH, degree of crush, water-to-grist ratio, and mash time.
Mash pH
Mash pH can have a significant effect on both yield and fermentability. Problems can occur when mash pH is <5.0 or >6.0. When mash pH is <5.0, and especially when <4.5, beta-amylase activity is severely diminished, and wort clarity can be a real problem as well. When mash pH is >6.0 silicates and tannin extraction from the malt husks increases substantially, affecting beer flavor.
Mash pH changes within the 5.0–6.0 range can also result in significant changes to yield. For example, one experiment, conducted at Ballast Point Brewery and Tap Room (San Diego, CA) by myself and Aaron Justus, using the same recipe for two pilot batches, demonstrated an 8% increase in yield where the only difference was a change in mash pH from 5.5 to 5.3, caused by an increase in the calcium ion level of the water from 54 to 120 ppm. Generally speaking, across a mash pH range of 5.2–5.8:
- • the fermentability will not significantly change;
- • the FAN content will improve by a small but significant amount at the low end of the range, all else being equal;
- • a lower mash pH (5.2) reduces the effect of water-to-grist ratio on yield and fermentability, all else being equal;
- • and a lower mash pH (5.2) reduces the activity of lipoxygenase and so reduces the rate of oxidation of fatty acids, which should improve long-term flavor stability, all else being equal.
Brewing salts can be used to raise or lower the mash pH, but these salts should only be used to a limited extent because they can also affect the flavor. Water treatment is an involved topic and will be discussed in more detail in chapters 21 and 22. If you are a beginner at mashing, it is often best to let the pH do what it will and work the other variables around it, as long as your water is not extremely soft or hard. In most situations, malt selection can do as much (or more) to influence the mash pH as brewing salt additions. The pH of the mash or wort runnings should be checked with a pH meter for best accuracy. The pH test papers that are sold at brewshops can give you a rough estimate, but even the best of them are not very accurate in wort. Testing pH will be discussed more in chapters 21 and 22.
Degree of Crush
Basically, the finer the crush, the better the enzymes will be able to act on the starches, and the faster the conversion will be. Do you get better yield from a finer crush? No, not really. Modern well-modified and highly modified malts differ in yield by a percentage point or two between fine grind and coarse grind, as in, the difference between 79% and 80%. The main difference is the length of time it will take for complete conversion. See below for more information on mash times.

Figure 16.5. Changes in AAL and Yield vs. Mill Gap. Data from mashes studied in the laboratory indicate that the difference in extract yield between a very fine grind (0.2 mm gap) and a typical homebrewing roller mill (1 mm gap) is about 1.5% at most. The difference in apparent attenuation limit (AAL) is about 2% at most. (Data taken from Evans et al. [2011].)
Figure 16.5 shows the effect of a finer crush on two different lager malt varieties, and indicates that the degree of crush will only improve AAL by about 2% and yield by about 1%–1.5%. Changes in mashing temperature have a much larger effect on fermentability and AAL than degree of crush. Generally speaking, a finer crush:
- • will convert faster,
- • will yield more extract by a small amount,
- • won’t significantly improve fermentability,
- • and won’t increase FAN.
Water-to-Grist Ratio
The water-to-grist ratio (usually in quarts per pound, or liters per kilogram) is the least significant factor influencing the performance of the mash (e.g., see fig. 16.6). A thinner mash of >2.0 qt./lb. (>4L/kg) dilutes the relative concentration of the enzymes, which slows the conversion and leads to quicker denaturing, but could ultimately lead to a more fermentable mash because the enzymes are not inhibited by a high concentration of sugars. A stiff mash of <1.25 qt./lb. (<2.5 L/kg) is better for malt protein degradation, but the resultant wort is less fermentable and will result in a sweeter, maltier beer.

Figure 16.6. Changes in AAL and Yield vs. Water to Grist Ratio. Laboratory mash studies indicate that changes in water-to-grist ratios across the range of 1–2 qt./lb. (2–4 L/kg) have only a small effect on fermentability and yield. (Data taken from Evans et al. [2011].)
According to the results of a study published in 2013,6 varying the water-to-grist ratio across a range of 1-2 qt./lb. (2–4 L/kg) changed the AAL and yield by less than 5%. Very thick mashes of less than 1 qt./lb. (2 L/kg) had the worst performance, requiring twice as much time, 40 versus 20 minutes, to fully convert to the same AAL as the thinner mashes. Anecdotal evidence from homebrewers suggests that higher water-to-grist ratios (2–4 qt./lb. [4–8 L/kg]) used by single vessel brewing methods, such as brew-in-a-bag, do not seem to significantly effect AAL or yield, although mashes may take longer due to enzyme dilution.
There is so much interaction of the various factors in the mash that it is difficult to generalize, especially with such a weak variable as water-to-grist ratio. When it comes to the mechanics of mashing, however, a thicker mash is better for multi-rest infusion mashes (see chapter 17), because it is gentler to the enzymes and easier to step up from rest to rest due to the lower heat capacity of grain compared to water.
Mash Time
Depending on the mash pH, water-to-grist ratio, and temperature, the time required to completely convert the mash can vary from under 30 min. to over 60 min. Enzyme activity is highest during the first 20 min. of the mash and tapers off thereafter, with a steep drop after 60 min. (typically). There is a lot of talk on homebrewing forums about mashes that are finished in 20 min., as verified by an iodine test for starch. But the iodine test only tells you that you have degraded starch, it does not tell you to what extent or the resulting fermentability, which will depend upon which sugars have been released. Generally, more time is needed to achieve a higher degree of fermentability, and I recommend mashing for 60 min. to be sure.
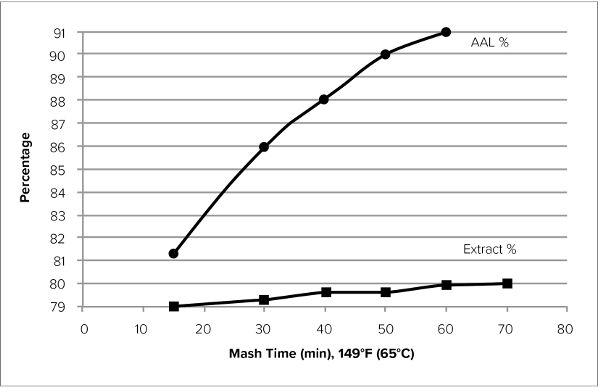
Figure 16.7. Changes in AAL and Yield vs. Time. Laboratory mash studies illustrating changes in apparent attenuation limit over time. Data shows the responses from two different malts, Gairdner (squares) and Flagship (triangles). (Data taken from Evans et al. [2011].)
A laboratory mashing study indicated that most of the starch conversion is achieved in the first 15 min., reaching 80% AAL (compared to a typical maximum AAL of 90%) in that time. The study was designed to mimic current brewing procedures in terms of degree of crush, single temperature infusion, mash pH, and water-to-grist ratio. A graph of the data is shown in figure 16.7, which includes the responses from two different malts. The change in fermentability (i.e., AAL) between 30 and 60 min. is about 5%. The change in total soluble extract (yield) is about 1%.
Summary
For modern well-modified malts (S/T or KI = 40% or higher), maximum extract yield and fermentability can be achieved by a single temperature infusion mash with a water-to-grist ratio between 1.25 and 2 qt./lb. (2.6–4.2 L/kg), mashed at or slightly above the gelatinization temperature of the malt, which is typically about 149°F (65°C). I would recommend going a degree or three higher, i.e., 152°F (67°C) to assure full starch solubilization, at least initially. More than half of the starch conversion and dextrinization will occur within 15 min., and the majority (>75%) will be complete after 30 min. Small gains in extract (1%) and fermentability (5%) can be realized with longer mashing times.
In mixed lots of base malt, there will be more variation in the gelatization temperatures, and thus a slightly higher infusion temperature or a second mash rest at the alpha-amylase rest temperature (or both) may be beneficial for both total extract and fermentability.
A compromise of all factors yields the standard mash conditions for most homebrewers. These conditions provide the best combination of high yield, normal fermentability, sufficient FAN, better foam, less haze, and reduced fatty acid oxidation with modern well-modified malts:
- • A water-to-grist ratio of about 1.5–2.0 qt./lb. (3–4 L/kg).
- • A mash pH of 5.2–5.6, measured at 77°F [25°C].
- • A single mash temperature rest between 149–155°F (65–68°C) for 30–60 min. Personally, I would recommend 153°F (67°C) for 60 minutes as a baseline; you can adjust from there as you gain experience with your equipment and recipes.
Alternatively, you can use a two step mash to achieve higher fermentability than a single temperature rest:
- • The first temperature rest at 147°F (64°C) for 30–40 minutes followed by 162°F (72°C) for 15–20 minutes. This schedule should achieve slightly higher fermentability, depending on your malts.