20
Brewing Your First All-Grain Batch
The comment you will most often hear from homebrewers after their first all-grain brew is, “I didn’t realize it would be so easy!” Making wort from malted grains is very easy. You mix the crushed grain with hot water, check the temperature and wait a while … and you have wort. I have talked to hundreds of people over the years that won’t try mashing because they worry and hesitate and try to read everything about it beforehand. They will plan every excruciating detail and failure scenario and still want someone to hold their hand before they try it themselves. My response? “Just do it!” Don’t overthink this.
After all, what’s the worst that can happen when you mix some crushed grain with hot water? It’s not going to explode. At worst, it will just sit there. The most likely failure scenario is that you will have mediocre conversion from not being in the right temperature range. So what?! You still made wort! You will do better next time; every batch is a learning experience.
I hope that you have done several extract-and-specialty grain batches by now. You should know to have your ingredients and brewing water ready, with everything clean and sanitized. Unless you have purchased a roller mill, have the grain crushed for you at the brew shop. Crushed grain will stay fresh for about two weeks if kept cool and dry.
There are several options that you can use for your first all-grain batch, but to keep it simple I will only describe two in this chapter. These are brew-in-a-bag (BIAB) and a combined mash and lauter tun (MLT) made from a picnic cooler or ice chest. In addition, you have the option of doing a partial mash with either of these methods, conducting a smaller mash to make half the wort and making up the difference with malt extract. The partial mash option is just like the partial-boil Palmer Brewing Method used for extract and specialty grains, but now Wort A is the mash. This is a good option if you are limited on kettle size.
Mash and Lauter Tun or Brew-in-a-Bag?
How will you conduct the mash and lauter? It’s a good question. The MLT method is more traditional and very similar to commercial brewing practice. In MLT, separate vessels are required, the most common configuration being a hot liquor tank to heat the brewing water, a single tun used to conduct both the mash and lauter, and a boil kettle. An insulated mash-lauter tun made from an ice chest with a manifold or false bottom works really well, because the insulation keeps it from losing more than a couple of degrees per hour. A mash-lauter tun needs to be sparged to get the best efficiency, but that is simply a matter of pouring in a pitcher of hot water every few minutes as the wort drains to your kettle. Or you can batch sparge and add it all at once.
Brew-in-a-bag appeals to many first time mashers because of its simplicity—it’s just like steeping, except you are mashing. You do everything in a single kettle and you don’t have to sparge. Mash, drain the bag, and boil. The downside is that you need a larger kettle and you have to heat more water at a time than you would with MLT. The other thing to consider is whether you are strong enough to lift and hold 20–30 lb. (9–14 kg) of hot wet grain, for 15 min. while it drains (many people use a rope and pulley).
There isn’t much difference in the cost of equipment between the two methods. The BIAB method needs a larger kettle than the MLT method plus a large grain bag, and the cost difference between the two kettle sizes plus the grain bag is about the same as a suitable ice chest and false bottom. I tend to prefer the MLT method myself. Maybe it’s just because that’s the way I learned to brew, but I also believe it’s important to learn the corners before you starting cutting them off. If you have faithfully read all the preceding chapters to this point, then you know what the corners are, so choose whichever method you like.
Additonal Equipment Needed
For the MLT method you will need:
- • an 8–10 gal. (30–38 L) boil kettle;
- • a 10 gal. (38 L), or larger, ice chest (or another kettle) for the mash-lauter tun;
- • a 5 gal. (20 L) kettle for the hot liquor tank.
For the BIAB method you will need:
- • a 10–15 gal. (38–56 L) boil kettle;
- • a grain bag (same size as kettle).
Larger boil kettle. You will need a larger boil kettle for either all-grain method, because you are going to be boiling the whole batch. The BIAB method needs a larger kettle than the MLT method, but a 15 gal. (56 L) vessel would work for both. All of the mash and sparge water is heated at the same time for BIAB, because there is no sparging step and it must be able to contain the entire mash. See tables 19.7 and 19.8 for estimated total volumes as a function of OG for nominal 5 gal. (19L) batch sizes.
Using the MLT method means that each of the vessels can be smaller than the single large kettle in BIAB. The boil kettle and mash-lauter tun only need to be about 10 gal. (37L). The sparge water can be heated in your old 5 gal. (20 L) kettle, which now serves as the hot liquor tank. You will probably use 4–8 gal. (15–30 L) of water for the mash, depending on OG, and another 3–4 gal. (11–15 L) of water for the sparge, so be prepared with the right sized vessels.
Grain bag. The grain bag for BIAB can be made from muslin, cheesecloth, or mosquito netting. Commercially made bags are also available and these are sturdy enough to be reused many, many times. Your grain bag should be about the same diameter as your brewing kettle and tall enough to either close with a drawstring or drape over the rim of the kettle. For best results, you want the bag to be big enough so that the grain can move freely during the mash. Do not try to use a pillow case; they don’t drain well and bits of grain husk might get stuck in other clothes during washing. (For the record, I have not tried this and I don’t know if it can cause irritation of family members. It could have been sawdust from the boy’s clothes.)
Mash-lauter tun. Instructions for building a mash-lauter tun are given in appendices E and F. A 36–48 qt. (34–45 L) rectangular chest cooler or 10 gal. (38 L) circular beverage cooler are probably the best choice for most 5 gal. (19 L) batches. The tun needs to be outfitted with some sort of straining device and a valve or siphon to separate the wort from the grain. Several options are discussed in appendices E and F. These devices are fun to make by yourself, but can be purchased as well.
Propane or natural gas burner. See chapter 9 for a discussion of appropriate burners.
Thermometer. Last, and most importantly, you will need a good thermometer to check the mash temperature quickly and accurately. A quick-read digital thermometer is probably best. Some brewing kettles come with thermometers mounted in the side, but a handheld thermometer is always, well … handy.
Suggested Recipe
For this all-grain batch, we will make a brown ale, using five malts and an adjunct in a single-temperature infusion mash. I will take you through the entire all-grain brewing procedure, then go back and discuss some options for various steps. Of course, if there is another beer style that you prefer, you are welcome to use one of the other recipes from chapter 23.
- Original gravity: 1.052
- Final gravity: 1.013
- IBU: 36
- Color: 17 SRM (34 EBC)
- ABV: 5.2%
|
All-Grain Version |
||
| Grain bill | Gravity points | |
|---|---|---|
|
8.5 lb. (3.9 kg) pale ale malt |
3 |
|
|
1.0 lb. (450 g) Carabrown malt |
3 |
|
|
0.5 lb. (225 g) flaked oats |
2 |
|
|
0.5 lb. (225 g) crystal 80°L malt |
1 |
|
|
0.5 lb. (225 g) aromatic 20°L malt |
2 |
|
|
0.33 lb. (150 g) chocolate malt |
1 |
|
|
Boil gravity for 7 gal. (27 L) |
1.044 |
|
|
Original gravity for 6 gal. (23 L) |
1.052 (see notes) |
|
| Mash Schedule | Rest temp. | Rest time |
|
Conversion Rest – Infusion |
153°F (67°C) |
60 min. |
| Hop schedule | Boil time | IBUs |
|
0.75 oz. (21 g) Horizon 12% AA |
60 min. |
28 |
|
0.5 oz. (14 g) East Kent Goldings 5% AA |
15 min. |
4 |
|
Total IBUs |
32 |
|
| Yeast strain | Pitch (billions of cells) | Fermentation temp. and time |
|
English ale |
225 |
68°F (20°C) for 2 weeks. |
| Directions for Mash Schedule | ||
|
MLT Method: Single temperature infusion mash with strike water at 161°F (72°C) and water-to-grist ratio of 2 qt./lb. (4 L/kg). BIAB Method: Single temperature infusion mash with strike water at 158°F (70°C) and water-to-grist ratio of 2.85 qt./lb. (5.96 L/kg). Target mash temperature of 153°F (67°C). Mash time of 1 hour. No mash-out. |
||
Notes: Target boil gravity of 1.044 for 7 gal. (27 L)—this will equal 1.052 for 6 gal. (23 L) after boiling. The extra gallon (3.8 L) provides for wort soaked up by the hops and break material in the kettle and fermentor, giving you at least five gallons (19 L) of clean beer.
Adjust the amount of chocolate malt between 0.25 and 0.5 lb. (110–225 g) depending on how dark you want it.
You can use any hops you want to; the key is the boiling times and total IBUs so that the hops don’t distract from the malt character. I’ve used English hops, but you could use American, European, orPacific instead (see table 5.3 for comparison.)
| Wort A | ||
|---|---|---|
|
2.0 lb. (0.9 kg) pale ale malt |
||
|
1.0 lb. (450 g) Carabrown malt |
||
|
0.5 lb. (225 g) crystal 80°L malt |
||
|
0.5 lb. (225 g) flaked oats |
||
| Wort B | ||
|
4 lb. (1.8 kg) pale ale LME |
||
|
0.33 lb. (150 g) chocolate malt |
The MLT Method
Basically, you will heat the mashing water in your larger boil kettle, pour that into your mash-lauter tun with the grain to mash, and then place the larger boil kettle underneath the tun to receive the wort (fig. 20.1). Your smaller boil kettle will be used to heat the sparge water. At the end of the mash, some of the wort is recirculated through the mash-lauter tun to clarify it, and drained to the large kettle. The sparge water is then added to the tun, mixed, recirculated, and the wort is drained again. This is the batch sparging option. Continuous sparging is similar, but the sparge water is added in small batches, or continuously with a hose, while the wort is drained slowly to the kettle. Chapter 19 explains sparging methods in more detail.
Starting the Mash
1. Heat the Mash Water
Heat up enough water to conduct the mash. Always make a little more hot water than you calculate is necessary, you will often need it. At a water-to-grist ratio of 2 qt./lb. (4 L/kg), the volume needed would be 21 qt. (20 L), or just over 5 gal. Therefore, heat up about 6 gal. (23 L) in the larger of your two boil kettles. At this water-to-grist ratio (or mash ratio), the initial infusion temperature should be 161°F (72°C) to create a mash temperature of 153°F (67°C). Depending on the amount of heat lost to the tun, the strike water could be as hot as 165°F (74°C), but that would (theoretically) create a mash temperature of 156°F (69°C). At 156°F, the wort would become more dextrinous than we intended, but it would still be a fermentable wort, so don’t worry if your infusion temperature is a couple of degrees off. Chapter 17 explains the infusion calculations.
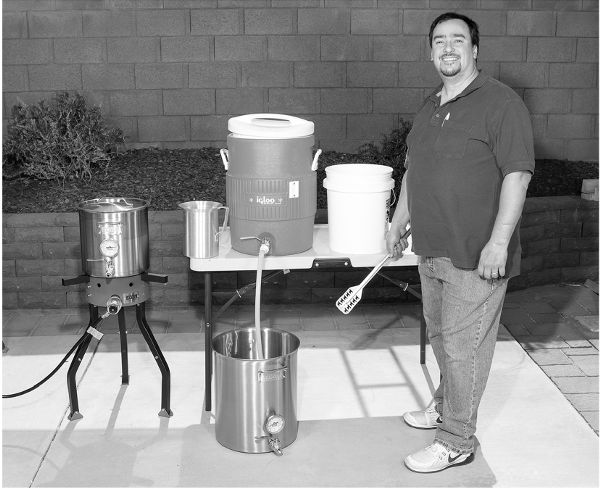
Figure 20.1. The larger of the two brew kettles is used to heat the mash water, and the smaller kettle is used for heating the sparge water.
Note on brewing salts: If you are going to add brewing salts to the water, this would be the time to do it. Remember that calcium sulfate actually dissolves better in cold water. You could also add brewing salts to the mash instead. See chapter 22 for more information on adjusting your brewing water for a recipe.
2. Preheat the Tun
Preheat the cooler with some boiling water, about a gallon or roughly four liters. Swirl the boiling water around to heat up the cooler and then pour it back to your sparge water kettle. Preheating will prevent initial heat loss from the mash to the tun, which can throw off your infusion calculations.
3. Mash-In
When you mash-in, you can add the grain to the water, or the water to the grain. Thermodynamically, it’s easier on the enzymes to add the water to the grain, but that tends to create dry spots on the bottom. I find it is easier to measure the water into the mash-lauter tun first and then add the grain. Stir as you pour in the grain. Mix thoroughly to make sure all the grain is fully wetted and break up any doughballs (fig. 20.2).
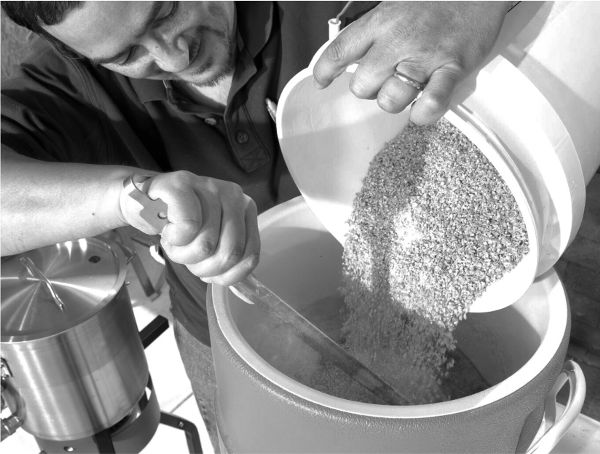
Figure 20.2. Mixing the grist and mash water. I find that adding the grist to the water is more convenient, although it can be done the other way. Stir thoroughly to make sure the grist is fully wetted and the temperature is uniform throughout the mash.
4. Check the Temperature
Check the temperature of the mash (fig. 20.3) to see if it has stabilized at the target temperature of 152°F (67°C), or at least in the range of 150–155°F (65–68°C). If the temperature is too low (e.g., 145°F [63°C]), add some more hot water. If it is too high (e.g., 160°F [71°C]), then add cold water to bring it down. For this recipe, 156°F (69°C) is the highest we would want the mash temperature to go. The target temperature range will yield a sweet, medium-bodied wort with good attenuation.
5. Adjust the Temperature
OK, the mash temperature came out a little low at 148°F (64°C), so I added 1.5 qt. (1.4 L) of boiling water to bring it up to 152°F (67°C). Stir as you add the hot water to evenly distribute the heat (fig. 20.4).
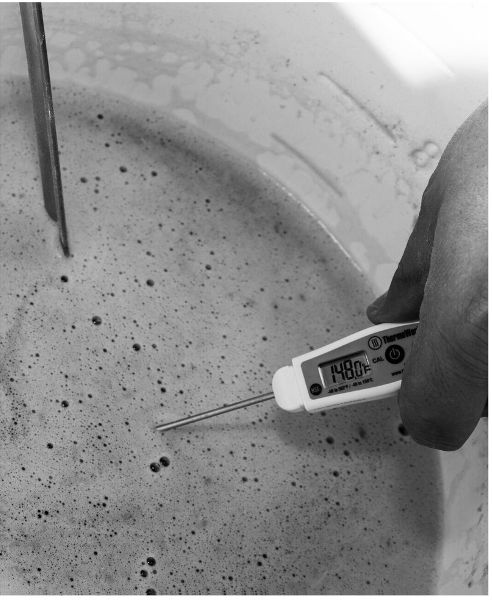
Figure 20.3. Checking the temperature of the mash after the infusion.

Figure 20.4. Adjusting the temperature of the mash. In this case, adding 1.5 qt. (1.4 L) of boiling hot water to raise the mash temperature another 4°F (3°C), to 152°F (67°C).
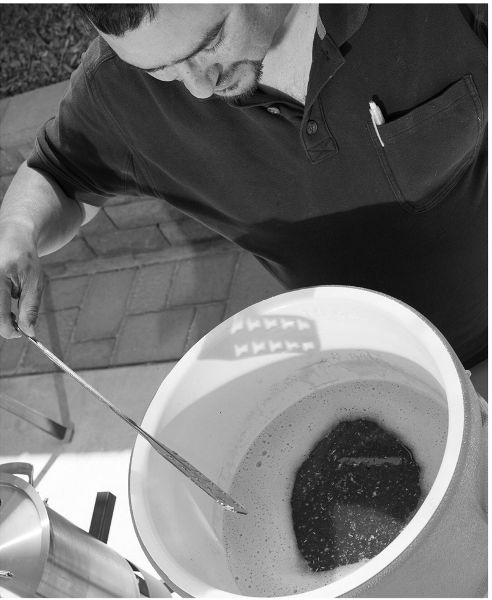
Figure 20.5. A picture of the mash at t = 0. The wort is cloudy with starch.
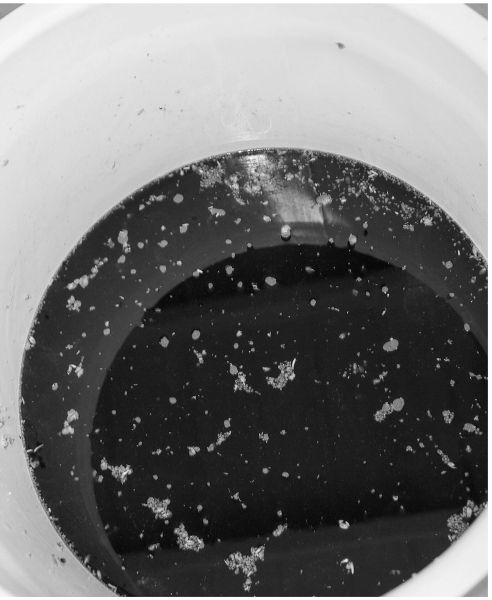
Figure 20.6. A picture of the mash at t = 60 minutes. Some of the larger grist particles are floating around, as are some husks. Notice the wort has cleared; it is no longer cloudy with starch, and it smells great.
Monitoring the Mash
6. Monitor the Mash
Stir the mash every 15–20 min. during the hour (fig. 20.5) to prevent cold spots and help ensure a uniform conversion. Monitor the temperature each time you stir. If the temperature drops by less than 5°F (3°C) over the hour-long mash, nothing further needs to be done. Cover the mash tun with the cooler lid between stirrings and let it sit for a total of 60 min. If you notice that the temperature drops below 145°F (62°C) within the first half hour, you can add more water to bring the temperature back up (fig. 20.4).
7. Heat the Sparge Water
Meanwhile, heat up your sparge water in the smaller of your two boil kettles (fig. 20.7). You will need about 3.5 gal. (13.25 liters) for the batch sparge volume. The sparge water temperature should be less than boiling, preferably 165–175°F (73–80°C). If the sparge water is too hot, the probability of tannin extraction from the grain husks increases substantially.
Conducting the Lauter
Okay, the hour has gone by and the mash should look a little bit different, the wort appearing clearer and smelling great (fig. 20.6).
8. Recirculate (Vorlauf)
Open the valve of your mash tun slowly and drain about 2 qt. (roughly 2 L) of the first runnings into a pitcher. This wort will be cloudy with bits of grain. Gently pour the wort back into the grain bed, recirculating the wort. Repeat this procedure until the wort exiting the tun is mostly clear (like unfiltered apple cider). It will be dark-amber colored, hazy, but not chunky. You should only have to recirculate a couple of pitchers to clarify the wort (fig. 20.8).
9. Lauter
Once the wort has cleared through recirculation, you are ready to lauter (drain) the first runnings into your boil kettle (fig. 20.9). Fill the kettle slowly at first; if you drain the mash-lauter tun too quickly you will compact the grain bed and get a stuck sparge. Drain the tun to collect about 3.5 gal. (13.25 L) of wort in the boil kettle.
10. Add the Sparge Water
Close the valve and add your sparge water to the mash-lauter tun using the pitcher until you can just dump in the rest straight from the kettle (be careful, it’s hot). Stir the grist thoroughly to get as much residual extract into the wort as possible (fig. 20.10). There is a chance of dissolving unconverted starch into the wort at this stage, so it doesn’t hurt to let the mash sit for 15 min. to allow residual alpha-amylase to convert it to sugars. Recirculate this new wort and then drain to your boil kettle. You should now have 7 gal. (27 L) total in your boil kettle.

Figure 20.7. Heating the sparge water in the smaller brew kettle while the mash is going on.
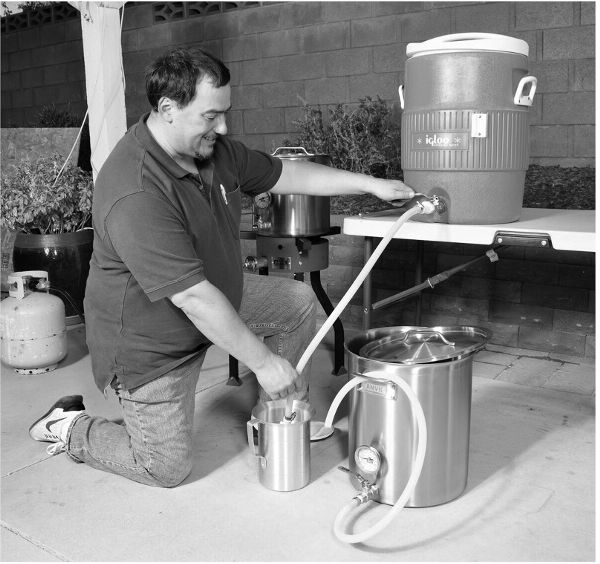
Figure 20.8. Recirculating the wort by draining about 2 qt. (roughly 2 L) of the first runnings into a pitcher. The wort will be cloudy with bits of grain. Then, slowly pour this wort back into the grain bed, recirculating the wort. Repeat this procedure until the wort exiting the tun is mostly clear (like unfiltered apple cider)—you just want to eliminate the bits of grain coming through. The wort will be dark amber, hazy, but not chunky.
Figure 20.9. Starting draining the lauter tun of the first runnings.
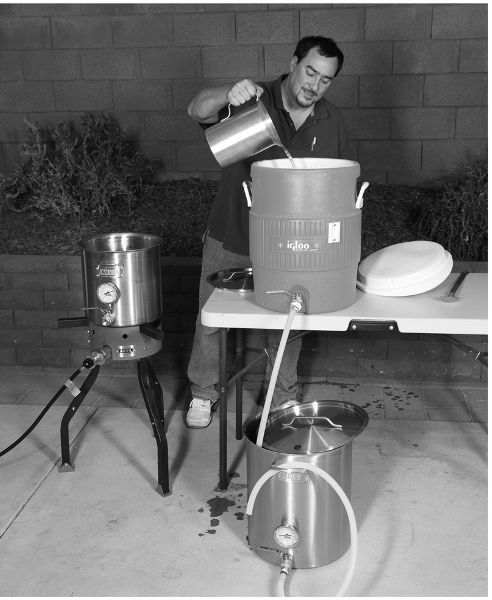
Figure 20.10. Adding the sparge water a pitcher at a time until the rest can just be dumped in. Stir the mash thoroughly to refloat the grain bed and get all of the remaining extract.
11. Stuck Sparge?
If the wort stops flowing then you have a stuck sparge. There are two common ways to fix it: blow back into the outlet hose to clear any obstruction of the manifold; or close the valve and add more hot water, stirring to resuspend the mash. You will need to recirculate again. Stuck sparges can result from grinding your grist too fine, or using too much adjunct, but it shouldn’t happen very often. Stirring in a couple of handfuls of rice hulls will usually fix the problem if the first two methods don’t.
12. Calculate Your Brewing Efficiency
Measure the gravity of the wort in the boil kettle (stir it first) and multiply the gravity points by the number of gallons (or liters) you collected. Then divide by the number of pounds (or kilograms) of grain you used. The result should be somewhere around 28 PPG (or 235 PKL), which is about 75% efficiency. Your yield and efficiency will decrease as the OG of your recipe increases because higher concentration means less volume, but that is not an issue in this recipe. If your yield efficiency is low, for example, 65%, you may not be getting good conversion in the mash, which could be caused by too coarse a grist, the wrong temperature, not enough time, or your mash pH is a factor. However, low efficiency is more often due to poor lautering, such as poor mixing of the batch sparging water, or draining the tun too fast. These issues are discussed more thoroughly in appendices E and F.
13. Done!
Okay, throw the spent grain on the compost pile and you are done! You have produced your first all-grain wort! The rest of the brewing process is just like extract brewing. Boil the wort, add hops, chill, and ferment. All-grain brewing produces more break material than extract brewing, so you will probably want to add Irish moss at the end of the boil to help with coagulation during the cold break and aid clarity. See appendix C for more information on beer clarity.
The BIAB Method
Basically, with BIAB, you are mashing with a giant tea bag in your large boil kettle. All of the water that would be used for the mash and sparge in the MLT method is combined here for the mash. At the end of the mash, the grain bag is lifted out of the kettle and allowed to drain. There should be a full 7 gal. (27 L) of wort at the target gravity in the kettle. There are no sparging or recirculation steps. The grain is thrown away and the boil can commence. This method creates a turbid (i.e., cloudy) wort that nevertheless usually produces a clear beer.
Notes when using BIAB for the Oatis A. Brown recipe:
- • BIAB has higher yield than batch sparging, so the pale ale malt quantity will be reduced from 8.5 lb. (3.86 kg) to 8 lb. (3.63 kg).
- • Do not grind the grist extra fine. Use a standard crush, it will drain easier.
- • The water-to-grist ratio is higher with BIAB, so the strike temperature of the infusion water is lower compared to that for typical water-to-grist ratios used in the MLT method.
Starting the Mash
1. Put the Grist in the Bag
Crush the grain and put it in your grain bag. The bag should be large enough that the grain is not compacted, but can move loosely within the bag during the mash. The grain should be loose enough to stir.

Figure 20.11. The kettle is filled with 7.75 gallons (29.5 L) of water, and the grain bag is ready to be immersed.
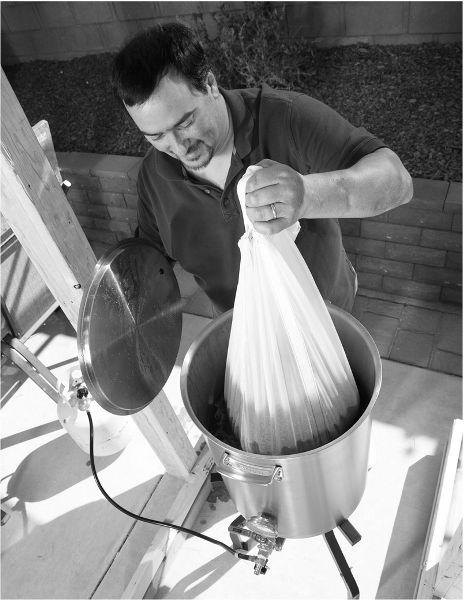
Figure 20.12. Immersing the grain bag when the water reaches strike temperature.

Figure 20.13. Checking the temperature of the BIAB mash.
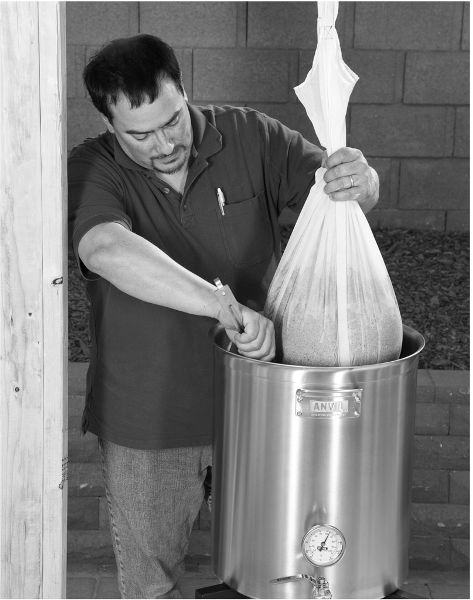
Figure 20.14. The bag is lifted while the burner is on to avoid scorching or melting the bag while I raise the mash temperature a few degrees.
2. Heat the Brewing Water
Heat up enough water to conduct the mash. Use the BIAB efficiency tables in chapter 19 (tables 19.7 and 19.8) to help you determine how much water to use to yield your target OG. For this recipe, with an OG of 1.052, we will be using 31 qt. (7.75 gal.) for a grain weight of 10.85 lb., or 29.5 L for 4.9 kg of grain (fig. 20.11). The water-to-grist weight ratio is about six (i.e., R ≈ 6). From the dry grain infusion calculations we discussed in chapter 17, we can work out what the strike temperature should be:
Tw = [(S / R) × (T2 − T1)] + T2
This calculation gives us:

Obviously, this temperature of 157.6°F (69.7°C) can be rounded up to 158°F (70°C).
Note on brewing salts: If you are going to add brewing salts to the water, this would be the time to do it. Remember that calcium sulfate actually dissolves better in cold water. You could also add brewing salts to the mash instead. See chapter 22 for more information on adjusting your brewing water for a recipe.
3. Immerse the Grain Bag
When the water reaches the strike temperature, which is 158°F (70°C) in this instance, turn off the burner and immerse the grain bag (fig. 20.12). It helps to stir both inside and outside the bag to make sure the grain is fully wetted.
4. Check the Temperature
Check the temperature once the grain is wetted (fig. 20.13). The mash temperature should be about 152°F (67°C). Anywhere between 150–155°F (66–68°C) is fine. Stir to make sure the temperature is uniform, and then cover the mash with a lid to help retain the heat. If it is cold outside, you may want to wrap the kettle with a heavy blanket or sleeping bag.
Monitoring the Mash
5. Heat as Needed
Check the temperature of the mash about every 15 min. If the temperature falls below 140°F (60°C), then you will need to turn on the burner for a few minutes to warm it up. Raise the bag a few inches off the bottom of the kettle while heating (fig. 20.14). Stir, or bob the bag up and down, to distribute the heat while heating. Turn off the burner after a couple of minutes and check the temperature again. Stir the mash thoroughly to make sure the temperature is uniform.
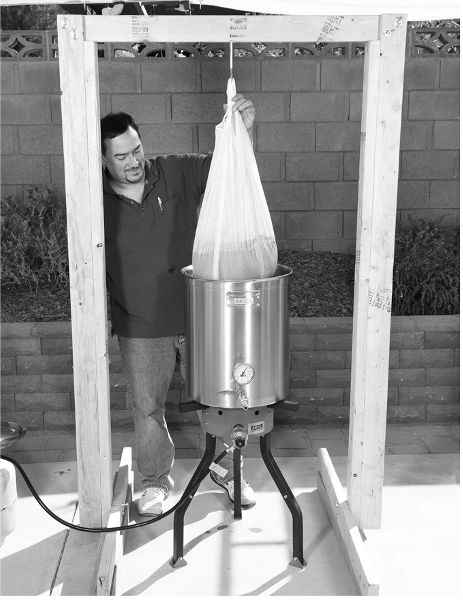
Figure 20.15. I built a simple wooden frame with a hook to hold the bag for draining, and obtained my full boil volume of 7 gallons (27 L) without squeezing it.
Lautering—BIAB-style
6. Drain the Grain Bag
The mash will take 60 minutes total. At the end of the hour, lift the grain bag out of the kettle and let it drain into the kettle (fig. 20.15). The weight of the grain in the bag will squeeze out more wort than you get from batch sparging in the MLT method. You should have 7 gal. (27 L) of 1.043 wort in the kettle.
Note on squeezing: I do not recommend manually squeezing the bag to get out every drop; the weights and volumes for the recipe have been calculated without it, and my personal experiments with roasted grains have demonstrated harsh flavors when the bag is squeezed.
7. Done!
Discard the grain (not the bag!) and start the boil as usual. The BIAB method is essentially a no-sparge process. Today’s highly modified malts with high diastatic power seem to have no problem with the BIAB method. It’s simple, and there is less to clean up at the end of the day.