17
The Methods of Mashing
In chapters 15 and 16 you learned about the biochemistry of malting and mashing. In this chapter we will discuss how to physically manipulate the mash to create desired characters in the wort and the beer. There are two basic schemes for mashing: a single temperature mash, which is a compromise temperature for all the mash enzymes; and a multi-rest mash, where two or more temperatures are used to favor different enzyme groups. There are two basic ways of heating the mash as well, by the addition of hot water (infusion) or by heating the mash tun directly. These two heating methods can also be combined into a third method, called decoction mashing. In decoction mashing, part of the mash itself is heated on the stove and added back (infused) to the main mash to raise the temperature.
All of these mashing schemes are designed to achieve saccharification (conversion of starches to fermentable sugars). However, the method used to achieve that goal can have a considerable influence on the overall wort character. Some malts, adjuncts, and beer styles need a particular mash procedure to arrive at the right wort for the style. First, let’s take a look at the entire grain brewing process.
Overview of the Grain Brewing Process
The grain brewing process is quite simple:
- Step 1. Heat water.
- Step 2. Crush the grain.
- Step 3. Soak the crushed grain in the hot water for an hour. (Mashing.)
- Step 4. Drain the wort from the grain. (Lautering.)
- Step 5. Rinse the grain to extract more wort. (Sparging.)
- Step 6. Boil the wort and ferment as usual.
The hot water in step 1 is usually heated in the hot liquor tank (HLT). Traditionally, each step has its own vessel, or tun. The mash would be conducted in a mash tun, then transferred to a lauter tun for lautering and sparging, and then the wort is boiled in the boil kettle. If you combined the mash and lauter tun into a single vessel, as homebrewers most often do, and use gravity instead of a pump to get the hot water into the mash tun and the wort into the boil kettle, then you have the common three-vessel, gravity-fed system used by most homebrewers all over the world (fig. 17.1). The vessels can be large stockpots (i.e., kettles), or two pots and an insulated cooler, or one pot and two coolers. There are many ways to accomplish these basic steps.

Figure 17.1. A conceptualized diagram from ancient Egypt of a three-tier, gravity-fed system.
A relatively recent method that only uses a single vessel for mashing and lautering is “brew-in-a-bag” (BIAB), sometimes pronounced “bob.” In BIAB, the boil kettle is large, typically 15 gal. for a 5 gal. batch (57 L for a 19 L batch), and is used to heat all of the water for the brew, as in, the combined volumes of the mash and sparge water. The grist is put into a large mesh bag and submerged in the pot and left there for an hour. The result is a water-to-grist ratio that is double that of a traditional mash, but it still works. Additionally, the mash is not sparged—the bag is simply hoisted and drained at the end of the mash, leaving the entire boil volume of wort in the kettle. This method will be discussed further in chapters 19 and 20.
The grain brewing process as a whole is not very complicated; after all, we have been doing it for thousands of years. There are a few details, however, that warrant due consideration when you start looking closely at the individual steps. Fortunately, we invented writing thousands of years ago to help us remember them.
And God said, “Let there be beer.” And there was beer, and God looked down upon the beer and saw that it was good. And God said, “You probably should write this down…” (According to John’s Book, chap. 17, para. 7)
The mashing method you use will depend in large part on the malts that you are mashing. Nowadays, base malts are manufactured to convert quickly and easily in the mash, because time is money to large industrial breweries. The more easily these brewers can convert and extract the sugars, the more wort they can make each day. The result is that for the last 50 years malt modification and diastatic power has been increasing, and today’s base malts can convert quickly and easily with a single temperature infusion mash in about 30 min. This is good for industrial brewers of pale lager using a high proportion (~30%) of unmalted adjuncts, like corn and rice. However, many of today’s craft brewers, brewing all-malt beers, decry the high modification and high diastatic power, because it makes the malts convert too fast and restricts the brewers’ options to manage wort fermentability and body.
The most commonly used indicator of malt modification is the soluble-to-total protein (S/T) ratio, also known as the Kolbach Index. The S/T ratio for a malt describes how well the endosperm has been opened up to expose the starches to the amylase enzymes. To recap from chapter 15, a ratio of 36%–40% is a moderately modified malt, 40%–44% is a well-modified malt, and 44%–48% is a highly modified malt. Historically, malts of a couple hundred years ago had S/T ratios between 30% and 35%, and would be rated as less-modified malt by today’s standards. These historical malts usually needed a protein rest to finish breaking down the endosperm, and they definitely needed a multi-rest or decoction mash to improve the yield. Today’s well-modified and highly modified malts usually don’t need a protein rest or multi-rest and decoction mashes for efficient conversion and high yield, but we may use these techniques for other reasons, as you will see.
You can’t really judge a chocolate cake only by its sugar-to-fat ratio, and the same goes for S/T ratio with regards to modification. However, the malt modification and diastatic power numbers tell you a lot about how a specific batch of malt will respond to a specific mash scheme. For example, using a multi-rest decoction mash on a highly modified malt is most likely a waste of time and could result in the degradation and loss of beer characters, such as foam and body, but a single temperature decoction mash done correctly, solely for melanoidin development, would produce desired flavors that other methods cannot.
Therefore, plan your mashes accordingly; look at the base malt’s S/T ratio, the F/C difference, and other information to determine which mashing process is best for your ingredients and intended beer style. Chapters 15 and 16 discuss malt modification and temperature rests in more detail.

Figure 17.2. Mashing in the kitchen. The grist is added to the cooler (1) and infused with the strike water from the hot liquor tank (2) to bring the mash temperature to the desired rest temperature. Additional hot water can be added to raise the temperature to a second rest, if desired. During the mash, sparge water is heated in the hot liquor tank (2). After mashing, the first runnings are drained to the boiling pot (3) and the mash is sparged for the second runnings. The full wort (3) is then placed on the stove and boiled with the hops.
Single Temperature Infusion
A single temperature infusion mash is the simplest method, and does the job for most beer styles (table 17.1). All of the crushed malt is mixed (infused) with hot water (the “strike water”) to achieve a mash temperature in the range 150–155°F (65–68°C). The strike water temperature can be adjusted to hit either the low end or the high end of the mash temperature range, depending on the style of beer being made. The strike water temperature also varies with the water-to-grist ratio being used for the mash, but in general the strike water temperature should be 10–15°F (5–8°C) above the target mash temperature. The equation for calculating the temperature is listed below in the section, “Infusion Calculations.” The mash should be held at the saccharification temperature for 30–60 min., hopefully cooling no more than a couple of degrees. The goal is to maintain a steady temperature in the range 150–155°F (65–68°C).
The best way to maintain a steady mash temperature is to use an ice chest or picnic cooler as the mash tun. This is the method I recommend throughout this book, but you can also use a kettle.
Generally, I recommend a water-to-grist ratio of 1.25–2 qt./lb. (2.5–4 L/kg), and a strike water temperature of 160–165°F (71–74°C). It may help to start out at the low end of the water-to-grist ratio in case you undershoot or overshoot the target temperature. If at first you don’t succeed, you can add more hot (or cold) water according to the infusion calculations to adjust the temperature. It is always a good idea to heat more water than you think you’ll need in case your mash temperature comes out lower than expected. Pre-heating the mash tun with hot water will also help you achieve your predicted temperatures more consistently.
Table 17.1—Suggested Single Temperature Infusion Mash Schedules
| Schedule description | Temperature | Time (min.) | Comments |
|---|---|---|---|
|
High fermentability / best yield |
149°F (65°C) |
30–60 |
Highest yield and fermentability, but least body of the three options. |
|
Medium fermentability |
153°F (67°C) |
30–45 |
Good yield, good fermentability, and good body. The most common mash temperature for most styles. |
|
More dextrinous |
158°F (70°C) |
30 |
Still very good yield, but more body and lower fermentability. Good for brewing low-alcohol light ales, or rich, heavy-bodied beers. |
Multi-Rest Mashing
A multi-rest mash requires you to add heat to raise the temperature of the mash to the various temperature rests. There are three basic ways of doing it: direct heat, infusion, or decoction. If you are using your boiling kettle as a mash tun, you can heat it directly using the stove or a stand-alone burner. Infusion is the addition of hot water (typically near boiling) to raise the mash temperature by a few degrees. Decoction is similar, except that instead of adding additional water to the mash, a portion of the mash (typically 20%–40%) is removed from the tun and brought to a boil, and the decocted mash is added back to the main mash to raise the temperature. These methods will be discussed more later on in this chapter.
Heating the Mash
Direct heating is the simplest method. The first temperature rest is usually achieved by infusion using the single temperature mash method described below. The subsequent rest(s) are achieved by carefully adding heat using the stove and with constant stirring to heat the mash uniformly. After the conversion, the mash is carefully poured or ladled from the mash tun into the lauter tun and lautered. If the mash tun has a false bottom, it can be lautered directly without transfer.
Note: A good way to prevent hot spots and scorching with enamelware and thin stainless steel pots is to use a “flame tamer” under the pot. A flame tamer is an ⅛" (3 mm) thick aluminum or copper plate that spreads the heat more uniformly across the bottom of the pot due to its high heat conductivity.
If you are using a picnic cooler or ice chest for your mash tun, multi-rest infusion mashes are a bit trickier. You need to start out with a stiff mash (e.g., 0.75–1.0 qt./lb., or 1.5–2.0 L/kg) to leave yourself enough room in the mash tun for the additional infusions of hot water. Usually, only two additional temperature rests (after the initial rest) are possible with this method, because each addition adds more water and increases the total mass that needs to be heated to the next rest. Reaching a third rest is possible if the change in temperature is only a couple of degrees, but by that time the mash tun may be pretty full. For example, raising the mash temperature for 8.0 lb. (3.6 kg) of grain from 150°F to 158°F (66°C to 70°C) at a water-to-grist ratio of 2 qt./lb. (4 L/kg) would require approximately 2.7 qt. (2.5 L) of boiling water.
Choosing a Multi-Rest Mash Schedule
From chapter 16, “How the Mash Works,” we know that several types of enzymes are at work, liquefying the mash and gelatinizing the starches in the endosperm. Varying the times spent at the beta-amylase rest, 140°F (60°C), and alpha-amylase rest, 158°F (70°C), allows you to adjust the fermentable sugar profile (see figs. 16.2, 16.3, and 16.4). For example, a 20 min. rest at 140°F (60°C) combined with a 40 min. rest at 158 °F (70°C) produces a sweeter, more dextrinous beer, while switching the times at those temperatures would produce a drier, more attenuated beer from the same grain bill. You can also change the rest temperatures to change the profiles. For example, you could rest at 145°F (63°C) and 155°F (68°C) to improve gelatinization and beta-amylase activity to make a more attenuable wort more quickly than the previous schedule.
If you use a moderately modified malt (e.g., S/T ratio 37%) a multi-rest mash with a protein rest will produce a better yield than a single temperature mash. One recommended schedule is a 122°F, 145°F, 158°F mash (50°C, 63°C, and 70°C mash) with half hour rests at each temperature. The length of the protein rest can be adjusted depending on the degree of modification. This schedule is often used for brewing continental lager beers from moderately modified malts.
A useful multi-rest schedule for brewing Bavarian wheat beers is the 104°F, 145°F, 158°F (40°C, 63°C, 70°C) mash, using a half hour rest at each temperature. This mash schedule produces high yields and good fermentability. The time at 104°F (40°C) serves as a ferulic acid rest to enhance the phenolic character in this style. You can include a protein rest in the schedule at 122°F (50°C) if you want to thin the body of the beer or are including unmalted wheat in the grain bill.
The schedules mentioned above and in table 17.2 are intended as guidelines; almost any combination of time and temperature will produce wort, so don’t freak out if you miss a rest by a few degrees. It’s OK if the mash cools by a couple of degrees during the rest. If it cools more than 10°F (5°C) that may be more of a problem, but wort will still happen. Don’t obsess over minutiae. Play with the times and temperatures and have fun.
Table 17.2—Suggested Multi-Rest Mash Temperatures and Times
| Schedule description | Temperatures | Time (min.) | Comments |
|---|---|---|---|
|
Traditional with max. fermentability |
140°F (60°C) 158°F (70°C) |
15–30 15–30 |
The beta-amylase rest temperature is at the lowest end of the range, giving the longest enzyme life, but a large proportion of the malt starches are not fully soluble until 149°F (65°C). |
|
Max. fermentability with highest yield |
145°F (63°C) 158°F (70°C) |
15–30 15–30 |
These temperatures will convert highly modified malts more quickly than the 140°F (60°C) traditional rest. |
|
Protein rest plus beta- and alpha-amylase rests |
122°F (50°C) 145°F (63°C) 158°F (70°C) |
15–20 15–30 15–30 |
Generally, today’s malts only a require a short protein rest for maximum extract. Protein rests are more common when brewing with unmalted wheat or a high proportion of adjuncts. |
|
Protein rest plus beta-glucanase rest or ferulic acid rest |
104°F (40°C) 122°F (50°C) 145°F (63°C) 158°F (70°C) |
10–20 10–20 15–30 15–30 |
This schedule is similar to the previous, but includes the 104°F (40°C) rest, which can be used to break down beta-glucans in flaked oats, wheat or rye, or it can be used to create more ferulic acid in a wheat mash to enhance the clove character of Bavarian wheat beers. |
Infusion Calculations
Infusions are calculated based on thermal mass, in other words, how much the temperature of water mass “A” will affect the temperature of water mass “B.” You cannot use volume because the density of water (and therefore the volume) varies with temperature. However, once we have solved the infusion equation for the weight of the infusion, we can convert that weight to volume by dividing the result by the density of water at that temperature range, which is 2.055 lbs./qt. (0.985 kg/L). (See the sidebar on R for explanation.)
Table 17.3—Weight to Weight Water-to-Grist Ratio (R) Values Derived from Typical Volume to Weight Water-to-Grist Ratio (RV) Valuesa
| For Rv in qt./lb. | R (lb./lb.) | For Rv in L/kg | R in (kg/kg) |
|---|---|---|---|
|
1.00 |
2.06 |
2.00 |
1.97 |
|
1.50 |
3.08 |
3.00 |
2.96 |
|
2.00 |
4.11 |
4.00 |
3.94 |
|
2.50 |
5.14 |
5.00 |
4.93 |
|
3.00 |
6.17 |
6.00 |
5.91 |
|
3.50 |
7.19 |
7.00 |
6.90 |
|
4.00 |
8.22 |
8.00 |
7.88 |
|
4.50 |
9.25 |
9.00 |
8.87 |
|
5.00 |
10.28 |
10.00 |
9.85 |
a R = Rv × ρ, where ρ is 0.985 kg/L (2.055 lb./qt.)
The calculations assume that no heat will be lost to the surroundings (which is not true), but we can minimize this error by pre-heating the tun (such as a picnic cooler or ice chest) with some boiling hot water before adding the grist and mash water. If you are mashing using the boil kettle as the mash tun, and heating the water in the kettle directly, then these considerations don’t apply.
To pre-heat the mash tun, pour a gallon or two (4–8 L) of boiling water into your tun and swirl it around. Let the tun sit for a few minutes with the lid on, and then dump it and replace the lid. Preheating the tun just before you add your grist and strike water will help the infusion heat to go into the grist rather than the tun, and your infusion estimates will be more accurate.
The subsequent infusions also assume no heat is lost to the tun, and my experiments have shown that if I calculate the infusion for about 1.5°F (1°C) higher than my actual target, then I will hit my target with the calculated amount. I was using a 10 gal. cylindrical beverage cooler. Your equipment will have its own offset.
The calculation for first infusion of the dry grain only depends on your initial grain temperature, the target mash temperature, and the weight to weight ratio (R) of water to grist (see sidebar and table 17.3). The amount of grain in the calculation is taken into account by the ratio, R. The typical water-to-grist ratio for single infusion mashing is 1.5 qt./lb. (i.e., roughly 3 L/kg). On brew day, you most likely won’t be very precise and will be measuring your infusions by eyeballing the pitcher to the nearest half quart or liter anyway. Always err on the side of caution and heat a little more water than you think you will actually need, just in case. Creating a mash is not rocket science or neurosurgery and being within one or two degrees of your target temperature is really close enough, but I wanted to explain it correctly first, and then let you make up your own mind on how precise you want to be.
Dry Grain Infusion Calculations
The equations for calculating the temperature and volume of the strike water are:
Strike water temperature, Tw = [(S/R) × (T2 − T1)] + T2
Strike water volume, Vw = (G × R)/ρ , or Vw = G × Rv
where:
T1 = temperature of dry grain.
T2 = target temperature of mash.
G = grist weight (mass).
ρ = density of water, 2.055 lb./qt. or 0.985 kg/L.
R = the weight per weight ratio of water to grist. See sidebar, “R, the Weight to Weight Water-to-Grist Ratio,” for explanation.
Rv = the volume per weight ratio of water to grist. Hence, Rv × ρ = R.
S = the heat capacity of grain relative to water, which is 0.4 (i.e., 40%), regardless of unit system.
Single Infusion Example
Before we begin, it is important to understand that the two common Rv values used in the example, 1.5 qt./lb. and 3 L/kg, are similar but not equal. A mash ratio of 1.5 qt./lb. more precisely equals 3.13 L/kg; similarly, 3 L/kg equals 1.44 qt./lb. Therefore, the water volumes that will be calculated from the following example will not be equal—similar, but not equal.
We will assume that the dry grain is at room temperature, i.e., 70°F (21°C). We are going to mash 10 lb. (4.54 kg) of grain at a target temperature of 153°F (67°C). A reminder: you may want to add one or two degrees to the target temperature to account for heat lost to the tun, but I will not include it for these examples.
1. First, calculate the infusion volume (Vw) from the grist weight and the water-to-grist ratio, Rv, and then calculate the actual R value (see sidebar that discusses R.)
therefore,
R (for pounds) = 1.5 × 2.055 = 3.08
and
R (for kilograms) = 3 × 0.985 = 2.96
2. Using the single infusion equation, the strike water temperature (Tw) is:

Wet Grain Infusion Calculations
Weight of water, Wm = G(S + R) × [(T2 − T1)/(Tw − T2)]
and
Volume of water, Wv = Wm/ρ
where:
R = weight ratio of water to grain currently in the mash. When you perform multiple infusions, the value of R changes after each infusion and needs to be recalculated before calculating the next infusion volume.
Wm = weight of hot water added (in pounds or kilograms).
Wv = volume of hot water added (in quarts or liters).
ρ = density of water (2.055 lbs/qt. or 0.985 kg/L).
G = weight of grain in the mash (in pounds or kilograms).
T1 = initial temperature (°F or °C) of the mash.
T2 = target temperature (°F or °C) of the mash.
Tw = actual temperature (°F or °C) of the infusion water.
A reminder: You may want to add a degree or two to the target temperature (T2) to account for heat that will be lost to the tun. Also, the infusion water does not have to be boiling, brewers often use the sparge water at 170°F (77°C). In that case, Tw becomes 170°F and more water (Wv) will be needed to make up the additional heat.
Multiple Rest Infusion Example
This example will use three rests. We are going to mash 10 lb. (4.54 kg) of grain at an initial volume ratio (Rv) of 1 qt./lb., through a 122°F, 149°F, 158°F (50°C, 65°C, 70°C) multi-rest mash schedule. For the purposes of this example, we will assume that the temperature of the dry grain is 70°F (21 °C). The first infusion will need to take the temperature of the mash from 70°F to 122°F (21°C to 50°C). Remember, you may want to add one or two degrees to these targets to account for heat lost to the tun, but I will not do that for these examples.
1. We will start with an initial water-to-grist ratio (Rv) of 1 qt./lb., which equates to R of 2.06 (see R sidebar and table 17.3). This means that we will use about 10 qt., or about 9.5 L, for the volume of the initial infusion. Note that R, which is weight-to-weight, is unitless and does not need to be converted when switching to liters and kilograms.
Vw = (G × R) /ρ = (10 × 2.06) /2.055 = 10 qt.
Vw = (G × R) /ρ = (4.54 × 2.06) /0.985 = 9.5 L
Using the single infusion equation, the strike water temperature is:

2. For this example, we will assume our mash has not lost any heat during the rest and is still at 122°F (50°C). In reality, you should measure the temperature and use that value as T1 in the next equation. Our mash currently contains 10 qt. (9.5 L) at a water-to-grist ratio (R) of 2.06. We need to use the mash infusion equation for the second infusion to raise the temperature to 149°F. We will assume that our boiling hot water for the infusions has cooled somewhat to 205°F (96°C).
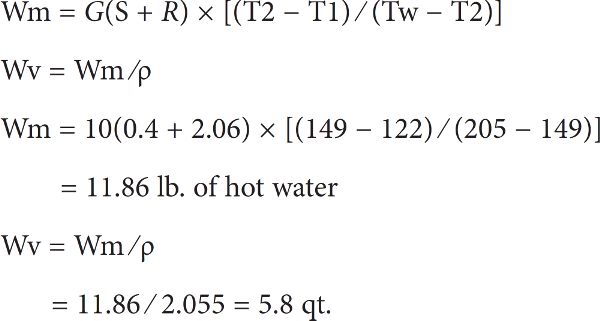
For metric:

3. For the third infusion, the total water volume is now 10 + 5.8 = 15.8 qt. We need to recalculate R. The current mash temperature is 149°F (65°C), and the target is 158°F (70°C). The temperature of the infusion water is still 205°F (96°C).
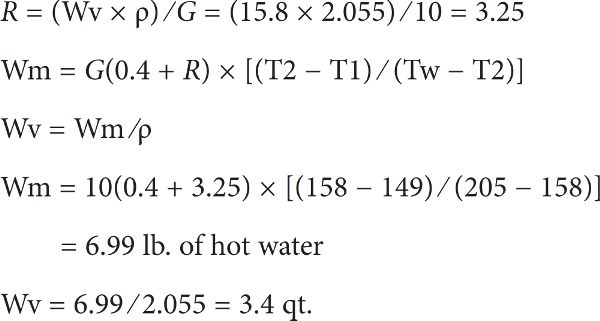
For metric:

The total volume of water required to perform this schedule is:
10 + 5.8 + 3.4 = 19.2 qt., or 4.8 gal.
Remembering that the weight of grain is 10 lb., the final water volume-to-grain ratio has increased to 1.92 qt./lb. (i.e., 19.2 /10).
The final weight-to-weight mash ratio is:
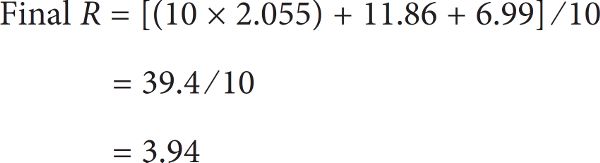
Note to liters, kilograms, and degrees celsius natives: If you had been conducting this mash from the beginning using the same amount of grain (4.54 kg) but using liters, your nominal Rv would have been 2 L/kg and your R (weight-to-weight) would have been 1.97 (table 17.3). Your R for the second infusion would have been 3.11, and the final R would have been 3.79. These differences demonstrate that while 1 qt./lb. is very similar to 2 L/kg, they are not exactly the same.
Decoction Mashing
Equipment needed:
- • picnic cooler mash tun
- • 4-gallon (15–16 L) heavy stockpot
- • 1-quart (1 L) Pyrex glass measuring cup
- • thermometer
Decoction mashing was developed to get the best extraction from the old-time northern European barley strains that depended on overwintering to germinate, and were more difficult to malt and modify. Decoction mashing provided for better breakdown and solubilization of the starches and better extraction from those less-modified malts. Beer connoisseurs claim better malt flavor and aroma from decoction mashing of those malts.
These days less-modified malts are hard to find, but decoction mashing is still useful for extracting that extra bit of malt character for German weissbier, bocks, and Oktoberfest style lagers. In addition, decoction mashing tends to increase the hot break and clarity of the wort. The pH of decoction mashes has been shown to be 0.10–0.15 pH units lower than the same recipe wort from an infusion mash, most likely due to Maillard reaction acidification.
Decoction mashing is a good way to conduct multi-step mashes without adding additional water or applying heat to the mash tun. It involves removing a portion of the mash to another pot, heating it to the conversion rest on the stove, then boiling it, and returning it to the mash to raise the rest of the mash to the next temperature rest. The portion removed should have a water-to-grist ratio between 1 and 1.25 qt/lb., or 2 to 2.5 L/kg. One way to tell if it is too dry is to watch how it backfills as you stir—it should backfill immediately, there shouldn’t be any delay and stirring should never uncover the bottom of the pot.
Decoction mashing is not some mysterious, arcane lore passed from master to apprentice for hundreds of years. Well, all right it was, but the reason that decoction works is that you are simply boiling the grist to solubilize stubborn starches and create malty flavors while leaving most of the wort with the enzymes behind in the mash tun. The number one question new decocters ask is, “How much grist do I decoct?” It helps to realize that this question was not relevant to the old time brewers using under-modified malt. Those brewers intended to boil all of it to get the best yield, and that is why a traditional triple decoction regimen used one third of the grist for each step. They added the hot decoction back to the mash tun bit by bit until they reached their next temperature rest, and then pulled the next one. They knew that with a nominal water-to-grist ratio of about 2 qt/lb., or 4 L/kg, decocting one-third of the volume would raise the mash temperature about 10°C (18°F). It’s easy to see how a 50°C, 60°C, 70°C mash progression became standard practice for old-time lagers.
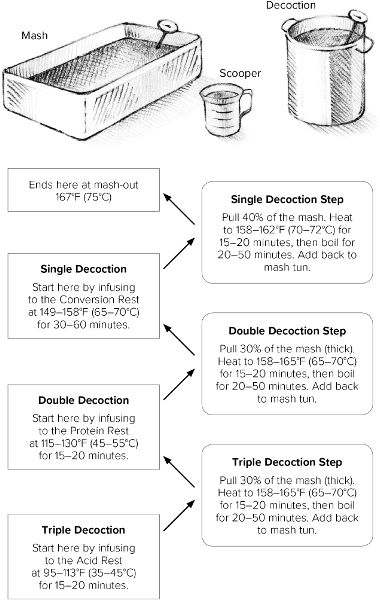
Figure 17.3. Use this diagram to help you plan your decoction mash. For example, if you are going to do a Zweimaischverfahren, start at the Double Decoction box and infuse your mash with hot water to achieve a protein rest or the beta-amylase rest, depending on the beer. Next, pull your first decoction according to the decoction step description, and add it back to your mash to achieve the conversion rest. Then pull your second decoction according to its description to achieve mash-out. Use the measuring cup or a saucepan to transfer the decoctions. You can use the decoction calculations presented on the next pages or just wing it and watch your thermometer.
Today, using well-modified malts, we don’t need to boil all of the grist and can get by with one or two smaller decoctions. The easiest way to do it is use the old rule of thumb of scooping one-third of the mash from the bottom of the tun (this will have a thicker water-to-grist ratio.) Alternatively, you can calculate a more precise volume using the equations below. Either way, simply dip out the grist into another pot and heat it to conversion temperature, about 158°F (70°C), where starch conversion happens quickly. Heat it quickly but gently and stir to avoid hot spots. Hold the decoction mash at conversion temperature for 15 min. and then heat it to boiling. Allow the mash to boil for 10–30 min. to develop the appropriate color and flavor; shorter boils for pale beers, longer for dark beers. Add most, but not all, of the decoction back to the mash while stirring. Mix thoroughly and then check the temperature. Add the remainder if you are low. If you have achieved your target temperature and there is some decoction left over, simply wait for it to cool to your target temperature before adding it back in.
You can use a decoction to move to any temperature rest you want, but it has traditionally been used to move the main mash from mash-in to the phytase/beta-glucanase/ferulic acid rest at 95–113°F (35–45°C), the protein rest at 113–131°F (45–55°C), the conversion rest at 149–158°F (65–70°C), or to mash-out at 167°F (75°C). The three-step decoction process is called Dreimaischverfahren. As lager malts became more modified, the dough-in stage was dropped, and the main mash was initially infused to the protein rest temperature. The two-step decoction for taking the mash from protein rest to conversion rest, and then to mash-out, is called Zweimaischverfahren (see fig. 17.3). A double decoction can also be used for transitioning between the beta- and alpha-amylase rests. You would infuse to the beta-amylase rest (20–30 min.) and then decoct to achieve the alpha-amylase rest and mash-out.
The single decoction mash is usually done from conversion temperature to mash-out. According to Greg Noonan, author of Seven Barrel Brewery Brewers’ Handbook, the important thing when brewing for extra malt character is not the number of decoctions, but the time spent boiling one of the decoctions to develop the Maillard reactions and flavors. He recommends boiling for 20 to 45 minutes. What this says to me is that you can use triple decoctions with less-modified malts, double decoction with moderately modified malts, and single decoctions with well-modified malts, to achieve the same degree of extract and (hopefully) the same sorts of malt flavors simply by adjusting the boiling time of the main decoction. See figure 17.3 for a diagram of the decoction process and keep your thermometer handy.
For recipes and more insight on when to use decoction mashing, I encourage you to read books such as New Brewing Lager Beer by Greg Noonan and some of the Classic Beer Styles Series books by Darryl Richman, Eric Warner, and George Fix.
Decoction Calculations
The key difference with decoction mashing is in the way heat is added to the system. With infusion mashing, hot water is always being added to the system. Decoction differs in that a volume of mash is removed from the tun, heated to boiling on the stove, and returned to the tun to raise the mash to the next temperature rest.
In essence, the amount of heat needed raise the temperature of the main mash, minus the decoction, has to equal the amount of decoction multiplied by its heat. The equation for estimating the volume of the decoction to pull and add back to the mash (Vd) is given by:

where,
Vd = volume of the decoction
Td = temperature of the decoction
T2 = target temperature of the next rest
T1 = current temperature of the mash
Note that this equation calculates the volume of the decoction and not the weight. Thermodynamically, weight is the proper factor, but this equation calculates a conservative estimate that provides slightly more decoction to work with than if we had calculated a precise amount based on the relative water-to-grist ratios of the mash and weight of the decoction. The big unknown in the equation is the total volume of the mash, which can be measured or calculated using the grain weight and the water volume-to-grist ratio (Rv):
Vm = G × (Rv + 0.38) for pounds and quarts
Vm = G × (Rv + 0.8) for kilograms and liters
where,
Vm = total volume (quarts or liters)
G = dry weight of grain (pounds or kilograms)
Rv = water-to-grain ratio of the mash (qt./lb. or L/kg)
Adjunct Mashing Procedure
I wanted to open this section with the Monty Python line: “And now for something completely different…” But that’s wrong. Adjunct mashing is actually something completely the same, being just a combination of some of the methods we have already discussed. To brew with starch adjuncts, you need to hydrolyze and gelatinize the starches so the amylase enzymes can break them into fermentable sugars. Accessibility is the key. You can gelatinize the starches just by boiling them, but you can do it more effectively by using a combination of enzymes and heat.
What about flaked adjuncts, like corn (maize) and oats? Aren’t they already pre-gelatinized? Yes, to a degree. Gelatinization is not an all-or-nothing state, it’s more like cooking. Actually, it is cooking; the starches can be partially, mostly, or fully gelatinized depending on how long they were cooked. Instant oats are more gelatinized than old-fashioned rolled oats. Also, just because an adjunct is flaked and pre-gelatinized does not mean that it is fully accessible to the mash enzymes. It helps to grind or break up the rolled flakes too, especially the big flakes like barley, oats, rye, and wheat.
Rice and corn contain very little beta-glucan and protein. There is no need to do a beta-glucanase rest when mashing these grains. Unmalted barley has a lot of beta-glucan, as does unmalted rye, oats, and wheat, and a beta-glucanase rest is necessary for good lauterability. If you are using the malted form of these grains you don’t need a beta-glucanase rest, but you may want to include a protein rest. A protein rest at 120–130°F (50–55°C) is a good idea to break up the relatively high levels of high-molecular-weight proteins these malts contribute, if you are using more than 20% in your grain bill.
Lastly, you may want to include rice hulls in the mash to help with lautering. The husk of malted barley constitutes about 5% of the weight, so if you are using a lot of wheat (which has no husk) or rye (which is really sticky) in your brew, you would want to add at least 5% of its weight in rice hulls to make up for it. Rice hulls are very helpful with wheat beers, rye beers, and high-adjunct beers, such as American lager. Corn and rice don’t have the beta-glucan that makes lautering difficult, but the high proportion of no-hull adjuncts will affect the lauterability all the same. I had a Classic American Pilsner recipe turn into porridge; it couldn’t be lautered and was finally dumped. Using rice hulls the next time took care of the problem. I have not needed rice hulls for oatmeal stouts.
Conducting a Cereal Mash
To conduct a cereal adjunct mash, I recommend that you use a heavy stockpot that can hold at least 4 gal. (15 L).
Step 1.
If the adjunct is not flaked, then grind it a few times in your roller mill or use small coffee grinder, or a hammer, but you need to break it down for the best results.
Step 2.
Combine your cereal grist with about 25% by weight of base malt, and infuse it at a mash ratio of 2 qt./lb. (4 L/kg) to the first temperature rest. Barley, oats, rye, and wheat should be started at 113°F (45°C) for a combined beta-glucanase and protein rest (you can cover all your bases that way.) You can start corn and rice at the beta-amylase rest of 145°F (63°C). Try not to exceed a 3:1 ratio of adjunct to malt to avoid diluting the enzymes too much.
Step 3.
Hold the mash at the beta-glucanase rest for about 15 min., and then heat it slowly, stirring constantly to get to the conversion rest. Barley, wheat, oats, and rye can be fully converted at 155–158°F (68–70°C). Corn and rice will need higher temperatures to assure gelatinization, 165–172°F (74–78°C), but the barley enzymes will convert any starch pre-gelatinized from rolling or flaking.
Step 4.
Next, bring the mash to a gentle boil for about 10–15 min. to fully gelatinize all the starch. There should be few, if any, crunchy bits left.
Step 5.
The main mash can be infused and waiting at whatever temperature rest is appropriate for your recipe. You can use this hot starch soup as a decoction for your main mash to reach the next rest temperature, or wait for it to cool to the saccharification temperature if you are doing a single rest mash. Keep in mind that you may need a short protein rest for your main mash to generate more FAN if you are using a high proportion of low-protein adjunct.
Step 6.
You can conduct further decoctions as necessary to finish the mash and then add rice hulls as necessary to help lautering. Good Brewing!
Summary
There you have it: the two or three methods of mashing, and the calculations to take out the guesswork. Most brewers keep it simple and use a single rest infusion, which is the easiest method for producing all-grain wort. Decoction mashing used to be regarded as the hallowed domain of expert all-grain brewers, but it really is just another tool that any homebrewer can use to gain an extra malty edge on a pale wort. The most common homebrewing mash schedule consists of a water-to-grain ratio of 1.5 qt./lb. (3 L/kg), and holding the mash between 150°F and 155°F (65–68°C) for 1 hour. Probably 90% of the beer styles in the world today can be produced with this method.