Reflexology as a science is a very powerful tool. The practitioner’s role becomes that of a guide to healing, enlightening the patient to control their own healing process. It is preferable that an indisposed body eliminates toxins that may have arisen as quickly as possible, otherwise these will only add to the body’s burden causing further ill-health. Stress is a major cause of many of the problems of today, often impeding a person’s mental health and physical well-being. Reflexology shows the patient a natural, non-invasive, holistic pathway to better health. As a treatment it is a totally holistic therapy, embracing many varied concepts that have been formed over many years of practical experience. As reflexologists our main approach should be to use simple safe techniques to return the equilibrium to the body, counteracting any imbalance, the main emphasis being the removal of any stress-related symptom that may arise. By totally relaxing the patient, reflexology becomes an effective potent therapy and many disorders are alleviated. Treatment brings about greater metabolic harmony, encouraging a better blood circulation, with increased vitality. The holistic practitioner treats the person and looks at symptoms as an expression of imbalance within the body. Reflexology has the effect of stimulating the body’s own natural healing energy, harmonizing and balancing the life force in order to achieve an improved state.
Reflexology treatment works on similar principles to those of acupuncture and acupressure. These are based on the fact that, by stimulating the skin at a specific minute area of the hands, feet or ears, there is an effect on a specific internal organ in another part of the body. The correct stimulation will give prolonged or even complete relief of symptoms without burdening the body with drugs. The theory is if the stimulation is continually repeated over a period of time then many pathological conditions disappear. It does not matter what modality is used to achieve alleviation of discomfort, but pressure and palpation from a professional practitioner using the most potent and precise techniques bring about rapid results. Water pressure on specific points will help to ease a tender point, after which palpation can be applied. Warming the reflex point, or the use of herbs or essential oils applied directly on the reflex point, will also help to stimulate the corresponding organ; these are an added benefit, but they should only be applied if you are qualified to do so.
As holistic practitioners the attitude of reflexologists to their patients encompasses the whole person. Health is the result of harmony between the body, mind and spirit. It is necessary always to take into consideration the physical, psychological and any social pressures that the patient may have. Reflexology can also be used as a preventative treatment to forestall ill-health; this is shown when reflex points are often tender prior to disorders manifesting in the body.
A treatment session begins with assessment of the patient; this can embrace foot, hand or ear analysis. Patients should be properly prepared, and the therapist should have a knowledge of support techniques, protective hold procedures, relaxation techniques and cross reflexes as well as the correct treatment according to the area chosen to work on. This treatment session should last 45–50 minutes if the correct procedures are followed, and it is necessary to be aware of reactions that may occur both during and between treatments. This chapter details the general principles of treatment. Specific treatments relating to the foot, hand and head in turn are dealt with in chapters 5 to 7 respectively.
Correct preparation of the client is necessary before commencement of treatment. The therapist should be aware also of the need to set up a suitable environment in which to carry out a treatment to obtain its optimum benefit. A suitable treatment couch or chair is essential, and a suitable area to work in. Some other points include:
• Always use a support cushion behind the client’s head
• Have all utensils to hand, such as cotton wool buds to apply direct pressure on points of the ear
• Have some wipes to clean hands
• Have clean towels ready
• Use a piece of tissue roll under the head to avoid changing pillows
• Have talcum powder ready in case it is needed (although use of this should be minimal)
• Make sure your nails are short and well trimmed
• Use a hair band if the client has long hair
• Remove patient’s earrings, if worn, when applying auricular pressure
• Finally ensure your posture is correct as you stand or sit behind your patient when working on the head areas.
Positioning the patient correctly is also important to enhance the effects of the treatment. Patients find it easier to relax if they have cushions supporting them. There should also be available a covering for them. Clothing should be loosened.
Prior to commencing treatment, many clients will need a preliminary relaxation massage. This is necessary when the patient needs to unwind; such techniques make the muscles and ligaments less stiff or tight and improve circulation generally.
Practitioners should also be aware of the variety of support holds available that enable treatment to be carried out to its optimum benefit.
Some of the many relaxation techniques used are outlined below. Many of these may be classed as massage to the foot or hand as they involve rubbing and kneading. These preliminary techniques will improve the circulation of blood to the area and relax the tight, tense muscles of the hand or foot. Also the more calloused areas may need to be softened prior to treatment, and the correct application will enhance any treatment process. These relaxation techniques can also be used at any time and on either or both feet throughout the treatment session as they often treat a larger area by relaxing the reflexes. However, reflexology itself is not a massage; it is an alternating pressure therapy, a very precise technique applied to minute areas, using fingers or thumbs or knuckles; rotation or palpation on certain points is used as well as firm unmoving pressure (the reflexology Taw of nerves’ is that pressure relieves pain).
It is imperative that the initial contact with the foot or hand is very gentle. The first approach sets the whole tone of the treatment session. The relaxation techniques described below can be used on either the foot or the hand but for brevity the holds will generally be described only for the foot. (See chapter 5 for details of foot anatomy, and chapter 6 for the hand anatomy and sequence.)
1 Holding. First hold each foot or hand with both thumbs on the solar plexus point. (See figure 4.13.)
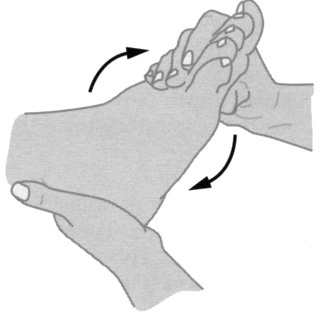
2 Ankle rotation (figure 4.1). Gently rotate the ankle, supporting with one hand under the heel and the other supporting and comforting the great toe joint. Rotate in both directions several times. The thumb of the upper supporting hand should be pointing slightly towards the little toe.
3 Side or spinal friction (figure 4.2). This is done on both sides to warm the limbs and improve the energy throughout the body, relieving stress or any tension immediately, before starting the gentle stretching exercise. Both palms are used, one on the medial (inside) side of the foot and one on the lateral (outside) side. Slide your hands up and down the surface alternately.

Figure 4.1 Ankle rotation: rotate in an inward direction
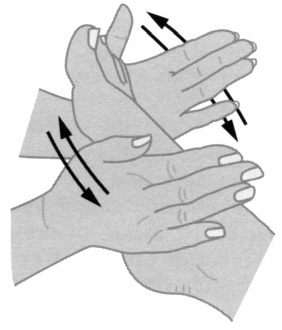
Figure 4.2 Spinal friction or side friction

Figure 4.3 (a) Front view of side to side relaxation. (b) Side to side relaxation, showing how light pressure is applied.
4 Side to side relaxation (figure 4.3). This uses the same hand positions as the previous movement, but here the foot is moved alternately backwards and forwards, applying light finger pressure. This loosens the upper part of the body, and relieves stiff tight shoulders and the respiratory tract, thus facilitating the breathing process.
5 Achilles tendon stretch. This is done using the same support hold as ankle rotation (see figure 4.1). The whole foot is stretched gently backwards and forwards. This relaxes the calf muscles. Because the Achilles tendon inserts into the heel this movement will have an effect on the wrists, ankles, pelvic areas and the hips. It also helps to relax the arches of the foot. Be careful not to overstretch this at first, as it is often very tight, or even sore or swollen. Do only gentle stretches at first, increasing the force very gradually. Change support hands when working on the other foot.
6 Toe stretching and rotation. Gently stretch and rotate each toe both ways. Then rotate all toes together, while supporting the ball of the foot. This aids the neck and shoulder girdle. Note that stretching the toes or fingers, or rotating them, should be done gently. It is imperative to be aware of arthritic joints, so that you do not hurt the patient or cause further damage to a joint. This technique should only be completed if there are no contraindications (see chapter 3).
7 Diaphragm relaxation. (See figure 5.12.) This facilitates the breathing process. Placing the thumb of the working hand on the ball of the foot at the medial edge, apply gentle but firm pressure. At the same time using the correct hold with the other hand to support the upper part of the foot like a crutch, lift it slightly and lightly flex the plantar (under) surface.
8 Metatarsal kneading (figure 4.4). Using a fist with the knuckles in line with the base of the toes on the plantar area and the index finger of the support hand in line with the base of the toes on the dorsal (upper) aspect, push and squeeze alternately. This relaxes the shoulder girdle, as well as aiding the lung and chest area. The working hand should be the hand forming the fist: the right hand to the right foot, the left hand to the left foot. Always work from the lateral edge.
9 Foot moulding (figure 4.5). Both palms working together, place one on the dorsal aspect and one on the plantar aspect. Working from the lateral side only, as this ensures that there is not too much pressure applied to the great toe joint, mould the foot in a rolling action as if you were rolling dough in your hands. This relaxes all the rib cage area, lungs and chest and the shoulders.
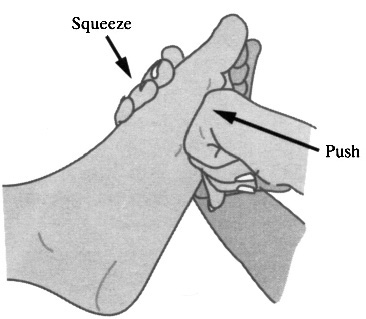
Figure 4.4 Metatarsal kneading (side view)
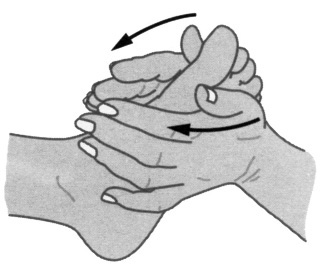
Figure 4.5 Foot moulding
10 Rib cage technique (figure 4.6). The thumbs are placed on the plantar surface of the ball of the foot. Now tuck up the first three fingers of each hand and use them in an alternating movement, working horizontally so that they almost meet on the centre line of the top of the foot. Be careful not to pinch the last little bit of skin. This will stimulate the lungs, chest area and shoulder girdle. Repeat this several times starting from the base of the toes and working down to the waist line.
11 Abdominal walking. Using the same hold as for the rib cage technique, finger walk with one, two or three fingers, whichever you find most comfortable, in slight diagonal lines across the dorsal aspect of the foot. This relaxes the abdominal wall, as it stimulates the musculature of the abdomen, the pelvis and the low lumbar area.
12 Working down the dorsum (figure 4.7). This relaxes the whole torso and the chest muscles, so is good for chest complaints. Using three fingers, with the fist supporting the plantar surface, work down to the waist area from the toes.
13 Ankle loosening (figure 4.8). Place the thenar eminence (the padded muscle at the base of the thumb) in the depression of the heel area and move the foot from side to side. This should not be painful, so do not apply pressure on the ankle bone, or shake the foot from side to side. (The ankle is a hinge joint; the sideways movement comes from the interaction of the navicular with the second and third cuneiform bones.)

Figure 4.6 Rib cage technique
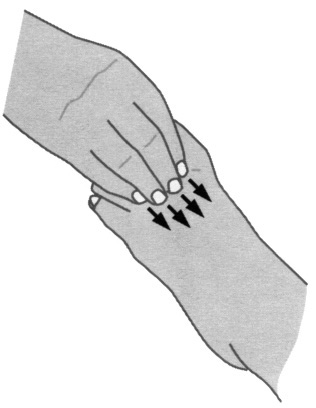
Figure 4.7 Working down the dorsum
14 Uterus or prostate sedation (figure 4.9). Firm unmoving pressure is applied to the heel point (see plate 2) with one hand as the other rotates down (always in an inward direction). This helps to sedate the point and alleviate pain; it is very potent for chronic problems.
15 Ovary or testes sedation. This is as 14; these two reflexes can also be worked together, using the thumb on the lateral reflex point and middle finger on the medial reflex (figure 4.9). Rotate the foot both ways so that pressure is exerted on both reflex points.
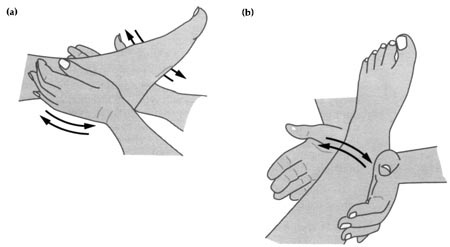
Figure 4.8 Ankle loosening: (a) side view; (b) relaxing the ankles

Figure 4.9 Pressure on the uterus/prostate and ovary/testes
16 Over clasp of fallopian and vas deferens areas and lymphatics of groin. Utilizing the web of one hand in a firm unmoving pressure on these points (see plate 2), again rotate the foot with the other hand in an inward direction.
17 ‘Hacking’ of the toes and foot. Rhythmically apply a sideways light and brisk stroke up and down the plantar aspect of the foot. It is imperative that you use the fingers (not the heel of your hand) on the ulnar side.
Note. Any rings should be removed prior to striking the foot.
18 Knuckling the foot (figure 4.10). Using a loose two-finger knuckle (index and second finger) sweep down the foot in vertical strips. If the knuckles are used when working a reflex, always use the medial edge of the index finger in a circular movement, and this gives light friction to the area. (This can also be used when massaging at the end of the session.) When knuckling the groin area (figure 4.10b), make rotational movement around both malleoli. This works the lymphatics and pelvic region.
19 Circular friction on the Achilles tendon. Knuckles or thumbs can be used here.
20 Sweeping strokes. These can be applied over the whole foot rhythmically. This helps the blood flow to increase, and to generally disperse any excess fluid, reducing swelling and oedema.

Figure 4.10 (a) Knuckling up and down the spine. (b) Knuckling on the groin area.
21 Pummelling. Using a closed fist and the heel of your hand, strike the heel area several times. The aim is to soften the solid firm tissue.
22 Metatarsal flexing (figure 4.11). Both thumbs are placed on the diaphragm area of the ball of the foot (see plate 2); the fingers lie on the dorsum. Lift and stretch the toes in a rising and falling movement (like a wave). Both hands apply the pressure. (This can also be used in massage techniques.)
23 Solar plexus rotation (figure 4.12). Cross the hands, and with the thumbs on the solar plexus reflex rotate the thumbs in an inward direction three times. (This is easier to do after you have applied a little cream and have massaged the lower leg and foot at the end of the treatment.)

Figure 4.11 Metatarsal flexing
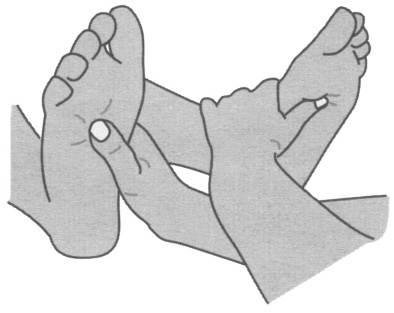
Figure 4.12 Solar plexus rotation
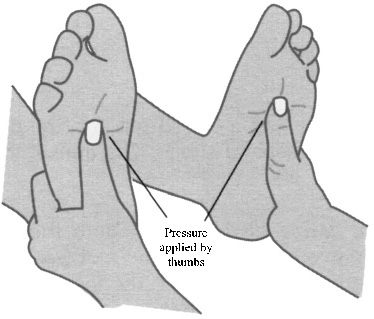
Figure 4.13 Solar plexus relaxation
24 Solar plexus relaxation (figure 4.13). Both thumbs are placed on the solar plexus reflex of the feet. Firm unmoving pressure is applied as the patient takes a breath, and the pressure is relaxed as he or she breathes out. Repeat this three times.
These relaxation techniques can be used in any order and can be repeated whenever necessary.
Self-help tip. By gently pulling your own fingers, stretching them and rotating them helps all areas of the body, especially a stiff neck or shoulder area.
It is necessary to provide optimum comfort both for the client and for the practitioner. Different techniques are used depending on the area being worked upon.
If you are working above the waist line area on the plantar surface (on the foot this is the distal area) hold it from above in a comforting firm hold (figure 4.14). Make sure you are applying light pressure with your thumb on the ball of the foot; your fingers encircle the foot. Lightly plantar flex the foot so that the ligament line is not exposed, which would cause discomfort; this allows the skin to relax rather than be taut, allowing deeper penetration without any undue discomfort when applying pressure.
If working on the area below the waist on the plantar surface (on the foot this is the proximal) support is again important as the correct hold (figure 4.15) allows the heel to rest in the palm of the supporting hand. If the thumb rests on the fifth metatarsal notch it allows you to control the foot so that it does not splay out to the lateral side. As you change support hands, place your thumb on the navicular or the medial cuneiform bone to hold the foot straight. This acts as a guide for the waist line.
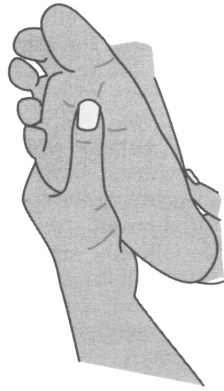
Figure 4.14 Support when working the medial side of the foot and above the waist line
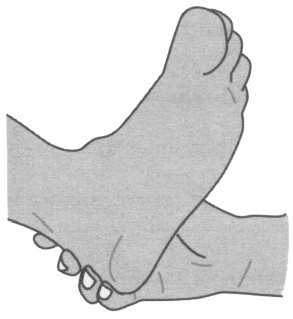
Figure 4.15 Support hold when working below the waist line
When working on the medial or lateral edge of the heel area, keep the foot as straight as possible. This permits the area to be worked without creasing the skin on the heel area, which hinders movement.
When working on the dorsal aspect, it is even more imperative that the correct support procedures are adopted. By making a fist of the support hand you can then rotate this; it also provides an anchor. The thumb of the working hand should be placed loosely in between the thumb and forefinger of the supporting hand, thus allowing a pincer action. This method improves the looks of treatment on this area, whilst at the same time giving maximum comfort to the patient. If dorsiflexing the foot or hand always do it gently.
Finally support can be given simply by the flat of the hand, either the dorsal or the palmar surface. By applying slight pressure with your hand you can move the foot into the required position. Alternatively, encircling the foot in a caressing way take the foot out to the required position.
Support for the hands follows a similar pattern. In all cases the principle should be that it allows both the practitioner and the patient to achieve maximum comfort, and also allows direct access to the reflex for the practitioner.
Some points to bear in mind when treating are as follows:
• Do not touch the nail in case of cross infection.
• Use iced flannels in the summer, if the hands and feet are hot and uncomfortable.
• Use warm towels in the winter to wrap the feet in, or to cover the patient.
• Remember to respect body space, move a leg or arm and do not lean on the patient. Do not allow your hair to touch the client’s foot or body.
• The working position of thumbs or fingers should always be towards the direction in which you are moving.
• If working in vertical lines towards the distal point you need to drop your wrist and work upwards, pressing on the metatarsals and between the metatarsals.
• If applying vertical strips on the dorsal aspect, the arm should be elevated accordingly so that you can work in vertical strips downwards, with the correct support behind.
• If making horizontal or diagonal passes on the plantar surface, again sufficient elevation of the arm is needed as this ensures that the correct working position is maintained, safeguarding against repetitive strain injury.
• The arms should also always follow the movement of the thumb or fingers to safeguard against RSI.
• Before treating, practise working on any area, by placing your hands flat with the fingers outstretched, then elevating the palm thumb side. After this loosening up, you are now ready to commence treatment using the alternating press-release thumb movement.
Some books show awkward moves that may encourage injury over a period of time. Work on any area or surface to practise thumb or finger walking. It takes quite a period of time to build up the muscles of the hand and forearm. Always imagine you are working on a pin cushion; making tiny steps makes certain that you have not missed a tiny section out. If the steps are too large then it is possible not to contact the congested reflex area.
Note. If it is uncomfortable to work in any way, then discontinue immediately, and find another angle to work.
Force should always come from the shoulder area and the position of the working hand should allow this to be carried out in the most simplified way. This is why new practitioners are encouraged to use a gas-lift therapist chair, which is ergonomic in design; it is completely adjustable with a five-star double castor base. This enables the practitioner to work more effectively as they are mobile. Unless the reflexologist is free to change position, many of the reflexology moves are not carried out correctly as the hands are put under too much strain.
The treatment couches are also designed so that the practitioner is seated at the correct height with the feet or hands at chest level, and with their feet under the treatment couch (this has no cross struts that catch the legs). The aim is also to position the client so that the head is more or less on the same level as their heart. If the legs are too elevated, as is the case with a 40-minute treatment session in some of the reclining chairs, the action of gravity allows too much blood to flow to the brain, and a U-shaped chair may divert blood flow and create congestion in the pathways of the abdominal organs.
Self-help tip. Hand exercises can be performed before treating to make your hands more supple, and to strengthen them generally. (See chapter 6 for some of these.)
‘Back-up’ or cross reflexes are used when it is unwise to pursue a normal treatment on the primary area because of an injured limb. It is important to know which reflex should be worked in order to aid a specific problem. Reflexes are used as an addition to treatment on the primary areas. Such points are related to the primary areas for a particular organ by an anatomical or physiological connection.
The body works as a complete unit at all times. So whenever there is any congestion or tension in any part of a zone this will often travel throughout the zone, and will affect any organ gland or function within it. Such congestion often travels up or down one side of the body. The Chinese empirically observed how one part of the body can affect another, and how each area or limb of the body is related with a corresponding part. Such connections are therefore part of any TCM technique such as acupuncture. With such connected areas if either is out of balance it may affect the other, but it also becomes an area of referral if one of the areas is too painful to work on. The corresponding area in the same zonal pathway would be less painful to use but equally effective. It may also be the distal point on the meridians. According to the TCM theory of treatment, it is often considered more suitable to work the distal point, the furthest point away from the problem. For instance, B-60, which is on the outer ankle, is suitable for back, neck and shoulder problems; it is also ideal for wrists and shoulders as the cross reflex point. This is also evident with ST-41, which is on the front of the ankle, is used extensively for all joints, mainly the ankles, but again is a cross reflex point that can be used for wrists. There are a number of such areas complementing each other, and in each case you can work on one to act on the other.
The specific connections are as follows (see also figure 2.7):
• The shoulders and hips correspond.
• The palms and soles correspond.
• The hands and feet correspond.
• The fingers and toes correspond.
• The wrists and ankles correspond.
• The forearms and forelegs correspond.
• The knees and elbows correspond.
• The upper arms and thighs correspond.
These areas are often referred to as cross reflex or referral areas, and sometimes as areas of assistance or back-up reflexes.
These correspondences relate to the ten equal longitudinal lines running the length of the body, between the tips of the fingers to the head and to the tips of the toes, or vice versa.
During treatment, it is important to know how to understand and interpret painful points and how they may show that they are areas of dysfunction. These may relate to a number of factors, including incorrect behaviour patterns, medication or food, or stress (see chapter 3).
An understanding of each individual client’s needs for treatment is also necessary. These include the correct amount of time, the right pressures and how to adapt them accordingly, use of specific relaxation techniques. With regard to pressure, the practitioner should be able to decide how much pressure should be applied to the detoxifying and eliminating reflexes, specifically when the areas for the liver and the kidneys are tender.
These are many different responses that may arise during a treatment. Some of these changes can at times be so subtle that some people are generally unaware of them, so you need to be observant. It is extremely rare, however, for a person to have an adverse reaction to treatment. Reactions may include:
• Sweating of palms of hands or soles of feet (often a release of tension)
• Coughing
• Laughing (release of emotions)
• Crying (release of emotions)
• Sighing deeply (release of emotions)
• Twitching or tingling in the limbs (normal reaction to nerve stimulation)
• Sudden cramp (normal reaction to nerve stimulation)
• Electric-type shock up the zone and sometimes in the opposite area being worked on, and sometimes also on the opposite side of the body (normal reaction to nerve stimulation)
• Warmth in the corresponding area being treated (normal reaction to nerve stimulation)
• Feeling of movement or clawing in the corresponding area being treated (normal reaction to nerve stimulation)
• Great fatigue (natural outcome of treatment)
• Overwhelming desire to sleep, or just close the eyes (natural outcome of treatment)
• Disappearance of all pain and discomfort (this may only last a day but as each treatment session progresses the timespan between the return of the discomfort lengthens).
The responses that may arise as a result of treatment can again sometimes be so subtle that some people are generally unaware of them. Therefore when evaluating each treatment session it helps if the patient is asked to give a report of any slight fluctuation in the body. Many of these signs are positive signs that the treatment process is working, and are all part of the healing process. This is not the same as a healing crisis, as many books state, but a natural outcome of treatment.
• Symptoms may be slightly exacerbated for 24 hours (this indicates the treatment is working)
• General aches and pains the following day after treatment
• Skin rashes
• Spots or pimples
• Great fatigue for approximately 48 hours
• Flu-like symptoms
• Increased wind or flatulence
• More ease and frequency of bowel movement
• In women, menstrual blood becomes more red, and usually more profuse
• Much better moods
• Improved sleeping patterns
• More energy
• Joints appear more mobile
• In the case of respiratory tract infections, mucopurulent (yellow or greenish) sputum becomes clear.
Note. We do not know how any person’s body will react or respond to the stimuli of reflexology. The reactions outlined are just a few of the many responses one might expect. A reaction is not a cause for worry; it is a positive sign that the therapy is working. Sometimes these reactions are due to the body not having dealt with the release of toxins from the system; the congested area (a painful or tender reflex) when stimulated reacts by releasing that congestion into the system. Many patients have no adverse reaction, just a steady cessation or withdrawal of symptoms. This is the body’s way of dealing with this input of energy. Out of the many thousands of treatments that I have given, I can count on one hand the reflexology treatments that did not agree with people. Most people respond within approximately three to six treatment sessions in some way. In some cases there may not be a complete cessation of symptoms, but certainly a response is felt and there is measurable relief. This is not a miracle cure; however, many long-term and extremely chronic problems respond over a period of a few weeks. Acute problems, especially those of the musculature and skeletal system, are often instant.
Remember, sick people do not become ill overnight, so people who are on heavy medication or those who have been unwell for a long period of time need to be treated gently and with care, as medication and illness can be debilitating to the body, causing physical changes in the efficiency of the detoxifying and eliminating organs. Drugs (medication) may accumulate in the body because the liver cannot process and break down these substances. If the kidneys are not performing at peak efficiency they in turn cannot eliminate these substances quickly enough and they may re-enter the bloodstream. If there is an accumulation of medication in the tissues the patient may get a marked response as their systems are unable to deal with an additional release of toxins due to the outcome of treatment. The strength of any reaction will be in proportion to the force of the treatment. However, as a speculative comment, in China a course of reflexology treatment is over ten consecutive days, with a wonderful response from most treatments.