
Charred Corn with Grilled Peppers
Butterball Potatoes with Crispy Potato Topping
Potatoes and Ramps Cooked in Ham Fat
Purple Cape Beans and Grilled Greens
Crowder Pea and Hominy Succotash
Pressure-Cooker Sea Island Red Peas
Serves 4 as a side
1½ cups fresh sweet corn kernels (from about 3 ears)
1 cup Vegetable Stock
¼ cup Sour Corn, drained
¼ teaspoon kosher salt
¼ teaspoon freshly ground white pepper
1 tablespoon unsalted butter
goes well with:
Grilled Catfish with Hoppin’ John
Beeliner Snapper with Fried Peppers
Normally when I cook fresh sweet corn, I do it quickly. It takes only a matter of seconds to be perfectly cooked. But this puree is different. Simmering the kernels slowly and gently in some stock brings out a deep, rich, almost soul-food flavor that will keep you coming back. The puree is brightened by the addition of Sour Corn, one of my favorite funky fermented flavors. You could also try this thinned out with more vegetable stock to turn it into a soup; eat it with a nice, hot wedge of cornbread alongside.
Combine the corn and vegetable stock in a small saucepan and bring to a simmer over high heat. Reduce the heat to low and cook until the corn is very soft and the stock has reduced by about half, about 45 minutes. Drain the corn, reserving the cooking liquid.
Combine the cooked corn, sour corn, salt, and white pepper in a blender and blend on high until completely smooth, about 2 minutes. If the puree needs more liquid to blend properly, add some of the reserved cooking liquid 1 teaspoon at a time. Transfer to a small saucepan, stir in the butter, and serve. Or transfer to a container, cool to room temperature, cover, and refrigerate for up to 2 days; reheat before serving.

Serves 4 as a side
2 large sweet potatoes (about 1½ pounds total), scrubbed and patted dry
½ cup Vegetable Stock
½ cup whole milk
1 teaspoon kosher salt
¼ teaspoon freshly ground white pepper
2 tablespoons fresh orange juice
goes well with:
Pork Shoulder Steak with Grilled Mushrooms
Chicken Breasts with Black Pepper and Peanut Butter Gravy
A simple sweet potato baked slowly in the oven gives off the most enticing aroma. The natural sugars transform into a sort of magical sticky glaze that keeps the flesh nice and moist, and when it’s scooped out and simmered with a touch of vegetable stock and milk, it becomes almost decadent. Seasoning the puree with freshly squeezed orange juice makes it pop, elevating that familiar and comforting sweet potato flavor.
Preheat the oven to 375°F.
Place the sweet potatoes in a baking dish and bake for about 1 hour and 15 minutes, until completely tender. Let cool completely.
Cut the sweet potatoes lengthwise in half, scoop out the flesh, and roughly chop it (discard the skins). Combine the flesh, vegetable stock, and milk in a medium saucepan and bring to a simmer over medium heat, stirring occasionally to prevent scorching. Simmer, stirring occasionally, until the liquid has reduced by about half, about 15 minutes.
Transfer the mixture to a blender, add the salt and white pepper, and blend on high until completely smooth, about 2 minutes. Blend in the orange juice and serve. Or transfer to a container, cool to room temperature, cover, and refrigerate for up to 2 days; reheat before serving.

Serves 6 as a side
Kosher salt
2 pounds Yukon Gold potatoes, scrubbed
⅓ cup whole milk
½ pound (2 sticks) unsalted butter, diced
¾ teaspoon freshly ground white pepper
8 ounces ramps, cleaned, dried, hairy root ends removed, and thinly sliced
goes well with:
Strip Steak with Worcestershire
Spring Lamb with Rhubarb Butter
The perfect potato puree is an ethereal thing. It should melt in your mouth, leaving behind that wonderful, buttery potato flavor. There are a couple of things that will help you achieve that perfection time and again. First, don’t let your potatoes come to a rolling boil. You want them to cook at just a little bit above a simmer, no more. And don’t let them cool before you puree them and add the milk and butter. If they cool too much, they won’t blend well and will turn waxy and starchy. This potato puree is great on its own, but it reaches new heights of deliciousness when you add an intense fresh ramp puree. I do that every spring when ramps first make their way into my kitchen.
Put the potatoes in a large pot of salted water and bring just to a boil over high heat. Reduce the heat to medium-high and boil gently until a fork inserted in a potato meets no resistance, about 35 minutes.
While the potatoes are cooking, heat the milk and butter in a small saucepan over low heat until the butter melts; set aside.
Drain the potatoes, return them to the pot, and cover with a kitchen towel. Then, using another towel to hold the potatoes and avoid being burned, peel them one at a time. Roughly chop the peeled potatoes and, working in batches if necessary, process them in a food processor, slowly adding the melted butter and milk, just until completely smooth, about 2 minutes. Be careful not to overprocess, or the potatoes will get gummy.
Transfer the potato puree to a medium saucepan, stir in 1 tablespoon salt and ½ teaspoon of the white pepper, cover, and set aside.
Bring a large pot of salted water to a boil over high heat. Make an ice bath with equal parts ice and water in a large bowl. Place the ramps in a large fine-mesh sieve and submerge them in the boiling water just until the whites are tender and the green parts are a vibrant green color, about 1 minute. Leaving them in the sieve, transfer the ramps to the ice bath and submerge until completely cool.
Drain the ramps, reserving about ¼ cup of the ice water. Transfer the ramps to a blender and blend on high until very smooth, about 1 minute. If the puree needs more liquid to blend properly, add some of the reserved ice water 1 teaspoon at a time. Blend in ½ teaspoon salt and the remaining ¼ teaspoon white pepper. Strain the puree through a fine-mesh sieve. (The puree can be made ahead. Tightly covered, it will keep for up to 2 days in the refrigerator.)
Add the ramp puree to the potato puree and reheat over medium heat, stirring occasionally. Transfer to a serving bowl and serve.

Serves 4 as a side
2 tablespoons unsalted butter
6 ounces ramps, cleaned, dried, hairy root ends removed, and thinly sliced
1 recipe Ramp Sauerkraut
½ cup heavy cream
2 ounces Asiago cheese, preferably Kenny’s Farmhouse Dry Fork Reserve (see Resources), grated
Pinch of ground nutmeg
Kosher salt and freshly ground white pepper
goes well with:
Grilled Quail with Red-Eye Gravy
I’ve made creamed ramps for years, but it wasn’t until recently that I had the idea to add some funky ramp sauerkraut. It adds a whole other layer of flavor to an already complex and delicious recipe.
Heat the butter in a medium skillet over medium heat until foamy. Add the ramps and cook, stirring constantly, until softened, about 3 minutes. Drain the ramp sauerkraut, add it to the skillet, and stir until warmed through. Add the cream and cook until it has reduced by half, about 3 minutes.
Remove from the stove and add the cheese, stirring until it has completely melted. Season lightly with the nutmeg, salt, and white pepper and serve.
Serves 8 as a side
10 whole green garlic stalks (about 12 ounces)
3 tablespoons unsalted butter
⅓ cup Anson Mills Carolina Gold Rice (see Resources)
Kosher salt
½ teaspoon freshly ground white pepper
goes well with:
Strip Steak with Worcestershire
Grilled Catfish with Barely Cooked Tomatoes
Green garlic season is pretty brief in the South. I always like to treat fleeting ingredients in the simplest ways so I can enjoy their flavor. This puree tastes like a slightly tame cross between garlic and ramps. Catching fresh green garlic at the right time in its growth is essential: It should not have formed a bulb but should resemble a small leek.
When I was first toying around with green garlic puree, it always turned into a lumpy, cottage cheese–like mess. The cellulose in the green garlic does strange things when it’s cooked. I was able to counter it with a classic technique: using rice as an emulsifier.
Separate the white and green parts of the garlic. Wash and dry. Thinly slice the whites and chop the greens, keeping them separate.
Heat the butter in a large saucepan over medium-high heat until foamy. Add the white parts of the garlic and cook, stirring frequently, until soft, about 7 minutes, adding a splash of water if the whites start to stick. Add the rice, stir to coat, and stir until the rice is toasted and starts to smell slightly nutty, about 1 minute. Add ½ cup water and bring to a simmer, then reduce the heat to low, cover, and cook, stirring often, until the garlic and rice are very soft, about 15 minutes. Remove from the stove and cool slightly.
Transfer the garlic mixture to a blender and blend on high until very smooth, about 2 minutes. Blend in 1 teaspoon salt and the white pepper. Strain through a fine-mesh sieve into a small saucepan and set aside.
Bring a large pot of salted water to a boil over high heat. Make an ice bath with equal parts ice and water in a large bowl. Put the green parts of the garlic in a fine-mesh sieve and submerge in the boiling water until tender and a vibrant green color, 1 to 2 minutes. Leaving them in the sieve, transfer to the ice bath and submerge until completely cold.
Remove the greens from the ice bath and transfer to a blender; reserve about ¼ cup of the ice water. Blend the greens on high until very smooth, about 1 minute; if the puree needs more liquid to blend properly, add some of the reserved ice water about 1 teaspoon at a time. Strain through a fine-mesh sieve into the saucepan with the pureed garlic whites and stir together until uniform in color.
Reheat the puree gently over low heat and serve. Or cover and refrigerate for up to 2 days; reheat before serving.
Serves 4 as a side
1 pound sweet onions, sliced ⅛ inch thick
6 tablespoons unsalted butter
1 teaspoon kosher salt
¼ teaspoon freshly ground white pepper
goes well with:
Cured Duck Breasts with Rice Porridge
This recipe takes a little bit of patience, but the result is completely worth it. When sweet onions are cooked with butter over low heat for a long time, they essentially dissolve into their own onion bisque. You don’t want any browning at all to sneak onto the onions, so stir them well and often. These slow-cooked onions are an excellent accompaniment to a nice piece of roasted meat, but I also love to add a little stock or milk to them for a simple but delicious onion soup.
Combine the onions, butter, salt, and white pepper in a medium skillet, spreading the onions in an even layer. Cover the mixture with a cartouche (see box) and cook over low heat, stirring occasionally, until the onions are extremely tender, about 45 minutes.
Serve the onions immediately. Or transfer to a container, cool to room temperature, cover, and refrigerate for up to 3 days; reheat before serving.
A cartouche is a parchment paper lid used to control evaporation during the cooking process. To make one, cut a square of parchment paper slightly larger than the pan you will be using and fold it in half from right to left to make a rectangle, then in half again from bottom to top to make a square. Keeping the folded seam on the bottom, fold the top right corner over to the bottom left corner to form a triangle. Fold the triangle over itself, then fold in the same manner one more time. Hold the point at the center of your pan and cut off the wider end of the paper at a point just inside the pan. Cut a ½-inch piece from the pointed end. Unfold the paper and place it directly over the ingredients you are cooking.

Charred Corn with Grilled Peppers
Serves 4 as a side
Grilled Jalapeño Vinaigrette
2 red jalapeño peppers
2 teaspoons grated lime zest
2½ tablespoons fresh lime juice
½ teaspoon kosher salt
2 tablespoons extra-virgin olive oil
Shishito Peppers
4 ounces shishito peppers (about 8 peppers), cut into ¼-inch-thick rings
Kosher salt and freshly ground black pepper
Charred Corn
2 cups fresh sweet corn kernels (from about 4 ears)
1 tablespoon extra-virgin olive oil
2 teaspoons kosher salt
1 teaspoon freshly ground black pepper
2 teaspoons grated lime zest
2 tablespoons fresh lime juice
2 tablespoons small dice Manchego cheese (about 1 ounce)
2 tablespoons ⅛-inch-thick slices scallion, white part only
8 basil leaves, torn into smaller pieces
Equipment
Round 15-inch open-top fine-mesh wire grill basket
Goes well with:
Arugula or other greens
When summer is at its peak, I like to grill fresh sweet corn over the fire, dress it with a chili-lime vinaigrette, and scatter some diced Manchego cheese and charred shishito peppers over it all.
For the vinaigrette: Prepare a hot fire in a charcoal grill (see Grilling), removing the grill rack and distributing the hot coals in an even layer in the bottom of the grill.
Put the jalapeños in the grill basket and place the basket directly on the coals. Grill the peppers, rotating them with long-handled tongs as they cook to char them evenly on all sides, for about 3 minutes. Transfer to a cutting board and cool to room temperature.
Remove the stems and seeds from the jalapeños, roughly chop them, and transfer to a blender. Add the lime zest, lime juice, and salt and pulse just enough to break up the charred peppers but not puree them. Transfer to a small bowl and stir in the olive oil to make a broken vinaigrette (it will not emulsify). Set aside at room temperature.
For the shishito peppers: Arrange the peppers in the grill basket in an even layer and place the basket directly on the coals. Grill the peppers until they have developed a nice char on the first side, about 30 seconds, then transfer to a bowl, season lightly with salt and black pepper, and cover to keep warm. Clean the grill basket to use for the corn.
For the corn: Put the kernels in a large bowl, add the olive oil, salt, and black pepper, and toss. Transfer the corn to the grill basket and place the basket directly on the coals. Grill the kernels, stirring them with long-handled tongs so they cook evenly, until they have lightly charred and softened, about 1 minute. Transfer the kernels to a medium bowl, add the lime zest and juice, and stir to combine.
To serve: Spoon the vinaigrette into the middle of a serving bowl. Add the charred corn, sprinkle the shishito peppers, cheese, and scallions on top, and garnish with the torn basil leaves.

Serves 4 as a side
20 baby carrots with tops (about 1½ pounds)
¾ cup water, plus more as needed
2 teaspoons sugar
1 teaspoon kosher salt
1 tablespoon citrus vinegar, preferably Jean-Marc Montegottero Calamansi Vinegar (see Resources)
1 tablespoon sunflower oil (seeResources)
3 tablespoons chopped chervil
Equipment
Round 15-inch open-top fine-mesh wire grill basket
Goes Well With:
Cornmeal-Dusted Grouper with Herb Puree
Grilling dense root vegetables like carrots can be challenging. Achieving the perfect balance of doneness and char is almost impossible from raw. So I came up with this method—sort of a high-heat, low-moisture braise—to make it easier to nail the ideal texture. The carrots are essentially cooked al dente before they hit the grill but in a way that adds much more flavor than a simple blanch would. The braise can be done ahead of time so the carrots just need to be grilled, a matter of minutes, when you’re ready to eat.
Remove the tops from the carrots. Pick the 12 nicest-looking tops and reserve in ice water to use as a garnish, if desired. Peel and rinse the carrots.
Arrange half the carrots in a single layer in a large cast-iron skillet. Add ¼ cup plus 2 tablespoons of the water, 1 teaspoon of the sugar, and ½ teaspoon of the salt. Cover the skillet with a cartouche (see box, How to Make a Cartouche) and cook the carrots over medium heat until all the water has evaporated, about 10 minutes. Remove the cartouche and continue to cook the carrots, shaking the skillet frequently and deglazing it with water, adding it 1 tablespoon at a time as necessary, until the carrots are just tender and evenly browned, 8 to 10 minutes. Transfer to a rimmed baking sheet and set aside. Repeat with the remaining carrots, using the remaining ¼ cup plus 2 tablespoons water, 1 teaspoon sugar, and ½ teaspoon salt.
Prepare a hot fire in a charcoal grill (see Grilling), removing the grill rack and distributing the hot coals in an even layer in the bottom of the grill.
Transfer the carrots to the grill basket and place directly on the coals. Grill the carrots, shaking the basket frequently with long-handled tongs to ensure that they cook evenly, until they are lightly charred and hot throughout, about 4 minutes.
Transfer the carrots to a serving bowl, add the vinegar, sunflower oil, and chervil, and toss to coat. Garnish with the reserved carrot tops, if desired, and serve.
Serves 8 as a side
1 medium head green cabbage (about 2 pounds), tough outer leaves discarded, cut into 8 equal wedges
¼ cup cabbage vinegar (see How to Make Vinegar) or apple cider vinegar
1½ teaspoons kosher salt
1 teaspoon freshly ground white pepper
2 tablespoons canola oil
goes well with:
Pork Prime Rib with Mustard Onions
This recipe combines two techniques I’ve always been particularly enamored of: cooking a vegetable as you would a nice piece of meat—in this case, braising the cabbage—and seasoning it with a vinegar made from the vegetable itself.
Remove all but the lower rack from the oven and preheat the oven to 400°F.
Place the cabbage wedges on a rimmed baking sheet and season them with the vinegar, salt, and white pepper. Transfer the wedges to a large Dutch oven or other heavy pot with a lid and arrange them in a single layer on the bottom, or in as close to a single layer as possible. Drizzle with any remaining liquid from the baking sheet and cover the pot.
Place the Dutch oven in the oven and cook the cabbage, basting it with the juices and rotating the pot every 10 minutes or so, for about 30 minutes, until it is just tender and beginning to turn translucent, about 3 minutes.
Remove the Dutch oven from the oven and set aside, covered, to keep the cabbage warm. (The cabbage can be made up to this point ahead. Tightly covered once cooled, it will keep for up to 2 days in the refrigerator.)
Heat the canola oil in a large skillet over medium-high heat. Working in batches if necessary, add the cabbage wedges cut side down and sear until dark brown on the first side, about 3 minutes. Turn onto the other cut side and sear until dark brown on that side, about 2 minutes (if working in batches, retrieve and reserve the juices in the Dutch oven before searing the second batch).
Transfer the cabbage to a serving dish, spoon some of the juices from the Dutch oven over it, and serve.
Serves 6 as a side
Butter for the pan
Kosher salt
1 medium green cabbage (about 2 pounds), tough outer leaves removed, halved lengthwise
¼ cup thinly sliced leek, white part only, washed and dried
¼ cup small dice cooked egg whites (from about 2 boiled eggs)
2 large eggs
1 cup heavy cream
2 teaspoons Asian mushroom seasoning (see Note)
½ teaspoon ground mace
¼ teaspoon freshly ground white pepper
goes well with:
Fried Catfish with Green Tomato Tartar Sauce
I first read about Ladies’ Cabbage in The Unrivaled Cookbook and Housekeeper’s Guide. As you might surmise, the dish was invented to be a more “delicate” vegetable option for ladies. The cabbage is boiled in two changes of water until it is quite tender and the flavor is pretty subtle, then it’s baked in a light custard. It reminds me of Japanese chawanmushi, the steamed savory custard, made with braised vegetables.
Note: Asian mushroom seasoning can be found in your local Asian foods store or from online retailers.
Preheat the oven to 375°F. Butter a 9-by-13-inch baking dish.
Bring a large pot of salted water to a boil over high heat. Add the cabbage, reduce the heat to medium, and simmer for 15 minutes. Drain. Fill the pot with fresh salted water, add the cabbage, and bring to a simmer over high heat, then reduce the heat to medium and simmer until the cabbage is completely tender, about 5 minutes. Drain the cabbage and cool completely.
While the cabbage is cooling, blanch the leeks: Bring a small saucepan of salted water to a boil over high heat. Put the leeks in a small sieve and submerge them in the water until tender, about 1 minute. Drain the leeks, transfer to a plate, spread them out evenly, and cool to room temperature.
Core the cabbage and roughly chop it into pieces no bigger than 1 inch. Combine the cabbage, leeks, and cooked egg whites in a large bowl. Whisk the eggs in a small bowl. Whisk in the cream, mushroom seasoning, mace, 2 teaspoons salt, and the white pepper and add to the cabbage mixture. Stir to combine and transfer the mixture to the prepared baking dish.
Bake the cabbage, uncovered, until bubbling and starting to brown around the edges, about 35 minutes. Remove from the oven and serve. Or cool to room temperature, cover, and refrigerate for up to 1 day; reheat in a 325°F oven for 15 minutes before serving.

Serves 4 as a side
2 tablespoons Rendered Fresh Lard
1 tablespoon Rendered Bacon Fat
½ medium head green cabbage (about 1 pound), tough outer leaves discarded, cored and cut into 1-inch chunks
1½ teaspoons kosher salt
2 teaspoons honey vinegar, preferably Lindera Farms (see Resources)
¼ teaspoon Hot Sauce or Red Clay Original Hot Sauce (seeResources)
1 teaspoon fresh lemon juice
Goes Well With:
Pressure-Cooker Sea Island Red Peas
Potatoes and Ramps Cooked in Ham Fat
Where I’m from, “fried” doesn’t always mean deep-fried, like French fries. Most of the time, in fact, it means skillet-fried. The trick with this recipe is to start with high heat so you caramelize the bottom layer of cabbage while the rest of the cabbage, stacked on top, releases its juices. Don’t cook the cabbage to death; it should still have a little bite. Try this technique with potatoes or turnips too. You won’t be disappointed.
Heat the lard and bacon fat in a large cast-iron skillet over high heat until just starting to smoke. Add one-third of the cabbage, season with ½ teaspoon of the salt, and cook, undisturbed, for about 1 minute to begin to caramelize the cabbage. Stir, add another one-third of the cabbage, season with another ½ teaspoon of the salt, and cook, stirring occasionally, for a minute or so, until the cabbage has decreased slightly in volume. Add the remaining cabbage and ½ teaspoon salt and cook, stirring, for 1 minute. Reduce the heat to medium, cover, and cook until the cabbage is just tender and starting to break down, 4 to 5 minutes.
Remove the cabbage from the stove and stir in the vinegar, hot sauce, and lemon juice. Serve straight from the skillet.
Butterball Potatoes with Crispy Potato Topping
Serves 4 as a side
Crispy Potatoes
2 medium russet potatoes (about 12 ounces total)
Canola oil for deep-frying
Kosher salt and freshly ground white pepper
1 ounce Gruyère-type cheese, preferably Kenny’s Farmhouse Norwood Cheese (see Resources), finely chopped
2 tablespoons finely sliced chives
Butterball Potatoes
1½ cups whole milk
6 tablespoons unsalted butter
2 teaspoons kosher salt, plus more for seasoning
½ teaspoon freshly ground white pepper
1 pound small Butterball potatoes (about ½ inch wide and 2 inches long) or new potatoes (about 1½ inches in diameter), washed and dried
goes well with:
Strip Steak with Worcestershire
Pork Shoulder Steak with Grilled Mushrooms
The technique for cooking these potatoes is the result of a happy accident. I lost track of some potatoes that were on the stove, gently simmering away in milk. The heat was too high, so the milk split into curds and whey, but it didn’t scorch. The potatoes were just sitting there, covered in clumpy curds, when it struck me how delicious all that milk protein would be if it were caramelized. I threw my accidental tubers into a hot skillet to get the outsides beautifully brown, then poured in a little bit of the whey and simmered it until it reduced and caramelized. The results ended up far exceeding the original idea! The flavors kicked into overdrive, and the crispy, fried potato coating I added stuck to the outside of the Butterball potatoes even better.
This recipe is a great example of how messing up doesn’t necessarily mean starting over. Always taste your food, even if it didn’t end up the way you had imagined. Things can almost always be saved or altered, and sometimes you’ll even get a pleasant surprise.
To make a faster, simpler dish, you can omit the crispy potatoes. They’re amazing and worth the effort, but if you don’t have the time, that shouldn’t keep you from trying the Butterball potatoes.
For the crispy potatoes: Fill a large bowl with water and line a baking sheet with paper towels. Peel the russet potatoes and grate on the large holes of a box grater, adding them to the bowl of water as you go. Swirl them around in the water, then change the water several times, until it remains clear. Working in two batches, transfer the potatoes to a kitchen towel and wring out as much of the water as you possibly can. Transfer the potatoes to the prepared baking sheet and fluff them out in one layer.
Fill a deep fryer with canola oil according to the manufacturer’s directions and heat the oil to 300°F. Alternatively, fill a deep heavy pot half full with canola oil and heat the oil over medium heat to 300°F. Line a rimmed baking sheet with paper towels.
Working in two batches, fry the potatoes until golden brown and completely crispy, about 4 minutes. Transfer the potatoes to the prepared baking sheet and season lightly with salt and white pepper. Once they cool to room temperature, transfer the potatoes to an airtight container lined with paper towels. (The crispy potatoes will keep well for up to 2 hours.)
For the Butterball potatoes: Combine the milk, 4 tablespoons of the butter, the salt, and the white pepper in a skillet large enough to hold the potatoes in a single layer and heat over medium-low heat, stirring occasionally, until the butter has melted and the salt has dissolved. Add the Butterball potatoes, cover them with a cartouche (see box, How to Make a Cartouche), and gently cook over medium-low heat until a knife inserted in a potato meets no resistance and the milk has curdled, about 15 minutes. Drain the potatoes, reserving ½ cup of the cooking liquid.
Heat the remaining 2 tablespoons butter in a large skillet over medium-high heat until foamy. Add the potatoes and cook, stirring occasionally, until they start to brown, about 2 minutes. Add the reserved cooking liquid and cook until the liquid has almost evaporated, about 3 minutes. Season liberally with salt. Remove from the stove and cover to keep warm.
to serve: Lightly crush the crispy potatoes until they are just a little larger than bread crumbs and mix with the cheese and chives. Transfer the Butterball potatoes to a warm serving dish and top with the crispy potatoes.
Potatoes and Ramps Cooked in Ham Fat
Serves 4 as a side
1 cup Rendered Ham Fat
1 pound small Butterball potatoes (about ½ inch wide and 2 inches long) or new potatoes (about 1½ inches in diameter), cut into ½-inch-thick slices
8 ounces ramps, cleaned, dried, and hairy root ends removed
1 tablespoon fresh lemon juice
Kosher salt and freshly ground black pepper
¼ cup sliced Pickled Ramps
Goes Well With:
Grilled Trout with Cornbread Puree
Grilled Swordfish with Green Gumbo
After a spring day of ramp hunting with chef David Chang and me, legendary curemaster Allan Benton pulled his car off the road on the creek side and set up a camp kitchen. He pulled out a cast-iron skillet, some of his famous ham and bacon, a sack of potatoes, black walnut brownies, and a plate of cornbread that his wife, Sharon, had sent us out with. Dave and I washed the ramps in the creek while Allan tended the fire. He fried up the ham and bacon, added the potatoes and ramps, covered the skillet, and cooked up some of the best food I’ve ever eaten. Sitting around that creekside campfire, eating the ham and potatoes and ramps with two great friends after a day in the mountains, is an experience I won’t forget. This plate of food is my homage to that meal. Serve this dish in spring, when ramps are in season, and thank Mr. Benton.
Melt the ham fat over medium heat in a deep saucepan just large enough to hold the potatoes in a loose single layer. Add the potatoes (they should be submerged in the fat) and cook until a knife inserted in a potato meets no resistance, about 15 minutes. Remove from the stove and let the potatoes cool in the fat.
Heat a large cast-iron skillet over medium-high heat. Spoon 2 tablespoons of the ham fat from the potatoes into the skillet, add the potatoes in a single layer, and cook until golden brown on the bottom and starting to crisp, about 2 minutes. Turn the potatoes over and cook until the other side is golden brown and starting to crisp, about 2 minutes. Add the fresh ramps to the skillet, cover, and cook until just wilted, 2 to 3 minutes. Uncover, add the lemon juice, and season liberally with salt and pepper.
Transfer to a serving bowl, sprinkle with the pickled ramps, and serve.

Serves 6 as a side
4 cups Vegetable Stock
One 8-ounce smoked ham hock
2 pounds fresh heirloom pole beans, such as greasy, cut-short, half-runner, or Turkey Craw, any strings removed and beans cut into 1-inch pieces
1 tablespoon Rendered Fresh Lard
1 tablespoon kosher salt
1 teaspoon freshly ground black pepper
goes well with:
These beans are braised low and slow with some salty pork until they’re practically falling apart, and by the time they’re ready, the umami flavor is off the charts.
Combine the vegetable stock and ham hock in a large pot and bring to a boil over high heat. Reduce the heat to low and simmer, covered, for 1 hour to develop the flavors.
Add the beans, lard, salt, and pepper to the pot and bring to a simmer. Reduce the heat to low, cover, and cook until the beans are very tender, about 1 hour, adding water if needed to keep the beans covered. Remove from the stove and serve. Or transfer to a container, cool to room temperature, cover, and refrigerate for up to 3 days; reheat before serving.

Serves 4 as a side
½ cup Anson Mills Petit Vert Peas (see Resources), soaked in 1 cup of water in the refrigerator overnight
1½ cups water
¾ teaspoon kosher salt
¼ teaspoon freshly ground black pepper
Goes Well With:
Sheepshead “on the Half Shell” with Tomato Gravy
Petit vert peas are barely the size of a lentil and were originally cultivated in the Lowcountry as an important part of the crop rotation for Carolina Gold rice. Cooking them yields a naturally thickened potlikker and deep, vegetal flavor that make them the ideal accompaniment to grilled seafood.
Drain the peas and rinse thoroughly under cool running water. Combine the peas and the water in a small saucepan and bring to a boil over high heat, stirring frequently to prevent sticking. Reduce the heat to low and simmer until the peas are tender and the cooking liquid has thickened, about 30 minutes. Stir in the salt and pepper, remove from the stove, and cover to keep warm.
Purple Cape Beans and Grilled Greens
Serves 4 as a side
2 teaspoons canola oil
½ sweet onion (about 3 ounces), trimmed and cut in half through the root end (leave the root intact so that the halves hold together)
2½ cups Vegetable Stock
1 tablespoon apple cider vinegar
1 fresh bay leaf
3 thyme sprigs
1 cup Anson Mills Sea Island Purple Cape Beans (see Resources), soaked in water to cover in the refrigerator overnight
Kosher salt
Freshly ground white pepper
4 tablespoons unsalted butter, diced
1 teaspoon fresh lemon juice
1 teaspoon Hot Sauce or Red Clay Original Hot Sauce (see Resources)
6 ounces mixed sturdy greens, such as kale, Swiss chard, and mustard greens
Freshly ground black pepper
Equipment
Round 15-inch open-top fine-mesh wire grill basket
Goes Well With:
Sheepshead “on the Half Shell” with Tomato Gravy
Chicken Breasts with Black Pepper and Peanut Butter Gravy
Glenn Roberts, the heirloom crusader behind Anson Mills, first encountered dried Purple Cape beans in the galley of a shrimp boat he was working on years ago. The Cape bean had traditionally been a staple on the fleet of fishing boats working the waters around Cape Romain, South Carolina, but it had all but disappeared in the first half of the twentieth century. Thanks to Glenn’s efforts and commitment, we get to taste something that could have been gone forever.
NOTE: You’ll need to start this recipe a day ahead of time to soak the beans.
Heat 1 teaspoon of the canola oil in a medium saucepan over medium-high heat until it shimmers. Add the onion halves cut side down and cook, undisturbed, until the bottoms are caramelized to a very dark brown, about 3 minutes. Add the vegetable stock, vinegar, bay leaf, thyme, and beans and bring to a boil. Reduce the heat to low and simmer until the beans are tender, about 1 hour and 15 minutes.
Drain the beans and discard the bay leaf, thyme, and onion. Transfer the beans to a medium saucepan and season lightly with salt and white pepper. Add the butter, lemon juice, and hot sauce and stir to combine. Cover and set aside.
Prepare a hot fire in a charcoal grill (see Grilling), removing the grill rack and distributing the hot coals in an even layer in the bottom of the grill.
Remove the stems and ribs from the greens. Make stacks of the leaves, roll them into cylinders, and cut them into very thin ribbons. Wash the greens in the sink or a large bowl of cold water, changing the water several times, to remove any sand. Drain and dry with paper towels.
Combine the greens and the remaining teaspoon of canola oil in a bowl, season with salt and black pepper, and toss. Transfer the greens to the grill basket and place the basket directly on the coals. Grill the greens, stirring them frequently with long-handled tongs so they cook evenly, until they are wilted and lightly charred, about 2 minutes. Add the grilled greens to the beans, stir to combine, and serve.
I cook greens a different way almost every time, depending on what I’ve found at the market, the time of year, and even whom I’m cooking them for. But at the core of my method is a simple idea: adding as little liquid as possible. It’s all about extracting the natural “potlikker” from whatever greens you’re cooking, whether collards, turnip or mustard greens, or some combination. Success starts with your pot selection: Go for one that is wider than it is tall, like a French-style rondeau, with a tight-fitting lid.
At the base of a good pot of greens is a smoky, meaty, umami-rich ingredient. This could be any number of things, from belly and jowl bacon or a ham hock to something less traditional, like dried shrimp or dried oysters. I set the pot over high heat and add a tablespoon or two of fresh rendered lard, depending on how much (if any) fat is going to render out of whatever umami ingredient I’m using. Then I cook the umami ingredient until its fat has rendered and it is evenly browned and fragrant, stirring frequently to keep it from burning and turning bitter.
At this point, I throw in a julienned large sweet onion and cook, stirring, until the onion just starts to give way and turn translucent. Then it’s time to start adding the greens. I add three or four good handfuls of greens that have been thoroughly washed, stemmed (if the stems are tough), and cut into ribbons about an inch wide. After a quick sprinkling of salt (more for releasing liquid than seasoning), I get in there with my hands (double up on latex gloves to do this, because the pot is hot, and the gloves also make it easier to manipulate the greens; or just use a pair of tongs) and start pushing the greens into the bottom of the pot, kind of smearing them around in the onions and lard, squeezing them to encourage them to give up their flavorful juices. As they wilt slightly, I add another three or four handfuls—mixing, squeezing, pushing—along with another sprinkling of salt, and I repeat the process until I’ve added all the greens.
By now, the greens should have released quite a bit of liquid, and the cooking process becomes more like a braise. If it seems that the greens are being stubborn and there isn’t quite enough liquid to cook them, I add moisture to the pan in the form of beer. You need to be careful here, though. You want to add it only a splash at a time, just enough liquid to encourage a little more steam in the pot, or you run the risk of adding too much liquid and diluting that flavor you’ve worked so hard for.
When all the greens are wilted, I reduce the heat to low, cover the pot, and braise the greens. A tight-fitting lid is really important here. It keeps all that hard-earned natural potlikker in the pot, and the greens cook faster than they would just boiling away uncovered. From this point on, I check the greens every few minutes, making sure I don’t overcook them. How far to take them depends on the greens, the time of year (late-season collards, for example, can be pretty tough), and how they’re going to be served. I prefer greens at the moment when they are just tender, before they lose that vegetal flavor, that vibrancy. When cooked this way, they have a lot more to offer from a nutritional standpoint too.
The last thing to do is a final seasoning, if necessary. Simplicity reigns supreme here. The greens ought to be just salty enough, as I’ve added a little salt with each addition of greens to the pot, but I taste to make sure. Then I finish them off with a little cider vinegar for acidity and hot sauce for bite. With patience, effort, and time, you can cook a pot of greens that captures those natural flavors that too often get diluted or hidden, giving you a dish that warms the body and the soul.

Crowder Pea and Hominy Succotash
Serves 4 as a side
Peas
1 teaspoon canola oil
½ sweet onion (about 3 ounces), trimmed and cut in half through the root end (leave the root intact so that the halves hold together)
2 cups Vegetable Stock
1 tablespoon apple cider vinegar
1 fresh bay leaf
3 thyme sprigs
2 cups fresh or frozen crowder peas (about 1 pound beans in the pod)
Kosher salt and freshly ground white pepper
Succotash
3 tablespoons unsalted butter
½ cup thinly sliced sweet onion
1 teaspoon minced garlic
¼ cup fine dice red bell pepper
¼ cup fine dice yellow bell pepper
2 tablespoons fine dice green bell pepper
½ recipe Hominy
½ cup Vegetable Stock
½ cup heavy cream
Kosher salt and freshly ground white pepper
1 tablespoon fresh lemon juice
½ ounce Asiago cheese, preferably Kenny’s Farmhouse Dry Fork Reserve (see Resources), grated
3 tablespoons Fines Herbes
In the middle of a cold January when you’re craving the flavors of the summer garden, instead of going for the ears of corn grown Lord knows where, make hominy. The best dried corn captures that corn flavor from the field and stores it, ready to be enjoyed in the colder months. Because crowder peas are a summer crop, in the winter you’re more likely to see them frozen than fresh. But when they’re shelled fresh and frozen right out of the field, they keep their intensity of flavor with very little change in texture. You can stockpile crowder peas in the summer months and freeze them to enjoy in the winter.
For the peas: Heat the canola oil in a medium saucepan over medium-high heat until it shimmers. Add the onion halves to the pan cut side down and cook, undisturbed, until the bottoms are caramelized to a very dark brown, about 3 minutes. Add the vegetable stock, vinegar, bay leaf, thyme, and peas and bring to a boil. Reduce the heat to low and simmer until the peas are tender, about 25 minutes.
Drain the peas, reserving ¼ cup of the cooking liquid, and discard the bay leaf, thyme, and onion. Transfer the peas to a medium saucepan and season lightly with salt and white pepper. Add the reserved cooking liquid, cover, and set aside.
For the succotash: Heat the butter in a large skillet over medium-high heat until foamy. Add the onion and garlic and cook, stirring frequently, until the onion is translucent, about 4 minutes. Add the bell peppers and cook, stirring frequently, until they soften, about 5 minutes.
Add the hominy, the crowder peas and their liquid, and the vegetable stock to the skillet and bring to a simmer. Cook, stirring occasionally, until the stock has reduced by half, about 3 minutes. Add the cream and cook, stirring occasionally, until the liquid has reduced by half and slightly thickened, 1 to 2 minutes.
Season the succotash liberally with salt and white pepper and stir in the lemon juice. Fold in the cheese and fines herbes and serve.
Serves 4 as a side
20 small okra pods
1 tablespoon canola oil
Kosher salt and freshly ground black pepper
2 teaspoons fresh lemon juice
2 tablespoons Benne Tahini
Equipment
Round 15-inch open-top fine-mesh wire grill basket
goes well with:
Beeliner Snapper with Fried Peppers
The okra served on my family’s table in Virginia (see recipe opposite) was almost always dredged in cornmeal and fried. I was in my twenties before I tried okra grilled. Okra cooked on a grill doesn’t have that (in)famous slimy texture that is often associated with it, because the high heat and the quick cooking technique don’t draw out as much of that mucilaginous cellulose from the vegetable. Grilled okra needs only a touch of fresh lemon juice and a drizzle of benne tahini to make an easy side dish you can eat all summer long.
Prepare a hot fire in a charcoal grill (see Grilling), removing the grill rack and distributing the hot coals in an even layer in the bottom of the grill.
Combine the okra and canola oil in a small bowl and toss, then season with salt and pepper and toss again. Transfer the okra to the grill basket, place directly on the coals, and grill, stirring occasionally with long-handled tongs, until the okra develops a light char and is just tender, about 2 minutes. Transfer to a large bowl, drizzle with the lemon juice and benne tahini, toss, and serve.

Serves 4 as a side
Canola oil for deep-frying
2 large eggs
1½ pounds small okra pods, caps removed and pods cut into ½-inch-thick pieces
1 cup fine yellow cornmeal, preferably Anson Mills (see Resources)
2 teaspoons kosher salt, plus more for seasoning
½ teaspoon freshly ground black pepper, plus more for seasoning
goes well with:
I learned this technique from chef Joseph Lenn while I was filming The Mind of a Chef. He showed me how his mom makes fried okra. I’d never seen anybody do it this way before—all the ingredients, including the okra, go into one bowl, and you end up with something closer to a cornmeal batter than a breading. The result is a satisfying, crispy cornmeal coating on the outside and fresh, vibrant green okra underneath. The only problem? It’s so good that when the okra comes out of the hot oil, it’s going to be tough to share.

Fill a deep fryer with canola oil according to the manufacturer’s directions and heat the oil to 350°F. Alternatively, fill a large deep cast-iron skillet half full with canola oil and heat the oil over medium heat to 350°F. Preheat the oven to 200°F. Line a rimmed baking sheet with paper towels.
Put the okra in a large bowl, add the eggs, and stir thoroughly to lightly beat the eggs and completely coat the okra. Add the cornmeal, salt, and pepper to the okra mixture and stir to evenly coat the okra.
Working in three batches, fry the okra until the cornmeal coating is crisp and golden brown and the okra is a vibrant green, about 2 minutes. Transfer to the prepared baking sheet and season liberally with salt and pepper. Keep the first batches warm in the oven while you fry the remaining okra.
Transfer the fried okra to a bowl or plate and serve.

Serves 6 as a side, 4 as a main course
Vegetable Base
2 tablespoons canola oil
1¼ cups very finely diced sweet onion
1 cup very finely diced celery
1 cup very finely diced green bell pepper
2 teaspoons minced garlic
1 tablespoon kosher salt
Rice
4 cups water
1 tablespoon kosher salt
¼ teaspoon freshly ground white pepper
1 fresh bay leaf
1¼ cups Anson Mills Carolina Gold Rice (see Resources)
4 tablespoons unsalted butter, diced
Okra
3 tablespoons unsalted butter
1 pound small okra pods, caps removed, pods cut into ½-inch-thick slices
Kosher salt and freshly ground black pepper
1 tablespoon Pepper Vinegar
1½ teaspoons okra seed oil (see Resources)
2 tablespoons Fines Herbes
1 tablespoon Anson Mills Antebellum Benne Seeds (see Resources)
Rumor has it that Limpin’ Susan was Hoppin’ John’s secret girlfriend. Whereas Hoppin’ John is a rich and filling blend of rice and field peas, Limpin’ Susan, rice and okra, is a little more delicate and fresh. I like to make this when the market is full of small, green, tender okra pods. It’s a simple dish that becomes memorable when cooked with care and drizzled with a touch of okra seed oil.
For the vegetable base: Heat the canola oil in a large skillet over medium heat until it shimmers. Add the onion, celery, bell pepper, garlic, and salt and cook, stirring occasionally, until the vegetables are softened, about 6 minutes. Remove from the stove and set aside.
For the rice: Combine the water, salt, white pepper, and bay leaf in a medium saucepan, bring to a boil over medium-high heat, and stir to be sure the salt has dissolved completely. Reduce the heat to medium, add the rice, stir once, and bring to a simmer. Simmer gently, uncovered, stirring occasionally, until the rice is al dente, about 10 minutes. Drain.
Transfer the rice to another medium saucepan, discarding the bay leaf, stir in the butter, and cover to keep warm.
for the okra: Heat the butter in a large skillet over high heat until foamy. Add the vegetable base and okra and cook, gently stirring often, until the butter begins to brown and the okra is just tender, about 6 minutes. Season lightly with salt and black pepper and stir in the pepper vinegar.
to serve: Put the rice in a serving bowl and spoon the okra mixture on top. Drizzle with the okra seed oil and sprinkle with the fines herbes and benne seeds.

Serves 6 as a side, 4 as a main course
Stew
4 ounces slab bacon, preferably Benton’s (see Resources)
¼ cup small dice green bell pepper
2 tablespoons small dice celery
10 ounces small okra pods, caps removed, cut into ½-inch-thick slices
1 tablespoon all-purpose flour
2 cups Preserved Tomatoes or canned whole tomatoes, with their juices
2 tablespoons Pepper Sauce
2¼ teaspoons kosher salt
½ teaspoon freshly ground black pepper
1 teaspoon Bourbon Barrel Bourbon Smoked Paprika (see Resources)
2 tablespoons small dice sweet onion
1 teaspoon minced garlic
Rice
4 cups water
2 teaspoons kosher salt
¼ teaspoon freshly ground white pepper
1 fresh bay leaf
1 cup Anson Mills Carolina Gold Rice (see Resources)
4 tablespoons unsalted butter, diced
1 tablespoon organic palm oil
¼ cup thinly sliced scallions
Goes Well With:
Baby Collards with Benne Caesar Dressing and Cornbread Croutons
When the okra starts to come in every summer, this is the first dish I make at home. It’s delicious, and it comes together quickly, which means you won’t have to keep the stove on for very long. This recipe calls for smoky bacon, but you could use country ham if that’s what you have.
This dish, along with okra itself, made its way into Lowcountry cuisine via the food culture of enslaved West Africans brought to South Carolina’s shores during the seventeenth, eighteenth, and nineteenth centuries. Along the coastal plains and barrier islands of South Carolina and Georgia, the stew takes this form, but in the Gulf communities of Louisiana, Cajun and Creole influences turned it into variations of gumbo. Dishes like this give us a chance to reflect on the history of Southern cooking.
For the stew: Make lardons by cutting the bacon into ¼-inch-thick strips and then cutting the strips into ¼-inch-thick matchsticks. Put the bacon in a medium saucepan and cook over medium heat, stirring frequently, until the fat has rendered and the bacon is crisp. Using a slotted spoon, remove the bacon and drain it on paper towels, leaving the rendered fat in the saucepan.
Add the bell pepper and celery to the pan and cook, stirring occasionally, until translucent, about 5 minutes. Add the okra and cook, stirring occasionally, until it begins to soften, about 3 minutes. Add the flour and cook, stirring constantly, for about 2 minutes to make a light roux. Stir in the tomatoes, pepper sauce, 2 teaspoons of the salt, the black pepper, and the paprika and bring to a simmer. Reduce the heat to low and cook, uncovered, stirring occasionally, until the okra is soft and the tomatoes have fallen apart, about 30 minutes.
Meanwhile, combine the onion, garlic, and the remaining ¼ teaspoon salt in a mortar and crush with the pestle until the mixture becomes a wet paste. Set aside.
for the rice: While the stew is simmering, preheat the oven to 300°F.
Combine the water, salt, white pepper, and bay leaf in a medium saucepan and bring to a boil over medium-high heat. Stir to be sure the salt has dissolved, then reduce the heat to medium. Add the rice, stir once, and bring to a simmer. Simmer gently, uncovered, stirring occasionally, until the rice is al dente, about 10 minutes. Drain.
Spread the rice out on a rimmed baking sheet; discard the bay leaf. Dry the rice in the oven, stirring occasionally, for 10 minutes. Scatter the butter evenly over the rice, return to the oven, and dry, stirring every few minutes for about 5 minutes more; the excess moisture should have evaporated and the grains should be separate.
To serve: Stir the onion paste and palm oil into the stew. Divide the rice among four warm bowls and spoon the stew over the top. Sprinkle with the bacon and scallions.

Serves 4 as a side
1½ cups medium dice peeled eggplant
3 tablespoons canola oil
Kosher salt and freshly ground white pepper
1 cup small dice yellow onion
⅓ cup small dice peeled celery
2 garlic cloves, shaved paper-thin on a mandoline or very thinly sliced with a knife
⅓ cup small dice red bell pepper
½ cup Anson Mills Carolina Gold Rice (see Resources)
⅓ cup Preserved Tomatoes or canned whole tomatoes, drained and roughly chopped
1 cup Vegetable Stock
1 fresh bay leaf
⅛ teaspoon Aleppo pepper (see Resources)
¼ teaspoon Bourbon Barrel Bourbon Smoked Paprika (see Resources)
1 tablespoon fresh lemon juice
Equipment
Round 15-inch open-top fine-mesh wire grill basket
goes well with:
Pork Shoulder Steak with Grilled Mushrooms
My version of eggplant purloo was inspired by an afternoon cooking alongside chef BJ Dennis, one of the champions of traditional Gullah Geechee cookery and history. It was his idea to replace the seafood or other protein in a traditional purloo with some meaty grilled eggplant. The eggplant goes beyond standing in for the meat; it makes you not even miss it at all.
Prepare a hot fire in a charcoal grill (see Grilling), removing the grill rack and distributing the hot coals in an even layer in the bottom of the grill.
Put the eggplant in a bowl, toss with 2 tablespoons of the canola oil, and season lightly with salt and white pepper. Transfer to the grill basket and place directly on the coals. Grill, stirring frequently with long-handled tongs, until the eggplant pieces have a light char and start to soften, about 5 minutes. Transfer the eggplant to a bowl and set aside. Cover the grill to maintain the temperature for cooking the pork; add a few more pieces of charcoal if necessary.
Heat the remaining tablespoon of canola oil in a medium pot over medium heat until it shimmers. Add the onion and cook, stirring frequently, until translucent, about 5 minutes. Add the celery and garlic and cook, stirring frequently, until tender, 3 to 5 minutes. Add the eggplant and bell pepper and cook for another minute.
Stir in the rice and cook, stirring, to toast the rice, about 1 minute. Add the tomatoes, vegetable stock, bay leaf, Aleppo pepper, and paprika and stir to combine. Once the mixture comes to a simmer, reduce the heat to low, cover, and cook until the rice is tender and just starts to make a caramelized crust on the bottom of the pot, about 15 minutes.
Remove the purloo from the heat, stir in the lemon juice, and season lightly with salt. Transfer to a serving dish, discarding the bay leaf, and serve.
Serves 6 as a side
2 tablespoons Rendered Fresh Lard
2 pounds Granny Smith apples, peeled, cored, and cut into ¾-inch-thick wedges
½ cup packed light brown sugar
4 tablespoons unsalted butter
½ teaspoon kosher salt
goes well with:
Cured Duck Breasts with Rice Porridge
Pork Prime Rib with Mustard Onions
Grilled Quail with Red-Eye Gravy
In Appalachia, “fried” means cooked in a skillet, not a deep fryer. I can hardly remember a breakfast at my grandmother’s table without fried apples. They’re equally at home on the dinner table. Try these with roasted or grilled pork and you’ll see why I can never pass up this dish.
Heat the lard in a large cast-iron skillet over medium-high heat until it shimmers. Add the apples and cook, stirring frequently, until they start to brown and soften, about 6 minutes. Add the brown sugar and butter and stir to combine and melt the butter. Reduce the heat to low and cook until the apples are completely tender but not falling apart, about 3 minutes.
Remove the apples from the stove, stir in the salt, and serve directly from the skillet. Or transfer to a heatproof container, cool to room temperature, cover, and refrigerate for up to 2 days; reheat over medium heat before serving.
How to Cook Fresh Field Peas or Butter Beans
A well-cooked pot of shelled fresh field peas or butter beans is one of the staples in the Southern cook’s arsenal of vegetable dishes. There are a lot of ways to cook them, but this way is my favorite. It retains the freshness of the ingredient but also delivers on that low-and-slow soulful flavor that makes so much of Southern cooking irresistible. I start by making a base of onion and garlic and then fold that into the cooked peas or beans and braise them until they just give way and glaze up.
To serve 4 as a side, here’s what you’ll need:
Base
1½ teaspoons canola oil
1 tablespoon unsalted butter
½ small sweet onion (about 2½ ounces), very finely diced
1 small clove garlic, minced
1 to 2 tablespoons Vegetable Stock
Kosher salt
Beans
4 cups shelled fresh field peas or butter beans
About 2 cups Vegetable Stock
1 tablespoon unsalted butter
Kosher salt
1 to 2 tablespoons finely chopped herbs (I like flat-leaf parsley and lovage)
1 to 2 teaspoons vinegar (apple cider vinegar is the classic choice, but this is a great place to use something homemade; see How to Make Vinegar)
Freshly ground black pepper
Hot Sauce or Red Clay Original Southern Hot Sauce (see Resources), or other hot sauce of your choice
For the Base: The process starts with making a rich onion base, which will give the relatively quick-cooking peas or beans a depth of flavor that belies how fast they cook. Heat the oil and butter in a medium skillet over low heat. When the butter is melted but not quite foaming, stir in the onion and cook, stirring frequently, until translucent and starting to soften; you’re not looking to get any color on the onion. Add the garlic and cook, stirring, for another minute or so. At this point, the onion and garlic will have given up some of their moisture, so I add vegetable stock 1 tablespoon at a time to make sure they’re never frying but instead gently braising and breaking down. When the mixture is completely soft and the liquid you’ve added has just cooked away, season with a pinch of salt and remove from the stove.
For the Beans: Put your field peas or butter beans in a medium saucepan, add enough vegetable stock so they’re almost but not quite covered, and bring to a boil over high heat. Add the base, lower the heat to medium-high, and cook, adding more stock as necessary to keep the peas or beans almost covered, until just tender and cooked through. The timing will vary depending on the size of the peas or beans, so taste them often as they cook.
When the peas or beans are right in that sweet spot, drain off all but about 3 tablespoons of the cooking liquid, add the butter, season liberally with salt, and cook a little further, just to glaze the peas or beans. Then the cooking is done and it’s up to you to season them just how you like, with chopped fresh herbs, vinegar, black pepper, and hot sauce.
I love to serve peas and beans cooked this way with a skillet of fresh cornbread (see Basic Cornbread) or simply steamed Carolina Gold rice (seeNo-Peek Rice), but they’re good with just about anything from fried fish to grilled pork chops.
Pressure-Cooker Sea Island Red Peas
Serves 4 as a side
4 cups Vegetable Stock
1 cup Anson Mills Sea Island Red Peas (see Resources), soaked in water to cover in the refrigerator overnight
½ cup roughly chopped drained Preserved Tomatoes or canned whole tomatoes
2 ounces bacon, preferably Benton’s (see Resources), cut into ¼-inch strips
1 small garlic clove
2 fresh bay leaves
5 thyme sprigs
Kosher salt
Equipment
Electric pressure cooker (see Note)
goes well with:
Grilled Quail with Red-Eye Gravy
Beeliner Snapper with Fried Peppers
Cured Duck Breasts with Rice Porridge
This technique for cooking dried peas and beans is pure magic. Using an electric pressure cooker opens up a whole range of flavors and textures that would take hours to achieve otherwise. With this recipe, everything goes into the cooker, you bring it up to pressure, and, in a matter of minutes, you have perfectly cooked peas. I love how the tomatoes become part of the potlikker under the high pressure.
NOTE: You’ll need to start this recipe a day ahead of time to soak the red peas.
Combine all the ingredients except the salt in the pressure cooker, lock on the lid, bring the cooker up to high pressure, and cook for 15 minutes.
Carefully release the steam from the pressure cooker. Drain the peas, reserving ½ cup of the cooking liquid, and discard the garlic, bay leaves, and thyme sprigs. Season the peas lightly with salt and serve. Or transfer the peas to a container, cool to room temperature, cover, and refrigerate for up to 3 days; reheat before serving.
Serves 6 as a side
2 tablespoons unsalted butter
3 pounds baby turnips, tops removed and reserved for another use if desired, washed, and quartered
About ¾ cup Turnip Green Potlikker (seePotlikker-Steamed Sea Bass with Corn Dodgers) or Vegetable Stock
2 teaspoons turnip vinegar (seeHow to Make Vinegar) or apple cider vinegar
Kosher salt and freshly ground black pepper
goes well with:
Potlikker-Steamed Sea Bass with Corn Dodgers
Braising is my preferred way to cook nearly every vegetable under the sun. Coating the vegetables in the soft but not quite melted butter creates a glaze as the liquid starts to come out of the turnips and naturally emulsifies. Try this with carrots or diced butternut squash in the winter and tender young onions in the spring.
Melt the butter in a large skillet over medium heat. Add the turnips and stir to coat, then add ½ cup of the potlikker and bring to a simmer, gently stirring. Cover the skillet and braise the turnips until tender when tested with a knife, 5 to 7 minutes. Check the turnips halfway through the cooking time and add more liquid if necessary to maintain the same level.
Remove the turnips from the stove, stir in the vinegar, and season liberally with salt and pepper. Transfer to a warm serving bowl and serve.

Serves 4 as a side
1 large fennel bulb (about 1 pound), stalks removed, some fronds reserved for garnish
1 cup Vegetable Stock
2 tablespoons unsalted butter
1 teaspoon kosher salt
¼ teaspoon freshly ground white pepper
goes well with:
Shrimp and Grits with Roasted Tomatoes, Fennel, and Sausage
Grilled Catfish with Hoppin’ John
Grilled Swordfish with Green Gumbo
Pork Shoulder Steak with Grilled Mushrooms
This is one of my absolute favorite ways to cook seasonal vegetables, especially a vibrant one like licorice-y fennel. Combining a little stock with good butter, adding the fennel, bringing it up to a simmer, and slowly cooking until the fennel just gives way traps all its flavor. As the stock reduces, the butter and pan juices emulsify, leaving you with beautifully glazed fennel ready to be served on its own or added to another dish, such as Shrimp and Grits with Roasted Tomatoes, Fennel, and Sausage.
Cut the fennel bulb into wedges about ½ inch thick; trim away some of the core from each wedge, leaving enough of it so the wedges stay intact. Combine the fennel, vegetable stock, butter, salt, and white pepper in a medium saucepan and bring to a simmer over high heat. Reduce the heat to low and cook until the fennel wedges are tender and easily pierced with a fork and the stock has reduced by about half, 10 to 12 minutes.
Transfer the glazed fennel pieces to a serving dish if serving as a side. If using the fennel in another recipe, such as shrimp and grits, transfer it to a plate to cool to room temperature; reserve the cooking liquid.
Serves 4 as a side
1 small head cauliflower with a 1-inch stem (about 1 pound)
Kosher salt
3 tablespoons unsalted butter
½ cup canola oil
Freshly ground white pepper
1 teaspoon fresh lemon juice
goes well with:
Strip Steak with Worcestershire
Potlikker-Steamed Sea Bass with Corn Dodgers
Cooking a whole head of cauliflower in a skillet with butter results in a beautifully golden brown, moist, tender, and nutty cauliflower. As delicious as it is, it may be even more fun to make. I love showing people this technique for the first time. Spooning the hot butter over the whole cauliflower as it cooks is most satisfying.
Remove the green leaves from the cauliflower but leave the stem intact. Press a small ring mold or round metal cookie cutter into the bottom of the stem so that the head of cauliflower will stand upright. Liberally season the cauliflower with salt.
Heat the butter and canola oil in a large deep skillet over medium heat until the butter melts. Stand the cauliflower up in the skillet and cook, occasionally spooning the hot butter-oil mixture over the cauliflower, until the outside of the cauliflower is golden brown, about 10 minutes. Transfer the cauliflower to a cutting board and cool to room temperature.
Cut the cauliflower away from the stem into 8 equal wedges and discard the stem. Transfer the wedges to a container, cover, and refrigerate. (Tightly covered, the cauliflower will keep for up to 1 day in the refrigerator. Remove from the refrigerator 30 minutes before you plan to grill.)
Prepare a hot fire in a charcoal grill (see Grilling), removing the grill rack and distributing the hot coals in an even layer in the bottom of the grill. Place the grill rack as close to the coals as possible.
Season the cauliflower lightly with white pepper. Grill the cauliflower wedges, turning frequently to develop an even, light char and warm them through, for about 3 minutes. Transfer to a serving dish, sprinkle with the lemon juice, and serve.
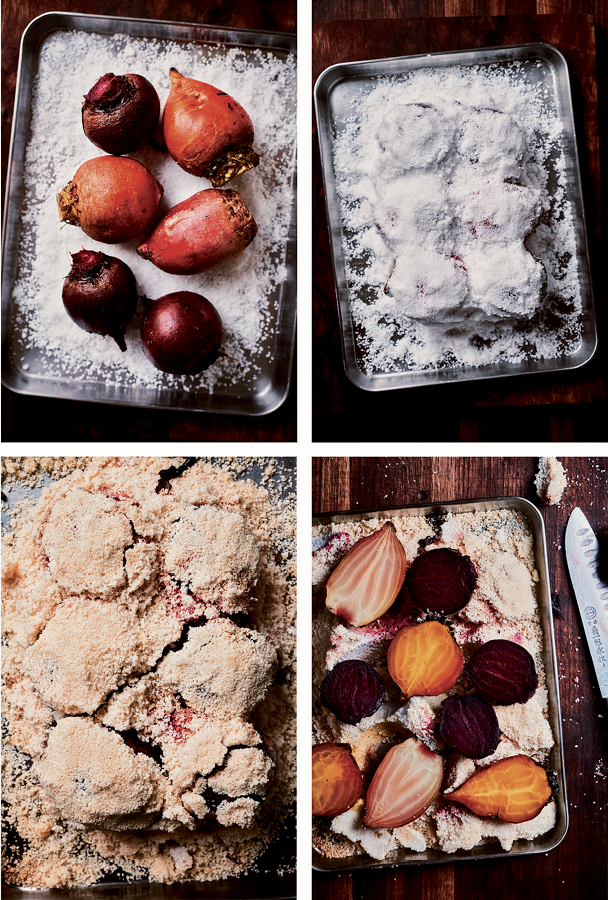
Serves 4 as a side or 6 as part of a salad
1 large egg white
3 cups kosher salt
20 baby beets (about 1 ounce each), preferably of various varieties, scrubbed and tops trimmed to 1 inch
goes well with:
Cured Duck Breasts with Rice Porridge
Spring Lamb with Rhubarb Butter
Salt-roasting in the oven, or in my fireplace, has become one of my go-to ways to cook root vegetables, and the technique is especially good with earthy beets. The egg-white-and-salt crust lets the beets steam in their own juices without losing any of that amazing pure beet flavor. And the kid in me loves cracking through the salt crust like it’s some sort of dinosaur egg, revealing the steaming red or golden orbs.
Preheat the oven to 400°F.
Lightly beat the egg white in a medium bowl. Add the salt and mix until completely incorporated; the mixture should feel slightly tacky to the touch. Spread a thin layer of the salt mixture in the bottom of a 9-by-13-inch baking dish. Put the beets on the salt mixture and cover them with the remaining salt mixture, lightly packing it down and making sure the beets are evenly covered.
Roast the beets for about 1 hour, until fork-tender. Remove from the oven and let cool slightly.
When the beets are cool enough to handle, crack the salt crust and pull it off. Remove the skin and tops of the beets by rubbing them with a kitchen towel. Wipe off any salt that remains on the beets, cut them lengthwise in half, and transfer to a bowl.
The beets are ready to be used in any of several ways. Try them glazed in a little vegetable stock and butter, grill them to perfection, or cool, slice, and dress in an acidic vinaigrette. If not using them immediately, transfer them to a container, cool to room temperature, cover, and refrigerate for up to 2 days.
Serves 4 as a side
1 pound heirloom plum tomatoes, cut lengthwise in half
4 garlic cloves, quartered lengthwise
2 tablespoons extra-virgin olive oil
Kosher salt and freshly ground black pepper
goes well with:
Grilled Catfish with Hoppin’ John
Grilled Swordfish with Green Gumbo
Beeliner Snapper with Fried Peppers
I love oven-roasting ripe tomatoes; it takes me back to the sun-dried-tomato craze of the late 1980s and early ’90s. My favorite thing about the technique is the intensity of flavor that results from the dehydration during cooking. You end up with something rich and concentrated, with a flavor almost like that of tomato paste. Roasted tomatoes are great as a summer side on their own, incorporated into succotash or pasta dishes, or spooned on top of some good grilled bread for bruschetta.
Preheat the oven to 450°F.
Stud the cut sides of the tomatoes with the garlic and lay the tomatoes cut side up on a rimmed baking sheet. Drizzle with the olive oil and lightly season with salt and pepper. Roast for about 25 minutes, until the tomatoes start to lose their shape and are lightly browned. Remove from the oven.
When the tomatoes are cool enough to handle, remove their skins and discard. Try to keep the tomatoes as intact as possible. If serving as a side, transfer to a warm serving dish. Otherwise, cool on the baking sheet to room temperature, then leave the tomatoes whole or roughly chop for use in another recipe. Transfer to a container, cover, and refrigerate for up to 3 days.

Makes 16 confit petals
4 heirloom tomatoes (about 8 ounces each)
4 thyme sprigs
5 small garlic cloves, peeled
Kosher salt and freshly ground black pepper
1 cup extra-virgin olive oil
goes well with:
I’ve been infatuated with the confit technique since I first pored over Thomas Keller’s French Laundry Cookbook. This is a recipe of transformation. Carefully peeling the tomatoes and cutting them into petals, laying them out in the foil-lined baking dish, and covering them with the best olive oil is like a ritual to me. Then, as the tomato petals slowly cook, their texture changes, developing a pleasant chew and resilience. As a bonus, you’re left with the tomato-infused olive oil, which can be drizzled on everything from roasted meats or fish to a big piece of burrata. Or add some to a vinaigrette or marinade, or use it to confit more tomatoes.
Preheat the oven to 200°F. Line a 9-by-13-inch baking dish with a rectangle of aluminum foil large enough to come about 1 inch up the sides.
Bring a large pot of water to a boil over high heat. Make an ice bath with equal parts ice and water in a large bowl. Lightly score the skin on the bottom of each tomato with an X. Submerge the tomatoes in the boiling water for 20 seconds, remove, and submerge them in the ice bath to cool; do not leave them in the ice bath for longer than 5 minutes. Drain.
Peel and quarter the tomatoes. Cut away the seeds and pulp, resulting in flat tomato petals.
Lay the tomatoes in the prepared baking dish in an even layer with no overlap, then add the thyme sprigs and garlic cloves. Sprinkle with salt and pepper and pour in the olive oil.
Transfer to the oven and cook for about 1½ hours, until the tomatoes are softened but not falling apart. Remove from the oven and cool to room temperature.
Using a slotted spoon, carefully transfer the tomatoes to a container. If not using immediately, add a couple of tablespoons of the oil from the baking dish, tightly cover, and refrigerate for up to 2 days.
Strain the oil through a fine-mesh sieve into a container, discarding the solids. Tightly cover and refrigerate the oil for another use; it will keep for up to 7 days.

Serves 4 as a side
Vinaigrette
8 ounces asparagus spears, tough ends cut off
1 tablespoon apple cider vinegar
1 tablespoon Rendered Fresh Chicken Fat, melted
asparagus
20 medium asparagus spears, tough ends cut off
2 tablespoons extra-virgin olive oil
1½ teaspoons kosher salt
½ teaspoon freshly ground black pepper
Equipment
Juice extractor
goes well with:
Grilled Trout with Cornbread Puree
Chicken Breasts with Herb Dumplings
Few things are better than simply grilled fresh asparagus dressed with a vinaigrette made from asparagus juice and chicken fat. It completely amplifies the spears, adding a fresh asparagus flavor to the charred tastes of the grill.
Prepare a hot fire in a charcoal grill (see Grilling), removing the grill rack and distributing the hot coals in an even layer on the bottom of the grill. Place the grill rack as close to the coals as possible.
for the vinaigrette: Roughly chop the asparagus and run it through the juice extractor. Remove the pulp and run it through the juice extractor again to extract all the juice. Strain the juice through a fine-mesh sieve into a small bowl. Add the vinegar and chicken fat and stir to combine. Set aside.
for the asparagus: Put the asparagus spears in a baking dish and toss with the olive oil, salt, and pepper. Transfer them to the grill (set aside the baking dish) and cook, turning frequently, until lightly charred and just tender, about 5 minutes.
to serve: Return the asparagus to the baking dish, add the vinaigrette, and toss to coat. Transfer to a serving dish.
Serves 4 as a side
8 spring onions with bulbs about 1 inch in diameter, trimmed and cut in half through the root end (leave the root intact so that the halves hold together)
4 tablespoons unsalted butter, at room temperature
Kosher salt and freshly ground white pepper
1 tablespoon fresh lemon juice
goes well with:
Strip Steak with Worcestershire
Grilled Catfish with Hoppin’ John
Grilled spring onions are delicious and extremely versatile. They can be eaten on their own as a side or used as an ingredient in a simple salad. Think arugula, fresh lemon, and salty cheese.
Prepare a hot fire in a charcoal grill (see Grilling), removing the grill rack and distributing the hot coals on one side of the bottom of the grill. Place the grill rack at its normal height.
Spread the cut sides of the onion bulbs with a thin layer of the soft butter, using about 2 tablespoons of it, and season them liberally with salt and white pepper.
Place the onions cut side down on the grill rack on the side opposite the coals, cover the grill, and grill the onions until they start to brown and soften, about 10 minutes. Turn the onions over, brush them with the remaining butter, cover, and grill until tender, about 5 minutes.
Transfer the onions to a serving dish. Add the lemon juice, toss, and serve.
Serves 4 as a side
6 ounces ramps, cleaned, dried, and hairy root ends removed
2 teaspoons Rendered Fresh Beef Fat, melted
Kosher salt and freshly ground black pepper
½ teaspoon fresh lemon juice
Equipment
Round 15-inch open-top fine-mesh wire grill basket
goes well with:
Potlikker-Steamed Sea Bass with Corn Dodgers
Chicken Breasts with Herb Dumplings
I’ve been known to literally hide grilled ramps to have them all to myself. I like to use beef fat to cook them, but you should experiment to find your favorite—whether chicken, bacon, or pork fat, or even good olive oil. You won’t go wrong.
Prepare a hot fire in a charcoal grill (see Grilling), removing the grill rack and distributing the hot coals in an even layer in the bottom of the grill.
Toss the ramps with the beef fat in a medium bowl, then season liberally with salt and pepper and transfer to the grill basket. Place the basket directly on the coals and grill the ramps, shaking the basket occasionally with long-handled tongs, until they are wilted and lightly charred, about 3 minutes.
Transfer the ramps to a small serving bowl. Add the lemon juice, toss to combine, and serve.
Charred Turnips with Their Greens
Serves 4 as a side
Turnips
2 medium turnips (about 2½ inches in diameter)
Kosher salt and freshly ground white pepper
Greens
10 ounces mixed young, tender greens, such as turnip greens, mizuna, and tatsoi, washed in several changes of water and dried
2 teaspoons extra-virgin olive oil
Kosher salt and freshly ground black pepper
2 teaspoons fresh lemon juice
Equipment
Round 15-inch open-top fine-mesh wire grill basket
goes well with:
Sheepshead “on the Half Shell” with Tomato Gravy
Cornmeal-Dusted Grouper with Herb Puree
Pork Prime Rib with Mustard Onions
This basic recipe works for nearly anything in the brassica family. If you have Brussels sprouts, use them instead of the turnips. If you have local broccolini, use it. Here I use fresh turnips and young, tender greens. Grilling the vegetable and greens separately and then combining them ensures the best results.
for the turnips: Prepare a hot fire in a charcoal grill (see Grilling), removing the grill rack and distributing the hot coals in an even layer in the bottom of the grill. Place the grill rack as close to the coals as possible.
Cut the turnips lengthwise in half. Season lightly with salt and let sit for 2 minutes. Grill the turnip pieces, turning frequently, until the outsides are evenly charred and the insides are just tender, 8 to 10 minutes. Transfer the turnips to a cutting board and cut in half, making 8 equal wedges. Season lightly with white pepper and lightly cover with foil to keep warm.
for the greens: Remove the grill rack (set the hot rack aside in a safe place). Combine the greens and olive oil in a large bowl and toss. Season liberally with salt and black pepper and toss again. Divide the greens into two batches. Transfer half the greens to the grill basket and place the basket directly on the coals. Grill the greens, turning them frequently with long-handled tongs so they cook evenly, until wilted and lightly charred around the edges, about 2 minutes. Transfer the greens to a clean bowl and cover to keep warm while you cook the second batch. Add the second batch to the bowl, add the lemon juice, and toss well.
to serve: Add the charred turnips to the greens and toss to combine. Transfer to a serving dish.

Serves 4 as a side
½ teaspoon kosher salt (plus 1½ cups more if using morels)
8 ounces fresh mushrooms, such as morels, shiitake, and oyster
1 tablespoon Rendered Fresh Beef Fat, melted, or extra-virgin olive oil
½ teaspoon soy sauce, preferably Bourbon Barrel Bluegrass Soy Sauce (see Resources)
Freshly ground black pepper
½ teaspoon fresh lemon juice
Equipment
Round 15-inch open-top fine-mesh wire grill basket
goes well with:
Strip Steak with Worcestershire
Cooking mushrooms over the heat of a fire, whether on the grill or perhaps in your fireplace, intensifies their natural umami flavor. Here the smoke, the char, the depth added by soy sauce, and the brightness of fresh lemon juice all come together to make an addictive side dish. This recipe calls for a mix, so use any fresh mushrooms you like (other than for morels, you can skip the soaking and drying and just do a quick wash and dry for most).
If using morels, fill a large deep container with 2½ gallons warm water, add ½ cup of the salt, and stir until it is dissolved. Add the morels and let them soak for 1 hour. Meanwhile, wash and dry the other mushrooms.
Using a wire rack, push the morels down a little and, with your other hand, skim any leaves and debris off the top with a mesh strainer. Remove the rack and gently lift out the morels, being careful not to disturb the debris that has settled at the bottom. Repeat this procedure twice, using ½ cup salt each time, then lay the morels out on a wire rack and let them air-dry at room temperature for 30 minutes to 1 hour, until completely dry.
Prepare a hot fire in a charcoal grill (see Grilling), removing the grill rack and distributing the hot coals in an even layer in the bottom of the grill.
Toss the mushrooms with the beef fat in a small bowl, then add the soy sauce and the ½ teaspoon salt and season lightly with pepper. Toss again and transfer to the grill basket. Place the basket directly on the coals and grill the mushrooms, shaking the basket occasionally with long-handled tongs, until tender and slightly crispy on the edges, about 3 minutes.
Transfer the mushrooms to a small serving bowl, add the lemon juice, and stir to combine. Serve immediately.