NATURE IS PACKED WITH INSPIRATION FOR PHOTOGRAPHERS, SO IF YOU WANT TO USE YOUR SMARTPHONE TO MAKE BEAUTIFUL PHOTOS OF ALL THE WONDER AROUND YOU, THIS IS THE CHAPTER TO READ. PACKED WITH SIMPLE IDEAS AND MY TRIED-AND-TESTED TIPS AND TRICKS FOR ACHIEVING PERFECTION, YOU WILL BE AMAZED AT WHAT YOU CAN ACHIEVE.
CHAPTER 3 LESSON 1
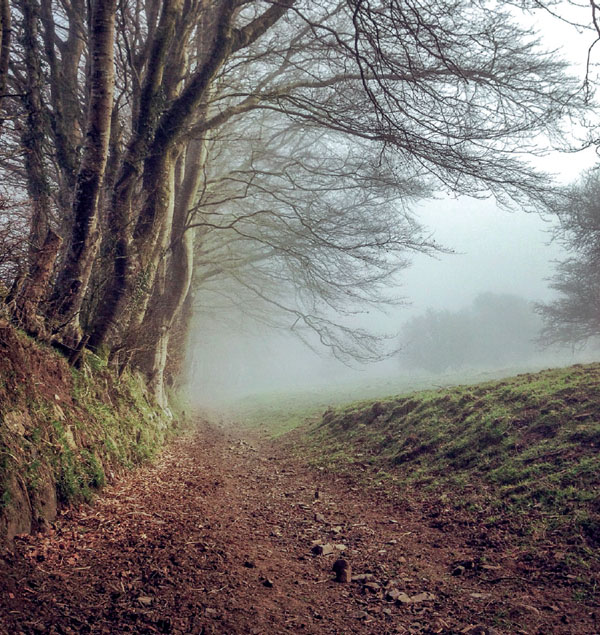
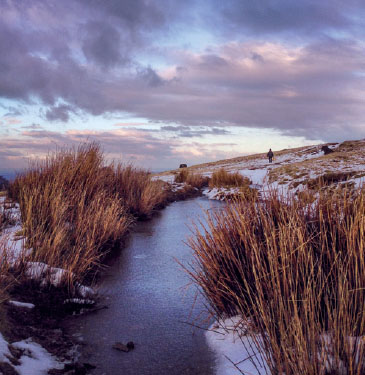
WEATHER: MIST
MIST IS ONE OF THOSE GREAT OCCASIONS WHERE THE WEATHER IS GIVING YOU A NATURAL DIFFUSER TO WORK WITH. THERE IS SO MUCH YOU CAN DO WITH MIST; EVEN A THICK FOG CAN PROVIDE INTERESTING MOMENTS FOR THOSE PHOTOGRAPHERS BRAVE ENOUGH TO VENTURE OUT ON A MAGICAL MYSTERY TOUR AROUND A SUDDENLY UNFAMILIAR LANDSCAPE. I AM ALSO SOMETHING OF A TREE-IN-THE-MIST ADDICT—IT’S MY GO-TO OPTION IN THESE WEATHER CONDITIONS.
Mist imparts such atmospheric moodiness that it is definitely worth getting out amongst it. Look for urban lights in cities or majestic trees in the countryside that pierce through the misty gloom.
This is a rare occasion when putting the sun in front of you as you take a photograph may yield some interesting results, so give it a go.
Hang around long enough to watch the mist dissipate as the day heats up. Often, the most dramatic scenes happen as a sunbeam pierces though the clearing mist and casts a glow across a partially shrouded landscape.
A misty sunrise is ethereal and otherworldly. At certain times of the year you will be able to photograph valley mist at dawn too. So go up to a local high point and see if the sky clears. When the mist sits below you and the sun is above it, you get the effect of a white ocean, often affording you tantalizing glimpses of hills, trees, or buildings poking through. As the sun burns off the mist, you will get some atmospheric and memorable photos.
Experiment with your exposure compensation slider (see pages 29 and 33) to get some slightly under- and over-exposed versions, so that you will have more to work with when you edit later. Use your exposure slider to alter the exposure marginally either way. To do this with an iPhone, use an app like ProCamera. Android users can use the Pro Mode in the camera settings.
CHAPTER 3 LESSON 2
DON’T THINK THAT YOU CAN ONLY PHOTOGRAPH THE LANDSCAPE ON CLEAR, SUNNY DAYS; YOU WILL FIND THERE IS PLENTY TO RECOMMEND BEING OUT UNDER CLOUD COVER AS WELL. BLANKET CLOUD CAN ACTUALLY MAKE FOR INTERESTING PHOTOGRAPHS BECAUSE IT BASICALLY ACTS LIKE A FULLY IMMERSIVE DIFFUSER.

You will notice on overcast days that there are no strong contrasts of light and shade to deal with, producing tonally smooth images that feel soothing and calm. Go with this, exploit the conditions, and capture images like waterfalls with long exposures in the reduced light. For more on Long Exposures of Water, see pages 118–19.
From time to time, a shaft of light may break through the cloud cover. Its effect on the landscape will make for a fantastic photo opportunity so look out for those moments. You will probably be able to make some great moody photos too, especially if you can find some detail in the clouds to expose for.
Bear in mind that overcast skies are still fairly bright, so this is a good time to experiment with sliding your exposure scale up or down by a half or full stop at least. You can fine-tune the exposure later on with your editing apps, so for now just collect some images at these various settings; it’s all grist for the mill, as they say.
For more about stopping down your exposures, see page 36; for more about editing apps, see page 130.
CHAPTER 3 LESSON 3
WEATHER: RAINBOWS AND STORMS

WILD WEATHER IS THE NORM WHERE I LIVE, SO I HAVE GROWN ACCUSTOMED TO SHOOTING IN IT. GENERALLY, THE ISSUE ISN’T BAD WEATHER, IT’S BAD OUTFIT CHOICES, SO IF YOU’RE KITTED OUT APPROPRIATELY, THERE IS NO REASON WHY YOU SHOULDN’T BRAVE THE ELEMENTS TO MAKE PHOTOS THAT SING WITH ENERGY AND LIFE.
Over the course of my life as a photographer, I’ve come to learn that inclement days are when the light is at its best, giving plenty of photo opportunities of dramatic clouds, shafts of light, colorful rainbows, and storm fronts passing across the landscape.
Low-key landscapes, where most of the tones in the picture are at the darker end of the scale, are in abundance in bad weather, so look out for the drama of dark and brooding cloudscapes.
Expose for the brightest patch of sunlit or cloudy sky. This will mean that some of the darker areas of the landscape look underexposed, but don’t worry about that now—you can fix this issue later during the edit stage (see the section on The Editing Process and Snapseed on pages 130–31).
Rainbows occur as the sun peaks out when it’s raining, so that’s as good a reason as any to be out in the rain or drizzle with your camera at the ready. Focus on the rainbow and expose for the brightest area of sky. Shoot some panoramas of rainbows to fit the whole arc in the shot and, if you have one, make some photos using a wide-angle lens attachment too.
Take a lens cloth to keep your lens dust- and rain-free. I keep mine inside a sealed plastic bag that is large enough to stash my phone in, should I need to.
CHAPTER 3 LESSON 4
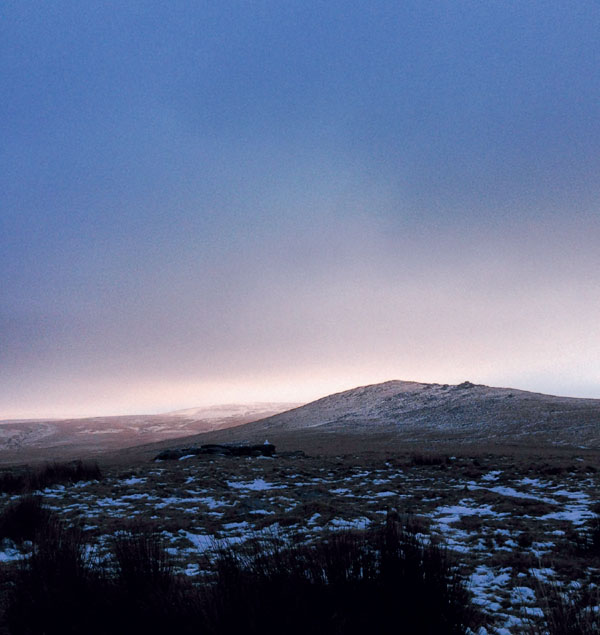
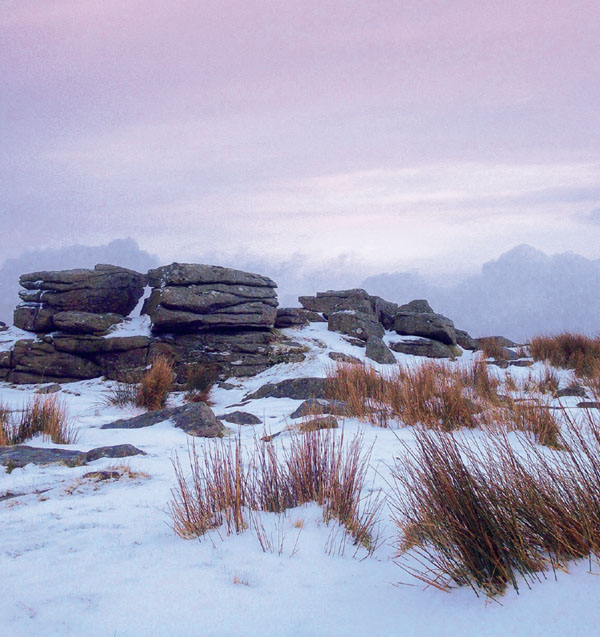
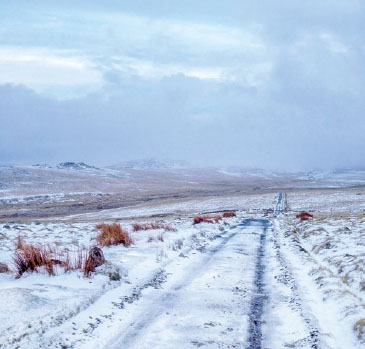
AN ALMOST MONOTONE EXPANSE OF LANDSCAPE IS A WONDER TO BEHOLD, BUT SNOW PHOTOGRAPHY COMES WITH CHALLENGES, ALL OF WHICH ARE EASY TO OVERCOME WITH THE FOLLOWING THOUGHTS FIRMLY WEDGED IN YOUR MIND.
Shooting in the snow is tricky when the sun is out because it will be hard to avoid overexposing with so much white and brightness in the scene. Wait for the sun to be diffused by cloud, or move so that it is partially or fully blocked by buildings or trees.
Look for leading lines and pops of color to add contrast and break up the monotony of a snow-covered landscape.
The snow may be largely white, so make the most of the color and light in the sky, especially during the golden and blue hours. (See The Glorious Golden Hour on pages 48–49, and The Magical Blue Hour, on pages 50–51, to learn more about photographing in these two light conditions.)
You could also try using a macro lens to see if you can capture individual snowflakes and close-ups of icicles.
Blue color casts (a kind of blue filter effect caused by your camera underexposing and seeing the snow as a mid-tone) are a common problem in snow photos, but they are easily fixed! To help you in the edit, take photos where you have exposed for different parts of the scene so that you have the best chance of having the perfect shot in the bag. Use your editing skills later to reduce any blueness (and even experiment with adding a tiny bit of warmth). See pages 130–31 for advice on editing in Snapseed.

ANIMALS IN LANDSCAPES
COMING ACROSS AN ANIMAL IN A LANDSCAPE IS A BONUS FOR ENHANCING YOUR COMPOSITION. IT WILL GENERALLY HELP GIVE A SENSE OF SCALE AND ADD AN EXTRA LAYER OF INTEREST TO THE IMAGE.
For herds of animals, look out for moments when they naturally form a line or triangle formation. For single creatures, think about composing with the animal’s back end near the edge of the frame so that it is looking into the picture with its line of sight across the landscape. Avoid photos of animals looking at the nearest edge of the frame with a big gap behind them; it feels uncomfortable and denies the viewer the opportunity to share the view with them. Adhering to the rule of thirds as a compositional guide and placing the creature off-center on one of the intersecting lines in the grid on your screen will help you achieve this.
For more about composing with the Rule of Thirds, see pages 14–15.
For more about adding a grid to your screen, see page 15.
Consider getting down lower than the creature(s) by kneeling or crouching so that you can look up at the sky behind them as well. I like to look for angles that will enhance the sight of the wind fluttering their manes or emphasize the length of their eyelashes.
Tap on the creature’s eye area to focus. Underexpose by at least one-third of a stop (one notch toward the “-” symbol on your exposure slider). This will get highlights such as the clouds exposed properly; don’t worry if the animal is dark and is hard to see in the exposure—you can easily fix this in the editing stage!
For more about dealing with dark areas when editing, see Sky and Landscape Exposure Balancing on page 131.
Use the standard lens and make the most of its wide-angle possibilities.
Using a telephoto lens attachment will help you get a stronger composition if the animal is too far away and may help you feel more confident about photographing it.
To learn more about Lenses, see pages 44–45.

SAFETY
Photographing animals in their natural environment requires a few sensible precautions. Keep a safe distance and always stay well clear of hooves and horns. Try to avoid alarming them in any way. Move slowly and softly, and do not speak loudly or shout at them. I tend to click my tongue soothingly to get them to look my way; I find that it usually produces a curious glance in my direction, and I get a great shot as they prick up their ears and make eye contact. Give animals with young extra respect because they are more likely to feel threatened by you and act accordingly. Know your safe exit route at all times and never ever get in a field with a bull—that’s just foolhardy.
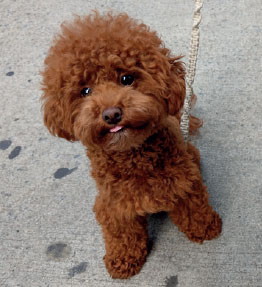
CHAPTER 3 LESSON 6
I ADORE MY TWO GERMAN POINTERS AND PERHAPS I AM BIASED, BUT I MUST SAY, THOSE BOYS ARE SO PHOTOGENIC! THEY AREN’T ALWAYS THAT GREAT AT POSING FOR MY PHOTOS, THOUGH; LIKE ALL ANIMALS THEY HAVE THEIR OWN AGENDA.

Try to shoot pets doing something they enjoy, perhaps running around after a stick or lazing on the windowsill. This way, you will get a more honest photo of the true character of your pet. Take your photos outside for the best ambient lighting. If you can’t manage that, then work near a window in natural light instead. Sticking with natural lighting helps to prevent red-eye. Avoid using a flash as this might upset your pet.
Don’t tie the animal up or try to force it to sit still or pose, because this rarely looks comfortable. Let them relax around you, be patient, and you will get a better shot. Once your pet is relaxed, if you click your tongue, call quietly, or whistle softly, they will probably look in your direction with an alert and interested expression for a few seconds, so be ready for this moment!
Get down to their eye-level and sit or lie on the floor with the light behind you, so that when the animal looks at you, you can see the catch-light (the little spark of light that is reflected in their eyes). Always tap to focus on the eye area; if the eye is out of focus, the portrait just doesn’t work.
If you have a animal with dark coloring, you'll find these tend to be a bit more difficult to photograph. Check out the section on selective adjustments in Snapseed on page 131 for tips to fix this.
And finally, I have been known to produce a treat and resort to bribery to get the shot. I will leave that one with you to consider!
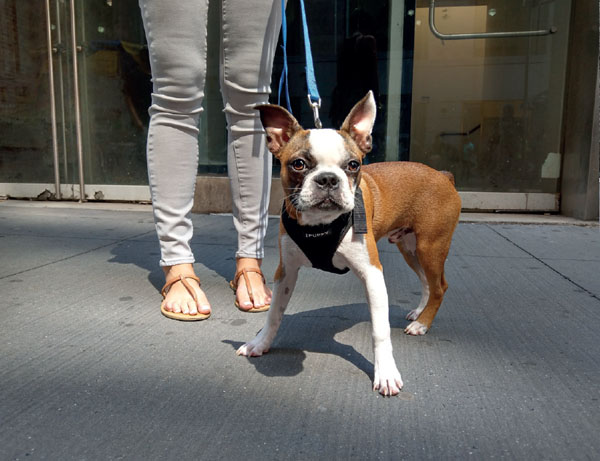
CHAPTER 3 LESSON 7
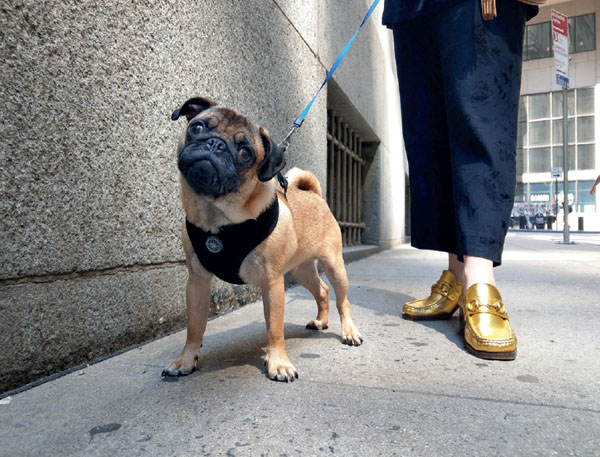
OF COURSE, NOT EVERY PET LIVES IN THE COUNTRYSIDE. URBAN POOCHES LIKE THESE DOGS IN MANHATTAN RULE THEIR NEIGHBORHOODS!
Taking pet portraits on the city streets requires a slightly different approach; letting an animal off a leash can potentially create havoc in the road, so think about including the leash and the owner’s feet in the photo for a real sense of who these pets are and who they belong to. Other than that, follow the instructions on page 101.

CHAPTER 3 LESSON 8
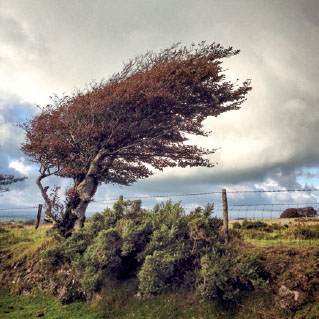
OFTEN SCULPTURAL, TREES ARE LANDMARKS LOADED WITH SYMBOLISM AND METAPHOR THAT ARE WORTHY OF PORTRAITS.
Give some thought to what it is about the tree that makes you want to photograph it in the first place. If you like its shape, then you will need to step back far enough to include it all in the frame.
Step back even farther if you like the way it looks within the landscape setting. Use your rule of thirds knowledge (see pages 14–15) to place the tree on one of the vertical lines to allow the tree space to breathe in the landscape around it.
For pictures in a woodland or forest setting, think about whether you want to focus on a single tree or perhaps the pattern of multiple trees together. Which tree is the main subject in your photo? Or do you want to give them equal prominence? Once you know these answers, you will be better placed to make a composition that tells your story.
Consider returning to a woodland to see the trees in a different season. Closely packed trees make for a congested view in the summer when they have all their leaves, but in the winter when they are stripped back to their naked branches, they might reveal more of their character and relationship to other trees around them.
You could make a project out of visiting the same tree over the course of a year or even many years, recording the changing seasons and the humans and animals that cross its path.
Look for moments when there is sunlight behind and shining through the tree to enhance the detail in the branches and make the leaves glow.
Using trees to frame a scene is another way of working with them. They can be used to create a foreground interest, which will frame an otherwise flat landscape.
Tap to focus on the tree and expose for the brightest area in the picture, usually the sky, to get the balance right across the scene. If the tree itself looks underexposed when you do this, fix it with Snapseed (see page 131).

CHAPTER 3 LESSON 9
RECORDING THE RHYTHMS OF BIRTH, LIFE, AND DEATH PLAYING OUT IN THE MICROCOSM OF THE PLANT WORLD OFFERS AN ENDLESS SOURCE OF PHOTOGRAPHIC IMAGERY AND INSPIRATION.
Exploring the textures, shapes, colors, and patterns that are abundant throughout nature may even set you on the path to pure abstraction. (See pages 108–109 for more on photographing abstract subjects.)
Drop to your knees—or even lie down—to look up at plants. From this vantage point, they will break the skyline, thus accentuating their height and color.
As always with smartphone photography, you can make the most of the fixed, wide-aperture lens by focusing on something in the foreground.
To mimic the shallow depth of field you get with a DSLR camera and lens, use a macro lens attachment. It will throw the background area of your image out of focus and separate the flower from the background. (For more about macro shooting, see pages 122–23)
Tap to focus on the center of the flower when you are shooting closer images; if you focus on the petals instead, it will feel awkward.
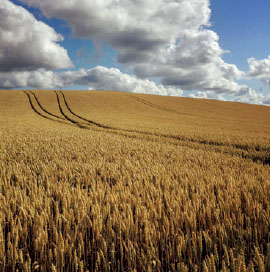
When you photograph plants en masse, such as carpets of bluebells, heathercovered hillsides, or fields of barley, experiment with focusing on the nearer plants for the detail, then try a few with the focus on the middle ground. You can decide at the editing stage which focal range best suits the overall scene.