
CHAPTER SEVEN
EXPLORING FLOWERS
This chapter presents some basics of botany that will support your drawing skills. Take this slow, and imagine you’re a botanist as you begin your study of flowers.
Have you ever wondered what a flower is and what its purpose is? I know this may sound silly. We’re all familiar with flowers, and we love them for their beauty, but it’s important to note that a flower has a purpose beyond looking pretty. But looking pretty is indeed important, because the main function of a flower is attraction. The enticing form, color, smell, and promise of sweet nectar make resistance difficult for any pollinator or person. Pollinators pollinate a flower’s ovules, which will then grow into a seed-bearing fruit or seed capsule. Flowers are crucial to the cycle of life. A flower is the reproductive or seed-bearing portion of a plant. It consists of male and female reproductive parts that are sometimes but not always on the same flower. Some flowers have only male or female parts. What follows is a list of basic flower parts; if you’re a botany enthusiast, please refer to a book on botanical terms to expand your vocabulary.
SEPALS are leaflike, usually green structures that hold the flower together.
PETALS are often brightly colored and surround the reproductive parts of a flower. If sepals and petals look alike, they are collectively called tepals.
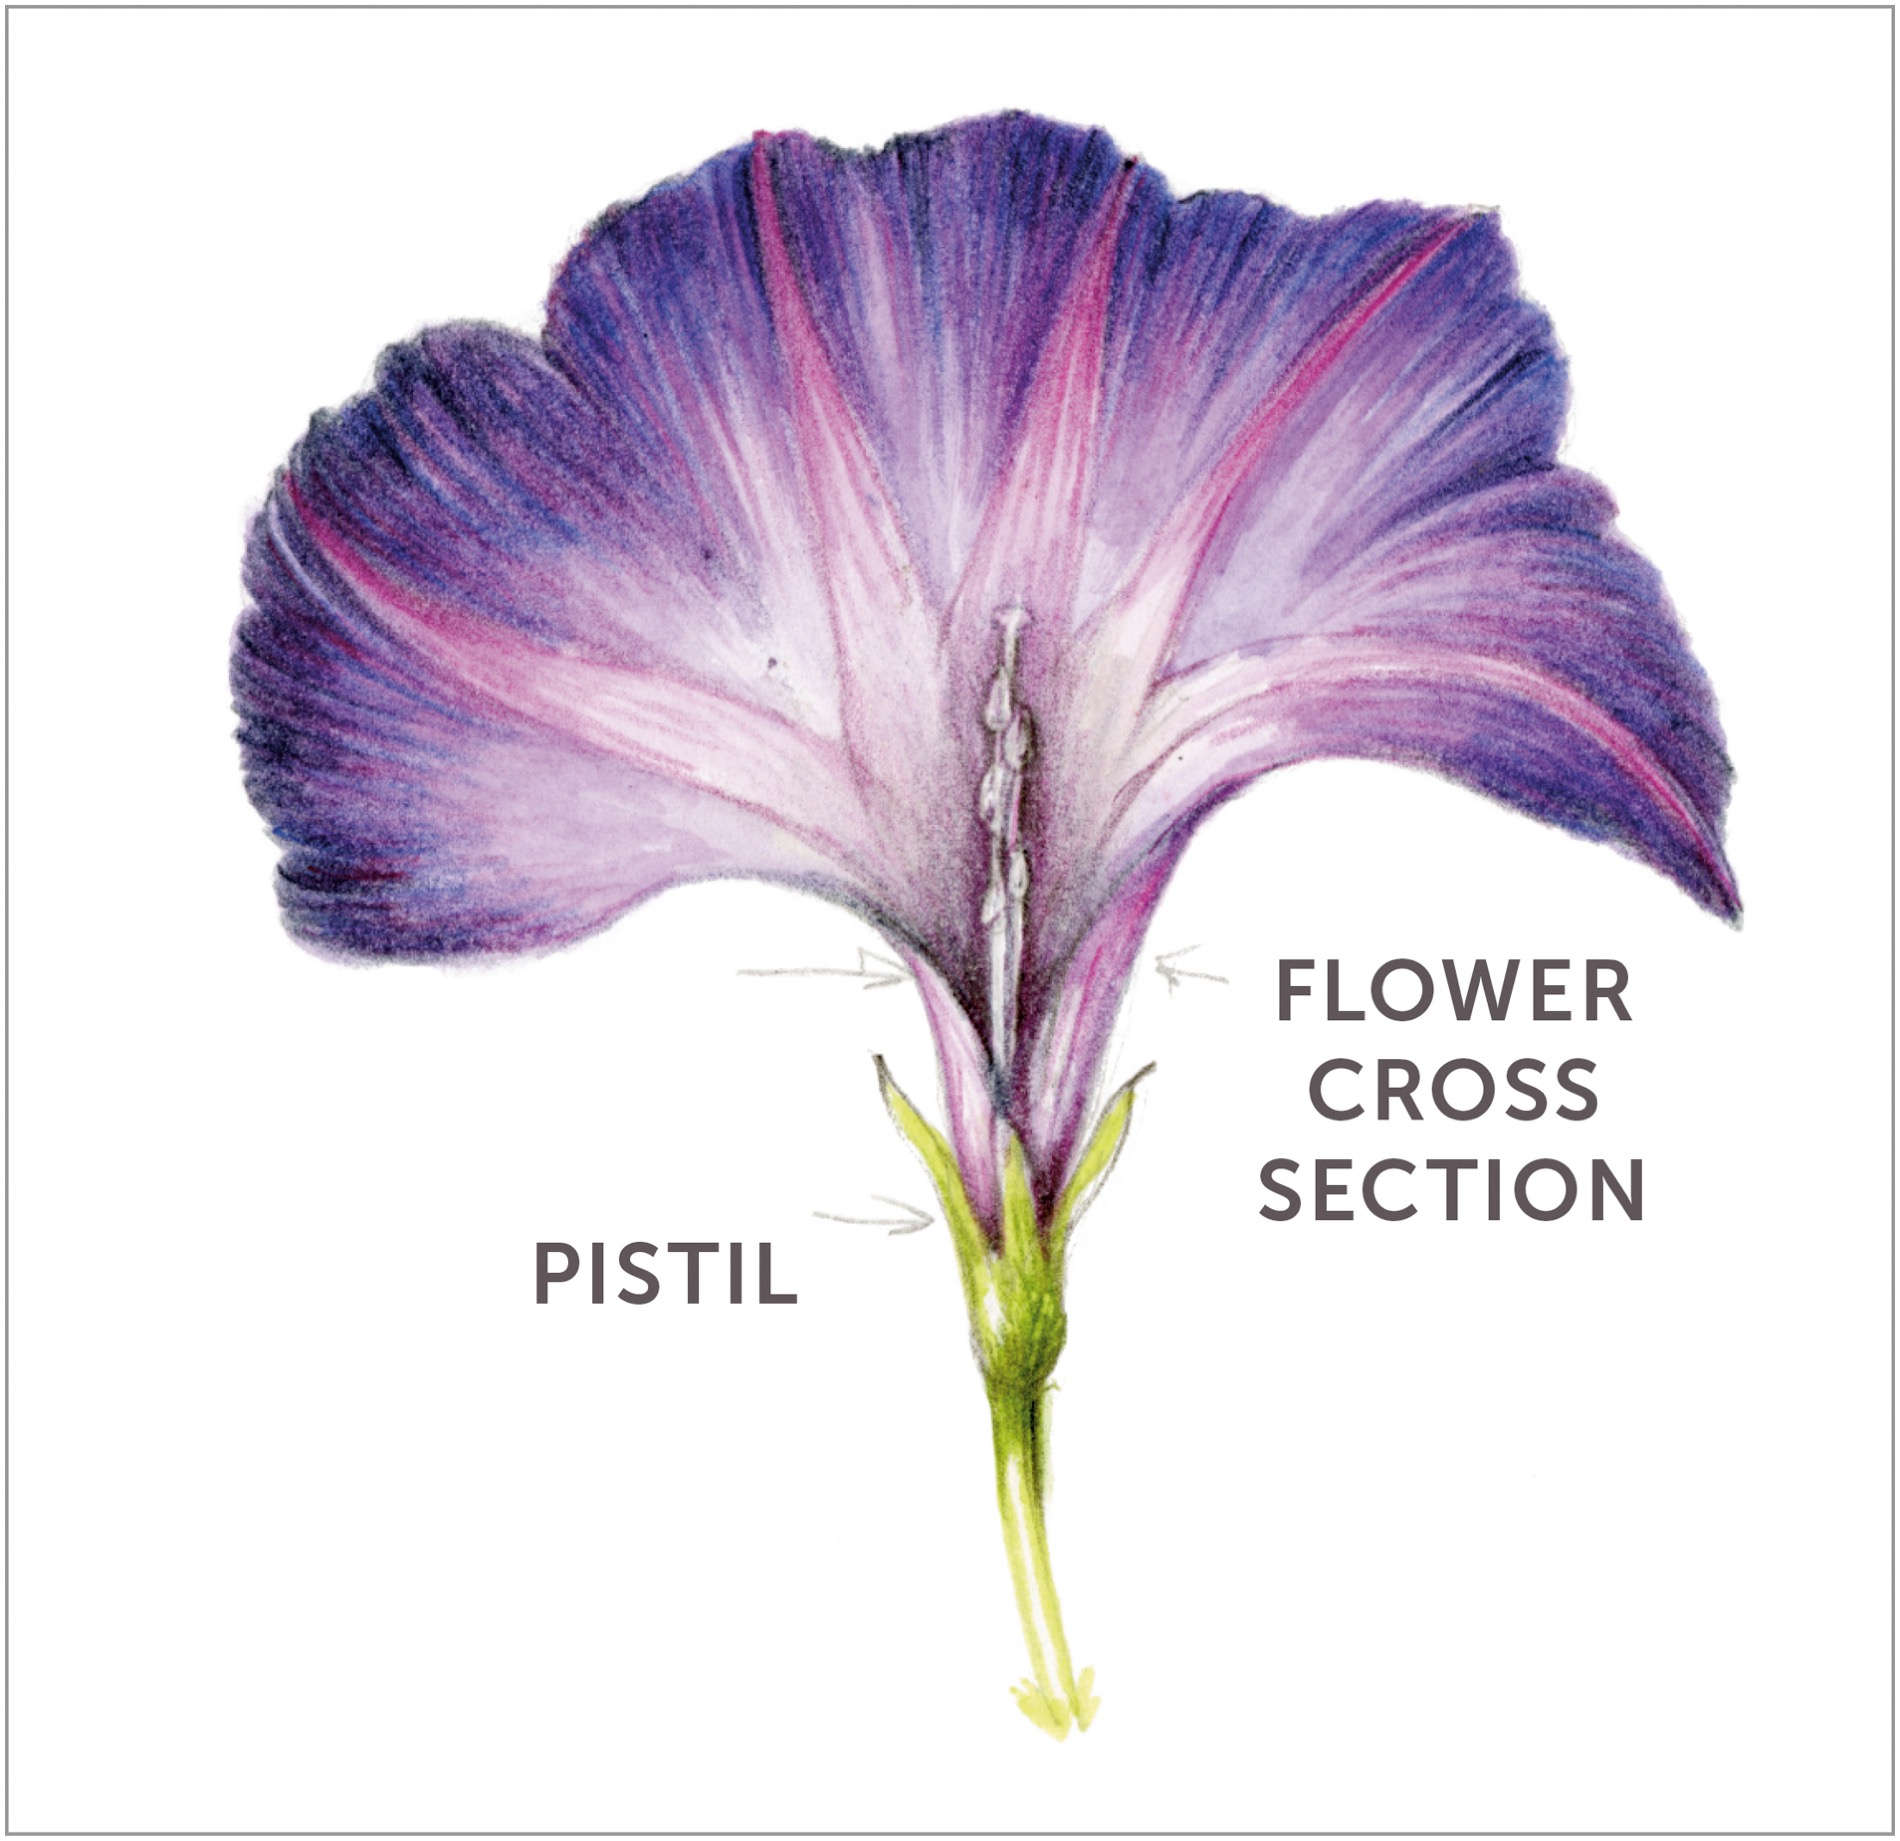
The PISTIL is the female part of the flower containing the stigma, style, and ovary. Inside the ovary are ovules, which are the immature seeds.
The STAMEN is the male part that contains a filament and an anther, which holds the pollen used to fertilize the ovules.
During fertilization, a pollinator inadvertently collects pollen on its body when in search of sweet nectar, which is located in the center of the flower. The pollinator moves from one flower to another. Pollen will land on the stigma, work its way through the style, and fertilize the ovules, which then develop into a fruit containing seeds. The seeds can grow into a new plant and continue the cycle of the plant year after year. I love to compare the structure of an ovary with the fruit or seed capsule that later develops. I often include these dissections in my drawings.
Once you’ve learned the basics of drawing several types and shapes of flowers, it’s time to explore all the components of a flowering plant. No need to feel you must do finished botanical drawings. The most important thing is that you practice, practice, practice! I love my plant process pages, where I can just take apart flowers, draw, and explore color and whatever else strikes me about my flower.
Understanding and drawing flowers is a lifelong pursuit, and aren’t we lucky to get to do this?! In this chapter, we’ll be drawing flowers in combination with other parts of the plant over and over again, so there’s no hurry to understand it all in this first lesson. Just explore and enjoy.


FLOWER SHAPES SIMPLIFIED
Thinking about the basic shapes of flowers and their symmetry is helpful when drawing an entire flower. Most flowers can be simplified into a few basic geometric shapes. Look at a flower and identify which simple shape is most like it. Tubular flowers are one of the simplest flower shapes. The petals are joined to form a tube either entirely or partly, which is a good shape for drawing, because the three-dimensional form is very evident.
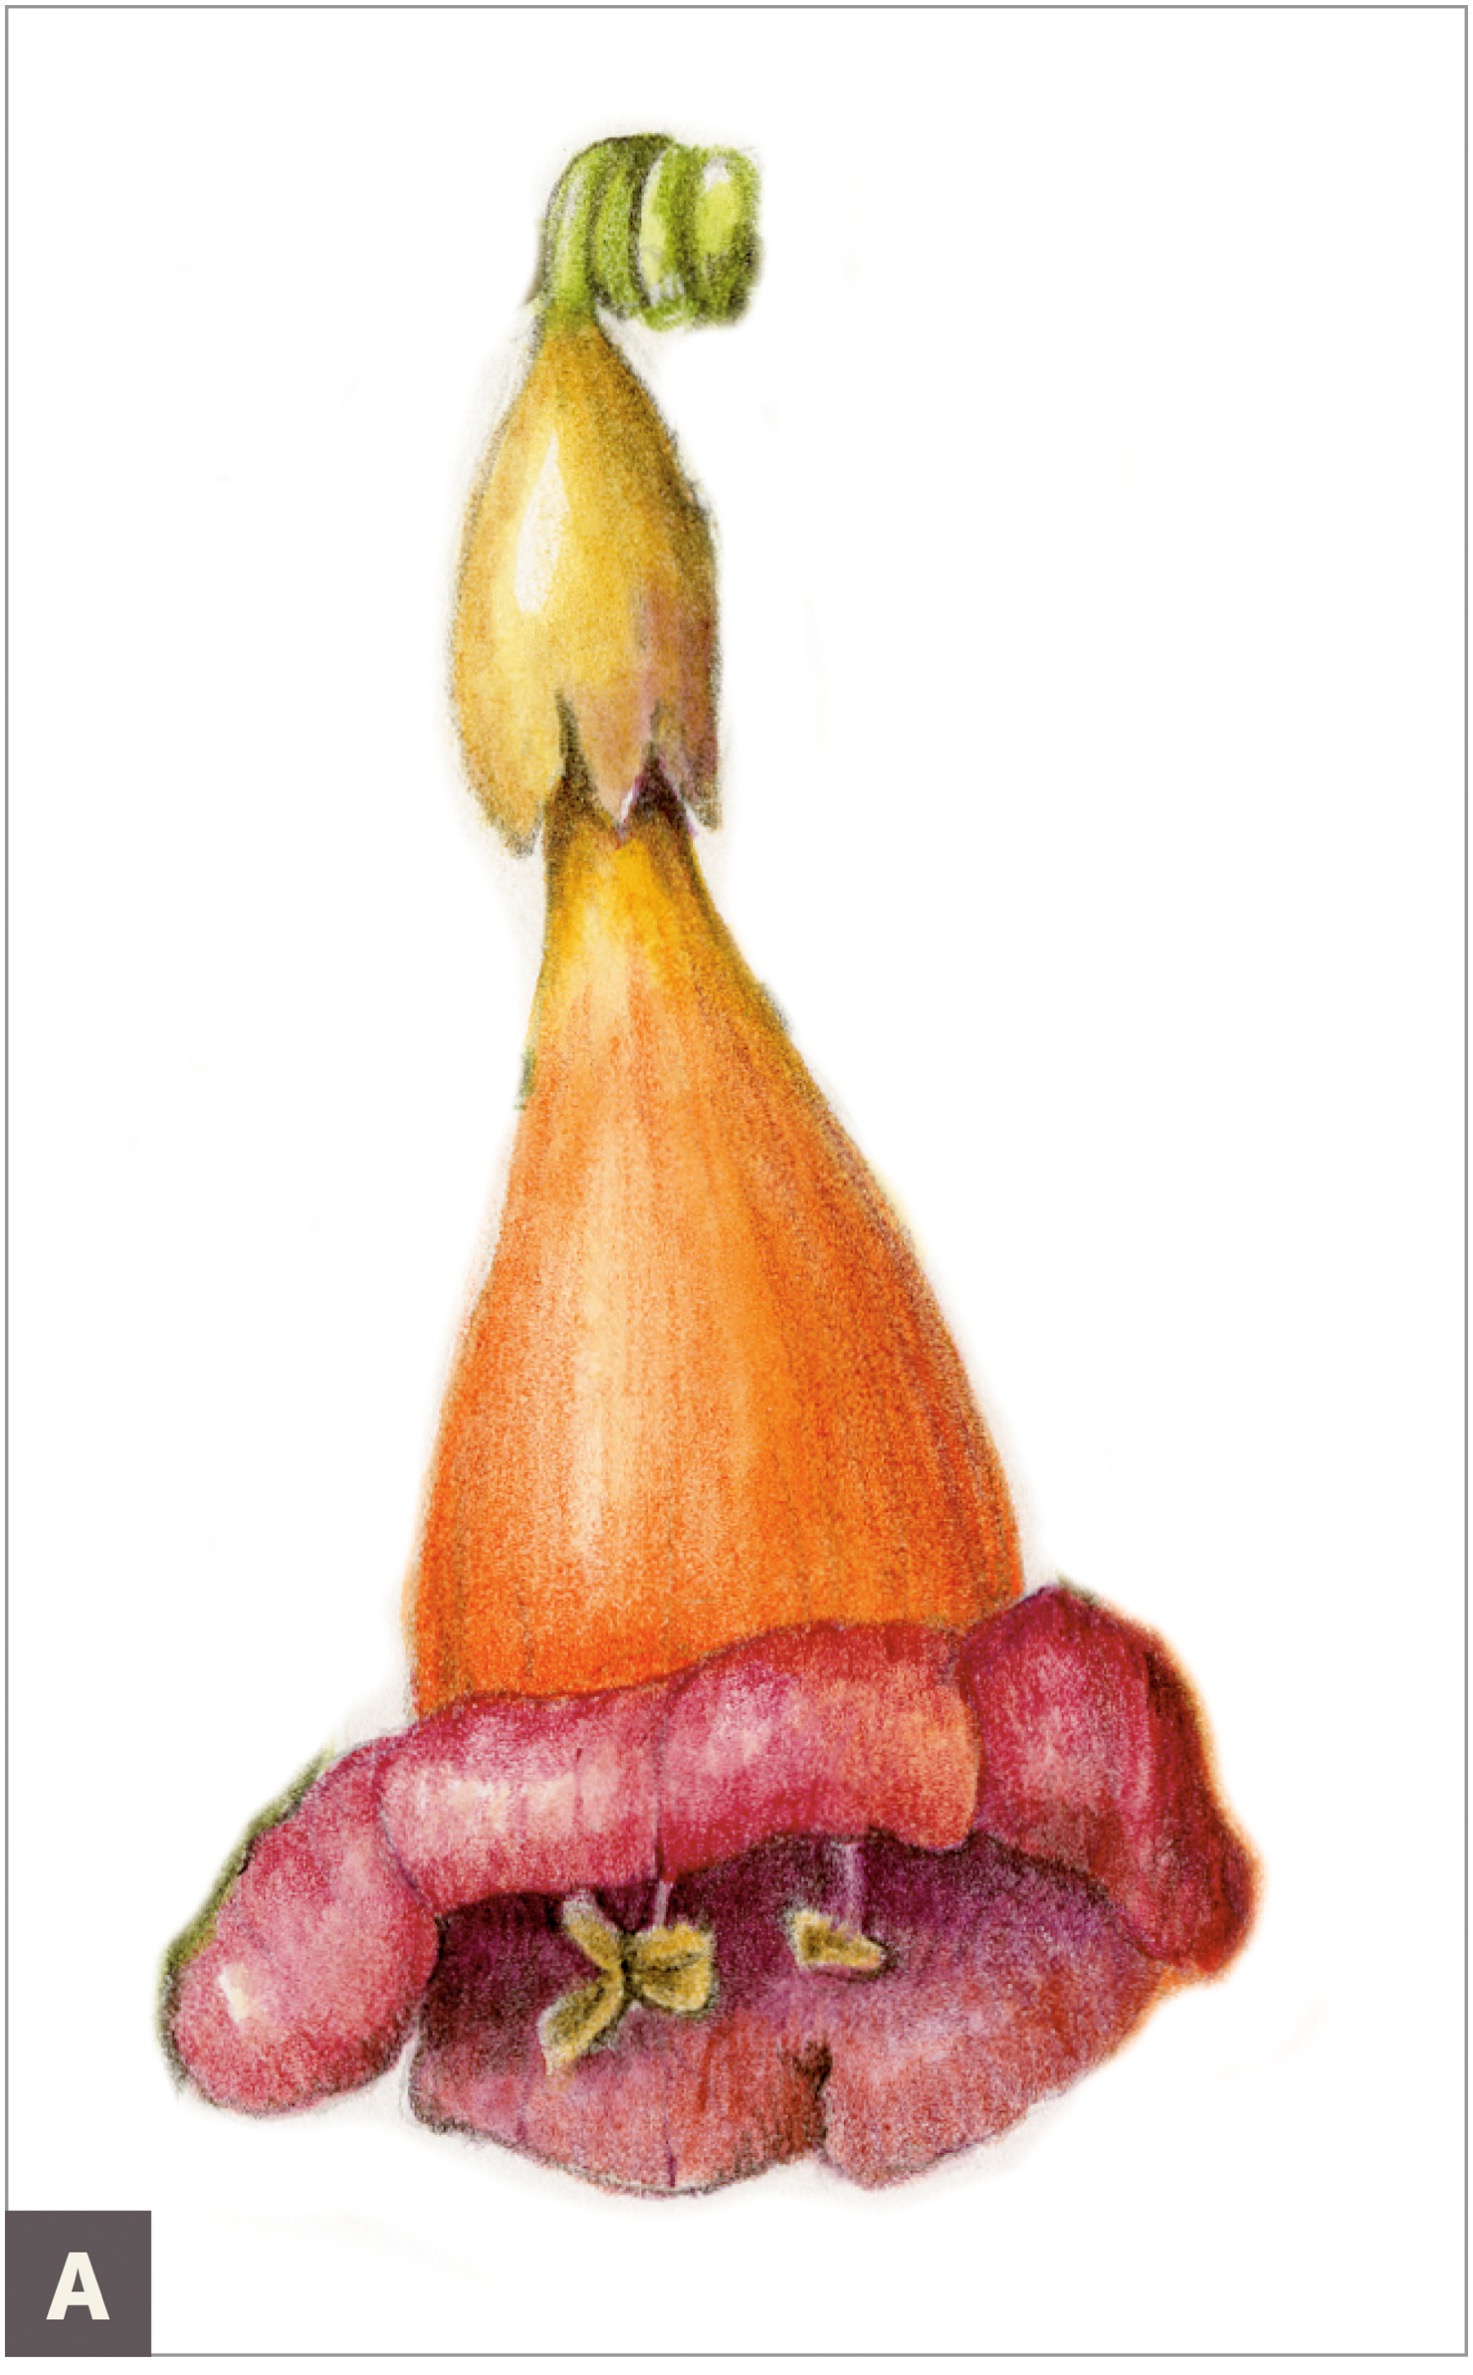
TUBULAR OR TRUMPET SHAPE: A flower with a tube formed of united petals, often separating at the mouth into a flared shape where the petals often curl back, such as a trumpet vine and an allamanda. (A)
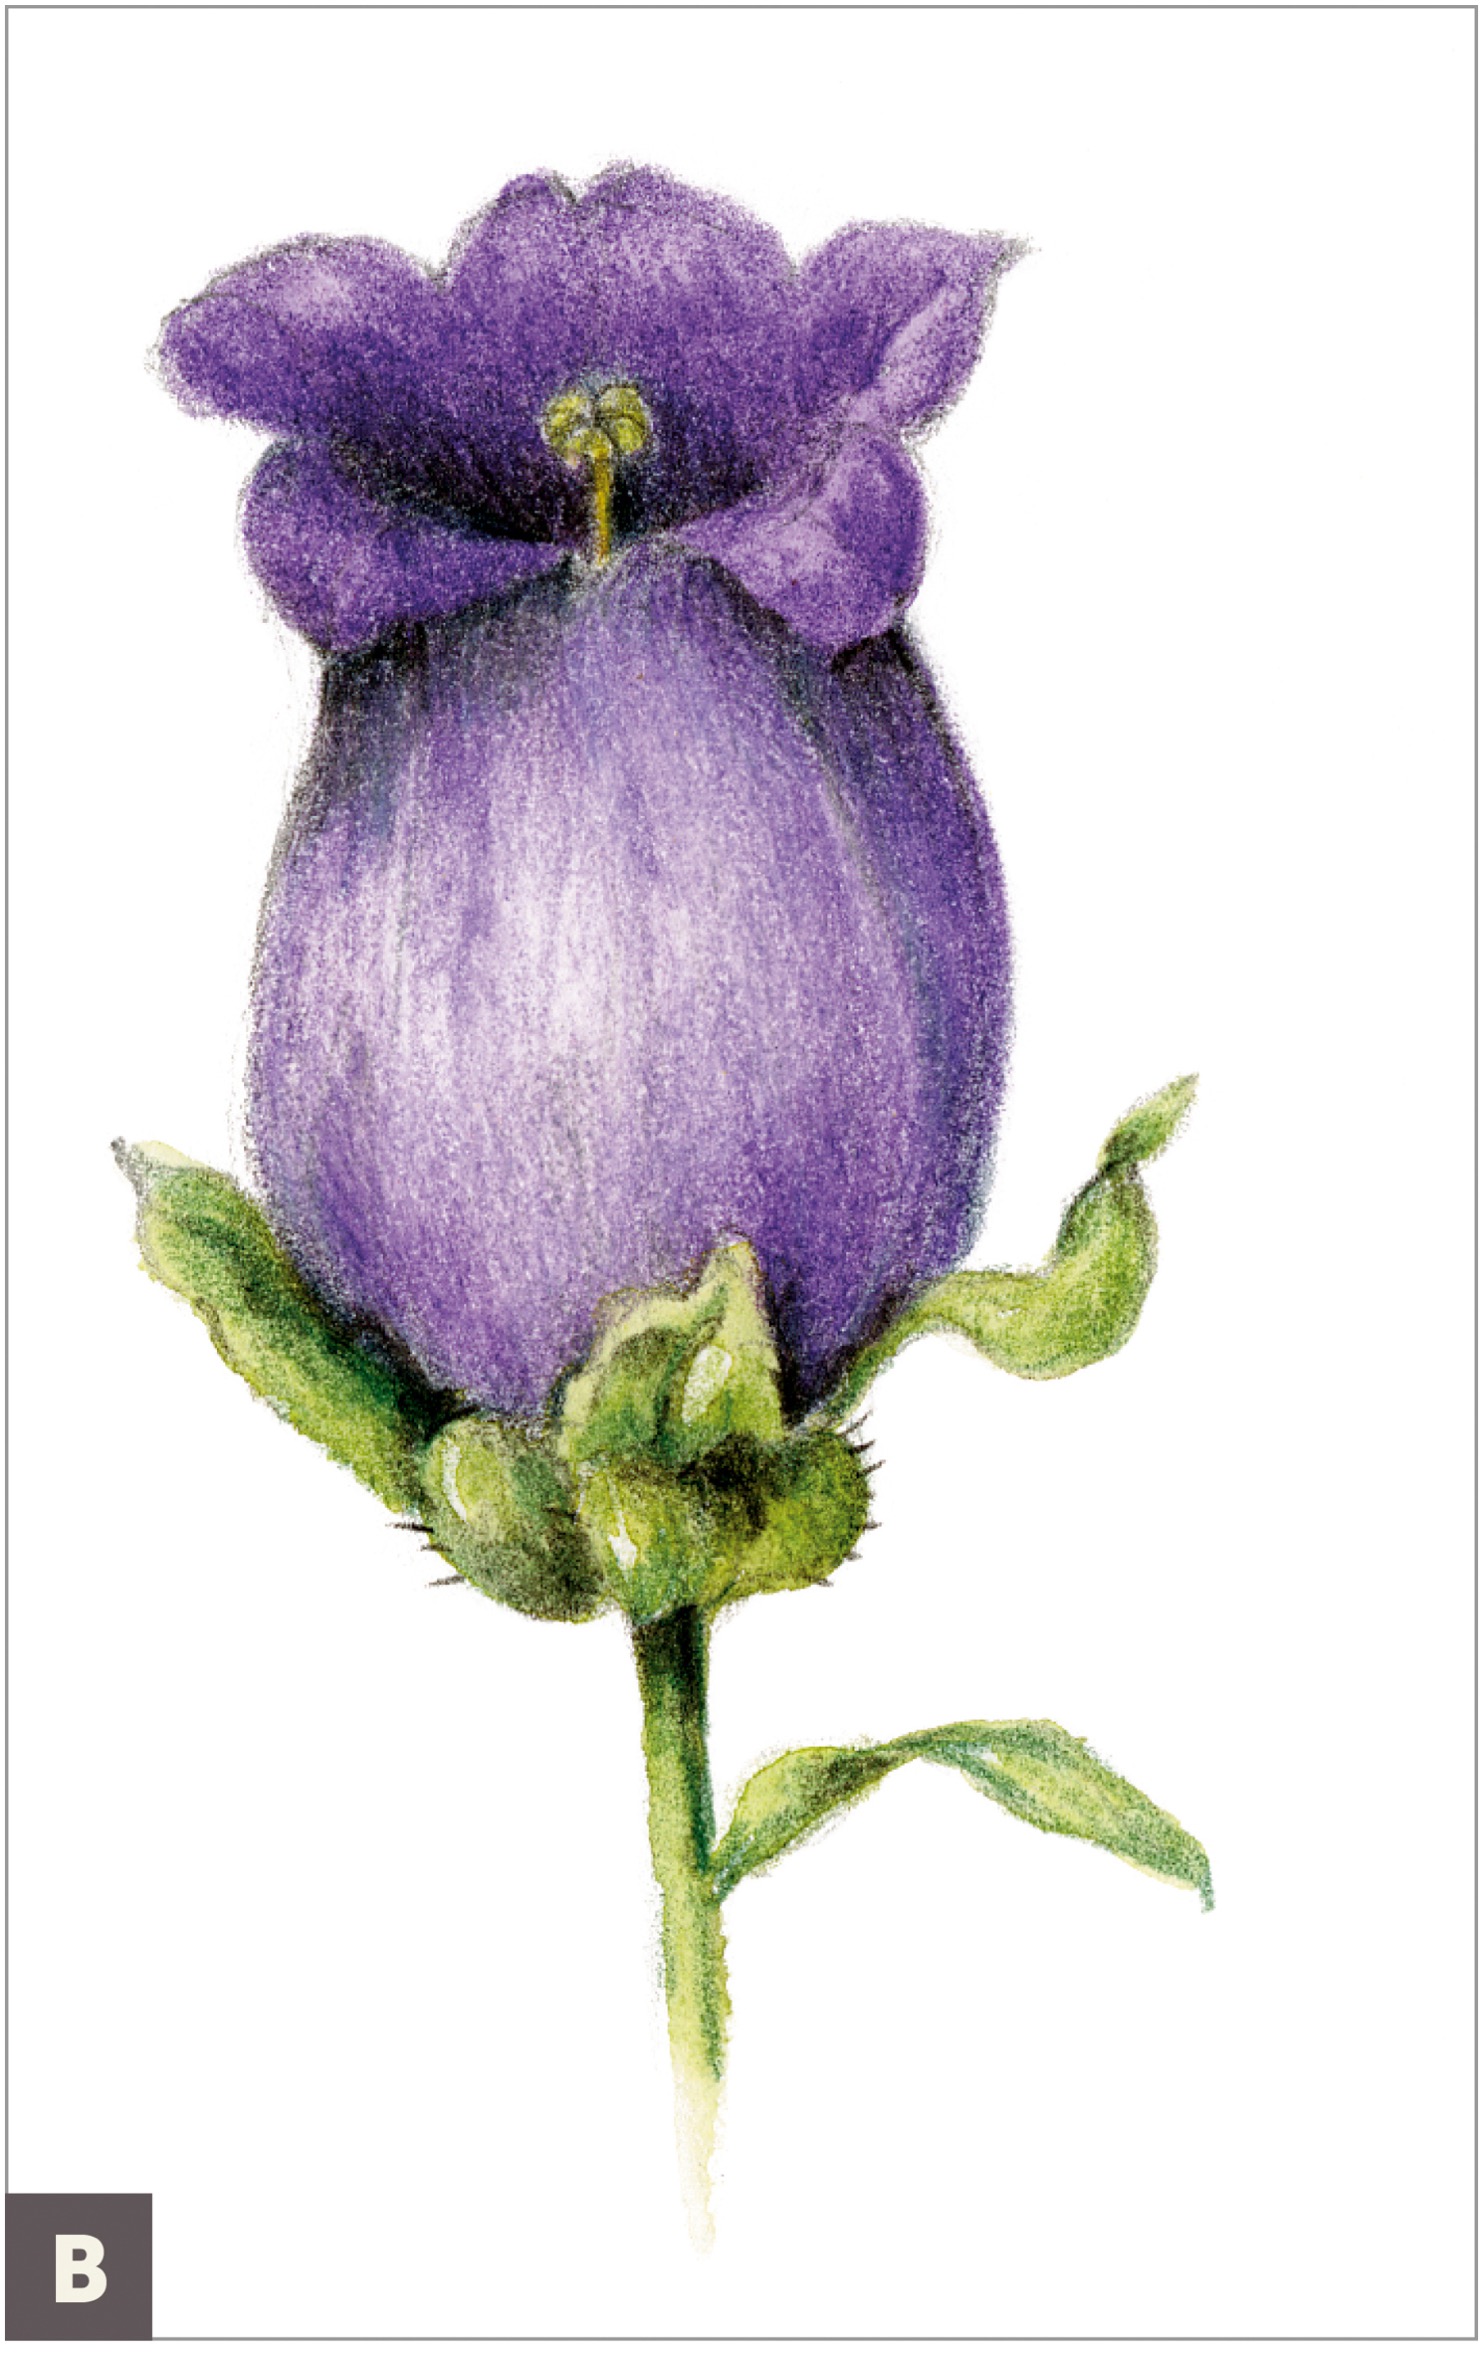
CAMPANULATE OR BELL SHAPE: A flower with a wide tube and flared petal tips, typical of the bellflower family, such as a nectar campanula or other campanula. (B)
FUNNEL FORM OR FUNNEL SHAPE: A flower that widens gradually from the base, ending in an open or flared shape, such as lily, morning glory, or azalea. (C)

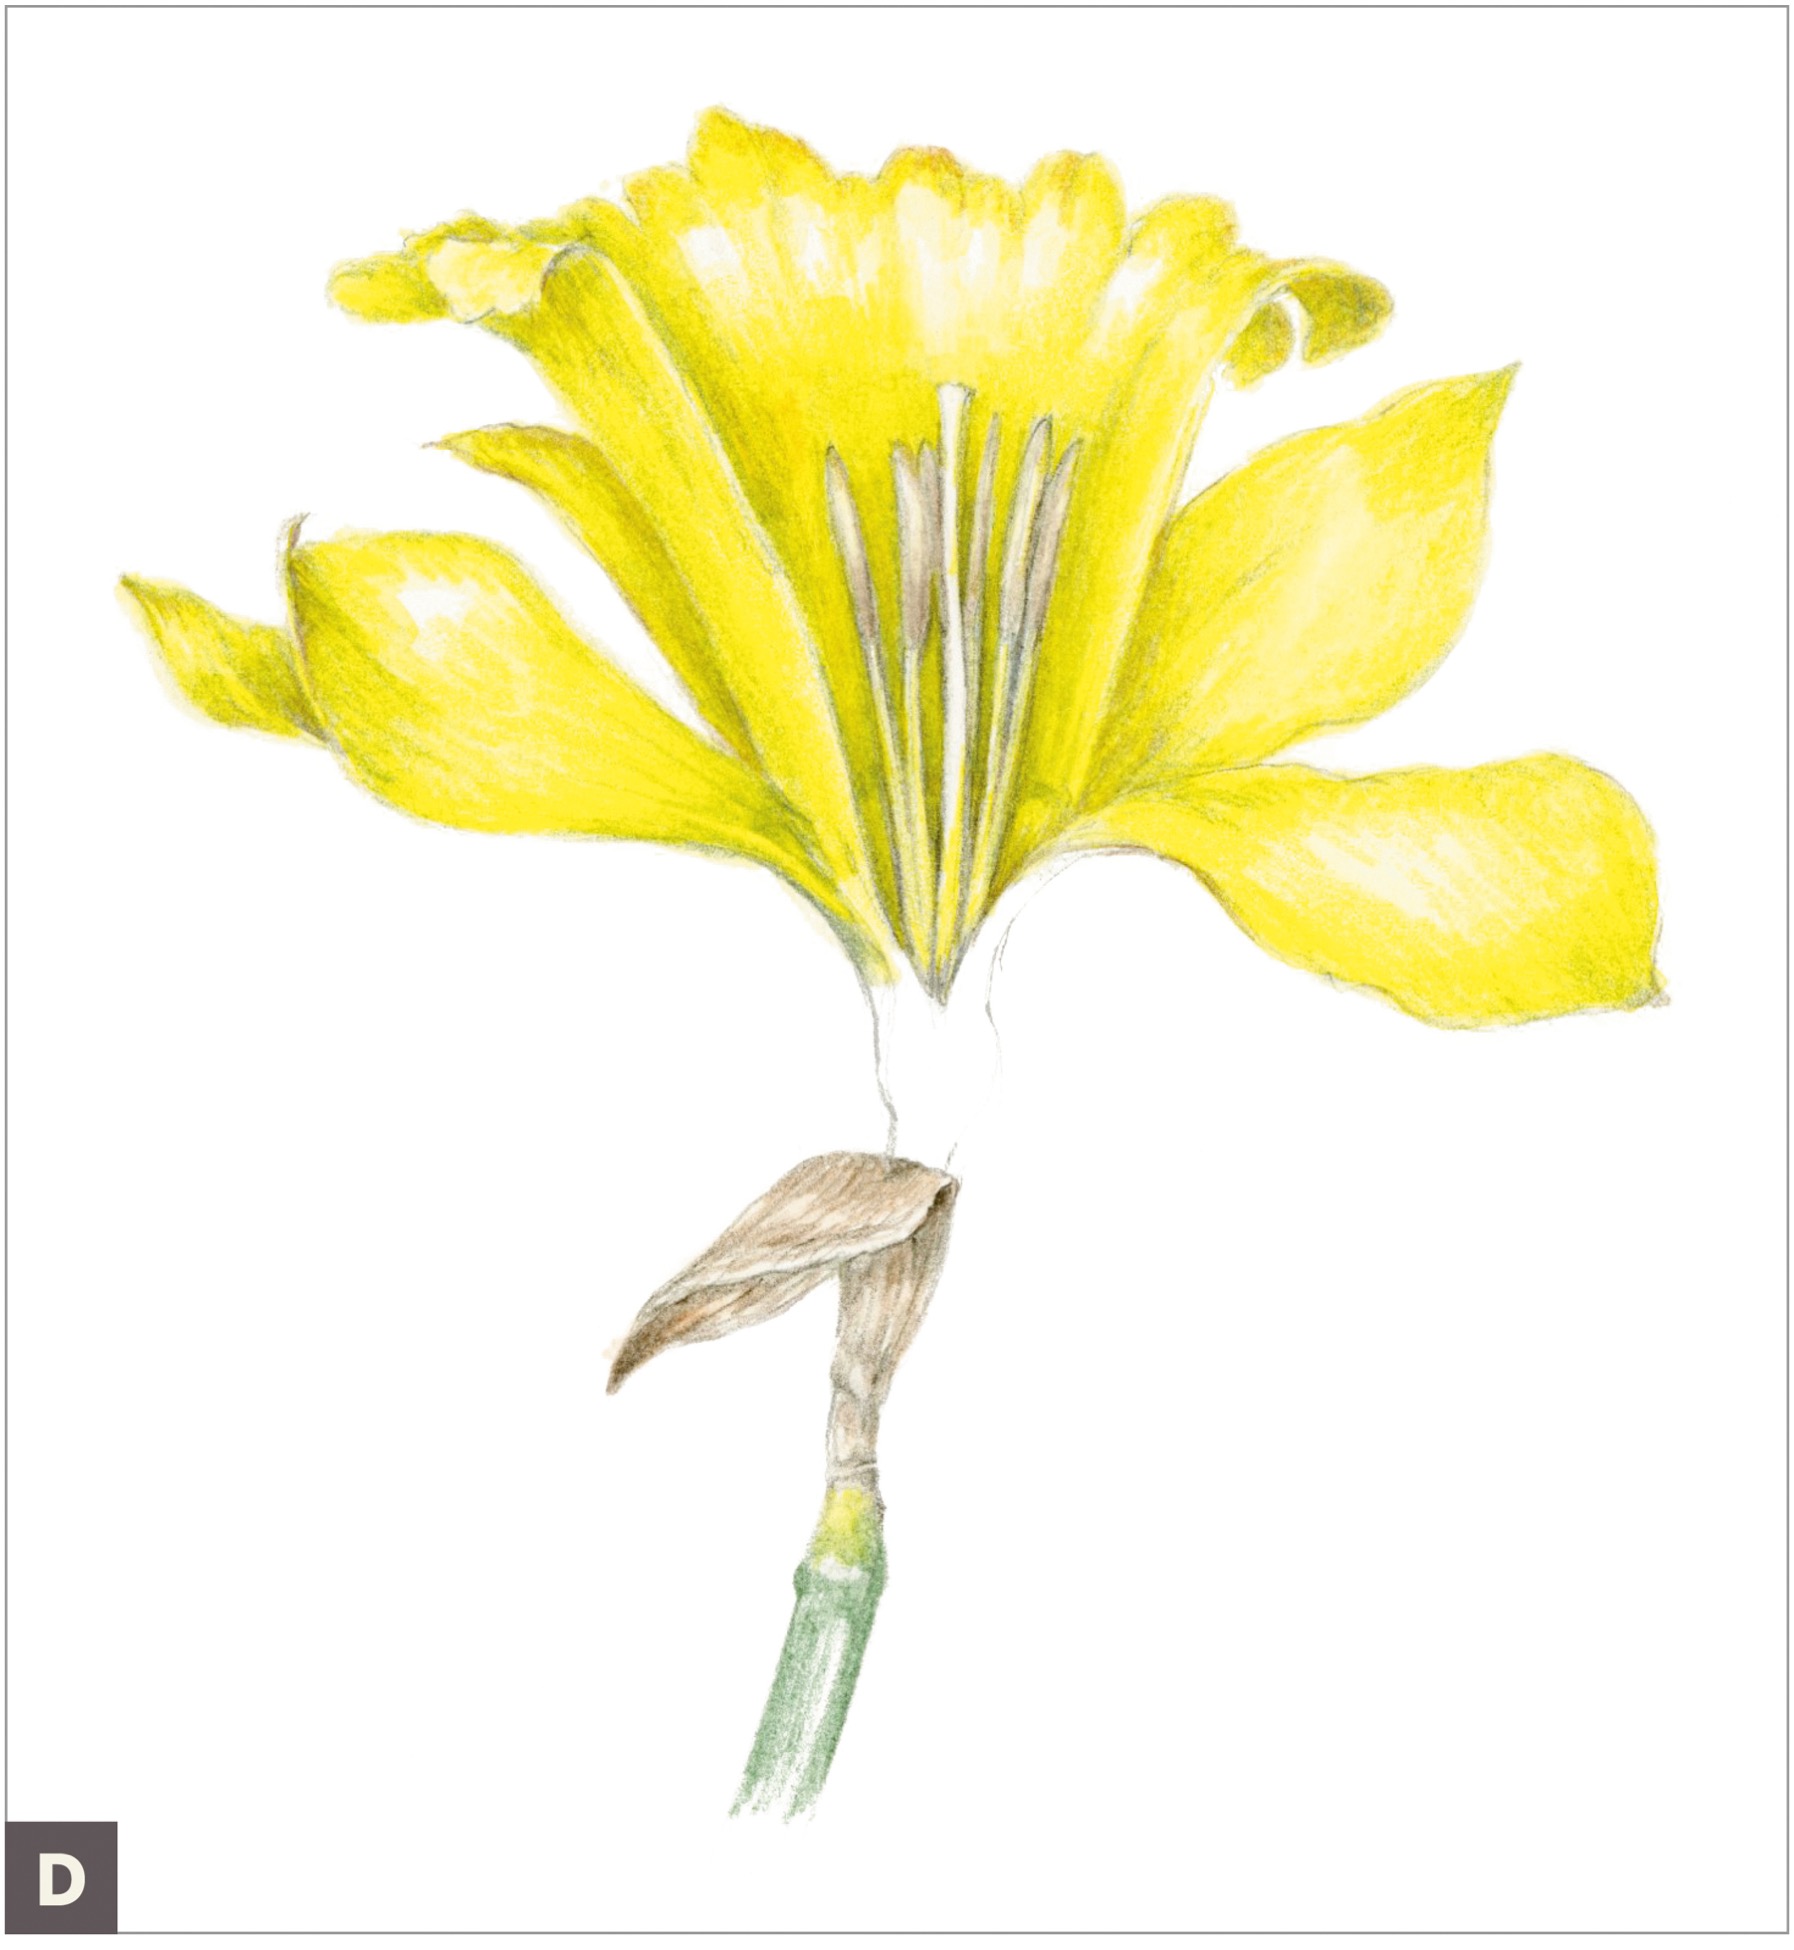
CUP SHAPE: A flower that widens gradually from the base and is formed by individual petals (collectively known as tepals). The tepals conform to a cup shape, which can be seen in flowers such as a tulip or crocus. (D)

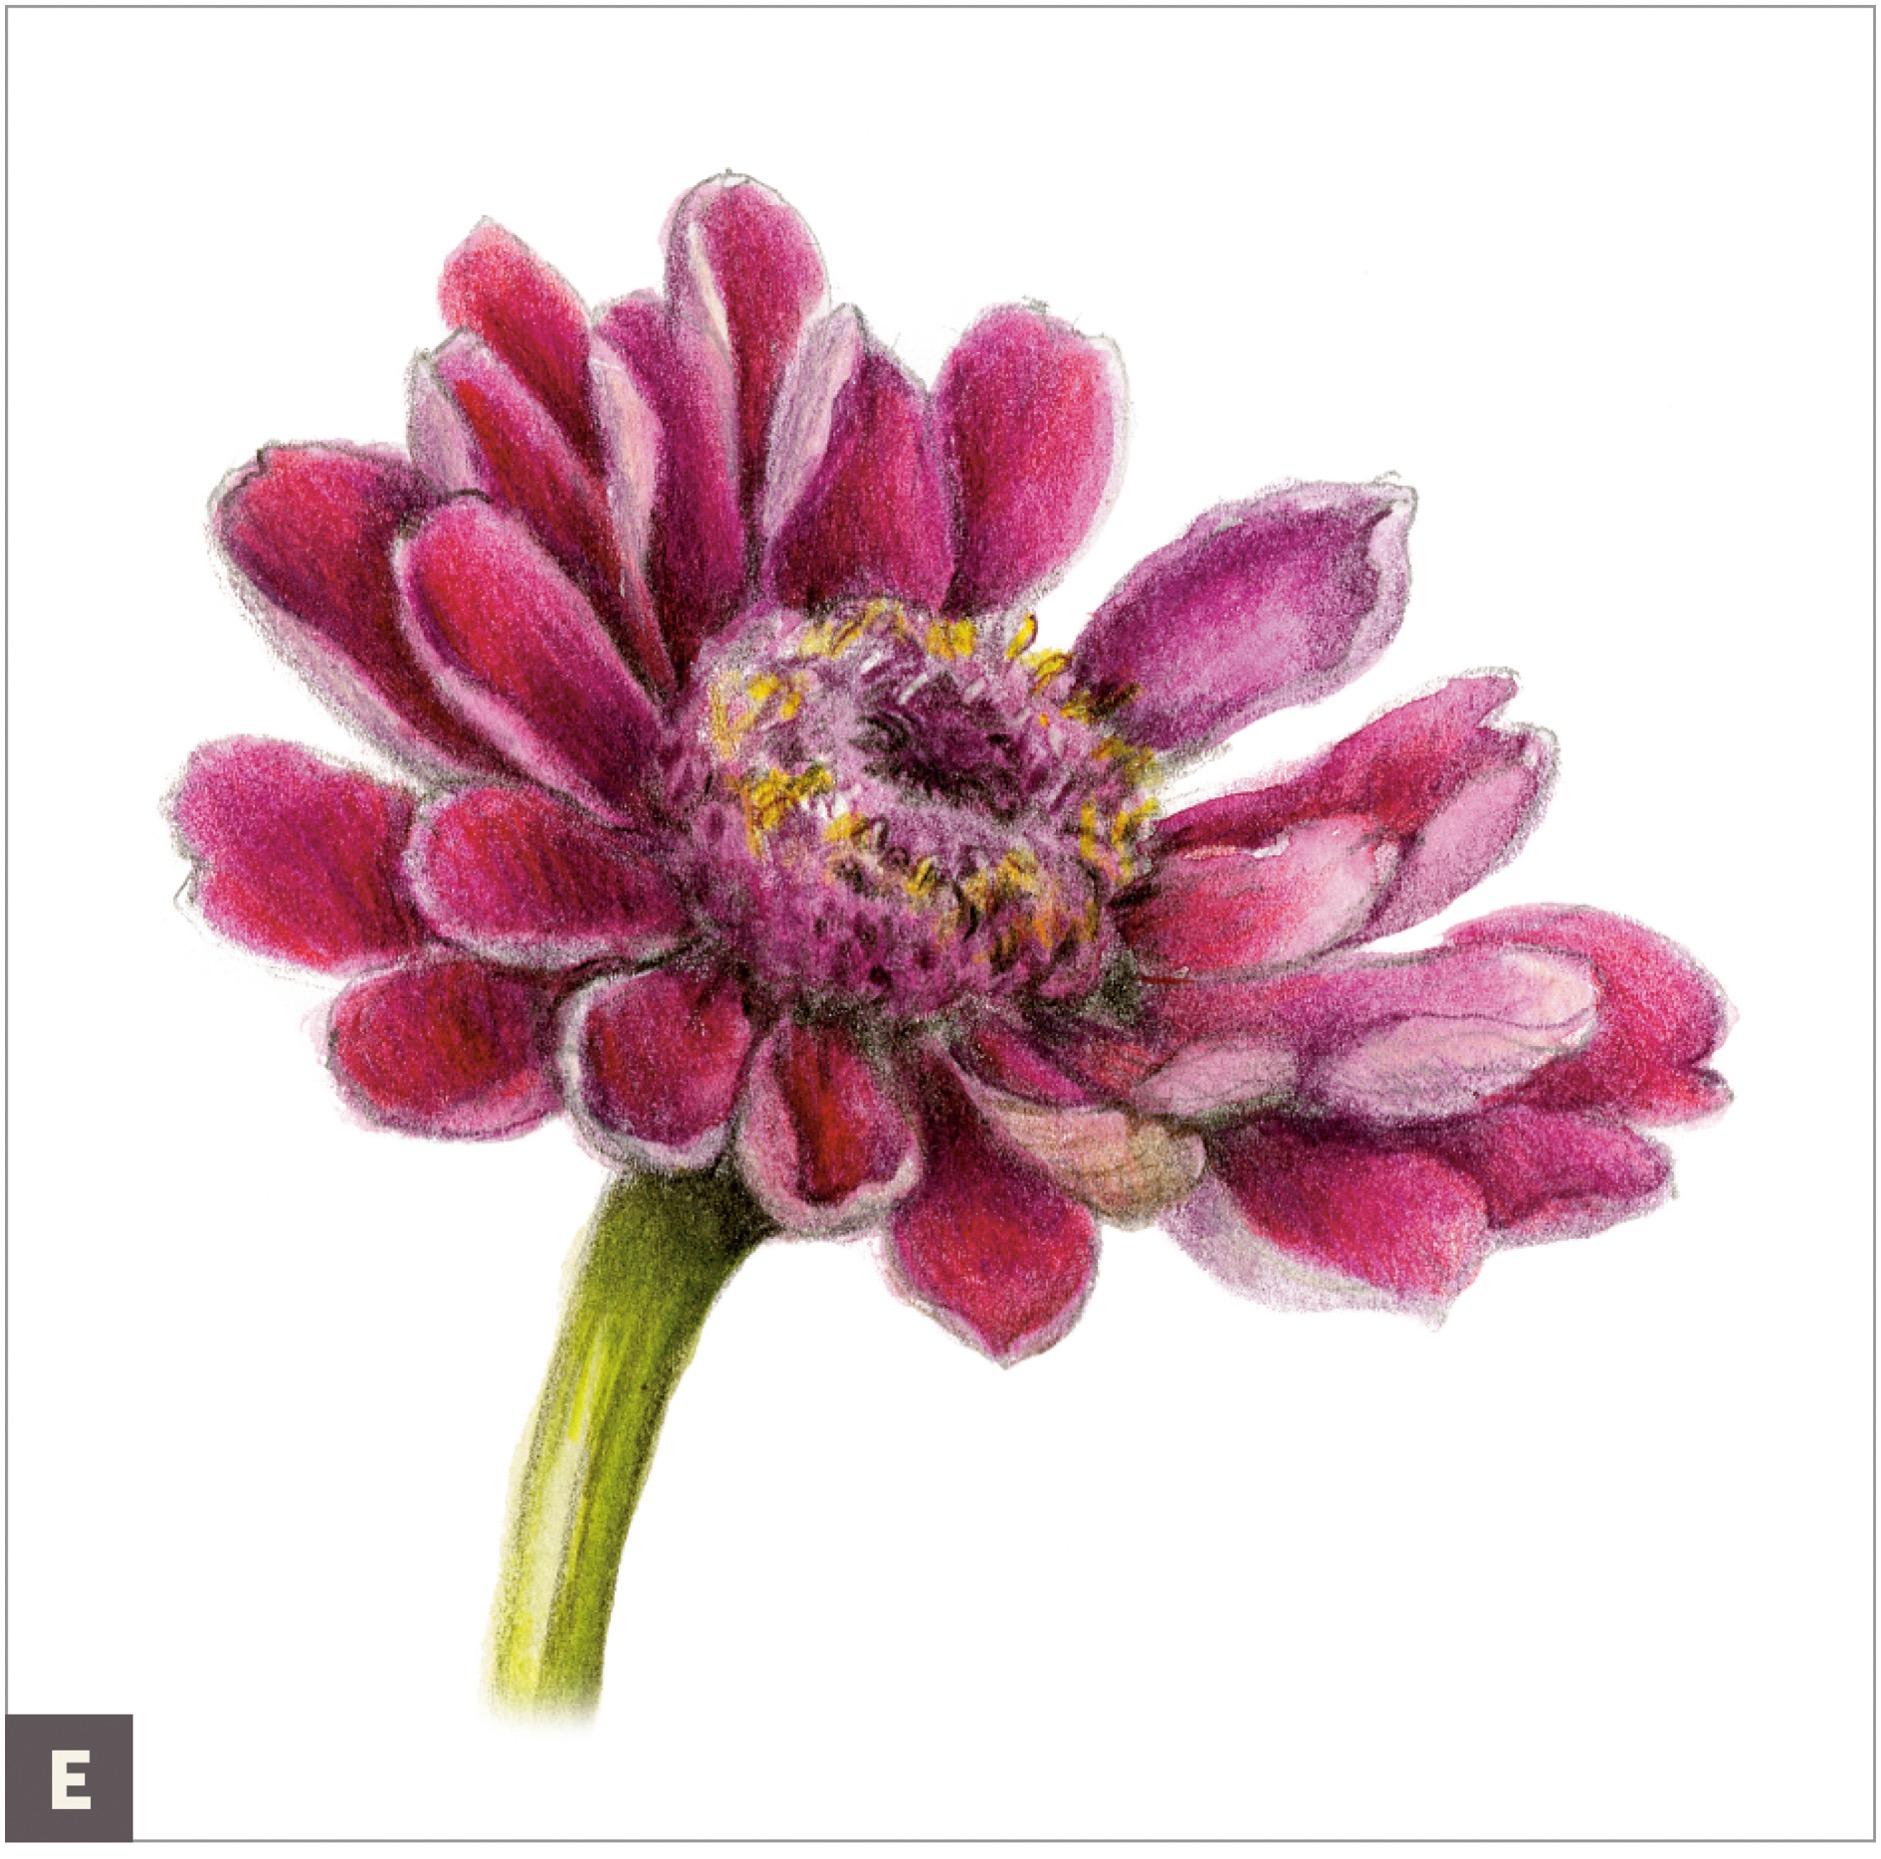
ROTATE OR ELLIPTICAL SHAPE: A disk-shaped flower that is mostly flat and circular, such as daisies, anemones, and sunflowers. (E)
COMBINATION SHAPE: A trumpet shape and a rotate or elliptical shape together, such as a daffodil. (F)


FLOWER SYMMETRY
Many flowers are symmetrical and can be segmented into identical sections. Some blooms have no axis because they grow in a spiral. Knowing the symmetry of a flower makes it easier to draw.
RADIAL SYMMETRY: The arrangement of parts is around a single main axis that will produce a mirror image on the plane at any angle when dissected in half. Think of the spokes on a bicycle wheel. Flowers such as zinnias and anemones have radial symmetry. (A)
BILATERAL SYMMETRY: The structure is a mirror image on either side of a line drawn vertically through the middle. Flowers that have bilateral symmetry include wisteria, orchid, mouthy flowers in the mint family, lavender, and wild bergamot. (B)

Drawing a Petal
Let’s start simple with a single petal from a flower. (The tulip petal I’ve used in my drawings is a wonderful choice.) This is a good way to study a flower, enjoy drawing and color matching, and closely inspect nature’s details. You’ll also practice the colors, patterns, and shadows you might use when drawing a whole flower. Another reason to do this is because it’s just so much fun. I could do a petal a day endlessly and be happy, even if I never draw that particular flower in its entirety. Drawing a petal works as a daily meditation. If you have a busy schedule, consider making a petal a day your drawing practice, at least in the spring and summer. (See this page for a complete drawing of the tulip.)
SUBJECT
Any petal, about 2 inches high, from any large flower, such as a tulip, daffodil, lily, rose, or iris
ADDITIONAL MATERIALS
• Watercolor brush #2
• Watercolor pencils and colored pencils to match the local color of your petal
• Gray Verithin pencil
• Black Verithin pencil
• Ivory colored pencil #103
• Dark Sepia colored pencil #175
COLORED PENCILS
#103
#175

Carefully choose a petal that isn’t too small and pull it off of your flower. Place the petal on your page, and with a graphite pencil, lightly draw it life-size. Set up a good light source, and note where the highlights appear.
Use a #2 brush to paint a watercolor wash as your first layer, leaving the highlights blank. (A)

If your petal has variegated color, lightly draw in the color variation with colored pencils, feathering one color into the next to keep it subtle. Look closely at your petal’s variegation and try to copy it. As you draw, follow the veining pattern direction, which mimics cross-contour lines on the surface.
With Gray and Black Verithin pencils, add a subtle cast shadow. (B)

Add a layer of watercolor on top, leaving the highlights empty. (C)

Continue to layer colored pencils. Close in on the highlights, making them shimmer. (D)

Burnish with an Ivory colored pencil, add more layers of color, and finish the cast shadow with a touch of Dark Sepia colored pencil.
Do another view of your petal—or a different petal if you can’t resist! (I couldn’t.) (E)

Making an Herbarium Page
Drawing a whole flower can be quite overwhelming, but if you start by observing a flower, taking it apart, and studying the components, drawing an entire flower will be a bit easier. Make sure to refer to the image on this page that labels the parts of the flower clearly. It feels manageable to take a flower apart, observe its structure, draw its parts individually, and make color notes. Only after doing this do I gain the confidence to tackle a whole flower. This process is a wonderful learning experience that invites you into the inner workings of nature. Even though I’ve drawn hundreds of flowers, I still love to start by closely observing a flower before I draw it. I sometimes imagine that the flower appreciates the time I am taking to understand its structure and rewards me by helping me with the drawing. It’s a good idea to have several flowers of the same species available to do this exercise so that you’ll still have a complete flower intact to draw later on. It’s also helpful to have a magnifying glass and a loupe that magnifies up to 30X.
SUBJECT
Daffodil (which is a combination flower shape) or other flower, such as a tulip, lily, or iris
ADDITIONAL MATERIALS
• Clippers
• X-Acto knife or other dissecting blade
• Magnifying glass or other magnifier
• Scotch tape (optional)
• Plain paper of any kind
Use clippers to cut a few daffodils and take them to your table to work.
Use an X-Acto knife to carefully take apart one of the flowers, starting with the petals.
Carefully slice open the corona, the center tubular shape of the daffodil. This process will expose the reproductive parts, all of which emanate from the center axis of the stem. You’ll find six stamens (male parts), each consisting of an anther (top part) full of pollen and a filament (lower shaft). Lay them on your paper and tape them down.
In the center is the pistil (female part) that consists of the stigma (which has three lobes) at the top and the ovary (which has three chambers) at the bottom. Examine the reproductive parts of your daffodil through a magnifying glass. It’s easier to see details once you’ve separated the parts.
You can dissect the ovary, which is located below the petals on the daffodil. It is slightly rounded and creates a bulge in the stem. This is called an inferior ovary. There are two ways to dissect the ovary: vertically or horizontally. Slice the ovary in half vertically to reveal the rows of ovules, horizontally to reveal the three carpels or chambers of the ovary. You can see different things about the structure of the ovary depending on which dissection you choose.
Arrange all the parts on a plain piece of drawing paper. Label the parts, and then either tape them down or leave them loose. To document the flower’s structure, include a whole flower and some leaves. You can also tape flat parts, such as petals, into your drawing sketchbook.

Making a Process Page from Your Herbarium Page
The goal of this lesson is to make a study page with drawings of the separated parts from your herbarium page, and to practice color mixing. These exploratory pages of dissected flower drawings are wonderful to look at, and they allow the viewer to see what you have experienced and discovered. Have a botany book available for reference or use online research to help with labeling and understanding the flower structure. On your page, consider recording the number of petals and details about the reproductive parts and leaves.
You can tape parts onto your process pages. These elements add visual interest to a page. Simple flowers with large reproductive parts—such as daffodils, tulips, lilies, irises, and anemones—are great, because you can easily observe the flower’s structure.
Follow the same procedure in this lesson with any other flower types.
SUBJECT
Your pressed flower from the previous lesson
ADDITIONAL MATERIALS
• Your herbarium page from the previous lesson
• Colored pencils and watercolor pencils to match the local color of your flower
• Earth Green colored pencil #172
• Watercolor brush #2
• Magnifying glass or other magnifier
COLORED PENCILS
#172
To study a petal, put one right on the paper next to where you mix your colors as a simple way to match the hue. Draw one individual petal life-size to understand the structure, and practice color blending so that when you start rendering a full flower, you’ll know what colors to use. Blend the shadow color as well on the petal so that you work out all your color options now. (A)

To draw the whole dissected flower, complete an outline drawing and tone overlaps with Earth Green colored pencil, taking special care to tone behind all the reproductive parts. (B)

Use a #2 brush to add a watercolor wash behind the reproductive parts on the flower, leaving some highlights with graduated yellow watercolor. (C)

Add details on the flower and stem with colored pencils. (D)
Draw other parts of the flower on your page. Look at your dissected ovary from your herbarium page using a magnifying glass. Draw the ovary with the ovules inside. Then draw the reproductive parts you see.
Draw any other parts of the flower that intrigue you, such as close-ups of leaves, stamens, or pistils. (E)

Drawing a Morning Glory (Tubular Flower)
I love to draw tubular flowers because the structure can look dramatic and three-dimensional. To do this, I choose a view that shows the tube shape as it opens into a rounded flower, with emphasis on the deep, mysterious center that disappears into the tubular shape. While I was observing these flowers growing on my porch, I watched as a bee flew inside a morning glory and wiggled down into the center of it, down into the tube, and stayed inside the flower for quite a while. The bee then had to backstep its way out of the flower. I was so excited to discover this! I always encourage you to study your plants in the environment as they grow whenever possible. Nature will be alive and active around you, and there’s so much to learn from this! For example, if you pay attention to the growing vines of the morning glory, you can find all stages of development, from bud to flower to seedpod, which is a wonderful way to build a composition.
Refer to this page for the basics of perspective and measuring. Remember to use ellipses to help measure and understand the three-dimensional structure of a flower. Though I recommend setting up a light source to help you see your shadows and highlights on the real flower, I exaggerate the light and shadows to create the illusion of the three-dimensional structure based on the overlaps and surface contour. Following is a study dissection I made of a morning glory flower as a warm-up before I did this lesson, and I encourage you to make these exploratory pages whenever you have enough flowers and time. Repeat this lesson many times with other tubular flowers. Some of my favorites are trumpet vines, campanulas, and daffodils.
SUBJECT
• Morning glory
ADDITIONAL MATERIALS
• Frog prong or smaller jar (optional)
• Dark Sepia colored pencil #175
• Tracing paper
• Watercolor brush #2
• Colored pencils and watercolor pencils to match the local color of your flower
COLORED PENCILS
#175
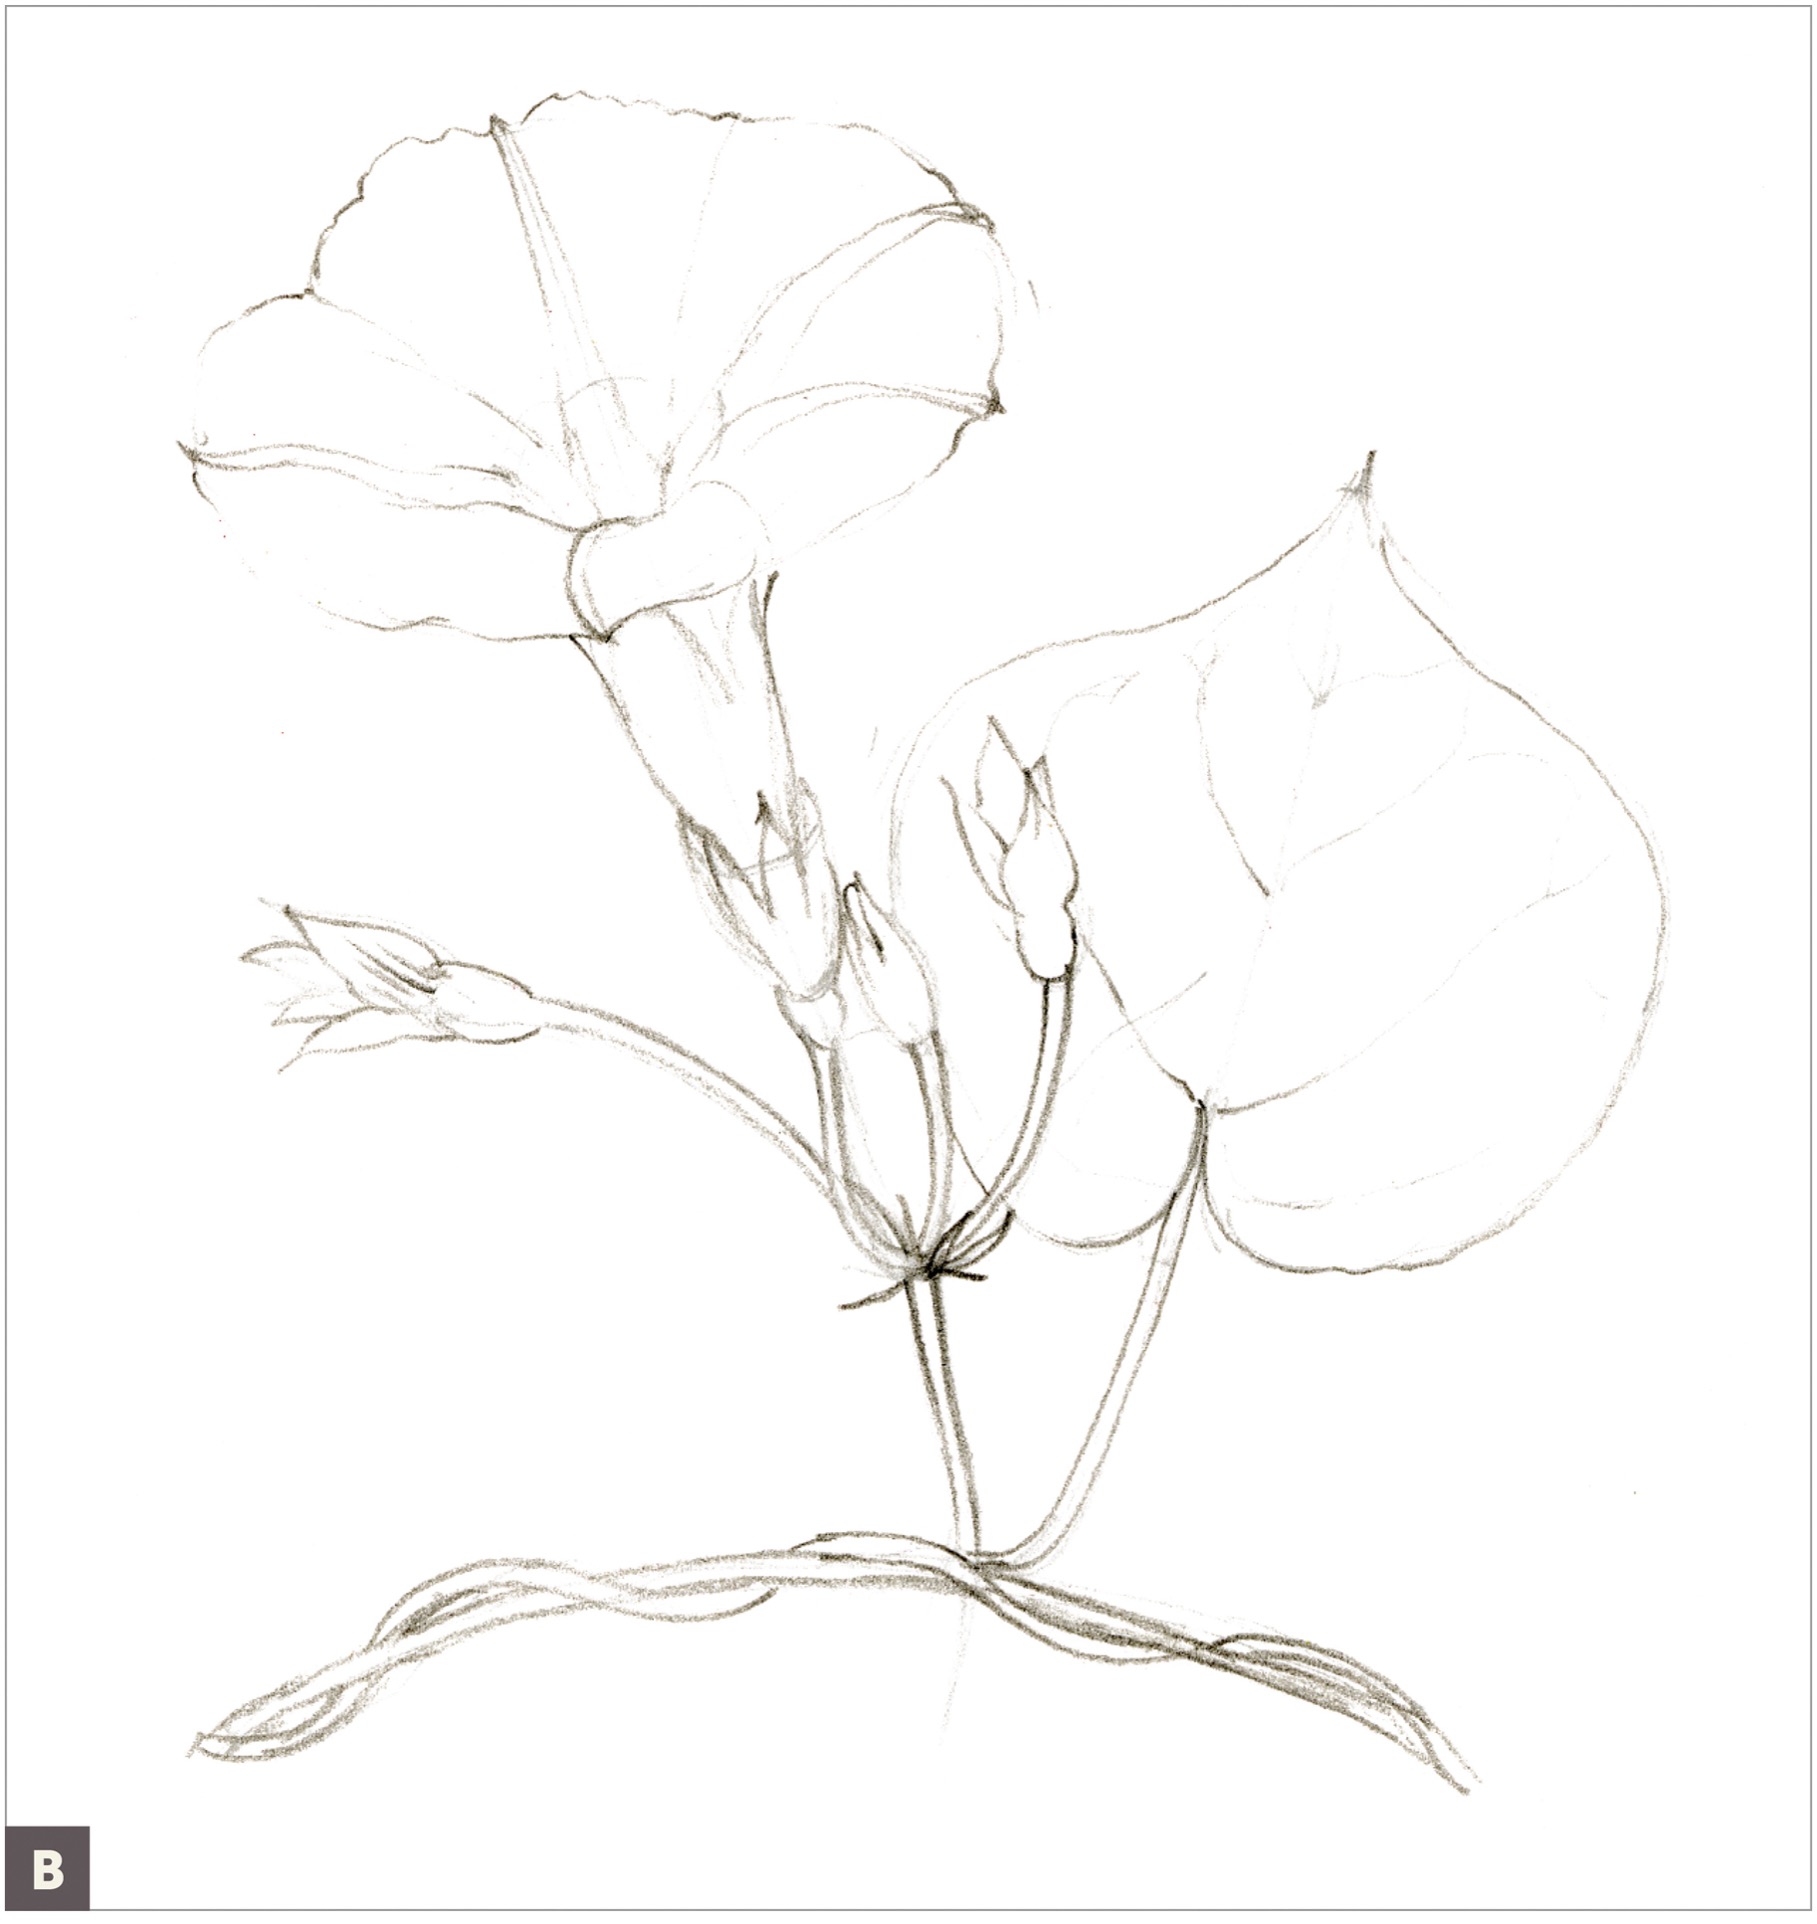
Look at your flower from all angles to find a good view to draw. Choose an angle that will show the structure of the flower well and look three-dimensional, rather than a straight-on flat view. I chose a view that shows both the inside and tubular part of the flower. I like to indicate this simple shape with a shaded thumbnail sketch to help me remember my light source correctly. If possible, secure your flower in a frog prong or a small jar with water to prevent it from moving.
Measure your flower, and with an H graphite pencil, very lightly draw your flower life-size.
Plan the composition of your flower so that you include a leaf and some of the twisting vine-like stems that are characteristic of the morning glory, and draw them in. (A)

After drawing lightly with graphite pencil, do a total, more precise “redraw” with a Dark Sepia colored pencil. Draw the clear five-petal flower that starts as a tube and then opens with five attached petals in starlike structure, depicting how each petal radiates out of the center of the tube. (Keep your pencil point very sharp, and do not press hard during this precise drawing.) Make note of the variation of line and value on my drawing at this stage. It is not a solid outline, but has various thicknesses and values so as not to appear cartoonlike. (B)
Place a piece of tracing paper over your drawing and draw the surface contour of the flower on the tracing paper. Use this as a map to help draw and tone the flower with a clear light source. Notice how the surface contour lines all radiate out of the center of the tube. (C)

Practice tone bars of color, use a #2 brush to mix watercolors, then add dry pencils for shading on your practice dabs.
Once you’re satisfied that you have a selection of pencils that will give the colors you want, paint a layer of watercolor. As this flower has both pink and purple colors, I used both these colors in my watercolor layer. Leave some empty white areas indicating where the highlights will be. Add a layer of green watercolor on the sepal cup, buds, and stems. (D)

Use colored pencils to add overlaps and color on the flower.
With colored pencils, and Dark Sepia on the overlaps, add color and detail to the buds, stems, and leaves. (E)

The morning glory flower has colored venation that follows the contour lines of the petals. Continue layers of color, using this pattern to define the veining of these contour lines. Layer color on the other parts of the plant as well.
You can also add to the composition by drawing a dried seedpod that develops on the vines, and scatter in a few seeds. (F)

With watercolor, add color on the seedpods and then, once it dries, use colored pencils on top to complete the seedpods. I added in a bumblebee pollinator; do this if you’d like. (G)

Drawing an Allamanda (Tubular Flower)
By drawing several different flowers that have a tubular shape, you’ll gain confidence, and tackling similar flower shapes will become easier. You’ll also start to notice the ways that flowers are similar, but also their subtle differences. Delight in the diversity that nature exhibits and highlight it in your drawings! This allamanda is interesting to draw in part because of the beautiful gold color of the tubular part of the flower that changes to bright yellow when the petals split apart and open. Yellow, because it is a light color, is challenging to make look three-dimensional, so be sure to refer back to the color study on this page for good shadow colors to use.

SUBJECT
Allamanda or other tubular flower
ADDITIONAL MATERIALS
• Watercolor brush #2
• Watercolor pencils and colored pencils to match the local color of your flower
With a graphite pencil, draw the flower life-size and notice what simple geometric shape it is similar to. I like to indicate this simple shape with a shaded thumbnail sketch to help me remember my light source correctly.
Draw cross-contour lines on the flower, following the veining of the petals. (A)

Tone the overlaps and then add tone to show the correct light source. (B)
Using a #2 brush, build up layers of color with a watercolor wash and then layer colored pencil. Emphasize details you see on your subject with toning and different colors. Burnish to blend the layers together, leaving a good highlight where appropriate. Add other elements to your composition, such as leaves and buds.
Add more layers to distinguish details. (C)

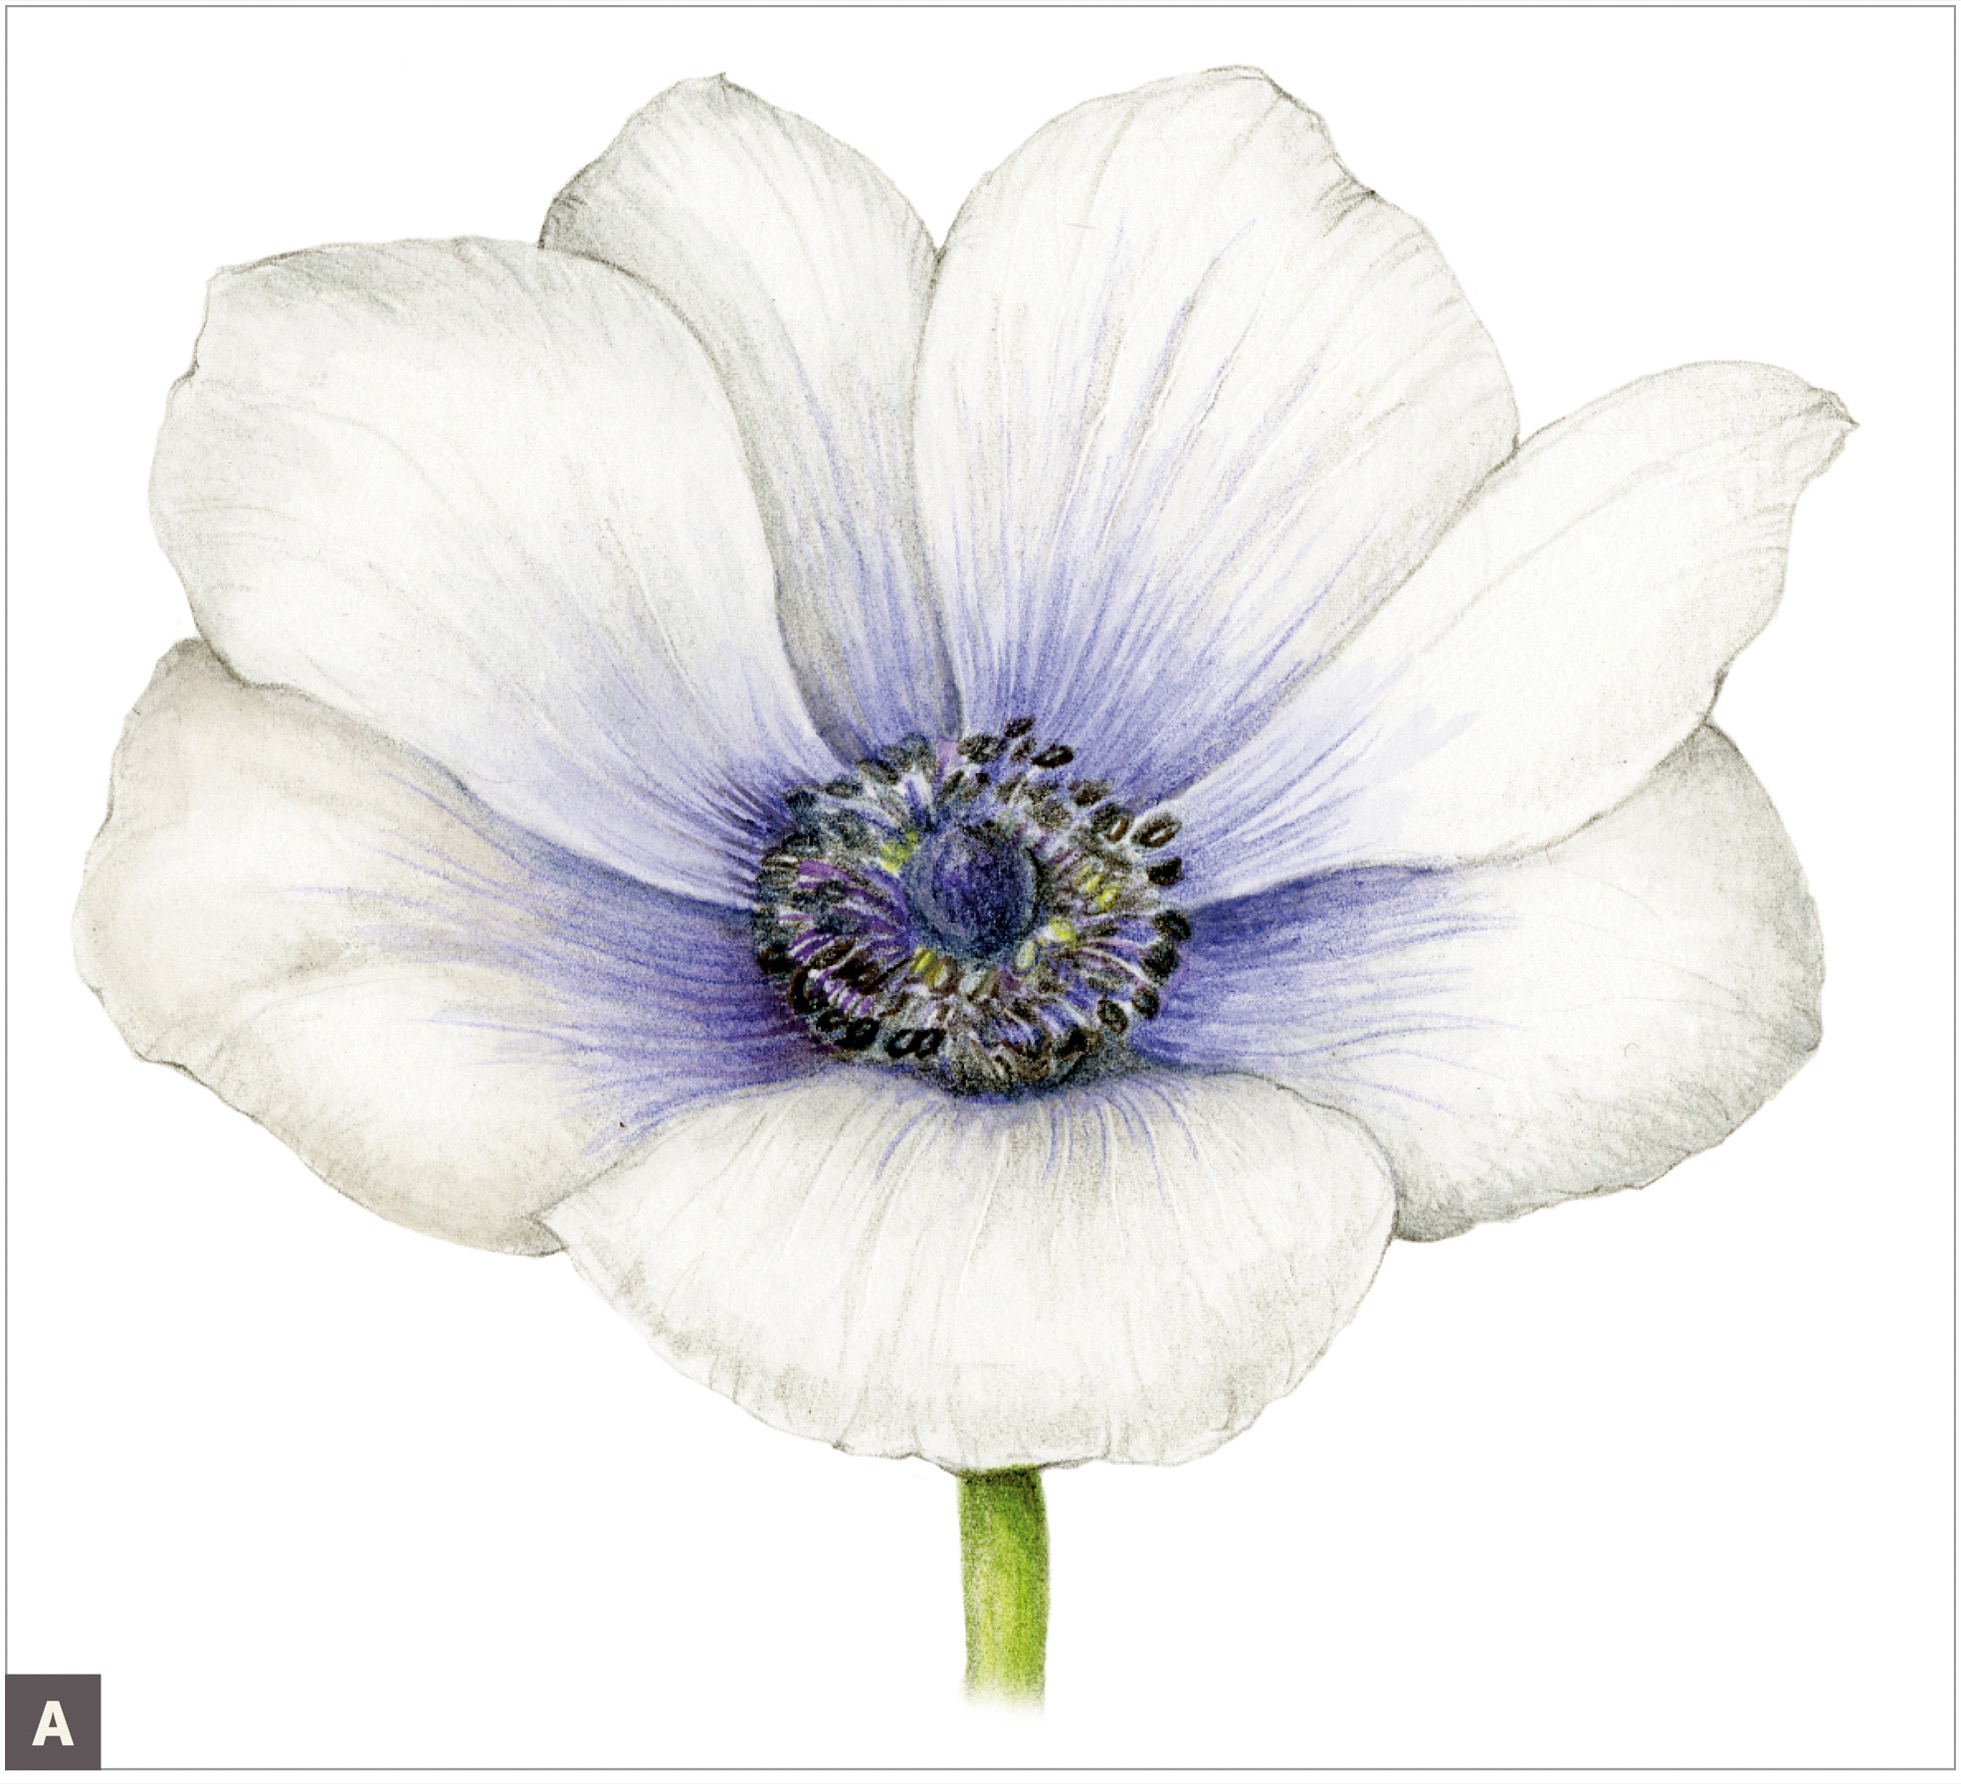
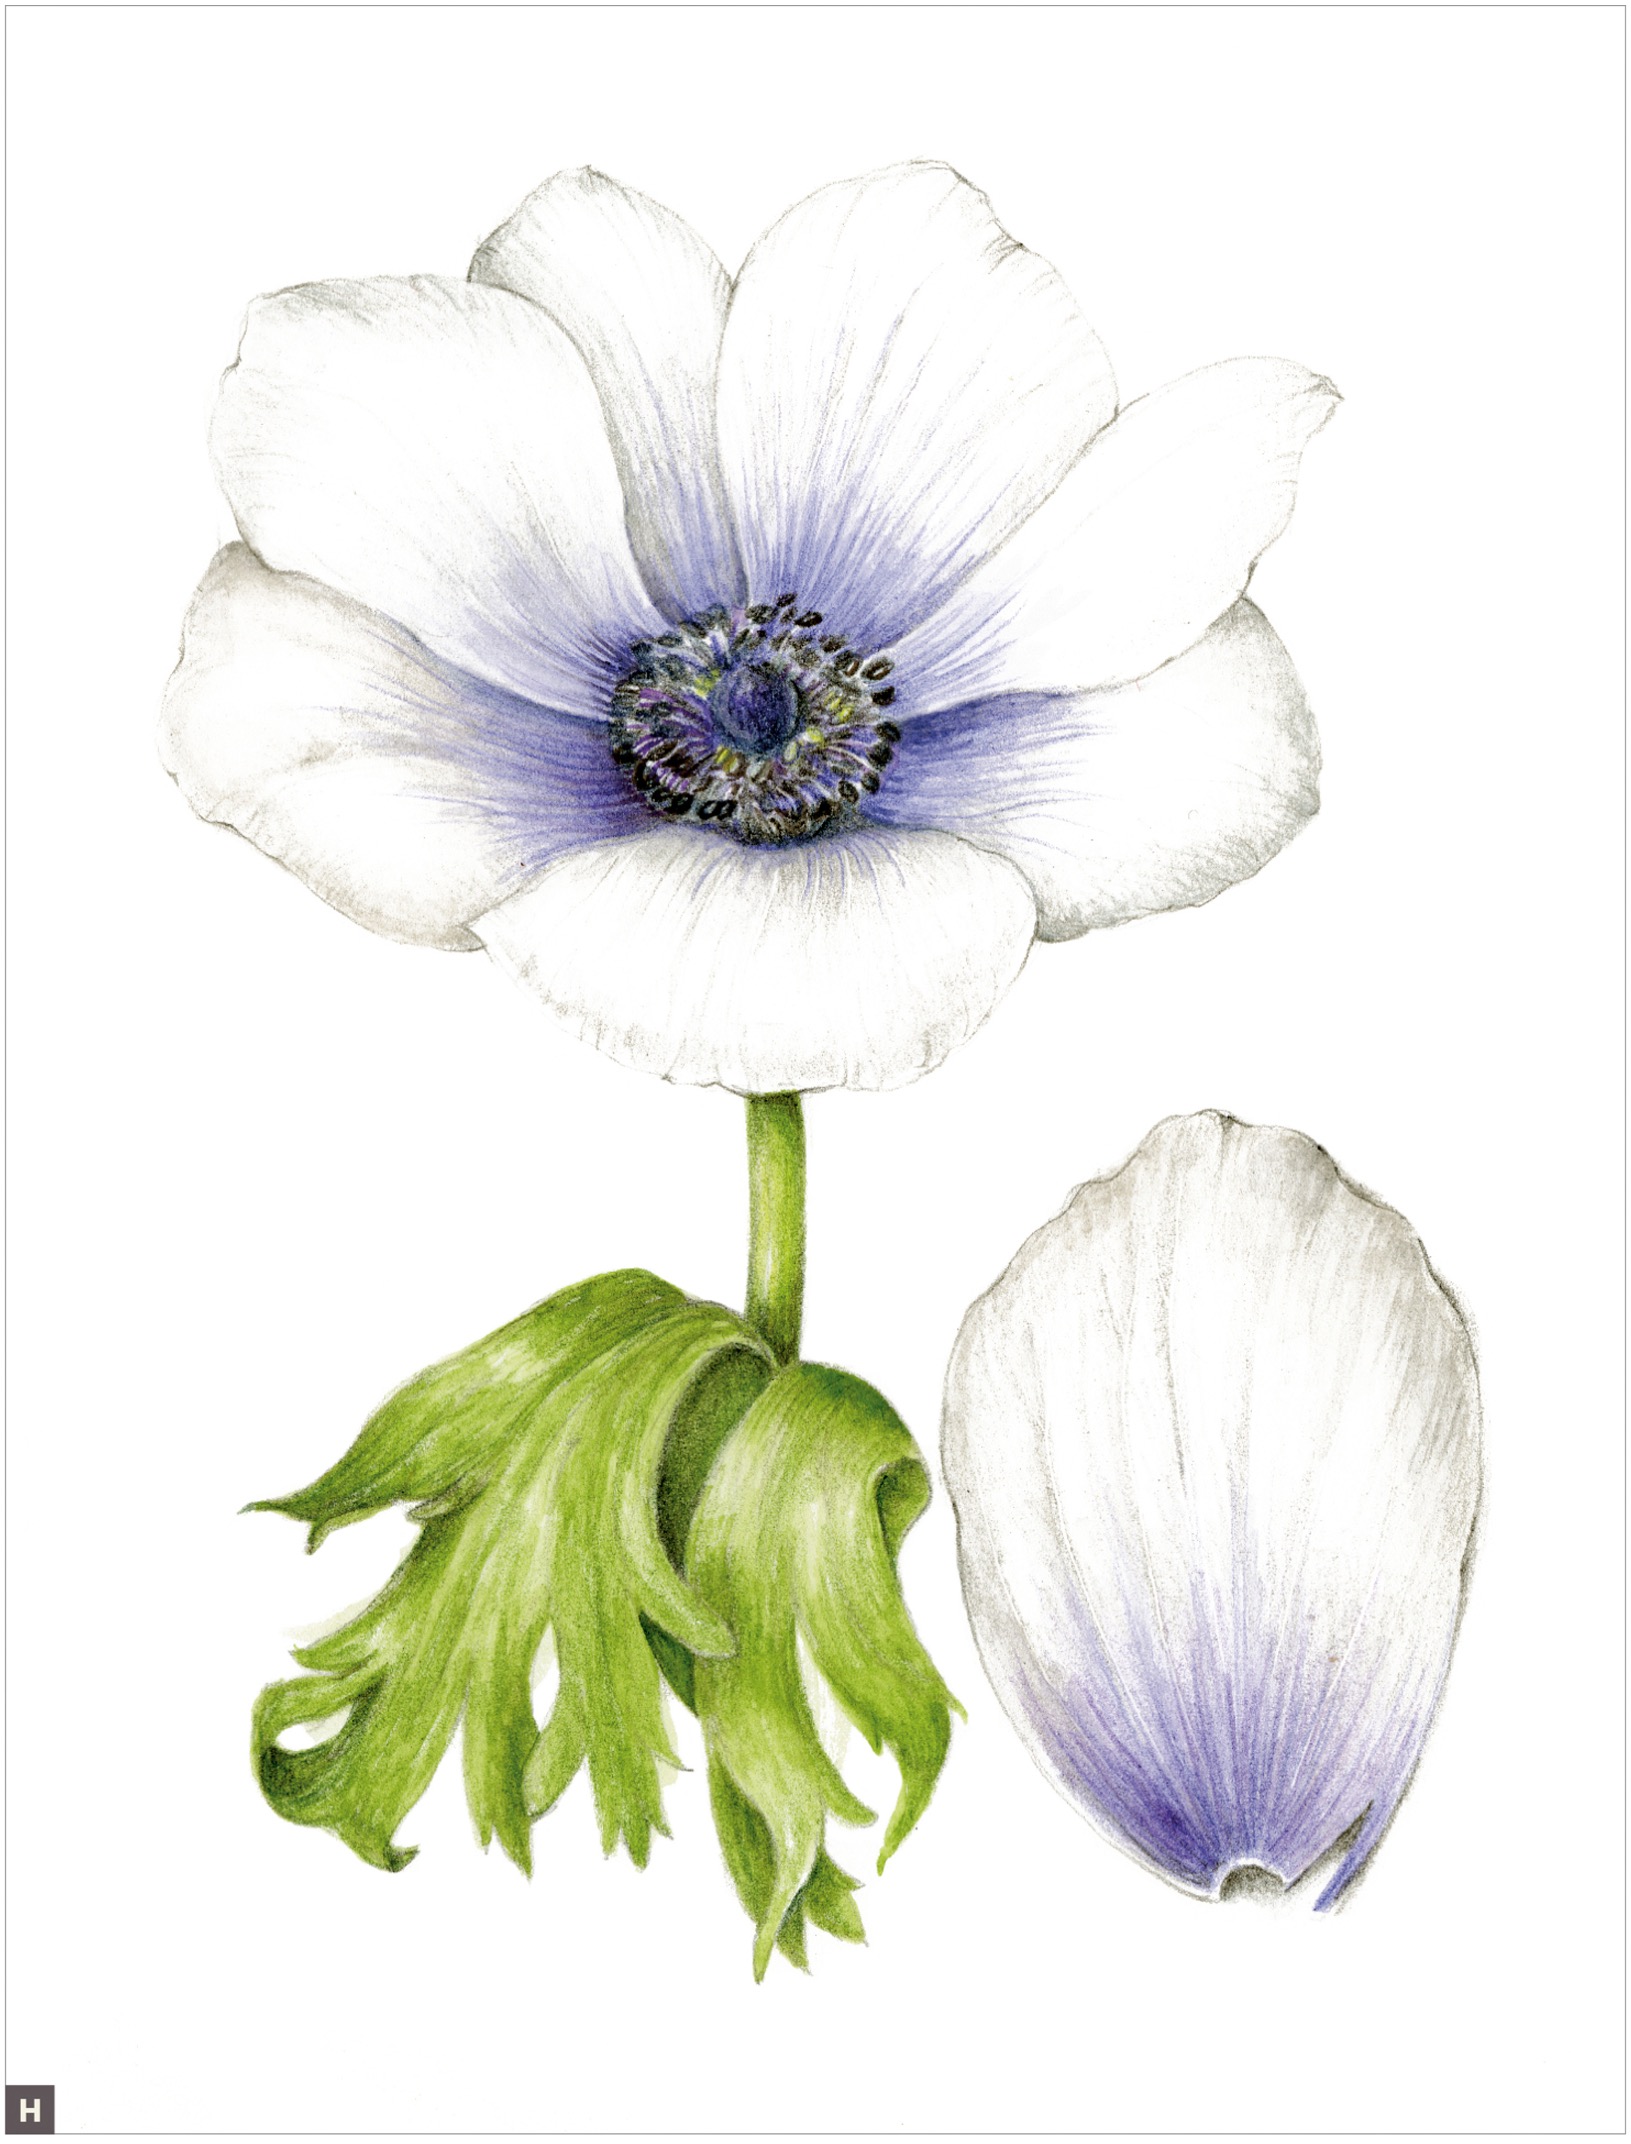
Drawing an Anemone (White Disk-Shaped Flower)
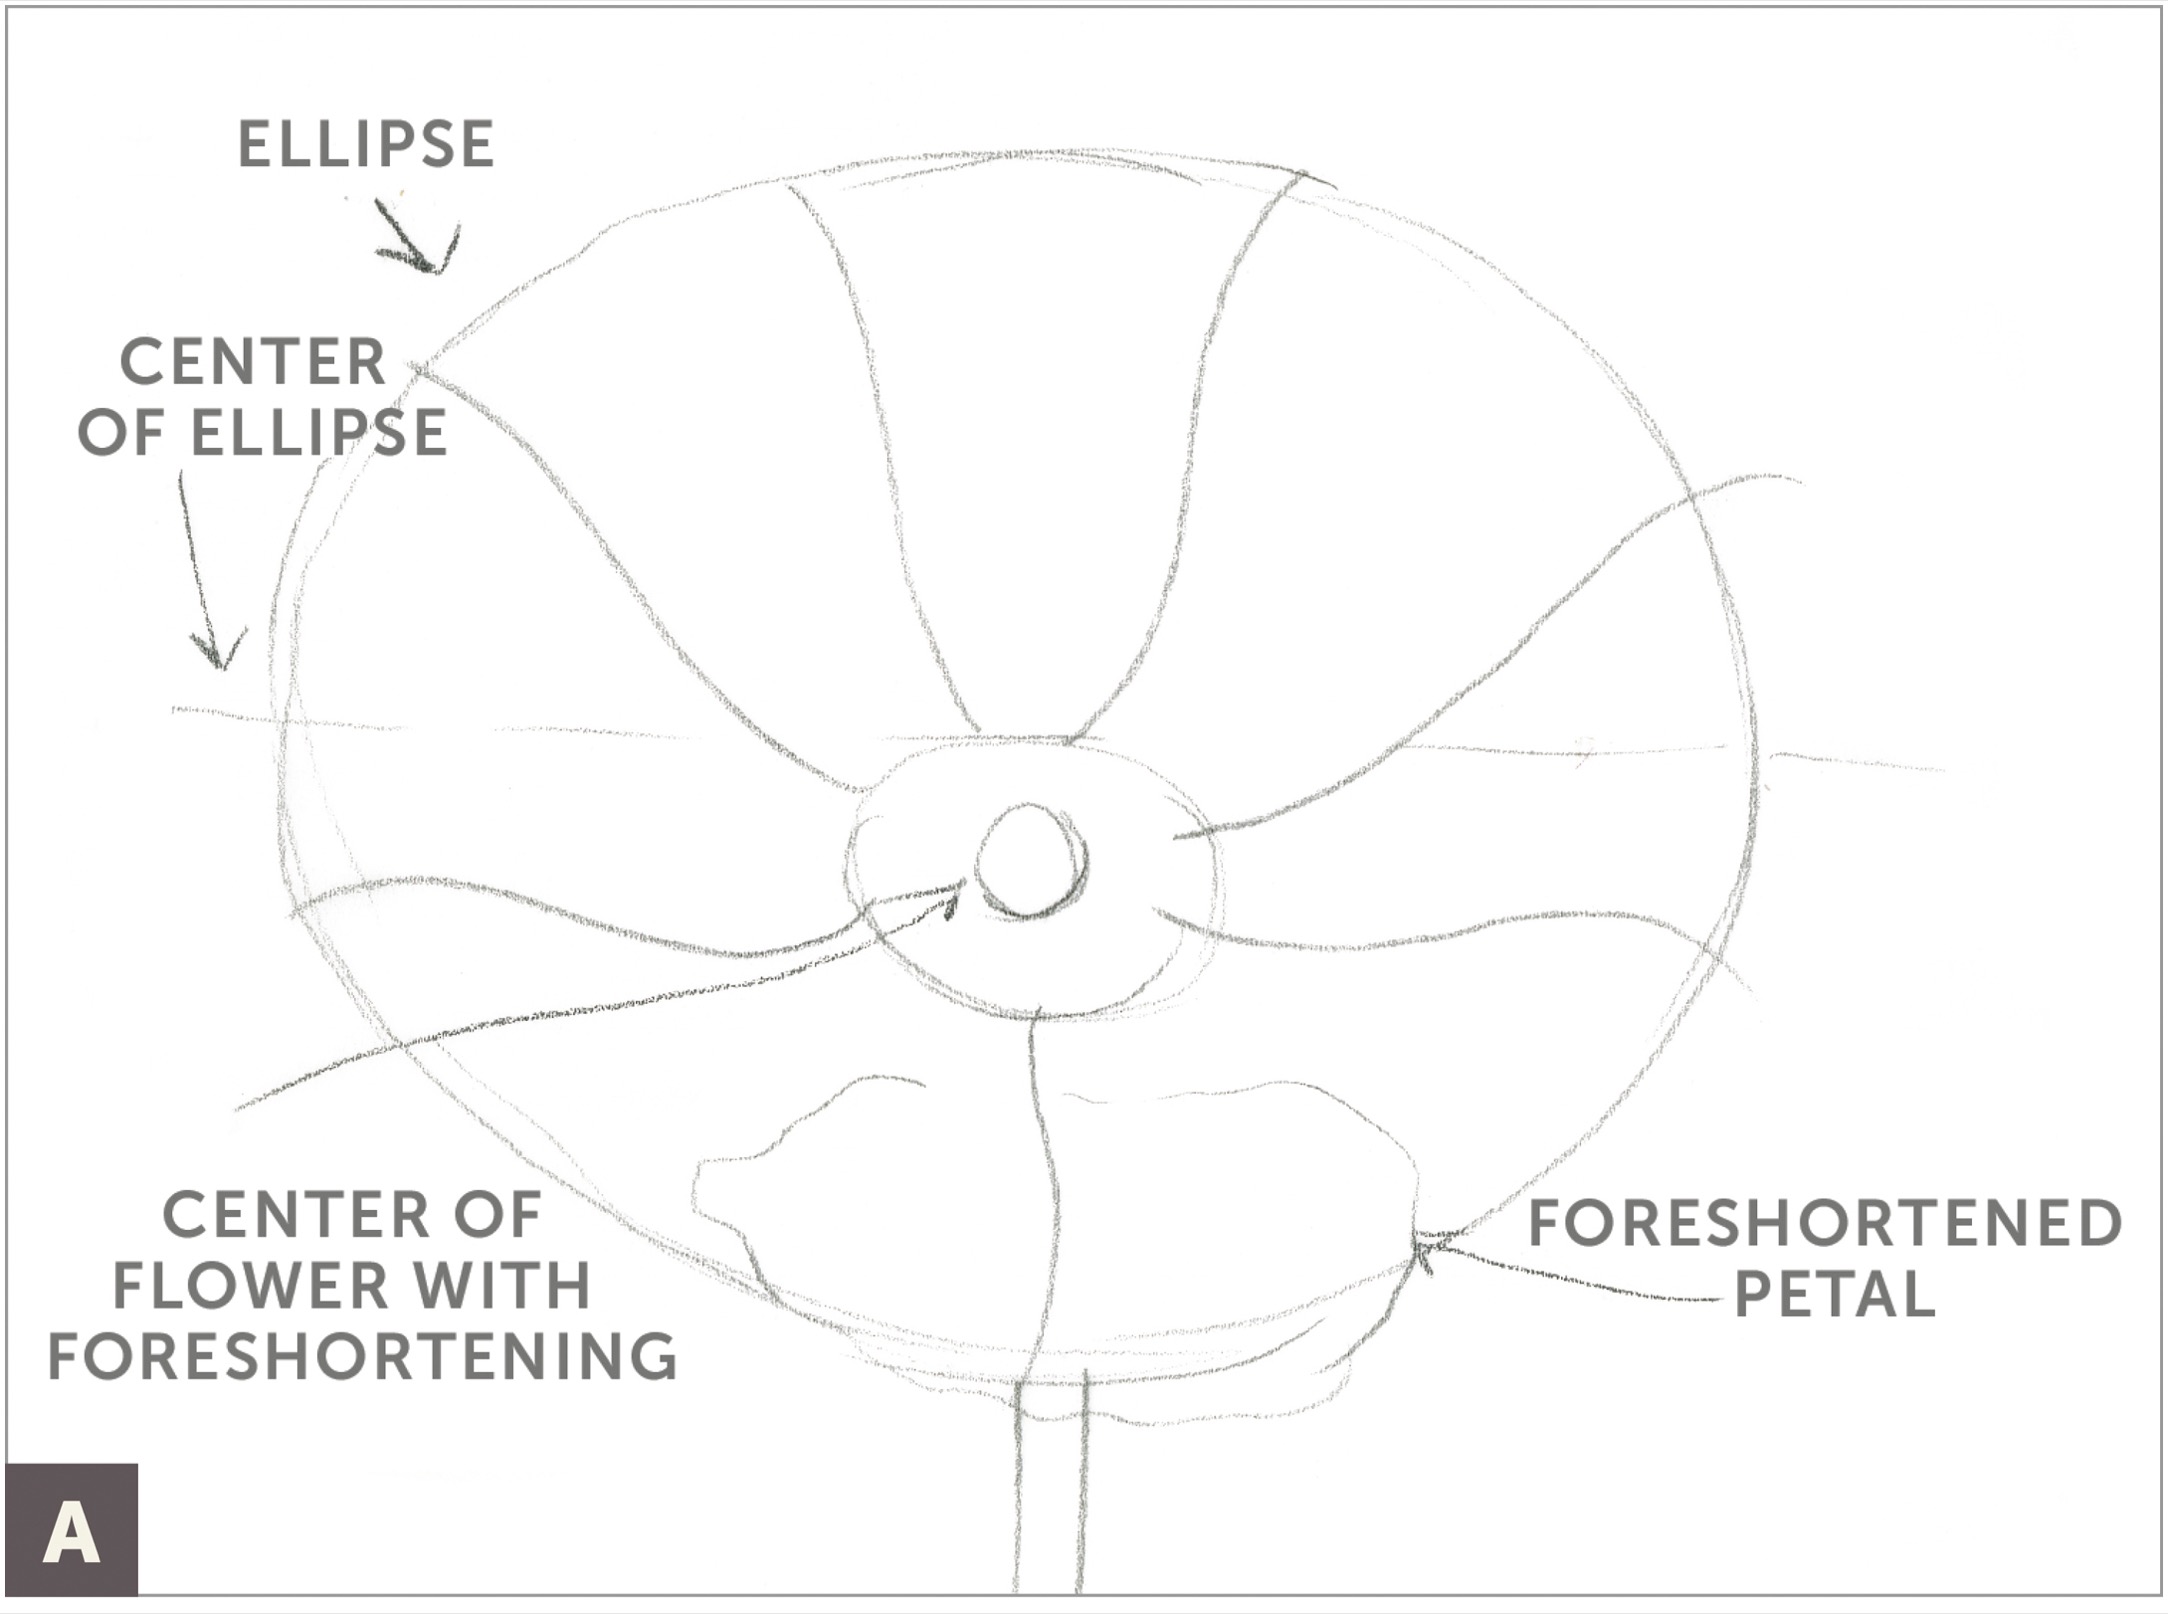
Rotate-shaped and disk-shaped flowers that are mostly flat and circular, such as an anemone, are good practice for drawing many other kinds of flowers. Rotate flowers have petals that all radiate out of a center where the reproductive parts live. When drawing a flower with complex reproductive parts, carefully draw those elements first so that when you start to work on the petals, they’ll be attached to the center of the flower. Use ellipses to measure your view in perspective, and make sure to draw each petal with its own center axis, radiating out of the center of the flower. Note that due to foreshortening, the center of the flower isn’t always in the center of the ellipse! Because of this, some petals (especially those in front) will appear foreshortened, and this is the secret to making interesting and realistic three-dimensional views.
When I drew this flower, it was the middle of winter and my gardens were dormant; however, about a 45-minute drive from my home is a nursery that grows anemone flowers for cutting all year and ships around the world. I was excited to see these flowers growing in the many hothouses, and I took home several bouquets to work from. Anemones come in so many colors that it’s always hard to choose one to draw. I chose white with some lovely purple venation to show you some of the important techniques you can use with white flowers.
SUBJECT
Two anemones of the same color
ADDITIONAL MATERIALS
• Tracing paper
• Watercolor brushes #2 and #3/0
• Watercolor and colored pencils to match the local color of your flower
• Embossing tool (small)
• Warm Grey IV colored pencil #273
• Dark Sepia colored pencil #175
COLORED PENCILS
#273
#175
Begin by setting up your flower so that it is stable and will not move. (I balanced my flower inside a jar with the petals rolling over the jar’s edges.) Once you have a view you like, immediately snap some photos of your setup, because anemones (and many flowers) will open and close at various times of the day.
Measure the flower and create an ellipse around the petal edges. Locate the center of the flower and, using a graphite pencil, draw a center axis in the direction each petal radiates out of the center. You can measure from one tip of the petal to the next to help get the measurements correct. The foreshortened petal in the front is always hardest to draw. Be sure to measure the width as well as the depth. (A)
Practice your drawing on tracing paper and add in surface contour lines, following the venation of the petals. Make sure to indicate how the petals overlap and curl. Do a light-source thumbnail sketch to help with grisaille toning. (B)

Redraw your flower on good paper. Carefully draw the reproductive parts so that when you start to work on the petals, they will appear attached to the center of the flower. (C)

Take a single petal off of your second flower to study and practice drawing a petal. This way you can practice the colors, veining pattern, and rolling of a petal before tackling the whole flower. (D)

With a #2 brush, create a watercolor wash and add some light watercolor to each petal to describe the petal venation, using a mixture of violet and blue to create the exact shade of blue-violet. With an embossing tool, draw some fine veins. With a light shadow color, such as Warm Grey IV colored pencil, tone the flower lightly. (E)
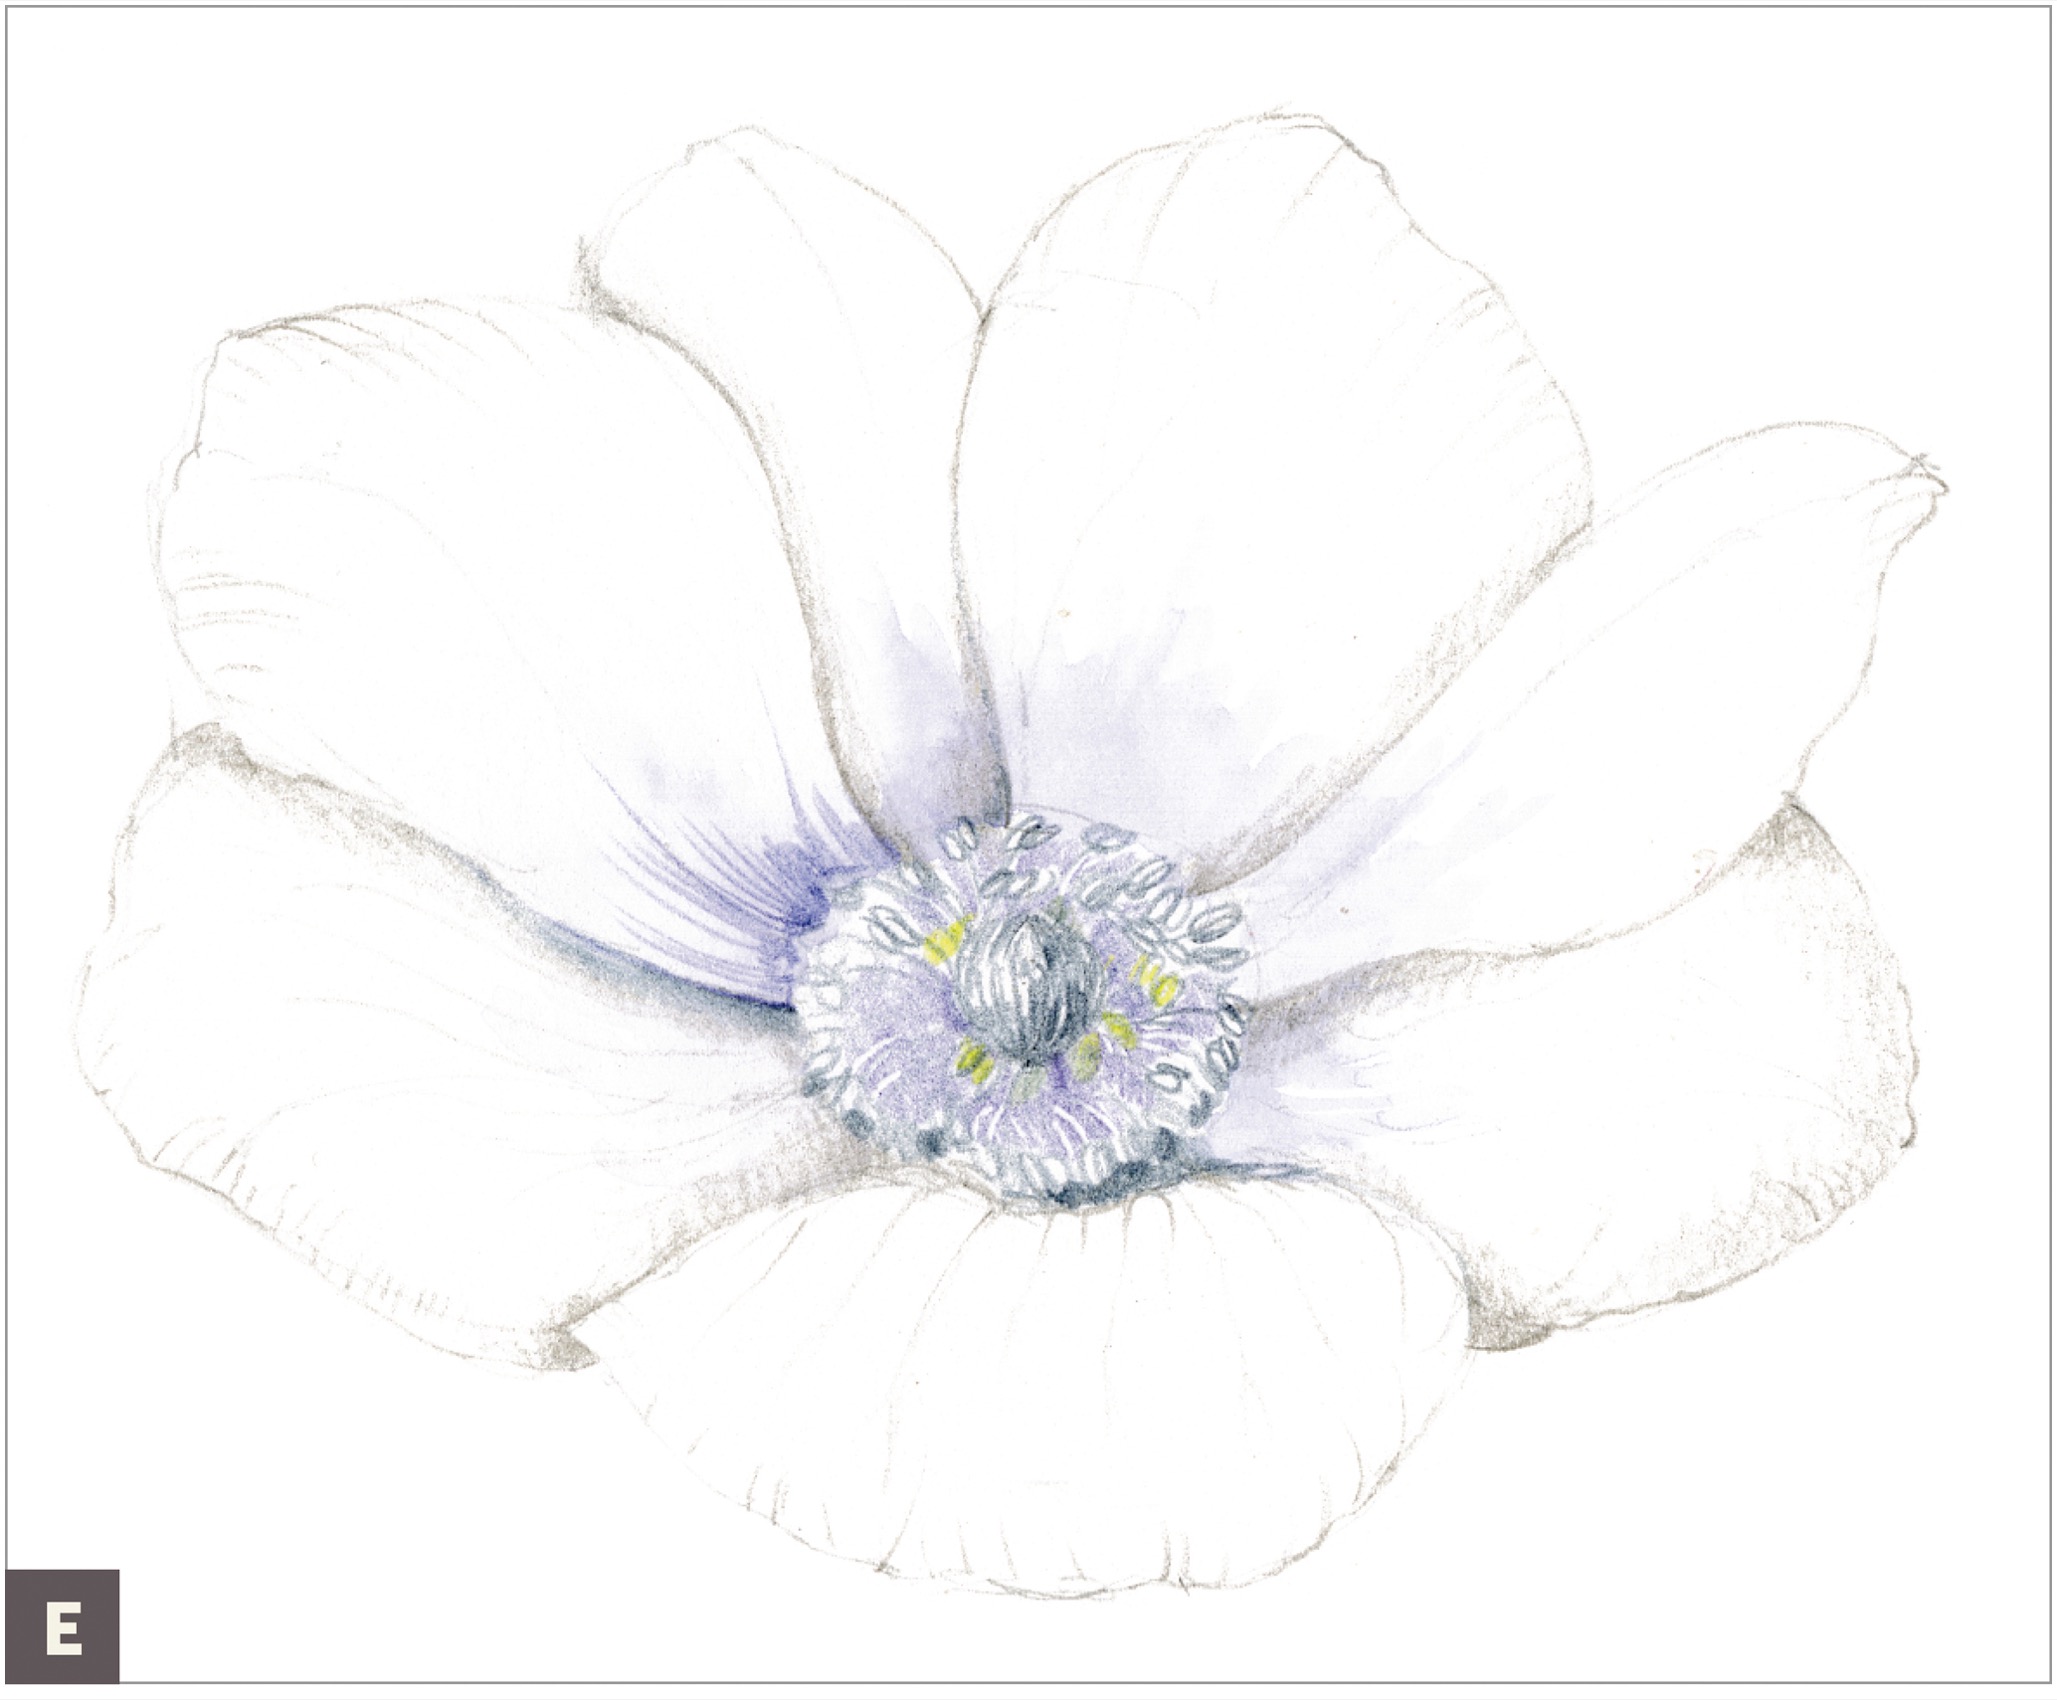
With colored pencil, continue to work on the detail in the center of the flower, and use the embossing tool to maintain light areas, such as the filaments on the stamen. (F)

Add color to the venation of the petals and more layers of the white petals, leaving good highlights and a lot of light, almost white, so that the flower appears white and not gray.
With gray watercolor, gray colored pencil, and just the slightest amount of Dark Sepia colored pencil, draw subtle, delicate inside edges and curling petal edges.
To fill in the center of this flower that is very detailed and dark, use an 3/0 fine-point brush with dry-brush pigment mixed to match the flower color. (G)

Finish with the stem and the lovely curling leaves of the anemone. (H)
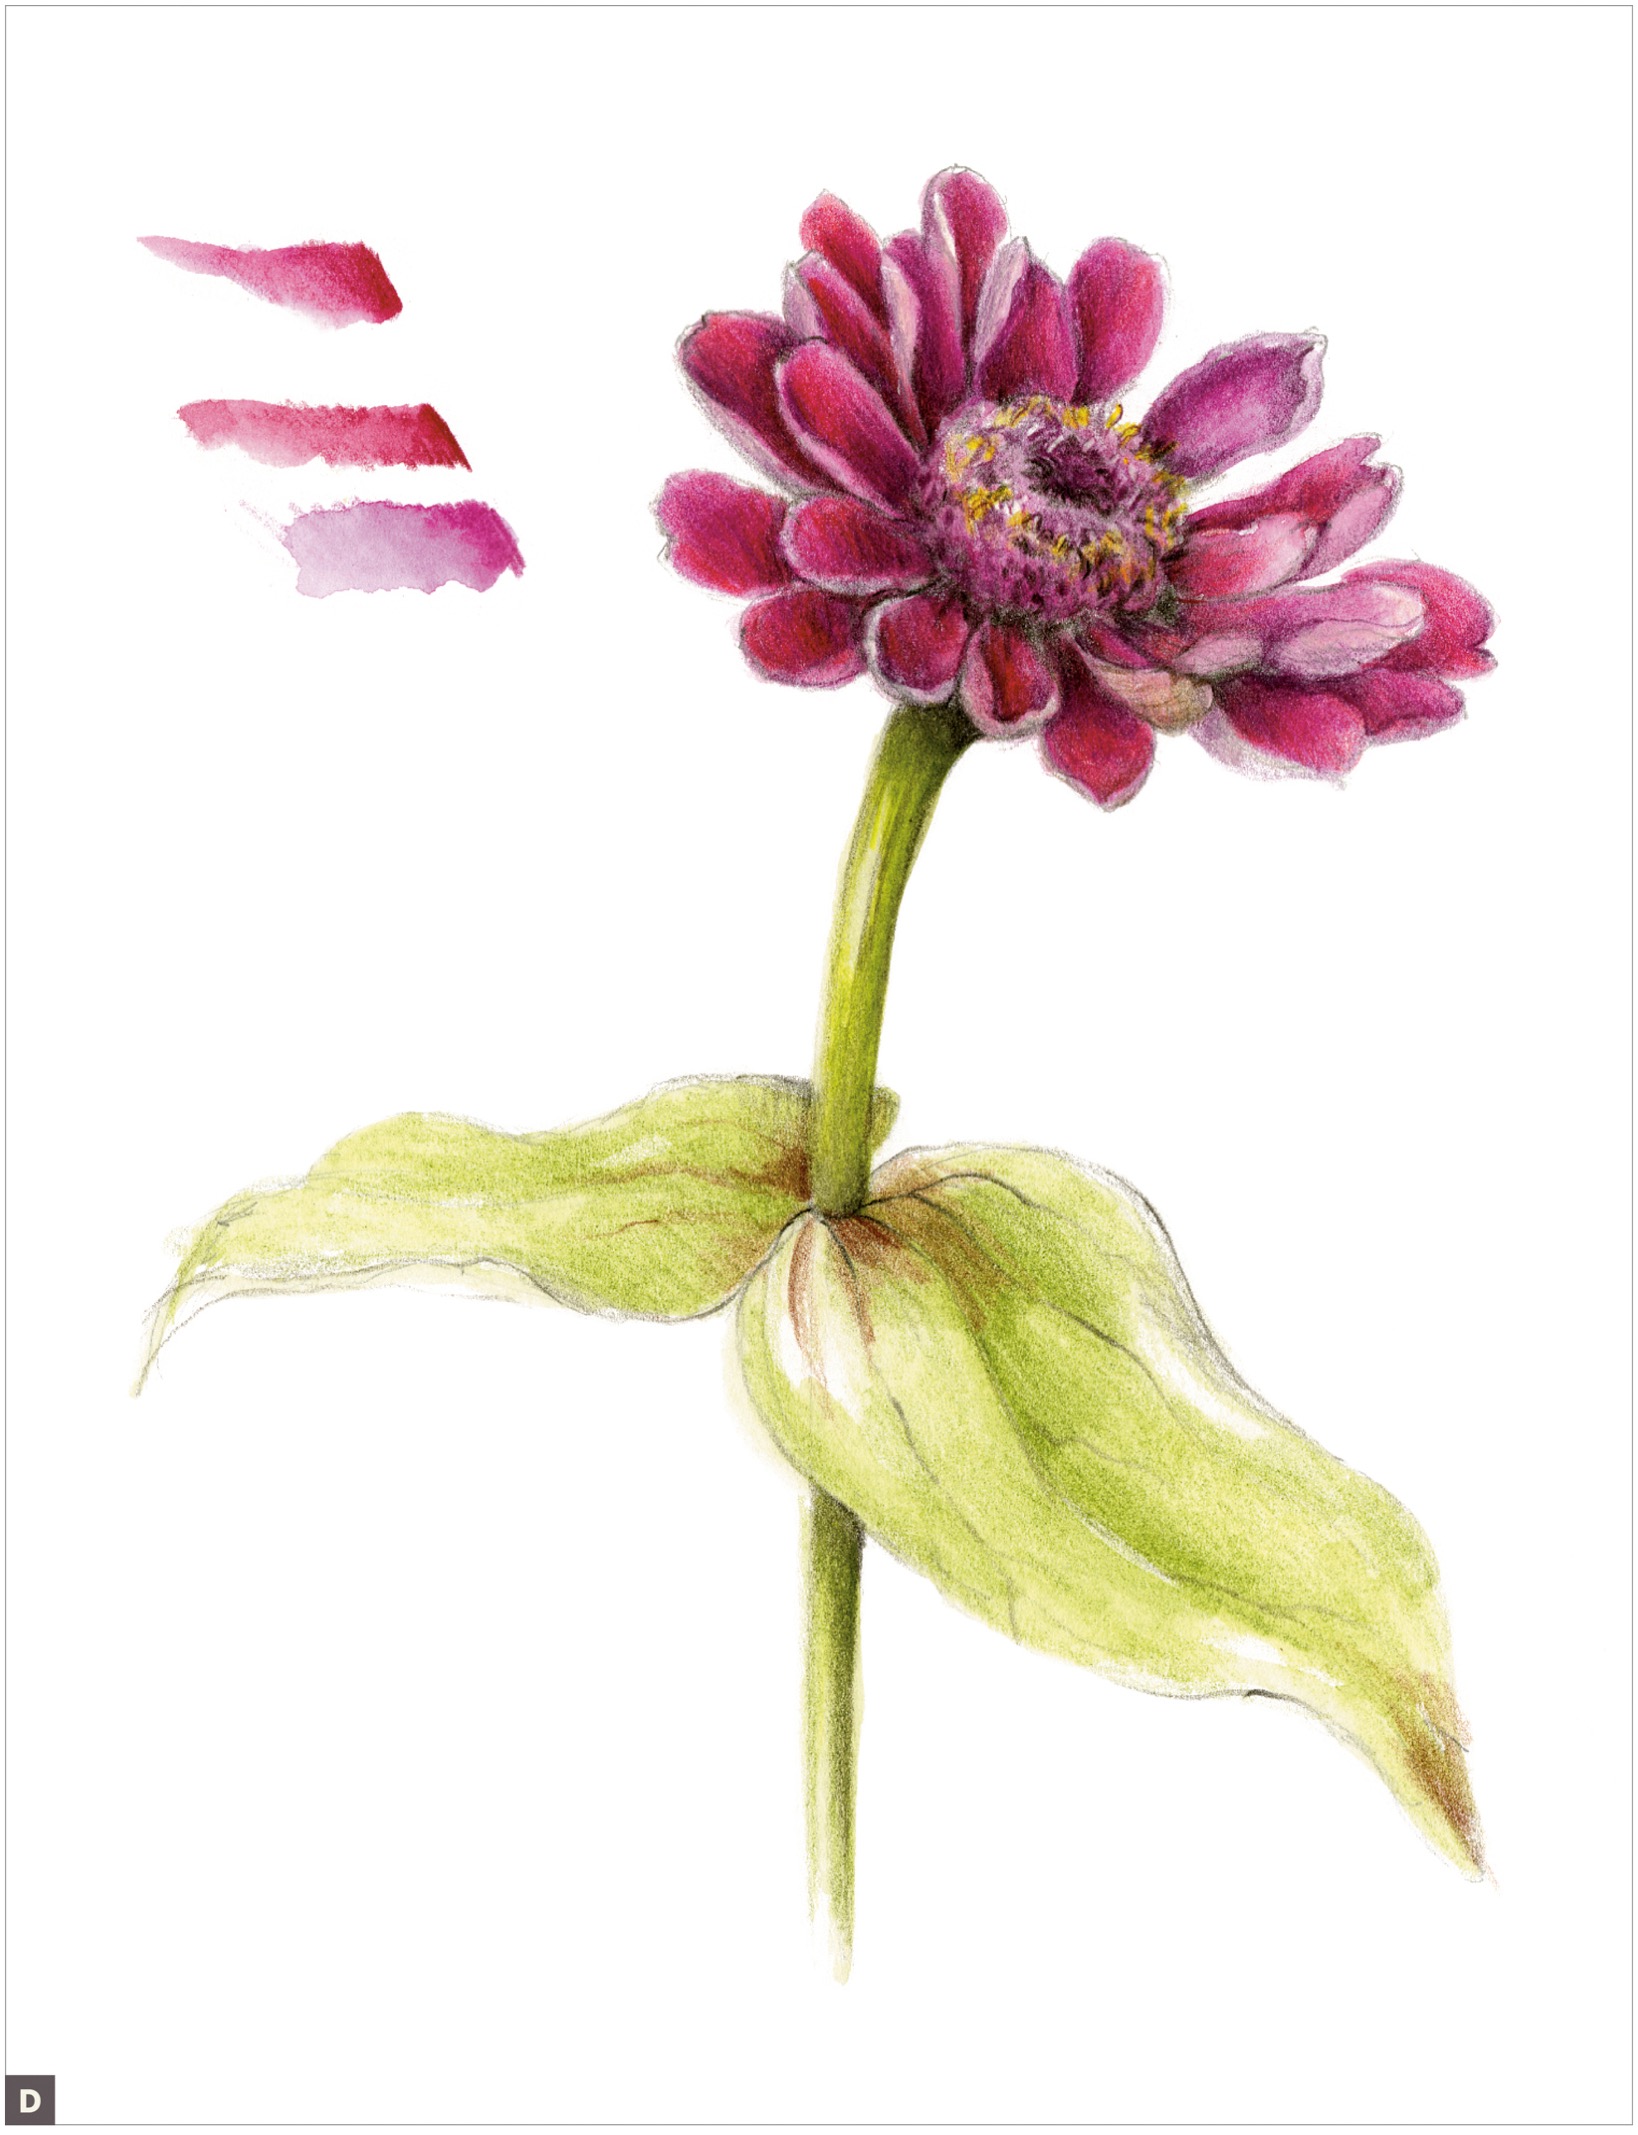
Drawing a Zinnia (Composite Flower)
In my garden, we plant fields of these colorful flowers each summer. They last well into the fall when most other flowers are on their way out, and monarch butterflies love them and dance from one bloom to the next.
Composite flowers are interesting and fun to draw, but you should avoid drawing a flat circular view of this kind of flower and instead go more for a foreshortened elliptical view because it will look more three-dimensional and thus show structure better. The structure of this family of flowers is interesting, as each flower is actually lots of flowers on a stem. Each petal is technically a flower, and the center of the flower is made up of many tiny flowers as well. The flowers in the center contain the female reproductive parts, and this is where the seeds develop. I used to draw the center of composite flowers, such as a daisy, as a round flat color, but no more. I love to show and explore the dimension and details of the flower centers. In addition to this step-by-step lesson, look at my process drawings of zinnias on this page. They show some of the unusual characteristics and structural challenges in drawing this flower. The key is to render the center of the flower extremely three-dimensional and detailed. Make sure to study under magnification to see and draw these details.

SUBJECT
Zinnia or other composite flower, such as a daisy or sunflower
ADDITIONAL MATERIALS
• Magnifying glass or other magnifier
• Watercolor brush #2
• Colored pencils and watercolor pencils to match the local color of your flower
• Embossing tool (small)
Measure your flower and draw an elliptical view of it. Draw your center axis radiating from the center of the flower through the stem. Draw the center axis of each petal radiating out of the center of the flower. (A)

Look at the center of the flower under a magnifying glass. Draw the center of the flower and then start drawing the petals, beginning with the petals on top. (B)

Add petals underneath, or behind, the top petals, and tone with overlaps so that you’re clearly describing the layering of the petals. (C)

Practice color mixing and then, with a #2 brush, add a watercolor wash to the petals and the flower’s center. Make sure to render the center in a three-dimensional way with good grisaille toning, fine details using an embossing tool, and good contrast.
Add in the stem and leaves with grisaille toning and color, and be sure to pay attention to how the leaves attach to the stem as they wrap around it, creating a pleated surface. (D)
Drawing a Hibiscus (Disk- or Funnel-Shaped Flower)
Flowers in the mallow family, such as hibiscus, grow in all kinds of climates. We think of hibiscus as the iconic tropical flower, but they have many temperate-climate relatives. A few fun facts about the hibiscus: Each bloom lasts only one day, but more are always ready to open. The vegetable okra is in the hibiscus family, and its flower is a gorgeous hibiscus. The petals are nicely undulating folds, so always fun to draw, and the center reproductive parts are housed on a dramatic column (think cylinder). Sometimes I like to leave my drawings unfinished, as I have in this case, doing grisaille toning with a Dark Sepia colored pencil on the stem and leaves, but not adding in color. This is a technique that invites the viewer into the page and your process, and lets them focus on the flower itself.

SUBJECT
Hibiscus or other colorful flower
Draw a flower bud as a nice warm-up, practicing grisaille toning and layering color. (A)

Draw a petal of a colorful flower, and really enjoy drawing the variety of the surface contours and vibrant colors. (B)

Draw the entire flower, making sure to choose a three-dimensional, slightly elliptical view, and start with a good drawing of the center reproductive column. Make sure the petals radiate out from the center.
Finish your drawing by continuing to add layers of local colored pencil. Emphasize details you see on your subject with toning and different colors. Burnish to blend the layers together, leaving a good highlight where appropriate. Add more layers to distinguish details. (C)

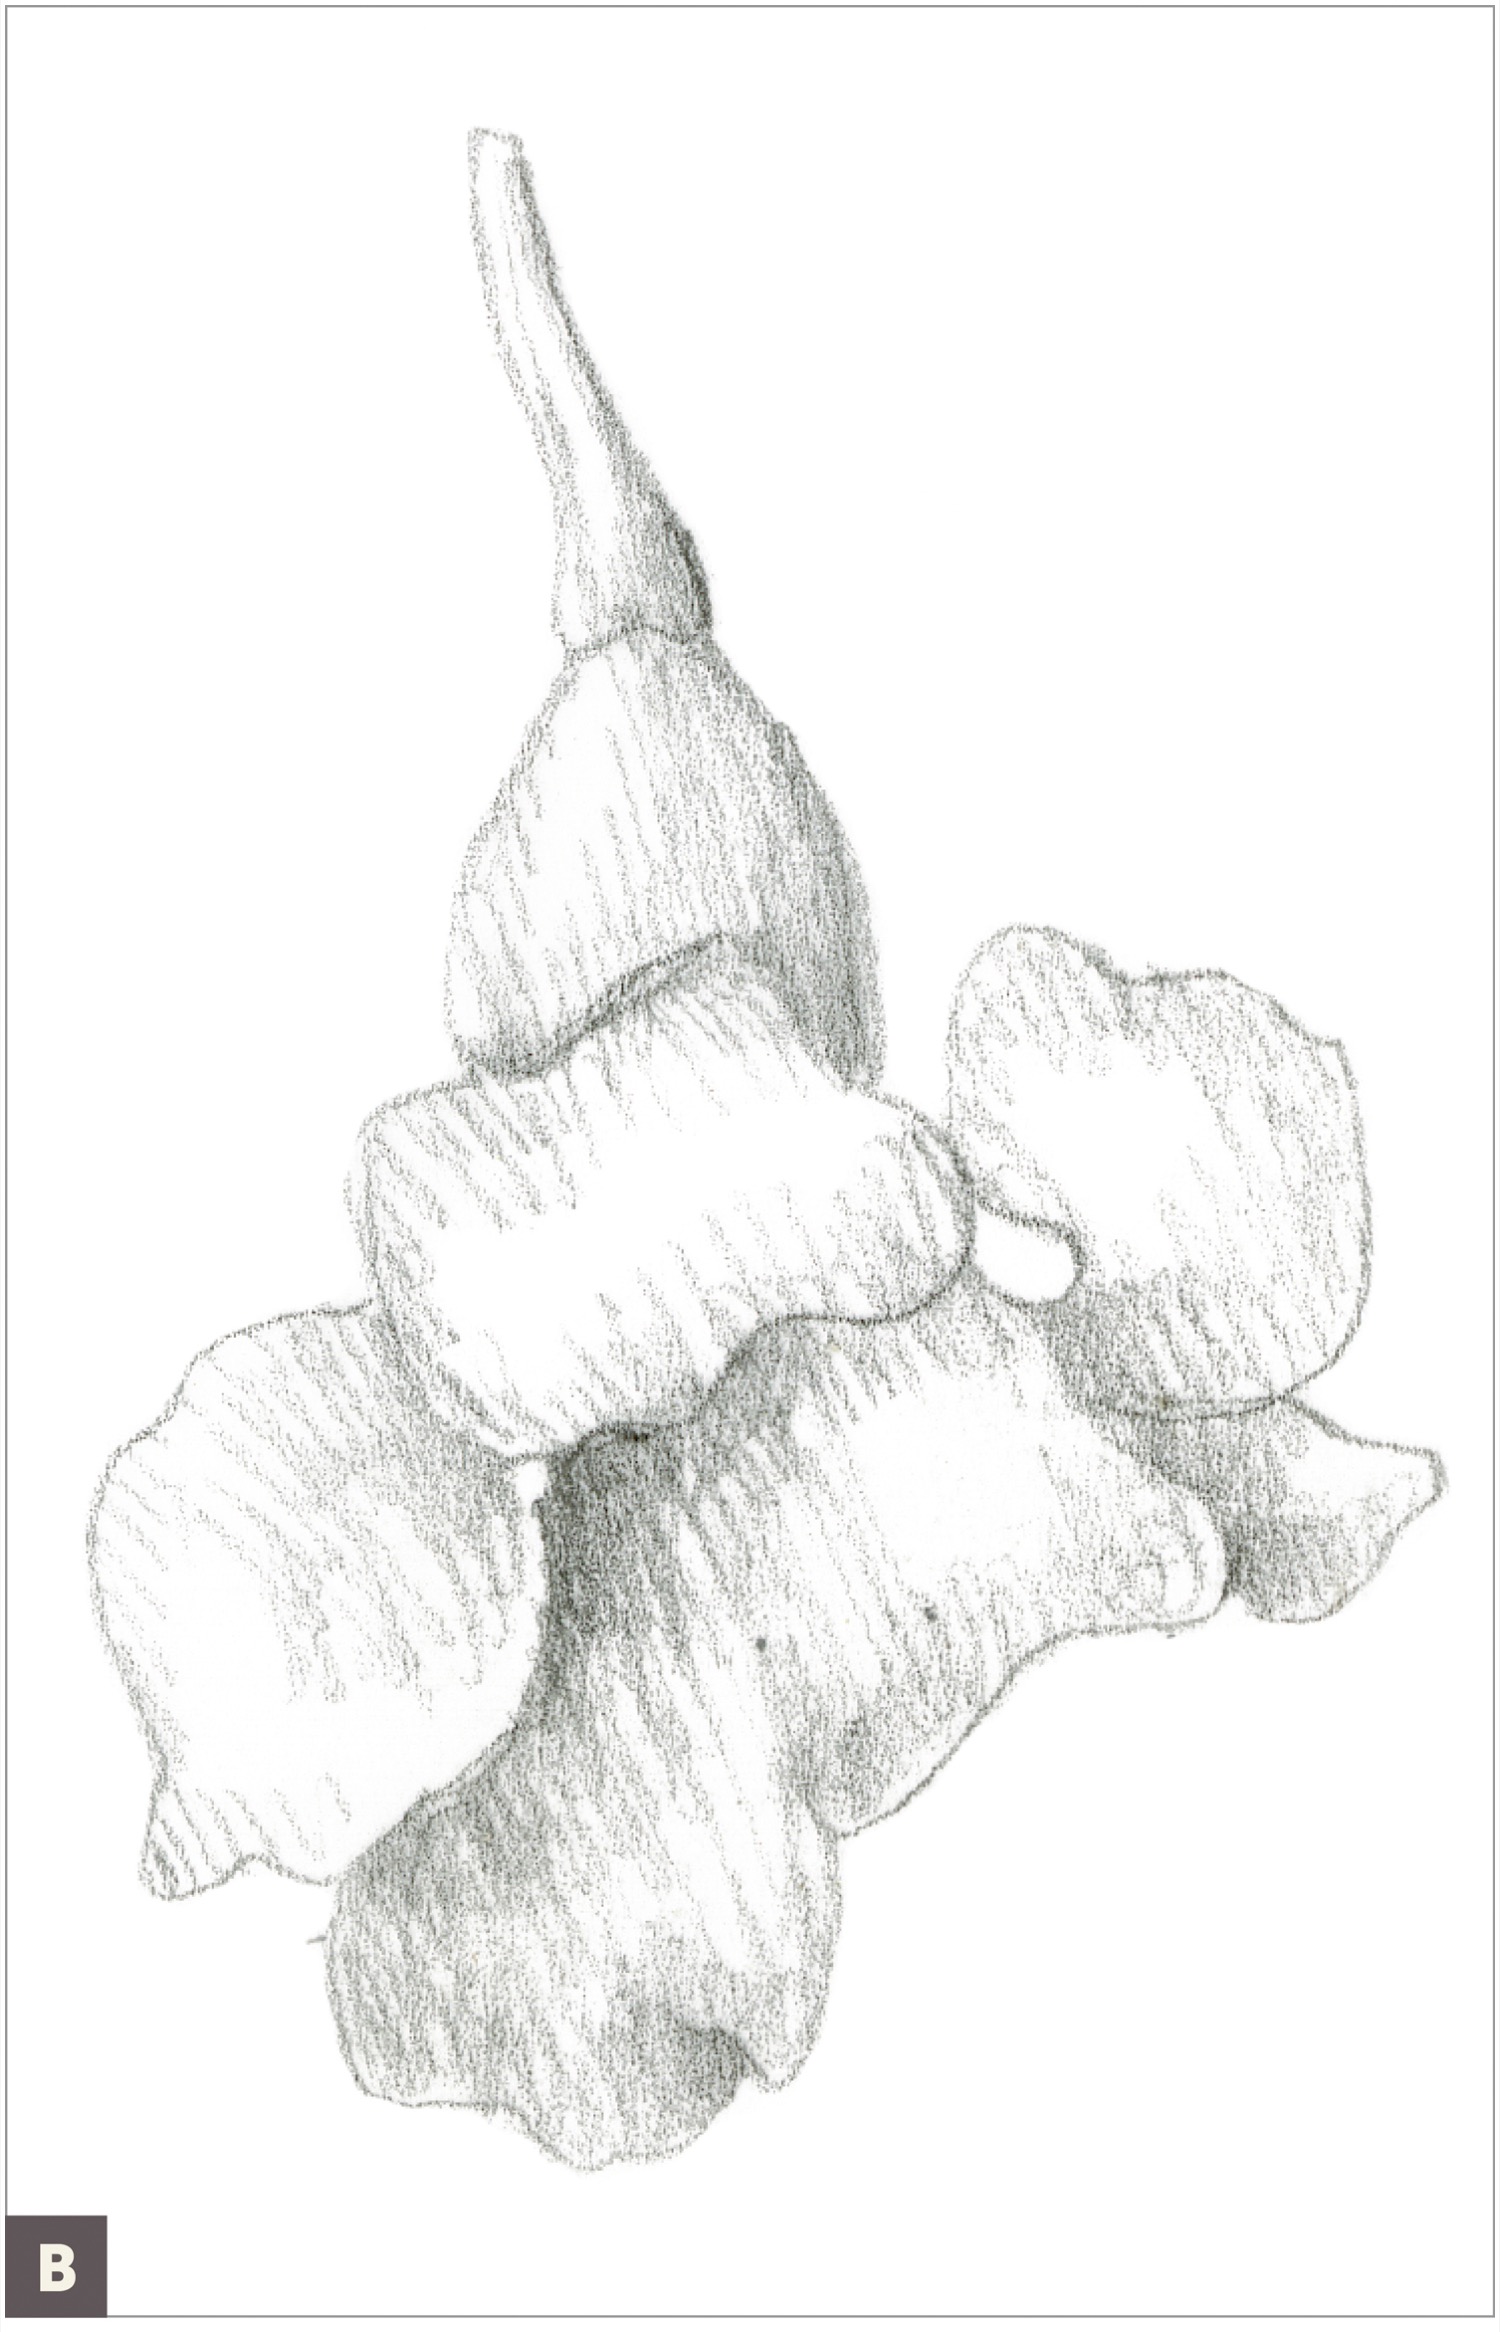
Drawing a Rose (Cup Flower)
I owe my love of botanical illustration to the romantic beauty of old paintings of cabbage roses often seen in antique chintz fabric designs and prints. They are quite enchanting, in part due to the use of dramatic light and shadow.
Roses with many tightly packed petals can be challenging to draw. Often there are so many petals that drawing this subject can be dizzying.
Notice the overall cup shape to the flower. I consider the overall form of a rose and the way the petals hug the form, and then how they peel away in bending shapes that can be rendered as cylinders. I pay close attention to the details of overlapping petals and make sure to describe this in the beginning of my drawing.
To start, focus on the overall shape of the whole flower. Set up your subject to give a good view of a rose blossom with lots of contrasting dark areas of shadow versus areas highlighted by a light source. The shiny leaves have planes that bend, creating dramatic highlights and shadows.
Get ready to spend several hours or even days on a drawing. Since a rose can keep opening as you work, putting your rose in the refrigerator can help preserve it. If you find yourself getting frustrated and impatient, stop to take breaks. Remember to “ smell the roses” as you draw and study!

SUBJECT
Rose
ADDITIONAL MATERIALS
• Tracing paper
• Watercolor pencils and colored pencils to match the local color of your subject
Draw a thumbnail sketch of your rose for overall form and light source. It is helpful to do a few loose concept sketches of various perspectives to make sure you have a dramatic light source and pleasing view. Snap some photos for your reference. (A)

Measure your rose and, with a graphite pencil, draw each petal carefully but lightly. Notice how the petals appear to be rolling, and that there is an overall cup shape to the flower. Place a small piece of tracing paper over the drawing and draw cross-contour lines to describe the bending, rolling petals for reference. (B)

Apply a layer of grisaille toning, emphasizing the overlapping petals with a good light source. If your flower is a pale color, start with light toning to keep your colors fresh. (C)

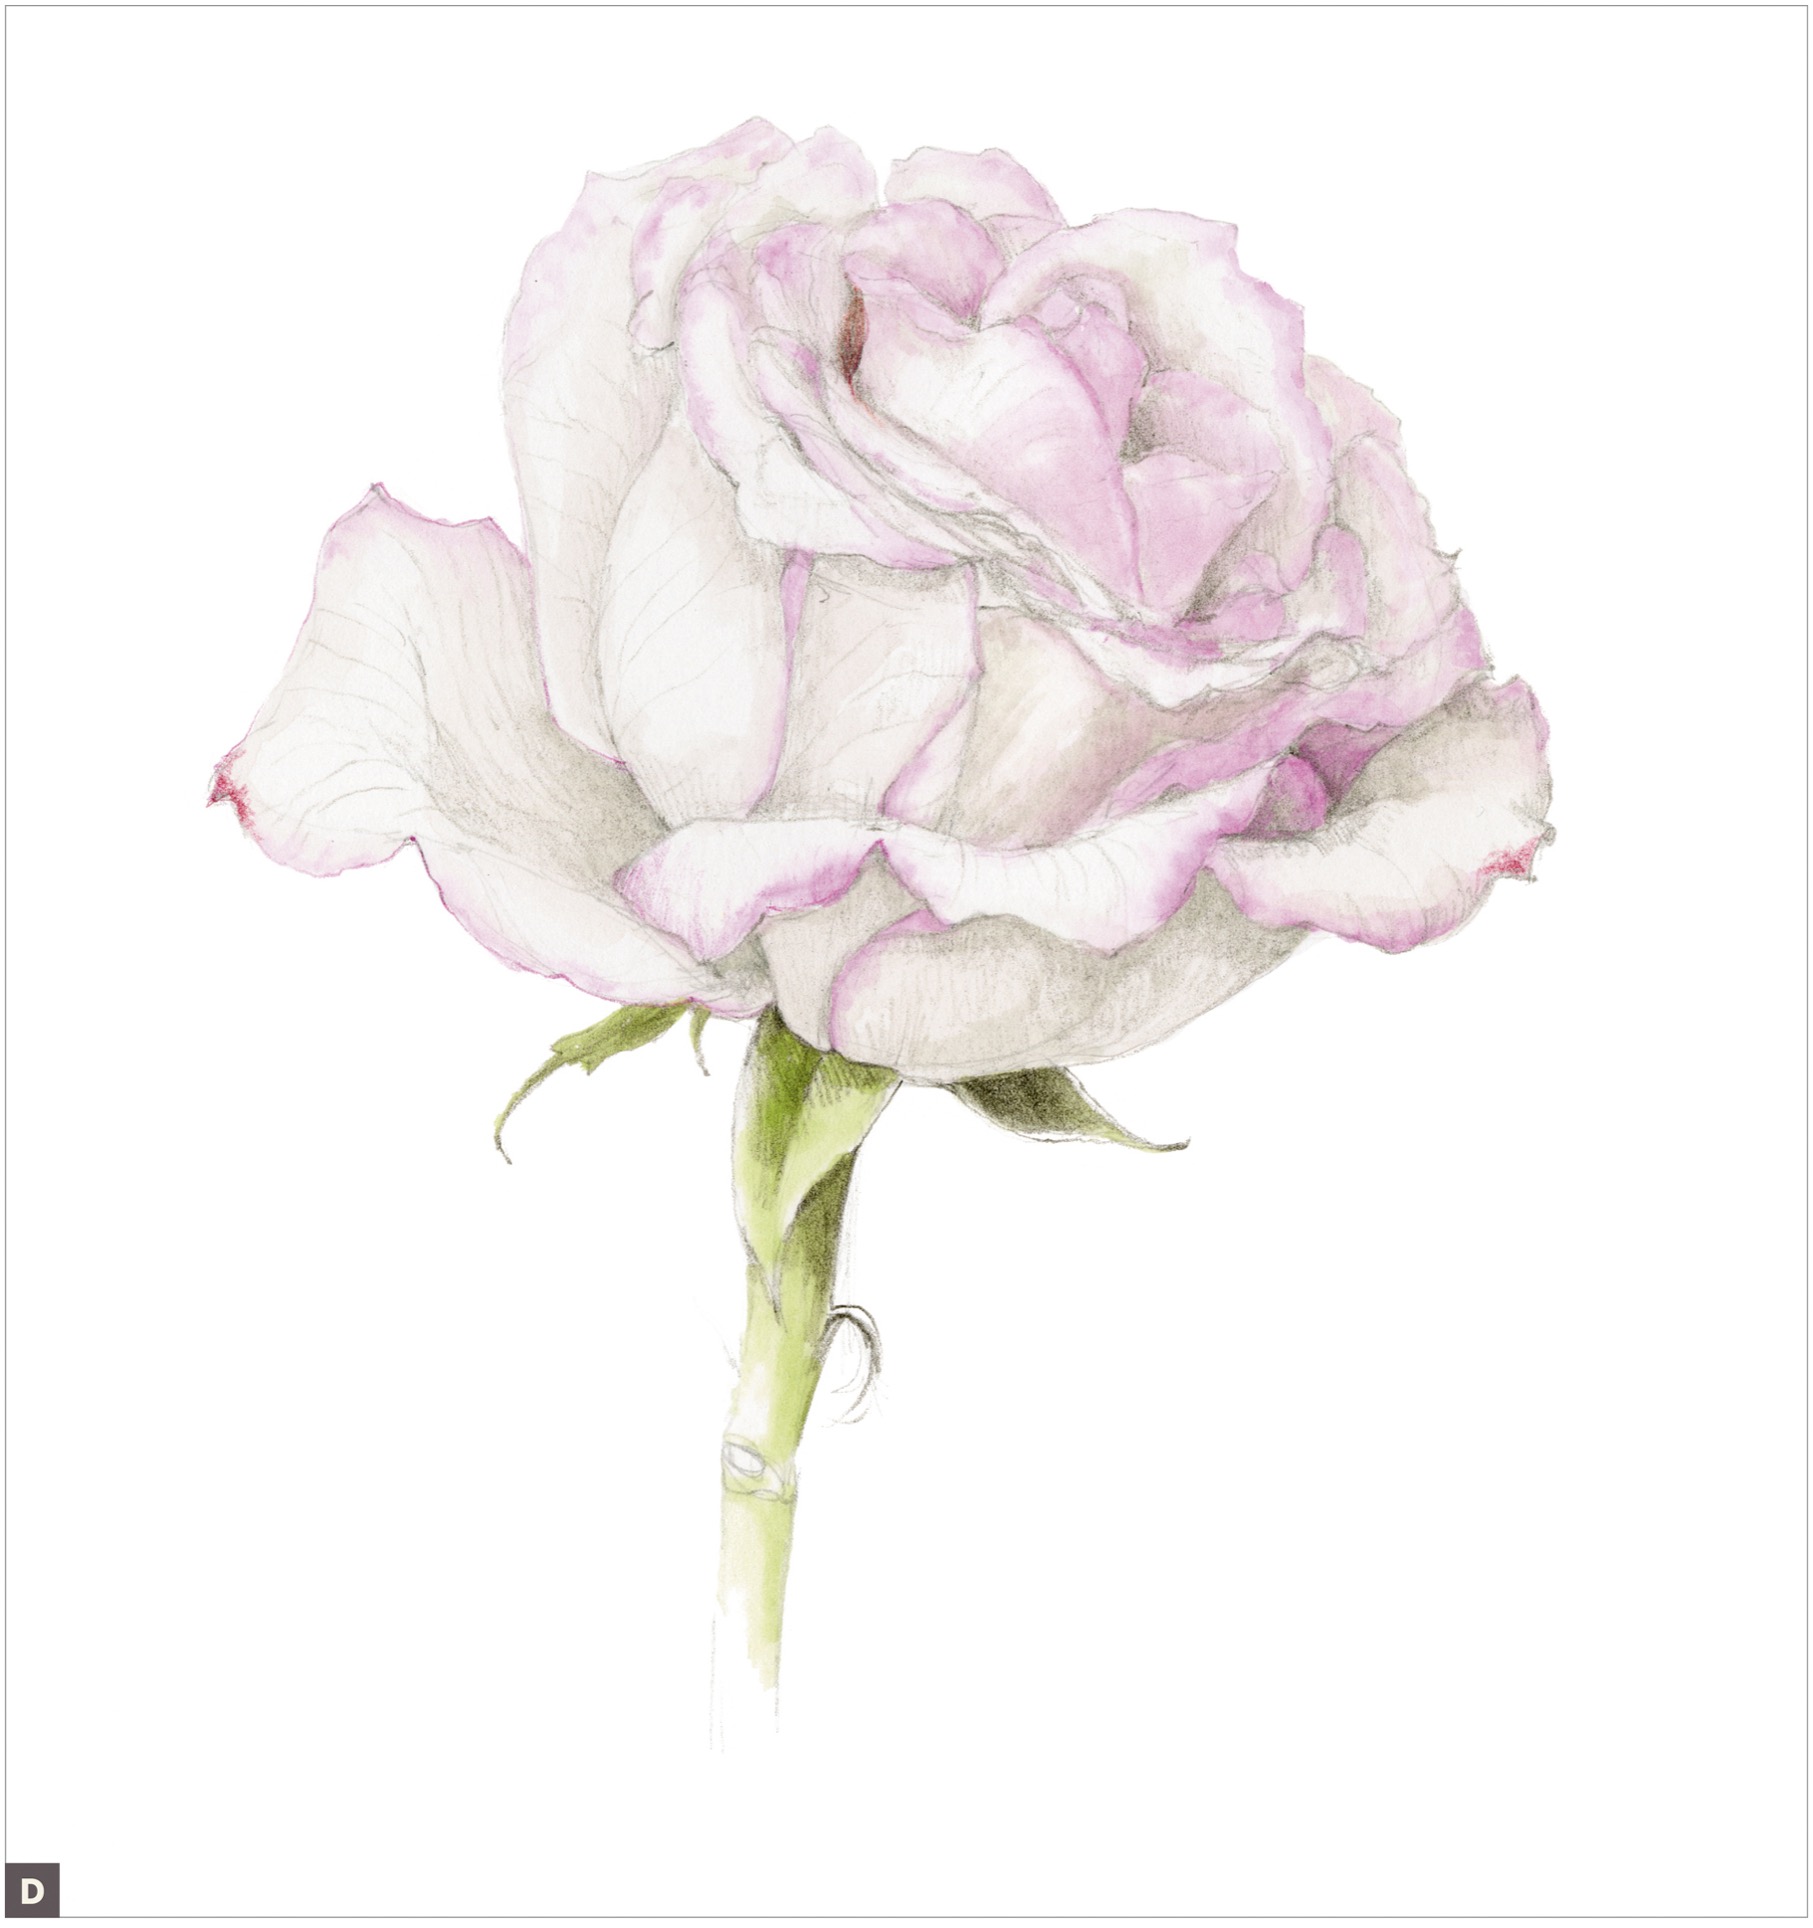
Continue to layer color, maintaining a strong contrast between the light and dark areas. Emphasize the shape of the petals and direction in which they roll with toning. Add details and sharpen edges.
Create a compelling focal point by contrasting the pale flower with dark, shiny, serrated leaves. Leaves have serrated margins and are often dark with shiny highlights, a good way to create contrast around a pale flower. (E)

