Chapter 3
Becoming a Network Admin
IN THIS CHAPTER
 Getting familiar with the Network Admin Dashboard
Managing your network
Preventing spam blogs
After you enable the WordPress network option and become a network admin, you can examine the various settings that are available to you and go over the responsibilities you have while running a network.
As a network admin, you can access the Network Admin Dashboard, which includes several submenus, to manage the sites in your network, as well as the overall settings for your network. This chapter discusses the menu items and options on the Network Admin screen, guides you in setting network options, and discusses the best ways to prevent spam and spam blogs (splogs).
Exploring the Network Admin Dashboard
When you visit the Dashboard after activating the Multisite feature, the toolbar includes the My Sites menu, which contains the Network Admin link. (See Figure 3-1.)

FIGURE 3-1: The Network Admin menu.
WordPress has separated the Network Admin menu features from the regular (Site Admin) Dashboard menu features to make it easier for you to know which part of your site you’re managing. If you’re performing actions that maintain your main website — publishing posts or pages, creating or editing categories, and so on — you work in the regular Dashboard (Site Admin). If you’re managing any of the network sites, plugins, and themes for the network sites or registered users, you work in the Network Admin section of the Dashboard.
 Keep in mind the distinct differences between the Site Admin and Network Admin Dashboards, as well as their menu features. WordPress does its best to know which features you’re attempting to work with, but if you find yourself getting lost on the Dashboard, or if you’re not finding a menu or feature that you’re used to seeing, make sure that you’re working in the correct section of the Dashboard.
The Network Admin Dashboard (see Figure 3-2) is similar to the regular WordPress Dashboard; however, the modules pertain to the network of sites. Options include creating a site, creating a user, and searching existing sites and users. Obviously, you won’t perform this search if you don’t have any users or sites yet. This function is extremely useful when you have a community of users and sites within your network, however.
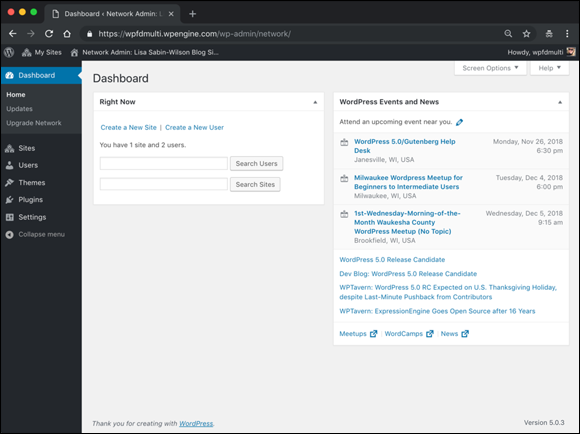
FIGURE 3-2: The Network Admin Dashboard.
 The Network Admin Dashboard is configurable, just like the regular Dashboard; you can move the modules around and edit their settings. Refer to Book 3, Chapter 1 for more information about arranging the Dashboard modules to suit your tastes.
The Search Users feature allows you to search usernames and user email addresses. If you search for the user Lisa, for example, your results include any user whose username or email address contains Lisa, so you can receive multiple results when using just one search word or phrase. The Search Sites feature returns any blog content within your community that contains your search term, too.
The Network Admin Dashboard has two useful links near the top of the screen:
- Create a New Site: Click this link to create a new site within your network. When you click the link, the Add New Site screen appears. Find out how to add a new site in the upcoming “Sites” section.
- Create a New User: Click this link to create a new user account within your community. When you click this link, the Add New User screen appears. Find out how to add a new user to your community in the “Users” section, later in the chapter.
Additionally, the Network Admin Dashboard gives you a real-time count of how many sites and users you have in your network, which is nice-to-know information for any network admin.
Managing Your Network
As mentioned, the Network Admin Dashboard has its own set of menus separate from the regular Site Admin Dashboard. Those menus are located on the left side of the Network Admin Dashboard. This section goes through the menu items and provides explanations and instructions for working with the settings and configurations to manage your network, sites, and users.
The menus available on the Network Admin Dashboard offer these options:
- Sites: View a list of the sites in your network, along with details about them.
- Users: See detailed info about current users in your network.
- Themes: View all the currently available themes to enable or disable them for use in your network.
- Plugins: Manage (activate/deactivate) plugins for use on all sites within your network.
- Settings: Configure global settings for your network.
All the items on the Network Admin Dashboard are important, and you’ll use them frequently throughout the life of your network. Normally, I’d take you through each of the menu items in order so it would be easy for you to follow along on your Dashboard, but it’s important to perform some preliminary configurations of your network before you do anything else. Therefore, the following sections start with the Settings menu and then go through the other menu items in order of their appearance on the Network Admin Dashboard.
Settings
Click the Settings menu link on the Network Admin Dashboard. The Network Settings screen appears (see Figure 3-3), displaying several sections of options for you to configure to set up your network the way you want.

FIGURE 3-3: The Network Settings screen.
 When you finish configuring the settings on the Network Settings screen, don’t forget to click the Save Changes button at the bottom, below the final Menu Settings section. (See Figure 3-7 later in the chapter.) If you navigate away from the Network Settings screen without clicking the Save Changes button, none of your configurations will be saved, and you’ll need to go through the entire process again.
Operational Settings
The two options in the Operational Settings section, shown in Figure 3-3, are
- Network Title: This setting is the title of your overall network of sites. This name is included in all communications regarding your network, including emails that new users receive when they register a new site within your network. Type your desired network title in the text box.
- Network Admin Email: This setting is the email address that all correspondence from your website is addressed from, including all registration and signup emails that new users receive when they register a new site and/or user account within your network. In the text box, type the email that you want to use for these purposes.
Registration Settings
The Registration Settings section (see Figure 3-4) allows you to control aspects of allowing users to sign up to your network. The most important option is whether to allow open registration.
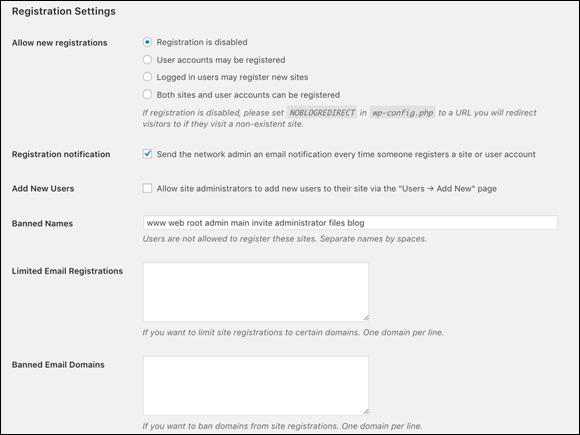
FIGURE 3-4: The Registration Settings section of the Network Settings screen.
To set one of the following options, select its radio button:
- Registration Is Disabled: Disallows new user registration. When selected, this option prevents people who visit your site from registering for a user account.
- User Accounts May Be Registered: Allows people to create only user accounts, not create sites on your network.
- Logged In Users May Register New Sites: Allows only existing users (those who are logged in) to create a new site on your network. This setting also disables new user registration. Choose this option if you don’t want just anyone registering for an account. Instead, you, as the site administrator, can add users at your discretion.
- Both Sites and User Accounts Can Be Registered: Allows users to register an account and a site on your network during the registration process.
These options apply only to outside users. As a network admin, you can create new sites and users any time you want by setting the necessary options on the Network Admin Dashboard. (For information about creating users, see the upcoming “Users” section.)
The remaining options in the Registration Settings section are as follows:
- Registration Notification: When this option is selected, an email is sent to the network admin every time a user or a site is created on the system, even if the network admin creates the new site.
- Add New Users: Select this check box if you want to allow your community blog owners (individual site admins) to add new users to their own community site via the Users page within their individual dashboards.
- Banned Names: By default, WordPress bans several usernames from being registered within your community, including www, web, root, admin, main, invite, and administrator — for good reason. You don’t want a random user to register a username such as admin because you don’t want that person misrepresenting himself as an administrator on your site. You can enter an unlimited amount of usernames that you want to bar from your site in the Banned Names text box.
- Limited Email Registrations: You can limit sign-ups based on email domains by filling in this text box with one email domain per line. If you have open registrations but limited the email addresses, only the people who have an email domain that’s on the list can register. This option is an excellent one to use in a school or corporate environment where you’re providing email addresses and sites to students or employees.
- Banned Email Domains: This feature, the reverse of Limited Email Registrations, blocks all sign-ups from a particular domain, which can be useful in stopping spammers. If you enter gmail.com in the field, for example, anyone who tries to sign up with a Gmail address will be denied.
New Site Settings
The New Site Settings section (see Figure 3-5) is a configurable list of items that WordPress populates with default values when a new site is created. These values include the ones that appear in welcome emails, on a user’s first post page, and on a new site’s first page.
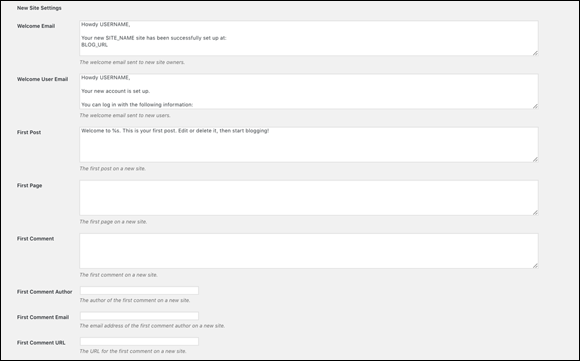
FIGURE 3-5: The New Site Settings section of the Network Settings screen.
The configurable list of items includes
Welcome Email: This setting is the text of the email that owners of newly registered sites in your network receive when their registration is complete. WordPress provides a default message that you can leave in place, if you like. Or you can type the text of the email you want new site owners to receive when they register a new site within your network.
A few variables you can use in this email aren’t explained entirely on the Network Settings screen, including the following:
SITE_NAME: Inserts the name of your WordPress siteBLOG_URL: Inserts the URL of the new member's blogUSERNAME: Inserts the new member’s usernamePASSWORD: Inserts the new member's passwordBLOG_URLwp-login.php: Inserts the hyperlinked login URL for the new member’s blogSITE_URL: Inserts the hyperlinked URL for your WordPress site
- Welcome User Email: This setting is the text of the email that newly registered users receive when they complete the registration process. The variables used for the Welcome Email setting apply to this email configuration as well.
First Post: This setting is for the first, default post that displays on every newly created site in your network. WordPress provides some default text that you can leave in place, or you can type your desired text in the text box. This text will that appear in the first post on every site that's created in your community.
You can use this area to provide useful information about your site and services. This post also serves as a nice guide for new users because they can view it on the Dashboard’s Edit Post page to see how it was entered and formatted and then use it as a guide for creating their own blog posts. You can also use the variables mentioned in the bullet points in the earlier Welcome Email option to have WordPress add some information for you automatically.
- First Page: Similar to the First Post setting, this default text for a default page displays on every newly created site in your network. (The First Page text box doesn’t include default text; if you leave it blank, no default page is created.)
- First Comment: This default comment displays in the first default post on every newly created site within your network. Type the text that you want to appear in the first comment on every site that’s created in your community.
- First Comment Author: Type the name of the author of the first comment on new sites in your network.
- First Comment Email: Type the email address of the author of the first comment on new sites in your network.
- First Comment URL: Type the web address (URL) of the author of the first comment; this entry hyperlinks the first comment author’s name to the URL you type here.
Upload Settings
Scrolling down the Network Settings screen, you get to the Upload Settings section (see Figure 3-6), which defines global values pertaining to the type of files you’ll allow the site owners within your network to upload by using the file upload feature in the WordPress Write Posts and Write Page areas. (See Book 3, Chapter 3.)
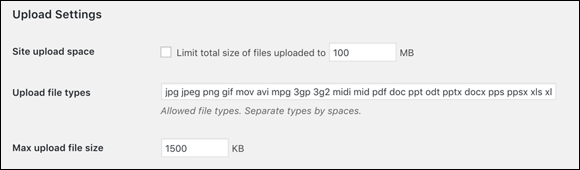
FIGURE 3-6: The Upload Settings section of the Network Settings screen=.
The fields in the Upload Settings section have default settings already filled in:
- Site Upload Space: If you leave this check box deselected, users are allowed to use all the space they want for uploads; they have no limits. Select the check box to limit the available space per site and then fill in the amount in megabytes (MB); the suggested, default storage space is 100MB. This amount of hard drive space is what you give users within your network for the storage of files they upload to their sites. If you want to change the default storage space, type a number in the text box.
- Upload File Types: This text field defines the types of files that you, as the network admin, allow site owners to upload to their sites on their Dashboards. Users can’t upload any file types that don’t appear in this field. By default, WordPress includes the following file types:
jpg jpeg png gif mov avi mpg 3gp 3g2 midi mid pdf doc ppt odt pptx docx pps ppsx xls xlsx key mp3 ogg flac m4a wav mp4 m4v webm ogv flv. You can remove any default file types and add new ones. - Max Upload File Size: This amount is in kilobytes (KB), and the default file size is 1500KB. This setting means that a user can’t upload a file larger than 1500KB. Adjust this number as you see fit by typing a new number in the text box.
Menu Settings
The Plugins administration menu is disabled on the Dashboards of all network site owners, but the network administrator always has access to the Plugins menu. If you leave this check box unselected (see Figure 3-7), the Plugins page is visible to users on their own site’s Dashboards. Select the box to enable the Plugins administration menu for your network users. For more information about using plugins with WordPress, see Book 7.

FIGURE 3-7: The Menu Settings section of the Network Settings screen.
When you finish configuring the settings on the Network Settings screen, don’t forget to click the Save Changes button at the bottom, below the Menu Settings section. If you navigate away from the Network Settings screen without clicking the Save Changes button, none of your configurations will be saved, and you’ll need to go through the entire process again.
Sites
Clicking the Sites menu item on the Network Admin Dashboard takes you to the Sites screen, where you can manage your individual sites. Although each site in the network has its own Dashboard for basic tasks (publishing, changing themes, and so on), the Sites screen is where you create and delete sites and edit the properties of the sites within your network. Editing information from this page is handy when you have problems accessing a site’s back-end Dashboard.
The Sites screen also lists all the sites within your network, displaying the following statistics for each site:
- URL: The site’s path in your network. In Figure 3-8, you see a site listed with the username
lisa. This path means that the site's domain islisa.yourdomain.com(if you're using a subdomain setup) oryoursite.com/lisa(if you're using a subdirectory setup). I discuss subdomains and subdirectories in Book 8, Chapter 2. - Last Updated: The date when the site was last updated (or published to).
- Registered: The date when the site was registered in your network.
- Users: The username and email address associated with the user(s) of that site.
- ID: The unique ID number assigned to the site. This ID number corresponds to the database tables where the data for this site are stored. (See Book 2, Chapter 3.)
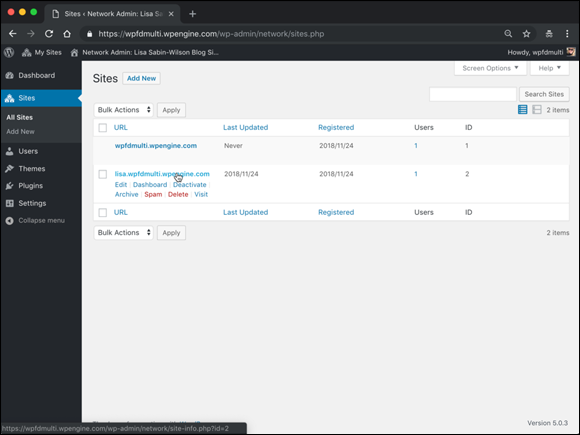
FIGURE 3-8: Site-management options on the Sites screen.
When you hover your pointer over the pathname of a site in your network, you see a handy listing of links that help you manage the site. Figure 3-8 shows the options that appear below a site listing when you hover your mouse over a site name.
The management options for network sites, most of which are visible in Figure 3-8, are as follows:
- Edit: Click this link to go to the Edit Site screen (see Figure 3-9), where you can change aspects of each site.
- Dashboard: Click this link to go to the Dashboard of the site.
Deactivate: Click this link to mark the site for deletion from your network. A message appears in a pop-up window, asking you to confirm your intention to deactivate the site. Click the Yes button to confirm. The user’s site displays a message stating that the site has been deleted.
You can reverse this action by revisiting the Sites screen and clicking the Activate link that appears below the site pathname. (The Activate link appears only for sites that are marked as Deactivated.)
Archive: Click this link to archive the site on your network and prevent visitors from viewing it. The user’s site displays a message stating
This site has been archived or suspended.You can reverse this action by revisiting the Sites screen and clicking the Unarchive link that appears below the site’s pathname. (The Unarchive link appears only for sites that are marked as Archived.)
Spam: Click this link to mark the site as spam and block users from accessing the Dashboard. WordPress displays the message
This site has been archived or suspended.You can reverse this action by revisiting the Sites screen and clicking the Not Spam link that appears below the site's pathname. (The Not Spam link appears only for sites that are marked as Spam.)
- Delete: Click this link to delete the site from your network of sites. Although a confirmation screen asks you to confirm your intention to delete the site, after you confirm the deletion, you can’t reverse it.
- Visit: Click this link to visit the live site in your web browser.
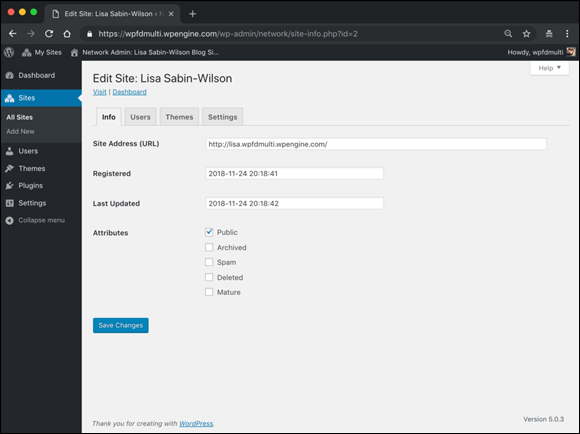
FIGURE 3-9: The Edit Site screen.
Generally, you use the Edit Site screen (refer to Figure 3-9) only when the settings are unavailable from the Dashboard of that particular site. Configure these options on the four tabs of the screen:
- Info: On this tab, you can edit the site’s domain, path, registered date, updated date, and attributes (Public, Archived, Spam, Deleted, or Mature).
- Users: On this tab, you can manage the users who are assigned to the site, as well as add users to the site.
- Themes: On this tab, you can enable themes for the site. This capability is particularly useful if you have themes that aren’t network-enabled. (I cover themes later this chapter.) All the themes that aren’t enabled within your network are listed on the Themes tab, which allows you to enable themes on a per-site basis.
- Settings: The settings on this tab cover all the database settings for the site that you’re editing. You rarely, if ever, need to edit these settings because as network administrator, you have access to each user’s Dashboard and should be able to make any changes in the site’s configuration settings there.
The Sites menu also includes a link called Add New. Click that link to load the Add New Site screen (see Figure 3-10) in your Network Admin Dashboard. Fill in the Site Address (URL), Site Title, Site Language, and Admin Email fields and then click the Add Site button to add the site to your network. If the Admin Email you entered is associated with an existing user, the new site is assigned to that user on your network. If the user doesn’t exist, WordPress creates a new user and sends a notification email. The site is immediately accessible. The user receives an email containing a link to her site, a login link, and her username and password.
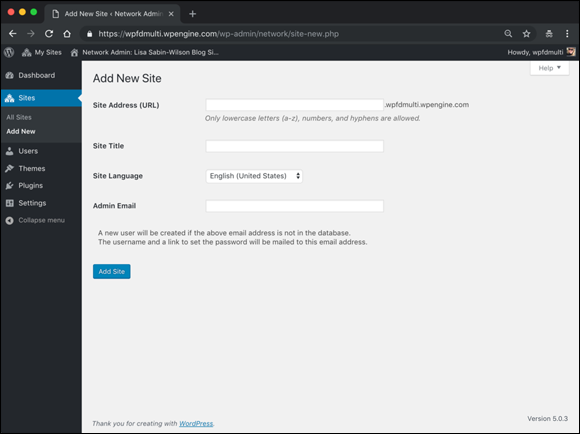
FIGURE 3-10: The Add New Site screen of the Network Admin Dashboard.
Users
Clicking the Users link on the Network Admin Dashboard takes you to the Users screen (see Figure 3-11), where you see a full list of members, or users, within your network.
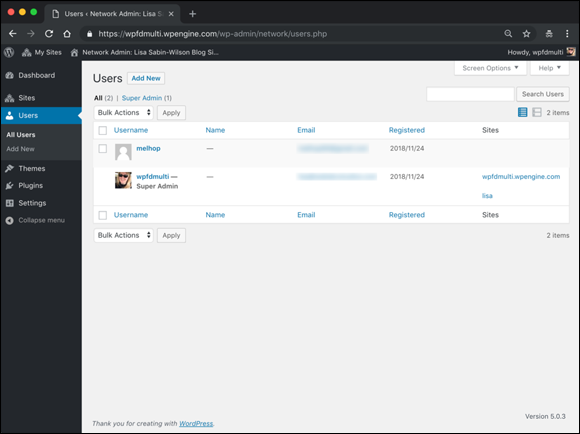
FIGURE 3-11: The Users screen.
The Users screen lists the following information about each user:
- Username: This setting is the login name the member uses when he logs in to his account in your community.
- Name: This setting is the user’s real name, taken from her profile. If the user hasn’t provided her name in her profile, this column is blank.
- Email: This setting is the email address the user entered when he registered on your site.
- Registered: This setting is the date when the user registered.
- Sites: If you enable sites within your WordPress Network, this setting lists any sites where the user is a member.
You can add users to the network, manage users, and even delete users by clicking the Edit or Delete links that appear below their names when you hover over them with your mouse (the same way you do with sites on the Sites screen).
To delete a user, simply hover your mouse over the username in the list that appears on the Users screen, and click the Delete link. A new screen appears, telling you to transfer this user’s posts and links to another user account (most likely, your account). Do that and then click the Confirm Deletion button. WordPress removes the user from the network.
This action is irreversible, so be certain about your decision before you click that button!
You can also edit a user’s profile information by clicking the Edit link that appears when you hover your mouse over his name on the Users screen. Clicking that link takes you to the Edit User screen, shown in Figure 3-12, which presents several options. These options happen to be (mostly) the same options and settings that you configured for your own profile information (as discussed in Book 3, Chapter 2).

FIGURE 3-12: The Edit User screen.
The only difference with the Edit User screen within the Network Admin Dashboard is the setting labeled Super Admin, which is deselected by default. If you select this check box, however, you grant this user network admin privileges for your entire network, which means that the user has exactly the same access and permissions as you.
At this writing, the terms super admin and network admin are interchangeable. When WordPress merged the WordPress MU code base with the regular WordPress software back in 2010 (in version 3.0), the term it used to describe the network admin was super admin. Now network admin is the standard term, but areas within the Network Admin Dashboard and regular Dashboard still use the Super Admin label. That situation will most likely change in the near future, because WordPress will realize the discrepancy and update later versions of the software.
Also on the Users menu of the Network Admin Dashboard, you see a link called Add New. Click that link to load the Add New User page on your Network Admin Dashboard (shown in Figure 3-13).

FIGURE 3-13: The Add New User screen of the Network Admin Dashboard.
You can add a user by filling in the Username and Email fields and then clicking the Add User button. WordPress sends the new user an email notification of the new account, along with the site URL, her username, and her password (randomly generated by WordPress when the user account is created).
Themes
When a network is enabled, only users who have Network Admin access have permission to install themes, which are shared across the network. You can see how to find, install, and activate new themes in your WordPress installation in Book 6, Chapter 1. After you install a theme, you must enable it on your network to have the theme appear on the Appearance screen of each site. To access the Themes screen (shown in Figure 3-14), click the Themes link on the Network Admin Dashboard menu.
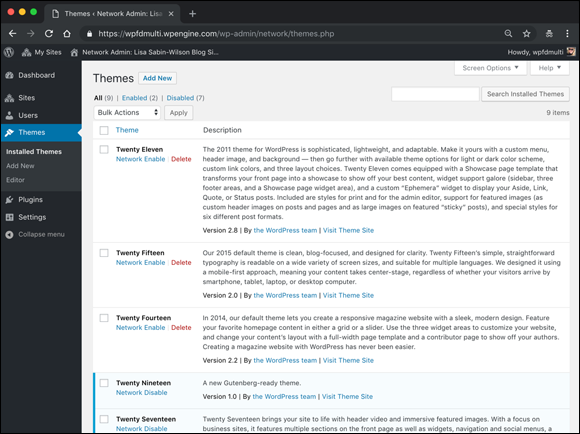
FIGURE 3-14: The Themes screen of the Network Admin Dashboard.
Turn to Book 8, Chapter 5 to see how to enable a theme on a per-site basis.
Plugins
By and large, all WordPress plugins work on your network. Some special plugins exist, however, and using plugins on a network involves some special considerations.
For details on finding, installing, and activating plugins in WordPress, see Book 7.
Browse to the Plugins screen of your WordPress Network Admin Dashboard by clicking the Plugins link. The Plugins screen is almost the same as the one shown in Book 7, Chapter 1, but if you don’t know where to look, you can easily miss one very small, subtle difference. Check out Figure 3-15, and look below the name of the plugin. Do you see the Network Activate link? That link is the big difference between plugins listed on the regular Site Dashboard and those listed on the Network Admin Dashboard. As the network administrator, you can enable certain plugins to be activated across your network. All sites on your network will have the network-activated plugin features available, in contrast to plugins that you activate on the regular Dashboard (Site Admin), which are activated and available only for your main website.
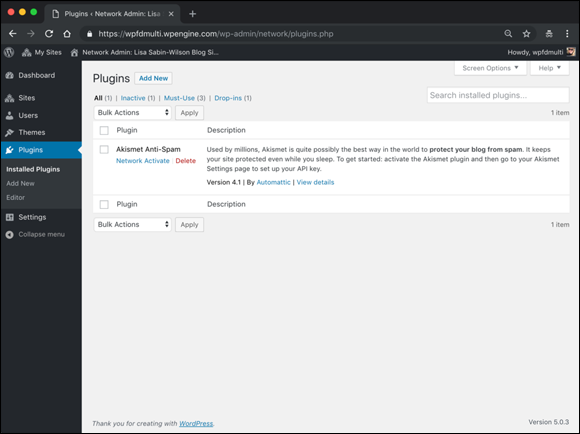
FIGURE 3-15: The Network Plugins screen.
If you select the Plugins administration menu (see “Menu Settings” earlier in this chapter) on the Network Settings screen, users see the plugins listed on their Plugins screens of their Dashboard. In their list of plugins, they see only the plugins that you haven’t network-activated — that is, all the plugins you installed in your WordPress installation but not activated on those users’ sites. Users can activate and deactivate those plugins as they desire.
Only network administrators can install new plugins on the site; regular users within the network don’t have that kind of access (unless you’ve made them network administrators in their User settings).
Also located on the Plugins menu of the Network Admin Dashboard are two other links: Add New and Editor. Click the Add New link to load the Plugins screen, where you can add and install new plugins by searching the WordPress Plugins page within your Dashboard. (I cover this topic in Book 7, chapters 1 and 2.) The Editor link gives you access to the Plugin Editor (covered in Book 7, Chapter 4).
Stopping Spam Sign-Ups and Splogs
If you choose to have open sign-ups, in which any member of the public can register and create a new site on your network, at some point automated bots run by malicious users and spammers will visit your network sign-up page and attempt to create one, or multiple, sites in your network. They do so by automated means, hoping to create links to their sites or fill their site on your network with spam posts. This kind of spam blog or site is a splog.
Spam bloggers don’t hack your system to take advantage of this feature; they call aspects of the sign-up page directly. But you can do a few simple things to slow them considerably or stop them.
In the Registration Settings section of the Network Settings screen (refer to Figure 3-4), clear the Add New Users check box to stop many spammers. When spammers access the system to set up a spam site, they often use the Add New Users feature to create many other blogs via programs built into the bots.
Spammers often find your site via a Google search for the link to the sign-up page. You can stop Google and other search engines from crawling your sign-up page by adding rel=nofollow,noindex to the sign-up page link. Wherever you add a link to your sign-up page inviting new users to sign up, the HTML code you use to add the nofollow,noindex looks like this:
<a href="http://yoursite.com/wp-signup.php" rel="nofollow,noindex ">Get your own site here</a>
Plugins can help stop spam blogs, too. The Anti-Splog plugin prevents and limits spam bots, and also identifies humans and known spammers efficiently. You can download the Anti-Splog plugin at https://wordpress.org/plugins/anti-splog.
The Cookies for Comments plugin (available at https://wordpress.org/plugins/cookies-for-comments) leaves a cookie in a visitor's browser. If the sign-up page is visited, the plugin checks for the cookie. If no cookie exists, the sign-up fails. Be sure to check the installation directions for this plugin, because it requires editing the .htaccess file.