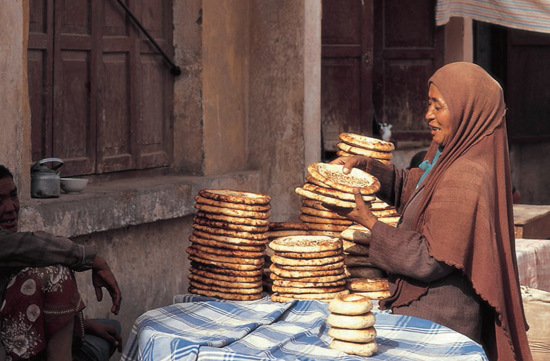
A Uighur woman in Kashgar, buying nan (flatbreads).
There are many reasons that we like traveling in the regions beyond the Great Wall, and bread is definitely one of them. Baking traditions here are still very locally based, and bread, in the places where it’s common, is still very much a staff of life.
Xinjiang, the large province in the far west of China, is a flatbread lover’s paradise. No matter where you are, and no matter what time of day, there’s a Uighur baker nearby with a tandoor oven who is just about to bake, or has just finished baking, or is baking as you wait. The breads (nan) fly in and out of the hot tandoor, and stacks of fresh hot flatbreads quickly begin to grow. One customer carries away six, another buys ten, and someone else buys one and eats it on the spot. In the dry desert air of Xinjiang, the smell of the bread is almost as good as the bread itself.
The Tajik people in the Pamirs have their own versions of tandoor nan, and so do the Kirghiz. The Kazakhs make a bread that’s unusual for Central Asia, in that it’s a domed loaf, not a flatbread (see Kazakh Family Loaf, page 195). Like Home-Style Tajik Nan (page 191), it’s made tender with yogurt.
One of the pleasures of travel beyond the Great Wall is the chance to discover a world of delicious and ingenious filled breads, including Cheese Momos (page 212) and Savory Tibetan Breads (page 214), as well as Succulent Lamb Samsa (page 198) and the greens-filled half-moon breads of Turpan (page 208). They’re like baked or deep-fried versions of the dumplings in the Noodles and Dumplings chapter.
Filled breads are eaten as snacks, while nan and other plain breads are present at every meal.
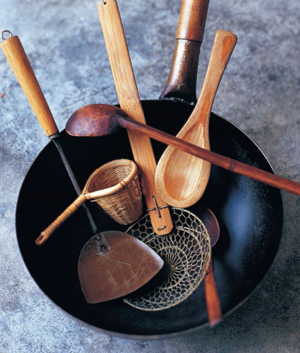
A well-seasoned wok holds an array of useful cooking tools, including a mesh skimmer, a rice paddle, a spatula for stir-frying, and a tea strainer made of woven bamboo.
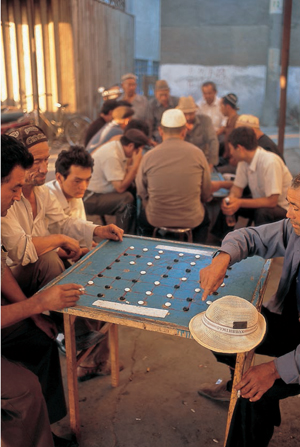
Uighur men in Turpan, playing a board game in a local café.
I’m in Altai, a town of thirty or forty thousand people up in the far northern part of Xinjiang province, after not having been in China for quite some time, five years or so. From the large window in my third-floor hotel room, I look out at a range of tall hills—over those hills lies Mongolia. If I stretch my head out the window and look north, I see a range of even taller hills, almost mountains, and beyond them is Siberia.
I flew here two days ago from Hong Kong, more or less directly. I awoke at our friends’ apartment in Hong Kong at five a.m., took a taxi to the subway and then the subway under the harbor to Kowloon. I walked through Kowloon Park past people practicing tai chi just as the sun was coming up. On the other side of the park, I found my way to the China ferry docks, where I went through Hong Kong immigration and officially entered China. By seven-thirty I was on a comfortable ferry traveling at high speed through the harbor, passing in a heavy morning mist through a vastness of container ships and loading cranes; on land, the horizon was banked with towering apartment blocks, one after another after another. Sixty-six million people now live and work in the Pearl River Delta (the triangle of Hong Kong, Guangzhou, and Shenzhen), the most intensive manufacturing region in the world.
By midmorning I was in Shenzhen Airport (Shenzhen is now a city of over seven million people), looking for the gate for my flight to Xinjiang. Everything around me was modern and bright, with that quintessential new airport feel. And on the airplane everyone around me (all Han Chinese from South China) was dressed in twenty-first-century clothing, Western clothing, with plenty of Gore-Tex, aqua, red, and yellow. But near the end of the five-hour flight, in case I might have forgotten, I was reminded that I was in China. The flight attendants stood in the middle of the aisles and led the way as everyone, in perfect unison, obediently did calisthenics in their seats. “Yi, er, san” (one, two, three), roll your head to the left, roll your head to the right. Lift your left arm up and twirl it in a circle. “Yi, er, san.”
I couldn’t do it. I was the only one on the plane not to do it. It wasn’t that I have a problem with stretching, but the coerciveness pushed all my buttons. One China = one way.
Here in Altai there are Tatars, Uighurs, Kazakhs, Mongols, even some Tuvans. There’s plenty of space and clear air to breathe. There are several banks and department stores along the main street, and many small shops selling cell phones, just like a main street anywhere in China. But people don’t look the same, and they walk with a freer stride. At night I can choose between Uighur noodles or a Tatar or a Kazakh pulao, and for dessert I can have thick, creamy Kazakh yogurt with sugar on top, or suck on a chunk of hard Kazakh cheese.
I’m very far from the Pearl River Delta.
I’m not sure how many people here would have joined in the calisthenics on the airplane. I have a feeling I wouldn’t have been the only one abstaining. J
Uighur nan are flatbreads. In Xinjiang they’re cooked in tandoor ovens, but at home we bake them on a baking stone or unglazed quarry tiles.
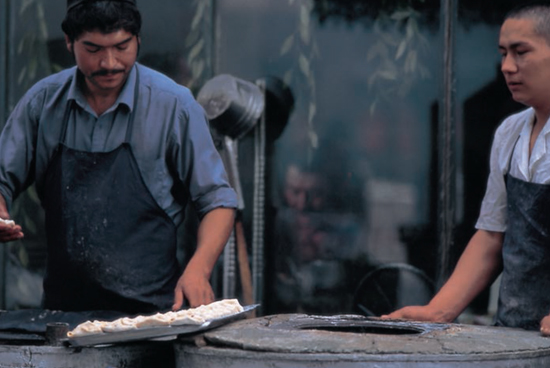
Tandoor baking is fascinating to watch: The barrel-shaped oven is preheated with a hot fire, then the fire is damped down and the shaped flatbreads are slapped onto the hot inside clay walls of the oven. They stick because they’re moist and uncooked. When they’ve cooked through (usually in three or four minutes), they come unstuck—the baker uses a stick to lift them off the side of the oven just before they fall. Then he slaps on more breads, and so it goes.
The distinctive thing about tandoor breads in this part of Central Asia (in Xinjiang, and also among the Uzbeks, Kazakhs, Kirghiz, and Turkmen across the border in the former Soviet republics) is that the center of the bread is stamped with a nail-studded device, called a chekitch or a durtlik, depending on the language (see photo, page 206). The stamping prevents the central part of the bread from puffing up during baking, though often it will still puff in spots. The result is a bread with a flatter center and a puffed rim, like a pizza, but instead of a sauced topping that weighs the center down, the stamping makes it flatter.
Bread stamps aren’t yet sold in North America, at least we haven’t seen them, so we suggest that you stamp the center of the breads all over with a fork. If you enjoy making the breads, you might try making your own bread stamp.
Flavorings for Uighur nan vary, and so do shapes and sizes. These breads are 9 to 10 inches across, with a soft rim and a flattened slightly crisper center lightly sprinkled with cumin, salt, and (optional) minced scallion.
3 cups lukewarm water
1 teaspoon active dry yeast
About 7 to 8 cups all-purpose flour, preferably unbleached, plus extra for surfaces
1 tablespoon plus 1 teaspoon salt
About 1 teaspoon cumin seeds
2 tablespoons minced scallions (white and tender green parts; optional)
Place the warm water in a large bowl, sprinkle the yeast over, and stir to dissolve it. Add 3 cups of the flour and stir to make a batter, always stirring in the same direction, to develop the gluten. If you wish, you can set the batter aside in a cool place, covered, for up to 12 hours; this pause helps it gain flavor. You can also just proceed without a pause, and the breads will still be a pleasure to eat.
Sprinkle on 1 tablespoon of the salt, then add another 2 cups or so flour and stir and turn to incorporate it. Sprinkle on a little more flour, and put a generous 1 cup flour on your work surface. Turn the dough out onto the flour and let rest for a moment while you wash the bread bowl and dry it.
Knead the dough, incorporating flour as needed and adding more to your work surface if necessary, until it is no longer sticky, but smooth and elastic and still somewhat soft, about 7 minutes.
Place the dough back in the bowl and cover with a damp kitchen towel or plastic wrap. Set aside to rise until doubled in volume: If you put it in a cool place, you can leave it for at least 6 hours or overnight, and the dough will develop more flavor. At room temperature (about 70°F), the rise will be quicker, about 2 hours.
Dust your work surface with flour. Pull the dough together and turn it out onto the work surface. Use a sharp knife or a metal dough scraper to cut the dough into 8 pieces (cut it in half and then in half and half again).
Roll each piece under your cupped palm on the counter, or between both palms, to form a firm ball. On a well-floured surface, with a floured palm, flatten each ball into a thick disk 5 to 6 inches wide. Turn and press the top side into the flour as well, then set aside to rest, covered, for 20 minutes.
Meanwhile, place a rack in the top third of your oven and put a baking stone or unglazed quarry tiles or a large baking sheet on it, leaving a 1-inch gap between the stone or tiles (if using them) and the oven walls so the air can circulate. Preheat the oven to 450°F.
Ten minutes after the oven has come to temperature (this wait gives the stone or tiles time to heat up completely), start shaping the breads on a floured surface. Press one disk of dough out with your fingertips into a large round, 9 to 10 inches in diameter (or use a rolling pin if you wish). The rest will have softened the dough, so the bread will flatten and stretch easily.
Place one stretched round on a flour-dusted baker’s peel or on the flour-dusted back of a baking sheet. Use a bread stamp (see headnote) or fork to prick the center of the round very thoroughly all over, leaving a ½-inch rim all around. Spritz or lightly brush it with a little water (use a sprayer or a pastry brush), then sprinkle on about ⅛ teaspoon cumin seeds and the same amount of salt. Sprinkle on a little of the scallions if you wish.
Use the peel or baking sheet to transfer the bread onto the hot stone or tiles or baking sheet: Open the oven and hold the peel or sheet over the hot surface, then quickly slip the peel away, leaving the dough round on the surface. Repeat with the other stretched round, placing it beside the first bread. Bake for 8 or 9 minutes, until nicely touched with golden brown. While the breads bake, stretch the next pair of dough rounds.
Remove the breads to a rack, or if you want to soften them, stack them and wrap the stack in a cotton cloth. Slide the next pair of breads into the oven, and repeat with the remaining dough and flavorings until all 8 breads are baked.
Makes 8 large round flatbreads, about 10 inches in diameter
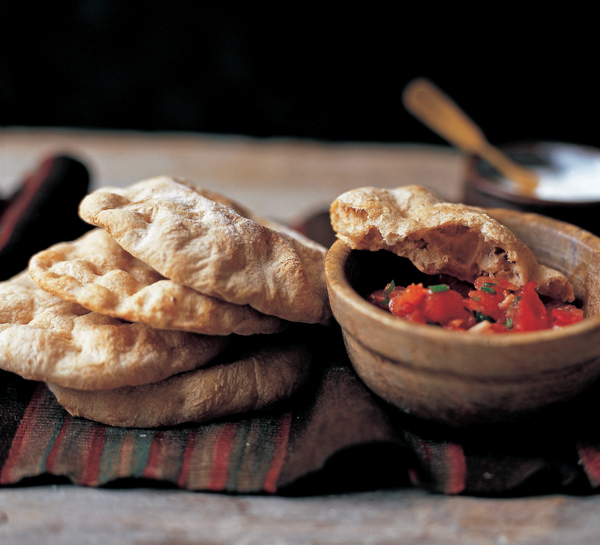
Home-Style Tajik Nan with Market Stall Fresh Tomato Salsa (page 18).
Up in the Pamirs, tandoor ovens are permanent features that mark the camping places of Tajik and Kirghiz nomads. Each tandoor, looking small in the open landscape, is surrounded by a circle of bare ground, the traces of the yurts that are occasionally set up around it. The tandoors we saw in the villages are of the same style, small dried-clay cylinders about three feet tall, with open tops.
The Tajiks cultivate a little wheat in the valleys near their villages. The breads we had there, in the village of Dafdar, and in the Tajik yurts (see “The Pamirs, June 1986,” page 141), were not just plain white, but had some whole wheat taste of the grain to them. We guessed that there was a little yogurt or whey in the dough, as well as a lower-gluten flour, for they were tender and oh-so-good. We call for a little pastry or cake flour to reproduce those softer-textured breads, and we include some yogurt.
Because the dough is made with a slow-rise technique, and also because of the yogurt, the breads will stay soft and fresh for much longer than quickly risen plain white flour nan. They’re smaller, home-style breads, like flattened rolls, if you will. We like making the dough the night before, then baking them for breakfast.
1½ cups lukewarm water
½ teaspoon active dry yeast
1 cup whole wheat or white pastry flour or cake flour
About 3½ to 4 cups all-purpose flour, preferably unbleached, plus extra for surfaces
½ cup plain full-fat or reduced-fat yogurt
2 teaspoons salt
Place the water in a large bowl and add about 8 granules of the yeast. Add the pastry or cake flour and 1 cup of the all-purpose flour and stir, always in one direction, to develop the gluten, until you have a smooth, thick batter. Cover and set aside to ferment for at least 4 hours, or as long as 24 hours, whatever is convenient. You will see small bubbles at the surface of the batter, showing that fermentation is taking place.
Sprinkle on the remaining dry yeast and stir it in. Add the yogurt and stir, then add ½ cup of the all-purpose flour and stir thoroughly until smooth. Sprinkle on the salt and stir in, then add another 1 cup all-purpose flour and stir and turn to blend it into the dough.
Flour a work surface generously with about 1 cup all-purpose flour and turn the dough out. Knead until smooth and no longer sticky, incorporating flour as needed and adding extra if necessary. You want a fairly soft dough rather than a stiff one.
Wash out and dry your bowl, place the dough in it, and cover with plastic wrap. Set aside at a cool room temperature to rise until more than doubled in volume, for at least 6 hours, or overnight. This slow rise helps give the bread flavor.
Lightly dust your work surface with flour and turn the dough out. Use a sharp knife or a metal dough scraper to cut the dough into 12 pieces: cut it in half and then in half again, then cut each quarter into 3 pieces.
Roll each piece under your cupped palm on a work surface, or between both palms, to form a firm ball. On a well-floured surface, with a floured palm, flatten each ball into a thick disk 2½ to 3 inches wide. Turn and press the top side into the flour as well, then set the disks aside to rest, loosely covered with plastic wrap, for 30 minutes, or for as long as 2 hours, if that is more convenient.
Meanwhile, place a rack in the top third of your oven and put a baking stone or unglazed quarry tiles on it, leaving a 1-inch gap between the stone or tiles and the oven walls so the air can circulate. Preheat the oven to 450°F.
Ten minutes after the oven has come to temperature (this wait gives the stones or tiles time to heat up completely), start shaping the breads. On a floured surface, press one round of dough out with your fingertips into a thin round about 6 inches in diameter, pressing into it firmly and leaving flattened dents. The rest will have softened the dough, so the bread will flatten and stretch easily. Don’t worry too much about dimensions: thicker breads are softer (and may puff while cooking), thinner ones are less likely to puff; both are pleasing. Repeat with another 4 or 5 breads, as many as will fit in the oven at once.
Use a flour-dusted baker’s peel or the back of a baking sheet lightly dusted with flour to transfer the breads onto the hot stone or tiles, or work by hand. If using a peel, place one dough round on the peel or sheet, then open the oven, hold the peel or sheet over the hot surface, and quickly slip it away, leaving the dough round on the stone or tiles. Repeat with the remaining shaped breads, setting them beside each other but not touching. If working by hand, you may find it easier to bake only 3 breads at a time, placing them nearer the front, rather than reaching all the way to the back of the hot oven. Place the breads one by one onto the hot surface.
Bake until the breads are lightly touched with brown and the bottom crust is firm, about 10 minutes. Use a long-handled spatula to lift the breads out of the oven as they are ready. Stack on a wire rack, or keep soft by wrapping the stack in a cotton cloth.
While the first breads are baking, shape the next batch. Continue baking the remaining dough rounds until all 12 are baked. Serve warm or at room temperature.
Makes 12 small flatbreads, about 5 inches in diameter
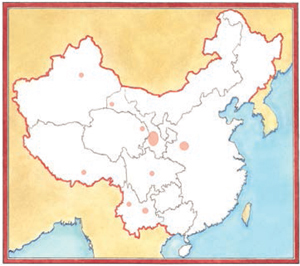
In this first decade of the twenty-first century, China’s fast-growing economy is the third largest in the world. The greatest economic growth is in the south, near the cities of Hong Kong and Guangzhou; in Shanghai and areas on the east coast; and in parts of Sichuan province.
With more money, and more freedom to spend it, the rapidly expanding Chinese middle class has begun to travel to the outlying areas of China, to the regions beyond the Great Wall. In the same way that Americans travel to Yellowstone National Park, the Grand Canyon, and the Navajo areas of Arizona and New Mexico to see exotic landscapes and the people who live there, the Chinese are flocking to northern Xinjiang and Tibet, to the Tibetan areas of Yunnan and Sichuan, and to the tribal villages in Yunnan.
This domestic tourism is in full flood during the three annual “Golden Weeks”: at Lunar New Year (late January to mid-February), around May 1, and around October 1. In 2001, the central government declared that these weeks would be national holidays, and as a result, that’s when the whole country, anyone who can afford to, is on the move.
In late September 2005, just at the start of the October Golden Week, I was in the Kanas Lake area in the far north of Xinjiang, a stone’s throw from the border of Siberia. One morning there were more than sixty tour buses filled with Chinese tourists from Shanghai and Beijing. A short time later, at 14,000 feet in the mountains of western Sichuan, I got caught in a traffic jam, moving nowhere for two hours. As far as I could see, there were Chinese tourists in BMW SUVs, brand-new Honda Odysseys, and Volvo station wagons, all heading out from the city of Chengdu to visit the mountainous Tibetan-inhabited areas of western Sichuan. The new face of tourism in China. J

Golden Week traffic jam in the middle of the mountains in western Sichuan, between Litang and Kanding.
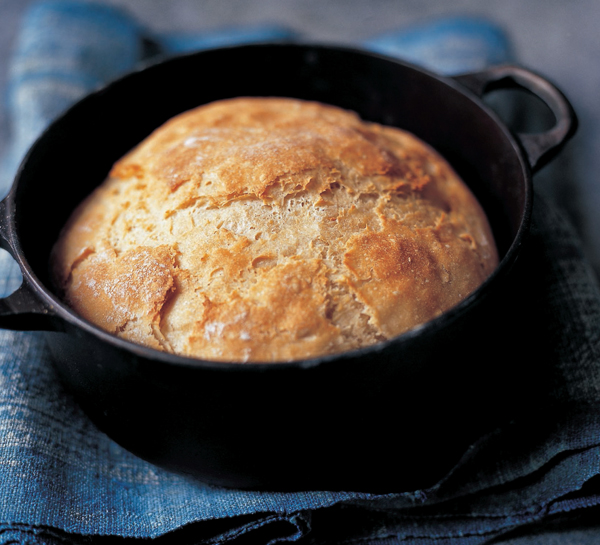
Kazakh Family Loaf
We’ve found that the easiest way to reproduce this wonderful Kazakh family loaf from the mountains of northern Xinjiang is by baking it in a moderate oven in a straight-sided pot that is 8 inches in diameter and at least 6 inches deep, with a lid. (We use the 3½-quart Calphalon pot that is our family rice pot, and the risen bread doesn’t quite come up to the lid; see instructions for a larger loaf, the Large Kazakh Fusion Loaf, below. If your pot is not as large as the dimensions set out here, then cut off ¼ of the dough and bake it separately, perhaps using it to shape some Home-Style Tajik Nan, for example.) Once the dough has done its first rise in a bowl, we shape it into a round and it rises in the pot with the lid on, then goes into the preheated oven, still with the lid on. This modified version of clay-pot baking keeps the bread surface moist as it bakes and produces a fine crust and tender, moist crumb. Near the end of baking, we remove the lid, which allows the top crust to brown a little (the sides brown against the hot metal pot).
The top crust has a few shallow little rips in it that are created when the loaf expands during baking. The classic way to avoid these tears in a top crust is to slash the loaf before baking, but the Kazakhs don’t, so we’re just mentioning it here as an option. When the bread is first out of the oven, the crust has a fine crisp texture, almost like that of a baguette cooked in a steam-injection oven, but because the loaf is so moist, the crust soon softens.
The yogurt in the dough makes the bread very tender and quite close-textured, ideal for sopping up flavorful meat stews, and for sandwiches. It also makes superb toast.
1½ cups lukewarm water
1 teaspoon active dry yeast
4 to 5 cups all-purpose flour, preferably unbleached, plus extra for surfaces
½ cup plain full-fat yogurt
2 teaspoons salt
Oil or butter for greasing surfaces
Place the water in a medium bowl and sprinkle on the yeast. Add 1 cup of the flour and stir to make a batter. Add the yogurt and stir it in, then add another cup of flour and stir to incorporate it. Sprinkle on the salt and another cup of flour. Stir and turn the dough to incorporate the flour.
Flour a work surface with about 1 cup flour, then turn the dough out. Knead, incorporating flour as you fold and turn, fold and turn, for about 5 minutes, or until the dough is smooth and still a little soft, but no longer sticky; add more flour to your work surface if necessary.
Wash and dry the bowl. Place the dough in the bowl, cover with plastic or with a lid, and let rise for 3 hours, or until more than doubled in volume. (When the dough is fully risen, you can poke it with a finger and the indentation will stay; if it is not yet ready, the dough will rebound when dented.)
Rinse an 8- or 9-inch cast-iron or other heavy straight-sided pot that is 6 inches or more deep and has a heavy ovenproof lid (see headnote) with hot water to warm it, then wipe dry. Place a circle of parchment paper several inches wider than the pot in the bottom of the pot. Lightly grease the sides of the pot.
Turn the dough out onto a lightly floured surface and flatten it gently under your hand. To shape it into a round, lift one edge of the dough and pull it over to the center, then move along the edge a little and repeat. Continue all around the dough (this creates a stretched surface on the other side of the dough) until you have a circular loaf, then pinch the center well to hold it together. Turn the shaped loaf over gently and place it in the prepared pan, seam side down. Press lightly on it to flatten it out toward the edges of the pan.
Put on the lid and set aside to rise for an hour in a warm spot (we put our rising loaves on the counter and turn on the overhead lights, which give a little extra warmth). The loaf may not quite double.
Meanwhile, place a rack in the middle of the oven and preheat the oven to 385°F.
Bake the loaf with the lid on for 40 minutes. Remove the lid and bake for about another 20 minutes. The sides should be golden brown, the top well touched with brown. Turn out onto a rack. The bottom of the loaf should sound hollow when tapped and the bottom edge of the bread should be firm when pinched. Let stand for at least 30 minutes to firm up before slicing.
Makes 1 large round domed loaf, 8 inches in diameter and 4 to 5 inches tall
LARGE KAZAKH FUSION LOAF: The first time we made the Kazakh Family Loaf, our kids, now in their late teens, decided they loved its texture, and the loaf vanished. So we thought we’d better figure out a larger loaf than the traditional one Jeffrey had encountered in the mountains of northern Xinjiang. To do that, we used our big old number 26 cast-iron Le Creuset casserole, which is 10 inches in diameter and about 5 inches deep, and we began with a dough half again as large. Since we were already being untraditional, we also wanted a slashed top crust, and a crisper, browner one, in this bread, so we tried baking it at a higher temperature. It takes about 1 hour to bake.
Here are the proportions and instructions: 2G cups lukewarm water, 1 teaspoon yeast, about 6 cups all-purpose flour (you can substitute whole wheat pastry flour for 1 or 2 cups of the all-purpose), ¾ cup yogurt, and 1 tablespoon salt. Do the first rise in the bowl, for about 3 hours. Line the bottom of the pot with parchment paper as above, and oil or butter the sides. Proof the shaped loaf in the pot with the lid on, as above, and preheat the oven to 425°F, with a rack in the upper middle. Just before the loaf goes into the oven, slash it two or three times with a very sharp knife. Bake with the lid on for 40 minutes, then remove the lid and bake for another 10 to 15 minutes. Check for doneness as above, tapping on the bottom of the bread and pinching the bottom edge. Let stand to firm up before slicing.
The bread is gorgeous, a 3-pound domed loaf with a fine crust and a lovely golden top and sides, about 10 inches in diameter and 5 inches high.
Uighur men at a tandoor oven, in Altai, northern Xinjiang. The man on the left has a tray full of samsa that he’s about to slap onto the hot oven walls.
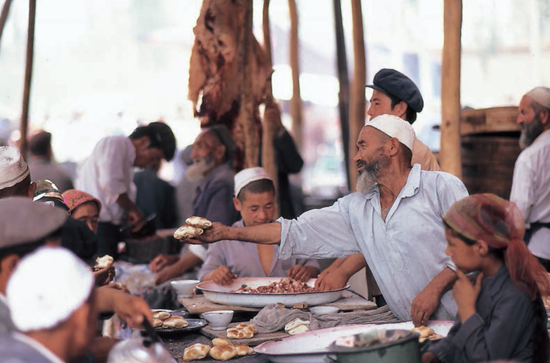
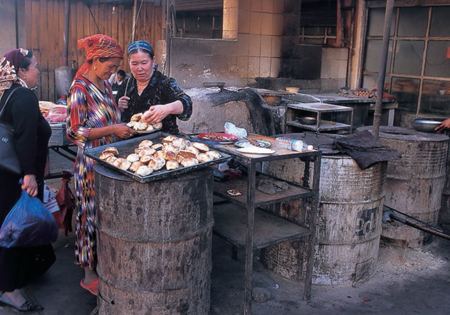
At the lively Kashgar market, a samsa baker hands several breads to a customer. In the background men are cutting up meat and preparing the filling.
In the oases of Xinjiang, Uighur bakers fire up their barrel-shaped clay tandoor ovens, then damp down the fires so they can slap flatbreads against the oven walls to bake. Though nan are the most common breads in Kashgar, Turfan, Aksu, Hotan, and the smaller places in between, the bakers also make filled breads, the Central Asian equivalent of the Indian samosa. Chopped lamb flavored with a few seasonings is wrapped in a simple unleavened flatbread dough and baked. The rectangular packages are known as samsa, not just in Uygur, but also in Uzbek, on the other side of the mountains, and they are delicious.
Samsa are baked either on the hot walls of a tandoor or on a wide wok-shaped clay surface set over an open fire. When they come out of the oven, they have a delectable aroma and are succulent and satisfying to bite into. In Xinjiang, samsa are made by the hundreds and thousands every day. And once you have one, you want another, they’re that pleasurable to eat.
Make the dough about 2 hours before you wish to serve the bread. (They take just over half an hour in the oven.) If you have a lot of people to feed, you can double the recipe: double all the ingredients. Serve as a snack or appetizer, allowing 1 or 2 per person. Or serve as part of a light meal, allowing 3 per person, accompanied by a chopped salad such as Cooling Oasis Salad with Tomatoes and Herbs (page 89) or a green salad. A light soup—for example, the chicken broth for Chicken and Noodles Tuvan-Style (page 246), or Hui Vegetable Soup (page 48)—will complement the breads nicely.
DOUGH
2½ cups all-purpose flour, preferably unbleached, plus extra for surfaces
1 teaspoon sugar
1 teaspoon salt
About 1¼ cups water
½ pound coarsely ground lamb or about ¾ pound bone-in lamb leg, shoulder, or chops (see Note on Texture)
¼ cup lamb fat if using ground lamb
1 packed cup coarsely chopped onion
2 tablespoons plain full-fat yogurt (see Note on Texture)
2 teaspoons minced garlic
⅛ teaspoon cayenne (optional)
1 teaspoon salt
¼ teaspoon freshly ground black pepper, or to taste
Place the flour, sugar, and salt in a food processor and pulse to mix. Then, with the blade running, pour the water slowly through the feed tube until a ball of dough forms. (Alternatively, make the dough by hand: mix the dry ingredients in a medium bowl, then stir in the water to make a rough dough.)
Turn the dough out onto a floured surface and knead until very smooth, about 4 minutes. Wrap well in plastic and set aside.
If using bone-in lamb, cut the meat off the bone and trim off most of the fat; set the fat aside. Measure out ½ pound of meat (1 tightly packed cup) and use a cleaver to finely chop it. (You can use the processor, pulsing, but you will get more of a paste rather than the chopped or minced texture that is both traditional and desirable; see Note.) Finely mince ¼ cup of the reserved fat. Add the ¼ cup fat to the chopped or ground meat in a bowl.
Mince the onion by hand or by pulsing it in a food processor. Add to the meat, then add the yogurt and stir in thoroughly. Add the garlic, cayenne, if using, salt, and black pepper and blend in well. You’ll have 2 packed cups filling. Set aside.
Place a rack in the upper third of the oven. Put a baking stone or unglazed quarry tiles on the rack, if you have them. Preheat the oven to 400°F. Lightly butter a baking sheet or line it with parchment paper.
Turn the dough out onto a lightly floured surface. Use a metal dough scraper or sharp knife to cut the dough in half. Set one half aside, loosely covered. Cut the remaining half into 8 equal pieces (cut it in half and then in half and half again). Roll each into a ball under your cupped palm on your work surface or between your palms. Flatten each ball slightly, flour both sides, and let rest for 10 minutes.
Roll out one dough piece to a round 5 to 6 inches in diameter. Repeat with a second dough round. Place a scant 2 tablespoons filling in the center of one of the rounds. Lift two opposite edges up to meet over the dough and pinch to join them. Then lift the open ends up to meet over the center and pinch them together, making a ridged seam across the top of the shaped bread. Flatten gently to make a neat rectangular package. Set the shaped bread seam side up on the prepared baking sheet. Repeat with the second round and place it next to but not touching the first bread. Repeat with the remaining 6 dough balls, and then with the other half of the dough, to make 16 breads in all.
Place the baking sheet on the baking stone or tiles or directly on the oven rack and bake for 35 minutes, or until touched with golden brown. Use a spatula to lift the breads off the baking sheet and onto a plate. They are very hot when they first come out of the oven; wait 5 minutes for them to cool slightly before serving them. Guests can eat them out of hand, as they’d eat a sandwich.
Makes 16 small filled breads; serves 6 for lunch, 12 as an appetizer
NOTE ON TEXTURE: The best samsa have a succulent, moist texture that comes from the inclusion of a little fat and from the texture of the meat. If the meat is chopped by hand or coarsely ground, then it won’t clump into a tight patty as it cooks inside the dough and it will stay moist and tender, but if it is processed to a paste, then it clumps. Adding yogurt to the mixture gives it extra moisture as well as a subtle acidic tang.
NOTE ON SHAPING: Samsa shapes differ from oasis to oasis and baker to baker. They also depend on the oven being used. Often the ends of the packages are overlapped under the breads, so they will cook on the hot wall of the tandoor. Sometimes there is a Y-shaped seam on the top instead. It all depends on local custom and on the baker’s preference. We have found that the breads bake best if the dough seam is on the top.
Every day here in Turpan, I’ve been walking back and forth between two worlds, Uighur and Han. My hotel is in the center of town, which is Han, while the large bazaar where I go to eat and to hang out is almost entirely Uighur, as are the neighborhoods that surround the center. When I first arrived in Turpan, I was confused and a little disappointed because everything around me looked much like any other town in China, with Soviet-style cement buildings and white-tile facades. I had been expecting a legendary desert oasis on the old Silk Road, with wind-sculpted adobe walls and narrow laneways with donkey carts and tinkling bells, the Turpan Naomi had visited in 1980.
The first few days, I kept searching for what I’d come expecting. I’d brought with me an ethnography, Oasis Identities, written by anthropologist Justin Jon Rudelson. Most of his fieldwork was done here in Turpan in 1989–1990. At night I’d read about Turpan’s remarkable system of irrigation (the karez) that channels water deep underground more than ten kilometers, from the Flaming Mountains to the oasis. The oasis lies in the bottom of the Turpan Depression, the second-lowest (500 feet below sea level) human settlement in the world. I’d read about the grape harvest, and the drying of the grapes to make golden raisins, the basis of the prosperous economy here.
Each morning—day two, day three, day four—I’d hit the streets eagerly, but by evening I’d be walking with slumped shoulders back to my hotel. The Han world and the Uighur world are very different from each other, but both are modernizing at a rapid rate. There are no more donkey carts, and so many motorbikes, trucks, and buses, all of them with blasting horns. But of course they are modernizing, I would tell myself, and that’s a good thing, not a bad thing.
Day five was a little different. An English teacher, a Uighur man, asked if I would come and talk with his class, and so I did. The students, all Uighur, and all in their mid-teens to early twenties, were outspoken and full of life. On day six, I was invited to a circumcision, and now on day seven, I’ve been invited to a wedding.
Each day I’ve walked the same streets. I’ve gone to the same place for lunch, the same place to drink a beer at night, the same place to buy fruit and juice for morning. My original expectations are beginning to blur. Every day that passes, I’ve come to see more detail, more life. I see the beautiful clothes of the Uighurs, and the flair with which they dance. I see Han kids playing tag on their way home from school, laughing and teasing.
I’m glad to have come to Turpan, donkey carts or no donkey carts. J
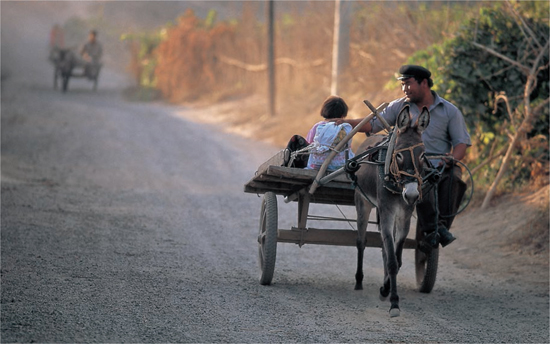
Trucks and buses dominate the center of Turpan, but here on the edge of the oasis, donkey carts still rule.
These delectable savory breads, known as guo cui (pronounced “gwo tsway”) are a fried stovetop Sichuanese version of the Chinese bread known as shaobing, a flaky oven-baked sesame-coated flatbread. They’re flavored with sesame seeds and Sichuan pepper. The guo cui we first encountered in Sichuan had a few shards of fine ham in them that melted into the breads as they cooked; we’ve included the meat in the variation.
We thought the breads had to be eaten hot from the pan, but we were wrong. As we tested and retested them, we came to prefer them when they had cooled, for then they became a little crisper and somehow the warm taste of the sesame seeds was more pronounced. You may discover, though, that your guests find the breads so delicious that they never get a chance to cool down….
Serve whole or cut into quarters, with a soup and a salad such as Cooling Oasis Salad with Tomatoes and Herbs (page 89) or some sliced cucumbers. Cut into wedges, these also make a great appetizer to accompany drinks.
2 cups all-purpose flour, preferably unbleached
1 cup white or whole wheat pastry flour
1 teaspoon salt
About 3 tablespoons lard
About 1¼ cups lukewarm water
About ¼ cup sesame seeds
About 1 tablespoon Sichuan peppercorns, ground
About 1 cup peanut oil for shallow-frying, plus extra for surfaces
Place the flours and salt in a food processor and pulse to mix. Add 1 tablespoon of the lard and process for about 30 seconds to blend it in. With the blade running, slowly pour the lukewarm water through the feed tube until a ball of dough forms. Turn the dough out onto a lightly oiled surface and knead for several minutes, until very smooth. Place the dough in a plastic bag and tie loosely or cover well with plastic wrap. Let rest for at least 1 hour, or up to 3 hours, whatever is convenient.
Cut the dough in half. Set one half aside, in the plastic bag or covered with plastic, while you work with the other half. Cut the dough in half and then cut each half into 4 equal pieces by cutting it in half and half again. Loosely cover 4 pieces with plastic wrap. Working on a lightly oiled surface, roll each of the other 4 pieces out into a 12- to 15-inch-long strip 1½ to 2 inches wide.
Use your fingertips to spread ¼ teaspoon lard onto the top of each dough strip. Roll each strip up fairly tightly, stretching the dough a little as you do so. Without turning it onto its coiled side, flatten each coil to a rectangular bundle under your palm and then use the rolling pin to flatten it out again to a strip about 12 inches long and 1½ to 2 inches wide. The strips may seem a little bumpy or uneven; don’t worry.
Once again, spread about ¼ teaspoon lard on the top of each strip. Roll one up loosely, with no stretching of the dough, then lay it on its side on the work surface and flatten gently with the palm of your hand to about 3 inches across (don’t worry about dimensions, because you will be rolling it out a little more later). Repeat with the remaining 3 strips. Set aside for a moment, loosely covered.
Put out two small flat plates. Place about 1 tablespoon sesame seeds on one and about 1 teaspoon Sichuan pepper on the other.
Place a large heavy skillet over high heat and add oil to a depth of about ¼ inch (for our 10-inch cast-iron skillet, we use about 1 cup oil). When the oil is very hot (you should see it start to smoke slightly), lower the heat to medium-high.
Meanwhile, lightly press one side of one of the flattened rounds onto the sesame seeds and then touch it lightly to the Sichuan pepper. Place the dough, seed side up, on your work surface and press down on it with your palm to press the seeds in well, then use a rolling pin to roll it out to an approximately 4-inch-diameter round. Repeat with a second round.
Place the breads into the hot oil, seed side up. Cook on the first side for 2 minutes, then use a wide spatula to flip the breads over, being careful not to splash yourself with hot oil. While the breads cook for another 2 minutes on the second side, finish flavoring and shaping the other 2 dough rounds; set aside. After 2 minutes, turn the breads over one more time and give them another minute or so on the first side, pressing down with the spatula to ensure that the center of the breads gets exposed to the heat. They will be a deep golden brown before they are done. Don’t worry about overcooking them: they need a good 5 minutes to cook through. When the breads are done, transfer them to a rack or plate, then add the next 2 breads to the oil, seed side up, and cook as above.
Once you get used to the timing, you will be able to shape the remaining breads while the first batches are cooking. Until you’re comfortable though, you may want to lower the heat to medium-low once the first 4 breads have cooked and shape and flavor another 4 breads (you’ll need to add more sesame seeds and Sichuan pepper to the plates). Once you’ve shaped the first 2 breads of this next batch, raise the heat under the skillet to high again; then, once the oil is starting to smoke, lower the heat to medium-high and start cooking 2 breads, as above. Repeat with the remaining dough and flavorings.
Makes 16 crispy round flatbreads
HAM SESAME COILS: One version of this bread uses small shreds of ham, along with the lard, to flavor and enrich the breads. If you’d like to try this version, use fine shreds of ham or prosciutto, the fattier the better. Spread a few strips (a scant teaspoon) on each strip of dough along with the lard the second (last) time you spread it with lard. You’ll need about ¼ cup thin fine shreds of ham or prosciutto, along with the lard, to make this version.
I came across these in Qinghai province, in the market in Xining, being made by a fresh-faced, friendly young Hui woman. Her breads were about ten inches across and she cooked them on a large cast-iron griddle. They’re made with two batters, a plain flour-and-water batter for the first layer, and a second one with egg and a little sugar for the sweeter, richer pale yellow top layer.
We’ve adapted the recipe to make slightly smaller (and thus easier to shape and cook) crepes than the originals. (Also see the Mini-Crepe Alternative, on page 204, for appetizer-sized crepes.) Whatever the size, they’re very attractive, and supple and pleasurable to eat. Make them as a snack, or to accompany any meal. They’ll steal the show….
FIRST BATTER
1¼ cups all-purpose flour
1½ cups lukewarm water
1½ tablespoons vegetable oil
Generous 1 teaspoon salt
SECOND BATTER
1 cup all-purpose flour
2 large eggs
1 cup water
3 tablespoons sugar
About ¼ cup peanut oil or vegetable oil for cooking
Make the batters at least 1 hour, or as long as 3 hours, before you wish to make the breads.
To make the first batter, place the flour in a medium bowl, add the water, and whisk until smooth. Add the oil and salt and whisk to blend. Cover and set aside for 45 minutes to 1 hour.
To make the second batter, place the flour in a medium bowl. Whisk the eggs in a small bowl and add to the flour, together with the water. Whisk the mixture vigorously until you have a very smooth batter. Whisk in the sugar. Cover and set aside for 45 minutes to 1 hour (refrigerate if leaving for longer).
About 10 to 15 minutes before you want to serve the breads, place a griddle or a 10- to 12-inch cast-iron skillet, preferably with low sides (see Note), over high heat. When it is hot, lower the heat to medium-high. Add about ½ teaspoon oil and rub it all over the pan with a wadded-up paper towel.
Whisk the first batter. If it seems a little thick (you want a pourable texture, like a crepe batter), whisk in 1 to 2 tablespoons water. Scoop up a scant ¼ cup of batter and pour it onto the hot pan in a spiral, working from the center outward. Use an offset spatula or the back of a large wet spoon to smooth and spread it as thin as possible, to a round about 7 inches in diameter. Let cook briefly, about 1 minute, while you whisk the second batter. Again, if it has thickened, whisk in a little water to thin it to a pourable crepe-batter texture. Scoop up a scant 3 tablespoons of the second batter and pour it on top of the crepe in the pan, using the back of a wet spoon to smooth it out to the edges. Let cook for another minute, or until the surface has turned from liquid to matte. Drizzle on a thin spiral of oil (just over 1 teaspoon), then flip over. Let cook for about 1 minute on the other side, then fold in half and transfer to a plate. Repeat with the remaining batter, stacking the breads as you make them, to keep them soft and supple.
Makes 7 or 8 crepe-like breads about 7 inches in diameter; allow 1 or 2 per person
NOTE ON TECHNIQUE: We’ve discovered that, as with any crepe, it’s easier if your pan has low sides so you can work with a spatula without running into the walls of the pan. If you have trouble spreading the batter very thin, there are two things to try: thin the batter a little more, to make it more liquid and easier to spread, and lower the heat slightly, so the batter doesn’t set too quickly.
HUI CREPE WRAPS: These breads were sold plain in Xining, to be eaten out of hand, but we think they are ideal for fillings of all kinds. To use them as sandwich wraps, place tender leaf lettuce on the breads, top with slices of cheese and/or roasted or grilled meat, or else salami or prosciutto, and roll up. Or try a soft filling like tuna salad, egg salad, or guacamole, on tender greens.
MINI-CREPE ALTERNATIVE: We sometimes make nontraditional smaller versions of this bread: Scoop up 1 tablespoon of the first batter and spread into a thin round about 3H inches across. Use about 2 teaspoons of the second batter. These smaller versions are easier to shape, and they make an attractive base for appetizers. They hold moist toppings well—spread them with a little Lhasa Yellow Achar (page 28) or a nontraditional topping such as tapenade or smoked salmon. They stay supple and fresh for several hours if covered.
Makes about 30 mini-crepes; allow 3 or 4 per person
HUI GREEN ONION CREPES: You can also use the first batter as a base for scallion crepes, beautiful flatbreads that the woman in the Xining market was selling alongside her two-layer crepes. Make only the first batter. Just before cooking the crepes, add ¼ cup minced scallions (white and tender green parts) to the batter and whisk in. Lightly grease a griddle or heavy skillet as above and preheat over medium-high heat. Then pour in ¼ cup of batter in a spiral, starting at the center of the pan, and smooth, as above, with an offset spatula or the back of a wet spoon, to a round just over 6 inches in diameter (the crepe will be a little thicker than the first layer of the Two-Layer Crepes because of the scallions). Once the top turns from shiny to matte and small bubbles appear, after about 1 minute, drizzle a thin spiral of oil, about 1 teaspoon, onto the crepe, then flip it over and cook on the other side for another minute or so, until lightly touched with brown on the underside. Serve these as a savory bread or snack, perhaps with a little salsa or a sharp cheese.
Makes 7 or 8 crepes about 6 inches in diameter
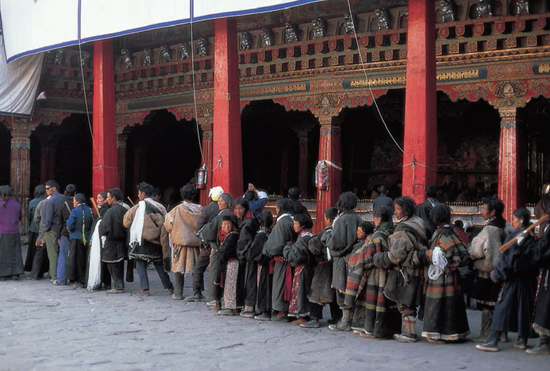
Late fall and winter is pilgrim season in Lhasa, when the city fills with pilgrims from all over. In this line waiting in the courtyard to get into the Jokhang Temple are many nomads and herders; they’re recognizable by their thick, long sheepskin coats. They’ve traveled here from the high-altitude grasslands of western Tibet, western Sichuan, and Qinghai.
When I returned to Lhasa after nineteen years away, it felt so familiar and yet so different too. There were lots more cars and many people looked more prosperous. The most obvious change was the huge growth of the city’s non-Tibetan population. The city now stretches down its fertile valley ten miles from its old boundary, and it seems that almost all the population growth is Han Chinese and Hui. These non-Tibetans settle here because they see economic opportunities, for the central government is investing money in Tibet, especially in industry and mining; the large army population also generates business for service industries. The recent opening of the train connection between Lhasa and central China promises to bring even more outsiders to Lhasa.
I was curious, so I conducted an informal survey: I asked every Han Chinese I met where he or she was from, how long he or she had been in Tibet, and finally I would say, “Do you like it here?” The people I spoke with (more than twenty-five in all) came from many different provinces of China. They’d all been living in Tibet a long while, from eight to eighteen years, and they all were very firm: “No, I don’t like it.”
It’s a bit of a grim picture, this majority population disliking the place they live. They don’t know or appreciate Tibetan culture, which has a centuries-old literary and philosophical tradition, and they don’t learn the language. For them, Tibet is a hardship post, like taking a job on the oil rigs in Saudi Arabia.
You can feel the resentment in both directions: the Tibetans, of the Chinese, who took over Tibet and have controlled it absolutely since 1959 (see page 39); and the Han, of the “barbaric” Tibetans among whom they find themselves. “If they didn’t spend so much time praying, they’d have more money,” said one Han woman to me, pointing disdainfully at an older woman prostrating herself in prayer in front of the Jokhang Temple. N
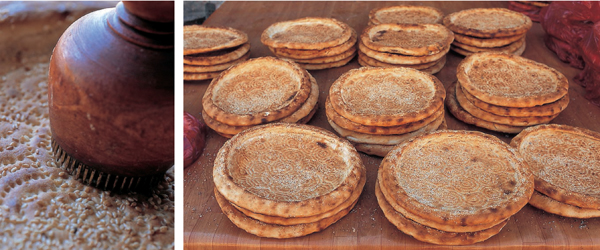
Large, densely stamped versions of Uighur nan topped with sesame seeds are stacked and displayed for sale at a small bakery in the Turpan oasis. On the left is a close-up of one of the breads, with a bread stamp. The bread stamps are usually made of wood and have sharp nails on their stamping surface (we’ve also seen them made of sharp quills tied into a bundle). The center of the bread is stamped repeatedly all over just before it is placed on the hot wall of the tandoor oven. This prevents the bread from puffing, except around the rim.
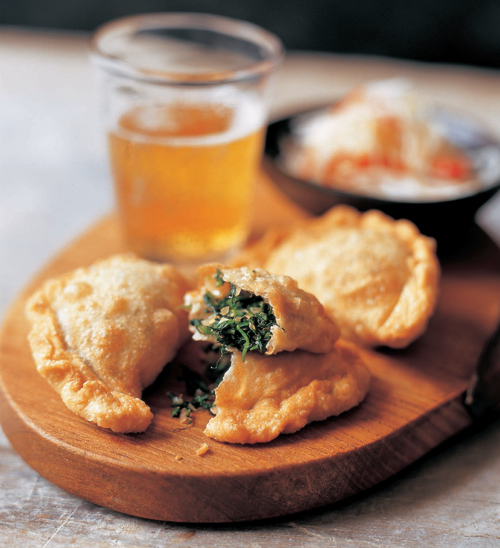
Uighur Pastries with Pea Tendrils
These deep-fried Uighur pastries are made in the Turpan oasis (see “Turpan Depression,” page 200), in a little shop in the center of town. We haven’t seen them anywhere else. The half-moon turnovers are filled with chopped greens flavored with onion and cumin, and they are very succulent. We use pea tendrils, not the fine delicate pea tendrils that are now sometimes available, but the heartier ones that come in large plastic bags in Asian grocery stores (see Glossary, page 354, for more). You could instead use other firm leafy greens such as Taiwan bok choi, with its long leaves (see Glossary), dandelion greens (add 1 teaspoon sugar to the cooked dandelion greens if you aren’t a fan of their enticing bitter edge), or amaranth greens. Serve these on their own or with a dipping sauce such as Soy-Vinegar Dipping Sauce (page 151) or, less traditionally, Quick Tomato-Onion Chutney (page 24). They’re a great treat to accompany drinks.
DOUGH
1 cup all-purpose flour, preferably unbleached, plus extra for surfaces
½ teaspoon salt
Scant ½ cup lukewarm water
FILLING
½ pound pea tendrils or other leafy greens (see headnote)
¼ cup grated onion
¼ teaspoon ground cumin
Pinch of cayenne
¼ teaspoon salt
Peanut oil for deep-frying (2 to 4 cups)
Make the dough an hour or more before you wish to fry the breads. Place the flour and salt in a food processor and pulse briefly to mix. With the blade running, slowly add the lukewarm water through the feed tube until a ball of dough forms. Turn the dough out onto a floured surface and knead for several minutes, until smooth and elastic. Let rest, covered with plastic wrap, for at least 30 minutes, or as long as 12 hours.
Meanwhile, prepare the filling: Bring a large pot of water to a rolling boil. Add the pea tendrils and stir with a wooden spoon to push them into the water so they are all immersed. Cook until tender, 4 to 6 minutes (timing will depend on the thickness of the pea tendrils, or other greens). Drain well in a colander and let cool for a moment.
Place the greens on a cutting board and chop them with a cleaver or chef’s knife, chopping first in one direction at ¼-inch intervals and then in the other direction until finely chopped (you should have a generous 1 cup packed chopped greens). Place the greens in a bowl, add the onion, cumin, cayenne, and salt, and use a fork to blend well. Set aside. If you make the filling more than 20 minutes ahead, a little liquid will drain from it; pour this excess off and press the filling to squeeze out any remaining liquid before placing the filling in the dough.
Turn the dough out onto a well-floured surface. Cut it in half and set one half aside. Cut the other half into 6 equal pieces, by cutting it in half and then cutting each half into 3 pieces. Roll each piece into a ball between your lightly floured palms, then lightly flatten into a disk and flour both sides. Set aside while you shape the remaining dough, to give a total of 12 disks.
With your fingertips or a rolling pin, flatten one disk out to a 4-inch round. Repeat with 5 more dough disks. Place 1 slightly rounded tablespoon filling in the center of one round. Fold the dough over to make a half-moon shape and press the edges together to seal in the filling. To ensure that the seal holds, pinch all along the edge, twisting slightly with each pinch. Flatten the bread gently with the palm of your hand, to push the filling out to the seam, and then set on a parchment-lined or lightly floured baking sheet or work surface. Repeat with the remaining rolled-out rounds, then repeat with the remaining 6 dough disks and filling. Set aside while you ready your deep-frying arrangement.
Place a large wok or deep pot on the stovetop (or use a deep-fryer); make sure that your wok or pot is stable. Pour in 1H to 2 inches of oil (3 inches or more if using a deep-fryer) and heat the oil over medium-high heat. Put out a slotted spoon or mesh skimmer. To test the temperature of the oil, hold a wooden chopstick vertically in the oil, with the end touching the bottom of the pot. If bubbles come bubbling up along the chopstick, the oil is at temperature. The oil should not be smoking; if it is, turn the heat down slightly and wait a moment for it to cool, then test again with the chopstick. (A deep-fry thermometer should read 325° to 350°F.)
Slide one half-moon into the oil, wait a moment, and then slide in a second. The oil will bubble up around them. After about 30 seconds, use the slotted spoon or skimmer to gently turn them over. Continue to cook until they are a rich golden brown all over, 50 seconds to 1 minute. Lift them out of the oil, pausing to let excess oil drain off, then place on a plate or rack. Repeat with the remaining half-moons in batches until all are cooked.
Serve hot or warm (we also love the texture of room-temperature half-moons).
Makes 12 deep-fried half-moon filled breads
PARTY HALF-MOONS: To make a large batch of these for a party, enlist some friends to help shape the half-moons ahead of time, up to 2 hours ahead. Let them sit out, uncovered (it’s fine if the dough dries out a little before they are deep-fried). Since the pastries take only a minute to deep-fry, you can cook a double or triple recipe very quickly, a great treat to accompany drinks.
A Uighur woman in a colorful ikat-print dress buying samsa from a street vendor in Turpan.
In most towns in China, there are restaurants or street vendors selling steamed or boiled jiaozi (see Savory Boiled Dumplings, page 150), small filled dumplings that come five or ten to a plate, with a dipping sauce alongside. But until my last trip to Lhasa, I had never seen giant deep-fried jiaozi like these. They were like large elongated half-moons, more than eight inches long, golden brown, and stuffed with a delectable vegetarian filling.
The woman making them in the market near the Barkhor (the walking route around the Jokhang Temple in the old part of Lhasa) was from Hunan province, in central China. She’d been in Tibet for twelve years and didn’t like it, but admitted she was making a good living. Somewhere in Hunan these must be a specialty, a common treat, but in Tibet they were very exotic, as well as delicious.
This recipe gives instructions for the original giant breads I encountered in Lhasa, but we’ve also included instructions for a smaller version that is more manageable for the home cook. The larger breads can be a little tricky to cook if you don’t have a big deep-fryer, but they are fun to try.
Make the dough first and let it rest while you make the filling and allow it to cool. Shape the breads just before you wish to cook and serve them. Final shaping and cooking will take only about 15 minutes.
Make a batch for lunch and serve them with a fresh salad and a soup, or with grilled meat, such as Oasis Chicken Kebabs (page 247). Allow 2 small or 1 large bread per person.
DOUGH
2 cups all-purpose flour, plus extra for surfaces
¾ teaspoon salt
About ¾ cup lukewarm water
FILLING
4 dried shiitake mushrooms
About 2 tablespoons dried tree ears (see Glossary)
One 100-gram package cellophane noodles
About 6 leaves Napa cabbage
1 small square pressed tofu (see Glossary)
2 tablespoons peanut oil or sesame oil
1 tablespoon minced ginger
2 scallions, cut lengthwise into ribbons and then into 1½-inch lengths
2 dried red chiles, or to taste
¼ teaspoon salt
1 tablespoon soy sauce
Peanut oil for deep-frying (2 to 4 cups)
Place the flour and salt in a food processor or bowl. If using a food processor, with the blade spinning, slowly pour the lukewarm water through the feed tube until a ball of dough forms. If working by hand, make a well in the center of the flour and add ¾ cup water. Stir with your hand and gradually incorporate the flour. If the dough is very stiff or dry, add a little more water and stir and turn in the bowl until all the flour is incorporated and you have a kneadable dough.
Turn the dough out onto a lightly floured surface and knead for 3 to 4 minutes, until very smooth and elastic. Cover with plastic and let rest for at least 1 hour or as long as 4 hours, whatever is convenient.
Meanwhile, start soaking the various dried ingredients for the filling: Place the dried shiitake in a small bowl and add about 1 cup hot water. The mushrooms will float, so place a small plate on top to keep them submerged. Soak for about 15 minutes, or until softened. In another small bowl, soak the tree ears in about a cup of hot water for about 15 minutes, until softened. Drain. Soak the cellophane noodles in lukewarm water to cover for 15 minutes; drain.
When the shiitake are softened, lift out of the soaking water, reserving it. (Some will go into the stir-fry; the rest can be used to flavor a broth.) Trim off and discard the stems. Thinly slice the mushrooms—you will have a scant ¼ cup. Set aside.
Cut off and discard any tough spots from the tree ears. You will have about ¼ cup. Thinly slice, and set aside. Use scissors to cut the soaked noodles into 1- to 1½-inch lengths. Set aside.
Slice the cabbage leaves lengthwise into 1-inch-wide strips, then slice crosswise into ¼-inch-wide slices. You should have 4 loosely packed cups. Set aside.
Thinly slice the tofu, then cut crosswise into ¼-inch-wide strips. You should have about 1 cup sliced tofu. Set aside.
Heat a wok or large heavy skillet over high heat. Add the oil and swirl gently to coat the bottom of the pan. Add the ginger, scallions, and dried red chiles and cook for 10 seconds. Toss in the cabbage and stir-fry briefly. Add the salt and stir-fry for 3 or 4 minutes, or until the cabbage starts to wilt. Add about 2 tablespoons of the reserved mushroom soaking water, the mushrooms, and tree ears and stir-fry for about a minute. Add the noodles and soy sauce and cook, stirring occasionally to prevent sticking, until the cabbage is tender and the liquid has evaporated. Add the tofu and stir-fry for another minute. Turn out into a bowl; set aside to cool to room temperature. You will have about 3 cups filling.
Working on a lightly floured surface, shape the dough into a cylinder. Cut it in half and in half again, then cut each piece into thirds. Lightly flour your palm and flatten each piece gently. Set aside, loosely covered with plastic wrap.
Place a large wok or deep heavy pot on the stovetop; make sure that the wok or pot is stable. (Or use a deep-fryer.) Pour oil into your wok or pot to a depth of 3 inches and heat the oil over medium-high heat. Put out a slotted spoon or mesh skimmer. To test the temperature of the oil, hold a wooden chopstick vertically in the oil, with the end touching the bottom of the pot. If bubbles come bubbling up along the chopstick, the oil is at temperature. The oil should not be smoking; if it is, turn the heat down slightly and wait a moment for it to cool, then test again with the chopstick. (A deep-fry thermometer should read 325° to 350°F.)
Once the oil is at temperature, turn the heat down slightly and shape your first jiaozi, leaving the remaining dough loosely covered. Use a rolling pin to roll one piece of dough out to a 7-inch round. Scoop up ¼ cup of the filling and place it in the center of the dough, leaving an inch clear all around the edges. Fold the dough over the filling to make a mounded half-moon shape. Press down lightly to push out air bubbles, then crimp the edges together: Start by pinching the edges together at one point, then twist the bottom over the top. Repeat at ¼-inch intervals to seal closed. The dough is moist and will stick to itself (if for some reason it doesn’t, wet a fingertip and use it to moisten one edge of the dough so that it sticks well).
Raise the heat under the oil again. Pick up the filled dough and stretch it gently, elongating it so it becomes more of a banana shape, a little more than 8 inches long, and then slide it gently into the hot oil. The bread will sink and then slowly rise back up in the hot oil. Use the slotted spoon or skimmer to encourage it to turn over after about a minute. It will turn golden and will develop darker brown bubbles in patches. Once it is a richer golden brown, after another 2 to 3 minutes, use the spoon or skimmer to lift it out of the oil, pausing to let excess oil run off, then transfer to a paper-towel-lined plate.
Repeat the shaping and cooking with the remaining dough and filling. Once you have shaped and cooked one bread, you will find it easy to shape one while another is cooking, and then, if you have room, to have 2 or even 3 in the hot oil cooking at once, at various stages of doneness. Cooking time will vary depending on how many breads you have in the oil at once. Serve hot.
Makes 12 elongated filled half-moon breads, about 8 inches long
APPETIZER-SIZED JIAOZI: Divide the dough into 24 pieces by cutting it in half, shaping each half into a cylinder, and cutting each one into 12 pieces as described above. To shape the jiaozi, roll each out to a round about 5 inches in diameter, place 2 tablespoons filling on each round, and then fold in half and pinch closed as above. Stretch each filled half-moon to nearly 6 inches long, then slide into the hot oil. You should be able to cook at least 3 of these at a time, shaping more jiaozi once the first one is in the oil.
Makes 24 elongated filled breads, 5½ to 6 inches long
VEGETARIAN STIR-FRY: The filling on its own makes a delicious vegetarian stir-fry for 3 or 4 people. Serve with rice and a soup, or over freshly cooked noodles.
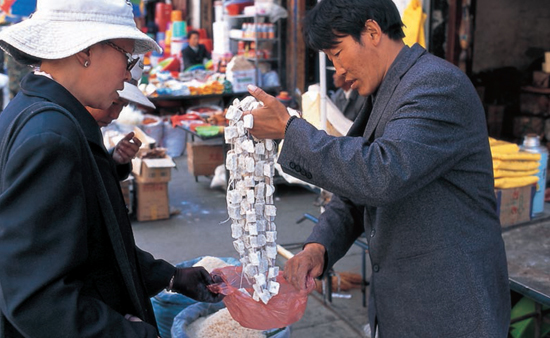
A Tibetan woman buys strands of dried cheese cubes at the market near the Barkhor, in the old part of Lhasa. She will probably use them in a stew or a noodle soup. They take long soaking in hot water to soften, but then add good flavor and texture.
With the rise of Tibetan restaurants in Lhasa, deep-fried cheese momos have become standard fare, a great snack for friends having a beer or hot tea together.
Cheese is a staple in many parts of Tibet, just as it is in Bhutan, across Tibet’s southern border. Tibetan-style cheese starts as a soft cheese, made from cooked-down milk (see Yak in Glossary), but it is most often dried, so that it can be easily stored and transported. My first taste of dried Tibetan cheese was long ago in the hut of some Tibetan herders in the mountains of Nepal. The cheese consisted of small off-white cubes, less than an inch square and hard as a rock, that had been strung on a piece of twine and dried in the smoke of the family fire. They had a definite cheesy-fermented flavor like a smoked aged goat cheese.
These days, dried cheese is still made by nomads but it is also widely available for sale, either in cubes or already grated, in the street markets of Lhasa and other Tibetan towns. The town of Shigatse specializes in a sweetened version—the cheese cubes are soaked in sugar water before being dried—but most are savory. People eat the cheese cubes as a snack or add them to thugpa (noodle stews), and they use the grated dried cheese to flavor breads.
We improvise the filling for these delicious deep-fried breads by using any one of several nontraditional dry-textured firm cheeses. Our favorite option is to start with a goat’s-milk feta and air-dry it over several days, until it becomes more dried out and crumbly. A good last-minute cheese choice is Pecorino-Romano.
We serve cheese momos as a snack or appetizer. You can also make a meal of them, accompanied by a soup and perhaps a salad. We love serving them with an acidic condiment such as Market Stall Fresh Tomato Salsa (page 18) or Lhasa Yellow Achar (page 28). Allow 1 cup sauce to accompany 16 momos, and put the sauce out in one or two small bowls with a spoon in each so guests can spoon on a little as they eat. Other good complements to momos include tart salads such as Napa and Red Onion Salad (page 86) or Cucumbers in Black Rice Vinegar (page 83).
1½ cups all-purpose flour, preferably unbleached, plus extra for surfaces
½ teaspoon salt
About ½ cup lukewarm water
FILLING
¼ pound dry-textured goat’s-milk feta or similar cheese (see headnote), crumbled or minced (1 packed cup)
¼ cup minced scallions (white and tender green parts)
Peanut oil for deep-frying (2 to 4 cups)
Place the flour and salt in a food processor and pulse briefly to mix. With the blade running, slowly add the water through the feed tube until a ball forms. Turn out onto a lightly floured surface and knead briefly. The dough should be soft and elastic. Cover with plastic wrap and set aside to rest for 30 minutes to 2 hours, whatever is most convenient.
Mix together the cheese and scallions in a medium bowl. Set aside. Use a dough scraper or a sharp knife to cut the dough in half. Set one half aside, covered. On a lightly floured surface, shape the other half into a cylinder by rolling it under your palms. Cut the cylinder crosswise in half, then in half and half again, to give you 8 equal pieces. Work with one piece at a time, leaving the others loosely covered with plastic wrap.
On the lightly floured surface, roll one piece out to a nearly 5-inch round. Place 1 packed tablespoon of the cheese mixture in the center of the round and fold over to make a half-moon shape. Press down lightly with a floured palm, to get rid of air bubbles, and then pleat the edges closed: Start at one end and pinch the edges together between your thumb and forefinger, then twist the pinched place over, rolling the edge. Move along about ¼ inch and repeat, then continue until the edge is completely sealed. This pinch-and-roll technique works well with soft doughs such as this; if you find the dough is not sticking to itself, make sure to brush off any excess flour, and then brush the edge with a very little water to help it stick. Set aside on a lightly floured surface, and repeat with the remaining 7 pieces of dough, and then with the remaining dough and cheese, to give you 16 momos in all. Set aside.
Place a large wok or deep heavy pot on your stovetop; make sure the wok or pot is stable. (Or use a deep-fryer.) Pour 2 inches of oil into the wok or pot and heat over high heat. Put out a slotted spoon or a wire skimmer and a rack or plate lined with paper towels. To check the temperature of the oil, hold a wooden chopstick vertically in the oil, with the end touching the bottom of the pot. If bubbles come bubbling up along the chopstick, the oil is at temperature. The oil should not be smoking; if it is, turn the heat down slightly and wait a moment for it to cool, then test again with the chopstick. (A deep-fry thermometer should read 325° to 350°F.)
Once the oil is at temperature, slide one momo into the hot oil, taking care not to splash yourself. Add another, and repeat until you have 4 frying at once (if your pot is small, stop before the pot is crowded). Use the slotted spoon or skimmer to move the momos around and gently turn them. They will quickly turn golden brown, with darker brown bubbled spots. After 1 to 2 minutes, when they are a rich golden brown and crisped looking, use the slotted spoon or skimmer to transfer them to the rack or plate. Repeat with the remaining momos, cooking them in batches.
Serve hot.
Makes 16 deep-fried half-moon filled breads; serves 4 as part of a meal, or 6 as a snack or appetizer
We’ve seen griddle-cooked versions of sha-pa-le (prounced “shahpa-láy”), as these breads are called in Lhasa dialect (sha is meat and pa-le is bread), made by Tibetan women in the market in Darjeeling, in northern India. But in Lhasa (and later, as we had them in Amdo, in the far northeastern edge of the Tibetan world), they’re deep-fried. You can order them for lunch in small Tibetan restaurants and then sit comfortably as you dip them into chutney and eat them bite by bite, a satisfying pleasure.
Traditionally the meat that fills these breads is yak meat, chopped finely and flavored with ginger and a little onion and perhaps some fresh Chinese celery leaf (see Glossary). We substitute beef, though you could also use lamb or goat.
Serve the breads hot, as they are done, accompanied by chopped fresh tomatoes or cucumbers, or with pickled radish or a tomato chutney (for example Quick Tomato-Onion Chutney, page 24).
DOUGH
3 cups all-purpose flour, plus extra for surfaces
1 teaspoon salt
About 1¼ cups lukewarm water
FILLING
½ pound (1 packed cup) lean ground beef or ½ pound boneless lean beef, such as round steak, cut into 4 or 5 pieces
½ cup minced onion
2 teaspoons minced ginger
1 teaspoon salt or ½ teaspoon salt plus 2 teaspoons soy sauce
1 tablespoon minced Chinese celery leaves (see Note)
Peanut oil for deep-frying (2 to 4 cups)
Combine the flour and salt in a food processor and pulse briefly to mix. With the blade running, add the water in a slow stream until a ball of dough forms. Turn out onto a lightly floured surface and knead for about a minute. The dough should be soft and supple and very smooth. Let rest, covered with plastic wrap, for 30 minutes to 1 hour.
If using ground beef, mix all the filling ingredients together in a bowl. If using steak or another cut, place the meat, onion, ginger, and salt (or salt and soy sauce) in the food processor and pulse repeatedly to make a coarse paste. Transfer to a bowl and stir in the herb, if using. You will have about 1G cups packed filling. Set aside, covered with plastic wrap (refrigerate if the wait will be longer than 30 minutes).
Dust your work surface lightly with flour. Use a sharp knife or a dough scraper to cut the dough in half. Set one half aside, loosely covered with plastic wrap. Divide the remaining dough into 12 pieces by cutting it in half and in half again, then cutting each piece into thirds. Roll each piece into a ball under the palm of your hand. On the lightly floured surface, press each round flat under your palm, then flip over and press once on the other side.
Cover 10 of the rounds and roll out the first 2: roll each one out to a 5-inch circle, rolling first one and then the other, to give the gluten a moment to relax. Repeat with the remaining rounds.
Scoop up a rounded tablespoon (about 1 tablespoon plus 1 teaspoon) filling and spread it onto one round with the back of the spoon or with a spatula, leaving a nearly ½-inch border all around the edges. Place another dough round on top of the filling, then crimp the edges all around: Start by pinching the edges together at one point, then twist the bottom edge over onto the top. Move along about ¼ inch and repeat. Continue until you have a rolled edge all around that seals in the filling. Set aside on a lightly floured surface. Repeat with the remaining rounds.
Place a large wok or deep heavy pot on the stovetop; make sure the wok or pot is stable. (Or use a deep-fryer.) Pour 3 inches of oil into the wok or pot and heat the oil over medium-high heat. Put out a slotted spoon or mesh skimmer. To test the temperature of the oil, hold a wooden chopstick vertically in the oil, with the end touching the bottom of the pot. If bubbles come bubbling up along the chopstick, the oil is at temperature. The oil should not be smoking; if it is, turn the heat down slightly and wait a moment for it to cool, then test again with the chopstick. (A deep-fry thermometer should read 325° to 350°F.)
Place 2 filled breads on a lightly floured surface. Flatten each of them gently with a lightly floured rolling pin or with your palm, just to ensure the edges are sealed, then slide one into the hot oil. The bread should sink to the bottom and then slowly start to rise to the surface. Use the slotted spoon or skimmer to flip it over. The side now on top will have some browned patches. Let cook for another 30 seconds, then flip the bread again. It will now be somewhat brown on both sides and starting to puff a little. Let cook for another 30 to 60 seconds, until it is a strong golden brown on both sides, then lift it out carefully and transfer to a paper-towel-lined plate. Repeat with the second bread.
Once you are accustomed to the timing and have a feel for deep-frying the breads, you can easily cook 2 at a time if your wok or pot is large enough. Slide in the first, then after turning it over the first time, slide in the second. Repeat with the remaining shaped breads, then turn down the heat while you shape the remaining 6. Raise the heat again several minutes before you start to deep-fry the remaining breads.
Makes 12 deep-fried filled breads about 5 inches in diameter; serves 6 as a snack, 3 or 4 as a small meal
NOTE ON CHINESE CELERY: Chinese celery can be difficult to find if you don’t have access to an East Asian grocery store. We often substitute finely minced mint, especially in summer, when mint is flourishing in our garden. Or simply omit the herb.
LARGE SHA-PA-LE: The breads we usually make are the smaller version we had in Labrang, in Gansu. Smaller breads are easier to handle if you’re deep-frying at home. To make larger ones, like those in Lhasa, make 8 rather than 12 breads: Cut each half of the dough into 8 pieces, and roll them out to 8- or 9-inch rounds; use 2 tablespoons filling for each bread.
Serves 4 to 8 for lunch with a side salad, or for a substantial snack
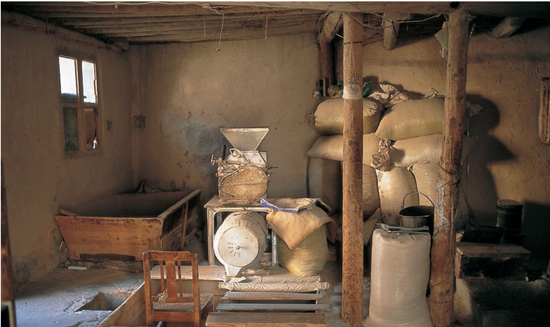
In the village of Labrang (the Chinese name is Xiahe), on a lane leading to the nunnery, we came upon this small mill, a place where roast barley is ground into tsampa and wheat berries into flour.
According to China’s 2000 census, there are nearly 10 million Hui (pronounced “hway”) living in the country. They are officially classified as a “minority nationality” (minzu), one of the fifty-five different groups with that designation (Tibetan, Mongol, Miao, etc.). But the Hui are the only people who have the designation as a result of religion, not as a result of language and/or ethnicity.
The Hui are Muslim. Although they are not the only Muslims in China (the Uighurs, Kirghiz, Kazakhs, and Tajiks are also Muslim), they have for centuries considered themselves a separate people, even though ethnolinguistically they are not. They live all across China (with much larger concentrations in the provinces of Ningxia, Gansu, Henan, Xinjiang, and Yunnan), and wherever they live, they speak the local Chinese dialect (as well as Mandarin). At the same time, they incorporate Persian- and Arabic-influenced terms into their vocabulary, so that they speak in a way that is distinctive, whatever the local language they are speaking.
Hui women cover their heads with kerchiefs or scarves and tend to be rather austere in their choice of clothing. Some Hui men grow beards, and most wear small caps as a mark of their religion. We’ve read that some Hui are more strictly observant than others, and that there are a number of different forms of Islam followed by the various Hui communities.
One of the ways Hui culture clearly sets itself apart is through food. There are two Chinese characters that are closely associated with the Hui, the characters for qing (pronounced “ching”), meaning pure, and zhen (pronounced “jen”), meaning true. Qing zhen is written outside every Hui restaurant, much as the Arabic word halal is outside Muslim restaurants in other places. This means the restaurant does not serve pork or cook with lard, both prohibited by Islam. Instead the meat is lamb or goat or sometimes beef.
We always go out of our way to find Hui markets and small restaurants, whether in Lanzhou or Xining, or in smaller towns such as Dali, in Yunnan. There we’ll find flatbreads of many kinds, grilled lamb, and inventive soups served over wheat noodles (see Hui Tomato-Lamb Noodle Soup, page 59, for example).
Hui history, culture, and food in China make a fascinating, complicated story. An excellent book on the subject is Muslim Chinese: Ethnic Nationalism in the People’s Republic by Dru Gladney (see the Bibliography). We strongly recommend it for anyone wanting to learn more about the Hui.
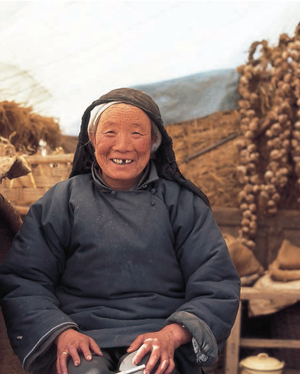
A Hui woman at a market stall in Linxia, in Gansu province, with braids of dried garlic hanging behind her.
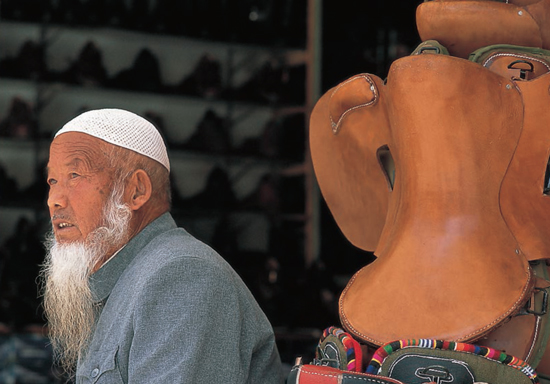
A fine-looking Hui man who runs a shop in Labrang, also in Gansu. The town is predominantly Tibetan, and historically so, because of the monastery (also called Labrang) that is located there. However, there is also a fairly large Hui population who have filtered down from the Hui Autonomous Region in the neighboring province of Ningxia, seeking business opportunities. This man sells saddlery and other kinds of useful equipment and tools,