 Preparing for the Installation
In This Chapter
Preparing for the Installation
Spending Some Time in Basic Training

Before you can begin to enjoy all the benefits of Reporting Services discussed in Chapter 1, you, of course, have to install the Reporting Services software. Reporting Services installs as part of the SQL Server 2016 installation. Before you begin the installation process, however, it is important to understand the structure of Reporting Services.
In this chapter, you will learn about the components that make up Reporting Services and the five editions of Reporting Services offered by Microsoft. Next, you will find out how the components are combined in different types of Reporting Services installations and see how to plan for each installation type. As part of that planning, you will learn about the software that must be in place prior to installing Reporting Services. After considering these preliminaries, we will walk you through the installation process.
The most important part of the Reporting Services installation is not what you do as you run the setup program, but what you do before you begin. In this section, we discuss the knowledge you need and the steps you should take to prepare for installation. With the proper plan in place, your Reporting Services installation should go smoothly and you can create reports in no time.
Reporting Services is not a single program that runs on a computer to produce reports. Instead, it is a number of applications, utilities, and databases that work together to create a report management environment. As you plan your Reporting Services installation, it is important that you understand a little bit about each piece of the puzzle and how all these pieces work together to create a complete system.
Figure 2-1 shows all the parts that make up a complete Reporting Services installation. Each part has a specific role to play in the development, management, and delivery of reports, or in the management of the Reporting Services environment itself. Most of these items can be installed as part of the SQL Server 2016 installation process. Some components, however, require a separate installation process of their own.
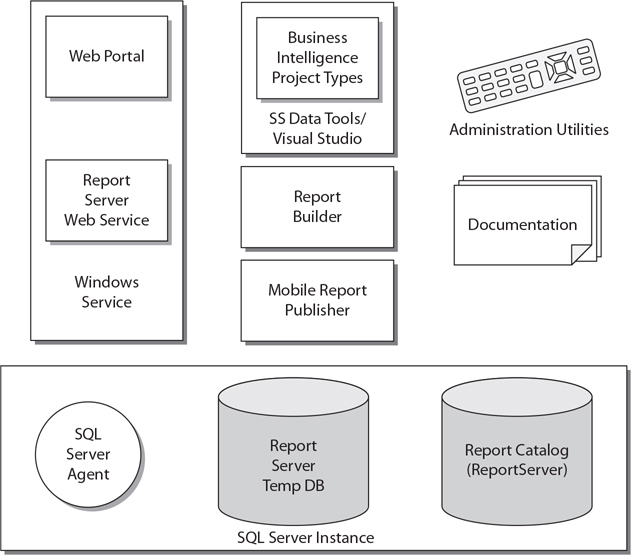
Figure 2-1 Reporting Services component parts
It is important to note that not all Reporting Services installations include all of the items shown in Figure 2-1. The subsequent sections of this chapter discuss the various types of installations and which components they include. Let’s take a look at each part and see how it fits into the whole.
 NOTE
NOTE
Unless specifically stated, the text and diagrams in this chapter are describing a native mode Reporting Services installation. The other type of installation, a SharePoint Integrated mode Installation, is described in the section “SharePoint Integrated Mode Installation” later in this chapter.
The Reporting Services Windows service is the heart of Reporting Services and is, of course, included as part of the Reporting Services installation. This service is responsible for the two main interfaces with the report server. First, it contains the application that implements the web portal. Second, it provides a web service interface for programmatic interaction with the report server.
As discussed in Chapter 1, the web portal provides a user interface for requesting reports and managing the report server. The Report Server web service provides a programmatic interface for requesting reports. It also provides an interface for report server administration.
In addition to these two interfaces, the Reporting Services Windows service provides the engine responsible for report rendering. This is true whether the report is requested through the web portal, the Report Server web service, or subscription delivery. As you saw in Figure 1-6 of Chapter 1, this includes fetching the report definition, retrieving the data used in the report, and rendering the report in the desired format.
The administration utilities are tools for managing the Reporting Services Windows service and for making changes to its configuration. The main administration utility is the Reporting Services Configuration Manager. This tool provides a convenient method for examining and modifying the configuration settings of a Reporting Services installation. You learn about the Reporting Services Configuration Manager in more detail in the section “The Reporting Services Configuration Manager,” later in this chapter.
The administration utilities can be run on the computer that is hosting the Reporting Services Windows service to manage the configuration on that computer. Most of the administrative utilities can also be used to manage a Reporting Services Windows service that is running on another computer. This is called remote administration.
An instance of the SQL Server database engine is required to host the Report Server database and the Report Server Temp DB database. Any of the following versions of SQL Server can be used to host the Reporting Services databases:
SQL Server 2005
SQL Server 2008
SQL Server 2008 R2
SQL Server 2012
SQL Server 2014
SQL Server 2016
Reporting Services also uses the SQL Server Agent, which you will learn about shortly. In addition, databases in SQL Server can be used as data sources for Reporting Services reports.
SQL Server Agent is part of SQL Server and is created as part of the SQL Server installation process. It is used by SQL Server to execute jobs scheduled to run at a certain time. These jobs might back up a database or transfer information from one database to another. Jobs may be scheduled to run once, or they may run on a regular basis, such as once a day or once a week.
Reporting Services also uses the SQL Server Agent to execute scheduled jobs. These jobs are used to run reports and distribute the results. In Chapter 1, you learned about users who subscribe to a report. When users subscribe to a report, they ask for it to be run and delivered to them on a regular basis. When a user creates a subscription, Reporting Services creates a SQL Server Agent job to handle that subscription.
During the Reporting Services installation or configuration process, two databases are created within SQL Server: the Report Server and Report Server Temp DB databases. The Report Server database is used to store the Report Catalog. (Recall from Chapter 1 that the Report Catalog holds the information about all of the reports deployed to a report server.) The Report Server database also holds information about the virtual structure that contains these reports. This includes such things as the folder structure displayed by the web portal and the security settings for each folder and report.
As the name implies, the Report Server Temp DB database is used as temporary storage for Reporting Services operations. Information can be stored here to track the current users on the web portal. Short-term copies of some of the most recently executed reports are also stored here in what is known as the execution cache.
As discussed in Chapter 1, Reporting Services reports are created using SQL Server Data Tools, Visual Studio, or the Report Builder. All of these report development environments produce the same result. There is no difference between a report created in SQL Server Data Tools, a Visual Studio development environment, or the Report Builder.
Beginning with SQL Server 2014, SQL Server Data Tools is no longer installed as part of the SQL Server installation process. SQL Server Data Tools has its own installation program that must be obtained separately and run as its own installation process. The good news is SQL Server Data Tools is available as a free download from Microsoft.
If you plan to create reports using a Visual Studio development environment, you need to purchase and install it separately. Report Builder is available as a free download from Microsoft.
If you are planning to create mobile reports, you will need to install the Mobile Report Publisher. Like SQL Server Data Tools, the Mobile Report Publisher has its own separate installation program. The Mobile Report Publisher is available as a free download from Microsoft.
The final piece of Reporting Services is the documentation. The bulk of this documentation is found online through the Microsoft Developer Network. The web portal also has a set of help screens to guide you through its user interface.
Reporting Services is included with five different editions of SQL Server 2016:
Express Edition with Advanced Services
Standard Edition
Web Edition
Enterprise Edition
Developer Edition
There is also an Evaluation Edition, which does not require a license, but it can only be used for a limited time. We won’t be discussing the Evaluation Edition in this book, but you can think of it as essentially being a Developer Edition you get to test-drive for free.
Reporting Services is licensed as part of your SQL Server 2016 license. Therefore, in a production environment, the Reporting Services edition you are licensed to use is the same as the SQL Server 2016 edition you are licensed to use. For example, if you have a Standard Edition of SQL Server 2016, you are only licensed for the Standard Edition of Reporting Services.
All editions of Reporting Services provide a rich environment for report authoring, report management, and report delivery. The Express Edition does not require a SQL Server license. It is intended to be distributed with packaged applications that require a SQL Server database. Only the SQL Server Express with Advanced Services Edition includes Reporting Services.
The Express Edition has some limitations compared to the other editions. It does not include all of the business intelligence and high-availability features you find in the Standard, Business Intelligence, and Enterprise Editions. When it comes to the reporting environment, it does not support e-mail and file share subscriptions and report caching. It does not support SharePoint Integration mode. In addition, Reporting Services in the Express Edition can only access 4GB of memory.
The Standard Edition, as one might expect, provides the features needed by most “standard” SQL Server implementations. The Web Edition is designed and licensed for web hosting applications. Reporting Services in the Standard and Web Editions can access as much memory as the operating system can make available. Just a few of the more advanced features of Reporting Services are not included in the Standard and Web Editions. These advanced features are listed in the following section, “The Enterprise Edition.”
The Enterprise Edition of Reporting Services includes the following advanced features:
Data-Driven Subscriptions Send a report to a number of users from a predefined mailing list, or send a number of reports to a Windows file share or SharePoint document library. Data-driven subscriptions are discussed in Chapter 12.
Scale-Out Deployment Configure several Reporting Services Windows services running on multiple computers to point to a single SQL Server database engine hosting the Report Catalog. The scale-out deployment is discussed in the section “Types of Reporting Services Installations.”
Mobile Reports Deploy reports created by the Mobile Report Publisher to the report server. This is covered in Chapter 10.
KPIs in the Web Portal Create KPIs to be displayed right within the Reporting Services web portal. KPIs in the web portal are discussed in Chapter 11.
Custom Branding of the Web Portal Add your organization’s logo and modify the color scheme of the web portal. This is covered in Chapter 12.
The Enterprise Edition includes a number of features in the SQL Server database engine and in SQL Server Analysis Services for handling large volumes of data and for implementing high availability that are not available in the Standard and Web Editions.
The Developer Edition provides support for all of the features of the Enterprise Edition. The Developer Edition does not, however, require that you have an Enterprise Edition license of SQL Server 2016. Of course, the Developer Edition is only for development and testing. It cannot be used in a production environment.
Now that you are familiar with the components that make up Reporting Services and the ways that Microsoft licenses it, you can give some thought to just what your Reporting Services installation will look like. The first decision you need to make is which of the components you want to install. Although you can choose to include or exclude items in any combination you like, in the end, only three combinations make sense: the full installation, the server installation, and the report author installation.
In addition to these are a couple of specialized installation types. These are the distributed installation and the scale-out installation. These installations are for high-end, high-volume Reporting Services sites. We will discuss these configurations briefly so you are familiar with the variety of ways that Reporting Services can be configured.
Finally, there is one installation type that allows you to tightly couple Reporting Services with a SharePoint server.
The full installation, as the name implies, is the “everything including the kitchen sink” installation. All of the items shown in Figure 2-1 and discussed previously are included in this installation. Nothing is left out.
The full installation is most likely to be used in a development environment. This might be on a server used by a group of developers or on a workstation used by a single developer. In either case, we want to have all the bells and whistles available to us as we figure out how to best use Reporting Services to suit our business needs.
The server installation is most likely used when we’re setting up Reporting Services on a production server. On a production server, we only want those items that are going to be used to deliver reports or to help us manage Reporting Services. We don’t want to include anything that will take up space unnecessarily, specifically the developer tools. Report authoring should be done elsewhere and deployed to the production report server. Figure 2-2 shows the items included in the server installation.
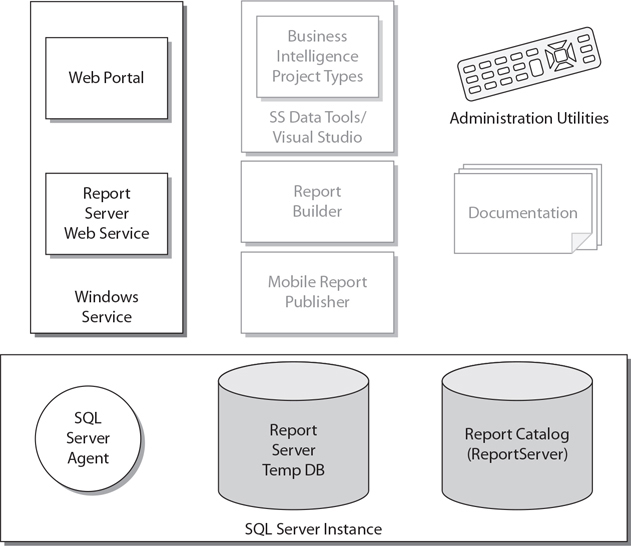
Figure 2-2 The server installation
The server installation includes the Reporting Services Windows service and the administration utilities used to manage it. As we discussed earlier, the Reporting Services Windows service provides the web portal and the Report Server web service for managing and delivering reports. In addition, Reporting Services will need the SQL Server Agent, the Report Server database, and the Report Server Temp DB database for its operations.
We won’t be doing any development work on the production server, so we will not need SQL Server Data Tools, Visual Studio, the Report Builder, or the Mobile Report Publisher. It is possible that you would want the documentation on the production server for questions on managing Reporting Services. Probably a better idea, though, is to have the documentation handy on a development computer and to keep the production installation as uncluttered as possible.
The report author installation is for individuals who are creating Reporting Services reports but not doing heavy-duty development. Report authors will not be creating full-blown applications that incorporate Reporting Services as part of a larger business system. The items included in the report author installation are shown here:
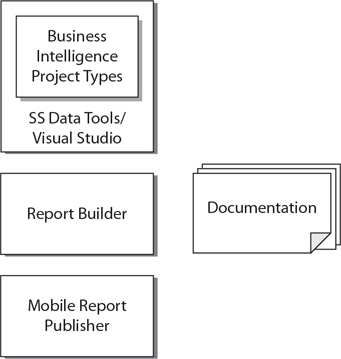
Report authors need the capability to create and preview reports. This capability is found in SQL Server Data Tools, Visual Studio, or the Report Builder. If the report author will be creating mobile reports, the Mobile Report Publisher is required in this installation as well. Report authors may also want access to the Reporting Services Books Online to look up information as they create reports. (Although, in my humble opinion, this book would serve as a better resource.) When report authors have completed their reports and are ready to have others use them, they will deploy the reports to a production Reporting Services server.
In a distributed installation, the Reporting Services items discussed are not installed on a single computer. Instead, they are split between two computers that work together to create a complete Reporting Services system. One computer runs the SQL Server database engine and hosts the Report Catalog databases. This is the database server. The other computer runs the Reporting Services Windows service. This is the report server.
Figure 2-3 shows a distributed installation. Note that this figure shows the servers and the Report Designer workstations. It does not show computers used for viewing reports.
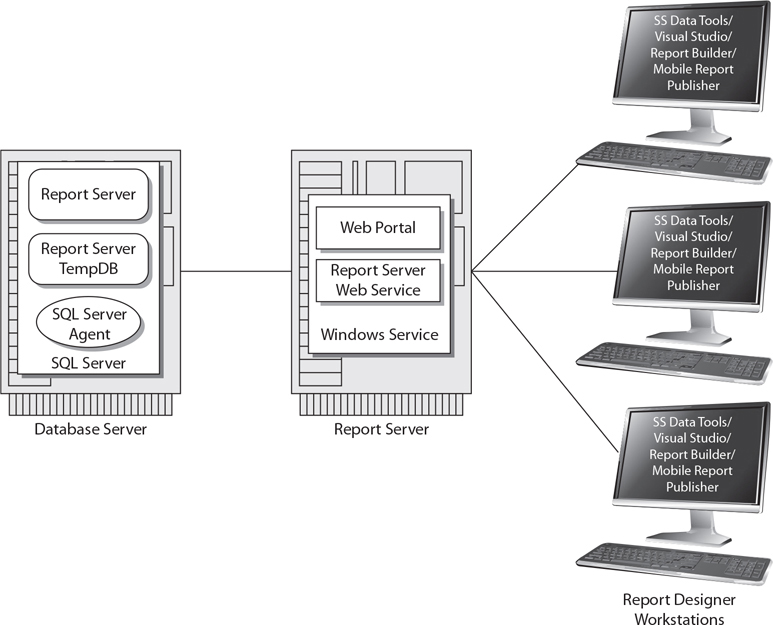
Figure 2-3 A distributed installation of Reporting Services
The distributed installation has advantages when it comes to scalability. Because the workload of the server applications—SQL Server and the Reporting Services Windows service—is divided between two servers, this installation can serve reports to a larger number of simultaneous users. The disadvantage of this type of installation is that it is more complex to install and administer. It also increases network traffic. In addition, two SQL Server licenses are required for this type of installation: one for the server hosting SQL Server and one for the server hosting the Reporting Services Windows Service. However, if you need a high-volume solution, it is certainly worth the effort to obtain one that will provide satisfactory response times under a heavy workload.
The scale-out installation is a specialized form of the distributed installation, as shown in Figure 2-4. In a scale-out installation, a single database server interacts with several report servers. Each of the report servers uses the same Report Catalog databases for its information. By using additional report servers, we can handle even more simultaneous users with the scale-out installation than we could with the distributed installation. In a scale-out installation, network load balancing is used to take requests to a single URL and distribute them among the scale-out servers.
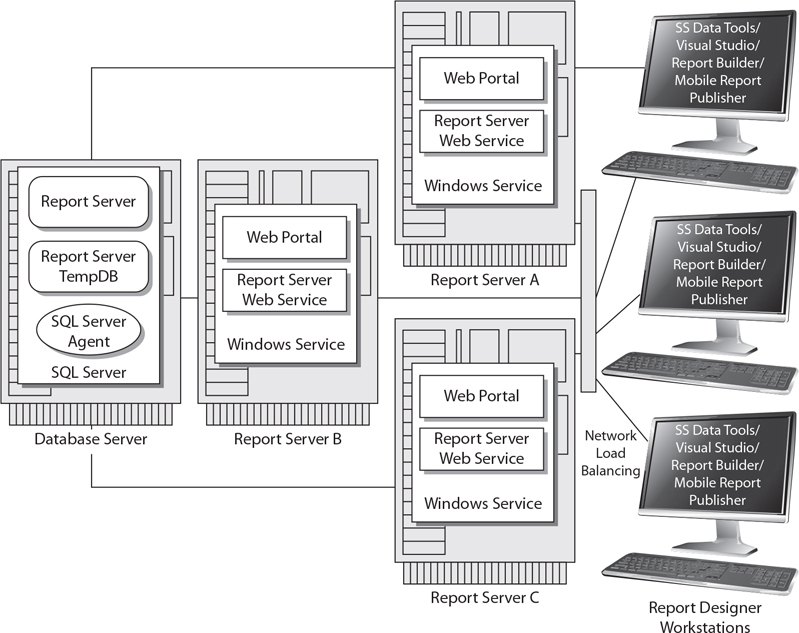
Figure 2-4 A scale-out installation of Reporting Services
Again, note that Figure 2-4 shows only the servers and the Report Designer workstations. It does not show computers used for viewing reports.
When report designers create reports, they can deploy them to any of the report servers. No matter which server is used, the reports will end up in the single Report Server database. Once the reports are in the Report Server database, they can be delivered by any of the report servers. In addition, because all of the information about the web portal is stored in the Report Server database, any changes to the web portal configuration made on one server will take effect on all the servers.
For example, suppose an administrator uses the web portal to access the Reporting Services through Report Server A. The administrator creates a new folder called Sales Forecasts 2016, sets the security so the sales staff can access this folder, and places the Sales Forecast report in the folder. Immediately after the administrator is finished, a salesperson brings up the web portal through Report Server C. The salesperson can browse the contents of the Sales Forecasts 2016 folder and will be able to run the Sales Forecast report.
As with the distributed installation, the scale-out installation provides a way to handle a large number of simultaneous requests for reports. Even though the scale-out installation uses a number of servers to deliver reports, it allows Reporting Services to be administered without duplication of effort. The scale-out installation will take additional effort to get up and running. It will also require a SQL Server license for each server used in the scale-out installation. However, this architecture provides an efficient means of serving a large number of users.
For all of the types of Reporting Services installations previously mentioned, the web portal user interface, provided by Reporting Services itself, facilitates the interaction of users with the reports. It is also possible to install Reporting Services so that a SharePoint server provides the interface for interaction with the reports. This is known as Reporting Services SharePoint Integrated mode.
When operating in SharePoint Integrated mode, reports are stored as documents on a SharePoint Server. This allows you to manage reports in the same way you would manage Word documents and Excel spreadsheets. Many of the SharePoint features available for document management, such as searching and version control, can be applied to Reporting Services reports. In addition, existing SharePoint security can be applied to reports rather than requiring the creation of a second security structure in the web portal.
In SharePoint Integrated mode, reports are executed and managed through the SharePoint Web Application. Reporting Services is configured through the SharePoint Central Administration Web Application. A report’s Report Definition Language (RDL) definition is stored in the Report Server Integrated database.
The architecture of a Reporting Services SharePoint Integrated mode installation is shown in Figure 2-5.
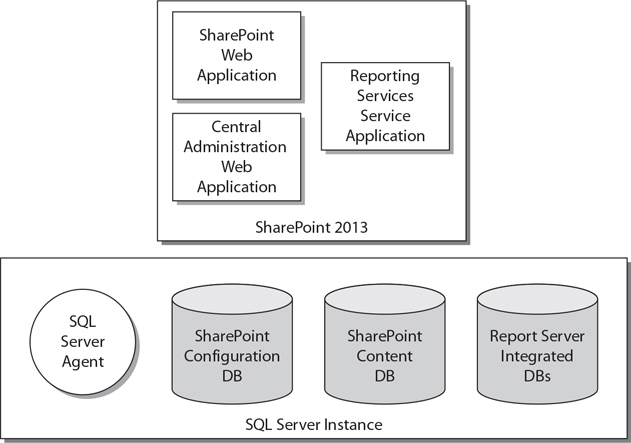
Figure 2-5 A Reporting Services SharePoint Integrated mode installation
In this section, we itemize the software requirements for each of the installation types just discussed. Before we get to that, however, let’s take a look at the hardware requirements for Reporting Services.
The first thing to keep in mind when considering what computer hardware to use for Reporting Services is this: bigger and faster are better. With Reporting Services, we are dealing with a server application that will be handling requests from a number of users at the same time. In many installations, the Reporting Services Windows service will be sharing processor time and computer memory with the SQL Server database engine. We need to have enough server power so both of these systems can happily coexist.
Processor Microsoft’s stated minimum processor is a 64-bit, 1.4 gigahertz (GHz) processor. You should install Reporting Services on this type of computer only if you are a patient person. A more realistic low end is an Intel Core processor (or comparable device from another manufacturer) at 2.0 GHz. This is true even for the report author installation. SQL Server Data Tools and Visual Studio demand a fair amount of horsepower to keep them from being sluggish.
Computer Memory Microsoft’s minimum requirement for computer memory is 1 gigabyte (GB). This is, indeed, a bare minimum. If you are running the Reporting Services Windows service on the same server with SQL Server, that minimum should probably go up to 2GB. Again, these are the absolute minimums—4GB or more is a much better place to start.
Disk Space A server installation of Reporting Services requires a minimum of 304MB of disk space. If an instance of the SQL Server database engine is installed on the same server, you will need an additional 811MB. A report author installation with SQL Server Data Tools requires a minimum of 4GB of disk space. Taken all together, you are going to need a minimum of 5.5GB of disk space for a full installation of Reporting Services.
NOTE
A minimum of 6GB of free space will be required during the installation process to have room for temporary files.
Remember, these requirements are minimums. Also, keep in mind that they do not include the space required for reports to be deployed to the server or project files created by the Report Designer. A Reporting Services installation is not useful if there is no room for reports. You will need additional space if your source databases are going to reside on a SQL Server instance running on the same server.
SQL Server 2016 Reporting Services Standard and Express Editions will run on the following operating systems:
Windows 10 Home 64-bit (Home, Professional, or Enterprise)
Windows 8.1 64-bit (Standard, Pro, or Enterprise)
Windows 8 64-bit (Standard, Pro or Enterprise)
Windows Server 2012 64-bit (Foundation, Essentials, Standard, or Datacenter)
Windows Server 2012 R2 64-bit (Foundation, Essentials, Standard, or Datacenter)
SQL Server 2016 Reporting Services Web and Enterprise Editions require one of the following operating systems:
Windows Server 2012 64-bit (Foundation, Essentials, Standard, or Datacenter)
Windows Server 2012 R2 64-bit (Foundation, Essentials, Standard, or Datacenter)
Microsoft .NET Framework version 3.5 SP1 is required by the SQL Server 2016 database engine. This framework must be in place before you start the installation. It is not installed as part of the SQL Server installation process. Microsoft .NET Framework 4.6.1 is required by SQL Server Management Studio. This framework will be installed as the first step in the SQL Server 2016 installation process if SQL Server Management Studio is selected and this framework is not already present on the target computer.
You need to keep several other tidbits of information in mind as you plan your Reporting Services installation. Many of these items are listed here.
If you create a distributed installation, the report server and the database server must be in the same domain or in domains that have a trust relationship. If you create a scale-out installation, all the report servers and the database server must be in the same domain or in domains that have a trust relationship.
Of course, for a SharePoint Integrated mode installation, you must have an instance of SharePoint running on the server where you will be installing Reporting Services. The following versions of SharePoint are supported:
SharePoint 2016
SharePoint Server 2013
The following are a couple of things to keep in mind as you are determining which server will host the Reporting Services databases:
The Report Server and Report Server Temp DB databases must be hosted by SQL Server 2005 or later. They cannot be hosted by an earlier version of SQL Server.
If you do not want to use the default name for the Reporting Services database (ReportServer), you can specify a different name. The database name you specify must be 117 characters or fewer.
If you are going to allow users to subscribe to reports and have them e-mailed, you need to specify the address of a Simple Mail Transfer Protocol (SMTP) server using the Reporting Services Configuration Manager. SMTP is the standard for exchanging e-mail across the Internet. You need to specify the address of an e-mail server that will accept e-mail messages from the report server and send them to the appropriate recipients.
In many cases, the address of your e-mail server is the same as the portion of your e-mail address that comes after the @ sign, prefaced by www. For example, if your e-mail address is MyEmail@Galactic.com, your e-mail server’s address is probably either www.Galactic.com or smtp.Galactic.com. Be sure to verify the address of your e-mail server with your e-mail administrator. Also, make sure this e-mail server supports the SMTP protocol and that it will accept and forward mail originating from other servers on your network.
One of the options you may specify in the Reporting Services Configuration Manager is a requirement to use a Secure Sockets Layer (SSL) connection when accessing the web portal and the Report Server web service. When an SSL connection is used, all of the data transmitted across the network is encrypted so it cannot be intercepted and read by anyone else. This is important if your reports contain sensitive personal or financial information.
To use SSL on a server, the server must have a server certificate. Server certificates are purchased from a certificate authority for use on a SQL Server Reporting Services (SSRS) server exposed to the Internet or obtained from an enterprise certificate authority within your organization for use on an SSRS server on your intranet. You can find information on certificate authorities on the Internet.
Each server certificate is associated with a specific uniform resource locator (URL). To use SSL with the web portal and the Report Server web service, your server certificate must be associated with the URL that corresponds to the default website on the server. If www.MyRSServer.com takes you to the default website on your server, then the server certificate must be associated with www.MyRSServer.com. If you plan to require an SSL connection, you should obtain and install the appropriate server certificate prior to installing Reporting Services.
When you require the use of an SSL connection to access the web portal and the Report Server web service, your users must specify a slightly different URL to access these locations. For instance, if the users would normally use http://www.MyRSServer.com/Reports to get to the web portal, they will now have to use https://www.MyRSServer.com/Reports. The https in place of the http creates the SSL connection.
The login account you are logged in as when you run the setup program must have administrative rights on the computer where the installation is being done. If you are doing a distributed or scale-out installation, the login account must have administrative rights on the computer that will be the report server, and also have SQL Server administrator rights on the database server.
The login account you are logged in as must also have system administration rights in the SQL Server installation that will contain the Report Catalog. The setup program uses this login to access SQL Server and create the items necessary for the Report Catalog. You may specify a different login, either a SQL login or a Windows login, for the report server to use when accessing the Report Catalog after the installation is complete.
You will be asked to specify two other login accounts during the Reporting Services installation and in the Reporting Services Configuration Manager. Make your choices ahead of time, create any required domain accounts that don’t currently exist, and track down any passwords you may need before you begin the installation process.
The Reporting Services Windows Service Account During the installation process, you will be asked to specify the login account used by the Reporting Services Windows service. If you are installing the SQL Server database engine or other SQL components as part of the same installation, you will be asked for login accounts for each of the necessary Windows services at the same time. You can choose from the following types of accounts:
The built-in LocalSystem account The LocalSystem account has access to almost all resources on the local computer and may or may not have access to resources on other computers in the network. You do not need to supply a password if you use this account.
The built-in NetworkService account This account exists on Windows server operating systems for running services. The difference between this account and the LocalService account is that this account has rights on the network and can access other servers on the network. You do not need to supply a password if you use this account.
The built-in LocalService account This account exists on Windows server operating systems for running services. The difference between this account and the NetworkService account is that this account does not have rights on the network and cannot access other servers on the network. You do not need to supply a password if you use this account.
A Virtual Service account This is an account local to the server that is automatically created for you by the SQL Server installation. By default, the virtual service account for Reporting Services will be called “NT Service\Report Server.”
A domain user account This is a regular user account that exists in the domain in which this server resides. You will need to know both the login name and the password. Do not use the domain account used by a regular Windows user as the login account for running a Windows service. This will cause issues with rights and with password expiration. If you are going to use domain accounts to run Windows services, always create new accounts dedicated to that purpose with passwords that do not expire.
Microsoft recommends a managed service account be used as the login account for the Report Server service. By default, the installation program will create a virtual Network Service account called ReportServer as the login account for this service.
The Report Server Database Credentials In the Reporting Services Configuration Manager, you can specify the Report Server database credentials. These credentials are used by the Reporting Services Windows service to log in to SQL Server and to access the Report Server database, the Report Server Temp DB database, and the SQL Server Agent. As noted earlier, this login account is used after the installation is complete. It is not used to access SQL Server during the installation process.
You have two options:
The login account used by the Reporting Services Windows service
A SQL Server login
You need to work with the database administrator of your SQL Server to determine which of these options to use.
NOTE
If a SQL Server login is used, it is recommended that you not use the system administrator (sa) login. The SQL Server login must be added to the RSExecRole role in the ReportServer, ReportServerTempDB, master, and msdb databases. This will be done automatically by the Reporting Services Configuration Manager.
You need to run the SQL Server installation program under a login that is a member of the local system administrators group. In addition, your login needs to have administrator permissions in SQL Server so you can perform the following tasks:
Create SQL logins
Create SQL roles
Create databases
Assign roles to logins
Now that you have worked through all of the preparation, it is finally time to install Reporting Services. This is done through the SQL Server 2016 setup program, either at the time SQL Server 2016 is originally installed or later, as an addition to an existing SQL Server installation. In this section, you will see the portions of the SQL Server 2016 installation dealing with Reporting Services and learn about the option selections necessary for the various types of Reporting Services installations discussed earlier in this chapter. You will also look at the Reporting Services configuration, which must be done after the installation is complete. This additional configuration is done using the Reporting Services Configuration Manager.
If you are doing a full, server, distributed, or scale-out installation of Reporting Services, the setup program must be run on the computer that will serve as the report server. This is the computer that will be running the Reporting Services Windows service and hosting the web portal and the Report Server web service. If you are doing a report author installation, the SQL Server Data Tools and SQL Server Management Studio installation software can be downloaded from Microsoft. You do not need to have access to the full SQL Server installation software.
If you are doing a distributed or scale-out installation, you do not need to run the Reporting Services setup program on the database server. You will, of course, need to install SQL Server 2005 or later on the database server prior to doing the Reporting Services installation, but you do not need to run the Reporting Services portion of the setup program on that computer. The Reporting Services setup program on the report server will access the database server and take care of all the necessary installation and setup remotely.
You will need to obtain the SQL Server 2016 installation files either through a download or from a DVD. If the autorun process does not automatically start the install, double-click the setup.exe file. Use the Planning page to ensure you have all the necessary hardware and software prerequisites.
When you are ready to begin the actual installation, select “New SQL Server stand-alone installation or add features to an existing installation” from the Installation page as, as seen at the top of Figure 2-6.
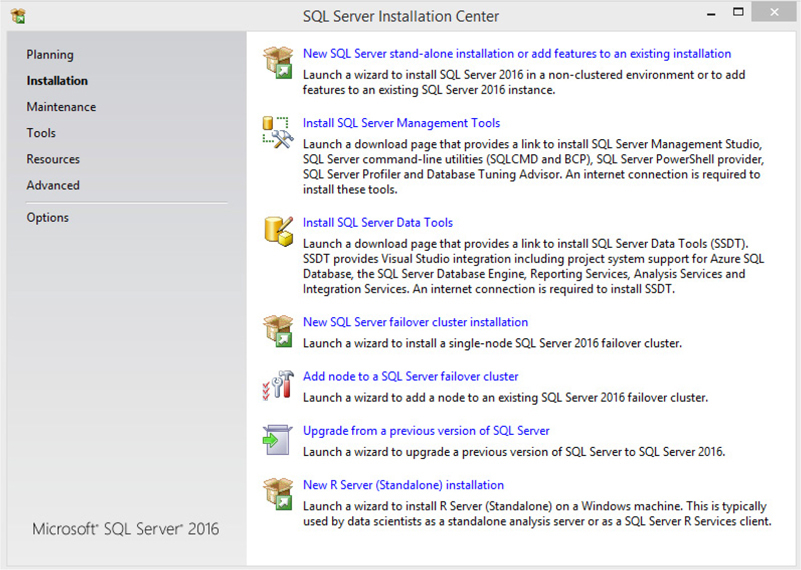
Figure 2-6 The SQL Server Installation Center screen
The setup process begins with the usual preliminaries. You need to enter the product key. Of course, you must read and accept the SQL Server licensing agreement. The setup will also double-check to make sure all the prerequisite software is installed and properly configured.
Once all this groundwork is complete, you get to the good stuff. On the Feature Selection page of the Installation Wizard, you can determine which components of SQL Server to install. The following sections show which items to select on the Feature Selection page for each type of installation.
Beginning with SQL Server 2014, the SQL Server Management Studio and the SQL Server Data Tools installations are no longer part of the SQL Server install. If you wish to have SQL Server Management Studio available for working with your instance of SQL Server, you need to install it using a separate process described in the section, “Installing SQL Server Management Studio.” If you are doing a Reporting Services Full Installation or a Reporting Services Author Installation, you need to install SQL Server Data Tools using a separate process described in the section, “Installing SQL Server Data Tools.”
Reporting Services Full Installation On the Feature Selection page, select the following for a Reporting Services full installation:
Database Engine Services, if you do not already have an appropriate version of the SQL Server database engine available to host the Report Catalog
Client Tools Connectivity
Documentation Components
The Feature Selection page should appear as shown in Figure 2-7. Click Next to continue with the SQL Server Installation Wizard.
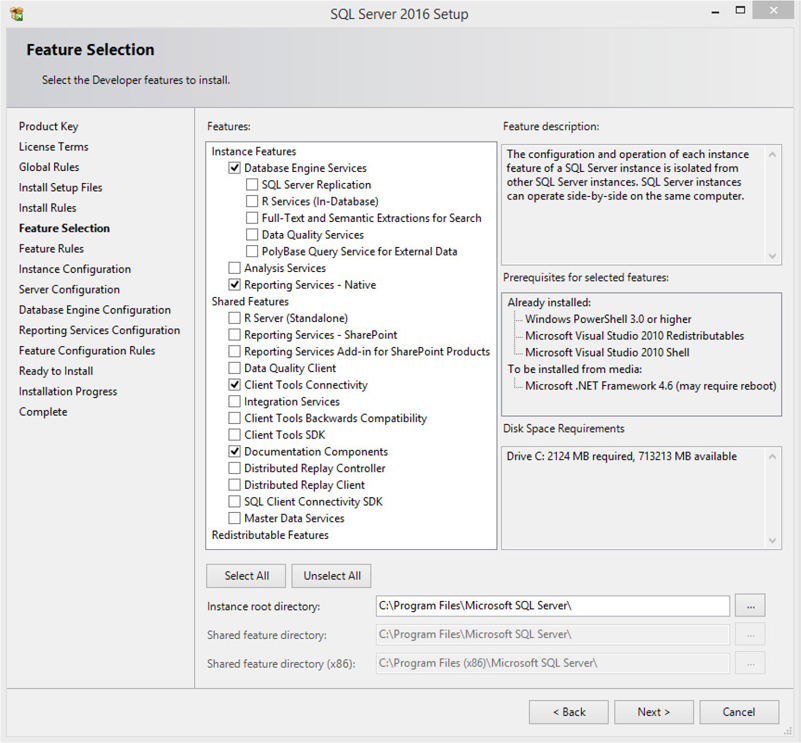
Figure 2-7 The Feature Selection page of the SQL Server 2016 Installation Wizard for a Reporting Services full installation
You may want to select other items on the Feature Selection page if you are installing other SQL Server components as part of this process. The items documented here represent the minimum for a Reporting Services full installation.
Reporting Services Server Installation On the Feature Selection page, select the following for a Reporting Services server installation:
Database Engine Services, if you do not already have an appropriate version of the SQL Server database engine available to host the Report Catalog
Reporting Services - Native
Client Tools Connectivity
The Feature Selection page should appear as shown in Figure 2-8. Click Next to continue with the SQL Server Installation Wizard.
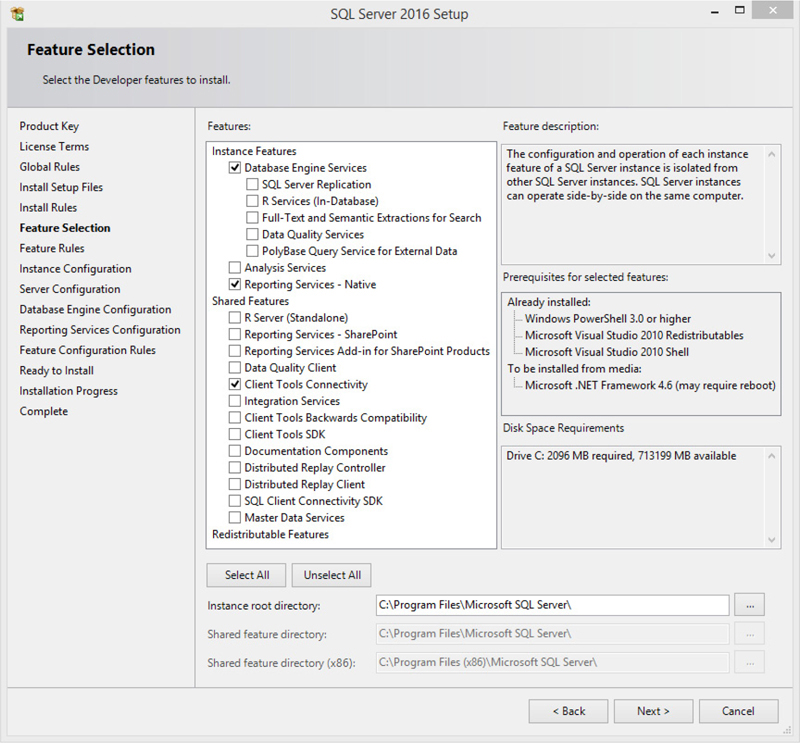
Figure 2-8 The Feature Selection page of the SQL Server 2016 Installation Wizard for a Reporting Services server installation
NOTE
You may want to select other items on the Feature Selection page if you are installing other SQL Server components as part of this process. The items documented here represent the minimum for a Reporting Services server installation.
Reporting Services Report Author Installation On the Feature Selection page, select the following for a Reporting Services report author installation:
Client Tools Connectivity
Documentation Components
The Feature Selection page should appear as shown in Figure 2-9. Click Next to continue with the SQL Server Installation Wizard.
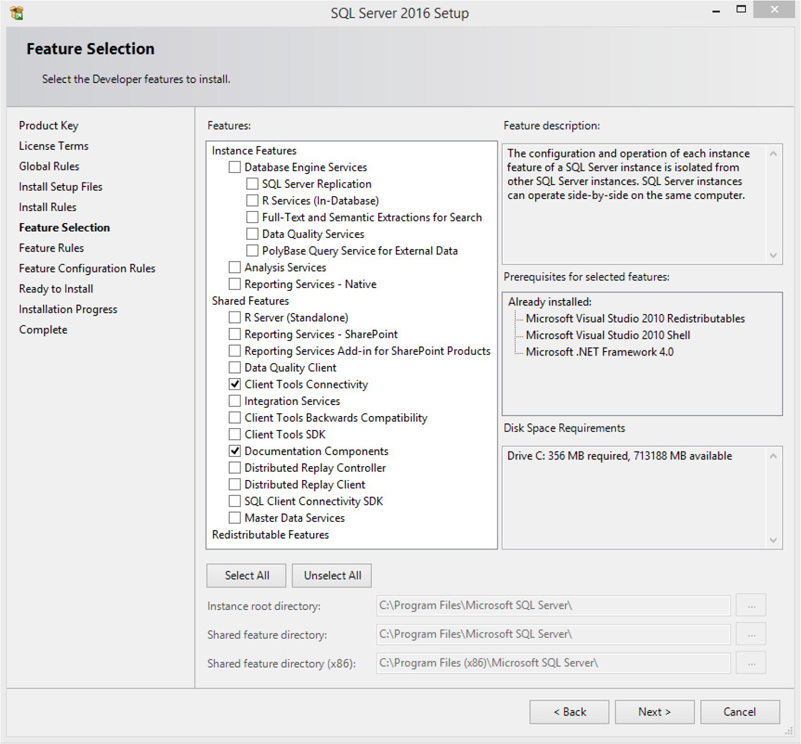
Figure 2-9 The Feature Selection page of the SQL Server 2016 Installation Wizard for a Reporting Services report author installation
Reporting Services Distributed Installation and Scale-Out Installation Before completing the Reporting Services portion of a distributed or scale-out installation, you must have SQL Server 2005 or later running on the computer that will serve as the database server. Remember, the Enterprise Edition of Reporting Services is required for a scale-out installation. On the Feature Selection page, select the following for a Reporting Services distributed installation or a scale-out installation:
Reporting Services - Native
Client Tools Connectivity
The Feature Selection page should appear as shown in Figure 2-10. Click Next to continue with the SQL Server Installation Wizard.
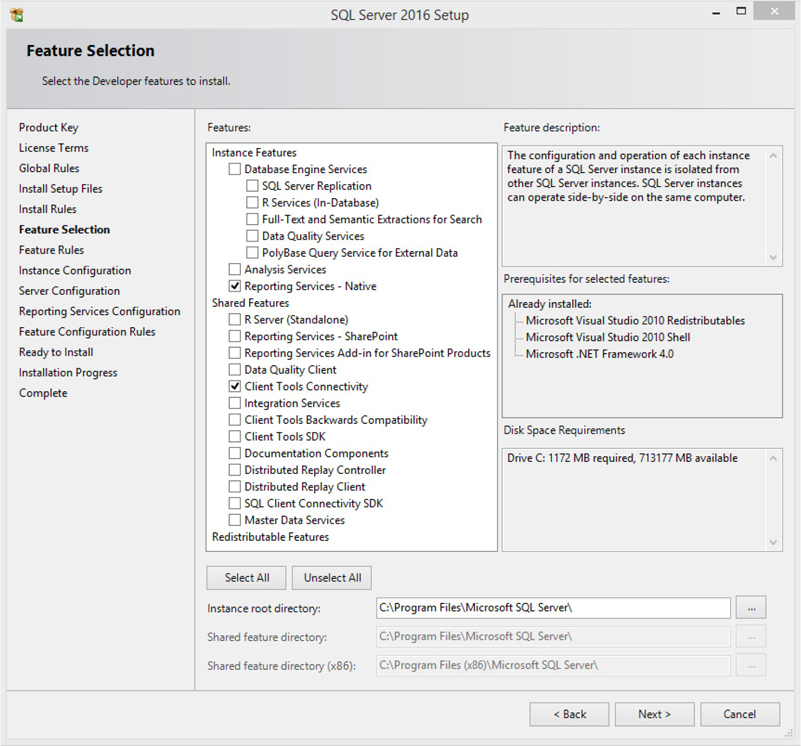
Figure 2-10 The Feature Selection page of the SQL Server 2016 Installation Wizard for a Reporting Services distributed installation or scale-out installation
Reporting Services SharePoint Integrated Mode Installation On the Feature Selection page, select the following for a Reporting Services SharePoint Integrated mode installation:
Reporting Services - SharePoint
Reporting Services Add-in for SharePoint Products
The Feature Selection page should appear as shown in Figure 2-11. Click Next to continue with the SQL Server Installation Wizard.
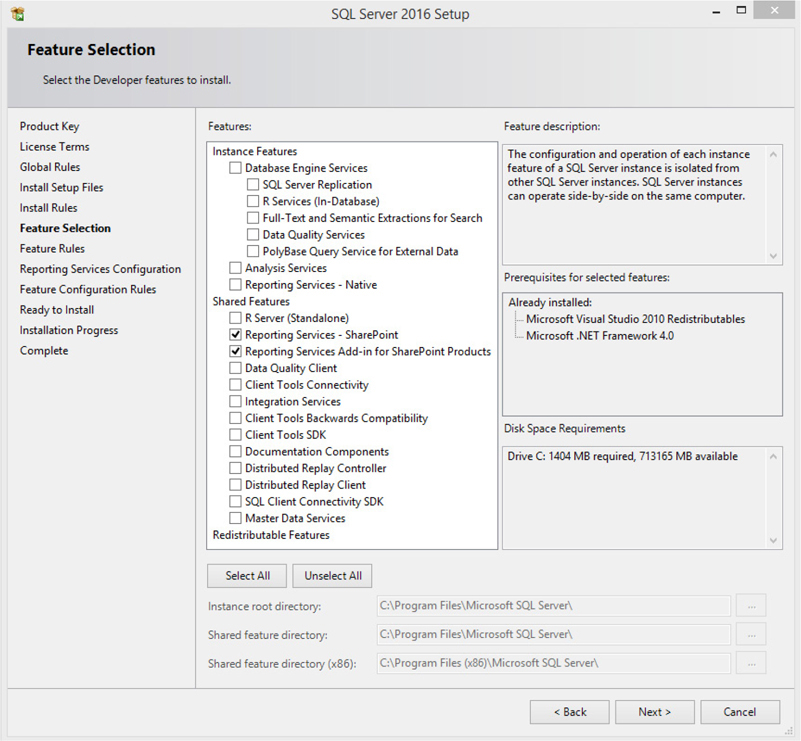
Figure 2-11 The Feature Selection page of the SQL Server 2016 Installation Wizard for a Reporting Services SharePoint Integrated mode installation
NOTE
The Reporting Services Add-in also needs to be installed on all SharePoint Web Front End (WFE) servers in the SharePoint farm.
The Instance Configuration page, shown in Figure 2-12, enables you to choose the name assigned to this instance of the components you are installing, including Reporting Services. The default instance will use Reports as the default name of the web portal and ReportServer as the default name of the Reporting Services web service. If you specify an instance name, by default, an underscore (_) followed by the instance name is appended to the end of the website and web service name. For example, if you specify an instance name of “RS2016,” the website will be “Reports_RS2016” and the web service will be “ReportServer_RS2016.”
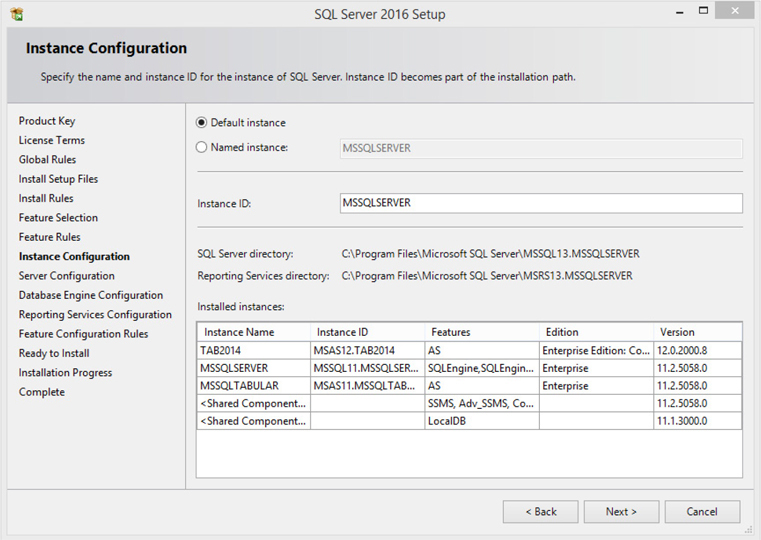
Figure 2-12 The Instance Configuration page
You can see all the instances of SQL Server components currently installed on this computer in the grid at the bottom of the Instance Configuration page. Of course, your new instance name cannot be exactly the same name as any existing instance. Unless you have a reason to change the instance name from the default, such as multiple Reporting Services instances on a single server, it is probably a good idea to stick with the default.
After you have entered the instance name, or if you have decided to use the default instance, click Next to continue with the SQL Server Installation Wizard.
The Server Configuration page is shown in Figure 2-13. This page enables you to specify the Windows credentials the Reporting Services Windows service is to run under. The content of this screen will vary, depending on the SQL Server 2016 components you chose to install. The options available here were discussed previously in the “The Reporting Services Windows Service Account” section of this chapter. This page also enables you to select the startup type of each of the services being installed. If SQL Server was included as part of this install, SQL Server Agent should be changed to the Automatic startup type.
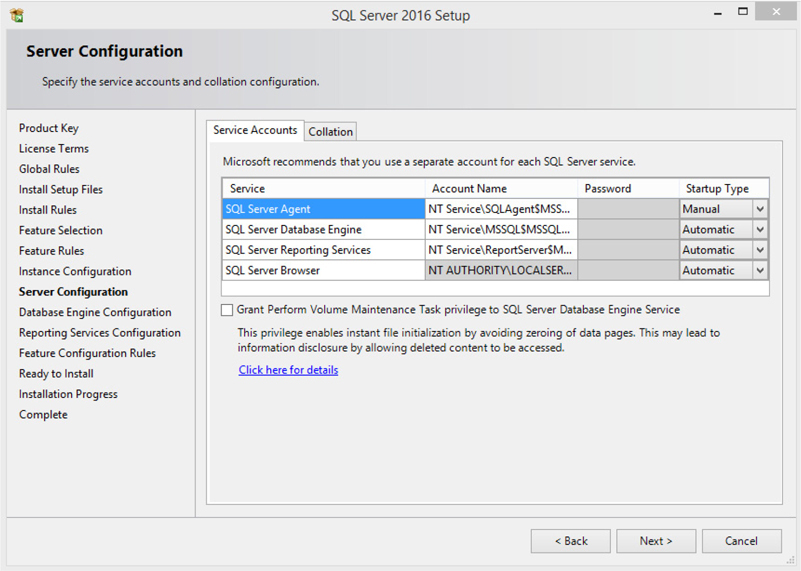
Figure 2-13 The Server Configuration page
NOTE
The SQL Server Browser does not need to be started unless there are multiple instances of SQL Server running on this server. The SQL Server Browser should be set to the Manual startup type on single SQL instance servers.
After you make your selections on this page, click Next to continue with the SQL Server Installation Wizard.
After leaving the Server Configuration page, you may encounter several pages that deal with the setup of the SQL Server database engine and other SQL Server components, depending on the items you selected on the Feature Selection page. Make the appropriate choices for your SQL Server installation. Click Next to move from one page to the next.
Eventually, you will come to the Reporting Services Configuration page, shown in Figure 2-14. If SQL Server was selected on the Feature Selection page and you are installing the default instance, this page provides you with two choices for configuring your Reporting Services installation:
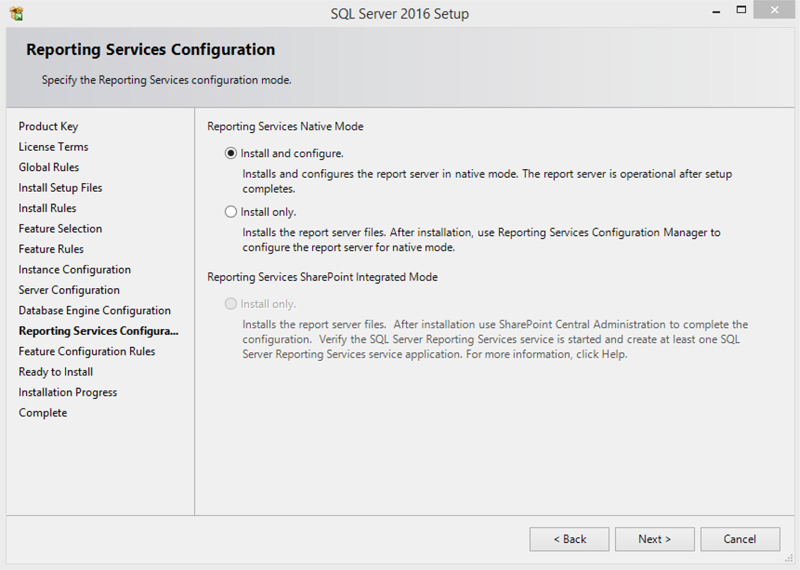
Figure 2-14 The Reporting Services Configuration page
Install and configure
Install only
If SQL Server was not selected on the Feature Selection page, or if you are not installing the default instance, you will not have a choice; the Install only option will be selected for you.
NOTE
If you are installing Reporting Services in SharePoint Integrated mode, the SharePoint Install only option will be selected for you. Configuration must be completed using SharePoint Central Administration.
If the Install only option is chosen, your new Reporting Services installation will need to be configured using the Reporting Services Configuration Manager utility program. You will learn more about this utility program in the upcoming section, “The Reporting Services Configuration Manager.”
This may seem like a rather limiting set of choices, sort of an all-or-nothing proposition, but it is not. For the majority of Reporting Services installations, the Native mode default configuration will do just fine. Only rarely, for distributed or scale-out installations, or for nondefault instances, do you need to change the default configuration settings.
The default configuration settings are
Web service name is ReportServer.
Web portal name is Reports.
The Report Catalog is hosted by the default instance of SQL Server 2016 being created by this installation process. (This is why the choice Install and configure is disabled when you are not installing SQL Server at the same time.)
The login account used by the Reporting Services Windows service is used as the credentials for accessing the Report Server database (Report Catalog).
After you make your selection on this page, click Next to continue with the SQL Server Installation Wizard.
After a few more screens, the SQL Server Installation Wizard has all the information it requires to install the components of SQL Server you requested. Click Install to finish the installation process. Remember, if you chose the Install only option, you will need to run the Reporting Services Configuration Manager to complete the final configuration of Reporting Services.
Even if you did use the Reporting Services Native mode default configuration, you should run the Reporting Services Configuration Manager to complete one important task. You should always create a backup of the Reporting Services encryption key as the final step of a Reporting Services installation. See the later section, “Backing Up the Encryption Key,” for instructions on completing this task.
If you wish to have SQL Server Management Studio available, you will have to accomplish this using a separate install process described in the section, “Installing SQL Server Management Studio.” If you are doing a Reporting Services Full Installation or a Reporting Services Author Installation, you will have to install SQL Server Data Tools using a separate process described in the section, “Installing SQL Server Data Tools.”
As you learned in the previous section of this chapter, the SQL Server Installation Wizard is geared completely toward installing Reporting Services with the default configuration. If you want to deviate from the default configuration, you must use another tool to make these nondefault configuration settings. When installing Reporting Services in Native mode, that tool is the Reporting Services Configuration Manager.
When the Reporting Services Configuration Manager utility is launched, it asks for the name of a server to connect to, as shown in Figure 2-15. Once you enter a server name and click Find, the program finds all instances of Reporting Services 2016 running on that server and displays them in the Report Server Instance drop-down box, as shown in Figure 2-16. You need to select an instance and click Connect to enter the utility program with the configuration information for that Reporting Services instance loaded.
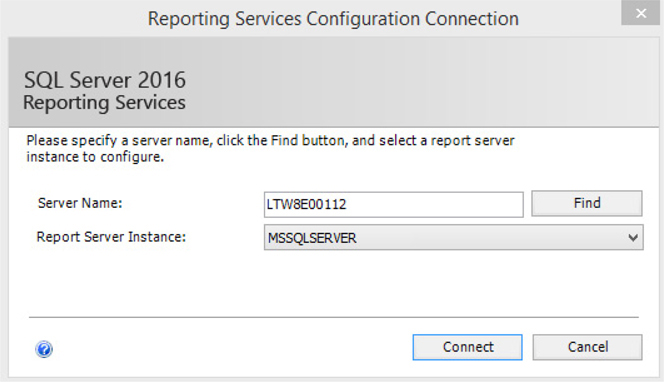
Figure 2-15 The Reporting Services Configuration Connection dialog box
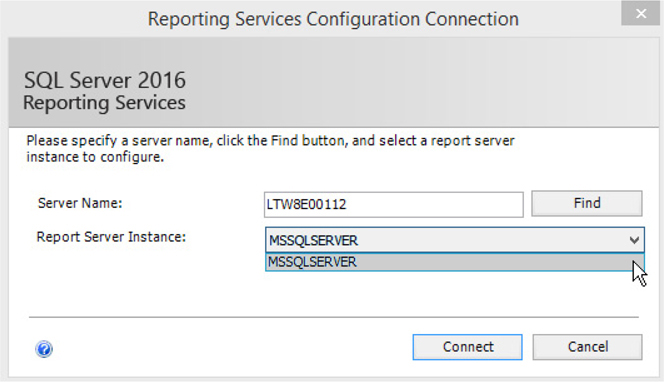
Figure 2-16 Selecting an instance in the Reporting Services Configuration Connection dialog box
The Reporting Services Configuration Manager contains a number of pages, each geared toward configuring a different aspect of Reporting Services. Let’s take a look at each of these pages and learn what they are used for.
The Report Server Status page displays status information about the Report Server instance you selected, as shown in Figure 2-17. There is no configuration information to change on this page. This page does provide buttons to start or stop this instance of Reporting Services.
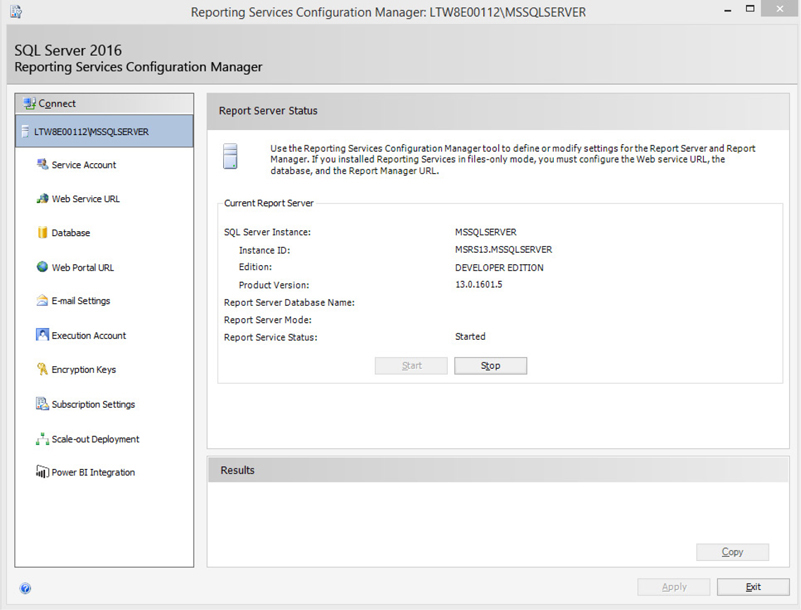
Figure 2-17 The Report Server Status page of the Reporting Services Configuration Manager
The Service Account page enables you to view and change the credentials used to run the Reporting Services Windows service. This is shown in Figure 2-18. These are the same credentials you set on the Server Configuration page of the SQL Server 2016 Installation Wizard. For more information about the possible choices on this page, see the “The Reporting Services Windows Service Account” section of this chapter.
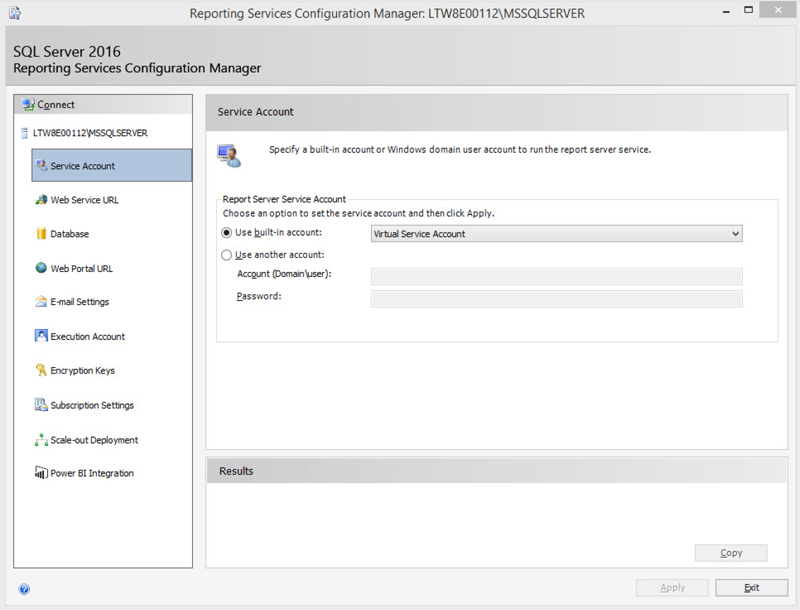
Figure 2-18 The Service Account page of the Reporting Services Configuration Manager
NOTE
If you ever need to change the credentials used to run the Reporting Services Windows service, be sure to make that change in the Reporting Services Configuration Manager and not through the Services Management Console snap-in. The Services snap-in will not apply the required database and file permissions to the new credentials.
The Web Service URL page enables you to view and change the URL used by the Reporting Services web service. This page is shown in Figure 2-19. As mentioned previously, if this is the default instance of Reporting Services on the server, the default name for this virtual directory is ReportServer.
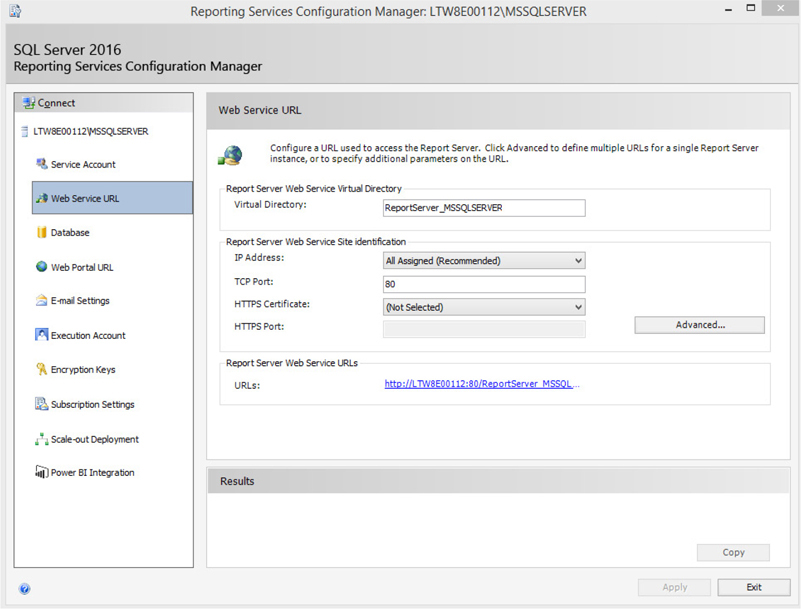
Figure 2-19 The Web Service URL page of the Reporting Services Configuration Manager
The Web Service URL page also enables you to select the Internet Protocol (IP) address and Transmission Control Protocol (TCP) port used by the Report Server web service. You need to make sure the Report Server web service does not conflict with any other TCP/IP addresses on the network. The IP address setting will default to all IP addresses assigned to the computer, and the TCP port will default to port 80 for Hypertext Transfer Protocol (HTTP) and port 443 for Hypertext Transfer Protocol Secure (HTTPS).
Internet Information Services (IIS) also defaults to using ports 80 and 443. If you are running IIS and Reporting Services on the computer, make sure to select ports that do not conflict.
Finally, the Web Service URL page enables you to select whether or not you want to require an SSL connection when retrieving data from the Report Server web service. If you have any questions on this option, refer to the section “Encrypting Reporting Services Information.” Because a server certificate is required for SSL, this option is disabled if you do not have a server certificate.
Clicking the URL shown on this page will open your default browser and take you to the Reporting Services web service.
The Report Server Database page, shown in Figure 2-20, enables you to select the set of databases that will serve as the Report Catalog. You can select the database server name, the name of the database on that server, and the credentials used to connect to that server. If you are performing a distributed or scale-out installation, this is where you will select the remote database server for hosting the Report Catalog. Remember, the database server hosting the Report Catalog must be SQL Server 2005 or later.
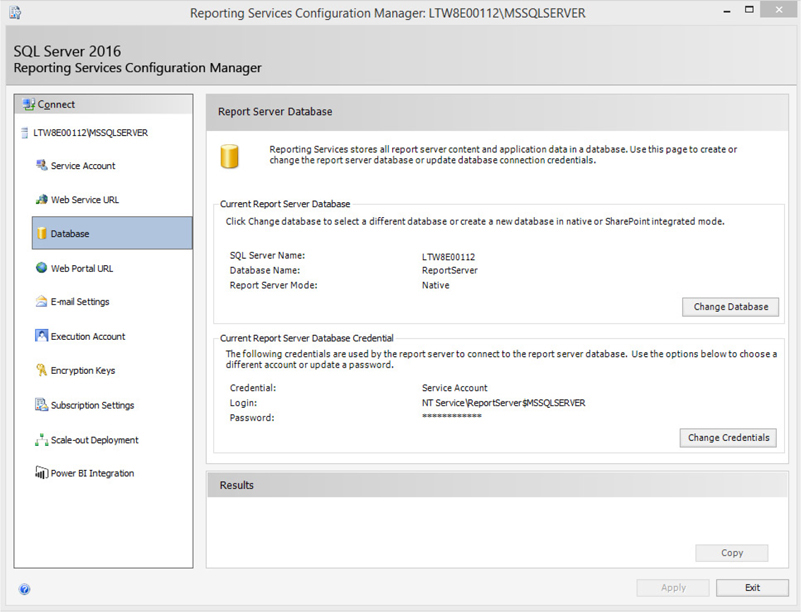
Figure 2-20 The Report Server Database page of the Reporting Services Configuration Manager
Click the Change Database button to change the database server or database to be used by the report server. You will have the option of creating a new Report Server database or choosing an existing Report Server database. In either case, you will need to complete the following steps:
Specify the database server and the credentials to be used to complete the current operation. These credentials are not necessarily the same as those that will be used by the Reporting Services Windows service to connect to the database.
Provide the name of the database.
Specify the credentials used by the Reporting Services Windows service to connect to the database.
Click the Change Credentials button to change only the credentials used by the Reporting Services Windows service to connect to the database.
When you click the Apply button, the following tasks are performed:
Grant access rights to report server accounts This task will set the appropriate rights in the databases for the credentials specified to be used by the Reporting Services Windows service.
Set the connection information This task will set this Reporting Services instance to use the specified Report Catalog.
The Web Portal URL page enables you to view and change the name of the virtual directory used by the web portal. This page is shown in Figure 2-21. As mentioned previously, if this is the default instance of Reporting Services on the server, the default name for this virtual directory is Reports. Clicking the URL shown on this page will open your default browser and take you to the web portal.
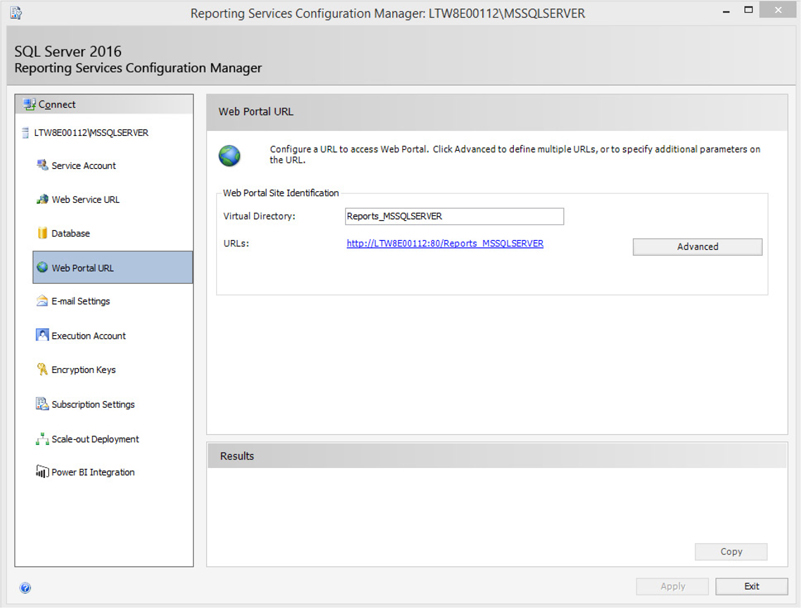
Figure 2-21 The Web Portal URL page of the Reporting Services Configuration Manager
The E-mail Settings page, shown in Figure 2-22, enables you to identify an SMTP server that can be used by Reporting Services. The SMTP server is used for delivering report subscriptions via e-mail. If an SMTP server is not specified, the e-mail delivery option will be unavailable when creating report subscriptions.
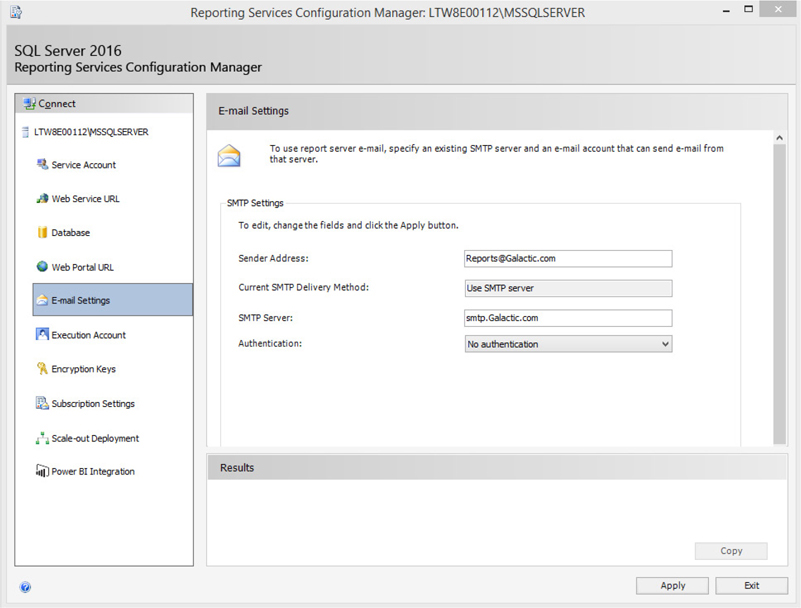
Figure 2-22 The E-mail Settings page of the Reporting Services Configuration Manager
Enter the name of an SMTP server that will accept mail from Reporting Services. You can also enter an e-mail address for Sender Address. This e-mail address will appear in the From line of any report subscriptions e-mailed from Reporting Services. You can also choose the authentication method to be used when connecting to the SMTP server.
The Execution Account page, shown in Figure 2-23, enables you to specify a set of login credentials to be used by Reporting Services when it needs to access a file or other resource. For example, suppose you have a report that uses an Access database as its data source. When it is time for the report to query the data from the Access database, the Execution Account credentials are used to gain rights to the Access MDB file. The Execution Account is also used to gain access to image files, which are pulled from the file system for use in your report.
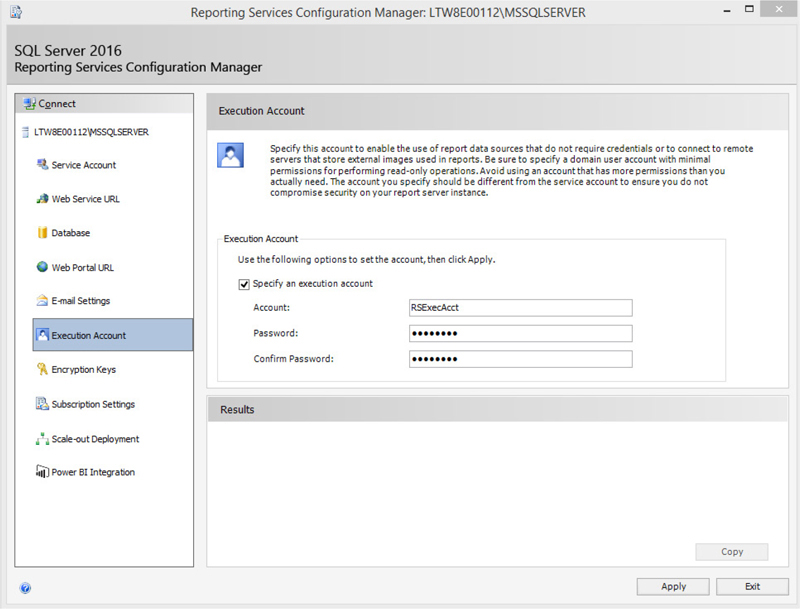
Figure 2-23 The Execution Account page of the Reporting Services Configuration Manager
Using the Execution Account page, you can specify the login account and the password to be used. Make sure this account has the appropriate rights to access any directories that might contain data sources or images. However, this account should have limited rights throughout the network to prevent it from being used in a malicious manner. If you do not anticipate the need to allow access to data sources or image files in the file system, you do not need to specify an execution account.
As you have seen, Reporting Services uses various sets of credentials for its operation. Whenever a login account and a password are specified, these credentials are stored as encrypted text. In addition, any credentials you specify in a report or shared data source are encrypted. To encrypt and, more importantly, to decrypt these credentials, Reporting Services needs to use an encryption key. This encryption key is created as part of the Reporting Services installation.
If this encryption key ever becomes corrupt, none of these encrypted credentials can be decrypted. The credentials become useless, and Reporting Services becomes inoperable. To remedy this situation, you need to have a backup of the encryption key, which can be restored over the top of the corrupt key. This is the purpose of the Encryption Keys page, shown in Figure 2-24.
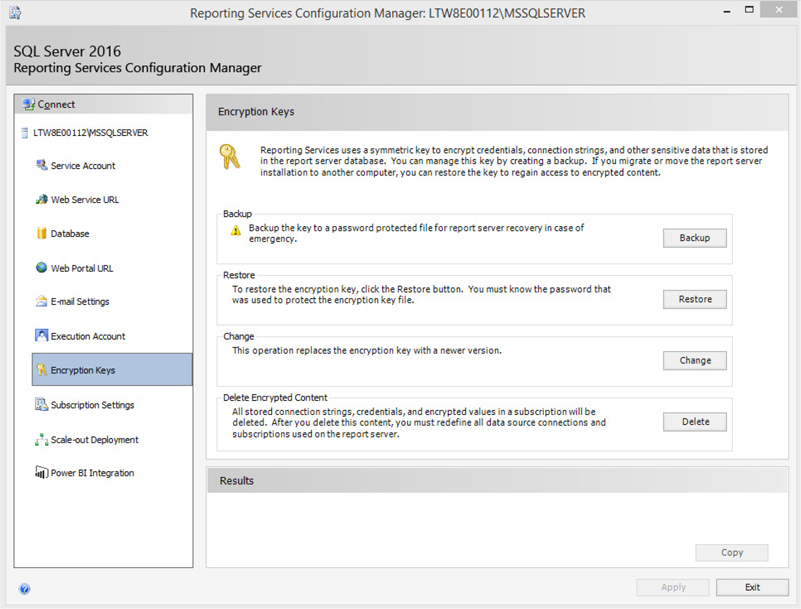
Figure 2-24 The Encryption Keys page of the Reporting Services Configuration Manager
Use the Backup button to create a backup copy of the encryption key. Use the Restore button to restore a previously created encryption-key backup. Use the Change button to create a new encryption key for Reporting Services. This should be done if your current encryption key becomes compromised. The current encryption key must be operable (that is, not corrupt) to use the Change function.
If your Reporting Services encryption key does become corrupt and you do not have a current backup, use the Delete button. This will remove all the encrypted credentials and create a new encryption key. After using this option, you will need to use the Report Server Database page of the Reporting Services Configuration Manager to reenter the database credentials. When the Delete button is used, Reporting Services will be inoperable until you enter a new set of database credentials. You will also need to reenter the data source credentials for each report and shared data source deployed on the server.
Backing Up the Encryption Key To create a backup copy of the encryption key, click the Backup button. Enter a path and a filename for storing the key, and then enter a password to protect the encryption key. You may want to put the key backup on removable media so it can be stored in a safe place. Make sure you keep the password in a safe place as well. The password helps protect your encryption key backup and is required by the restore process.
NOTE
In previous versions of Reporting Services, the Reporting Services encryption keys had a bad habit of becoming corrupted. If the key does become corrupted, Reporting Services ceases to function and all the encrypted credential information on the server must be reentered. Therefore, it is important to maintain a current backup of your Reporting Services encryption key in a secure location on a remote device. Never save the encryption key to the local file system.
In Chapter 1 we discussed the fact that reports can be e-mailed to a user through a subscription. Subscriptions can also be set up to run reports on a scheduled basis and export the result to a specific file format and stored in a specified file share. Reporting Services must have a set of credentials allowing it to gain rights to create a file in the specified file share. The Subscription Settings page, shown in Figure 2-25, enables you to specify a set of login credentials to be used for this purpose.
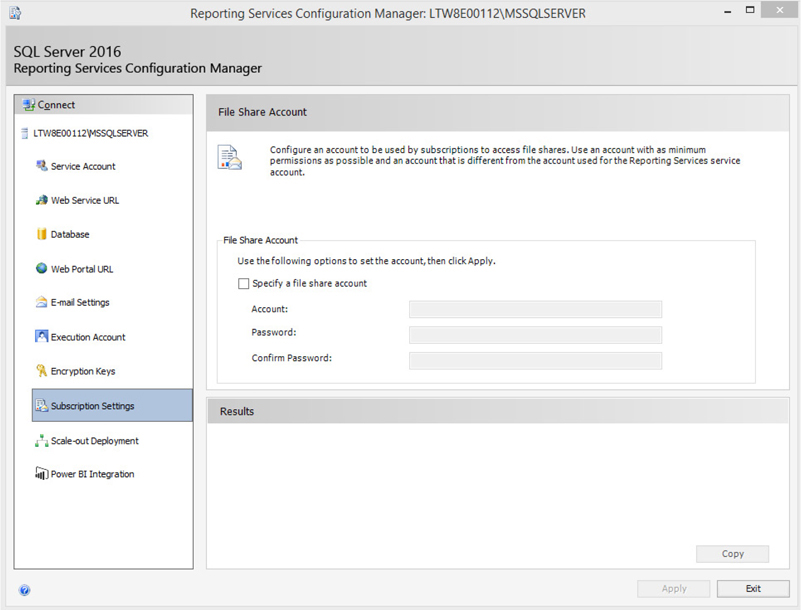
Figure 2-25 The Subscription Settings page of the Reporting Services Configuration Manager
The Scale-out Deployment page, shown in Figure 2-26, is used to add servers to a scale-out installation of Reporting Services. Each server added to the scale-out list uses the same encryption key. In this way, encrypted data stored in the common Report Catalog can be decrypted by any report server in the scale-out installation.
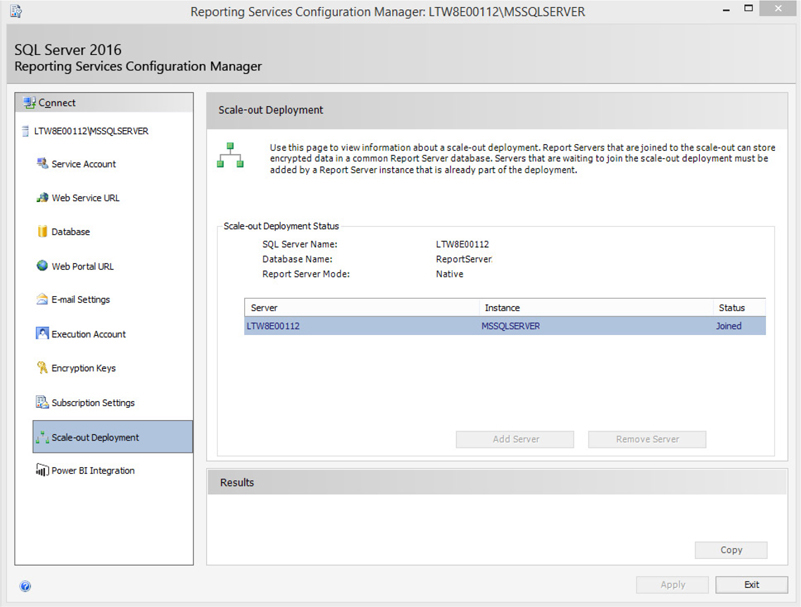
Figure 2-26 The Scale-out Deployment page of the Reporting Services Configuration Manager
One of the new Reporting Services features in SQL Server 2016 is the ability to pin Reporting Services reports to a Power BI dashboard. In order for Power BI to display these reports for a user, it must know how to find a Reporting Services web service that can render the reports. The Power BI Integration page, shown in Figure 2-27, is used to register a Reporting Services web service with Power BI. To register, simply enter your Microsoft online credentials and the Reporting Services web service will be registered with the Power BI site associated with those credentials.
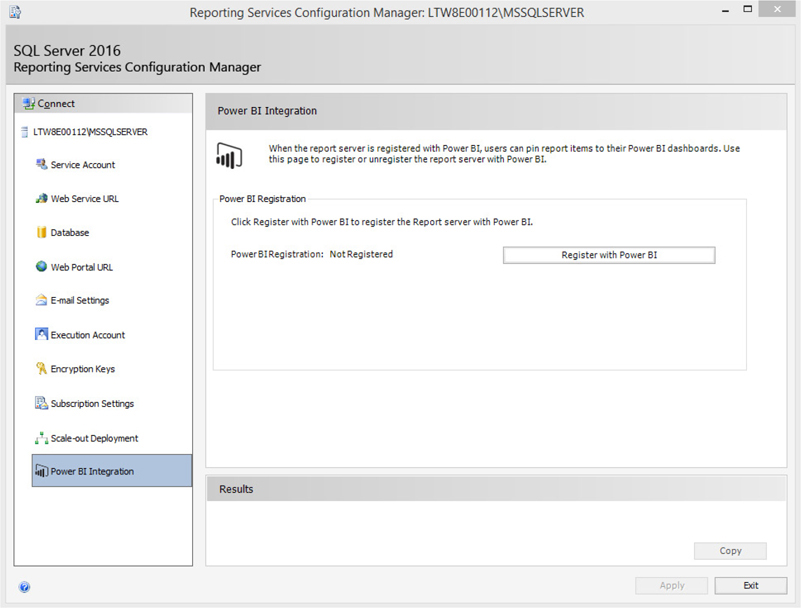
Figure 2-27 The Power BI Integration page of the Reporting Services Configuration Manager
The Connect button, at the top of the page’s menu area, lets you connect to a different server and then select a Reporting Services instance on that server.
In order to complete an installation of Reporting Services in SharePoint Integrated mode, you must configure SharePoint to work with Reporting Services. This is done through the SharePoint Management Shell and through SharePoint Central Administration. We must complete the following steps:
Register and start the Reporting Services SharePoint Service.
Create a Reporting Services Service Application.
To register the Reporting Services SharePoint service and start up the Reporting Services Service, complete the following:
1. From the Microsoft SharePoint 2013 Product group on the server’s Start page, right-click SharePoint 2013 Management Shell and select Run as Administrator from the context menu.
2. Type the following command to install the Reporting Services SharePoint service:
Install-SPRSService
and press ENTER. Note that no message is returned when the command completes successfully.
3. Type the following command to install the service proxy:
Install-SPRSServiceProxy
and press ENTER. Again, no message is returned when the command is successful.
4. Go to SharePoint Central Administration and click Manage Services on Server in the System Setting group.
5. Click Start next to the entry for SQL Server Reporting Services Server. The status for this service will change from Stopped to Started.
NOTE
The Reporting Services Add-in also needs to be installed on all SharePoint Web Front End (WFE) servers in the SharePoint farm.
To create a Reporting Services Service application, complete the following:
1. In SharePoint Central Administration, click Manage Service Applications in the Application Management group.
2. In the ribbon, click New.
3. In the New menu, click SQL Reporting Services Service Application.
4. On the Create SQL Server Reporting Services Service Application page, enter a name for the application.
5. In the Application Pool section, create a new application pool for the application.
6. Select or create a security account for the application pool.
7. In the Web Application Association section, select the Web Application that will have access to the new Reporting Services Service Application.
8. Click OK. The process to create the Reporting Services Service Application may take a few minutes to complete.
Your Reporting Services SharePoint Integrated mode installation is now ready to go. We will talk more about managing Reporting Services reports in SharePoint Integrated mode in Chapter 11.
If you are going to be authoring reports using SQL Server Data Tools/Visual Basic, then you need to download and run a separate install. You can locate this download using the “Install SQL Server Data Tools” link on the Installation page of the SQL Server 2016 Installation program, as seen at the top of Figure 2-6. Clicking this link will take you to an MSDN web page with links to the latest downloads for SQL Server Data Tools. Follow the instructions on this web page to download SQL Server Data Tools for Visual Studio 2015.
Once you have downloaded the SQL Server Data Tools setup program, launch this program and follow the steps to complete the installation. You can choose which of the SQL Server business intelligence tools (project types) you would like to install. The SQL Server Reporting Services tools are the only features you must install in order to create reports with Report Designer/Visual Studio. You can install the tools for the other SQL Server business intelligence features if you want to try those out as well. If you already have Visual Studio 2015 installed on the computer where you are running the setup program, setup will just install the selected Visual Studio business intelligence project types. If you do not currently have Visual Studio 2015 installed, setup will install the Visual Studio shell along with the business intelligence project types.
If you want to have SQL Server Management Studio available to work with your instance of SQL Server, then you need to download and run a separate install. You can locate this download using the “Install SQL Server Management Tools” link on the Installation page of the SQL Server 2016 Installation program, as seen at the top of Figure 2-6. Clicking this link will take you to an MSDN web page with a link to the latest download for SQL Server Management Studio (and other management tools). Follow the instructions on the web page to download and install SQL Server Management Studio.
This section lists some of the common problems you may encounter while installing Reporting Services. Suggested solutions are provided to help you resolve these problems.
One of the most frequent problems with the Reporting Services setup is not using login accounts that have the appropriate rights. If you encounter an error during installation, refer to the earlier section, “Login Accounts,” and make sure you are using login accounts that have the appropriate rights.
If you discover you received a setup error because one of the login accounts you used was not adequate to the task, try changing that account using the Reporting Services Configuration Manager. If this does not work, remove the failed installation of Reporting Services and try again. To remove the failed installation, select Add or Remove Programs or Programs and Features from the Control Panel, depending on your version of Windows. Select SQL Server 2016 from the list of installed programs and click the Uninstall/Change button. Work through the SQL Server install program and deselect the Reporting Services features.
If you are performing an installation that requires the server components but they are not present on the Feature Selection screen, this is probably an indication that you are not up to date on your Windows service packs. Reporting Services is finicky about this. If you encounter this problem, cancel the installation, install the latest service pack for your version of Windows, and then start the installation process again.
If you are installing the report server on a computer that is already running IIS, care must be taken to ensure that these two services are not using the same TCP/IP port. Both IIS and the report server will default to using port 80 for HTTP requests and port 443 for HTTPS requests. If this occurs, IIS and the report server will compete to handle traffic on these ports, resulting in neither service working correctly. If this occurs, simply use the Reporting Services Configuration Manager to direct the report server to a different port.
If your installation does not complete successfully, you can try the Repair utility on the Maintenance page of the SQL Server Installation Center. If none of these suggestions solve your installation issues, you may want to consult the installation log files for more information.
The default location for the log files is
C:\Program Files\Microsoft SQL Server\130\Setup Bootstrap\Log
The log files will be in a folder named for the date and time of the installation.
You now have Reporting Services installed and ready to go. As mentioned at the end of Chapter 1, we will take time to ensure that you understand the basics of database architecture and querying before we begin creating reports. Chapter 3 gives you this database basic training. This basic training won’t be as tough as army boot camp, but it will get you ready to attack all those tough data-reporting challenges.
Chapter 3 also introduces you to Galactic Delivery Services (GDS): what it does, how it is structured, and what its data processing systems look like. We use GDS and its business needs for all our sample reports throughout the book.