NOTE This chapter covers maintenance and optimization techniques for all the operating systems currently on the CompTIA A+ exams. But, like the exams and the reality of market share, Windows features a lot more than Mac OS X or Linux.
In this chapter, you will learn how to
• Perform operating system maintenance tasks
• Optimize operating systems
• Prepare for problems
Every computer running a modern operating system (OS) requires both occasional optimization to keep the system running snappily and ongoing maintenance to make sure nothing goes wrong. Microsoft, Apple, and the many Linux developers use decades of experience with operating systems to search for ways to make the tasks of maintaining and optimizing surprisingly easy and very automatic, but there’s still plenty to do to keep things humming along.
The chapter covers maintenance and optimization, so let’s make sure you know what these two terms mean. Maintenance means jobs you do from time to time to keep the OS running well, such as running hard drive utilities. CompTIA sees optimization as changes you make to a system to make it better—a good example is adding RAM. This chapter covers the standard maintenance and optimization activities performed on Windows, Mac OS X, and Linux, and the tools techs use to perform them.
NOTE This chapter covers maintenance and optimization techniques for all the operating systems currently on the CompTIA A+ exams. But, like the exams and the reality of market share, Windows features a lot more than Mac OS X or Linux.
Even the best maintained, most perfectly optimized computer is going to run into trouble. Hard drives crash, naïve coworkers delete files, and those super great new video card drivers sometimes fail. The secret isn’t to try to avoid trouble, because trouble will find you, but rather to make sure you’re ready to deal with problems when they arise. This is one area that very few users do well, and it’s our jobs as techs to make recovery from trouble as painless as possible. OS developers give us plenty of tools to prepare for problems—we just need to make sure we use them.
Maintaining modern operating systems can be compared to maintaining a new automobile. Of course, a new automobile comes with a warranty, so most of us just take it to the dealer to get work done. In this case, however, you are the mechanic, so you need to think as an auto mechanic would think. First, an auto mechanic needs to apply recalls when the automaker finds a serious problem. For a PC tech, that means installing the latest system patches released by Microsoft. You also need to maintain the parts that wear down over time. On a car, that might mean changing the oil or rotating the tires. In a Windows system, that includes keeping the hard drive and Registry organized and uncluttered. Mac OS X and Linux require a little less maintenance, but I’ll cover those needs as well.
There’s no such thing as a perfect operating system, and Windows is no exception. From the moment Microsoft releases a new version of Windows, malware attacks, code errors, new hardware, new features, and many other issues compel Microsoft to provide updates, known more generically as patches in the computing world, to the operating system. The process of keeping software updated in a safe and timely fashion is known as patch management. Microsoft’s primary distribution tool for handling patch management is a Control Panel applet called Windows Update. (This applies to Windows versions covered on the 901 exam, but not to Windows 10. Just FYI.)
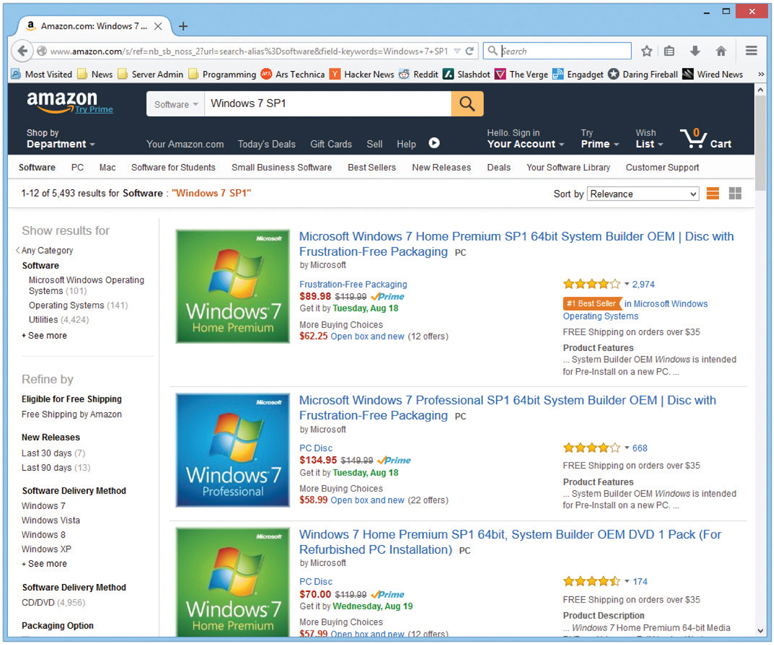
Windows Update separates the different type of fixes into distinct types: updates and service packs. Updates in Windows Vista and 7 are individual fixes that come out fairly often, on the order of once a week or so. Individual updates are usually fairly small, rarely more than a few megabytes. A service pack is a large bundle of updates plus anything else Microsoft might choose to add. Service packs are invariably large (hundreds of megabytes) and are often packaged with Windows, as shown in Figure 15-1.
Figure 15-1 Windows 7 with Service Pack 1
NOTE Windows Vista has two service packs: SP1 and SP2. Window 7 has one service pack: SP1. In Window 8, 8.1, and 10, updates have replaced the use of service packs.
With Windows 8 and later, Microsoft ditched the service pack terminology and uses only updates to indicate changes. Big updates get a revision number, like Windows 8 to Windows 8.1.

EXAM TIP You might be asked about installing service packs and updates on the CompTIA A+ exams. Pay attention to the steps listed here.
Windows Update checks your system, grabs the updates, and patches your system automatically. Even if you don’t want to allow Windows Update to run automatically, it’ll nag you about updates until you patch your system. Microsoft provides Windows Update for all versions of Windows.
NOTE Windows 8/8.1 offers two interfaces for Windows Update: one in Control Panel and one in the PC Settings app. In Windows 10, the Control Panel Windows Update app is gone and you will find the only Windows Update interface in the Settings app under Update and Security.
Windows Update can run automatically, so you’ll probably see new updates to install every time you open the applet. There are three common types of updates:
• Important These updates address critical security or stability issues and are the most critical. You can configure Windows Update to install these updates automatically.
• Recommended A recommended update is an added feature or enhancement that is not critical. You can configure Windows Update to install these updates automatically.
• Optional These include device drivers, language packs, and other nonessential updates. You must install these updates manually.
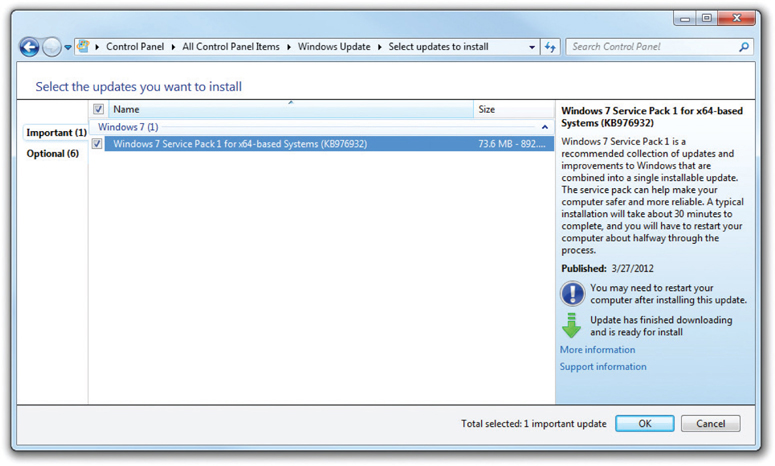
Figure 15-2 shows you what Windows Update looks like in Windows 7. Note that the Important update is Windows 7 Service Pack 1.
Figure 15-2 Windows Update in Windows 7
NOTE All Windows 10 updates download and install automatically by default and you cannot selectively choose individual updates to download.
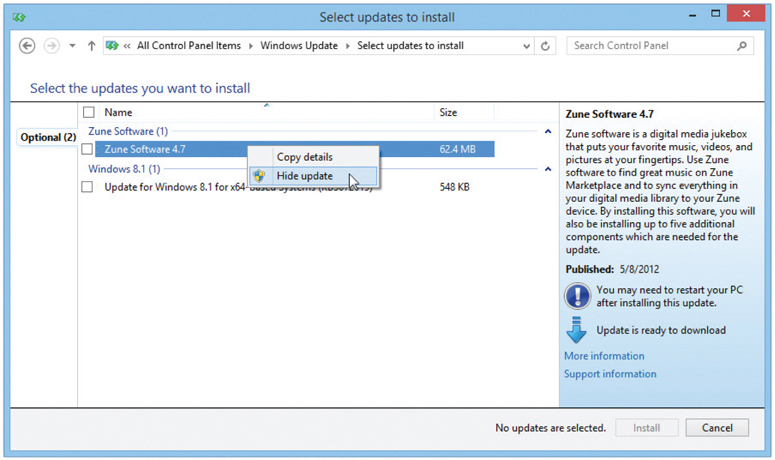
Installing an update is as easy as selecting the updates you want to install and clicking OK. If you don’t want to install a specific update, and don’t want to look at it every time you open Windows Update, you can hide it. To hide an update, right-click on the update you wish to hide and select Hide update (see Figure 15-3).
Figure 15-3 Hiding an update
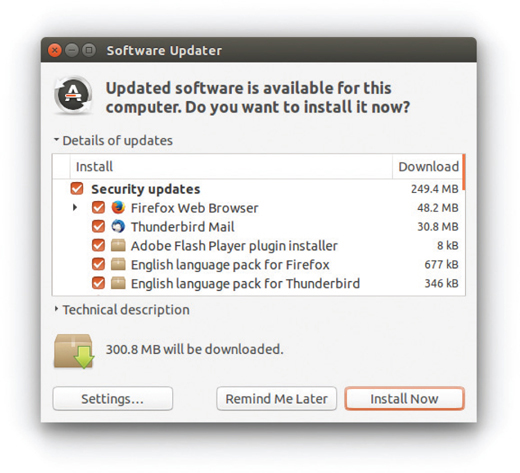
Both Mac OS X and Linux automatically alert you when software needs updating. With Mac OS X, you access updates through the App Store pane in System Preferences (see Figure 15-4). Most Linux distros have an updating tool like the Software Updater in Ubuntu (see Figure 15-5).
Figure 15-4 App Store update options
Figure 15-5 Software Updater in Ubuntu Linux
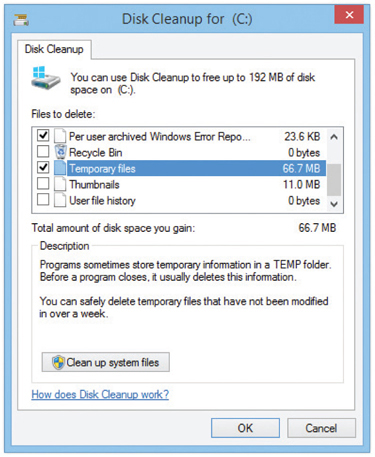
You should run the Disk Cleanup utility regularly to make sure you’ve cleared out the junk files that accumulate from daily use. All that late-night Web surfing doesn’t just use up time; it also uses up disk space, leaving behind hundreds of temporary Internet files. Those, and other bits and pieces (such as those “deleted” files still hanging around in your Recycle Bin), can add up to a lot of wasted drive space if you don’t periodically clean them out.
NOTE Disk Cleanup is part of System Tools. Remember how to access System Tools from Chapter 3, “The Visible Computer”?
When you click the Disk Cleanup button, the application first calculates the space you can free up and then displays the Disk Cleanup dialog box, which tells you how much disk space it can free up—the total amount possible as well as the amount you’ll get from each category of files it checks. Windows will also ask if you want to clean up all the files on the computer or just your files. In Figure 15-6, the list of files to delete has a couple of categories checked; also listed is the amount of disk space to be gained by allowing Disk Cleanup to delete these files. As you select and deselect choices, watch this value change.
Figure 15-6 Disk Cleanup dialog box
If you scroll down through the list, you will see a choice to compress old files. What do you know—Disk Cleanup does more than just delete files! In fact, this file compression trick is where Disk Cleanup really, uh, cleans up. This is one of the few choices where you will gain the most space. The other big heavyweight category is Temporary Internet Files, which Disk Cleanup will delete. Try Disk Cleanup on a computer that gets hours of Internet use every day and you’ll be pleased with the results.
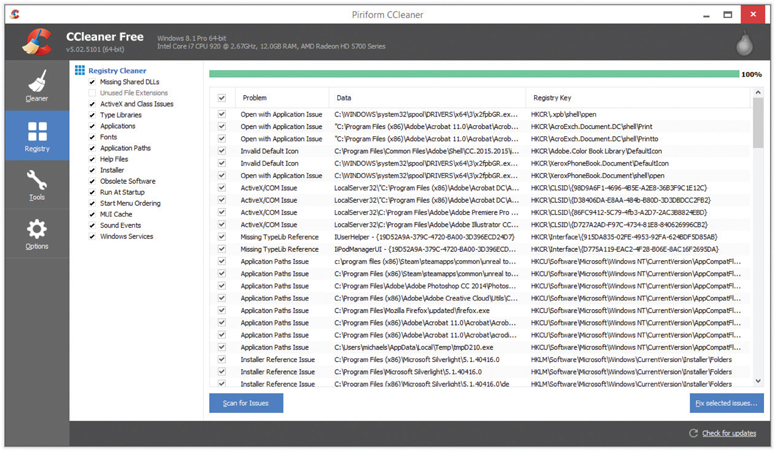
The Registry is a huge database that Windows updates every time you add a new application or hardware or make changes to existing applications or hardware. As a result, the Registry tends to be clogged with entries that are no longer valid. These usually don’t cause any problems directly, but they can slow down your system. Interestingly, Microsoft does not provide a utility to clean up the Registry. To clean your Registry, you need to turn to a third-party utility. Quite a few Registry cleaner programs are out there, but my favorite is the freeware CCleaner by Piriform (see Figure 15-7). You can download the latest copy at www.piriform.com/ccleaner/.
Figure 15-7 CCleaner Registry Cleaner
Before you start cleaning your Registry with wild abandon, keep in mind that all Registry cleaners are risky in that they may delete something you want in the Registry. Because Microsoft makes changes to the Registry for every version of Windows, make sure your utility supports the Windows version you’re running. This is especially true for any 64-bit version of Windows! I’ve used CCleaner for a while and it has worked well for me—your experience may differ.
NOTE CCleaner also helps clean all of the most common Web browsers and a number of popular applications.
Every modern OS has one or more utilities designed to maintain hard disk drives (HDDs) and solid-state drives (SSDs), though Windows requires a little more manual action than Mac OS X or Linux. Let’s look at all three.
EXAM TIP Performance-based exam questions will likely test your knowledge of the various OS-related tools listed in the CompTIA objectives and in this chapter. Given a scenario, be sure you know what tool to use, where to find it, and how to achieve the desired result.
Keeping drives healthy and happy is a key task for every tech. Error-checking and Disk Defragmenter, discussed way back in Chapter 10, “Implementing Hard Drives,” are the key Windows maintenance tools used to accomplish this task.
When you can’t find a software reason (and there are many possible ones) for a problem such as a system freezing on shutdown, the problem might be the actual physical hard drive. The tool to investigate that is Error-checking. You can run Error-checking by using the chkdsk command from an elevated command prompt. You can also access the tool through the GUI by opening Computer, Explorer, or File Explorer (depending on the OS), right-clicking on the drive you want to check, selecting Properties, and then clicking the Tools tab. Click Check now, or Check in Windows 8 forward, to have Error-checking scan the drive for bad sectors, lost clusters, and similar problems, and repair them if possible.
Disk Defragmenter (see Figure 15-8) should run on a regular basis to keep your system from slowing down due to files being scattered in pieces on your hard drive. Every current version of Windows runs Disk Defragmenter automatically by default on HDDs; SSDs do not require defragmenting.
Figure 15-8 Vista Disk Defragmenter
Error-checking and Disk Defragmenter are such critical maintenance features that you really should have them run automatically. Let’s glance at Mac OS X and Linux tools, then look at scheduling.
Mac OS X handles most chores automatically these days. Apple still includes the Disk Utility in Mac OS X, a disk maintenance utility/tool that used to be important for techs to run regularly. You’ll encounter veteran Apple folks who still run it to verify and repair file structures. The current version of the tool also enables you to partition and format drives, a useful feature with used external drives. (Wipe them and start fresh.)
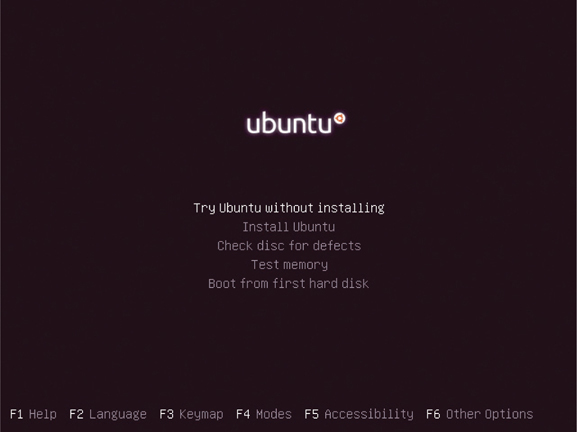
Just about every distro offers one or more disk maintenance utilities, plus you can download a ton of really good applications for free. The best option for most techs is to use the disk diagnostic tool on the installation DVD. Reboot with the installation media in the drive. In some installation discs, you’ll see a little keyboard icon that, when you press ENTER, shows you options to try, install, check disk for defects, test memory, and more (see Figure 15-9). Another option is to download the everything-but-the-kitchen-sink utility package, Ultimate Boot CD. Get it here: www.ultimatebootcd.com.
Figure 15-9 Ubuntu installation options, including one for disk diagnosis
Maintenance only works properly when you do it at regular intervals. Depending on the version of Windows installed, for example, you can schedule maintenance jobs to run automatically. The CompTIA A+ 220-902 exam objectives define two areas for you to consider for scheduled maintenance: backups and disk maintenance.
Current versions of Windows use a single Administrative Tool, Task Scheduler, to schedule maintenance. You can choose an executable program and define when you want that program to run. The key to running scheduled maintenance is to know the names of the executable programs and any special switches you may need to enter.
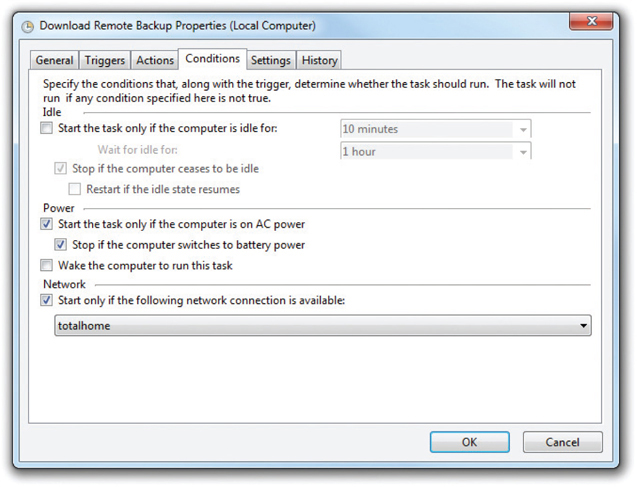
Task Scheduler divides tasks into triggers, actions, and conditions. Triggers are actions or schedules that start a program. Actions are steps that define both the program to run and how it is to run. Conditions are extra criteria that must be met for the program to run. (Is the system idle? Is it connected to the Internet?) Figure 15-10 shows the Conditions tab for a sample task. To create a basic task, all you need to do is name it, set how often it should run, and decide what it should do.
Figure 15-10 Conditions tab in Windows 7 Task Scheduler
Many Windows utilities include built-in scheduling options. Here’s the twist, though: they’re still using Task Scheduler. If you want to modify the automated defragmentation from within Disk Defragmenter, for example, you can open up Task Scheduler and see it listed as a scheduled task. Neat!
Mac OS X and most Linux distributions use one of two scripting tools to run all sorts of tasks automatically in the background. Apple developed launchd for automation; most Linux distros use the more universal and older cron. Although you can create custom launchd and cron jobs, the details on making custom scripts go way beyond CompTIA A+, so I’ll leave them out here. Just remember the names of the tools for the exam.
The backup utility varies depending on your version of Windows: in Windows Vista, it’s called the Backup and Restore Center; in Windows 7, it’s called Backup and Restore; Windows 8/8.1/10 use a tool called File History (although Windows 10 has a Backup and Restore tool as well). You’ll learn more about each of these tools later in the chapter, but right now, let’s talk about scheduling regular backups of your data, something necessary in Windows Vista and Windows 7.
Windows Vista/7’s Backup and Restore Center/Backup and Restore applet includes a scheduler, too. Near the end of the Set up backup Wizard, after you’ve selected which folders to back up, you can click on Change schedule to set when and how often you want Windows to create the backup. It’s that easy.
How often should you back up your files on the older versions of Windows? If you’re creating new documents, downloading music, and taking lots of digital photos, you’ll want to back up your files weekly. If you’re a casual, Internet-browsing, Solitaire-playing PC user, you’re probably safe making a new backup once a month.
NOTE You don’t need to schedule anything, really, on Mac OS X. Once you’ve set up Time Machine, you’re golden (see “Time Machine in Mac OS X,” later in the chapter).
The tool you know and love as Error-checking appears on the CompTIA A+ 220-902 exam objectives as CHKDSK (the command-line version of the tool, though it’s more properly written all lowercase, chkdsk, as we’ll refer to it). Regardless of what you call Error-checking, setting up Task Scheduler to run it automatically is a good thing according to CompTIA.
In a typical scenario today, only run chkdsk when you suspect a problem. Windows 8/8.1/10 don’t ever need the tool to run, automatically or manually. They do periodic tests of hard drives and will notify the user if errors are detected.
EXAM TIP You do not have to run any kind of scheduled drive maintenance on Mac OS X. In fact, Disk Utility doesn’t provide that option at all. The OS runs scans late at night regularly and either fixes any problems or makes you aware of them when you next access the Mac.
A lot of software loads when you boot up any computing device, such as small programs that provide support for the various functions of the operating system. These small programs are called processes and services. As you add applications and peripherals to a system, software loads automatically at startup. Most of the time these autostarting programs are welcome—you want that latest peripheral to work, right? Sometimes, though, autostarting programs cause problems and need to be stopped, either temporarily or from loading at all.
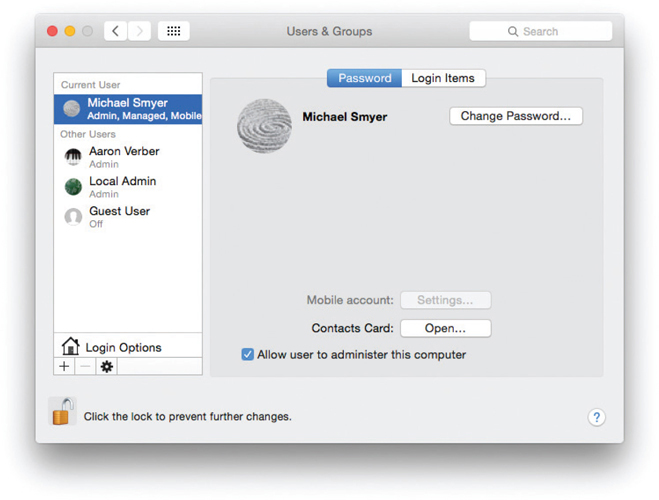
Every OS gives you the capability to stop autostarting applications, processes, and services. Windows has two tools, System Configuration and Task Manager. Apple discourages startup programs, but each user account will have certain login items that load. To manage those, use the Users & Groups pane in System Preferences. In Linux, check the Startup Applications folder for automatic programs.
Techs use the System Configuration utility (also known by its executable name, msconfig) in Windows Vista/7 to edit and troubleshoot operating system and program startup processes and services. From Windows 8 on, you can make these changes from Task Manager.
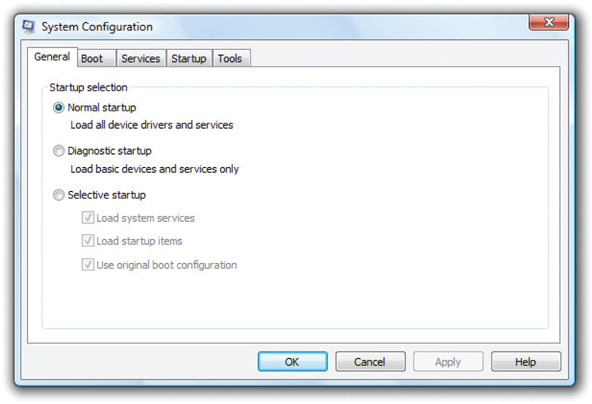
To start the System Configuration utility, go the Start | Search bar, enter msconfig, and click OK or press ENTER (see Figure 15-11). The program runs after you provide the necessary credentials, depending on the User Account Control (UAC) setup.
Figure 15-11 Windows Vista System Configuration utility
The System Configuration utility offers a number of handy features, distributed across the following tabs:
• General Select the type of startup you would like to use for the next boot. You can perform a normal startup with all programs and services launching normally, a diagnostic startup with only basic devices and services, or a custom boot.
• Boot This tab contains advanced boot features. Here you can see every copy of Windows you have installed, set a default OS, or delete an OS from the boot menu. You can set up a safe boot, or adjust advanced options like the number of cores or amount of memory to use. Selecting Safe boot, by the way, will force Windows to start in Safe mode on every reboot until you deselect it. Safe mode loads minimal, generic, trusted drivers and is used for troubleshooting purposes. It’s better to use the F5 key to get into Safe mode, but see Chapter 17, “Troubleshooting Operating Systems,” for troubleshooting issues.
• Services This tab is similar to the Services tab in the Task Manager. You can enable or disable any or all services running on your PC.
• Startup This tab enables you to enable or disable any startup programs (programs that load when you launch Windows). This is perhaps the most useful tab, especially if Windows is slow to load on your PC.
• Tools This tab lists many of the tools and utilities available in Windows, including Event Viewer, Performance Monitor, Command Prompt, and so on. There’s nothing here that you can’t find elsewhere in Windows, but it’s a handy list all the same.
Microsoft placed the Startup applications and services in Task Manager (press CTRL-SHIFT-ESC) in Windows 8/8.1/10. You can readily see the status (enabled or disabled) of each application and a handy guide to the Startup impact that program has (see Figure 15-12). As you might imagine, programs that require syncing of a lot of files across the Internet will have a higher impact than applications that just load local files.
Figure 15-12 Startup tab in Task Manager
To enable or disable an application, right-click and select one of those options. When you reboot the system next, the behavior of the application will be changed according to your previous action.

SIM Nervous about using Task Manager? Then try the Chapter 15 Click! sim to try your hand at killing a task without fear http://totalsem.com/90x.
In the Users & Groups pane of System Preferences, you can readily select or deselect any application that might load with specific user accounts (see Figure 15-13). There’s not a lot more to say about the process, so I’ll throw in some filler words for fun. Mac OS X is easy to use and maintain because Apple exercises extreme control over the platform.
Figure 15-13 Options in Users & Groups pane
NOTE You know the importance of users and groups in Windows from Chapter 14.
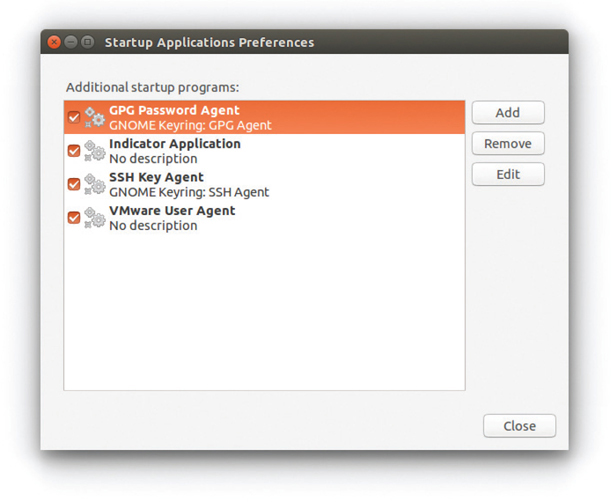
With Ubuntu Linux, you can access the Startup Applications preferences by searching. Click the Search button (top left of screen, on the Unity bar) and start typing Startup. When the Startup Applications preferences appears, click it. From there, you deselect the check box next to a program you don’t want to start at boot and you’re done (see Figure 15-14).
Figure 15-14 Disabling an autostarting program in Startup Applications
Windows comes with a handy built-in utility known as the System Information tool (see Figure 15-15) that collects information about hardware resources, components, and the software environment. When it finishes doing that, it provides a nice and tidy little report, enabling you to troubleshoot and diagnose any issues and conflicts. As with many other tools, you can access this tool from the Start | Search bar; simply enter msinfo32. The CompTIA A+ exams also refer to System Information by its executable, msinfo32.
Figure 15-15 System Information
It is also important to note that you can use System Information to gather information about remote computers by selecting View | Remote Computer and then entering the remote computer’s network machine name. Under Tools, you even get quick access to System Restore and the DirectX Diagnostic Tool, a tool for checking your video card that Chapter 19, “Display Technologies,” discusses.
Maintenance means keeping the performance of an OS from degrading with time and use. Of course, you don’t just want to keep trouble at bay—you want to make your systems better, stronger, faster! Anything you do that makes Windows better than it was before, such as adding a piece of software or hardware to make something run better, is an optimization.
Optimizing by installing and removing software is part of the normal life of any computing device. Each time you add or remove software, you make changes and decisions that can affect the system beyond whatever the program does, so it pays to know how to do it right.
If you can’t download or access an application over the Internet, it’ll probably arrive on an optical disc. Windows supports Autorun, known as AutoPlay in modern Windows operating systems, a feature that enables the operating system to look for and read a special file called—wait for it—autorun.inf. Immediately after a removable media device (optical disc or thumb drive) is inserted into your computer, whatever program is listed in autorun.inf runs automatically. Most application programs distributed on removable media have an autorun file that calls up the installation program.
To start an installation manually, double-click on the disc icon in Explorer, File Explorer, Finder, or the desktop. All OSs will scan the disc or other removable media for an executable file and run it.
The UAC in Windows complicates the installation process a bit. You will most likely be prompted by UAC when installing an application, giving you time to review what is happening to your system in case you did not intend to install the program. If you are using an administrator account, you can simply click Continue and finish the installation. Should you be logged in with a less privileged account, you will need to enter a user name and password of an account with administrative privileges. Some installers have trouble letting UAC know that they need more privileges and simply fail no matter what account you are logged in with. In those cases, it is best to right-click the installer icon and select Run as administrator to give the installer the access it expects from the start.
Assuming all is well, you typically must accept the terms of a software license before you can install an application. These steps are not optional; the installation simply won’t proceed until you accept all terms the software manufacturer requires and, in many cases, enter a correct code. You may also be asked to make several decisions during the installation process. For example, you may be asked where you would like to install the program and if you would like certain optional components installed. Generally speaking, it is best to accept the suggested settings unless you have a very specific reason for changing the defaults.
You have a couple of options for installing software in Mac OS X. The most common method involves the Mac App Store; the link is in System Preferences. Installing via the App Store is pretty much just like installing an app on a cell phone. You click the Install button, add some credentials, and the app installs.
Alternatively, you can download installation programs, often .dmg files, that you drag to the Applications folder. Mac OS X will prompt you to accomplish this goal.
Linux distros differ in the process of installing applications. A common way is to download an installation file, double-click it, and select Install from the options. Applications generally install into the Applications folder.
EXAM TIP Mac OS X and Linux require you to type in root credentials every time you install anything. Many times, you’ll get prompted a few more times for credentials before the installation completes.
Each installed application program takes up space on your computer’s hard drive, and programs that you no longer need waste space that could be used for other purposes. Removing unnecessary programs can be an important piece of optimization.
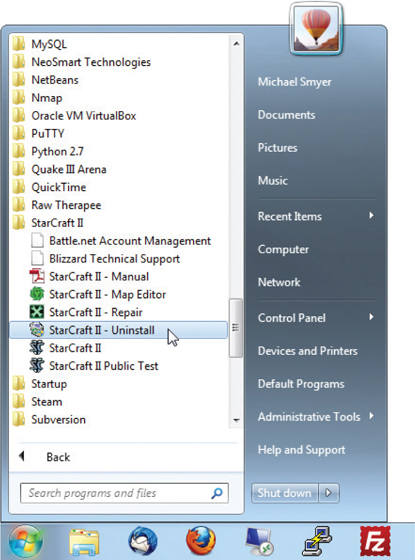
You remove a program from a Windows PC in much the same manner as you install it. That is, you use the application’s own uninstall program, when possible. You normally find the uninstall program listed in the application’s folder in the All Programs section of the Start menu, as shown in Figure 15-16.
Figure 15-16 Uninstall me!
If an uninstall program is not available, use the Programs and Features applet to remove the software (see Figure 15-17). You select the program you want to remove and click the Uninstall/Change button or Change/Remove button. Windows displays a message warning you that the program will be permanently removed from your PC. If you’re certain you want to continue, click Yes.
Figure 15-17 Programs and Features applet
NOTE The Uninstall/Change and Change/Remove buttons change depending on the program. Not all programs can be changed.
You may then see a message telling you that a shared file that appears to no longer be in use is about to be deleted, and asking your approval. Generally speaking, it’s safe to delete such files. If you do not delete them, they will likely be orphaned and remain unused on your hard disk forever. In some cases, clicking the Uninstall/Change or Change/Remove button starts the application’s install program (the one you couldn’t find before) so you can modify the installed features. This is a function of the program you’re attempting to remove. The end result should be the removal of the application and all of its pieces and parts, including files and Registry entries.
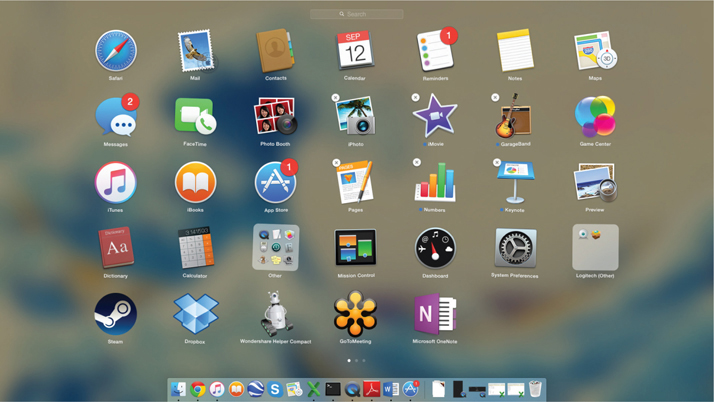
Uninstalling applications in Mac OS X varies based on how they were installed. Mac Store apps are removed very similarly to apps on a cell phone. First, open the Launchpad app from the Dock or Applications folder (it looks like a rocket ship), then click and hold on any app icon until all the icons start to wiggle. An × in a circle will appear on the upper left of any app that can be removed (see Figure 15-18). Click the × to remove the app. If you accidentally remove an app you wanted, you can re-download it from the Mac App Store.
Figure 15-18 Uninstalling App Store–purchased applications using the Launchpad app
For all other Mac OS X apps, removing them comes down to two options. Drag the app to the Trash or run the uninstaller if the app came with one. Of the two, the first option of just deleting the app is the most common, with a dedicated uninstaller only being available for some of the larger (and often cross-platform) apps like Photoshop. Be aware that deleting an app can leave behind various files on the system, most often a few user preference files and other customizations in the user’s Library folder.
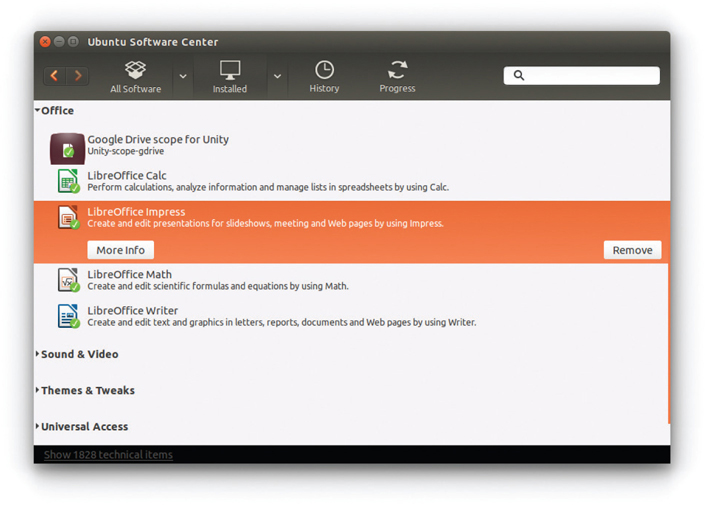
Removing software in mainstream Linux distros is just as easy as installing it. Open the software manager, find the app, and then click Remove (see Figure 15-19). The underlying package manager, which we’ll work with directly in Chapter 16, “Working with the Command-line Interface,” will handle all the deleting and cleanup for you.
Figure 15-19 Removing an application in Ubuntu Linux
When you installed Windows, it included certain features by default. It installed Notepad, network support, and games on your computer. You can remove these Windows components from your system if you like, and add other components as well.
Open the Programs and Features applet in the Control Panel, and then click the Turn Windows features on or off option on the Tasks list. Click Continue if prompted by UAC and you will be presented with the Windows Features dialog box (see Figure 15-20). To toggle a feature on or off, simply click its checkbox.
Figure 15-20 Windows Features dialog box
The processes for optimizing hardware in Windows are absolutely identical between the versions, even down to the troubleshooting utilities, and are very similar to the steps for installing a new device. The installation process is covered in every chapter of this book that deals with one type of device or another. You should also recall the optimization and troubleshooting processes you read about specifically way back in Chapter 7. (Refer to that chapter to refresh your memory if any of the following steps don’t seem crystal clear.) So, these are the important steps/action items:
• Update the drivers, usually from the manufacturer’s Web site.
• Verify that the device works properly.
• If the drivers prove buggy, use the driver rollback feature to restore the older drivers.
• Never run beta drivers.
The textbook version of this book has a classroom feature called a “Cross Check” where students examine older sections of the book in light of the current section. This completely applies right now in this book too! Check Chapter 7, “Motherboards,” and make sure you can answer these questions: What’s the update process? Does Windows provide any assistance? Where can you verify a working device? What do you need to select to roll back a driver? Enquiring minds want to know!
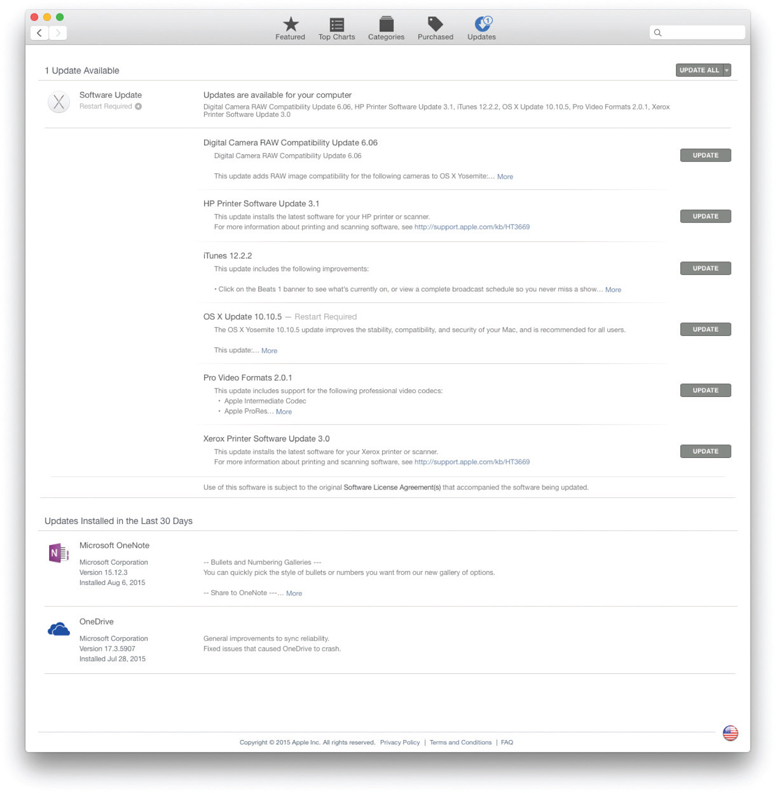
Mac OS X will notify you about available system updates that contain driver updates for built-in components. Make a quick trip to the App Store to get updates installed (see Figure 15-21). If the system has third-party devices, like a Wacom tablet, you will need to manually check and update any drivers for those devices.
Figure 15-21 App Store showing an available update
Most Linux distros regularly check for updates and will signal any new updates. Download and install the updates using the Software Updater.
You’ve worked with Device Manager in other chapters when installing and troubleshooting devices; it’s also the tool to use when optimizing device drivers. Right-click on a device in Device Manager to display the context menu. From here you can update or uninstall the driver, disable the device, scan for hardware changes, or display the Properties dialog box. When you open the Properties dialog box, you’ll see several tabs that vary according to the specific device. Most have General, Driver, Details, and Resources. The tab that matters most for optimization is the Driver tab.
The Driver tab has buttons labeled Driver Details, Update Driver, Roll Back Driver, Uninstall, and Disable. Most of these you’ll recall from Chapter 7. Driver Details lists the driver files and their locations on disk.
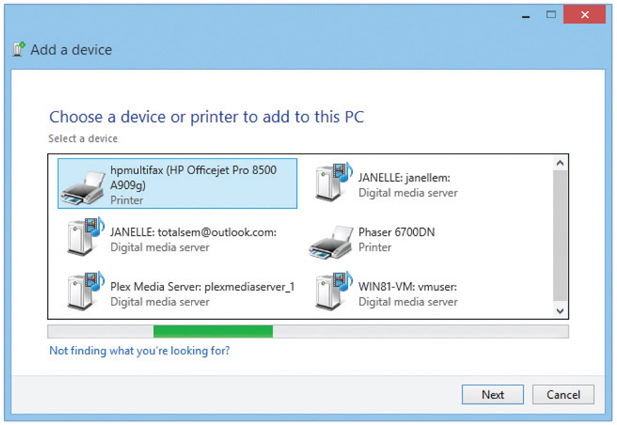
Windows should automatically detect any new device you install in your system. If Windows does not detect a newly connected device, use Windows Vista’s Add Hardware wizard, which you can find in the Add Hardware applet, or the Add a device option in the Devices and Printers applet in Windows 7/8/8.1/10 to get the device recognized and drivers installed (see Figure 15-22).
Figure 15-22 Adding a device in Windows 8.1
Windows almost completely automates the Add Hardware/Add a device wizards. The wizards present you with a list of detected hardware.
One optimization you can perform on all Windows versions is setting Performance Options. Performance Options are used to configure CPU, RAM, and virtual memory (page file) settings. To access these options right-click Computer or This PC and select Properties, and then click the Advanced system settings link in the Tasks list. On the Advanced tab, click the Settings button in the Performance section.
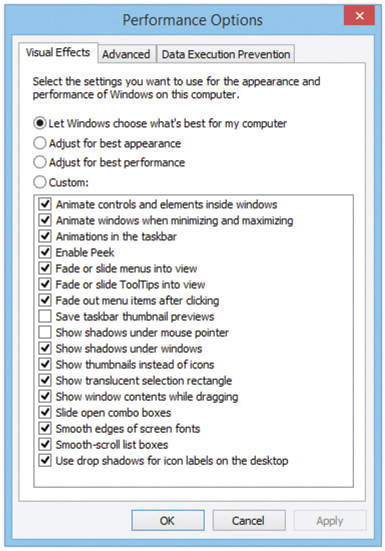
The Performance Options dialog box has three tabs: Visual Effects, Advanced, and Data Execution Prevention (see Figure 15-23). The Visual Effects tab enables you to adjust visual effects that impact performance, such as animations, thumbnails, and transparencies. Try clicking the top three choices in turn and watch the list of settings. Notice the tiny difference between the first two choices (Let Windows choose what’s best for my computer and Adjust for best appearance). The third choice, Adjust for best performance, turns off all visual effects, and the fourth option is an invitation to make your own adjustments.
If you’re on a computer that barely supports Windows, turning off visual effects can make a huge difference in the responsiveness of the computer. For the most part, though, just leave these settings alone.
Figure 15-23 Windows 8.1 Performance Options dialog box
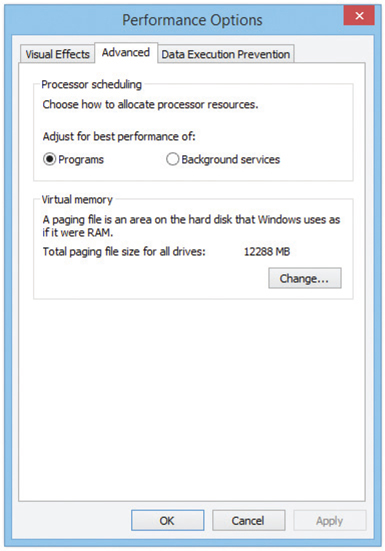
The Advanced tab, shown in Figure 15-24, has two sections: Processor scheduling and Virtual memory. Under the Processor scheduling section, you can choose to adjust for best performance of either Programs or Background services. The Virtual memory section of this tab enables you to modify the size and location of the page file.
Figure 15-24 Advanced tab of Performance Options dialog box
Data Execution Prevention (DEP) works in the background to stop viruses and other malware from taking over programs loaded in system memory. It doesn’t prevent viruses from being installed on your computer, but makes them less effective. By default, DEP is only enabled for critical operating system files in RAM, but the Data Execution Prevention tab enables you to have DEP turned on for all running programs. It works, but you might take a performance hit or find that some applications crash with it enabled for all programs. Like other options in Performance Options, leaving the default DEP settings is the best option most of the time.
Techs need to prepare for problems. You must have critical system files and data backed up and tools in place for the inevitable glitches. Every modern operating system has options for backing up data and, as you might imagine, they all offer different features. Windows offers System Restore to recover from problems, too. Let’s take a look.
The most important data on your computer is the personal data: your documents, e-mail messages and contacts, Web favorites, photographs, and other files. To handle backing up personal data, every version of Windows comes with some form of backup utility. Mac OS X and Linux of course have backup tools as well.
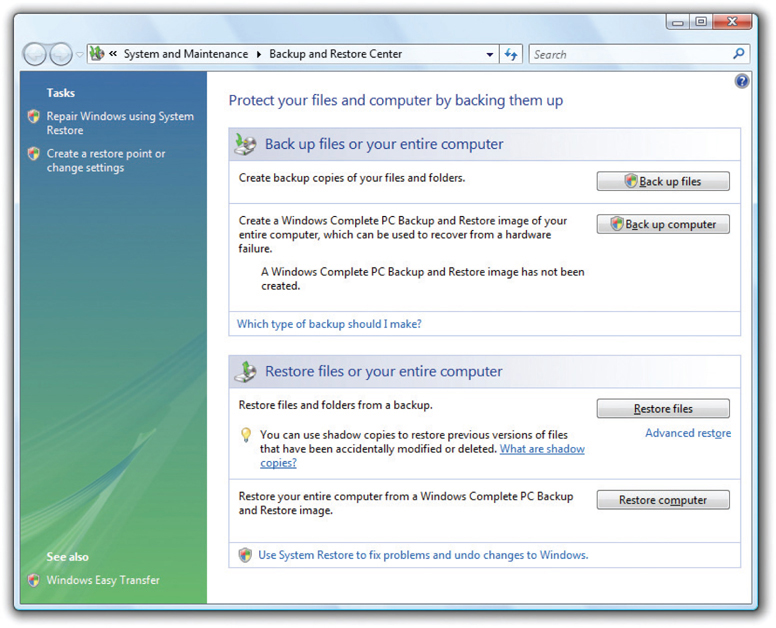
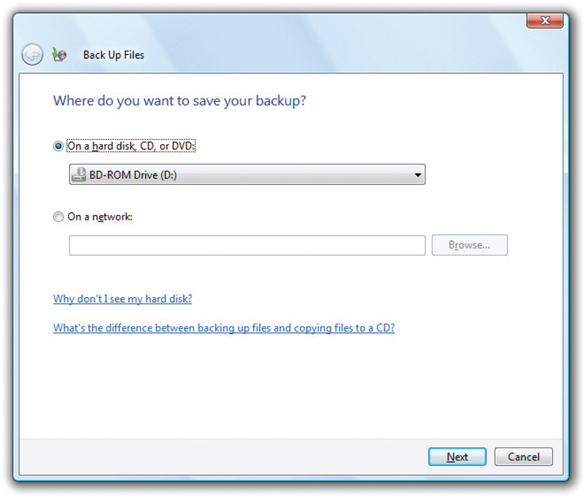
Microsoft includes the automated and simple Backup and Restore Center (Windows Vista) and Backup and Restore (Windows 7) Control Panel applets. In Windows Vista, you can either back up files or back up your computer (see Figure 15-25). Both choices will first ask you where you want to store the backup (see Figure 15-26).
Figure 15-25 Backup options in Vista
Figure 15-26 Backup location in Vista
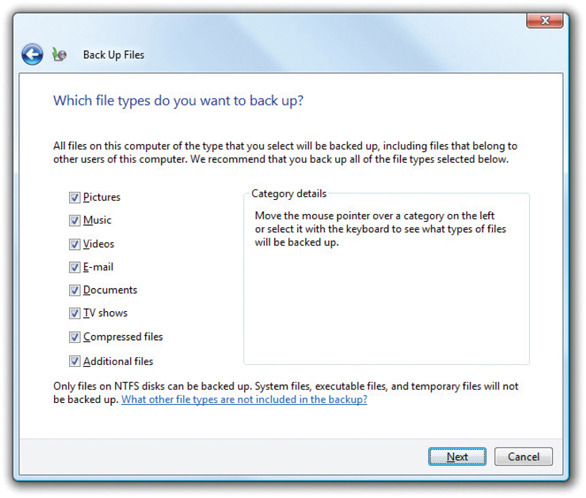
As the name implies, the Back up computer option backs up your entire computer to a system image. All you need to do is pick a destination for the image (optical drive, hard drive, or network location) and Windows takes care of the rest. Choosing the Back up files option is another matter entirely. Clicking this button reveals the screen shown in Figure 15-27.
Figure 15-27 Types of files to back up
The Back up files option in Vista only enables you to back up personal information for all users. If you want to back up any installed applications, or even Windows itself, don’t bother using the Back up files option that comes with Vista.
EXAM TIP Windows will not back up content stored on non-NTFS volumes.
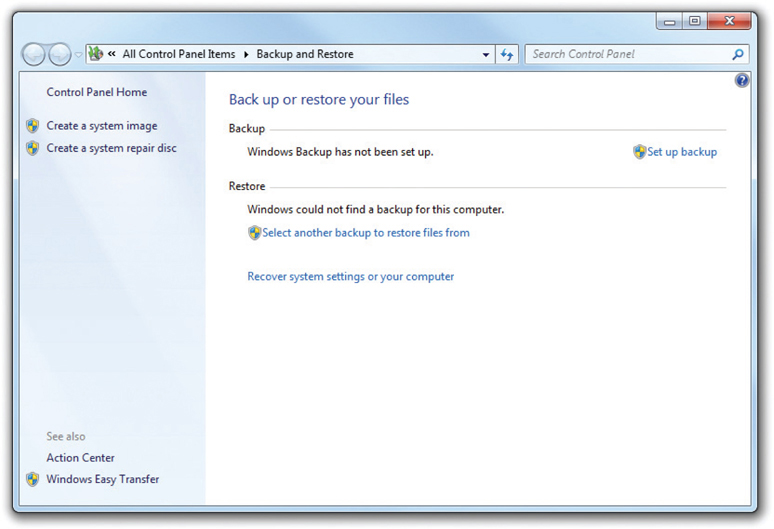
Windows 7’s Backup and Restore utility includes a number of noteworthy improvements over Windows Vista’s. First of all, Microsoft changed the look of the main screen (see Figure 15-28).
Figure 15-28 Windows 7 Backup and Restore
Clicking the Set up backup link in Windows 7 opens a dialog box asking you to choose your backup location—very similar to Vista’s backup. After selecting your backup location and clicking Next, you then see the screen shown in Figure 15-29.
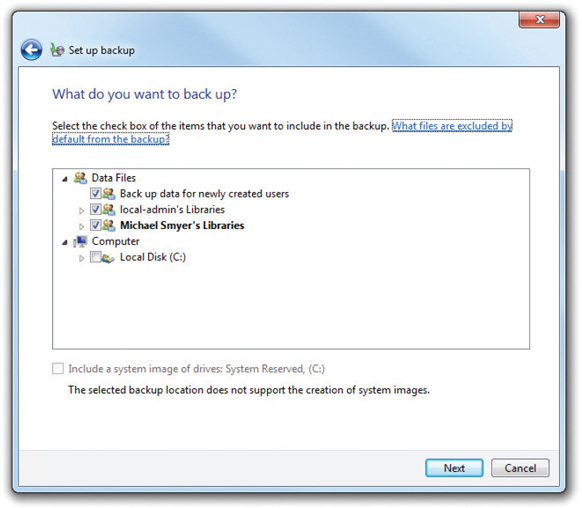
Figure 15-29 What do you want to back up?
If you select Let Windows choose (recommended), you’ll get a backup similar to the Vista backup, but with one very important difference. You’ll back up each user’s personal data, but Windows 7 doesn’t stop there. Assuming you have enough space in your backup location, Windows 7 will automatically add a system image that includes the entire Windows operating system, every installed program, all device drivers, and even the Registry.
Selecting Let me choose is equally interesting. Unlike Vista’s selection, Windows 7 enables you to pick individual users’ files to back up (see Figure 15-30).
Figure 15-30 Backup showing a list of users
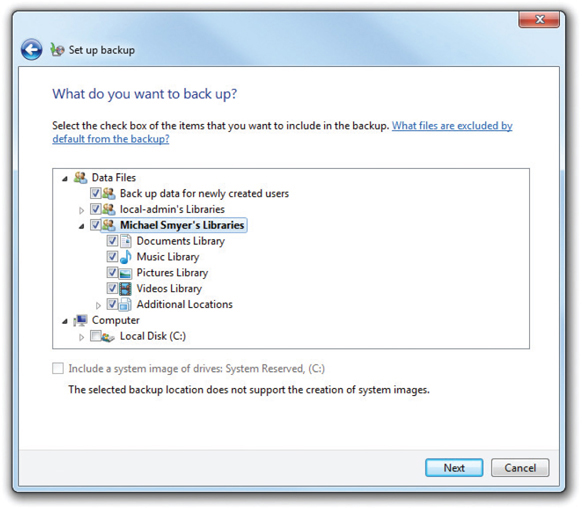
By selecting a user, you can choose libraries or the user’s personal folders to back up, as shown in Figure 15-31. Also note the checkbox that gives you the option to make a system image, just as if you selected the Let Windows choose (recommended) option.
Figure 15-31 Single user, showing some of the user’s libraries/folders
Once you complete the wizard, Windows starts backing up your files. While the backup runs, you can monitor its status with an exciting and handy progress bar (see Figure 15-32). If you can’t handle that much excitement, you can close the backup window while the OS backs up files. The process can take a long time, many hours with a modern system with a large hard drive.
Figure 15-32 Backup in progress…
NOTE You can also choose to create just a system image in Windows 7. From the Backup and Restore applet, select Create a system image. It works like the system image function in Windows Vista.
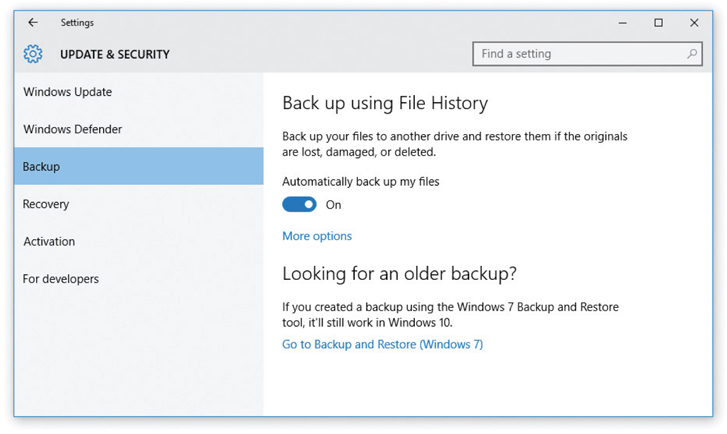
Microsoft introduced the robust File History Control Panel applet in Windows 8 that enables aggressive backup of personal files and folders (see Figure 15-33). File History requires a second drive and is not enabled by default. You can use any type of HDD or SSD as the second drive, internal or external. (You could choose to back up to a second partition on the same drive, I suppose, but what would be the point?) Enable File History and start backing up your Libraries, Desktop, Contacts, and Favorites right now.
Figure 15-33 Windows 10 File History
Note that File History won’t back up all your personal files unless you either add them to the default Libraries or create custom Libraries. Also, File History does not replace full system backups at all. To back up your system, select the System Image Backup option (lower left option in File History) to open the Windows 7–era Backup and Restore tool. Create a full backup to another (larger) drive.
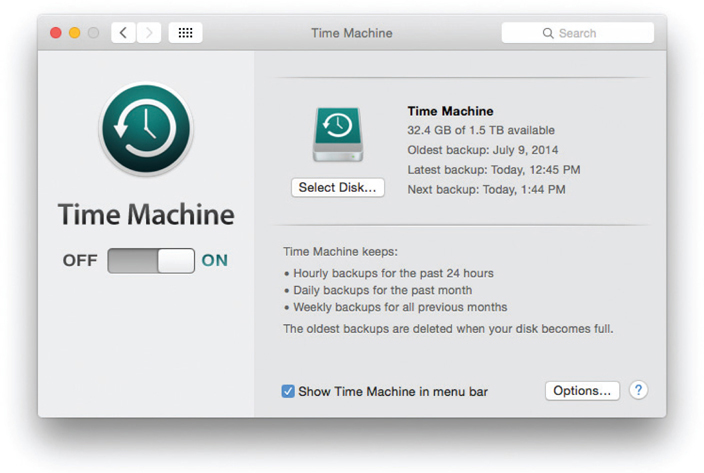
Mac OS X provides the excellent Time Machine to create full system backups (see Figure 15-34). These backups are called local snapshots. Time Machine enables you to recover some or all files in the event of a crash; it also enables you to restore deleted files and recover previous versions of files. Time Machine requires an external HDD or SSD, or you can use a shared network drive. Find Time Machine in System Preferences.
Figure 15-34 Time Machine
Different Linux distros offer different tools for backing up files, folders, and drives. Ubuntu Linux uses Déjà Dup, although it goes by the name Backups in System Settings (see Figure 15-35). Déjà Dup will happily back up your files to wherever you tell it, such as an external drive, network share, or even a folder on your main hard drive (not recommended if you care about your files!). Déjà Dup backs up a user’s Home folder by default; that’s where most users store all personal documents. Déjà Dup will store files and versions of files permanently, as long as the storage location has sufficient space.
Figure 15-35 Backups under System Settings in Ubuntu
Every technician has war stories about the user who likes to add the latest gadget and cool software to his computer. Then he’s amazed when things go very, very wrong: the system locks up, refuses to boot, or simply acts weird. This guy also can’t remember what he added or when. All he knows is that you should be able to fix it—fast.
The System Restore tool enables you to create a restore point, a snapshot of your computer’s configuration at a specific point in time. If you later crash or have a corrupted OS, you can restore the system to its previous state.
System Restore makes a number of restore points automatically. To make your own restore point, right-click Computer or This PC and select Properties, and then click the System protection link in the Tasks list. On the System Protection tab, click the Create button to open the dialog box shown in Figure 15-36. Name your restore point appropriately and then click Create.
Figure 15-36 Creating a manual restore point in Windows
If you click the System Restore button on the System Protection tab, you might be surprised at how many system restore points have already been made for you automatically (see Figure 15-37).
Figure 15-37 Restore points in Windows
The System Restore tool creates some of the restore points automatically, including every time you install new software. Thus, if installation of a program causes your computer to malfunction, simply restore the system to a time point prior to that installation, and the computer should work again.
During the restore process, only settings and programs are changed. No data is lost. Your computer includes all programs and settings as of the restore date. This feature is absolutely invaluable for overworked techs. A simple restore fixes many user-generated problems.
To restore to a previous time point, start the System Restore Wizard in System Tools.
You don’t have to count on the automatic creation of restore points. You can open System Restore at any time and simply select Create a restore point. Consider doing this before making changes that might not trigger an automatic restore point, such as directly editing the Registry.
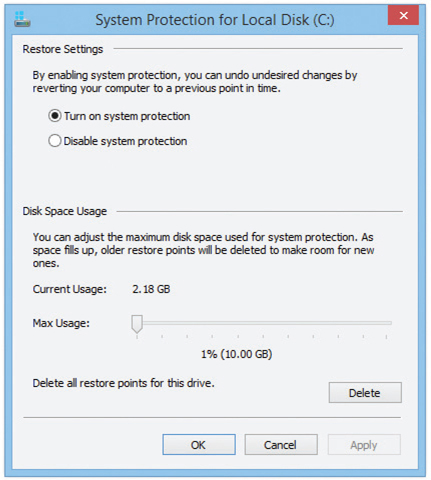
System Restore is turned on by default and uses some of your disk space to save information on restore points. To turn System Restore off or change the disk space usage, right-click Computer or This PC and select Properties, and then click the System protection link in the Tasks list. On the System Protection tab, click the Configure button to change System Restore configuration settings (see Figure 15-38).
Figure 15-38 System Restore settings and Disk Space Usage options
1. What tool enables you to modify which programs start when Windows 7 starts?
A. msstartup
B. msinfo32
C. msconfig
D. ipconfig
2. What tool enables you to modify which programs start when Windows 8.1 starts?
A. msstartup
B. msinfo32
C. msconfig
D. Task Manager
3. What does System Information do?
A. Provides you with a report about the hardware resources, components, and software environment in your computer
B. Enables you to select which programs and services start when Windows boots up
C. Enables you to schedule hard drive defragmentation, chkdsk scans, and other computer tasks
D. Enables you to perform automatic custom backups of your files and settings
4. What tool enables you to correct a corrupted Windows operating system by reverting your computer to a previous state?
A. Windows Restore
B. Restore State Manager
C. Time Machine
D. System Restore
5. What is Data Execution Prevention (DEP)?
A. A technology that prevents viruses from taking over programs loaded in system memory
B. A technology that enables you to set permissions for different users on your computer
C. A technology that prevents programs from being installed on your computer
D. A technology that prevents files from being written to your hard drive
6. If you install a driver on your system and it causes problems, which tool can you use to roll back to a previous driver?
A. Driver Manager
B. msconfig
C. Device Manager
D. System Info
7. When performing automatic updates, Windows 7 uses which feature to download additional updates for other Microsoft products?
A. Software notifications
B. msinfo32
C. Microsoft Update
D. Registry
8. Joan recently bought a new gamepad and used the Add a Device wizard to install it, but it still won’t work. What should she do next? (Select two.)
A. Check the manufacturer’s Web site for updated drivers
B. Run the Automated System Recovery tool to return the PC to a functioning state
C. Use a restore point in System Restore to return the PC to a functioning state
D. Run Windows Update to search for new drivers
9. What tool is used in Mac OS X to perform full system backups?
A. AppleBack
B. Users and Groups
C. Time Machine
D. System Preferences Backup
10. What feature included in Windows 8, 8.1, and 10 allows you to regularly back up your important files and folders?
A. System Configuration
B. Backup and Restore
C. AutoPlay
D. File History
1. C. msconfig enables you to select the programs and services that start with Windows Vista or Windows 7.
2. D. Task Manager enables you to modify the applications and services that start with Windows 8 and later.
3. A. System Information gives you a wide variety of information about your system.
4. D. Using System Restore, you can restore your computer to a previous restore point.
5. A. Data Execution Prevention prevents viruses from taking control of programs loaded into memory.
6. C. The Roll Back Driver option in Device Manager is a great tool for fixing driver problems.
7. C. Windows uses the Microsoft Update feature to download additional updates for other Microsoft products, such as Microsoft Office.
8. A, D. Joan should check both the manufacturer’s Web site and Windows Update for the latest drivers.
9. C. Mac OS X uses Time Machine to perform full system backups.
10. D. File History is an awesome backup tool included with Windows 8, 8.1, and 10. It enables you to perform backups of important files and folders regularly.