CHAPTER 16
Working with the Command-Line Interface
In this chapter, you will learn how to
• Explain the operation of the command-line interface in Windows, Mac OS X, and Linux
• Manipulate files from the command line
• Execute fundamental commands from the Windows command line
• Execute fundamental commands from the Mac OS X and Linux Terminal
Whenever I teach a class of new techs and we get to the section on working with the command line, I’m invariably met with a chorus of moans and a barrage of questions and statements like “Why do we need to learn this old stuff?” and “Is this ritualistic hazing appropriate in an IT class?”
For techs who master the interface, the command line provides a powerful, quick, and flexible tool for working on a computer. Learning that interface and understanding how to make it work is not only useful, but also necessary for all techs who want to go beyond baby-tech status. You simply cannot work on modern computers without knowing the command line! I’m not the only one who thinks this way. The CompTIA A+ 220-902 certification exam tests you on a variety of command-line commands, both in Windows and Linux, for doing everything from renaming a file to rebuilding a system file.
If you’re interested in moving beyond Windows and into other operating systems such as Linux, you’ll find that pretty much all of the serious work is done at a command prompt. Even Mac OS X supports a command prompt.
The command prompt is popular for three reasons. First, if you know what you’re doing, you can do most jobs more quickly by typing a text command than by clicking through a graphical user interface (GUI). Second, a command-line interface (CLI) doesn’t take much operating system firepower, so it’s the natural choice for jobs where you don’t need or don’t want a full-blown GUI for an OS. Third, text commands take very little bandwidth when sent across the network to another system.
So, are you sold on the idea of the command prompt? Good! This chapter gives you a tour of the Windows and Linux command-line interfaces, explaining how they work and what’s happening behind the scenes. You’ll learn the concepts and master essential commands, and then you’ll work with files and folders. A good tactic for absorbing the material in this chapter is to try out each command or bit of information as it’s presented. If you have some experience working with a command prompt, many of these commands should be familiar to you. If the command line is completely new to you, please take the red pill and join me as we step into the matrix.
902
Deciphering the Command-Line Interface
So how does a command-line interface work? It’s a little like having a Facebook Messenger conversation with your computer. The computer tells you it’s ready to receive commands by displaying a specific set of characters called a prompt. Here’s an example of a generic prompt:

You type a command and press ENTER to send it:
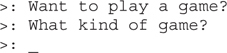
The PC goes off and executes the command, and when it’s finished, it displays a new prompt, often along with some information about what it did:
Once you get a new prompt, it means the computer is ready for your next instruction. Running commands from the command line is similar to clicking icons in the operating system’s GUI. The results are basically the same: you tell the computer to do something and it responds.
Try This!
Opening Windows GUI Programs from the Command Prompt
Keep in mind as you go through this chapter that the command line is just another tool for communicating with the operating system. Windows responds whether you click or type and sometimes does both, so try this! At a command prompt, type notepad and press ENTER. What happens? The graphical program Notepad opens up, just as if you’d double-clicked its icon. Here’s another: type explorer and press ENTER. Voilà! Windows Explorer or File Explorer loads. Windows just responds.
Shells
The command prompt, like a GUI, is just another way to interface with a computer. The command line interprets input and sends it to the OS in a form the OS understands, and then shows the results. The tool that interprets input is called the command-line interpreter, also known as the shell. The default Windows shell is cmd.exe. On Mac OS X and on most Linux distros, the default shell is called bash. While most operating systems have only one GUI, that’s not the case with the shell. Every operating system has the ability to interface with different types of shells. On Mac OS X and Linux, it’s easy to replace bash with popular shells with names like Z shell (zsh), Korn shell (ksh), and C shell (csh). In Windows you can replace cmd.exe with PowerShell. It’s a standard right of nerd passage to start experimenting with these alternative shells.
Accessing the Command-Line Interface in Windows
You access the command-line interface in Windows by starting the shell program cmd.exe. We touched on accessing the CLI in Chapter 3, “The Visible Computer,” but let’s develop this procedure in a bit more detail here.
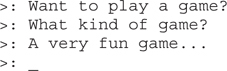
A common way to access the command-line interface is through the Start menu (Windows Vista and 7) or the Start screen’s Search bar (Windows 8/8.1). In Windows Vista/7, from the Start menu type cmd (see Figure 16-1) and press ENTER to start the command prompt.
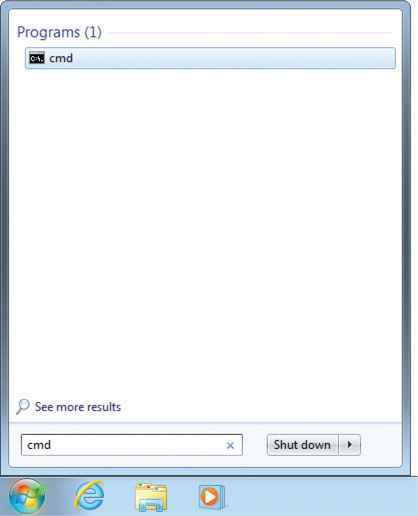
Figure 16-1 Starting the command prompt in Windows 7
In Windows 8/8.1, the search is a bit more hidden, but just start typing cmd from the Start screen. The Search charm will appear with the full command (see Figure 16-2). Press ENTER.
Figure 16-2 Starting the command prompt in Windows 8.1
A Command Prompt window pops up on your screen with a black background and white text—welcome to the Windows command-line interface (see Figure 16-3). To close the CLI, you can either click the Close box in the upper-right corner, as on any other window, or simply type exit and press ENTER.
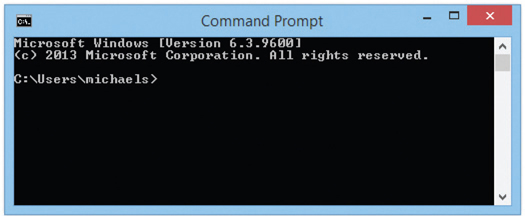
Figure 16-3 The Windows 8.1 command-line interface
If you attempt to enter a command that requires elevated or administrative privileges at the Windows command prompt, you’ll receive a UAC “Windows needs your permission to continue” dialog box. (You learned about UAC in Chapter 14, “Users, Groups, and Permissions.”) You can also manually run a command with elevated privileges by right-clicking a command-prompt shortcut and then selecting Run as administrator. If you are prompted for the administrator password or credentials, enter whatever is needed.
Accessing the Command-Line Interface in Mac OS X and Linux
The command line in Mac OS X and Linux functions virtually identically. This isn’t too surprising given that they both are based on UNIX. The terminal emulator in OS X has a specific name, Terminal. The many distros of Linux use different emulators, such as konsole and gnome-terminal. To make things easy, we’ll use the command-line interface in Ubuntu Linux, conveniently also called Terminal.
To open Terminal in Mac OS X, either launch the Terminal app from the Utilities folder (located in the Applications folder) or activate Spotlight (COMMAND-SPACEBAR), type terminal, and press ENTER to bring up the Mac OS X Terminal (see Figure 16-4).
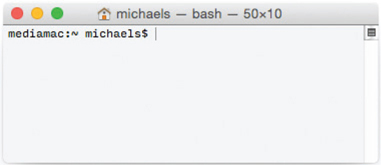
Figure 16-4 Mac OS X Terminal
The way to open a terminal emulator in Linux varies depending on the Linux distribution (distro) you use. Generally, every desktop-focused Linux distro has some form of finder or search function on the desktop that works similarly to the search tools in Mac OS X and Windows. Find this tool and then type in terminal to start the program. This brings up the terminal window as shown in Figure 16-5.
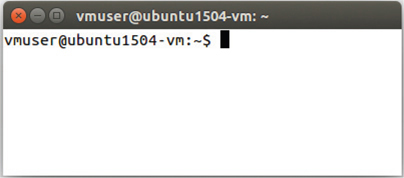
Figure 16-5 Linux Terminal
Both Mac OS X and Linux give you the ability to run the command line with advanced privileges, called super user or root privileges. Even though Mac OS X and Linux advanced privileges function is equivalent to the elevated privileges in Windows, they handle this elevation quite differently. First, open Terminal. Whenever you need to run a command as root, type sudo followed by the desired command. The system will prompt for a password and then run the command.
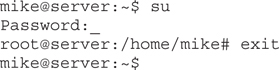
If the system doesn’t have sudo, it should have its older cousin su. With su, you typically type su at the prompt and press ENTER; you will then be prompted for the root password. Once you have successfully entered the password, the prompt will change (usually changing the character at the end from a $ to a #) and every command you enter from then on will be executed as root. When you finish working as root, type exit and press ENTER. Terminal won’t close like before, but you will return to a normal prompt. You can see how the prompt changes in the following example.
The Command Prompt
Regardless of what shell you use, the command prompt always focuses on a specific folder, the working directory, usually indicated by the prompt. The OS executes commands in the specified folder unless otherwise directed. Here’s an example of focus. In Windows, if you see a prompt that looks like the following line, you know that the focus is on the root directory of the C: drive:

In Mac OS X and Linux the prompt is subtly different, but functionally the same. First of all, Mac OS X and Linux systems don’t use the Windows drive lettering concept; all forms of storage are simply mounted as folders. Second, Linux prompts show the currently logged-on user and system as well as the current directory. Third, Mac OS X and Linux use a forward slash (/) instead of a backslash (\). This prompt shows user mike is on the “server” system and is in the home directory:

In Windows, if you see a prompt that looks like Figure 16-6, you know that the focus is on the \Diploma\APLUS\ folder of the C: drive. The trick to using a command line is first to focus the prompt on the drive and folder where you want to work.
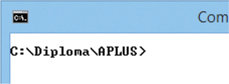
Figure 16-6 Command prompt indicating focus on the C:\Diploma\APLUS\folder
Closing the Terminal
Closing a command prompt is easy and is done the exact same way in both Windows and OS X and Linux. At the prompt just type exit. The terminal window will disappear.

Filenames and File Formats
All operating systems manifest each program and piece of data as an individual file. Each file has a name, which is stored with the file on the drive. Names are broken down into two parts: the filename and the extension. In the early days of PCs, Microsoft used a file system that dictated the filename could be no longer than eight characters. The extension, which was optional, could be up to three characters long. The filename and extension are separated by a period, or dot. Here’s an example of an old-style filename:

The “8.3” format does not apply to modern operating systems. Here are some examples of acceptable filenames:

Whether you’re running Windows, Mac OS X, or Linux, the extension is very important as it’s the filename’s extension that tells the operating system what type of program uses this data. This is called the file’s association. For example, Microsoft Word is associated with any file that has the extension .docx or .doc. PowerPoint uses .pptx or .ppt. Graphics file extensions, in contrast, often reflect the graphics standard used to render the image, such as .gif for CompuServe’s Graphics Interchange Format or .jpg for the JPEG (Joint Photographic Experts Group) format.
Changing the extension of a data file does not affect its contents, but without the proper extension, your operating system won’t know which program uses it. Figure 16-7 shows a folder with two identical image files. The one on the right shows a thumbnail because Windows recognizes this as a JPEG image; the one on the left shows a generic icon because I deleted the extension. Windows’ GUI doesn’t show file extensions by default, but Mac OS X and most Linux distros do.
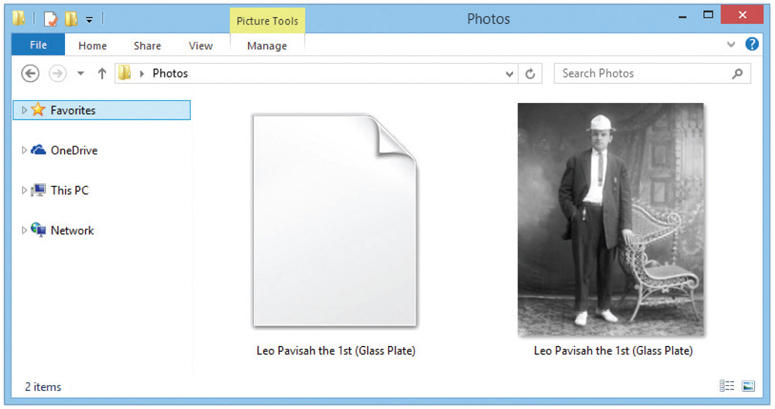
Figure 16-7 What kind of file is the one on the left?
Drives and Folders
When working from the command line, you need to be able to focus the prompt at the specific drive and folder that contains the files or programs with which you want to work. This can be a little more complicated than it seems.
Before we get too deep here, let’s review what we know from Chapter 10, “Implementing Hard Drives.” Windows assigns drive letters to each hard drive partition (except the system partition) and to every recognized form of mass storage. Hard drive partitions usually start with the letter C:. Optical drives by default get the next available drive letter after the last hard drive partition. On top of that, you can mount a hard drive as a volume in another drive.
Mac OS X and Linux don’t use the idea of drive letters. Instead, the boot partition is defined as the root drive, shown as just a slash: /. All other storage—partitions, optical discs, thumb drives, and so on—must go through a process called mounting to enable the OS to just treat them as folders. These folders are most often mounted to a single folder off the root drive called /mount or /media in Linux and /Volumes in Mac OS X.
Whatever the names of the drives, all operating systems use a hierarchical directory tree to organize the contents of these drives. All files are put into groups called folders, although you’ll often hear techs use the term directory rather than folder. Any file not in a folder within the tree—that is, any file in the folder at the root of the directory tree—is said to be in the root directory. A folder inside another folder is called a subfolder. Any folder can have multiple subfolders. Two or more files with the same name can exist in different folders on a PC, but two files in the same folder cannot have the same name. In the same way, no two subfolders under the same folder can have the same name, but two subfolders under different folders can have the same name.
When describing a drive in Windows, you use its letter and a colon. For example, the hard drive would be represented by C:. To describe the root directory, put a backslash (\) after the C:, as in C:\. To describe a particular directory, add the name of the directory. For example, if a PC has a directory in the root directory called Test, it is C:\Test. Subdirectories in a directory are displayed by adding backslashes and names. If the Test directory has a subdirectory called System, it is shown like this: C:\Test\System. This naming convention provides for a complete description of the location and name of any file. If the C:\Test \System directory includes a file called test2.txt, it is C:\Test\System\test2.txt.
The exact location of a file is called its path. The path for the test2.txt file is C:\Test \System. Here are some examples of possible Windows paths:
Mac OS X and Linux also use paths. However, folder names are separated by a forward slash (/) instead of the backslash as used by Windows. Also, Windows and Mac OS X are not case sensitive, while Linux is. For example, in Linux it’s perfectly acceptable to have two folders called “Mike” and “mike” inside the same folder. Windows does not allow this. Here are some examples of Mac OS X and Linux paths:
Mac OS X and Linux prompts show your folder location a bit differently than Windows. Generally, your default prompt is pointing at the /home/<username>/ folder. However, by default Mac OS X and Linux do not show that path. They only show a tilde, ~, as follows:

The ~ is really just a shorthand for your users folder; in this case it means you are in /home/mike. Yes, a little confusing, but welcome to UNIX! Mac OS X and Linux provide a handy utility, pwd, that tells you exactly where you are if you’re unsure:

Here are a few items to remember about folder names and filenames:
• Folders and files may have spaces in their names.
• The only disallowed characters in Windows are the following eleven: * “ / \ [ ] : ; | = ,
• In Mac OS X and Linux the only disallowed character is a forward slash: /
• Files aren’t required to have extensions, but in most cases the OS won’t know the file association type without an extension.
Mastering Fundamental Commands
It’s time to try using the command line, but before you begin, a note of warning is in order: the command-line interface is picky and unforgiving. It will do what you say, not what you mean, so it always pays to double-check that those are one and the same before you press ENTER and commit the command. One careless keystroke can result in the loss of crucial data, with no warning and no going back. In this section, you’ll explore the structure of commands and then play with basic commands to navigate and manipulate your OS’s folder structure.
Structure: Syntax and Switches
All commands in every command-line interface use a similar structure and execute in the same way. You type the name of the command, followed by the target of that command and any modifications of that command that you want to apply. You can call up a modification by using an extra letter or number, called a switch or option, which may follow either the command or the target, depending on the command. The proper way to write a command is called its syntax. The key with commands is that you can’t spell anything incorrectly or use a \ when the syntax calls for a /. The command line is almost completely inflexible, so you have to learn the correct syntax for each command.

or

How do you know what switches are allowed? How do you know whether the switches come before or after the target? If you want to find out the syntax and switches used by a particular command, in Windows type the command followed by /? to get help:

In Mac OS X or Linux, type the command man (manual) followed by the command you’re interested in:

When you are done reading the manual, press the Q key to quit back to the prompt.
Viewing Directory Contents: dir and ls
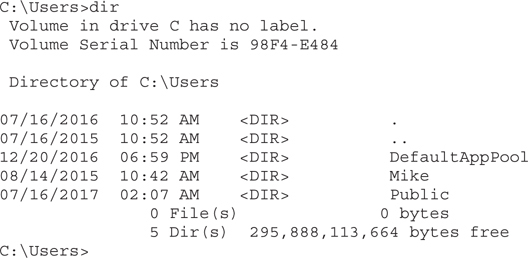
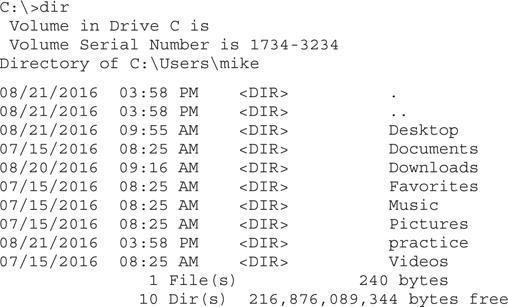
The Windows dir command and the Mac OS X and Linux ls command show you the contents of the directory where the prompt is focused. If you’re like most techs, you’ll use dir or ls more often than any other command at the command prompt. When you open a command-line window in Windows, it opens focused on your user folder. You will know this because the prompt looks like C:\Users\User name>. By typing dir and then pressing the ENTER key (remember that you must always press ENTER to execute a command from the command line), you will see something like this:
The default prompts in Linux don’t show the full path, but on my Ubuntu Linux system, typing ls shows the following in the mike user’s Home folder:

If you are following along on a PC, remember that different computers contain different files and programs, so you will absolutely see something different from what’s shown in the previous example. If a lot of text scrolls quickly down the screen in Windows, try typing dir /p (pause). Don’t forget to press ENTER. The dir /p command is a lifesaver when you’re looking for something in a large directory. Just press SPACEBAR to display the next screen.
In Mac OS X and Linux, you can get the same result as dir /p by typing ls | more. The | symbol is called a pipe. You are telling the OS to take the output of ls and, instead of sending it directly to the screen, “pipe” it through a second command called more. The pipe command works in all three operating systems and is incredibly powerful. You’ll see lots more of the pipe command later in this chapter.
Some commands give you the same result whether you include spaces or not. Typing dir/p and dir /p, for example, provides the same output. Some commands, however, require spaces between the command and switches. In general, get into the habit of putting spaces between your command and switches and you won’t run into problems.
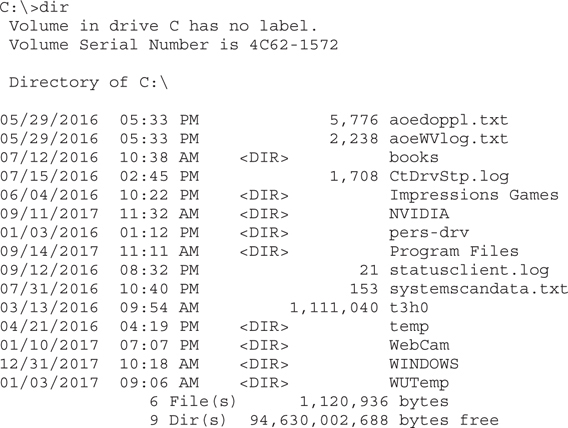
dir Command
When you type a simple dir command, you will see that some of the entries look like this:

All of these entries are files. The dir command lists the creation date, creation time, file size in bytes, filename, and extension.
Any entries that look like this are folders:

The dir command lists the creation date, creation time, <DIR> to tell you it is a folder, and the folder name.
Now type the dir /w command. Note that the dir /w command shows only the filenames, but they are arranged in five columns across your screen. Finally, type dir /? to see the screen shown in Figure 16-8, which lists all possible switches for the command.
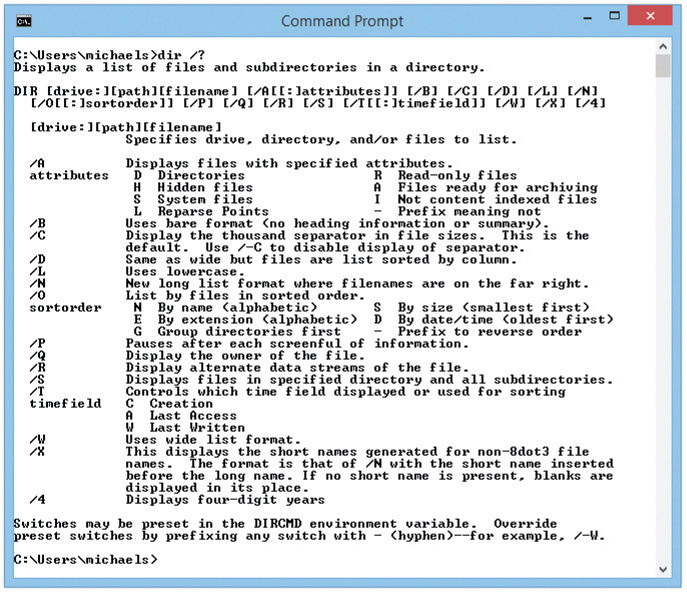
Figure 16-8 Typing dir /? in Windows lists all possible switches for the dir command.
ls Command
The ls command, like most UNIX commands, is very powerful and contains over 50 different switches. For now let’s just cover one of the more important ones: –l.
Using ls with the –l switch, which stands for long listing, gives detailed information about all the files:

We’ll discuss this output in more detail as we continue through the chapter.
Windows help screens sometimes seem a little cryptic and Mac OS X and Linux help screens are often impossibly hard to read. Still, they’re useful when you’re not too familiar with a command or you can’t figure out how to get a command to do what you need. Even though I have many commands memorized, I still refer to these help screens; you should use them as well. If you’re really lost, type help at the command prompt for a list of commands you may type.
Changing Directory Focus: The cd Command
The cd command works in every operating system, although there are differences between Windows and Mac OS X and Linux. You can use the cd command to change the focus of the command prompt to a different directory. To use the cd command, type cd followed by the name of the directory on which you want the prompt to focus. For example, in Windows, to go to the Obiwan directory in the root directory, you type cd \obiwan and then press ENTER. If the system has an Obiwan directory there, the prompt changes focus to that directory and appears as C:\Obiwan>. If no Obiwan directory exists or if you accidentally type something like obiwam, you get the error “The system cannot find the path specified.” If only I had a dollar for every time I’ve seen those errors! I usually get them because I’ve typed too fast. If you get this error, check what you typed and try again.
To return to the root directory, type cd \ and press ENTER. You can use the cd command to point the prompt to any directory. For example, you could type cd obiwan\my \hope from a C:\ prompt, and the prompt would change to C:\Obiwan\my\hope>—assuming, of course, that your system has a directory called C:\Obiwan\my\hope.
Once the prompt has changed, type dir again. You should see a different list of files and directories. Every directory holds different files and subdirectories, so when you point the prompt to different directories, the dir command shows you different contents.
Changing directory focus in Mac OS X/Linux is similar to doing so in Windows but you use a / instead of a \. Using the same example just shown for Windows, from the root directory you type cd /Obiwan. To go to the /obiwan/my/hope directory you type cd /obiwan/my/hope.
In the previous examples we have been using what are known as absolute paths, meaning we have been typing out the entire path of a directory we are changing to. This might work OK for an ancient DOS system from the ’80s, but it’s way too much work to move around in today’s deeply nested directory trees.
That’s where relative paths come in handy; instead of starting the path with a \, you can just type the name of the directory. For example, you could go to the C:\Obiwan directory from the root directory simply by typing cd obiwan at the C:\> prompt. You can then move one level at a time, like this:
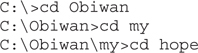
Or, you can jump multiple directory levels in one step, like this:

These tricks also work for Mac OS X and Linux, but of course you always use a forward slash instead of a backslash as needed:

A final trick: if you want to go up a single directory level, you can type cd followed immediately by two periods. So, for example, if you’re in the C:\Obiwan\my directory and you want to move up to the C:\Obiwan directory, you can simply type cd .. and you’ll be there:

Take some time to move the prompt focus around the directories of your PC, using the cd and dir commands. Use dir to find a directory, and then use cd to move the focus to that directory. Remember, cd \ (or cd / in Mac OS X and Linux) always gets you back to the root directory.
Moving Between Drives
Windows and Mac OS X and Linux have very different techniques for moving between drives, given that Windows uses drive letters while Mac OS X and Linux do not. Let’s start with Windows and then we’ll take a look at Mac OS X and Linux.
Moving Between Drives in Windows
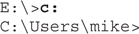
The cd command is not used to move between Windows’ drive letters. To get the prompt to point to another drive (“point” is command-line geekspeak for “switch its focus”), just type the drive letter and a colon. If the prompt points at the C:\Users\mike directory and you want to see what is on the USB thumb drive (E:), just type e: and the prompt will point to the USB drive. You’ll see the following on the screen:
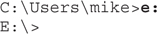
To return to the C: drive, just type c: and you’ll see the following:
Note that you return to the same directory you left. Just for fun, try typing in a drive letter that you know doesn’t exist. For example, I know that my system doesn’t have a W: drive. If I type in a nonexistent drive on a Windows system, I get the following error:

Try inserting an optical disc or a thumb drive and using the cd command to point to its drive. Type dir to see the contents of the optical disc. Type cd to move the focus to any folders on the optical disc. Now return focus to the C: drive.
Using the dir, cd, and the drive letter commands, you can access any folder on any storage device on your system. Make sure you can use these commands comfortably to navigate inside your computer.
Moving Between Drives in Mac OS X and Linux
So if Mac OS X and Linux don’t use drive letters, how do you access your other drive partitions, optical media, thumb drives, and so on? Well, all media is mounted as a folder, but the location of those folders is going to vary by the OS. In Mac OS X, you need to look in the /Volumes folder. In Ubuntu Linux, you need to look in the /mnt folder for drives and the /media/<user name> folder for removable media. In other Linux distributions, well, you’re going to have to explore—good thing you know how to use the cd and ls commands, eh? The following commands show my optical drive and a thumb drive in a Ubuntu Linux system:

Making Directories: The md/mkdir Command
Now that you have learned how to navigate in a command-prompt world, it’s time to start making stuff, beginning with a new directory.
To make a directory, use the md command in Windows. Alternatively, you can use the mkdir command, which works in all operating systems and is identical to md. In Windows, to create a directory called practice under your user’s folder, for example, open a new command prompt window or cd to your users folder at \Users\<your username>. You should see the prompt

Now that the prompt points to the C:\Users\mike directory, type md practice to create the directory:

Once you press ENTER, Windows executes the command, but it won’t volunteer any information about what it did. You must use the dir command to see that you have, in fact, created a new directory. Note that the practice directory in this example is not listed last, as you might expect.
What about distinguishing between uppercase and lowercase? Windows displays both in file and folder names but rarely makes any distinction with commands—which is a nice way to say that Windows doesn’t support case. For clarity, try using the md command to make a folder called Practice (note the uppercase) and see what happens. This also happens in the graphical Windows. Go to your desktop and try to make two folders, one called files and the other called FILES, and see what Windows tells you.
To create a files subdirectory in the practice directory, first use the cd command to point the prompt to the practice directory:

Then run the md command to make the files directory:

When you’re finished, type dir to see the new Files subdirectory. Just for fun, try the process again and add a games directory under the practice directory. Type dir to verify success.
Creating folders in Mac OS X and Linux is again identical, but you must use the mkdir command. Here is the same example just given but done on my Ubuntu system:

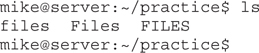
You can see the results by running the ls command:

Don’t forget that Linux and Mac OS X are case sensitive. Check out the results of these three different folders, all different capitalizations of “files”:
Removing Directories: The rd Command
Removing subdirectories works exactly like making them. First, get to the directory that contains the subdirectory you want to delete, and then execute either the rmdir or rd command. Both of these commands are functionally identical, but where they work is important. The rmdir command works equally well in both Windows and Mac OS X and Linux, but the rd command only works in Windows.
So, with that in mind, let’s get rid of some folders. It’s actually quite simple. In this example, let’s use Linux as an example to delete the Files subdirectory in our ~/practice directory (remember ~ means your home directory). First, get to where the files directory is located—~/practice—by typing cd practice (make sure you’re in your home directory first). Then type rmdir files. If you received no response, you probably did it right! Type ls to check that the Files subdirectory is gone. Windows works exactly the same, although we tend to use the rd command more often, simply because it’s faster to type.
The rmdir/rd command alone will not delete a directory if the directory contains files or subdirectories. If you want to delete a directory that contains files or subdirectories, you must first empty that directory. However, Windows folks can use the rd command followed by the /s switch to delete a directory as well as all files and subdirectories. The rd command followed by the /s switch is handy but dangerous, because it’s easy to delete more than you want. There is no Recycle Bin when deleting from the command line, so when deleting, always follow the maxim “Check twice and delete once.”
Let’s delete the practice and games directories with rd followed by the /s switch. Because the practice directory is in your home directory, point to it with cd \Users\<your username>. Now execute the command rd practice /s. In a rare display of mercy, Windows responds with the following:

Press the Y key and both C:\Users\mike\practice and C:\Users\mike\practice\games are eliminated.
Want to remove a folder and all of its contents in Linux? No problem, but we don’t use rmdir. Instead we turn to the very handy rm command. With the same scenario just presented, type the rm command with the –r switch as shown:

Try This!
Working with Directories
PC techs should be comfortable creating and deleting directories. To get some practice, Try This!
1. Create a new directory in your home directory by using the make directory command (md). At the command prompt from your home directory, make a directory called Jedi:

2. As usual, the prompt tells you nothing; it just presents a fresh prompt. Do a dir (that is, type the dir command) to see your new directory. Windows creates the new directory wherever it is pointing when you issue the command, whether or not that’s where you meant to put it. To demonstrate, point the prompt to your new directory by using the cd command:

3. Now use the make directory command again to create a directory called Yoda:

Do a dir again, and you should see that your Jedi directory now contains a Yoda directory.
4. Type cd .. to go up one level and return to your home directory so you can delete your new directories by using the remove directory command (rd):

In another rare display of mercy, Windows responds with the following:

5. Press Y to eliminate both Jedi and Jedi\Yoda.
6. Using a Mac OS X or Linux system, repeat this entire process using the mkdir, cd, and rm commands.
Running a Program in Windows
To run a program from the Windows command line, simply change the prompt focus to the folder where the program is located, type the name of the program, and then press ENTER. Try this safe example. Go to the C:\Windows\System32 folder—the exact name of this folder is pretty standard on all Windows systems, but your mileage may vary. Type dir /p to see the files one page at a time. You should see a file called mmc.exe (see Figure 16-9).

Figure 16-9 The mmc.exe program listed in the System32 folder
As mentioned earlier, all files with extensions .exe and .com are programs, so mmc.exe is a program. To run the mmc.exe program, just type the filename, in this case mmc, and press ENTER (see Figure 16-10). Note that you do not have to type the .exe extension, although you can. Congratulations! You have just run another application from the command line.
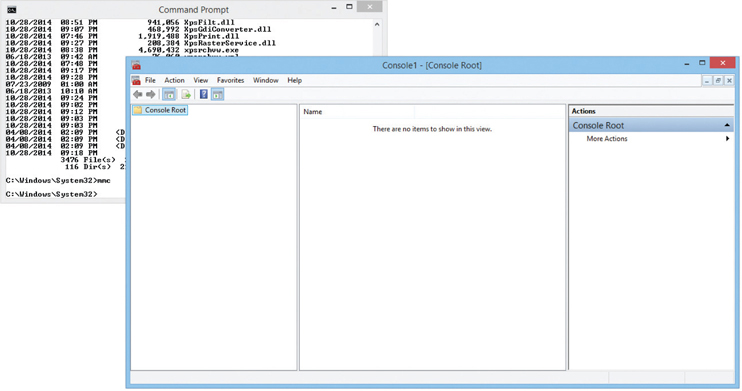
Figure 16-10 Running mmc in Windows
Running a Program in Mac OS X and Linux
As much as I like to tell folks how similar Mac OS X, Linux, and Windows command lines are, they are very different in some areas, one of which is how you run executable programs from the command line. For starters, Mac OS X and Linux executable programs don’t rely on any kind of extension such as .exe in Windows. Instead, any file, whether it’s compiled code or a text file, can be given the property of executable, as shown in Figure 16-11.
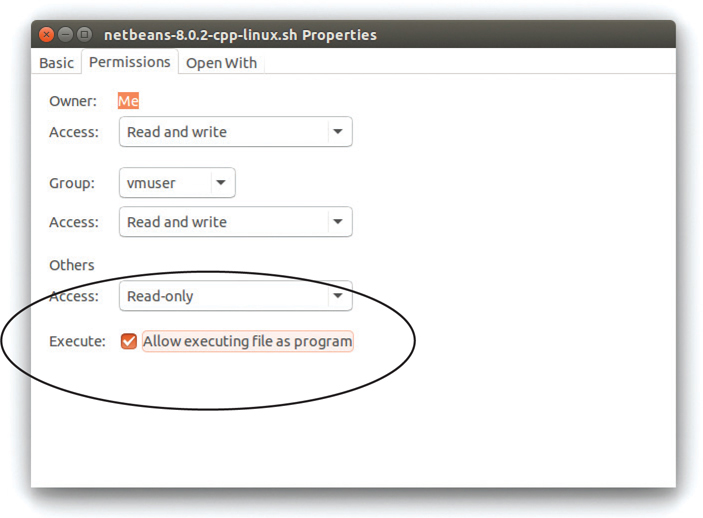
Figure 16-11 Showing file properties in Ubuntu
So it’s really up to the person using the program to verify they are even using a program. One does not just start programs haphazardly in Mac OS X or Linux. You make a point to know your executable before you run it.
Mac OS X and Linux help you in the command line when it comes to executables. First of all, Mac OS X and almost all versions of Linux come with color-coded command lines, as shown in Figure 16-12 (although you can’t really tell because the book is in black and white). In this particular version the executable files are colored green.

Figure 16-12 Color-coded files in Ubuntu, helpfully displayed in black and white
Mac OS X and Linux have two very different types of executable file types: built-in and executables. Built-in programs are like the ones you see in Figure 16-12: commands you’ve just learned such as ls, mkdir, and rm are all individual executable programs. To run a built-in program you just type it in as you have already done many times in this chapter.
Executable programs are programs that are, well, not built in. If you download a program from somewhere (and Linux people do this a lot), you first unzip the program and then run the program. But there’s one problem. If you try to run it, Linux can’t find it, even though it is in the exact folder you are running it from! Interestingly, this is by design. When you run a program from a Linux command line, Linux first looks through a series of folders called the path (not to be confused with the other type of path discussed earlier). You can see the path by typing the command echo $PATH:

In order to make Linux run the executable, you need to add a period and a slash (./, commonly called “dot-slash”) in front of the executable to make it run:

Working with Files
This section deals with basic file manipulation. You will learn how to look at, copy, move, rename, and delete files. The examples in this section are based on a C: root directory with the following files and directories:
Because you probably don’t have a PC with these files and directories, follow the examples but use what’s on your drive. In other words, create your own folders and copy files to them from various folders currently on your system.
Using Wildcards to Locate Files
Visualize having 273 files in one directory. A few of these files have the extension .docx, but most do not. You are looking only for files with the .docx extension. Wouldn’t it be nice to be able to type the dir command in such a way that only the .docx files come up? You can do this by using wildcards.
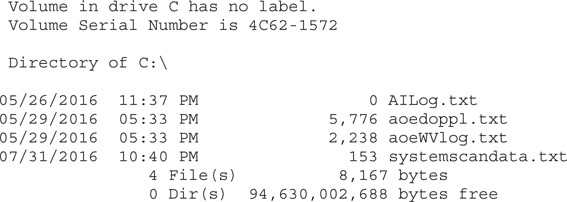
A wildcard is one of two special characters—asterisk (*) and question mark (?)—that you can use in place of all or part of a filename, often so that a command-line command will act on more than one file at a time. Wildcards work with all command-line commands that take filenames. A great example is the dir command. When you execute a plain dir command, it finds and displays all of the files and folders in the specified directory; however, you can also narrow its search by adding a filename. For example, if you type the command dir ailog.txt while in your root (C:\) directory, you get the following result:

If you just want to confirm the presence of a particular file in a particular place, this is very convenient. But suppose you want to see all files with the extension .txt. In that case, you use the * wildcard, like this: dir *.txt. A good way to think of the * wildcard is “I don’t care.” Replace the part of the filename that you don’t care about with an asterisk (*). The result of dir *.txt would look like this:
Wildcards also substitute for parts of filenames. This dir command will find every file that starts with the letter a:
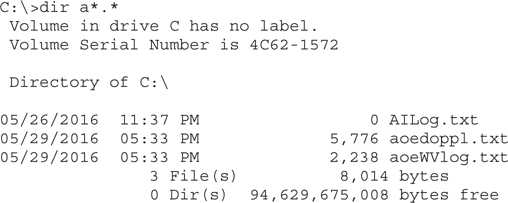
Wildcards in Mac OS X and Linux work basically the same as in Windows. Head over to the /bin directory on a typical Linux system (it’s so full of files) and try using a wildcard with the ls command. Let’s find everything that starts with the letter s by using the command ls s* -l:
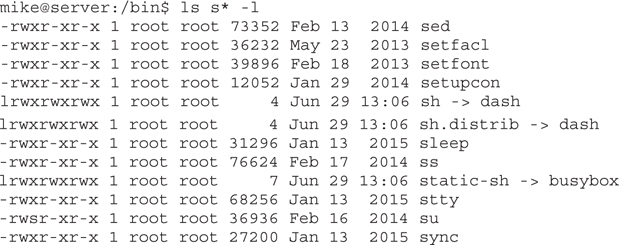
We’ve used wildcards only with the dir and ls commands in the previous examples, but virtually every command that deals with files and folders will take wildcards. Let’s examine some more commands and see how they use wildcards.
Deleting Files
To delete files, you use the del (or erase) command in Windows and the rm command in Mac OS X and Linux. Deleting files is simple—maybe too simple. As I said before, deleting a file in your GUI gives you the luxury of retrieving deleted files from the Recycle Bin on those “Oops, I didn’t mean to delete that” occasions everyone encounters at one time or another. The command line, however, shows no such mercy to the careless user. It has no function equivalent to the Recycle Bin or Trash. Once you have erased a file, you can recover it only by using special recovery utilities (maybe…but don’t bet on it). Again, the rule here is to check twice and delete once.
To delete a single file in Windows, type the del command followed by the name of the file to delete. To delete the file reportdraft1.docx, for example, type this:

In Mac OS X and Linux, do the same thing but type rm in place of del, like this:

Although nothing appears on the screen to confirm it, the file is now gone. To confirm that the reportdraft1.docx file is no longer listed, use the dir or ls command.
You can use wildcards with the del and rm commands to delete multiple files. For example, to delete all files with the extension .txt in a folder, you can type this in Mac OS X/Linux:

You can place the wildcard anywhere in the name. For example, to delete all files with the filename “config” in a Windows directory, type del config.*. To delete all of the files in a directory, you can use this dangerous but useful *.* wildcard (often pronounced “star-dot-star”):

This is one of the few command-line commands that elicits a response—but only in Windows. Upon receiving the del *.* command, Windows responds with “Are you sure? (Y/N),” to which you respond with a Y or N. Pressing Y erases every file in the directory, so again, use *.* with care!
With Windows, we only use del to delete files; it will not remove directories. Use rd to delete directories. In Mac OS X and Linux, you can use the rm command to delete both files and folders. Here’s an example of the rm command using the –r switch to delete the folder Jedi as well as all of its contents:

The Windows rd command comes with a switch, /s, which makes it act identically to the rm –r command:

Clearly it can be very dangerous to use the rm and rd commands with these switches. Use them carefully.
Copying and Moving Files
Being able to copy and move files in a command line is crucial to all technicians. Because of its finicky nature and many options, the copy command is also rather painful to learn, especially if you’re used to dragging icons in Windows, Mac OS X, or Linux. The following tried-and-true, five-step process makes it easier, but the real secret is to get in front of a prompt and just copy and move files around until you’re comfortable. Keep in mind that the only difference between copying and moving is whether the original is left behind (copy) or not (move). Once you’ve learned the copy command, you’ve also learned the move command! In Mac OS X and Linux, the copy command is cp and the move command is mv. Otherwise, use the same syntax.
Mike’s Five-Step copy/move Process
I’ve been teaching folks how to copy and move files for years by using this handy process. Keep in mind that hundreds of variations on this process exist. As you become more confident with these commands, try doing a copy /? or move /? in Windows and man cp or man mv in Mac OS X and Linux at any handy prompt to see the real power of the commands. But first, follow this process step by step:
1. Point the command prompt to the directory containing the file(s) you want to copy or move.
2. Type copy or move (Windows) or cp or mv (Mac OS X and Linux) and a space.
3. Type the name(s) of the file(s) to be copied/moved (with or without wildcards) and a space.
4. Type the path of the new location for the file(s).
5. Press ENTER.
Let’s try an example using Windows. The directory Jedi (in my \users folder) contains the file notes.txt. Copy this file to a USB thumb drive (E:).
1. Type cd Jedi to point the command prompt to the Jedi directory.

2. Type copy and a space.

3. Type notes.txt and a space.

4. Type e:\.

5. Press ENTER.
The entire command and response would look like this:

If you point the command prompt to the E: drive and type dir, the notes.txt file will be visible. Let’s try another example, this time in Mac OS X and Linux. Suppose 100 files are in the ~/Jedi directory, 30 of which have the .odf extension, and suppose you want to move those files to ~/Screenplays/sw2018. Follow these steps:
1. Type cd Screenplays/sw2018 to get the command prompt to the correct folder.

2. Type mv and a space.

3. Type *.odf and a space.

4. Type ~/Jedi.

5. Press ENTER.

Mac OS X and Linux don’t give you any feedback at all unless you use special switches. You can check to see if they all made it with ls.
Pruning and Grafting Folder Trees
There’s a number of situations where you find yourself wanting to grab a folder, complete with all of the subfolders and any files that might be anywhere in any of the folders, and copy or move the whole “pile” in one command. We call this process pruning and grafting and it’s one of the places where the command line really shines in comparison to GUI file manipulation. Done properly, command-line pruning and grafting is faster and gives you much finer control of the process.
In Windows, the standard copy and move commands can work only in one directory at a time, making them a poor choice for copying or moving files in multiple directories. To help with these multi-directory jobs, Microsoft added the xcopy command. (Note that there is no xmove, only xcopy.) We’ll also look at robocopy, cp, and mv.
xcopy
The xcopy command works similarly to copy, but xcopy has extra switches that give it the power to work with multiple directories. Here’s how it works. Let’s say I have a directory called Logs in the root of my C: drive. The Logs directory has three subdirectories: Jan, Feb, and Mar. All of these directories, including the Logs directory, contain about 50 files. If I wanted to copy all of these files to my E: drive in one command, I would use xcopy in the following manner:

Because xcopy works on directories, you don’t have to use filenames as you would in copy, although xcopy certainly accepts filenames and wildcards. The /s switch, the most commonly used of all of the many switches that come with xcopy, tells xcopy to copy all subdirectories except for empty ones. The /e switch tells xcopy to copy empty subdirectories. When you have a lot of copying to do over many directories, xcopy is the tool to use.
robocopy
Microsoft introduced the robocopy command—short for Robust File Copy—many years ago as an add-on tool for Windows Server to enable techs to manage files and folders more quickly and efficiently than with xcopy or copy. The robocopy command is powerful indeed, enabling you to, for example, copy the files and folders from one computer to another across a network, fully replicating the structure on the destination system and deleting anything on that system that wasn’t part of the copy. It can do this with a simple command.
The robocopy syntax does not resemble xcopy, so if you’re going to use the tool, you need to unlearn a few things. Here’s the basic syntax:

Here’s an example of the command in action. The following command would copy all files and subfolders from a local machine’s D:\testserver\website folder to a shared folder on the remote server \\liveserver\website.

The /mir switch, for mirror, tells robocopy to copy everything from the source and make the destination mirror it. That means robocopy will also delete anything in the destination that doesn’t match the source folders and files.
If that were it, robocopy would be powerful, but that’s not even the tip of the iceberg. The robocopy command can copy encrypted files. It enables an administrator to copy files even if the administrator account is expressly denied access to those files. It will also resume copying after an interruption, and do so at the spot it stopped. For the full syntax, type the following:

Their power and utility make the del, copy/move, xcopy, and robocopy commands indispensable for a PC technician, but that same power and utility can cause disaster. Only a trained Jedi, with The Force as his ally…well, wrong book, but the principle remains: Beware of the quick and easy keystroke, for it may spell your doom. Think twice and execute the command once. The data you save may be yours!
cp and mv (again!)
If you really want to see some powerful commands, let’s head over to Linux. Unlike Windows, you can both move and copy folders and their contents, using the same cp and mv commands we saw earlier for regular copying and moving. Let’s say we have a folder called /home/mike/Backups. The Backups folder has ten subfolders and hundreds of files. I want to save a copy of these files to a folder called /mnt/storage. To do this I only need to run cp with the –R (recursive) switch (note that the ~ in my prompt shows that I’m in the home folder):

If I want to move all of that to storage instead of copy, I use the mv command. Interestingly, the mv command doesn’t even need a special switch—just run the program, pointing at the folder of interest and giving it a destination:

Assorted Windows Commands
As a proficient IT technician in the field, you need to be familiar with a whole slew of command-line tools and other important utilities. The CompTIA A+ 220-902 exam focuses in on several of them, and although many have been discussed in detail in previous chapters, it is extremely important that you understand and practice with chkdsk, format, hostname, gpupdate, gpresult, sfc, and shutdown.
chkdsk (/f /r)
The chkdsk (checkdisk) command scans, detects, and repairs file system issues and errors. You can run the chkdsk utility from a command prompt with the switches /f and /r. The /f switch attempts to fix file system–related errors, while the /r switch attempts to locate and repair bad sectors. To run successfully, chkdsk needs direct access to a drive. In other words, the drive needs to be “unlocked.” For example, if you run chkdsk /f /r and chkdsk does not consider your drive unlocked, you will receive a “cannot lock current drive” message, meaning that another process has the drive locked and is preventing chkdsk from locking the drive itself. After this, chkdsk presents you with the option to run it the next time the system restarts (see Figure 16-13).

Figure 16-13 The chkdsk /f /r utility and switches on a locked drive
format
After the previous chapters, you should have an expert-level knowledge of (or, at the very least, a passing familiarity with) formatting and partitioning hard drives. Formatting, you may remember, is the process of writing a new file system to a volume (or partition, if you are old school) so it can hold an operating system or data. We have already discussed the various built-in Windows utilities available to provide the formatting of drives, and you no doubt know that many third-party formatting tools are out there. In this chapter, you just need to become familiar with the format command and its switches.
The format command, you may have guessed, enables you to format volumes from the command line. The very best way to familiarize yourself with the format command and its available switches is simply to enter format /? from the command prompt. Your results should be similar to those displayed in Figure 16-14.
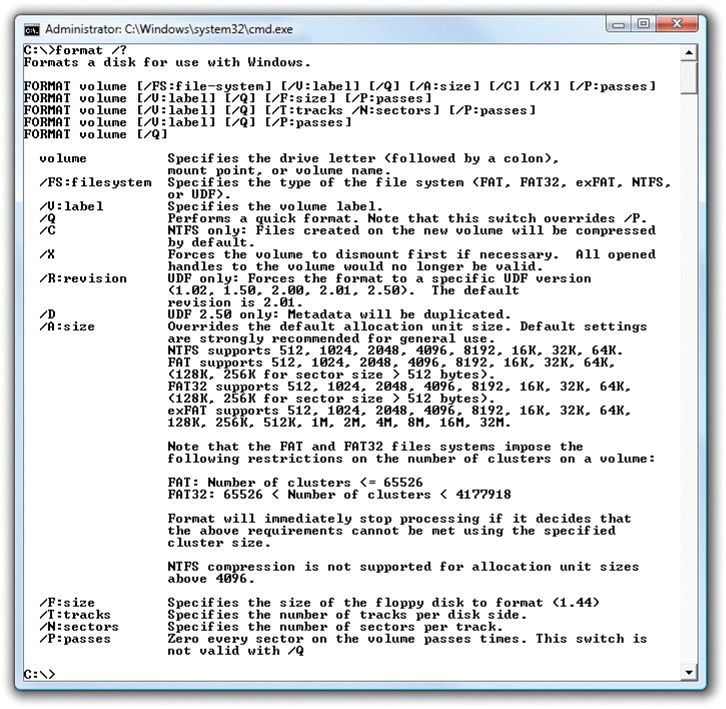
Figure 16-14 Using format /? at the command prompt
The CompTIA A+ 220-902 exam focuses on both GUI and command-line operating system formatting utilities and options, so you should familiarize yourself with the format command and its switches by practicing them on a test system you are literally not afraid to wipe out. Besides, you never know what skeletons CompTIA may pull out of the closet.
hostname
The hostname command is the most straightforward of all command-line commands. If you type hostname at the command prompt, it will display the name of your computer, also known as the hostname. When I type hostname, for example, it displays “MikesPC.”
gpupdate
Group policies are the cornerstone of security settings for Windows systems. There are thousands of group policies. Group policies define important issues such as password complexity, logon attempts, even whether a user can install software. On an individual system it’s easy to set up a group policy using GUI tools, but when you make changes on a local machine, it can take up to 16 hours before the new policy actually starts to work. If you want your newly set polices to work immediately, you use the gpupdate command-line utility.
gpresult
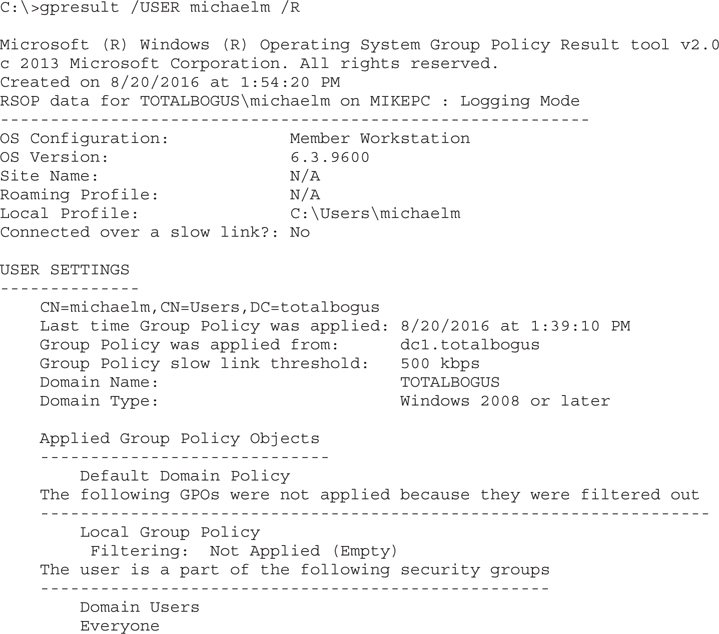
If you need a quick overview of all security policies applied to a single user or computer, the gpresult tool is for you. You can run gpresult for any user or computer on your network (assuming you have a valid username and password) and you can ask for detailed or summary information. This command shows the summary results for user michaelm on the local computer:
sfc
The Windows sfc (System File Checker) command, or simply sfc.exe, scans, detects, and restores important Windows system files, folders, and paths. Techs often turn to sfc when Windows isn’t quite working correctly and use it to find and fix critical Windows system files that have become corrupt. If you run sfc and it finds issues, it attempts to replace corrupted or missing files from cached DLLs (backups of those system files) located in the Windows\System32\Dllcache\ directory. Without getting very deep into the mad science involved, just know that you can use sfc to correct corruption. To run sfc from a command prompt, enter sfc /scannow. To familiarize yourself with sfc’s switches, enter sfc /? (see Figure 16-15).

Figure 16-15 Checking sfc options with sfc /? at a command prompt
shutdown
The shutdown command enables you to do exactly that to a local or remote computer—namely, shut it down (or reboot it if that’s your thing). The cool part of the tool is that you can use a number of switches to control and report the shutdown. A network administrator could use this tool to restart a computer remotely, for example, like this:

The /r switch tells shutdown to have the computer reboot rather than just shut down. If you want to see the full syntax for shutdown, type the following:

Using Special Keys in Windows
You might find yourself repeatedly typing the same commands, or at least very similar commands, when working at a prompt. Microsoft has provided a number of ways to access previously typed commands. Type the dir command at a command prompt. When you get back to a prompt, press F1, and the letter d appears. Press F1 again. Now the letter i appears after the d. Do you see what is happening? The F1 key brings back the previous command one letter at a time. Pressing F3 brings back the entire command at once. Now try running these three commands:

Now press the up ARROW key. Keep pressing it till you see your original dir command—it’s a history of all your old commands. Now use the RIGHT ARROW key to add /p to the end of your dir command. Windows command history is very handy.
Using Special Keys in Mac OS X and Linux
Mac OS X and Linux shells come with their own sets of special keys, many of which match those in Windows. Actually, Windows copied many of the handier keys, like the history feature, from the UNIX world. Mac OS X and Linux take the command history one step further and remember it even if you close the terminal or reboot the machine—useful if you accidently closed the terminal. Mac OS X and Linux shells don’t use the function keys as Windows does but have many hotkeys that use the CTRL key. For example, you can search your history with the CTRL-R keystroke. This can pay for itself if you have been working with a long, complex command one day and need to use it again two weeks from now!
Beyond A+
The compact and cipher Commands
Windows offers two cool commands at the command-line interface: compact and cipher. The compact command displays or alters the compression of files on NTFS partitions. The cipher command displays or alters the encryption of folders and files on NTFS partitions. If you type just the command with no added parameters, compact and cipher display the compression state and the encryption state, respectively, of the current directory and any files it contains. You may specify multiple directory names, and you may use wildcards, as you learned earlier in the chapter. You must add parameters to make the commands change things. For example, you add /c to compress and /u to uncompress directories and/or files with the compact command, and you add /e to encrypt and /d to decrypt directories and/or files with the cipher command. When you do these operations, you also mark the directories involved so that any files you add to them in the future will take on their encryption or compression characteristics. In other words, if you encrypt a directory and all its files, any files you add later will also be encrypted. Same thing if you compress a directory. I’ll run through a quick example of each.
compact
First let’s try the compact command. Figure 16-16 shows the result of entering the compact command with no switches. It displays the compression status of the contents of a directory called Tie Fighter on my desktop. Notice that after the file listing, compact helpfully tells you that zero files are compressed and six files (all of them) are not compressed, with a total compression ratio of 1.0 to 1.
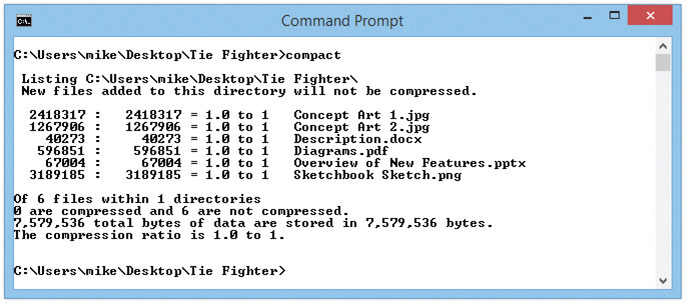
Figure 16-16 The compact command with no switches
If you enter the compact command with the /c switch, it compresses all of the files in the directory, as shown in Figure 16-17. Look closely at the listing. Notice that it includes the original and compressed file sizes and calculates the compression ratio for you. Notice also that the JPG and PNG files (both compressed graphics files) didn’t compress at all, while the PowerPoint file compressed down to around a 80 percent of its original sizes. Also, can you spot what’s different in the text at the bottom of the screen? The compact command claims to have compressed seven files in two directories! How can this be? The secret is that when it compresses all of the files in a directory, it must also compress the directory file itself, which is “in” my Desktop directory above it. Thus it correctly reports that it compressed seven files: six in the compact directory, and one in the Desktop directory.
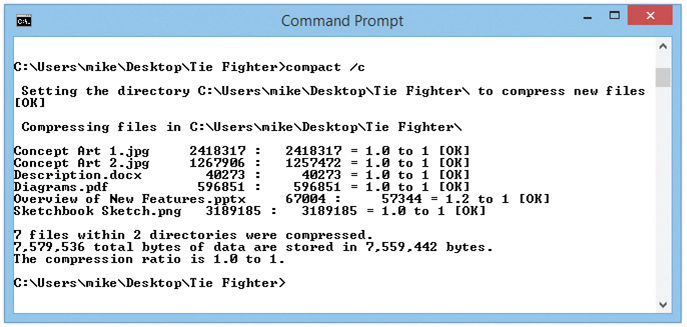
Figure 16-17 Typing compact /c compresses the contents of the directory.
Typing compact again shows you the directory listing, and now there’s a C next to each filename, indicating that the file is compressed (see Figure 16-18).
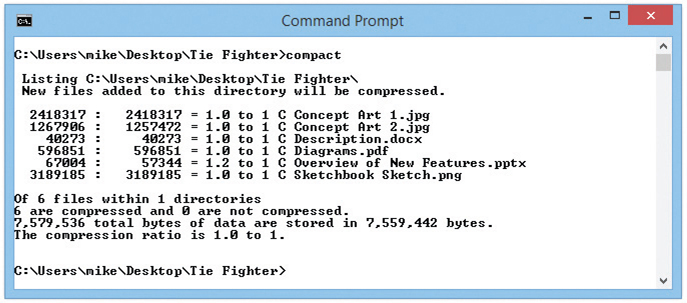
Figure 16-18 The contents of C:\Compact have been compressed.
Okay, now suppose you want to uncompress a file—say, a PowerPoint file, Session 1.ppt. To do this, you must specify the decompression operation, using the /u switch and the name of the file you want decompressed, as shown in Figure 16-19. Note that compact reports the successful decompression of one file only: Overview of New Features.pptx. You could do the same thing in reverse, using the /c switch and a filename to compress an individual file.

Figure 16-19 Typing compact /u “Overview of New Features.pptx” decompresses only that file.
cipher
The cipher command is a bit complex, but in its most basic implementation, it’s pretty straightforward. Figure 16-20 shows two steps in the process. Like the compact command, the cipher command simply displays the current state of affairs when entered with no switches. In this case, it displays the encryption state of the files in the C:\Users\mike\Pictures\Armor Pictures directory. Notice the letter U to the left of the filenames, which tells you they are unencrypted. The second command you can see on the screen in Figure 16-20 is this:

Figure 16-20 The cipher command showing the unencrypted files followed by results of running cipher /e

This time the cipher command carries one switch: /e specifies the encryption operation. As you can see, the command-line interface is actually pretty chatty in this case. It reports that it’s doing the encryption and then tells you what it’s done, and it even warns you that you should clean up any stray unencrypted bits that may have been left in the directory.
To confirm the results of the cipher operation, enter the cipher command again, as shown in Figure 16-21. Note that the U to the left of each filename has been replaced with an E, indicating an encrypted file. The other indication that this directory has been encrypted is the statement above the file listing:
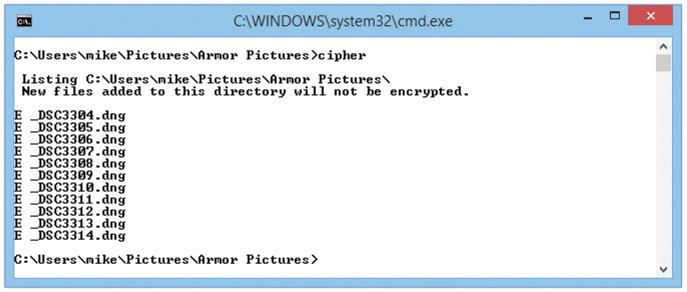
Figure 16-21 The cipher command confirms that the files were encrypted.

Remember that the cipher command works on directories first and foremost, and it works on individual files only when you specifically tell it to do so.
That’s great, but suppose you want to decrypt just one of the files in the Armor Pictures directory. Can you guess how you need to alter the command? Simply add the filename of the file you want to decrypt after the command and the relevant switches. Figure 16-22 shows the cipher command being used to decipher _DSC3304.dng, a single file.
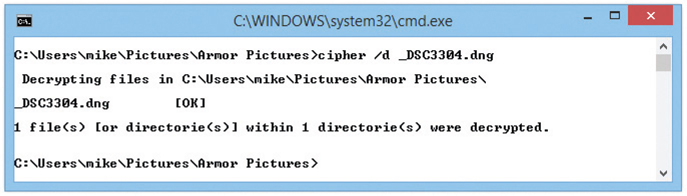
Figure 16-22 Typing cipher /d _DSC3304.dng decrypts only that file.
902
PowerShell
Microsoft’s PowerShell is a more powerful replacement for the traditional Windows command-line interface. PowerShell enables you to do all the typical command-line activities, such as dir, cd, md, and so on, but brings a series of vastly more powerful tools called cmdlets that enable you to accomplish some amazing tasks. Figure 16-23 shows two commands that do the same thing by default, show the contents of a directory: dir and Get-ChildItem.
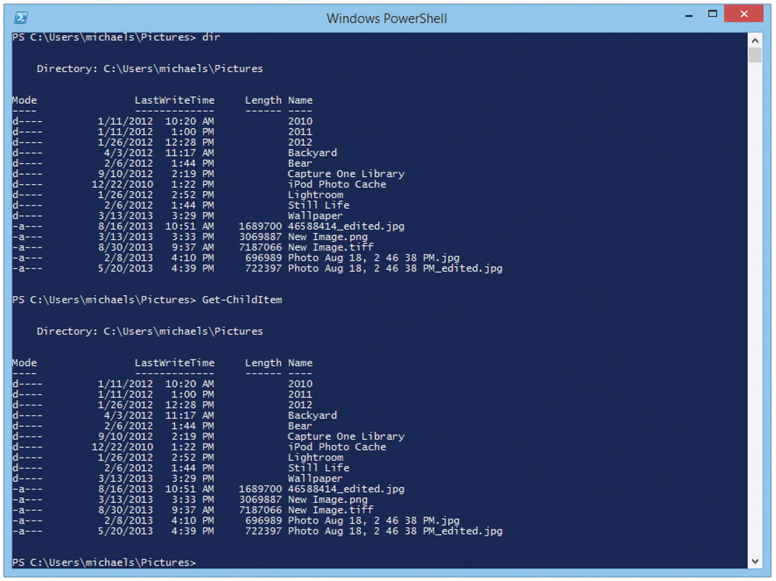
Figure 16-23 Simple commands in PowerShell
With dir, you know you can search for items in a directory, such as “find all the JPEG files in a folder” with this command:

PowerShell lets you dial it all the way to 11, though, with a few more characters on a search string. The following command will find all the JPEG files in the current directory, plus all the mentions of .jpg files in any document format, such as Word, PowerPoint, and Acrobat:

Just in case you want to know what each piece of that string in the cmdlet means, here’s the scoop: Get-ChildItem is the main command. The dot . indicates the current directory, while –include tells the command to fetch the file type indicated next, in this case *.jpg. –Recurse means go into every subdirectory and –Force retrieves hidden and system files too. It’s like dir on steroids!
This is just scratching the surface with what you can do with PowerShell. If you want to give it a try yourself, simply type powershell in the Search bar and press ENTER. Good luck!
Assorted Mac OS X and Linux Commands
Mac OS X and Linux have a massive number of built-in command-line utilities and probably hundreds of thousands of easily accessed and installed third-party tools that work amazingly well. In fact, one of the most interesting challenges to Terminal is that for almost any job, there is more than one tool for the job (see the vi command later). What you are going to see here are the commands listed by the CompTIA A+ objectives—you could spend the rest of your life learning all of the Terminal commands!
ifconfig
The ifconfig command enables you to view and change the settings for your network connections. Running ifconfig shows the following output (yours will certainly be different):
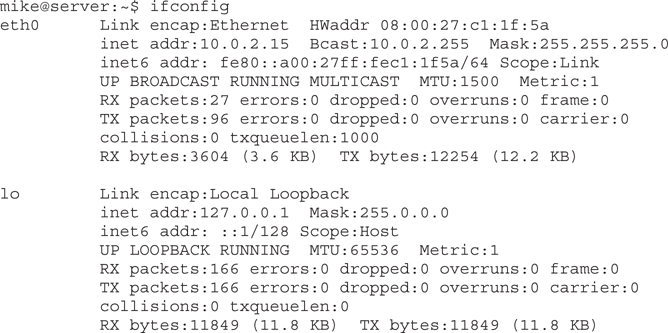
Mac OS X and Linux use special terms to define your network connections:
• eth0, eth1, en0, en1, and so on: wired Ethernet NICs
• wlan0, wlan1, and so on: wireless 802.11 NICs
• lo: loopback
You can disable a NIC using the following:

You can also temporarily change any IP setting with ifconfig. This command will set the IP address of a wireless NIC to 192.168.4.15 until the computer is rebooted:

iwconfig
The ifconfig command is a powerful tool, but when you need to know about (and to change) your wireless settings, you need iwconfig. Typing iwconfig by itself gives you all the wireless details about your wireless NICs:
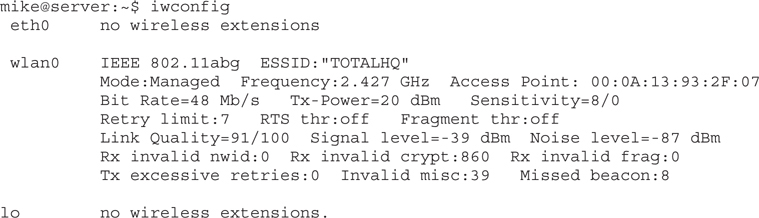
To change the SSID for wlan0 to AnotherSSID, you would type

Note that you don’t use iwconfig to view base IP information. That’s ifconfig’s job.
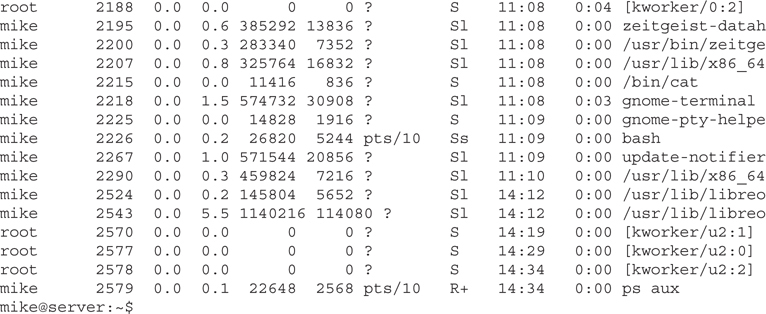
ps
If you want to see the processes running on your system, you need the ps command. This very old command is designed to provide detailed and customizable information about the processes running on your system. This deep history shows up even on the most basic use of ps, as it has two totally different types of switch sets! Anyway, let’s look at one of the most common examples of ps, the ps aux command. The aux command is actually three switches: a = processes for all users, u = show process owner, x = process not attached to a terminal.

Note that I’m skipping a lot of lines right here between the beginning and the end of the displayed results of the ps aux command.
One of the big problems with ps aux is the enormous output. There’s a number of ways to make dealing with this output easier. One way is to use ps | less. The less tool makes it easy to scroll up and down through the output. Remember the | more tool we used earlier in this chapter? Well, “less” is “more.” Humor! Get it? I’ll see myself out… But seriously, less and more will both work for this task, the difference between the two are details for power users and programmers.
Let’s discuss the output of the ps aux command:
• USER: Who is running this process
• PID: The process ID number assigned to the process
• %CPU: What percentage of CPU power this process is using
• %MEM: What percentage of memory this process is using
• VSZ: Total paged memory in kilobytes
• RSS: Total physical memory in kilobytes
• TTY: The terminal that is taking the processes output
• STAT: S = waiting, R = running, l = multithreaded, + = foreground process
• START: When the process was started
• TIME: Length of time process has been running
• COMMand: Name of the executable that created this process
One of the many reasons we run ps is to determine the PID for a process we want to kill. To kill a particular process, we use the kill command (functionally identical to Windows taskkill). The following command will stop the process with the PID 2218:

There’s more fun to be had with the ps command output, but we will save that for the grep command next.
grep
The grep command is one of the handiest of all Linux commands. At its most basic level, we use grep to search through text files or command output to find specific information or to filter out unneeded information. Let’s look at just two of the countless potential ways we use the powerful grep.
Finding a specific process is easy using grep with the ps command. Let’s say I have a LibreOffice document that I need to kill. I have no idea what the PID is, but I can use grep with ps to find it. I know the command uses the word “libre,” so I type

So I see there are two processes from LibreOffice: 2524 and 2543. Cool! The grep command can find any string of text and show you the line it was in. Let’s do it again, this time using ifconfig. Let’s say you want to know if any of your NICs is using 192.168.4.15. You can use ifconfig and grep together:

Note that grep shows us a line from the ifconfig output indicating that something is using that IP address.
Again, this is only a light overview of grep; it is one of the most powerful tools in Linux. If you need to look in anything to find a string of text, grep is the go-to tool.
apt-get
The first ten years of Linux was interesting from the standpoint of installing programs on your computer. Linux was always a nerdy operating system used primarily by programmers and server administrators; most of the big commercial software companies didn’t write applications for Linux. If you needed an application, you dug around the Internet looking for a program, downloaded the code, and tried to compile it on your system, only to find that it depended on yet more bits of code that you had to find, manually set up configuration files…Ugh! It wasn’t a pretty process, especially compared to the relative ease of installing Windows or Mac programs.
Over the years many improvements have been made to the availability, acquisition, and installation of Linux programs, culminating in a number of different tools called package managers that give you the ability to download and fully install and update software from a single command.
Different Linux distributions use different package management systems. For Debian Linux–based distributions (like Ubuntu and Mint), we use APT, the advanced packaging tool. For Red Hat–based systems, we use RPM Package Manager (RPM). There are other package management systems available, of course, but APT and RPM are currently dominant. However, the CompTIA A+ objectives only list apt-get, the command-line tool for APT. This fact tells us a lot about where CompTIA is looking when it comes to what Linux distro they want you to know: Ubuntu!
Apt-get is wonderfully simple to use, assuming you know the name of the program you wish to install. For example, many Linux users aren’t big fans of the old-fashioned vi text editor and prefer to use the substantially better vim. To download and install this program, you start by typing

The first bit of business to get out of the way is to have APT go and update its package index. The package index is the list of all the available packages (software). You can technically skip this step, but you might end up installing an old version or, if the package is new enough, not finding it. Once APT’s index has been updated, we’re ready to install by typing

That’s it! Vim will now be installed and ready to use. Got vim already installed but want the newest version? No problem! Just use apt-get again:

The only downside to apt-get is that you need to know the name of the package you wish to install. While there are command-line tools that help (apt-cache), many people prefer to use whatever graphical search tool their Linux distro provides, such as the Ubuntu Software Center.
As useful as APT is for fetching and installing single applications, that’s not where its real power lies. These package managers are used to manage all the software (minus the stuff you compiled yourself) on the system and are the tool that you use to keep the whole system up to date, just as Windows Update handles much of the software on Windows. All that it takes to upgrade all the packages on your system is to type

If apt-get finds any out-of-date packages, it will let you know which ones and ask you to confirm the upgrade, then away it goes to download and update your system. Keeping your system up to date in this way is critical to close any security vulnerabilities that might be lurking on your system.
vi
You will sometimes need to edit raw text files in Mac OS X and Linux, and vi is the default text editor, built-in to Mac OS X and most distros of Linux. Figuring out how to edit a file (or even just exit) with vi in some ways is a rite of passage. Only after your have mastered vi’s non-intuitive and perhaps even downright weird interface can you truly start to think of yourself as a UNIX Terminal Jedi master. Well, maybe not a Jedi master, but the fact that vi is almost always available will make you want to know how to use it. Let’s get started with vi by creating a new text file called “fred”:

You’ll now be in the vi text editor, staring at a blank file as shown in Figure 16-24.
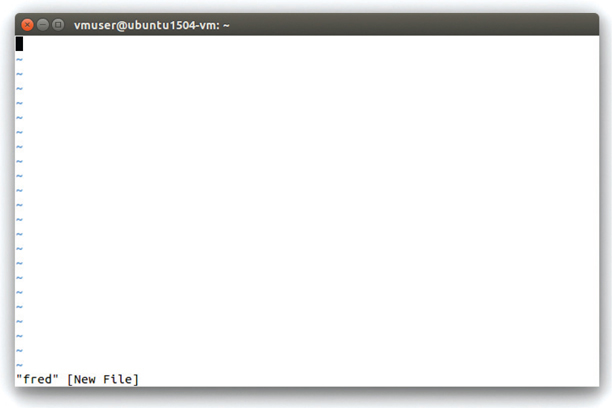
Figure 16-24 vi open
The vi editor uses a non-intuitive “mode” concept where the editor is always in either insert mode or command mode. Insert mode allows you to insert and edit text. Command mode allows you to give commands such as cut, paste, delete line or characters, and save the file. By default you are in command mode, so press the I key to go into insert mode. Enter a few lines of text, such as shown in Figure 16-25, press ENTER at the end of each line, and use the BACKSPACE key if you make an error. None of the other keys you’re used to working with in any other text editor (such as Windows Notepad) work here! Press the ESC key to leave insert mode and return to command mode.

Figure 16-25 vi with text
To save your new file and quit vi, type ZZ (note the uppercase) and press ENTER. To edit an existing file, just type vi followed by the name of the file you wish to edit. If you wanted to edit the Fred file, for example, you would type

The biggest trick to vi is making sure you know which mode you are in and how to swap between the two modes. Press ESC to get into command mode, and press I to get into insert mode. Be ready to make lots of mistakes the first few times you use vi!
The vi command set is archaic, but it is powerful if you take the time to learn it. Here is a list of a few command mode keys that you’ll find helpful:

Granted, it’s important to know how to use vi, but most Linux people quickly find themselves going to one of the hundreds of alternatives. Check out one of the terminal-based editors such as vim, joe, or emacs or one of the graphical editors such as gedit or gVim.
dd
The dd command is primarily used to create an exact, bit-by-bit image of any form of block storage, meaning mass storage devices such as hard drive volumes, thumb drives, and optical media. In its most simple form, the dd command is just

There’s no way to show you all the possible uses for dd, so I’ll just show three of the typical places I use it. Let’s start with something simple: copying a hard drive.
Be careful here! The dd command name is sometimes said jokingly to stand for “Disk Destroyer.” This powerful tool will wreak havoc on your data if not used correctly. There are a number of issues that I’m not covering here that could greatly affect the success of running the dd command. While all of the following commands are valid, simply running them on your systems without understanding these subtleties can wipe drives. You have been warned!
Copying a Hard Drive
Let’s say you have a hard drive (sda) you want to copy onto another hard drive (sdb). In this case we will say they are exactly the same size. The following command will copy the entire sda drive, partition table, file systems…everything to the sdb drive:

Backing Up a Thumb Drive
Let’s say you have thumb drive full of important files you really want to back up. Using dd as follows, you can copy the entire USB drive and make an image file (I chose to call it thumbBackup.bak) and place that image file on your Desktop:

Wiping a Disk
I have a drive (sdb) that I want to totally wipe. The dd command can take input from anywhere, but in this case I’ll use Linux’s random number generator, /dev/urandom, to write a stream of random bits completely over the entire drive. It’s not a perfect wipe, but it will stop all but the most sophisticated tools.

shutdown
Same as in Windows, you can shut down or restart the system from a terminal using the shutdown command. You run the command as follows:

By far the most common time is now. To shut the system down immediately, type

To restart the system, run shutdown with the –r option:

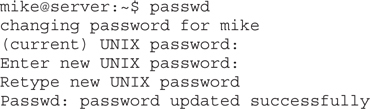
passwd
The passwd command allows you to change your password or, if logged in as a root (the super user), any user’s password. To change your own password, type the following:
Chapter Review
Questions
1. Which of the following is an illegal character in a Linux filename?
A. * (asterisk)
B. . (dot)
C. / (forward slash)
D. _ (underscore)
2. Which command pauses after displaying a screen’s worth of directory contents? (Choose two.)
A. dir p
B. ls | more
C. ls -p
D. dir /p
3. Which of the following commands will delete all of the files in a directory in Linux?
A. del *.*
B. del all
C. rm *
D. rm all
4. Which command do you use to determine your exact folder location (path) in Linux?
A. dir
B. path
C. pwd
D. prompt
5. Which Windows command is functionally equivalent to the Linux ls command?
A. dir
B. command
C. copy
D. dd
6. What do you type before a Linux command to access help for that command?
A. help
B. ?
C. man
D. /?
7. Which of the following Linux commands will show detailed information about the contents of a folder?
A. ls –l
B. ls –e
C. ls –h
D. ls –k
8. What command, identical in both Windows and Linux, will tell you the name of the computer?
A. hosts | grep
B. whoami
C. hostname
D. net name
9. Of the following, which best describes the function of the Windows gpresult command?
A. Lists all recently updated group policies
B. Lists the group policies applied to a user
C. Lists all changes to a user’s group policies since the last refresh
D. Lists any and all conflicting group policies
10. How do you run a command at the Windows command prompt with administrative privileges?
A. Enter an elevated username and password at the command prompt.
B. Right-click a command-prompt shortcut and then select Run as PowerUser.
C. Right-click a command-prompt shortcut and then select Run as administrator.
D. The cmd command only runs with administrator privileges.
Answers
1. C. Any of these characters are acceptable in a Linux filename except the forward slash (/), which is used exclusively as a path separator.
2. B, D. The ls | more and dir /p commands in Linux and Windows, respectively, pause a long listing at the end of the page.
3. C. Type rm * and press ENTER to delete all files in a directory in Linux.
4. C. The pwd command enables you to determine the current folder location in Linux.
5. A. The Windows dir command accomplishes a similar function to the Linux ls command.
6. C. Access the help for a Linux command by typing man [command name].
7. A. Type ls –l and press ENTER to see detailed information about the contents of a folder in Linux.
8. C. Type hostname and press ENTER to discover the hostname for just about any computer.
9. B. The gpresult command in Windows lists group policies applied to a user.
10. C. To run a command at the Windows command prompt with administrative privileges, you would right-click a command-prompt shortcut and then select Run as administrator.


