Organize Your Work
Short documents don’t need many organizational cues—it’s hard for someone to get lost in, say, an informal letter or a yard-sale flyer. But when a document grows beyond a page or two, organizational assistance becomes more important to both you and your readers.
In this chapter, I describe three different Pages features that can make your documents models of organizational coherence:
- Use Sections provides an in-depth look at how to break your document up into separate sections and why you might want to do so, and it describes the options you have when you do.
- Use Lists and List Styles delves into how to make and manage hierarchical lists for producing outlines and taking notes, and for numbering headings and sub-headings to give your readers important navigational assistance.
- Make Tables of Contents shows you how to use both sections and styles to produce an automatically updating table of contents for anything from a business proposal to a fantasy epic.
Sure, it can be fun to get lost in a good book, but it’s even more fun when you can find your way around in it.
Use Sections
The dividing of documents into smaller parts has long been a common practice, whether it has been into chapters in a book, sections in a finance report, or acts in a play. Such subdivided documents might use continuous pagination, or each division might have its own page numbering (for example, numbering a book’s introduction with roman numerals but the main text with arabic numbers).
In Pages for Mac, you can break a document into discrete sections and, optionally, provide each section with individualized headers, footers, and page numbering. While Pages for iOS and Pages for iCloud respect and preserve the sections you create, only Pages for Mac provides tools for creating and customizing them.
Several menu commands in Pages for Mac will create sections in a document, but the Document Setup inspector’s Section panel is the place to go for customizing them—to see that useful panel, either choose View > Inspector > Document Setup or click Document ![]() on the toolbar, and then click Section in the Inspector (Figure 85).
on the toolbar, and then click Section in the Inspector (Figure 85).

Figure 85: A document divided into sections, with the Section panel visible on the right and the Page Navigator on the left.
Add, Move, and Remove Sections
To apply custom section formats to different sections, it stands to reason that you first must divide your document into sections. You can add a new section at the end of a document by choosing Insert > Section, or you can insert section breaks within a document.
You can insert a section break in three locations:
- At the insertion point: If you know where you want the break, set the insertion point at that place and then choose Insert > Section Break. (You may wish to choose View > Show Invisibles so you can see exactly what you are doing.)
- At the top of the current page: Select some text or set the insertion point on the page where you want the new section to start. Then, from the Create a New Section pop-up menu at the end of the Document Setup inspector’s Section panel, choose Starting with This Page.
- Below the current section: Select some text or set the insertion point anywhere in the section that you want the new section to follow. Then either choose Insert > Section or, at the end of the Section panel, choose After This Section from the Create a New Section pop-up menu.
To move a section, you use the Page Navigator—choose View > Show Page Thumbnails (Option-Command-P) to view the Page Navigator if it is not visible. In the Page Navigator, drag any page that is part of the section: as you drag, the pages in the section appear as a stack under the cursor (Figure 86). When you reach the place where you want the section to go (as you drag, space opens between sections in the Page Navigator to make room for the moved section), drop the stack in the new location.

Figure 86: To move a section, drag one of its page thumbnails in the Page Navigator.
To delete a section break, choose View > Show Invisibles (if you haven’t already) so you can see the section break marker (Figure 87). Double-click the marker to select it, and then press Delete.

Figure 87: Choose View > Show Invisibles to see any section break markers (a blue line with small section icon) in a document.
Customize Sections
When a document contains multiple sections, you can control the content of the header and footer of each section independently as well as the starting page number and page number format for each section with the Section panel of the Setup inspector (Figure 88). The settings in that panel pertain to the section containing the current text selection or the text insertion point—which could be the entire document if it only has one section.

Figure 88: Click in a section to see its settings in the Section panel of the Setup inspector.
Set Up and Customize Headers and Footers
The headers and footers each contain three fields: one for left-aligned text, one for center-aligned text, and one for right-aligned text. The borders of these fields appear when you hover over them (Figure 89).

Figure 89: Hover over a header or footer to see its fields and their borders.
To edit text in a header or footer, click within a header or footer field or make a selection. A popover (Figure 90) indicates the range of pages that are affected by your edits (unless neither the header nor footer contain a page number, in which case you see an Insert Page Number popover, as described in Add Dynamic Numbers).

Figure 90: A popover tells you how many pages your header and footer edits affect.
To give a section its own distinct header and footer contents, make a selection in the section or in its header or footer and then disable Match Previous Section in the Section panel; this prevents the contents of the previous section’s header or footer from carrying forward into the current section.
To allow the header and footer contents to carry over from the previous section, select Match Previous Section.
You can also hide the header and footer on a section’s first page by enabling Hide on First Page of Section. This setting is useful, for example, for sections that begin with a title page. Unfortunately, Pages does not let you hide a section’s header or footer separately: you must show them both or hide them both.
Set Up and Customize Page Numbers
The Page Numbering settings on the Section panel apply to the current section of the document—the one containing the insertion point or text selection. If neither the header nor the footer in the section contains a page number, the Page Numbering settings consist of a single pop-up menu (Figure 91, left): choose a page number format from the Insert Page Number menu to insert a page number with that format in the footer’s center field (if the insertion point is already in a header or footer field, the page number is inserted in that field).
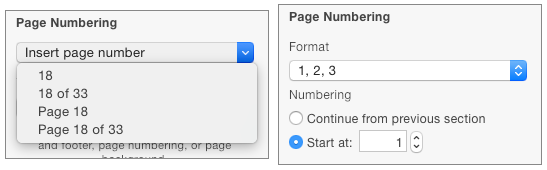
Figure 91: The Page Numbering settings you see depend on whether a page number already appears in the header or footer.
If, on the other hand, the header or footer already contains a page number, the Page Numbering settings are more extensive (Figure 91, right), providing different formats for the page number: numeric, upper- and lower-case roman numbers, and upper- and lower-case letters. You may also see other choices depending on whether your document has text in a non-roman writing system, such as Japanese.
You can also select to continue page numbering from the previous section (this has no effect if the document has only one section) or to start numbering the section with a specific page number.
Page numbering settings are independent of header and footer settings: it is possible to number a section independently from the preceding section while, at the same time, have the header and footer match the previous section, as described just previously in Set Up and Customize Headers and Footers.
Headers, Footers, and Page Numbers in iOS and iCloud
In Pages for iOS, you make changes to headers and footers on the Doc Setup screen as described in Set Document Layouts in iOS. You insert page numbers using the editing popover menu as described in Add Dynamic Numbers.
In Pages for iCloud, you edit header and footer content directly in the header and footer fields as you do on the Mac. To insert page numbers in those fields, click the Insert ![]() button in the toolbar and then choose Page Number.
button in the toolbar and then choose Page Number.
Although you can’t create or customize sections in Pages for iOS or Pages for iCloud, each of those apps respects the section settings you make on the Mac, including whether headers and footers match the previous section, and whether page numbering continues from the previous section.
Use Lists and List Styles
Very generally speaking, there are three kinds of lists:
- Simple lists: These are lists that consist of one item after another: for example, shopping lists, team rosters, and agendas. Each list item is preceded by a marker, such as the bullet character that precedes this item, or some other character, or an image, or, in the simplest case, no marker at all.
- Ordered lists: Like simple lists, ordered lists consist of one item after another, but each item is preceded by a number, letter, or some other marker that indicates the item’s position in the list. Step-by-step numbered instructions, such as those found throughout this book, are examples of ordered lists.
- Hierarchical lists: These are lists that contain sub-lists. Hierarchical lists can be ordered or unordered (or mixed). For example:
- An outline: This typical ordered hierarchical list has a few major topic items at the first level. Each topic item heads an indented secondary list of ideas or sub-topics. The topics and ideas are presented in the order in which they will appear in a final work, such as an essay. Items in ordered hierarchical lists are preceded by markers (usually letters or numbers) that indicate their position in the list hierarchy.
- A recipe’s list of ingredients: These are often hierarchical and non-ordered lists, presenting a top-level list consisting of items like “pastry” and “filling,” and with each top-level item containing a simple list of ingredients at the second level.
- This list: What you are reading right now is an example of a hierarchical non-ordered list.
Pages can create all these types of lists, and variations upon them.
Create a Basic List
To start a list in Pages for Mac or Pages for iOS, type the list marker—either a number followed by a period, a bullet • character, or a hyphen—and then type a space. Next type the text of the item followed by a Return: Pages makes the text into a list item and formats the next line to match. To end the list, type Return twice.
You can also make any group of paragraphs into a list by applying a list style.
No matter how you make your lists, if you’d like more control over them, there’s quite a bit more to know:
- To format lists, you use the Bullets & Lists section of the Text Format inspector’s Style panel (see Format Simple and Ordered Lists, ahead a few pages).
- To make lists consistent throughout a document, you can create your own list styles in Pages for Mac to capture your list settings so you can reuse them elsewhere in your document (see Make, Modify, Rename, and Delete a List Style). Though neither Pages for iOS nor Pages for iCloud has the capability of customizing lists, they both can apply list styles that you create or customize with Pages for Mac.
- For help with hierarchical lists, which also make use of the indentation buttons under Alignment in the Style panel, see Make Hierarchical Lists, later in this chapter.
Apply a List Style
A list style contains the settings for formatting a list item. These comprise:
- The appearance of the list marker that precedes a list item
- The amount of space that separates the list marker from the text of the list item
- The amount of space that the list marker is indented from the page margin (left or right, depending on writing direction)
For hierarchical list items, the style contains the format settings for each level of the hierarchy.
To make one or more paragraphs into a list by applying a list style, select the paragraphs, open the Text Format inspector’s Style panel and click the list styles menu button beside the Bullets & Lists label (shown circled in red in Figure 92). In the List Styles popover that appears, click a style.
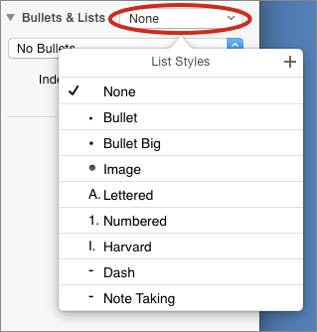
Figure 92: This List Styles popover shows the list styles that come with the Blank template.
Pages applies the style to the selected text.
If you ever want to remove a list style from a list item, click anywhere in the list item and then choose None from the List Styles popover.
Every template that comes with Pages (see Try Templates) includes its own set of list styles, which you can use, rename, modify, and expand.
Because each item in a list, whether a single word or several sentences, is a paragraph (that is, a string of characters followed by a Return), list settings, and, therefore, list styles, are applied on a paragraph-by-paragraph basis. When you apply a list style to a paragraph, however, the list style doesn’t replace the paragraph’s style, nor does it override the paragraph style. Think of a list style as sitting on top of a paragraph style: you can apply a list style to a paragraph, modify the list style, and remove the list style without disturbing the underlying paragraph style.
Make, Modify, Rename, and Delete a List Style
If you’ve read Manage Your Styles, making a list style will be familiar:
- Click within the paragraph that you want to make into a list item, or create a new paragraph and adjust the settings in the Bullets & Lists section as needed (I describe these settings in Format Simple and Ordered Lists and Make Hierarchical Lists just ahead).
An asterisk appears beside the name of the current list style, which is displayed on the list styles menu button in the Bullets & Lists section (refer to Figure 92, above).
- Click the list styles menu button to see the List Styles popover.
- At the top right of the popover, click the Add
 button.
A new list style appears, with its name selected, directly beneath the currently selected style in the popover (if your list of styles is long, you may have to scroll the popover to see it).
- Type a new name for the list style and press Return.
You can now apply the new list style to other paragraphs in your document, just as you would any list style: select the paragraphs and then choose the style from the List Styles popover.
Modify a List Style
Much like paragraph styles and character styles, when you change a setting in the Bullets & Lists section, that change constitutes an override to the current list style, which Pages indicates by placing an asterisk after the list style name on the list styles menu button. When you click the menu button, the current list style in the List Styles popover has an Update button (Figure 93).

Figure 93: The Update button indicates a list style with overrides.
To add your changes to a list style, click the Update button; to discard your changes, click the More  button, which appears when you hover over the item in the popover, and then choose Clear Override.
Rename a List Style
To rename a list style, hover over the style name in the popover, click the More  button, and then choose Rename Style.
Delete a List Style
To remove a list style completely from your document (for example, after you have been creating list styles to try them out), hover over the style name in the popover, click the More  button, and then choose Delete Style. If the style is being used by a list item in your document, a dialog asks you to choose another style to replace it (None is one of the choices).
Format Simple and Ordered Lists
Simple lists use either text or images as list item markers; ordered lists use numbers and letters as item markers. You choose the kind of marker, and, hence, the type of list item, with the second menu button in the Bullets & Lists section of the Text Format inspector’s Style panel (Figure 94).

Figure 94: Choose a list marker type for a list item.
The settings available in the Bullets & Lists section change depending on the type of marker you choose (Figure 95).

Figure 95: Clockwise from top left, the setting options for text bullet markers, image bullet markers, and number markers.
These settings are common to all marker types:
- Indent: These two measurements specify how far to indent the bullet or the number marker from the text’s margin (left or right, depending on writing direction), and how far to indent the text of the item from the marker.
- Size: This controls how tall the marker is relative to the line-height of the item’s text.
Both types of bullet markers have an Align setting, which controls how far to raise the marker above the baseline of the item’s text.
Both types of text markers (text bullets and numbers) have a color setting, so you can really make them stand out (please, be tasteful!).
Finally, each marker type has one or more settings specific to its type:
- Text Bullets: The Bullet setting provides a pop-up menu from which you can choose common typographical characters to use as a marker. You can also type your own text in the setting’s field to serve as a marker, and the text can be more than one character in length; for example, you can use the word “Pro” as a marker for pros in your report on whether the annual company meeting should include live entertainment this year.
- Image Bullets: Click the Current Image well to see a popover list of simple images you can use for a marker. The popover also includes a Custom Image button you can click to choose an image from those on your Mac. When you choose a custom image, it is scaled to match the line-height of the list item (Figure 96).

Figure 96: Custom image markers are scaled to the item’s height.
- Numbers: The number marker, which is used for ordered lists, has, um, a number of settings:
- Format pop-up menu: Click this unlabeled pop-up menu to choose a number or ordered character format for the marker, such as “1. 2. 3. 4.”, “a) b) c) d)”, “i. ii. iii. iv.”, and so on.
- Tiered Numbers: This setting is used for hierarchical ordered lists, which are described immediately following. When Tiered Numbers is enabled, the list uses nested numbers for each level of the hierarchy. For example, the first sub-item under the item numbered 2 in a hierarchical list would be numbered 2.1, and its first sub-item would be 2.1.1. Legal and technical documents often use tiered numbers for section and sub-section headings.
- Continue from Previous: Enable this to have the ordered list item continue its numbering from the previous ordered list item in the document.
- Start from: Enable this to restart the ordered list numbers at a specific number. If the format of the ordered list uses letters or roman numerals, you can type a number into the field and Pages converts it to the appropriate format.
Make Hierarchical Lists
You can make a hierarchical list out of any simple list: click the item marker of any list item to select the item and do one of the following:
- Press Tab.
- Click the increase indent
 button under Alignment in the Text Format inspector’s Style panel. (Pages for iOS provides this button in the List pane of the Format popover, and Pages for iCloud provides it at the bottom of the Text Format inspector).
 - In Pages for Mac or Pages for iOS, drag the item marker to the right. Keep dragging until a blue triangle appears above the highlighted text; the triangle indicates a drop spot, and you can keep dragging to see more triangles. (If you can’t see any triangles, try moving your drag path slightly up; you should see not only a triangle but also a blue horizontal line above the highlighted text.)
Any of these actions makes the selected item into a sub-item of the previous item in the list. However, unless you use a list style designed for hierarchical lists, such as the Harvard list style that comes with the Blank template (Figure 97), the markers of sub-items use the same settings as the markers for top-level items.
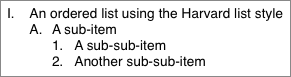
Figure 97: The Harvard list style is designed for hierarchical lists; specifically, Harvard-style outlines.
Fortunately, you can make your own list styles that use the markers and indent settings you choose for each level of the list hierarchy.
When you make a list style for a hierarchical list, you customize the style for each level of the hierarchy until the style contains the settings for each level you need:
- Create and format a top-level list item, either by applying an existing list style to the currently selected paragraph or by manipulating the settings for it under Bullets & Lists in the Text Format inspector’s Style panel.
- Make a new list style based on the current one (see Make, Modify, Rename, and Delete a List Style).
- Add an item to the list, and then click its marker and press Tab, making the item into a sub-item.
- Adjust the sub-item’s Bullets & Lists settings until the item has the kind of marker and the indent you want.
If the ruler is visible (View > Show Ruler), the indent settings for each item in the currently selected list are shown as flags, with the indent for the current item highlighted in blue (Figure 98). You can drag the blue flag on the ruler to adjust the indent.

Figure 98: Drag the blue flag to adjust indent settings for a hierarchical list item.
- Update the list style to include the sub-item settings (see Modify a List Style).
- Repeat the previous three steps for as many hierarchical levels as you need. When you finish, the list style contains the settings for every level of the hierarchy.
- Now that you have the list style configured, you can discard the list you used to set the style up.
The list style is now available to be applied to any list in your document.
Mix and Match Markers
Hierarchical lists can mix the kinds of markers they use, with some levels of the hierarchy being ordered lists, and other levels being simple lists, as in the example shown in Figure 99.
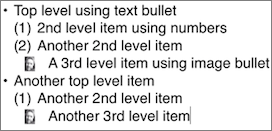
Figure 99: A hierarchical list that mixes numbers and bullets.
Even though Pages can handle a different marker for each list level, unnecessarily mixing markers can confuse your readers—mix them only when doing so makes the underlying logic of a list more obvious.
Make Tables of Contents
Pages for Mac can generate automatically updating tables of contents for your documents, with multiple levels if you like, and each level can have its own format, as seen in Figure 100. Pages for iOS and Pages for iCloud can display tables of contents created by the Mac app, and they both can update them as you edit your document, but neither can manipulate them in any other meaningful way.

Figure 100: A two-level table of contents, with each level formatted separately.
Create Tables of Contents
Creating a table of contents is a matter of making a menu choice and then picking which items appear in the table of contents. Let’s deal with each of these steps separately:
- Place your text insertion point where you want the table of contents to appear. It’s best to choose a blank line for this because every table of contents begins on a new line and is followed by a page break. (“Every”? Yes, you can have more than one table of contents in a document.)
- Choose Insert > Table of Contents, and then, from the Table of Contents submenu, choose one of the following:
- Document: This choice creates a table of contents that spans the entire document.
- Section: This choice includes only items within the current section (see Use Sections), so you can have separate tables of contents for each section of a long document. The page numbers listed in the table of contents use the section’s page numbering if the section’s pages are numbered independently from other sections.
- To Next Occurrence: This choice includes all the items in the document up to the next table of contents in the document, and is useful if you haven’t divided your document into sections but still want to have separate tables of contents for specific parts of the document.
As soon as you choose what kind of table of contents you want, Pages goes to work assembling it, which might take a few seconds.
At this point, you should display the Format inspector if it isn’t already visible because you’re going to need it: choose View > Inspector > Format. The Format inspector displays the Table of Contents panel, like the one shown in Figure 101.

Figure 101: The Table of Contents panel in the Format inspector for a document created with the Blank template.
Chances are, the table of contents won’t contain the items you want unless you are extremely lucky. That’s because Pages, by default, includes the text of paragraphs that use certain paragraph styles. For example, tables of contents made in documents that use the Blank template include by default the text from paragraphs formatted with these styles: Title, Heading, Heading 2, Heading 3, and Heading Red (Figure 101, just above).
Enable the checkbox to the left of a paragraph style in the Format inspector to trigger an appearance in the table of contents; disable it to exclude the style from the table of contents.
Entries in a table of contents can include page numbers or not, also on a style-by-style basis: enable the checkbox to the right of the style if the table of contents entries for that style should include a page number.
Figure 102 illustrates how selected styles affect the table of contents.

Figure 102: Two paragraph styles as they appear in a document (top). The table of contents for the document when those two styles are enabled in the Inspector’s Table of Contents panel (bottom).
Format Tables of Contents
The nicely formatted table of contents shown in Figure 102, just previously, didn’t start out looking that way. By default, Pages uses Helvetica for table of contents entries, for example, and it doesn’t automatically provide period leaders for the page numbers.
To format table of contents entries, first select them: click the text of an entry in the table of contents (not the page number—those are live, and clicking one takes you to that page in the document!) to select all the entries in the table of contents that were generated from the same paragraph style (Figure 103).
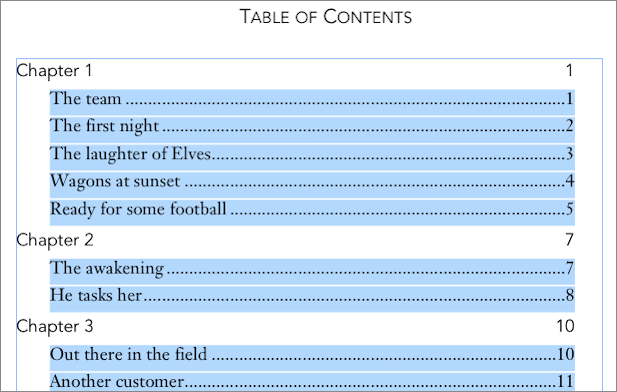
Figure 103: Click a table of contents entry generated by a particular paragraph style to select all the entries generated by that style.
Pages formats its table of contents entries en masse: you can’t select a single entry in a table of contents to adjust its settings independent of other entries generated by the same paragraph style, nor can you select text within an entry to change its font, style, or size.
When you select table of contents entries, you can use the settings in the Format inspector’s Text panel (Figure 104), as well as the ruler, to adjust their formatting (see Set Paragraph Layouts on a Mac).
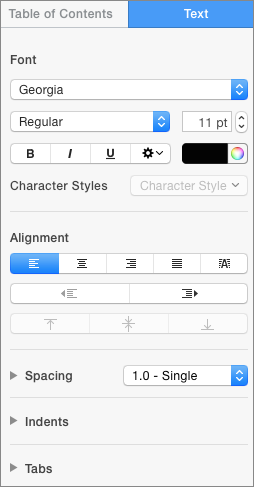
Figure 104: The Text panel of the Format inspector when table of contents entries are selected.
Don’t be discouraged, though, if you need detailed table of contents formatting beyond the capabilities that Pages provides. When your document is done and the table of contents is set, you can copy the table of contents from Pages and paste it into another application to turn it into editable text, and then copy and paste that editable text back into Pages. At that point, the table of contents is text like any other text, and you can format it as richly as you desire.