Try Templates
For some of us, few things are more liberating than the blank page of a brand-new document, which promises total freedom for creating whatever we like. For others, nothing can be more intimidating than that same blank page: all that emptiness, demanding that we fill it with something. That’s why Pages provides us with document templates: so we can, if we like, get a running start on the creative process.
As you have seen, every time you Create a New Document with Pages, you start by choosing a document template, even if that template is a blank one. But you needn’t choose a blank one: Pages offers dozens of templates in its Template Chooser, suitable for a variety of writing tasks, and, if none of them meets your needs, you can supplement the offerings with your own hand-crafted templates.
In this chapter we’ll first look at what templates Pages offers. After that, we’ll see how to Make and Manage Your Own Templates and get hands-on experience when we Design a Template for Reuse.
Explore the Templates
The first question you might ask about Pages templates is the most important one: what are templates? Simply put, a template is a special document that contains customized paragraph styles, character styles, list styles, and object styles, along with, optionally, placeholder text and media, that you use as a starting point for your document.
When you Create a New Document, the Template Chooser displays a thumbnail of each available template (Figure 164). In Pages for Mac/iCloud, select a template and click Choose. Pages creates a new document, ready to edit, based on that template. (In Pages for iOS, tap a template thumbnail.)
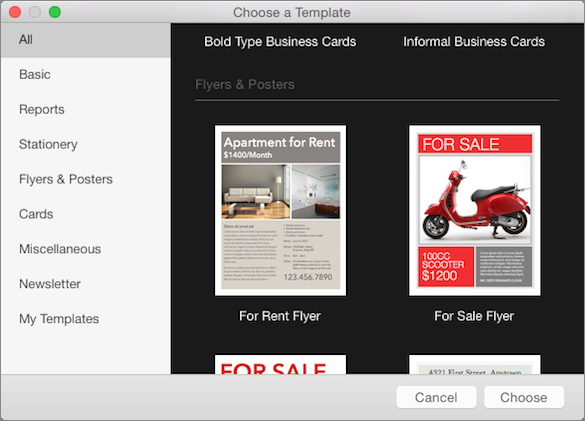
Figure 164: The Template Chooser in Pages for Mac offers you starting points for many different kinds of document. Pages for iOS and Pages for iCloud also provide Template Choosers.
One very important thing to know about templates is this: you can’t edit them. When you choose a template in the Template Chooser, Pages makes an editable copy of it: the template itself remains untouched and inviolate.
To use a document derived from a template, just replace the placeholder content with your own. You may also want to duplicate some items before replacing their contents if you want to use them more than once—for example, custom graphics or text boxes.
Let’s look at the templates that come bundled with Pages.
Pages divides the templates into categories. Here’s how to quickly navigate among these categories:
- On a Mac: Click a category in the left panel of the Template Chooser to view a specific category; click All to scroll through the templates in every category.
- In iOS: On an iPad, tap Show Categories on the Choose a Template screen to choose a specific category, or just swipe up or down on the screen to browse them all. Pages on an iPhone labels the template categories but does not provide shortcuts to view to specific ones.
- In a browser: Scroll up or down in the Choose a Template dialog to view the various templates. Pages for iCloud, like Pages on an iPhone, does not provide shortcuts to specific categories.
Here are the available pre-built template categories:
- Basic: This group contains two blank documents—one formatted for portrait layout and one for landscape—along with an almost blank Note Taking template that comes with a placeholder list to get you started.
- Reports: As the name suggests, these templates provide styles, layouts, and placeholders for various kinds of reports. In most cases, the templates are best suited for the kinds of reports that college and high-school students might need.
- Stationery: This group is currently the only template category that contains subcategories (in Pages for iCloud and in Pages on an iPhone these subcategories appear independently):
- Letters: These templates are designed for correspondence, and range from informal letters to elegant missives.
- Resumes: The offerings in this subcategory mirror those in Letters (with a couple of omissions), but they contain placeholders and layouts suited for resumes.
- Envelopes: Here you can find letter-size envelope layouts that match the templates found in the Resumes subcategory.
- Business Cards: These templates each contain a sheet of business card placeholders meant to print on Avery 5371 card stock. Their designs match those in the Resumes and Envelopes subcategories. The templates include crop marks (implemented as master objects) to help you better align your cards.
- Flyers & Posters: This group of single-sheet templates includes designs suitable for sales and rental flyers, event announcements, lost pets or property, and so on. The templates in this group are all layout documents; see About Page Layout Documents.
- Cards: This group contains cards for both business (e.g., real estate sale cards) and personal use (e.g., greeting cards). They are designed to be printed double-sided, cut, and then folded. Like the flyers and posters, these are layout documents with no body text.
- Miscellaneous: This small group contains a couple of brochure templates and an invoice template. In Pages for iCloud this category currently provides only one template: a brochure.
- Newsletter: The handful of newsletter templates found here are suitable for short personal or in-house newsletters.
- My Templates: This category shows up only if you have saved any of your own templates to the Template Chooser, as I describe next. You have to install the templates in this category individually in Pages for Mac and in Pages for iOS. Pages for iCloud currently does not support custom templates at all—its document manager does not display any template documents saved in your iCloud account (they do appear in the Pages app library in the iCloud Drive Web app but not in the Pages for iCloud document manager itself).
Make and Manage Your Own Templates
There are two sides to custom templates: the boring bookkeeping side and the fun creative side. Here I cover the boring side first and reserve the fun stuff for dessert later, in Design a Template for Reuse.
Save and Share Your Templates
Only Pages for Mac can create a template document. Creating a template requires almost no effort:
- Open the Pages document that you want to turn into a template.
- Choose File > Save as Template to evoke the dialog pictured in Figure 165.

Figure 165: This dialog appears when you choose File > Save as Template in Pages for Mac.
- Save the file in one of two ways:
- To work with the template only on this Mac, click Add to Template Chooser. Pages adds it to the My Templates category.
- To share the template with other users (such as co-workers) or other devices (such as your iPad or laptop), click Save. Pages saves it as a template document in the location that you specify.
Template documents have a special thumbnail, as in Figure 166.
Figure 166: Template document thumbnails display a special icon in both Pages for Mac (left) and Pages for iOS (right).
Install a Shared Template
You can install a shared template in Pages for Mac and Pages for iOS just by opening it as you would any other Pages document. Pages immediately offers to install it (Figure 167).

Figure 167: Both Pages for Mac (left) and Pages for iOS (right) offer to install a template document in the Template Chooser when you open it.
When you accept this offer, the template appears in the Template Chooser’s My Templates category, labeled with the name of the template document from which it is derived.
Rename and Delete Templates
To rename a template in the My Templates category, open the Template Chooser—as explained earlier in this chapter—and then:
- On a Mac: Control-click the template icon, choose Rename, edit the name, and then press Enter.
- In iOS: Tap the template’s name to make it editable. Edit the name and then tap Done.
To delete a template from the My Templates category, open the Template Chooser and then:
- On a Mac: Control-click the template’s icon, choose Delete from the contextual menu, and then confirm the deletion.
- In iOS: Touch and hold the template’s thumbnail. Tap Delete and then confirm the deletion.
Design a Template for Reuse
Although any document can be saved as a template, a good template is one that you intentionally design to reuse with different content.
To give a sense of how you go about designing a template for reuse, I provide a quick tour here of how to make a simple reusable newsletter template. This small project demonstrates how to construct a new template from scratch (or, as close to scratch as you can get in Pages), using various Pages features described elsewhere in this book.
Here are the design requirements of the simple newsletter template:
- A two-column layout
- Images that move with text, but that can span column boundaries
- Support for stories that span page boundaries
- Support for multi-column sidebar stories
Let’s get started…
Two-column Layout
This first requirement is the reason I don’t just use an Apple-supplied newsletter template: currently, none of them offer a two-column layout.
Meeting the two-column requirement, though, is easy. I start with a new document based on the Blank template and use the Text Format inspector’s Layout panel to give the body two columns (see Create Columns on a Mac).
To help me see how text flows in the columns and how it interacts with other elements in the newsletter more easily, I fill it with a good supply of sample text, using one of the many Lorem ipsum generators that can be found on the Web; in this case, I choose one that generates bacon-flavored filler text.
I also take this opportunity to override the Body paragraph style for the newsletter’s body text, setting it to Georgia at 11 points, with a 0.25-inch indent for the first line of each paragraph (see Set Paragraph Layouts on a Mac, Choose Fonts on a Mac, and Handle Style Overrides).
Figure 168 shows a reduced view of the layout so far.
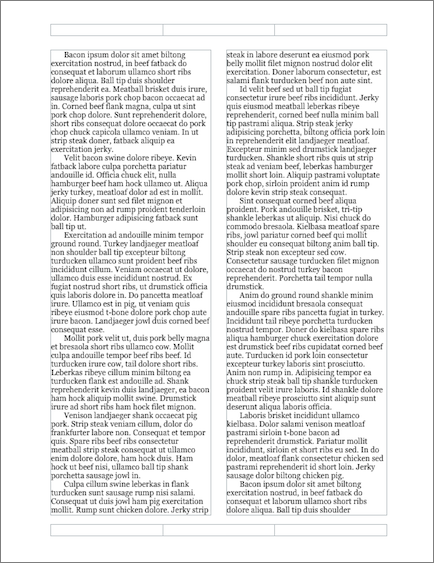
Figure 168: The document begins with a basic (bacon-flavored) two-column layout.
Column-spanning Images Anchored to Text
This requirement was a pain point for my colleague: in his previous newsletter (which he created in Pages 4), he had to anchor images to stay on the page because images anchored to move with the text were constrained to column boundaries; in Pages 5, that constraint no longer exists. All I have to do is drop an image where it needs to go, resize it, and make sure text wraps around it properly and that it is set to move with the text (see Set an Object’s Size and Proportions, Set Where an Object Is Anchored, and Set Text Wrap).
I also make the image into an image placeholder so it can easily be replaced with a different image. Then, because every image should have a caption, I add a caption text box (redefining the Blank template’s Caption style) and group the text box with the image so it will stay attached to the image should a text reflow cause the image to move (see Use Placeholders and Master Objects, Use Text Boxes, and Group and Lock Objects).
The newsletter document now looks like Figure 169.

Figure 169: The document now includes a placeholder image and an attached caption.
Stories that Span Page Boundaries
Unlike Pages 4, where you can link and flow text between text boxes, stories that leap across page boundaries must reside in the document’s body text in Pages 5. That isn’t, however, as much of an obstacle as you might think: using a combination of techniques, such as employing empty shapes as spacers and inserting column breaks at appropriate places, you can create a sophisticated layout even without linked text boxes.
Body text, by definition, spans page boundaries. To highlight the page-spanning criterion in this template, I first separate my sample text into stories by inserting headings using the Heading 3 style that comes with the Blank template—this style displays a line border above the text as part of the style definition: perfect to signal the start of a new story!
As it turns out, the final story in the right column on the first page flows onto the document’s second page. I therefore position a “continued on next page” text box at the place where the story breaks across page boundaries. I want this text box to stay put, so I set it to Stay on Page in the Object Format inspector’s Arrange panel.
The document now looks like Figure 170.
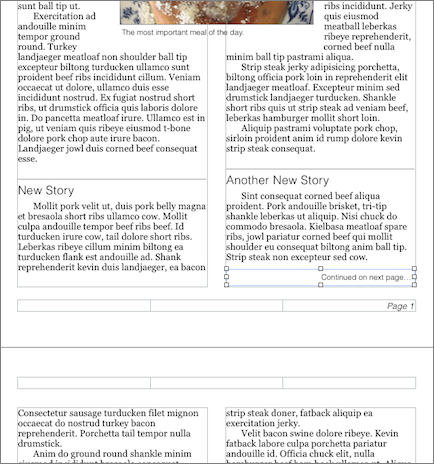
Figure 170: Stories in the body text can span pages; adding a text box at the story break tells the reader where the story continues.
Multi-column Sidebar Stories
Incorporating multi-column sidebar stories is no problem, since, as we know from Create Columns on a Mac, text boxes can support multiple columns. I create a new text style for the text of sidebar stories to differentiate them from flowing body text stories, and create a heading style for the sidebar’s header. I also give the sidebar text box a background color and a border to make it further stand out (see Set Object Fills and Set Object Borders).
I fill the text box with some placeholder text, give it a placeholder heading, and set it to Stay on Page at the bottom of the second page.
Figure 171 shows how the sidebar lays out.

Figure 171: A sidebar interrupts the two-column body text flow.
Finishing Touches
Finally, I add a text box for the newsletter’s placeholder banner, set that box to stay at the top of the first page, give the first story a placeholder headline, turn each story’s text and headings into placeholder text, and save the whole thing as a template in the Template Chooser (Figure 172).
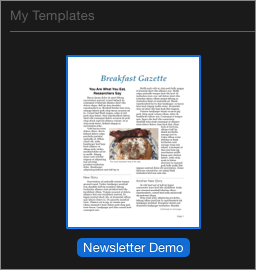
Figure 172: A new template is now ready to be served.
And that’s it: one reusable newsletter template, served piping hot, with crispy bacon.