Add All Sorts of Objects
Other chapters have touched on, and, in some cases, gone deeply into ways you can manage and modify objects in Pages. This chapter provides a closer look at the specific kinds of objects you can use. In Pages, objects generally fall into two types: what I call “basic objects” and “computing objects.” Although Pages does not explicitly draw this distinction, it becomes clear when you work with them.
Basic objects:
- Text boxes: These text-containing objects are distinct from a document’s body text area and its headers and footers. Use Text Boxes describes how to make and customize them.
- Shapes and lines: Pages provides a range of shapes and lines you can add to a document, whether to ornament it or to construct diagrams; see Use Shapes and Lines.
- Media: You can illustrate your documents with pictures, video, and audio. Use Media describes the multimedia capabilities of Pages.
The basic objects share some common appearance options; you can see how to dress these objects up in Change How Basic Objects Look.
Computing objects:
- Tables: In Pages, tables are fully functional spreadsheets, complete with formulas; see Use Tables.
- Charts: Pages provides dozens of colorful and dynamic charts and graphs, along with data editors to populate them with your figures and labels; read Use Charts.
Unlike basic objects, computing objects are made up of multiple internal elements that interact with one another dynamically.
Use Text Boxes
When you need to place text above, beneath, or outside of a document’s body text, or you want to add some text to a document that has no body text, use a text box. Text boxes have all sorts of uses: for example, sidebars, captions, callouts, pull-quotes, and watermarks.
Adding a text box is easy:
- On a Mac: Choose Insert > Text Box, or, on the toolbar, click the Text
 icon.
icon. - In iOS: On the toolbar, tap the Add
 icon. Next, in the popover, tap the Shapes
  icon, and then tap Text.
 - In a browser: On the toolbar, click the Text
 icon.
icon.
A new text box, by default, arrives as a transparent box with no visible border and contains a text placeholder (Figure 131). You can ornament a text box in a variety of ways, as described in Change How Basic Objects Look, later in this chapter.

Figure 131: A new text box has no border or fill, and contains placeholder text; above, a new text box in Pages for Mac.
Click or tap the placeholder to select it, then enter your replacement text. Text in a text box can be formatted and styled in the same ways that body text can be formatted and styled.
In addition, text boxes include a vertical alignment capability not available to body text:
- On a Mac: In a text box, place the insertion point or select some text and then, in the Text Format inspector, click a vertical alignment setting to align the text with the top of the box, the box’s center, or the box’s bottom (Figure 132).

Figure 132: The vertical alignment settings appear in the Text Format inspector on the Mac.
- In iOS: With some text or an insertion point selected in the text box, tap the Format
 icon, tap Layout in the popover, and then tap a Text Alignment setting.
 - In a browser: Select some text in the box or click the text, and then click a vertical alignment setting in the Text Format inspector.
If you put more text in a text box than it can display, an overflow icon appears at the bottom of the box ( on a Mac;
  in a browser and iOS).
Use Shapes and Lines
Pages provides a rich collection of shapes and lines that you can use as ornamentation or in diagrams, organization charts, callouts, labels, illustrations, and more. You can combine shapes and lines to produce complex graphics, and you can customize them in various ways.
Pages for Mac offers the deepest collection of line and shape options, with Pages for iCloud offering the shallowest, and Pages for iOS falling between the two. Nonetheless, every Pages app supports the shapes and lines that you add and customize in the other Pages apps.
Add and Customize Shapes
Much like adding a text box, adding a shape to a document is just a matter of a few taps or clicks:
- On a Mac: Choose Insert > Shape and then choose a shape from the Shape submenu, or, on the toolbar, click the Shape
 icon and then click a shape in the popover. If you use the toolbar method, you can scroll the Shape popover left and right to choose from various shape styles.
 - In iOS: On the toolbar, tap the Add
 icon. Next, in the popover, tap the Shape
  icon, and then tap a shape. You can swipe the Shape popover left and right to choose from shape style variations.
 - In a browser: On the toolbar, click the Add Shape
 icon.
icon.
Figure 133 shows the twelve prebuilt shapes that Pages provides.
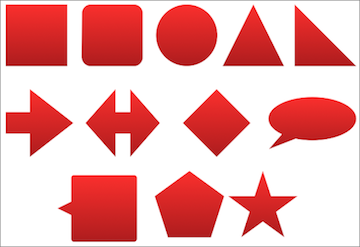
Figure 133: Each of the twelve prebuilt shapes has a name. In order from the top left: rectangle, rounded rectangle, oval, triangle, right triangle, arrow, double arrow, diamond, quote bubble, callout, polygon, and star.
You can resize, rotate, and reposition shapes as described in Arrange Objects on the Page. You can also change a shape’s fill color, border, and other appearance properties; see Change How Basic Objects Look.
But that’s not all. Many prebuilt shapes have one or more green feature handles  that appear when you select the shape (Figure 134) (they don’t appear in iCloud currently). Drag a handle to modify the shape.
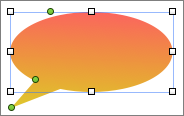
Figure 134: A quote bubble has three feature handles you can drag to modify its features, such as the bubble’s curvature and the length and direction of the quote bubble’s pointer.
Here’s a quick look at the feature handles that prebuilt shapes provide and what they do when you drag them:
- One handle (rounded rectangle, arrow, double arrow, and polygon): Drag a rounded rectangle’s feature handle to change the radius of its corners. Drag the feature handle on an arrow or a double arrow to change the angle of the arrow points and the width of the arrow shaft. Drag a polygon’s feature handle to change how many sides it has.
- Two handles (star): Drag a star’s inner feature handle to change the angle of its points. Drag a star’s outer feature handle to change the number of points it has.
- Three handles (quote bubble and callout): Drag the feature handle on the shape’s bounding box to change the radius of its curves. Drag the feature handle where the shape’s main body joins its pointer to change the point’s sharpness. Drag the handle on the pointer’s tip to change its length and where it points.
Every shape also acts like a text box: that is, you can double-click or double-tap inside a shape to insert and modify text in it (Figure 135). You can edit, lay out, and style the text in a shape just as you can body text or text in a text box—with one exception: text in any shape other than a rectangle cannot be laid out in snaking columns.
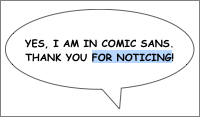
Figure 135: Shapes can contain text, which you can edit and format.
If none of the shapes that Pages provides meets your needs, no problem: you can draw your own shapes or you can edit a prebuilt shape to add corners and curves to it (see Draw and Edit Shapes and Lines a little further on).
Add and Customize Lines
Lines have all sorts of uses in a document: you can use them to separate things, connect things, or point at things…or you can simply use them as decoration.
The number of line types that Pages explicitly offers you depends on where you look and which app you are using. For example, the Insert > Line command in Pages for Mac produces a submenu that offers six different types of lines, examples of which are shown in Figure 136.
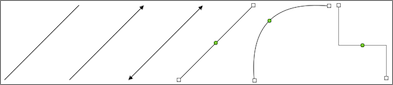
Figure 136: From left to right, the six named line types in Pages for Mac are: line, line with arrowhead, line with two arrowheads, straight connection line, curved connection line, and right angle connection line.
However, when you click the Shape ![]() icon in Pages for Mac, you only see three line types offered in the app’s Shape popover. Pages for iCloud also offers three line types in its Shape popover—but they are different line types than those in the popover in Pages for Mac! And then there’s Pages for iOS, which only provides two line types in its Shape popover.
icon in Pages for Mac, you only see three line types offered in the app’s Shape popover. Pages for iCloud also offers three line types in its Shape popover—but they are different line types than those in the popover in Pages for Mac! And then there’s Pages for iOS, which only provides two line types in its Shape popover.
This is not as big a problem as it seems, because, when you get right down to it, there are really only two types of lines in Pages: straight lines and connection lines. All the other types are just variations of these.
Straight lines are just that: straight. They optionally can have arrowheads or other symbols at one or both ends, and can be drawn with different thicknesses and in different styles and colors (see Set Line Properties for how to specify these).
Connection lines can be straight, curved, or consist of several segments at right angles to each other. When you select a connection line, it displays a connector point  at each end and a green feature handle
  somewhere along its length (Figure 137). Like straight lines, connection lines can be drawn in various thicknesses, colors, and styles, and they can be given arrowheads or other symbols at one or both ends.
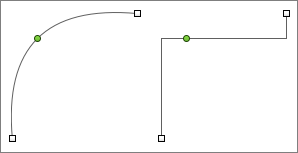
Figure 137: When you select connection lines, they show connectors at each end and a green feature handle.
You can change both the orientation and the rotation of any line, whether straight or connection, by dragging one end of it.
You can change the curvature of a curved connection line by dragging its feature handle. For a right angle connection line, drag the feature handle to change where the right angles appear in the line.
You can also switch the type of connection line between curved and right angle and back again:
- On a Mac: Double-click the green feature handle to toggle the line between curved and right angle. To make a straight connection line, drag the feature handle of a curved connection line between its two endpoints until the line’s curvature disappears—as the line becomes straighter it eventually “snaps” into place as a straight line.
- In iOS: First, select the line. Next, tap Format
 , then, in the popover, tap Style > Style Options > Line. Finally, tap Connection and choose a type (Straight, Curve, or Corner). You can also drag the feature handle of a curved connection line to make it straight, or vice versa, just as you can on the Mac.
At this point you may be wondering what connection lines connect. The answer is objects (other than lines) that are anchored to a page (on the Mac, this setting is in the Object Format inspector’s Arrange panel; in iOS, it’s a Wrap option on the Format ![]() popover’s Arrange pane).
popover’s Arrange pane).
To connect a connection line to an appropriately anchored object, drag one end of the line to the object: the object highlights as the connection is made. You can connect the unconnected end of that line to a second object as well. Once an object is connected to a connection line, the line reshapes itself to retain the connection when you drag the object—great fun when you’re fiddling with diagrams or organization charts!
Connection lines don’t visibly have to touch objects to which they connect—the endpoint can be offset from the object, as in Figure 138.
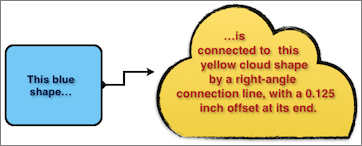
Figure 138: Connection lines can be offset from the shapes they connect.
Here’s how to offset a connection line:
- On a Mac: Select the connection line and then, in the Object Format inspector’s Arrange panel, under the Connection heading, enter a value in the Offset fields to specify the distance from the line’s end to the object.
- In iOS: Select the line, then, in the Line pane of the Style Options (tap Format
 , then, in the popover, tap Style, followed by Style Options), tap Connection and use the Offset sliders to control the distance between the line’s end and the connected object.
Draw and Edit Shapes and Lines
If none of the prebuilt shapes meets your needs, you can edit a shape, text box, or straight line, or you can draw your own shape. For example, the yellow cloud shape in Figure 138, just previously, began life as an ordinary prebuilt rectangle shape before I edited it.
Edit Shapes and Lines
To edit a shape, text box, or line, choose Format > Shapes and Lines > Make Editable. Edit handles appear on the object, as in Figure 139.
Figure 139: Use the edit handles to change an object’s shape.
Pages provides three kinds of edit handles:
- Sharp points: Represented by a red square
 , lines connecting to this handle do so at a straight angle. Use these to give a shape corners and straight edges.
 - Smooth points: Represented by a red circle
 , lines curve smoothly when they connect to this handle. Use these to create curves along a shape’s edge.
 - Bézier points: Represented by a circle with an interior + symbol
 , lines curve smoothly when they connect to this handle, too. However, a Bézier point also provides adjustable curve guides so you can modify the curvature of the lines connecting to the point (Figure 140).
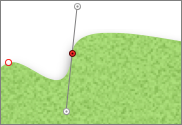
Figure 140: Use a Bézier point’s curve guides to control the curvature of the lines that enter the point.
Here’s what you can do with edit handles:
- Reshape an object by dragging an edit handle.
- Add additional edit handles to an object by clicking the object’s edge where you want to place the new handle.
- Toggle a handle between a sharp point and a smooth point by double-clicking it.
- Remove a handle by clicking to select it and then pressing Delete.
- Make a handle into a Bézier point by Control-clicking it and choosing Make Bézier Point from the contextual menu.
When you work with Bézier points, you can adjust the angle at which lines enter the point by dragging the end of one of its curve guides around the point. To adjust the length of a curve guide (which controls the depth of the curve entering the Bézier point), drag the curve guide’s handle toward or away from the Bézier point.
Draw Shapes and Lines
To draw a new shape freehand, choose Insert > Line > Draw with Pen (Option-Shift-Command-P), or click the Add Shape ![]() toolbar icon and then click Draw with Pen. Your pointer becomes a pen
toolbar icon and then click Draw with Pen. Your pointer becomes a pen  , and drawing instructions appear (Figure 141).
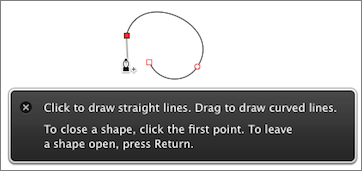
Figure 141: Pages provides freehand drawing instructions.
Let me expand on the first line of those drawing instructions, as they are confusing (by which I mean that I was confused by them at first):
- To create a straight line segment, click to set a point, then move your pointer and click again.
- To create a curved line segment, click to set a point, move your pointer away from that point and then click and drag to create a curve point; finally, click once more to set the point that finishes the curve segment.
You can either double-click or press Return at any time to stop drawing and create an open shape. To stop drawing and create a closed shape, click the first point you created. When you stop drawing by either of these methods, you end up with a shape that has edit handles, ready for tweaking. You can manipulate these handles as described in Edit Shapes and Lines, above.
Once you have finished editing your new freehand drawing, press Esc or click away from the drawing.
Combine Shapes
Finally, you can combine two or more shapes to create new shapes as in Figure 142.
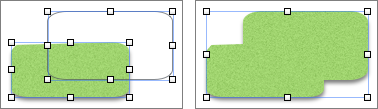
Figure 142: Combine shapes to create a single shape.
Follow these steps to combine shapes:
- Drag a shape over one or more other shapes (optional).
- Select all of the shapes you want to combine.
- At the bottom of the Arrange panel of the Object Format inspector, click one of the following:
- Unite: Click this to combine the selected shapes into one shape.
- Intersect: This creates a new shape that consists only of the area where the shapes overlap.
- Subtract: This option subtracts the overlapped portion of the topmost shapes from the bottom shape (see Set Front-to-back Order for more about object layering).
- Exclude: Like the Unite option, Exclude combines the shapes into one shape, but it leaves out the area where they overlap.
Use Media
If a picture is worth a thousand words, you can save a lot of words by adding pictures to your documents instead…and imagine how much writing you can avoid if you add video or audio as well!
Pages provides the ability to add media to your documents as follows:
- On a Mac: Drag a media item either from the Finder or from a Web page into your document, or use the Media popover:
- On the toolbar, click Media
 .
. - In the popover, click Photos, Music, or Movies, then, on the left of the popover, click to choose the source of the media (for example, an iPhoto album or an iTunes playlist).
- Finally, click the media item you want to add.
- On the toolbar, click Media
- In iOS: Tap Add
 , and tap the Media
  icon to see your photo albums. You can then tap an album to insert media from it, use your device’s camera to add a new picture or video, or insert media from other source, such as from an iCloud Drive folder (Pages for iOS does not support adding audio). When you tap a picture in the popover, Pages adds it to your document. When you tap a video, the popover provides preview controls; to add the video to your document, tap Use on the iPad or Choose on the iPhone.
 - In a browser: Drag an image from another Web page or from the Finder (or Windows Explorer) into your document. Pages for iCloud currently does not let you add video or audio.
No matter whether a particular Pages app allows you to add video or audio, each Pages app preserves media from the other apps.
Edit Images
All of the Pages apps provide non-destructive image editing capabilities; that is, you can undo the edits that you make, and you can restore the original image at any time.
Crop an Image
You can crop any image in both Pages for Mac and Pages for iOS, while Pages for iCloud restricts cropping to images that you have anchored to the page (see Set Where an Object Is Anchored).
To see an image’s cropping control, double-click or double-tap the image. On a Mac, when an image is selected, you can instead click Edit Mask in the Object Format inspector’s Image panel; in iOS, tap Format ![]() and then tap Image to see the Edit Mask button.
and then tap Image to see the Edit Mask button.
Figure 143 shows the cropping control in Pages for Mac.
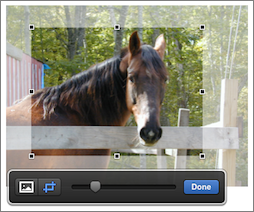
Figure 143: Use the cropping control to display part of an image.
The cropping control places a translucent mask over the part of the image that will be cropped out; the hole in the mask shows the part of the image that remains when you click or tap Done.
To use the mask:
- Drag the slider to adjust the size of the image.
- Drag any part of the image to reposition the part of the image that shows through the mask’s hole.
- Drag the handles on the mask’s hole to adjust its dimensions.
On the Mac and in a browser, click the crop ![]() icon or the image
icon or the image ![]() icon to choose whether the resizing handles surround the mask’s hole or the entire image, respectively; in iOS, tap the masked part of the image or the mask’s hole to choose where the resizing handles appear.
icon to choose whether the resizing handles surround the mask’s hole or the entire image, respectively; in iOS, tap the masked part of the image or the mask’s hole to choose where the resizing handles appear.
To reset an image to its uncropped state, select the image and then:
- On a Mac: Choose Format > Image > Reset Mask.
- In iOS: Tap Format
 , tap Image, and then tap Reset Mask.
 - In a browser: Control-click the image and then choose Reset Mask from the contextual menu.
Adjust an Image (Mac only)
When you select an image in Pages for Mac, you can change how it looks with the Adjustments settings in the Object Format inspector’s Image panel (Figure 144).
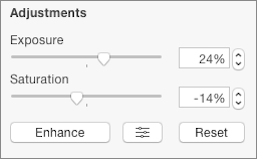
Figure 144: Change an image’s exposure, saturation, and more with the Object Format inspector’s Adjustments settings.
The settings are similar to those in iPhoto, Preview, and other image editing apps, so I won’t provide details here. The basic controls in the Object Format inspector are probably all you need to fix up a photo that is underexposed or that needs its colors toned down.
For more fine-grained image adjustments, click the Adjust Image  button to bring up a floating Adjust Image window with additional settings, including sharpness, levels, color temperature, and contrast.
Use Instant Alpha
You use the Instant Alpha tool to make areas of an image transparent so that whatever lurks behind the image can peek through. Both Pages for Mac and Pages for iOS offer an Instant Alpha tool; Pages for iCloud does not, but, of course, it does preserve the transparent image areas that the other two Pages apps create.
To wield the Instant Alpha tool, select the image and then:
- On a Mac: In the Image panel of the Object Format inspector, first click Instant Alpha, and then click and drag over a part of the image you want to remove. As you drag, the tool selects adjacent pixels that have the same, or similar, colors, and then makes the selection transparent. Click Done when you finish.
- In iOS: Tap Format
 , tap Image, and then tap Instant Alpha. Drag over the image to select pixels of similar color adjacent to those over which you are dragging. Lift your finger to make the selection transparent. Tap Done to finish.
Figure 145 shows the Instant Alpha tool in action on the Mac, along with examples of an image before and after the tool was applied.
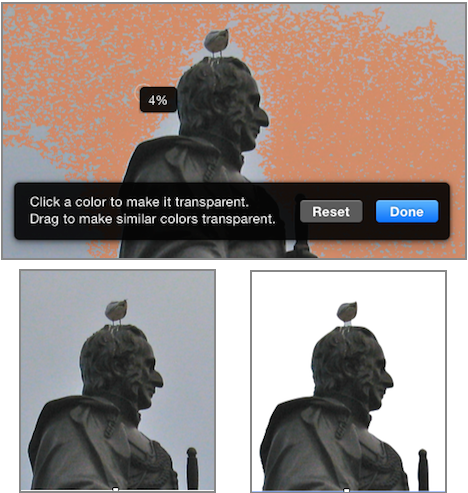
Figure 145: Dragging with the Instant Alpha tool (top) removes parts of an image that have a similar color. Here, the gray sky in the original image (bottom left) becomes transparent (bottom right).
To revert to the original image, click the Reset button in the panel that appears below the image when the Instant Alpha tool is active. You can revert an image even after you finish using the tool: select the image, bring up the Instant Alpha tool again, and then click Reset.
Adjust Media Playback
In both Pages for Mac and Pages for iOS you can select an inserted media item and then adjust how it plays:
- On a Mac: Open the Object Format Inspector and look in the Video panel or in the Audio panel.
- In iOS: Tap Format
 , and then tap Movie or Audio.
In either app, you can choose Repeat settings:
- None: The media plays once when you click or tap it.
- Loop: The media plays repeatedly until you move to another page in the document (or you click or tap the media to make it stop).
- Loop Back and Forth: Like Loop, this setting makes the media play continuously; however, when the media gets to the end it plays backward to the beginning, and then plays forward again. This setting works best with very short pieces of media.
In Pages for Mac you’ll find more options:
- Volume: This slider controls the playback volume of the media.
- Play, Rewind, and Fast Forward: Click these playback controls as a convenience when working with playable media.
- Trim: Use this slider, under the Edit Movie or Edit Audio heading, to restrict playback to only a portion of the media. You can trim from both the beginning and the end, but not from the middle.
- Poster Frame: Drag this control, available under Edit Movie, to pick a representative frame from the selected video; Pages displays the poster frame when the video is not playing.
Change How Basic Objects Look
On the Mac, the Object Format inspector’s Style panel provides most of the appearance settings when you select basic objects; that is, text boxes, shapes, lines, images, and video.
Pages for iOS gives you similar settings: to see them, tap to select an object, tap Format ![]() , tap Style, and then tap Style Options.
, tap Style, and then tap Style Options.
Pages for iCloud offers fewer appearance settings for basic objects than the other two apps do, though it preserves the appearance settings that the other apps make. Like Pages for Mac, the iCloud app presents its appearance settings in the Format inspector’s Style panel when you select an object.
The appearance settings that Pages provides depend on the object that you select. I describe the setting types in the following sections, and discuss how they may differ among the Pages apps.
The Look of Audio and Video
When you insert a playable media object into a Pages document, changes you make to the object’s appearance are not always preserved when the document is exported from Pages. This is because the presentation of the media, and especially the player controls used by media, are then outside of Pages’, um, control.
Take, for example, Figure 146, which shows video and audio objects both as they appear in Pages and as they appear in an ebook exported from Pages. Note, in particular, the different playback controls for the video and audio objects between Pages and the ebook export, and that the video has lost its picture frame border.
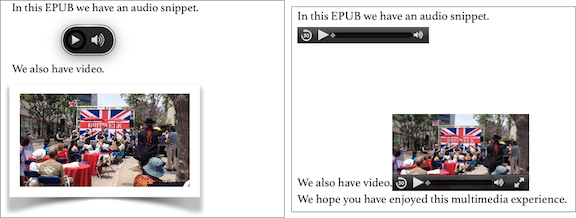
Figure 146: Audio and video within Pages (left) can look different when exported into an EPUB (right).
Video objects usually retain the size settings you give them, but can lose other ornamentation. Audio is more problematic, since sound has no width nor height independent of the controls used to play it, and Pages itself provides no appearance settings for audio objects.
Therefore, don’t spend too much time tweaking the appearance of playable media objects: set the position, set the size (for video), and, unless you never intend to export the file, don’t worry too much about the rest.
Set Object Borders
Borders are ornaments that completely surround an object. The object can have no border at all, a line border, or a picture-frame border (Figure 147). Only objects that are closed shapes (that is, they have no openings on any side) can have picture-frame borders.

Figure 147: Line borders (left) trace an object’s shape; picture-frame borders (right) surround the object with a rectangular graphic.
When you select a line border, you can set the thickness of the line, the style of the line, and the line’s color.
You select picture-frame borders from a preset collection of frame styles. You cannot customize these frame styles, but you can make a frame thinner or thicker by adjusting its scale.
To work with object borders:
- On a Mac: Select an object and then click Style in the Object Format inspector. The Border settings on the Style panel (shown in Figure 148) include a menu with common border presets, a menu for choosing between a line or picture-frame border or no border at all, a menu with line or picture-frame styles that changes depending on what you choose in the border-type menu, and settings for border color and thickness.
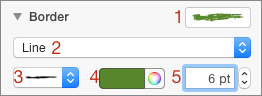
Figure 148: Border settings on the Mac for closed objects can include: (1) presets menu, (2) border-type menu, (3) border style menu, (4) border color settings, and (5) border thickness settings.
When you choose a picture-frame border in the border-type menu, the color and thickness settings are replaced with Scale settings that adjust the size of the picture frame.
- In iOS: Select an object, tap Format
 , tap Style in the popover, and then tap Style Options. Tap Border to see the Border settings (Figure 149).
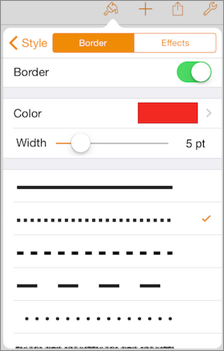
Figure 149: The Format popover’s Style Options panel provides controls for altering an object’s border in Pages for iOS.
Use the Border setting controls as follows:
- Tap the Border toggle at the top of the popover to turn the object’s border on or off.
- Use the Color and Width controls beneath the toggle to alter the appearance of line borders.
- Select a line style or a picture-frame style to use as a border by tapping in the scrolling list at the bottom of the popover. Note that when you choose a picture-frame style, a Scale control replaces the Color and Width controls.
- In a browser: Select an object and then enable Border in the Object Format inspector’s Style pane. You can then choose whether to border the object with a line or a picture frame of various styles. You can choose the color and thickness of border lines and the scale of picture frames.
Set Line Properties
A line’s appearance is controlled by its stroke, which describes the line’s thickness, style, and color settings. Lines can also have endpoint and connection settings, depending on the type of line selected (see Add and Customize Lines and Draw and Edit Shapes and Lines for more about line types).
To set a line’s (or an open shape object’s) stroke, select it and then do the following:
- On a Mac: Use the Stroke settings in the Object Format inspector’s Style panel. You can choose whether the line appears at all (that is, by giving it a stroke), and, if it does appear, set its style, color, thickness, and endpoints (such as arrowheads). As a convenience, the first pop-up menu in the Stroke section provides preset strokes you can apply to the line.
- In iOS: Tap the Format
 icon, tap Style, tap Style Options, and then tap Line (or Border for an open shape). You can then tap Color to choose a different line color, adjust the line’s width with the Width slider, or change the line’s style by tapping a style from among those displayed. Depending on the type of line selected, you can also tap Arrowheads to set the endpoints for each end of the line.
 - In a browser: With a straight line selected, check Stroke in the Object Format inspector’s Style panel, and then choose a line style from the pop-up menu. Click the color pop-up to change the line’s color, and enter a value in field provided to set the line’s thickness in pixels. If the line is either a straight line or makes up an open shape, you can also set its endpoint symbols.
Set Object Fills
Most basic objects can have a fill applied: that is, you can fill the object with a color, a gradient blend, an image, or a combination gradient blend and image. Not all of the fills, as you might expect by this point, are available in all of the Pages apps. Also, as you might expect, Pages for Mac provides the most fill options, and Pages for iCloud the least.
I describe the fill options available in each app separately.
Tip: The easiest way to tell whether an object can have a fill is to select it. In Pages for Mac and Pages for iCloud, if you then see a Fill option in Object Format inspector’s Style panel, the object can be filled. In Pages for iOS, tap Format ![]() > Style > Style Options, and look for a Fill option.
> Style > Style Options, and look for a Fill option.
Set Object Fills on a Mac
The Fill section of the Object Format inspector’s Style panel varies dramatically in appearance and functionality, depending on what type of fill you choose (Figure 150).
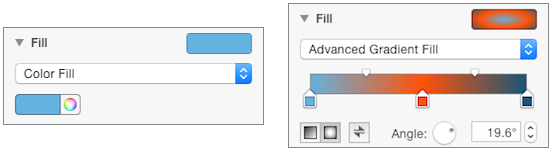
Figure 150: The Fill settings vary depending on the type of fill you choose.
You can choose a preset fill by clicking the preset fills well at the top-right of the Fill section, or you can roll your own. For the latter, several types are available in the second pop-up menu in the Fill section:
- No Fill: This choice removes any fill that the object has, so that anything behind the object is visible. This choice also makes the object more difficult to select: you must click its border, since any click inside the object falls through to whatever is behind the object.
- Color Fill: Choose this to give an object a single color as a fill. Click the color well to choose from a popover containing preset colors, or click the color
 icon to select a color from the Mac’s standard Colors picker window.
 - Gradient Fill: This creates a gradually changing blend between two colors. You can choose each of the two colors from a popover, or select the colors from the Colors picker window. You can also control the angle at which the blend is displayed.
- Advanced Gradient Fill: When you choose this, you can create a gradient fill that uses multiple colors and that either blends the colors linearly across the shape or that blends them radially.
To manage an advanced gradient fill, do any of the following:
- Click the gradient setting strip (refer back to Figure 150), and then use the Colors picker to add more colors to the blend.
- Drag a color’s slider off the bottom of the strip to remove it from the blend.
- Use the sliders at the top and bottom of the strip to adjust the color blending.
- Click the linear
 icon to choose a linear blend, click the radial
  icon to choose a radial blend, and click the direction
  icon to reverse the fill’s direction.
 - Use feature handles that appear on the object to adjust the blend (Figure 151).
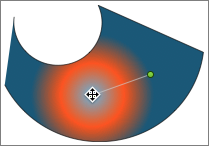
Figure 151: Advanced gradient fills provide feature handles that you can drag to adjust the blend within the object itself.
- Image Fill: This type of fill uses an image to fill the object. To specify the image, drag an image from a Web page or from the Finder and drop it into the image well or click Choose. You can scale the image’s size and set it to tile or stretch to fill the object.
- Advanced Image Fill: This complex fill uses both an image and a color to create a fill. Drag an image from a Web page or from the Finder and drop it into the image well or click Choose to specify the image. Click the color well to choose from preset colors, or click the color
 icon to select a color and set its opacity from the Colors picker window (at 100% opacity the color completely obscures the image, so you should set it to a lower value). This fill also provides the same tiling and scaling options that normal image fills offer.
If you have created a particularly lovely fill, you can use it on other objects in your document:
- Select the object with your particularly lovely fill.
- Click the preset fills well at the top left of the Fills section in the Object Format inspector’s Style panel.
- In the popover, drag the Current Fill over one of the other fills in the popover (Figure 152) to replace it with your creation.
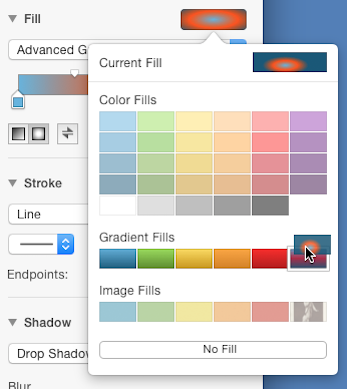
Figure 152: Replace a preset fill by dragging your fill over another.
You can only replace fills of the same type; that is, color fills replace color fills, gradient fills replace gradient fills, and image fills replace image fills. The new preset is saved with the Pages document.
Set Object Fills in iOS
Compared to Pages for Mac, Pages for iOS’s fill options seem positively spartan: you can only use preset fills—including any you may have saved with the document using Pages for Mac, as described just above.
To set a fill, do this:
- Select the object.
- Tap Format
 and then, in the popover, tap Style.
 - Tap Style Options and then tap Fill.
- Swipe left and right in the popover to see the available fills; tap a fill to apply it to the selected object.
Set Object Fills in a Browser
Pages for iCloud makes even the limited fill options in Pages for iOS look robust. You can apply fills only to prebuilt shapes and to text boxes—freehand shapes, whether open or closed, do not offer a Fill option.
To set a fill, select the object, open the Object Format inspector’s Style panel and enable Fill. Then click the fill well to see the Fills popover. You can choose from Theme Colors, which comprise the colors, gradients, and image fills in the document’s template (and those you’ve saved with the document in Pages for Mac as described a little earlier), or you can click More Colors to choose from a wider variety of colors.
Set Object Effects
Pages provides three object effects, with varying degrees of customization, on all three platforms: shadow effects, reflection effects, and object opacity. You can apply object effects to text boxes, shapes, lines, images, and video.
When you select an object, you can find its effects settings as follows:
- On a Mac/iCloud: Open the Style panel of the Object Format inspector.
- In iOS: Tap Format
 > Style > Style Options, and then tap Effects.
Cast a Shadow
This effect makes an object appear as though it is casting a shadow on the page. Pages provides three different kinds of shadow:
- Drop shadow: The object looks like it’s floating above the page.
- Curved shadow: Objects appear as though either they, or the page behind them, is curved.
- Contact shadow: Objects seem to be standing on, or above, the page (Figure 153).
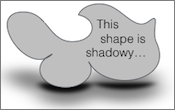
Figure 153: A contact shadow makes the object look like it is standing on a tilted page.
With Pages for Mac, when you enable Shadow in the Object Format inspector’s Style panel and choose a shadow type from the Shadow pop-up menu, you can customize the following shadow characteristics:
- Blur: The slider controls how sharp the shadow looks; you can also enter an exact blur value, in points. Drop and contact shadows offer this setting.
- Inward/Outward: This slider, available for curved shadows, controls how curved the shadow appears.
- Offset: Specify how far from the object the shadow appears, either by dragging the Offset slider or by entering an exact measurement.
- Opacity: Control how transparent the shadow looks by dragging the Opacity slider in the Shadows section of the Inspector, or by entering a value.
- Angle: Think of this as controlling the angle of the light that strikes the object, such as from above, or from the left, and so on. Set the angle either with the Angle dial or by entering an exact angle value. Drop shadows and curved shadows offer this setting.
- Perspective: Set the apparent tilt angle of the page behind the object in the entry field. Values can range from 5 to 35. Only contact shadows offer this setting.
- Color: Select from a set of possible shadow colors by clicking in the color well, or click the color
 icon to choose a color from the Colors picker window.
Pages for iOS provides a set of prebuilt shadow effects you can choose when you enable Shadow in the Format ![]() popover; no customization settings are offered. Nonetheless, the app preserves shadows you customize on the Mac or in a browser.
popover; no customization settings are offered. Nonetheless, the app preserves shadows you customize on the Mac or in a browser.
Pages for iCloud has shadow settings similar to those in Pages for Mac, but it currently offers only drop shadows. What’s more, it displays every shadow as a drop shadow no matter what type of shadow it might really be (it preserves the actual shadow type and its settings).
Reflect an Object
An object can be reflected in the (imagined) shiny surface of the page (Figure 154). All three apps provide this effect.

Figure 154: A document’s page can reflect an object.
To give an object a reflection, select the object, enable Reflection, and then drag the slider to control how solid the reflection appears.
Set Opacity
You can set an object’s opacity so that it appears completely opaque, semi-transparent (Figure 155), or even completely transparent, in which case the object becomes invisible. All the Pages apps provide an Opacity slider for objects.
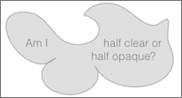
Figure 155: Adjust an object’s Opacity slider to make it fade away.
To set an object’s opacity, select it, and then drag the Opacity slider.
Don’t Forget Object Styles
In addition to all the appearance customizations you can make to an object, don’t forget the prebuilt object styles for each type of object. In Pages for Mac and Pages for iOS, these styles appear at the top of the Style panel in the Object Format inspector; in Pages for iOS, they appear on the Style pane of the Format ![]() popover.
popover.
Also remember that in Pages for Mac you can usually save an object’s appearance settings as a style that you can then apply to other objects in your document. See Create Object Styles.
Use Computing Objects
In addition to the basic object types described earlier in this chapter, Pages provides two object types that can contain, display, and calculate complex data: tables and charts.
Both of these object types should be familiar to users of another of Apple’s iWork apps, Numbers. That’s because the tables and charts that Pages provides are almost exactly the same, both visually and functionally, to the tables and charts provided by Numbers. In fact, you can freely copy and paste tables and charts between the two apps.
In this section I’m going to describe these objects only briefly; otherwise, this chapter could easily become a book in itself (such as Take Control of Numbers, by Sharon Zardetto).
Use Tables
Commonly, you use tables in documents to present tabular lists: a list of options with pro and con points for each, a list of students with their grades for each assignment, a list of monthly bills and their costs, and so on.
Tables in Pages can be employed for all such purposes. But, being full-fledged Numbers-style spreadsheets, they can do much more, too. Their biggest drawback, it sometimes seems, is that very flexibility: creating a basic table for text can feel overwhelming when you are confronted with all the table options available.
In the following topics, I focus on how to find and navigate among these options, with only a nod or two at more advanced capabilities.
Add and Position Tables
To add a table to your document, do the following:
- On a Mac: Click the Table
 icon on the toolbar, page through the Table popover that appears to find a table sample that looks right for your purposes, then click it or drag it into your document. It doesn’t have to look exactly like what you need; you can easily customize it.
 - In iOS: Tap the Add
 icon, tap the Table
  icon in the popover, swipe through the table samples to find a suitable one, and then tap the sample to add it to your document.
 - In a browser: Click the Table
 icon on the toolbar, and then click a sample in the popover (there are currently only a few) to add it to your document.
When you add a new table, it appears along with its row and column widgets along the top and left side of the table, as in Figure 156. These widgets are necessary for adjusting a table’s position and size, but appear only when you select the table; they don’t print, and they vanish when you select anything else in your document.
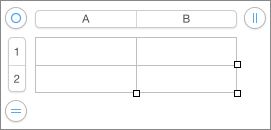
Figure 156: A selected table, like this one in Pages for Mac, has row and column widgets along the top and left that vanish when the table is not selected.
To move a table, select it by tapping or clicking the selection handle at its top left (for example, the ![]() handle in Pages for Mac) and then dragging.
handle in Pages for Mac) and then dragging.
More on Moving a Table
Like other objects, a table can be set to Move with Text or to Stay on Page (see, for example, Set Where an Object Is Anchored). If a table is set to Move with Text, you won’t be able to position it by dragging.
To solve this problem:
- On a Mac/iCloud: Select the table and then click Stay on Page in the Arrange panel of the Table Format inspector.
- In iOS: Disable the Move with Text switch in the Wrap settings of the Format
 popover’s Arrange panel.
Work with Columns and Rows
Once your table is added to a document and you know how to select it to view its row and column widgets, you can:
- Add or remove columns: In a selected table, click or tap the button at the right of the table’s row widget (such as the column number
 button in Pages for Mac). In the popover that appears, click the up or down arrow (Figure 157). This adds or removes columns at the right of the table.
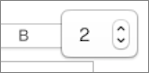
Figure 157: Set the number of table columns with a popover control, like this one in Pages for Mac.
- Add or remove rows: In a selected table, click the button at the bottom of the row widget. In the popover that appears, click the up or down arrow. This adds or removes rows from the bottom of the table.
- Add or remove individual rows or columns: In Pages for Mac/iCloud, hover over the row or column head and click the menu
 button. You can delete the current column or row, or add one to that part of the table. In Pages for iOS, tap the column or row head, then tap Delete to remove a row or column or tap Insert > Body to add a row or column. This method can remove rows and columns even when they contain cells that aren’t empty.
 - Resize an entire table: To resize a table (without changing the number of columns or rows), click or tap the table’s selection handle and then drag one of the size handles that appear along the table’s right and bottom sides and at the bottom-right corner.
- Resize a column or row: To resize a table column or row on the Mac or in a browser, point at the edge of the row or column head in the widget until you see a resize
 pointer, and then drag. In iOS, tap the row or column head in the widget, and then drag with the resize
  handle that appears.
Find Your Table Settings
Look for most table settings in the Format inspectors. As always, what you see depends on what you’ve selected. The settings are distributed among various inspector panels:
- Table Name: Each table in a document has a name, and that name must be unique. A setting for showing or hiding the name above the first table row is in the Table panel of the Table Format inspector (Mac/iCloud) and in Table Options under Tables in the Format popover (iOS). To change the name, first show it and then double-click (tap) it to select it for editing; in Pages for iCloud, use the Table Format inspector’s Name field.
- Headers and Footers: A table can have as many as five row headers, column headers, and column footers. Use these to label columns and rows; information in headers and footers is not used when a table contains formulas that perform calculations. Settings for headers and footers are in the Table panel of the Table Format inspector (Mac/iCloud), and under Headers in the Format popover (iOS).
- Table Outline, Grid Lines, and Alternating Row Color: These settings make it easier to see the rows and individual cells that comprise a table. Find them in the Table panel of the Table Format inspector (Mac) and by tapping Table Options under Tables in the Format popover (iOS). Pages for iCloud offers an Alternating Row Colors checkbox in the Table Format inspector’s Table panel, but no settings for grid lines or table outline.
- Fill and Border: You can fill any selected table cell, row, or column with a specific color (and, in Pages for Mac, images), and make them stand out with custom borders. Look for these settings in the Cell panel of the Table Format inspector (Mac/iCloud) or tap Cell in the Format popover (iOS).
- Text settings: You can format the text in a table cell as you do elsewhere in a Pages document, adjusting the font, alignment, color, and so on. Find these controls in the Text pane of the Table Format inspector (Mac), by tapping Cell in the Format popover (iOS), and in the Cell pane of the Table Format inspector (iCloud).
- Data Format: Because tables in Pages are spreadsheets, they offer the data format options typical of such beasts: you can set cells to display numbers as currency, or to display dates in several different formats, and so on. To locate these options, look for Data Format in the Cell panel of the Object Format inspector (Mac), tap Format in the Format popover (iOS), and look in the Data panel of the Object Format inspector (iCloud).
Edit a Cell’s Contents
A table cell functions in some ways like a text box; that is, you can enter as much text into it as you like:
- On a Mac/iCloud: Click a cell once to select it, then click again to place your insertion point within it.
- In iOS: Double-tap the cell.
To clear the contents of a cell, do this:
- On a Mac/iCloud: Click to select the cell, then press Delete.
- In iOS: Tap to select the cell, and then tap Delete in the popover.
Tables are spreadsheets so it shouldn’t be a surprise that you can enter complex formulas into a cell. What is surprising, however, is that, at least currently, Pages for iOS provides no way to enter formulas, though it does support formulas entered with Pages for Mac or Pages for iCloud.
To enter a formula, clear the cell (if necessary) and then type an equal sign (=). A formula editor appears (Figure 158).

Figure 158: You can grab the left side of the formula editor to move it in order to see the cell underneath; grab the right side to stretch it horizontally.
In addition, when you begin to enter a formula, a Functions browser appears in place of the Format inspector. Use it to select from among hundreds of functions, including Date functions, Engineering functions, Financial functions, Logical functions, and many more. The Functions browser also provides help and examples for each function.
As you type your formula, click other cells to include references to their contents in your formula, as in Figure 158 just above. When you finish, click the green check mark  to save the formula, or click the red X
  to discard it.
Use Charts
Pages provides charts for those times when you need to present a bunch of related numbers in a compact visual form (if you never have that need, you can stop reading this chapter right here).
Pages offers many of the standard chart types you may have seen in one place or another, such as pie charts, column charts, scatter charts, and line charts, to name a few. Both 2D and 3D versions for many of these chart types are offered, and interactive versions of some of them are also available (these last are charts with on-page controls that you can use to view different sets of related data in the same chart, one set at a time).
When it comes to charts (and, by now, I think you can guess what’s coming), Pages for Mac provides the most extensive charting capabilities, Pages for iCloud the least, and Pages for iOS a middling number of them. And, of course, charts created in each of the Pages apps are preserved by the other apps.
Whole books have been written about the visual display of data (The Visual Display of Quantitative Information, by Edward Tufte, is a classic in the field), so I’m only going to skim lightly over the surface of what is a very deep subject here. Instead, in the remainder of this chapter, I help you Learn Chart Terms, describe how to Add Charts to documents, go over how you Edit Chart Data, and briefly guide you through the settings you can make when you Customize Charts.
Learn Chart Terms
The various chart setting options employ certain terms that you need to understand in order to use those options:
- Data series: Every chart you make plots a data series—that is, a collection of numerical values—in some fashion. Different kinds of charts plot the same data series differently; for example, a pie chart plots the individual values of a single data series as wedges in a pie, while a column chart plots that same data series as a sequence of columns (as you can see by the two charts of weekend box office gross receipts in Figure 159).

Figure 159: A pie chart (left) presents a data series as different size wedges in a pie; a column chart (right) shows the same values as columns of varying height.
- X-axis and y-axis: Each of the charts in Pages (with the exception of pie charts) have two axes: the horizontal axis is called the x-axis and the vertical one is called the y-axis.
- Value axis: Very often, one chart axis is the value axis, along which each numeric value in the data series is plotted; for example, in Figure 159, just above, the y-axis in the column chart is the value axis, with the length of each column along that axis representing a movie’s weekend gross receipts. Some complex charts (such as scatter charts) may use both axes as value axes.
- Category axis: Arrayed along the category axis are the separate items in a data series. In Figure 159, the x-axis of the column chart serves as its category axis: the gross receipt columns for the movies appear from left to right along it.
Add Charts
Adding a chart to your document works much like adding any other sort of object:
- On a Mac: You can add a chart either visually or by name. To add a chart visually:
- Click the Chart
 icon on the toolbar to see the Chart popover.
 - Click 2D, 3D, or Interactive at the top of the popover to see the types of charts available in each category.
- Page through the popover to see samples of the different chart styles available in that category.
- When you find a chart thumbnail suitable for your needs, click it or drag it into your document.
If you prefer to pick a chart type by name, choose Insert > Chart and then choose a chart type from the submenu.
- Click the Chart
- In iOS:
- Tap the Add
 icon, and then tap the Chart
  icon in the popover.
 - Click 2D, 3D, or Interactive at the top of the popover that appears to see the thumbnails of the types of charts available in each category.
- Swipe through the popover to see different color styles for the charts in each category.
- Tap a chart thumbnail to add it to your document.
- Tap the Add
- In a browser: Click the Chart
 icon on the toolbar, click 2D or Interactive at the top of the popover to see thumbnails of charts in those categories (Pages for iCloud currently does not offer 3D charts), and then click a thumbnail to add it to your document.
As you can with other objects, you can anchor a chart to a position in the text, or specify that it stay on the page: select the chart and then:
- On a Mac/iCloud: Click Stay on Page in the Arrange panel of the Chart Format inspector.
- In iOS: Disable the Move with Text switch in the Wrap settings of the Format
 popover’s Arrange panel.
Edit Chart Data
Every chart that you add to a document comes with a set of sample data in one or more data series. Edit the sample data to replace it with your own. Figure 160 shows the sample data that comes with a 2D stacked bar chart.
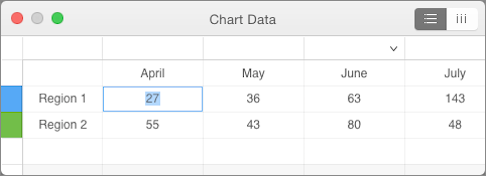
Figure 160: A chart’s data appears in a table when you edit it. This chart has two data series (named “Region 1” and “Region 2”) with four categories (the month names along the top).
As you can see, the data series and categories are presented in a table. You can edit the cells of the table to change the data in each series (that is, the numbers), the name of each series (shown in the left column in the figure), and category names (in the table’s top row in the figure).
To edit a chart’s data, click or tap the chart to select it and then:
- On a Mac/iCloud: Click the Edit Chart Data button that appears.
- In iOS: Tap Edit Data in the menu that appears.
Note: In Pages for iOS, when you edit chart data, you see a numeric keyboard by default; to use a full keyboard to edit the chart data, tap the chart data settings ![]() icon at the top left of the Edit Chart Data popover, and then tap to enable Full Keyboard.
icon at the top left of the Edit Chart Data popover, and then tap to enable Full Keyboard.
To add rows or columns in the data table:
- On a Mac/iCloud: Control-click any cell; the contextual menu provides commands for inserting rows and columns.
- In iOS: Tap the top border of a column or the left border of a row, and then tap Insert.
To remove a row or column:
- On a Mac/iCloud: Hover over the left end of a row or over the top of a column until you see the pop-up
 symbol appear; click it and then choose Delete Row or Delete Column.
 - In iOS: Tap the top border of a column or the left border of a row, and then tap Delete.
To finish editing chart data, close the data editing window (Mac/iCloud) or tap Done in the Edit Chart Data popover (iOS).
Specifying Where the Data Series Is
You can choose whether the data series in the chart’s data table are in the rows or in the columns of the table:
- On a Mac/iCloud: Use the
 buttons at the top right of the data editing window to switch between the two choices.
 - In iOS: Tap the chart data settings
 icon in the Edit Chart Data popover and then tap Plot Rows as Series or Plot Columns as Series.
Customize Charts
Charts have parts—often lots and lots of parts. Consequently, Pages offers an almost staggering number of settings for customizing charts and their parts, divided among panels in the Chart Format inspector (Mac/iCloud), or among the panes and sub-panes of the Format popover (iOS).
I won’t even attempt to provide a comprehensive catalog of all the settings: first, they can vary widely from chart type to chart type and from chart part to chart part, and, second, because by the time I finish, Pages 6 might be out! Instead, here’s a brief tour of the major points of interest.
Chart Settings
These settings affect the entire chart. To see them:
- On a Mac/iCloud: Select the chart and then click Chart at the top of the Chart Format inspector.
- In iOS: Select the chart, tap Format
 , and then tap Chart to change the chart’s visual style; for the rest of the chart settings, tap Chart Options at the bottom of the popover.
The following types of settings may appear, depending on the type of chart selected and the app you are using, with Pages for Mac, as usual, having the most complete collection of options:
- Chart Options: In Pages for Mac and Pages for iCloud, this collection of settings is used only to select whether the chart displays a title and a legend for the various data series it plots; whereas, in Pages for iOS, Chart Options comprises many of the other items in this list. To set a chart’s title, edit it directly in the chart (Mac/iOS); or enter the chart’s title in the Inspector (iCloud).
- Chart Font: Set a typeface and size for the various text elements of a chart. These can sometimes be overridden with font settings for individual text elements, depending on the type of chart selected and the app.
- Chart Colors: Use this setting, available only in Pages for Mac, to choose colors for the charts elements. Click it and hover over the individual color samples to see how the selected chart looks wearing those colors; click a color sample to apply it.
- Background & Border Style: Give a chart a background color or background image (Pages for Mac only), and place a border around the plotted data area in the chart. You can control the border style in Pages for Mac only; the other two apps only let you toggle a chart border on or off.
- Shadow: Only available in Pages for Mac, and only for some chart types, use this collection of settings to make the plotted elements in a chart cast a shadow on the page.
- Gaps: Also found only in Pages for Mac, this setting controls the distance between bars or columns (and sets of bars or columns) in those types of charts.
- 3D Scene: This collection of settings in Pages for Mac controls the appearance of 3D charts, including the depth of the 3D effect, the lighting style, and the rotation of the chart. In Pages for iOS, a simple Depth slider is offered; you can rotate the chart by dragging a touch control on the chart itself when you select the chart. For 3D bar and row charts, both Pages for Mac and Pages for iOS let you choose whether rectangles or cylinders are used to plot the data.
- Chart Type: Use this to switch the chart to any other chart type.
Axis Settings
You can control how each axis of a chart appears (for those charts that have axes; pie charts don’t) with the axis settings. Here’s where to find them when you select a chart:
- On a Mac/iCloud: Look in the Axis panel of the Chart Format inspector. Use the first item in the panel to select which axis to manipulate; the selection buttons helpfully identify which axis displays values and which one displays categories (Figure 161).
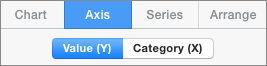
Figure 161: You can tell which axis is the value axis and which is the category axis from the axis selection buttons in Pages for Mac.
- In iOS: Tap Format
 , and then tap X Axis or Y Axis. Although the buttons at the top of the popover don’t tell you which axis is which, you can tell: the first item in the pane provides a broad hint (Figure 162).
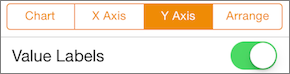
Figure 162: In Pages for iOS, the first item in the Format popover’s Axis panel clues you in as to whether you’re adjusting a category axis or a value axis. (Give up? You’re looking at a value axis here.)
These are the types of axis settings you’re apt to encounter:
- Axis Options: These can include whether to display a name for the axis and to draw a line bordering just that axis.
- Axis Scale: This controls the scale of the values along a value axis. Some things you can specify are minimum and maximum values, whether the scale is linear or logarithmic, and the number of steps displayed.
- Labels: You can specify the angle at which labels are displayed (either horizontal, or diagonal, or, in Pages for Mac, a custom angle), and whether the label is displayed at all. For value axes you can choose the numeric format (e.g., currency, percentage) used for display. For category axes, you can choose how Pages attempts to fit long labels (Pages for Mac only).
- Gridlines and Tick Marks: You can choose whether these are displayed. In Pages for Mac, you can choose the line style for gridlines.
Series Settings
These settings control the display of the plotted data itself. You can find a selected chart’s series settings here:
- On a Mac/iCloud: Use the Series panel in the Chart Format inspector.
- In iOS: The series setting are found in the Chart Options sub-pane of the Format popover’s Chart pane.
These settings, most of which you can configure only in Pages for Mac, include the following:
- Value Labels: Unlike the axis labels, these labels appear on the plotted data themselves (Figure 163). You can set the number format; in Pages for Mac, some chart types provide settings to position the label.

Figure 163: You can display and format value labels on the plotted data.
- Error Bars (Mac only): You can choose to show error bars for data on some types of charts, and you can specify how they are calculated. (An error bar displays the range of uncertainty in a data point’s value.)
- Trendlines (Mac only): You can display trendlines that show the general direction of your data. You can display a name for trendlines, and also display the formula and R-squared value used to calculate the lines. (If you don’t know what all this means, don’t use trendlines; but see this article in Wikipedia for an overview of trend estimation if you’re curious.)
- Bubble Data: For bubble charts, where data is plotted with circles of varying diameter, you can set whether the area or diameter of the bubbles represent a plotted value.
- Data Symbols and Connection Lines: For scatter charts, you can set the data symbol used for each series (Mac only), and whether each series connects the plotted points with lines (either curved or straight); neither of these settings are available in Pages for iCloud.
Wedge Settings
These settings apply only to pie charts, which have no axes and just a single data series. Wedge settings combine settings that are analogous to those offered for axes and data series. When you select a pie chart, you can find the wedge settings on the Wedges panel in the Chart Format inspector (Mac/iCloud), or in the Chart Options sub-pane in the Format popover’s Chart pane (iOS).
Here are the wedge-related types of settings available:
- Labels: Choose whether each wedge displays a data value (and, if so, the number format used), and whether it displays a data name. In Pages for iOS, this second option is a toggle called Series Names, and it appears when you tap Value Labels in Chart Options. In Pages for Mac, you can also set how far from the center of the pie the labels for a wedge appear.
- Wedge position: In all three apps you can drag a wedge to separate it from the chart. In Pages for Mac, you can also select the entire chart and then separate all the wedges an equal amount with the Position from Center slider in the panel’s Position section.
- Pie rotation (Mac only): Drag the Rotation Angle wheel or enter a value in the entry field in the Wedges panel’s Position section.