Learn Layout Possibilities
Whether on the Mac, iOS, or the Web, “Pages” is what the app is called, and, at the most basic level, pages are exactly what the app produces. The trick is controlling how those pages look, and that’s the craft of layout: setting the size and shape of a document’s pages, and specifying where text and other objects go on those pages. You have a lot of tools to help you with those tasks.
This chapter covers how to:
- Set Page Size and Layout: This topic covers document-wide layout options, such as margins and header and footer measurements, hyphenation and ligature toggles, and the small but important Document Body checkbox.
- Create Columns: This topic explains how to use snaking columns for text (and explains what snaking columns are, of course).
- Use Guides with Rulers: This topic looks at how to position items exactly where you want them in relation to each other.
- Arrange Objects on the Page: Whether you need to position a graphic within flowing body text or you need to overlap a photo with a box—or handle a variety of other layout tasks—this topic explains how to make Pages do the job. This topic also describes the many multi-finger gestures for manipulating graphics in Pages for iOS.
- Use Placeholders and Master Objects: When you need to establish a layout before you have all the text or media you need in your document, you can create placeholders to stand in for the missing material. And, when you need text or other material to appear on every page (like a logo), you can create master objects. You can even create master placeholder objects!
Set Page Size and Layout
As explained in Set Document and Section Layouts, both Pages for Mac and Pages for iOS provide document layout settings, though they do so in distinctly different ways:
- On the Mac: You use the controls in the Document Setup inspector. When you make page size and layout changes, you can instantly see their effect on the document.
- In iOS: You use the Doc Setup screen, available from the Tools
 icon, which shows a schematic page layout that you adjust by hand. You can’t see the effect of your changes in the document until you dismiss the Doc Setup screen.
On the Mac and in iOS, the page size and layout settings affect the entire document. We’ll explore the layout capabilities of each app in turn.
Set Page Size and Layout on a Mac
The Document panel of the Document Setup inspector provides nearly all the page size and layout controls. To access them, choose View > Inspector > Document Setup, or click Document ![]() on the toolbar, and then click Document at the top of the Inspector.
on the toolbar, and then click Document at the top of the Inspector.
The Document panel (Figure 105) has several settings that specify where things are located on the page. These settings use the same measurement units as those set for Ruler Units in the Rulers preference pane (choose Pages > Preferences, and then click Rulers in the preference window’s toolbar).
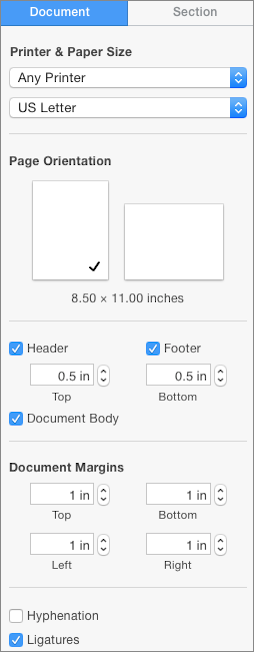
Figure 105: The Document panel of the Document Setup inspector provides global document layout settings.
Here’s what you can set on the Document panel:
- Printer & Paper Size: Set the default printer for the document with the first pop-up menu in this section. You can set up the document for any printer, or customize it for a printer connected to your Mac. Choosing a specific printer affects the items on the second pop-up menu in this section. You use that menu to set the paper size, and, when a particular printer is chosen in the first menu, the second menu lists the various paper sizes that the printer can handle. When you choose Any Printer on the first menu, the second offers a generic set of paper sizes.
- Page Orientation: Click either the horizontal or vertical page thumbnail to set whether the document will display and print in a landscape or portrait layout.
- Header and Footer: Set the distance from the top of the page for headers or the bottom of the page for footers with the Header or Footer field. Headers and footers cannot be set outside the page boundaries, nor within the document margins (described two bullet items ahead): if, for example, you move a header below the top document margin, Pages automatically moves that margin down so the header and main body text won’t overlap.
To eliminate a header or footer, deselect its checkbox. Remember, though, that headers and footers are document-wide settings: if you eliminate a header or footer, it is eliminated in every section of your document! (See Use Sections for more about sections.)
- Document Body: The seemingly innocuous Document Body checkbox, when deselected, removes the body text area from a document and all its contents (don’t worry—you have to confirm the deletion). Pages refers to a document with no body text as a page layout document. (See the sidebar About Page Layout Documents for more about those kinds of documents, and read Arrange Objects on the Page for more about placing objects.)
- Document Margins: Set the distances of the top, bottom, left, and right margins of the main body text from the edge of the page with these fields. The margin fields are disabled when you deselect Document Body (described in the previous bullet item).
- Hyphenation and Ligatures: Select these checkboxes to enable automatic hyphenation and ligature substitution throughout the document. These settings can be overridden on a paragraph-by-paragraph basis (see Set Paragraph Layouts with the Format Inspector on a Mac).
Set Page Size and Layout in iOS
In iOS, the Doc Setup screen (tap Tools ![]() > Document Setup) is your gateway to page size and layout controls (Figure 106).
> Document Setup) is your gateway to page size and layout controls (Figure 106).
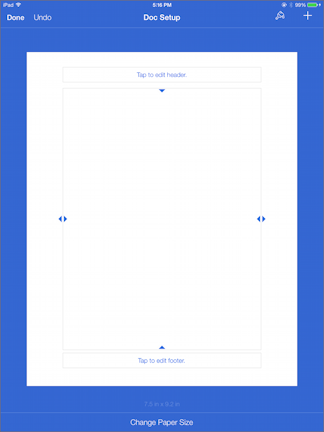
Figure 106: The Doc Setup screen on an iPad; in this image Pages for iOS has respected the non-standard paper size (7.5 in x 9.2 in, shown in light type above “Change Paper Size”) set in Pages for Mac.
Sadly, this gateway only lets you roam through a limited field of settings, especially when you compare them to the layout settings in Pages for Mac. On the other hand, the iOS app will respect any layout settings you make to a document with the Mac app.
Here’s how to work in the Doc Setup screen:
- Margins and header or footer position: Drag the item. When the whole page is visible on the Doc Setup screen, items you drag move in quarter- or eighth-inch increments, depending on whether you are using a small-screen or a large-screen device. You can drag an item by more precise increments on small-screen devices if you zoom in (pinch out) on the Doc Setup screen before you drag.
- Header or footer contents: Tap within the header or footer to add text, including automatic page numbers (described in Add Dynamic Numbers). When you edit header or footer text, a Format
 icon appears at the top of the screen on small-screen devices (it is always present on large-screen devices): tap it to format the text (see Choose Fonts in iOS, Set Paragraph Layouts in iOS, and Headers, Footers, and Page Numbers in iOS and iCloud).
 - Paper size: Tap Change Paper Size. You can choose between Letter and A4; there is no capability to adjust the page orientation.
- Add master objects: To add objects that will appear on every page, tap the Add
 icon (see Make and Edit Master Objects).
Tap Done to return to your document from the Doc Setup screen.
Create Columns
By default, new Pages documents contain a body text area that lays out text in a single column. Similarly, text objects added to a Pages document are laid out in a single column (see Use Text Boxes). However, in both cases you can arrange the text into multiple columns.
Pages offers the kind of columns commonly known as snaking columns: that is, when the text reaches the bottom of one column, it flows to the top of the next column over, twisting across the page, or text object, rather like an undulating snake (Figure 107). Snaking columns are particularly useful for text set in small type: the shorter text lines in a column are easier to read than long lines of small text that stretch across an entire page.
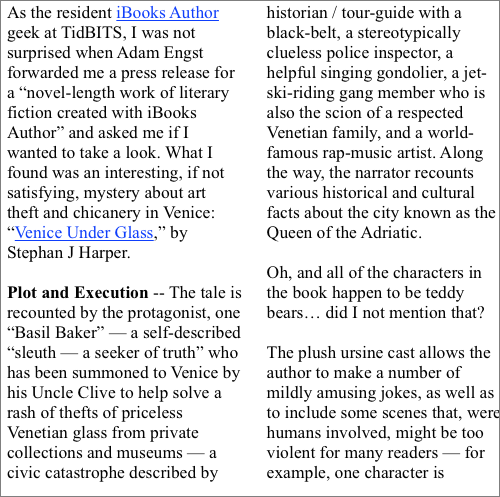
Figure 107: With snaking columns, text from the left column flows, or “snakes,” into the right.
You can create columns in both Pages for Mac and Pages for iOS; you can edit documents with columns in Pages for iCloud although you cannot currently create text columns in that app.
Create Columns on a Mac
Both text in the body text area and text in text box objects can be laid out in multiple columns. You specify number of columns, the column widths, and the gutter (the space between columns) in the Columns section of the Text Format inspector’s Layout panel (Figure 108). (To see the Inspector, select some text or set a text insertion point and then choose View > Inspector > Format.)
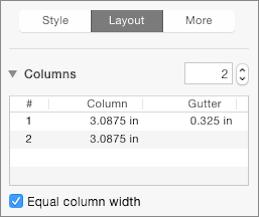
Figure 108: Use the Columns section of the Text Format inspector’s Layout panel to set column number and dimensions.
You can lay out the text in columns for an entire document, for a single paragraph, for a range of paragraphs, or for the text in a text box:
- Entire document: Click in the body text and then set the number of columns in the Columns section of the Text Format inspector.
- Single paragraph: Select the entire paragraph and then set the number of columns.
- Paragraph range: Select the range of paragraphs and then set the number of columns. You do not need to select the entire starting or ending paragraph in the range: any portion of a paragraph included within a selection that spans multiple paragraphs is affected.
- Text box: Select any of the text, or set a text insertion point, in the text box and then set the number of columns in the Text Format inspector. Column settings for a text box always affect the entire text in the box.
To set the width of any column, or to set the gutter width between two columns, double-click the item’s width value displayed the Text Format inspector (Figure 108, above) and type a new value. Enable the Equal Column Width checkbox to give all the columns the same text width and gutter width.
Tip: Choose View > Show Invisibles (Shift-Command-I) to see a column-change marker ![]() wherever you have changed the numbers of columns in the text, and a column-break marker
wherever you have changed the numbers of columns in the text, and a column-break marker ![]() wherever you have inserted column breaks (see Add Breaks).
wherever you have inserted column breaks (see Add Breaks).
Create Columns in iOS
As with Pages for the Mac, in Pages for iOS you can lay out the text in columns for an entire document, a single paragraph, a range of paragraphs, or the text in a text box, and the same text selection rules apply. However, you can only set the number of columns; you have no control over column widths and gutter widths as you do on the Mac.
To set the number of columns, make your text selection and then tap the Format icon. In the Format inspector popover, tap Layout and then tap the right or left part of the Column  control to increase or decrease the number of columns (Figure 109).
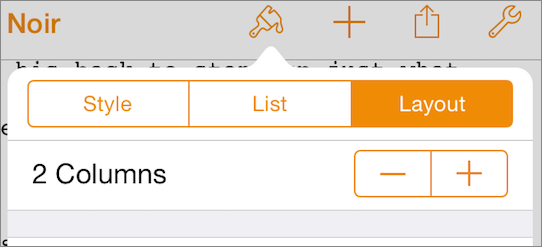
Figure 109: In Pages for iOS, you set the number of columns for a text selection in the Format inspector’s Layout pane.
Use Guides with Rulers
The ruler in Pages is not only a powerful tool for laying out text: both it and its friends, the alignment guides, provide welcome assistance when you need to position things like illustrations, diagrams, or other objects in your document. These tools are particularly useful when you design page layout documents (see About Page Layout Documents).
Pages for Mac is the app you want to use when you have heavy-duty layout needs and require robust positioning guidance. Pages for iOS offers only a horizontal ruler for formatting text and not the vertical ruler and other ruler options provided by Pages for Mac. Pages for iCloud currently offers merely a non-functional ruler (see Use Guides in iOS and iCloud, a little further on).
Use Guides with Rulers on a Mac
You set your ruler and guide display options in the app’s preferences: choose Pages > Preferences and then click Rulers in the Preferences window’s toolbar (Figure 110).
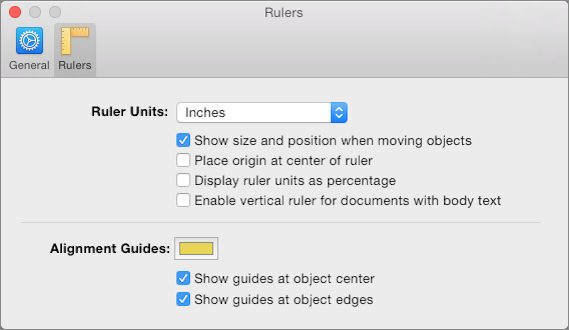
Figure 110: The Rulers preferences in Pages for Mac.
The options provided are easy to understand, and you can see explanations and examples of some a page or so ahead.
The following are additional facts to keep in mind about the ruler and guide options:
- Options are application-wide: When, for example, you set the ruler units or choose to display the ruler origin at the center of the ruler instead of the top left, your settings apply to every Pages document you have open, or that you subsequently open, on the Mac. You cannot specify different ruler or guide display options on a per-document basis.
- Ruler options and guide color are Mac-only: The display options in the Rulers preferences apply only to Pages for Mac.
Figure 111, below, shows the kinds of guides available in Pages for Mac. It also shows the visual effect of the Rulers preference settings shown in Figure 110 (back a few paragraphs).
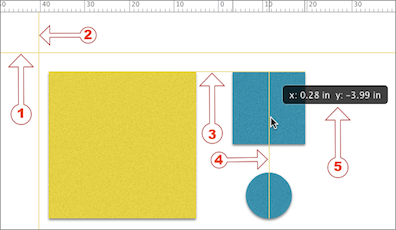
Figure 111: A guide to guides and other placement tools in Pages for Mac; see the following text for an explanation.
Here’s a guide to the guides shown in Figure 111; the numbers in the list correspond to the numbers in the figure:
- Persistent horizontal guide: Set a persistent horizontal guide by dragging down from the horizontal ruler at the top of the window. You can position the non-printing guide anywhere on the page to help you lay out objects: when you drag an object close to a persistent guide, the object “snaps” into alignment with it. You can create multiple persistent guides.
To move a persistent guide, position your pointer over the guide and drag.
- Persistent vertical guide: Set a persistent vertical guide by dragging right from the vertical ruler. Note that when you choose View > Show Ruler, the vertical ruler does not appear in documents that contain a body text area (see About Page Layout Documents) unless you check Enable Vertical Ruler for Documents with Body Text in the Rulers preference pane. However, the vertical ruler always appears along with the horizontal ruler in page layout documents when you choose View > Show Ruler.
You can reposition vertical guides by dragging them, just like horizontal guides.
- Edge guide: An edge guide appears when you’ve checked Show Guides at Object Edges in the Rulers preferences and you then drag an object so one of its edges aligns with the edge of another object. The guide is visible only while you drag an object. In Figure 111, above, the guide labeled “3” is a top edge guide.
- Center guide: A center guide appears when you have checked Show Guides at Object Center in the Rulers preferences and you then drag an object so that its center aligns with the center of another object. The guide labeled “4” in Figure 111, above, is a center guide for the two blue objects.
- Object position: In the Rulers preferences, enable Show Size and Position When Moving Objects to see a temporary readout when you drag an object. If you stop dragging, the readout disappears.
The readout shows the distance between the top-left corner of the object being dragged and the origin of each ruler: x is the distance from the origin of the horizontal ruler to that corner, and y is the distance of the corner from the vertical ruler’s origin. The units displayed in the readout are those currently specified in the Rulers preference pane. (In Figure 111, above, the origin is set at the center of each ruler; hence the negative y measurement.)
To delete a horizontal persistent guide, drag it up off the page; to delete a vertical persistent guide, drag it left off the page. You can also hide guides temporarily: choose View > Guides > Hide Guides.
To delete all persistent guides and give yourself a clean slate, choose View > Guides > Clear Guides.
Use Guides in iOS and iCloud
In Pages for iOS, you set guide and ruler display options in the Tools popover: tap Tools ![]() > Settings to see them (Figure 112).
> Settings to see them (Figure 112).
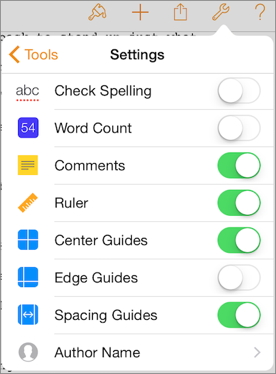
Figure 112: The Pages for iOS (large screen) ruler and guide settings appear in the middle and toward the bottom of the Settings popover.
Pages for iOS has only a horizontal text formatting ruler (to view it on large-screen devices, tap Tools ![]() > Settings > Ruler; on small-screen devices, tap Tools
> Settings > Ruler; on small-screen devices, tap Tools ![]() > Ruler), and no customizable ruler display options are available.
> Ruler), and no customizable ruler display options are available.
In Pages for iCloud, you also click Tools ![]() > Settings to see the guide options, but Pages for iCloud has no Ruler setting. Neither app has an option for adjusting guide colors.
> Settings to see the guide options, but Pages for iCloud has no Ruler setting. Neither app has an option for adjusting guide colors.
Here’s how guides work in Pages for iOS and Pages for iCloud:
- Center and edge guides: In both Pages for iOS and Pages for iCloud, the center guides and edge guides work the same as those in Pages for Mac, described just previously.
- Persistent guides: Neither Pages for iOS nor Pages for iCloud provides a way to set persistent guides in a document, though Pages for iOS (but not Pages for iCloud), will show such guides if you set them in a document in Pages for Mac (explained just previously).
- Spacing guides: Pages for iOS and Pages for iCloud both provide spacing guides to help you set the spacing an equal amount between three or more objects on the page (you can see the iOS Spacing Guides switch in Figure 112, just above).
Spacing guides appear, as in Figure 113, when you drag an object so that it is approximately equidistant, horizontally or vertically, from the other objects. The object snaps into place when the spacing guides appear.
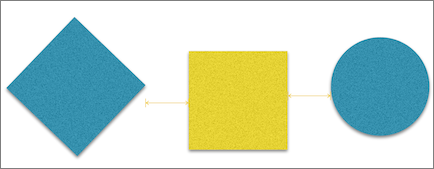
Figure 113: Spacing guides in Pages for iOS and for iCloud show up when an object is approximately equidistant from two other objects.
Arrange Objects on the Page
Pages allows you to Add All Sorts of Objects to a page, and most objects share common, or at least similar, layout methods. Later in this chapter, I explain how to control these object settings, but for now I want to give you an overview of what’s possible:
- Position: An object’s position refers to the position of the top-left corner of its bounding box; the position is relative to the top-left corner of the page.
- Size: An object’s size is specified by the width and height of the object’s bounding box.
- Rotation: An object can be rotated to any angle between 0º and 359º, with rotation measured by how many degrees the object’s bounding box is rotated around its center (you can rotate even a perfectly circular shape object, though you probably won’t notice the difference).
- Alignment and distribution: These properties are relative to other selected objects on the page. You can align two or more selected objects by the centers or edges of their bounding boxes (see Use Guides with Rulers), and you can distribute the spacing, horizontally or vertically, equally between three or more selected objects, measured from the centers of their bounding boxes.
- Front-to-back order: You can set the front-to-back position of an object on the page to control how it appears relative to other objects that it overlaps (or that overlap it).
- Text wrap: When an object’s position causes it to overlap with text on the page, you can control how, or whether, the text wraps around the object.
- Attachment to the body text or page: An object can be attached (or “anchored”) to a page or to a location in the body text. When you anchor an object to a page, the object stays in that spot on that page unless you deliberately move it. When you anchor an object to a text location, the object moves when the text moves: if, for example, you add enough content to the body text to move that text anchor location to a new page, the object moves to that page as well.
You can also group multiple objects together so that any arrangement settings you make apply to the entire group, and you can lock objects and groups of objects so that they cannot be moved or transformed in any way until you unlock them.
As you might expect, Pages for Mac provides the most powerful set of object arrangement options, but both Pages for iOS and Pages for iCloud have substantial object arrangement capabilities as well.
Arrange Objects on a Mac
The object arrangement tools can be found in the Arrange panel of the Object Format inspector (Figure 114, left) or in the floating Arrange window (Figure 114, right).

Figure 114: The Arrange panel in the Object Format inspector (left) and the Arrange window (right) offer the same tools; here, the settings for a shape object are shown.
The Arrange panel is useful for making just a few tweaks to an object or two; whereas the Arrange window is useful when you want to use other inspector panels with the object while referring to its arrangement settings—or if you have a large monitor and want keep the Arrange window open so it’s there when you want it.
To open the inspector, select an object, choose View > Inspector > Format, and then click Arrange at the top of the Inspector pane.
To open the window, choose View > Arrange Tools.
You can also use your pointer to make some arrangement adjustments.
Set an Object’s Position
To set an object’s position, either drag it or select it and enter the desired coordinates in the Arrange panel’s Position settings (the origin is at the top-left of the page, regardless of ruler settings, so, for example, the X value is the distance between the left edge of the page and the left edge of the object’s bounding box).
You can constrain drags by holding down Shift as you drag so that the object moves only in horizontal, vertical, and 45º diagonal directions.
You can move multiple objects at once by selecting them (for example, by Shift-clicking them) and then dragging one of them: the others move along as you drag. However, if you select multiple objects and then type X and Y values in the Position fields the objects will stack in the same spot, since the upper left of each object’s bounding box will move to the same X, Y location.
Set an Object’s Size and Proportions
You can use your pointer or the Size fields in the Arrange panel to change an object’s size and alter its proportions.
To resize an object with your pointer, select the object and then drag one of the small rectangular control points (Figure 115); when the pointer is over a control point it appears as a sizing  cursor.
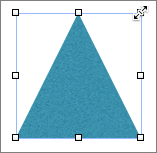
Figure 115: This triangle object is about to be resized by dragging. Notice the sizing cursor on the control point at the upper-right corner of the object’s bounding box.
Dragging a corner control point adjusts both the height and width of the object; dragging a control point at the center of an edge adjusts only the height or the width. However, some objects have a Constrain Proportions checkbox in the inspector: when that is checked, a change to either the object’s height or width changes the other measurement proportionately, so the object retains its shape (a square remains a square, for example).
You can constrain proportions when you resize by dragging as well: hold down Shift as you drag.
When you resize by dragging, the side or corner on the opposite side of the object’s bounding box remains fixed. For example, if you drag down from the bottom edge, the object’s top edge stays in place and the object grows downward. Hold down Option when dragging to make the object’s center remain fixed instead.
Rotate or Flip an Object
You can rotate a selected object around its center either with your pointer or by changing the rotation amount in the Angle field in the Arrange panel (Figure 116).
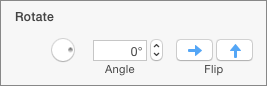
Figure 116: You can find the Rotate settings in the Arrange panel of the Object Format inspector.
Because angles are expressed as degrees, with a degree being 1/360th of a circle, the Angle setting can be any whole number from 0 to 359; you can enter larger or smaller numbers and Pages will do the math to make it into a number within that range; for example, 371 becomes 11 (all the way around a circle plus 11 more degrees of rotation); -5 becomes 355 (5 less than 360, the total number of degrees in a circle).
You can drag the rotate dial  around in the inspector. Once you start dragging you don’t need to keep your pointer within the dial: you can move it around the screen and the dial’s indicator will follow your movements. You can constrain rotation angles to 45º increments by holding down Shift as you drag.
You can also rotate an object directly: select the object, hold down Command (⌘) and position the pointer over a control point so that it becomes a rotate  cursor, and then start dragging.
The Flip buttons in the Arrange panel, when present and enabled, flip the selected object horizontally (making it a mirror image) or vertically (turning it upside down as well as making it a mirror image). Not all objects can be flipped.
Align and Distribute Multiple Objects
Pages gives you three ways to align objects with one another:
- Use Guides with Rulers on a Mac to align objects, but not to distribute them (covered earlier in this chapter).
- Choose commands from the Align and Distribute pop-up menus in the Arrange panel (Figure 117).
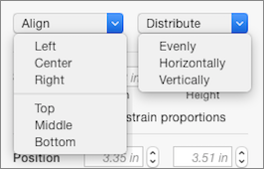
Figure 117: Arrangement commands to line ’em up and spread ’em out.
- Use the Arrange > Align Objects and the Arrange > Distribute Objects submenus (useful if you don’t have the Arrange panel of the Object Format inspector or the Arrange window visible).
The Align commands are straightforward: the Left, Center, and Right commands line up two or more selected objects by their left edges, centers, or right edges, respectively. Use these commands to line up objects that are separated from one another vertically—if the selected objects are arranged horizontally across the page, these commands make them stack up on each other (probably something you don’t want to do). The Top, Middle, and Bottom commands work similarly, and are for objects that are separated from one another horizontally, lining them up along their top edges, their centers, or their bottom edges.
The Distribute commands adjust the relative spacing between three or more selected objects. The Horizontally command sets the distance between the centers of all the selected objects to the same amount horizontally, the Vertically command sets the distances between each of their centers to the same amount vertically; and Evenly combines the two commands (Figure 118).

Figure 118: Distributing objects evenly, before (top) and after (bottom)—note the movement of the triangle up and to the right.
Set Front-to-back Order
When you look at objects on the page, you’re looking straight down at them, so you might not notice that they’re arranged in a stacking order—unless they overlap, of course. You can control the stacking order of objects with the Back, Front, Backward, and Forward buttons on the Object Format inspector’s Arrange panel—there are similar commands with keyboard shortcuts on the Arrange menu; these shortcuts are handy if you need to do a lot of object shuffling.
Here’s how the commands work:
- Back: Sends the selected object(s) all the way to the bottom in the stacking order (behind everything else).
- Front: Brings the selection to the top (in front of everything else).
- Backward: Moves the selection one step toward the bottom of the stacking order.
- Forward: Moves the selection one step toward the top of the stacking order.
Set Text Wrap
You can control how body text wraps around objects (or not!) with a Text Wrap pop-up menu and controls for Text Fit, Spacing, and Alpha in the Object Format inspector’s Arrange panel (Figure 119).
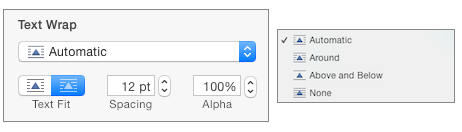
Figure 119: Text wrap setting options (left) and the contents of the Text Wrap pop-up menu (right).
Let’s take the Text Wrap pop-up menu first:
- Automatic: Choose this to let Pages pick how text wraps around the selected object based upon the type of object, its characteristics, and where it is on the page. In many cases, this is the one to pick.
- Around: The text flows around the object, like water in a stream.
- Above and Below: The text breaks above the object and resumes below it.
- Inline with Text: The object sits on the text’s baseline and moves with the text as you add or remove content. Generally, you want to choose this wrapping option only for objects that are no taller than the text line itself. In addition, this command is available only to objects that are anchored to the text and not to the page (see Set Where an Object Is Anchored, just ahead).
Note: Scattered throughout this book are little icons set within the lines of text, like this one here: ![]() . They are examples of how you can use inline objects.
. They are examples of how you can use inline objects.
- None: There is no wrapping. Text either appears behind or on top of the object, depending on the front-to-back stacking order, as described just previously. Generally, the body text of a document is behind any objects you place. (See, however, Make and Edit Master Objects to see how to make objects appear behind the body text.)
Assuming that you have not chosen None, the Text Fit and Spacing options swing into action:
- Text Fit: The left
 button wraps the text around the object’s bounding box; the right
  button wraps around the object’s shape (if the object is rectangular, of course, which button you select is moot).
 - Spacing: Use this to set the minimum amount of space, in points, between the object and the text that wraps it.
If you have chosen None for your wrapping, the Alpha option might come into play. It allows the text behind an object to show through any transparent or semi-transparent areas in the object: the Alpha value you enter controls the amount of transparency required in the object before the text peeps through.
Set Where an Object Is Anchored
You can anchor an object to the page or to a location in the text with the Object Placement buttons in the Arrange panel: Stay on Page anchors the object to the page; Move with Text anchors the object to a text location. An Object anchored to the text moves if the anchor location does, so it can move on the page or even to another page.
You can see a text location anchor by selecting the object: it’s corresponding anchor is indicated by a blue pin  icon.
icon.
If you have chosen Automatic, Around, or Above and Below as the text wrapping option for an object, the object’s anchor pin  is set at the end of the line of text immediately above the object, and moves as you drag an object around the page.
Group and Lock Objects
You can group objects together, so that they all move together when you position them, move front and back as a unit, and resize when you drag a control point or use the Size options in the Arrange panel.
To group objects, select two or more objects and choose Arrange > Group (Option-Command-G), or click Group in the Arrange panel. To ungroup previously grouped objects, select the group and choose Arrange > Ungroup (Option-Shift-Command-G), or click Ungroup in the Arrange panel.
You can group two or more previously made groups of objects, and make groups of groups of groups…. When you ungroup a group that comprises one or more groups, the groups that made up that group remain grouped.
When you don’t want arbitrary clicks or drags to accidentally change an object you have carefully arranged on a page, you can lock it: choose Arrange > Lock (Command-L) or click Lock in the Arrange panel. The object’s control handles change to lock  handles (Figure 120). The object then stays exactly where you put it and none of the Arrange tools can affect it—with the exception of the Arrange panel’s Unlock button, or the Arrange > Unlock (Option-Command-L) command.

Figure 120: A locked object isn’t about to move.
Arrange Objects in iOS
Much like Pages for Mac, in Pages for iOS you can access a number of arrangement settings in the Arrange pane of the Format inspector popover. But, as you might also expect of an app running on a multi-touch device, you can perform much of your object arranging with multi-finger gestures.
Position, Rotate, and Flip Objects
There are no Inspector settings for positioning or rotating objects in Pages for iOS—all such manipulations are tactile.
Position
Positioning an object is a simple matter of tapping the object to select it, and then dragging it into place with one finger. The app does, however, have multi-touch variants for fine-tuning object placement:
- Constrained dragging: To move an object along a horizontal, vertical, or a 45º diagonal path, begin your drag with one finger and then, while dragging, touch outside the object’s bounding box with a second finger. If you are dragging more or less up or down when you touch with the second finger, the object movement is constrained to a vertical path; if you are dragging more or less left or right when you touch with the second finger, the movement is constrained to a horizontal path; and if you are dragging in a diagonal direction when you touch with the second finger, the drag becomes constrained to a 45º angle. Pages displays a label to show the type of constraint being imposed (Figure 121).
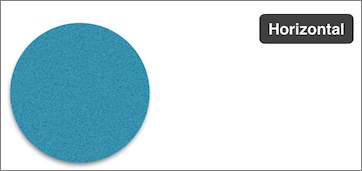
Figure 121: This circular object is being dragged, but the drag is constrained to horizontal movement, as the label indicates.
- Incremental movements: For precise control when you move an object, hold down on the object with one finger while you swipe in the direction you want to move it using one or more fingers. A one-finger swipe moves the object a single point (1/72 of an inch), two-finger swipes move it 10 points, three-finger swipes move it 20 points, four-finger swipes move it 30 points, and five-finger swipes move it 40 points per swipe. (This last gesture requires six fingers, counting the finger that is touching the object!)
Rotate
You use a multi-finger gesture to rotate an object: hold down on the object with one finger and then, while holding, touch it with a second finger and start dragging that finger in the direction you want to rotate the object (you can lift the first finger once you start dragging). A label appears, showing you the number of degrees of rotation as you drag.
Flip
To flip an object horizontally or vertically do the following:
- Tap the object to select it.
- Tap the Format
 icon, and then tap Arrange in the Format inspector popover.
 - In the Arrange pane, tap Flip Vertically or Flip Horizontally.
Size Objects
To adjust an object’s horizontal and vertical dimensions, tap to select the object and then drag one of the control points that appear on the object’s bounding box. The object’s dimensions change as you drag.
Pages provides the following sizing variations via multi-touch gestures:
- Center resize: To keep the object’s center in place as you resize it (instead of the control point on the opposite side of the object from the one you are dragging), start to drag and, while dragging, touch outside of the object’s bounding box with a second finger. A Center Resize label appears. To complete center resizing, lift the finger with which you were dragging before you lift the second finger.
- Match size: To make the bounding boxes of two objects match, tap the object you want to resize to select it, start dragging one of the control points on its bounding box, and then, while dragging, touch the object you want it to match with a second finger. A Match Size label appears. To finish, lift the finger with which you were dragging before you lift the second finger.
Set Object Stacking Order
To set where an object is located in the object stack, tap to select the object, tap the Format ![]() icon, and then tap Arrange. In the Arrange pane of the popover, use the Move to Back/Front slider (Figure 122) to move the selected object forward or backward in the stacking order.
icon, and then tap Arrange. In the Arrange pane of the popover, use the Move to Back/Front slider (Figure 122) to move the selected object forward or backward in the stacking order.
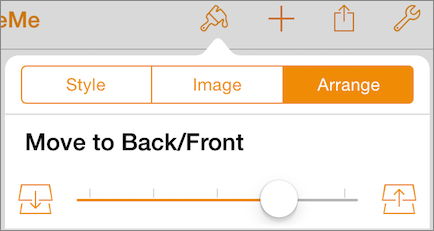
Figure 122: Set the position of an object in the stacking order with this slider.
Wrap Text around Objects
The object text wrapping options in Pages for iOS are similar to those in Pages for Mac (refer to Set Text Wrap for detailed descriptions of these options).
To set text wrapping for one or more objects, do the following:
- Select the object or objects.
- Tap the Format
 icon, and then tap Arrange in the popover.
 - In the Arrange pane, tap Wrap and pick your settings (Figure 123).
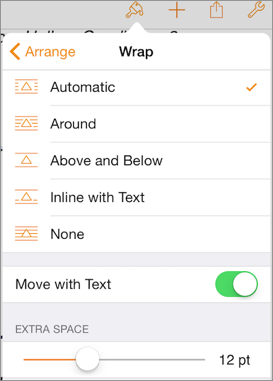
Figure 123: Set text wrap options for an object in this sub-pane of the Format inspector popover.
Note that enabling Move with Text in the Wrap pane anchors the object to a location in the text, while disabling it anchors the object to the current page. When an object is anchored to the text, you see a pin  icon to show where the object is anchored, just as you do in Pages for Mac.
Lock and Group Objects
Just as in Pages for Mac, you can lock objects to keep them from being moved or modified, and you can group multiple objects so they behave like a single object.
To group multiple objects do the following:
- Select two or more objects (to select multiple objects, tap and hold one object while tapping additional objects to add them to the selection).
A menu appears when you lift your finger (Figure 124, top).
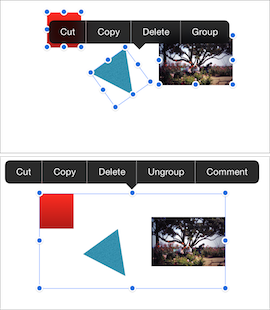
Figure 124: Objects ready to be grouped, above; grouped object ready to be ungrouped, below.
- In the menu, tap Group.
To ungroup grouped objects, tap the grouped object, and in the menu that appears, tap Ungroup (bottom image in Figure 124, above).
To lock an object so it cannot be modified, tap it and then tap Format ![]() > Arrange > Lock. A locked object displays lock
> Arrange > Lock. A locked object displays lock  handles on its bounding box when you select it (Figure 125).
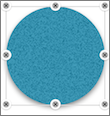
Figure 125: A locked object in Pages for iOS has lock handles on its bounding box.
To unlock a locked object, tap it, and then, in the menu that appears, tap Unlock. You can also unlock it by selecting it, tapping the Format ![]() icon, and then tapping Unlock in the popover: when an object is locked, the Format inspector popover shows only an Unlock command.
icon, and then tapping Unlock in the popover: when an object is locked, the Format inspector popover shows only an Unlock command.
Arrange Objects in iCloud
Most of the commands in the Mac app’s Arrange panel, as described in Arrange Objects on a Mac, are available in the Arrange panel of the Object Format inspector provided by Pages for iCloud, and most of the modifier keys used when dragging an object’s control points are the same as well—for example, holding Shift as you resize an object to constrain proportions, or holding down Command (⌘) when you hover over a control point to see the rotate  cursor.
Let’s look at what’s not implemented currently:
- Alpha command for text wrapping: The app currently provides no way to set an Alpha threshold percentage to allow text to show through an object with transparent areas.
- Locked objects: Pages for iCloud provides methods neither for locking nor for unlocking objects. What is more, if you lock an object in either of the two other Pages apps, the object isn’t locked in Pages for iCloud. This means you can change the object, possibly inadvertently, so be warned! Interestingly, a locked object that you tamper with in Pages for iCloud remains locked in the other apps, though it does reflect any changes you’ve made to it in Pages for iCloud.
- Grouping commands: You cannot group or ungroup objects in Pages for iCloud.
Use Placeholders and Master Objects
You may, as you create documents, find that you need to reserve space for, say, an image or a pull-quote on a page, but you don’t yet have the final material you need. That’s what placeholders are for.
You may also find that sometimes you want an image (like a logo) or some text (like a “Confidential” watermark) to appear on every single page of your document or on every page within a section in your document. That’s what master objects are for.
Make and Use Placeholders
You can make a placeholder out of any text, image, or movie in Pages for Mac. You can then use that placeholder in Pages for Mac, for iOS, or for iCloud—with some limitations, as I note below.
Making a placeholder only takes two steps:
- Select the text, or the image or movie, that you want to make into a placeholder. (For more about how to add images or movies to a document, see Use Media.)
- Choose one of the following:
- Format > Advanced > Define as Placeholder Text (Control-Option-Command-T) to make selected text into placeholder text
- Format > Advanced > Define as Media Placeholder (Control-Option-Command-I) to make a selected image or movie into a media placeholder
Voilà! You have a placeholder. But what does that mean?
Here’s what it means in the case of text: when you click in the text placeholder in Pages for Mac or Pages for iCloud, or tap on placeholder text in Pages for iOS, the entire text placeholder becomes highlighted (Figure 126), and the next thing you type replaces the placeholder.
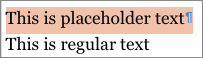
Figure 126: When you click or tap placeholder text, it highlights.
Media placeholders display a badge indicating that they are placeholders in Pages for Mac (Figure 127) and Pages for iOS (Figure 128), though the badges differ in appearance in the two apps. Pages for iCloud supports media placeholders but currently does not provide them with badges to distinguish them from non-placeholders.
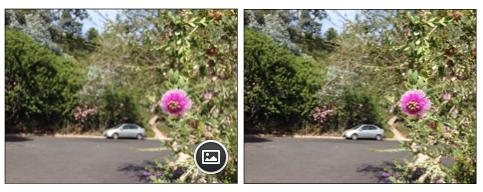
Figure 127: A media placeholder (left) distinguishes itself from non-placeholder media (right) with a badge in Pages for Mac.

Figure 128: A media placeholder in Pages for iOS has a different badge than its Pages for Mac counterpart.
To use a media placeholder on the Mac or in iCloud, drag the replacement media from anywhere on your Mac and drop it on the placeholder. The replacement is sized to fit in the same space as the placeholder.
You can also click a placeholder badge in Pages for Mac to see a media picker from which you can choose the replacement (Figure 129).
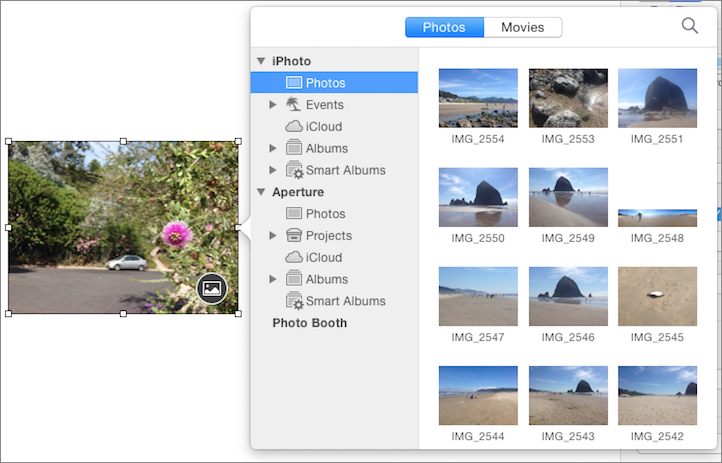
Figure 129: Click the placeholder badge in Pages for Mac to choose replacement media.
To use an image placeholder in Pages for iOS, tap the placeholder badge to choose a replacement image (Figure 130). You can choose the replacement from images on your device, use your device’s camera to supply the replacement, or insert the replacement from another source (such as from a folder in your iCloud Drive).
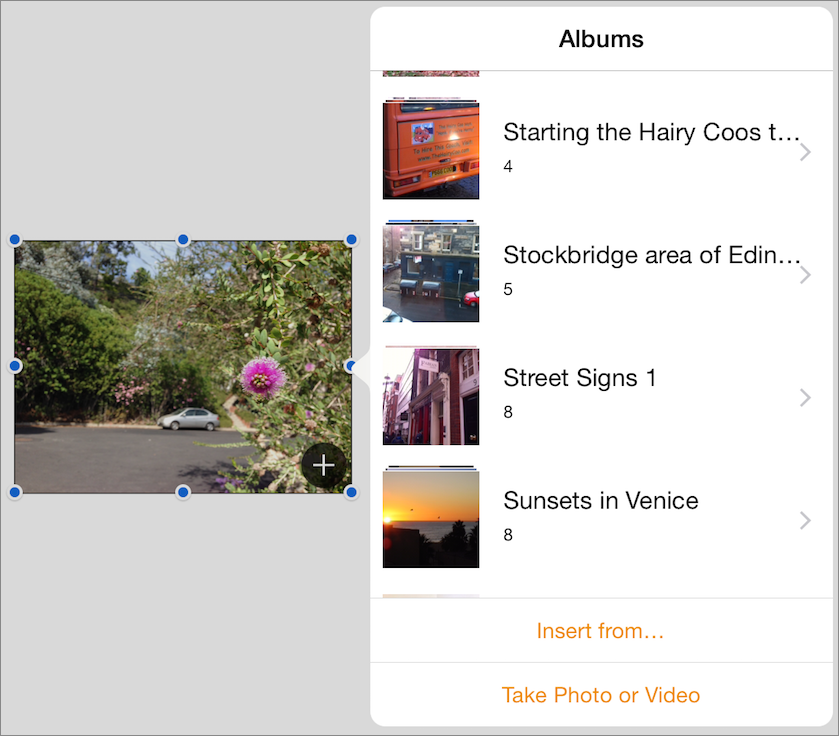
Figure 130: Tap a placeholder badge in Pages for iOS to choose a replacement image; Pages for iOS does not currently support movie placeholders.
Make and Edit Master Objects
You can turn almost any on-page object in Pages into a master object except for the document’s body text, its headers and footers, and any tables you have inserted. A master object appears on every page of the section in which you created it; if a document has only one section, the object appears on every page of the document (see Use Sections).
How Pages handles master objects varies from platform to platform:
- On the Mac: You can create master objects, lock them so they can’t be edited, and make master objects unselectable.
- In iOS: You can create master objects and lock them so they can’t be edited.
- In a browser: You can view master objects created in Pages for Mac and Pages for iOS, but you cannot manipulate them or replace any placeholder content in them.
To create a master object on a Mac:
- Select one or more objects on the page.
- Choose Arrange > Section Masters > Move Objects to Section Master.
To create a master object in Pages for iOS:
- Tap to select an object and then choose Copy or Cut from the menu that appears.
- Tap Tools
 > Document Setup.
 - In the Doc Setup screen, tap anywhere on the page and then choose Paste from the menu that appears.
- Drag the master object to position it, and then tap Done.
Edit Master Objects on a Mac
On the Mac, you can edit a master object just as you can any other object. For example, you can:
- Copy and paste: Click the object to select it, and then cut or copy it as you would any other object.
- Move it and resize it: Drag it around to move it; click its control handles to resize it. You can also manipulate it with the Object Format inspector (see Arrange Objects on a Mac).
- Replace placeholders: Click placeholder text (if it contains any) to replace the text, or, if it is a media placeholder, drop new media on it (see Make and Use Placeholders).
You can also make all master objects unselectable in Pages for Mac to avoid the risk of accidentally editing them or deleting them: choose Arrange > Section Masters > Make Master Objects Selectable. When this command is unchecked, you cannot select any master objects until you choose the command again.
Edit Master Objects in iOS
Edit master objects on the Doc Setup screen: tap Tools ![]() > Document Setup. You can do the following with master objects:
> Document Setup. You can do the following with master objects:
- Cut, copy, and paste: Tap the master object to select it, and then cut or copy it using the commands in the menu that appears. If you have an object on the Clipboard, tap on the page and choose Paste.
- Move and resize: Drag the master object to move it, or drag its control handles to resize it. Or manipulate it with the Format popover’s commands (tap the Doc Setup screen’s Format
 icon).
 - Replace placeholders: Tap the master object’s placeholder text, if it has any, to replace the text; tap its media placeholder badge, if it has one, to replace the media it contains.
Lock and Unlock Master Objects
You can lock master objects so they can’t be edited until you unlock them in both Pages for Mac and Pages for iOS. You can lock and unlock objects on an individual basis or select multiple objects to lock and unlock.
On the Mac, use the Arrange > Lock command on a selected master object to lock it, and the Arrange > Unlock command to unlock a selected locked master object. You can also use the Lock and Unlock settings in the Object Format inspector’s Arrange panel.
In Pages for iOS, on the Doc Setup screen, use the Lock command on the Format popover’s Arrange panel to lock a selected master object. You can use the same popover to unlock it, or you can simply tap the locked master object and then tap Unlock on the menu that appears.