Where Is Everything?
I have to assume that Pages is not your first word processor: after all, we live in the second decade of the 21st century! It would be a waste of words—and pixels—for me to tell you about all the amazing things a word processor can do. We all know them.
Instead, in this chapter I tell you where in Pages to find the tools and commands to do all those amazing things you already know a word processor can do. I break them down into common tasks that you do with word processors, and then tell you where to click or tap to perform those tasks.
Think of this chapter as a Pages gazetteer, a geographical catalog of major places of interest. It’s useful whether you’re coming from a previous version of Pages or from some other word processor.
You don’t have to read this chapter straight through, although I recommend you at least skim “Get to Know the Interface Landmarks,” immediately following, so you’re familiar with the terrain.
Get to Know the Interface Landmarks
Pages is a whole family of word processor apps: Pages for Mac, Pages for iOS, and Pages for iCloud. While every current member of the Pages family can edit files created by any other family member, each has its own interface, tailored for the environment in which it runs. This section is a short guide to the places in each app—the landmarks, if you will—where you are most apt to find the controls you seek.
Learn the Mac Landmarks
Pages for Mac behaves like most Mac apps, making use of traditional interface elements, such as the menu bar, with its array of menus in which the vast majority of the commands can be found, and a customizable toolbar at the top of each document window (Figure 3), where you can place some of the controls that you use the most.
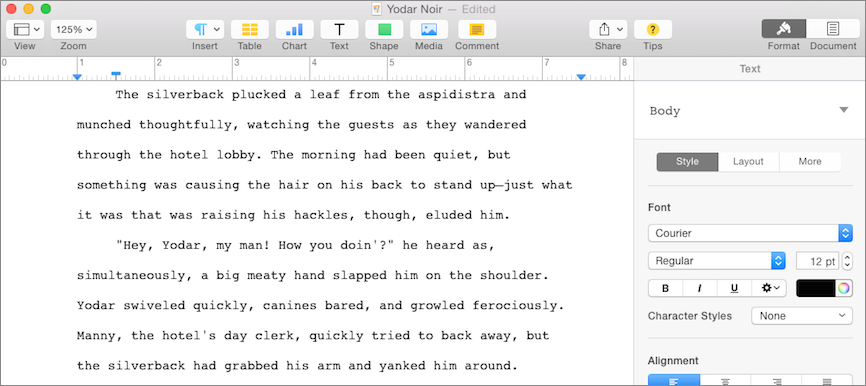
Figure 3: A typical Mac Pages document window, with the toolbar at the top, the ruler below the toolbar, and the Inspector pane at the side.
Although the menus in the menu bar and the items on the toolbar are relatively constant (I say “relatively” because you can customize the toolbar with the View > Customize Toolbar command and hide it with the View > Hide Toolbar command), other interface landmarks, like the ruler and the Inspector, are context sensitive: what they display depends on what you have selected in the document.
For example, the ruler shows the tab and paragraph margin settings for the currently selected paragraph; put the insertion point in, or select within, a different paragraph with a different layout and the items on the ruler change (see Set Paragraph Layouts to learn how to use the ruler to change the way a paragraph lays out horizontally).
The Inspector pane contains most of the settings that affect the appearance of a document’s text and objects. The pane can display one of two inspectors: the Format inspector, which provides, for example, text formatting commands (click Format ![]() in the toolbar to see it), and the Document Setup inspector, which provides document layout commands (click Document
in the toolbar to see it), and the Document Setup inspector, which provides document layout commands (click Document ![]() in the toolbar to see it).
in the toolbar to see it).
Unlike the previous versions of Pages, which had separate floating Inspector windows that could clutter the screen, the single Inspector pane in Pages 5 is always relevant to what you are working on. For example, place your cursor in the document’s text and the Format inspector shows text commands (shown in Figure 3, previously) that give you control over text styles, typefaces, line spacing, and a whole lot more. Or, select an image in a document and the Format inspector provides a range of controls for adjusting that image’s appearance.
Because the Mac is a multitasking, multi-windowing environment, you can have more than one document window open at a time, each with its own toolbar, ruler, and Inspector. And a few tools always live in their own windows—such as the Arrange window for managing objects inside a document (read Arrange Objects on a Mac). However, for the most part, when you need to find a control, you should look in the menus, toolbar, ruler, and Inspector pane.
Learn the iOS Landmarks
Unlike OS X, iOS is not a multi-windowing environment: only one document at a time can be seen in Pages for iOS, and that document takes up the whole screen. In addition, iOS devices have less spacious screens than Macs—in some cases, much less spacious. And the screen space is even more constrained by the virtual keyboard.
Therefore, Pages for iOS has no menu bar (no iOS app has one), a much smaller toolbar, a ruler that scurries out of the way when you aren’t editing text, and, in the most radical departure from Pages for Mac, no Inspector pane.
Figure 4 shows a Pages document on an iPad.
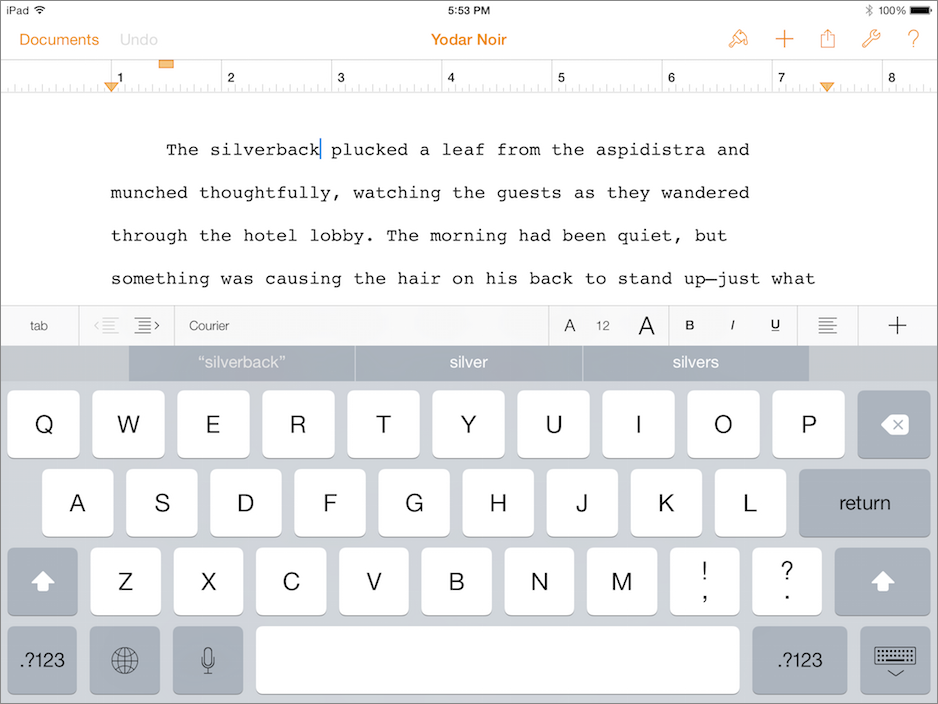
Figure 4: A typical Pages screen on an iPad, with the toolbar at the top, the ruler below the toolbar, and the virtual keyboard with the format bar above it.
On smaller-screen devices like an iPhone (even a 6 Plus), the paucity of space leads to an even more pared-down interface (Figure 5).
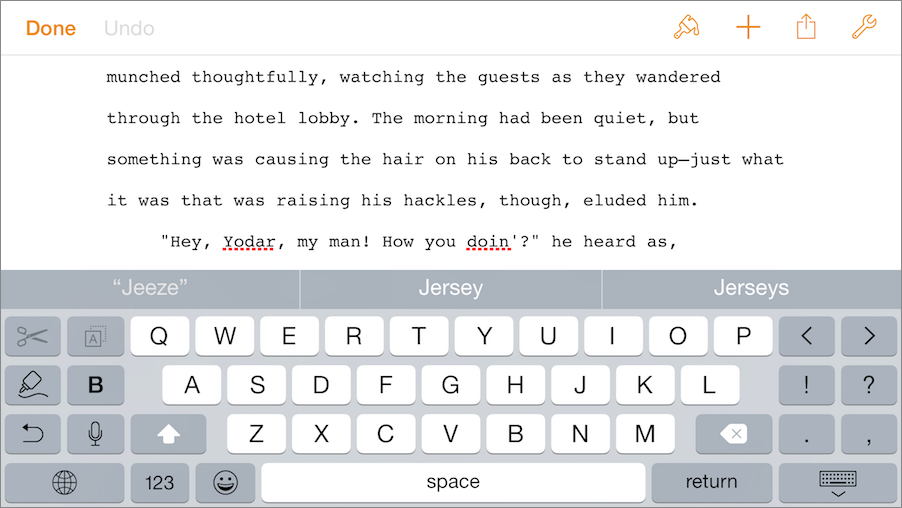
Figure 5: A Pages document on an iPhone 6 Plus, with virtual keyboard, but lacking a ruler and format bar above the keyboard.
Although Pages for iOS is the same app for both large-screen and small-screen devices, where and how it presents its controls differs between them. I present those differences next.
Find the Large-screen iOS Landmarks
In Pages for iOS on a large screen, the controls can be found in the format bar and by tapping icons in the toolbar:
- Format bar: To find common text formatting options, look on the format bar, located above the virtual keyboard (Figure 6). The format bar, like the keyboard, appears only when you’ve selected text or have set an insertion point within the document; tap outside of the text area on the screen and it hides so you can see more of the document.

Figure 6: The format bar appears above the virtual keyboard when you edit text.
- Toolbar and popovers: The small number of icons on the toolbar leads to a large number of commands. For example, you can tap the Format
 icon in the toolbar to bring up the Format inspector popover (Figure 7, left).
Similarly, a tap of the Tools
 icon brings up a Tools popover with many of the commands that you might find on menus in the Mac variation of Pages (Figure 7, right), including Find, Settings, and Print. It’s also where you find the Document Setup commands that correspond to those in the Document Setup inspector in Pages for Mac. In Pages for iOS on a large screen, popovers float above the document and go away when you tap outside their boundaries.
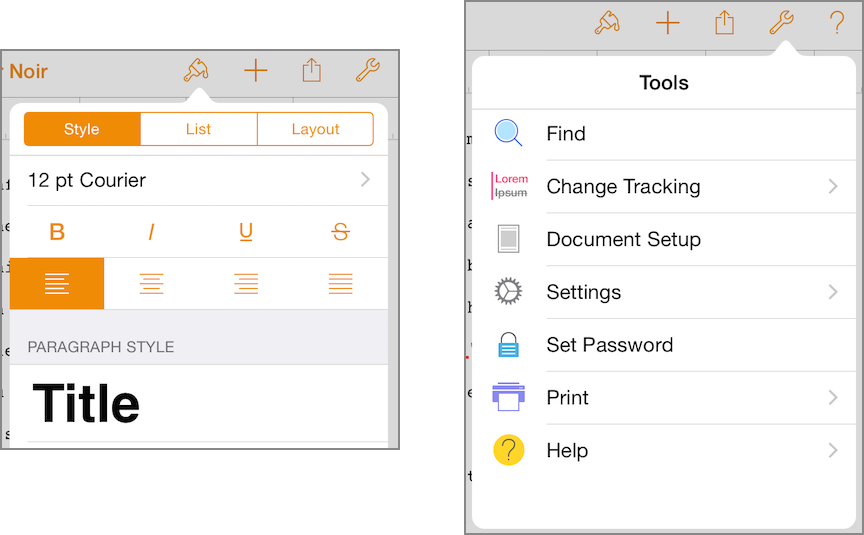
Figure 7: The Format inspector popover appears when you tap the Format icon in the toolbar (left), and the Tools popover appears when you tap the Tools icon (right).
Find the Small-screen iOS Landmarks
When Pages for iOS runs on a small-screen device, there is even less space to present controls. Consequently, even such conveniences as the format bar that’s available on large-screen devices are absent. Pages compensates for the lack of space by becoming more modal.
For example, editing text puts you into a text editing mode—you can tell because the leftmost command on the toolbar becomes the Done command when you select either text or an insertion point; you have to tap Done to dismiss the virtual keyboard and leave text editing mode (Figure 8).

Figure 8: Text editing is a mode in iOS Pages on small-screen devices, as the Done command at left implies.
Some commands that you might find elsewhere in Pages on a large screen appear when you select text or tap an insertion point (see Figure 9).

Figure 9: A menu appears when you tap to set an insertion point on the small screen.
For example, tap Insert on the menu shown in Figure 9 to see the Insert popover shown in Figure 10. This popover offers the Tab command that you would find in the format bar in Pages for iOS on a large screen.
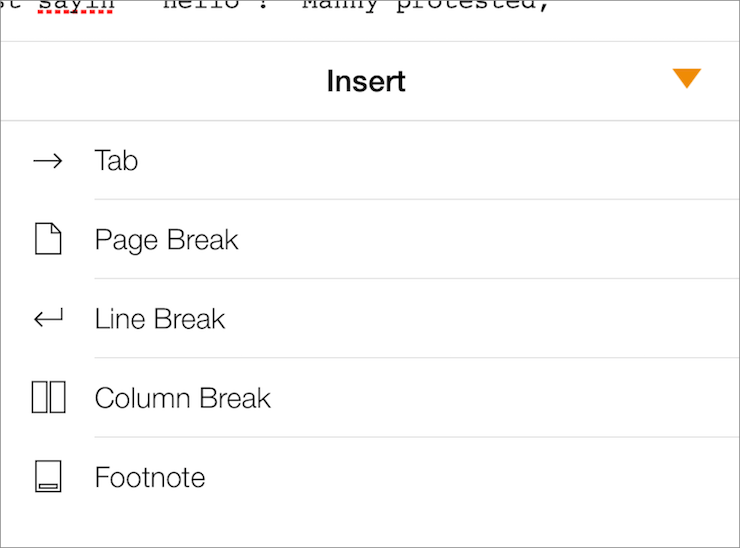
Figure 10: The Insert popover on the small screen provides a Dismiss icon at its right.
On small-screen devices, popovers like the Insert popover shown in the figure above are closed by tapping the Dismiss ![]() icon. Presumably, Apple made it work like this because the popover is so big on the small screen that tapping outside its boundaries would be difficult.
icon. Presumably, Apple made it work like this because the popover is so big on the small screen that tapping outside its boundaries would be difficult.
Learn the iCloud Landmarks
Pages for iCloud, which can run inside a browser in both OS X and Windows, is something of a hybrid of Pages for Mac and Pages for iOS. On the one hand, like Pages for Mac, it can have multiple document windows open at a time, and those windows can be large enough to support an Inspector pane. On the other hand, like Pages for iOS, Pages for iCloud lacks a menu bar and the wealth of commands contained therein.
Furthermore, Pages for iCloud is currently a beta app (see An Interface as Solid as a Cloud), and lacks a number of features found in other members of its family. For example, while its documents do show a ruler, that ruler is currently completely inactive (Figure 11).
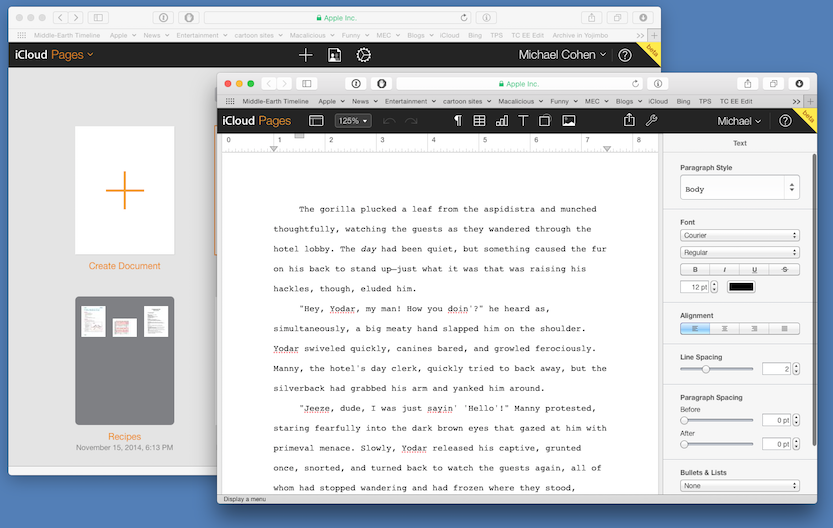
Figure 11: Pages for iCloud can support multiple windows, but currently offers fewer features than other members of the Pages family.
To find the controls, you have two main landmarks to explore:
- Inspector pane: This landmark (which displays what Pages for iCloud calls the Format panel), is available when text or an object is selected or when an insertion point is set. It provides formatting commands. To hide or show it, click the show/hide
 icon on the document toolbar. (Although the name “Format panel” appears in the show/hide
  menu in this beta Web app, I usually call it an “Inspector pane” since that’s what it’s called in Pages for iOS and Pages for Mac.)
 - Tools popover: Available when you click the Tools
 icon in a document window, this provides printing commands, search commands, and various settings (Figure 12).
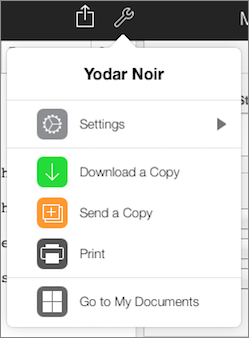
Figure 12: The Tools popover in Pages for iCloud offers various commands; you can also change the document’s name with it.
An Interface as Solid as a Cloud
Of the three Pages apps, Pages for iCloud is by far the most volatile in terms of interface and functionality, changing substantially with each release. What’s more, its interface is by far the least standard.
For example, consider the document management icon in the main window that currently looks like a typical settings gear ![]() icon, even though the commands that it offers have little to do with settings. Or take the paragraph symbol
icon, even though the commands that it offers have little to do with settings. Or take the paragraph symbol ![]() icon on the document toolbar, which offers commands for inserting things like page numbers, page counts, page breaks, and footnotes…but not paragraphs. And then there’s the Help command, which has migrated from an icon
icon on the document toolbar, which offers commands for inserting things like page numbers, page counts, page breaks, and footnotes…but not paragraphs. And then there’s the Help command, which has migrated from an icon ![]() on the document toolbar to the Tools
on the document toolbar to the Tools ![]() popover—and then back to a toolbar icon. It’s confusing.
popover—and then back to a toolbar icon. It’s confusing.
It’s even more confusing when you realize that these toolbar icons have had very different appearances in previous versions of the app, and likely will look different in the next. It’s a state of affairs that is decidedly unhelpful to anyone attempting to learn the interface landmarks!
Eventually, the Pages for iCloud interface will settle down, but until then remember that this app is very noticeably a work in progress, and accept that your mental map of where things are in the app is going to be a work in progress, too.
Help Yourself
Need help? You have lots of options:
- Get a tooltip: In Pages for Mac you can hover with your pointer over a toolbar item or Inspector item to see a short explanation of the setting. Hovering also works in the iCloud Inspector.
- See onscreen coaching: Click the Tips/Help icon on the toolbar in the Mac, iPad, or iCloud version of Pages. For more help in Pages for iPhone, tap Tools
 > Help.
 - Read the online help: To see the Pages for Mac Help in your Web browser, go here; for iPad, go here; for iPhone, go here; for iCloud, go here.
Create a New Document
As you might expect, the ways in which you create a new Pages document, and the choices you can make when doing it, vary from app to app.
Create a New Document on a Mac
For decades, to create a new document on the Mac in almost every application you followed these two steps:
- Launch the app.
- Choose File > New.
You’ll be pleased to know that Pages 5 honors this long-standing tradition. However, that’s not the whole story.
When you launch Pages 5 on the Mac, if no document was open when you last quit the app, you see its Open dialog (Figure 13).
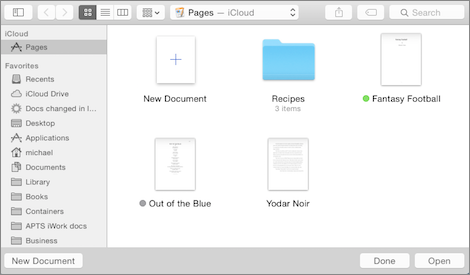
Figure 13: The Pages Open dialog.
You either can click the New Document button at the lower left of this dialog, or you can choose File > New (following the traditional two steps above), to create a new document. Either way, you end up seeing the Template Chooser (Figure 14).
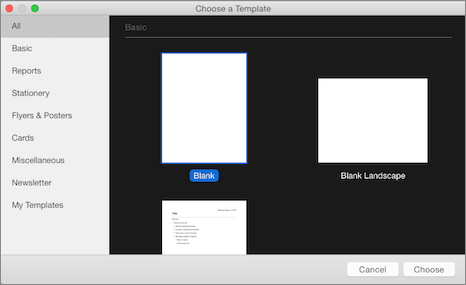
Figure 14: The Template Chooser in Pages for Mac.
Pages has a lot of document templates; see Try Templates to learn more about them. For a traditional blank document, select the Blank template (it’s pre-selected by default) and then click Choose, or double-click the Blank template. The new document opens and you’re ready to rock and roll.
By default, the new document is named Untitled; also by default—if you turned on iCloud as detailed in Set Up an iCloud Connection, earlier—the new document is automatically saved in iCloud as soon as you make any changes to it. To change the new document’s name, choose File > Rename. The document’s name in its window’s title bar is selected, so all you have to do is type its new name and press Return.
Bypass the Template Chooser
You can avoid the Template Chooser rigmarole with a trip to Pages’ preferences (Figure 15): choose Pages > Preferences > General, and select Use Template: Blank. When you set this option, choosing File > New Document or clicking New Document in the Open dialog, bypasses the Template Chooser and immediately creates a new blank document.
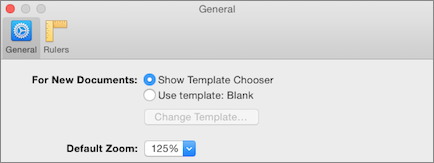
Figure 15: You can specify what will happen when you create a new document in the Pages preferences, shown here in a detail from the top of the Preferences window.
You can also change which template Pages uses for new documents when it bypasses the Template Chooser by clicking the Change Template button and selecting the desired template.
If you bypass the Template Chooser in this way, you can still access other available templates: hold down Option and choose File > New from Template Chooser.
Create a New Document in iOS
Creating a new document in Pages for iOS doesn’t involve as many steps or options as it does on the Mac. In the windowless world of iOS, Pages offers only two basic displays: either the document you are working on, or the document manager (Figure 16), from which you choose documents on which to work. If a Pages document is already open, you can get to the document manager screen by tapping Documents at the upper left of the editing screen (on a small-screen device, tap < when the device is in portrait orientation).
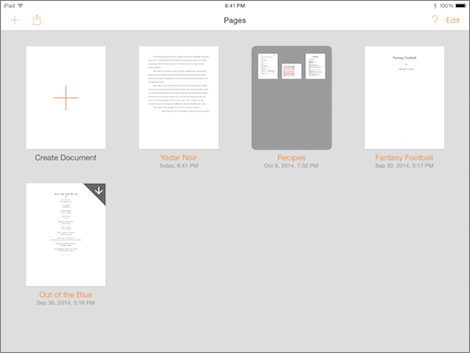
Figure 16: The document manager in Pages for iOS.
Tap Create Document (the thumbnail is labeled “Create New” on small-screen devices) to create a new document.
Pages displays its Template Chooser (Figure 17); tap the template you want to use for your new document.
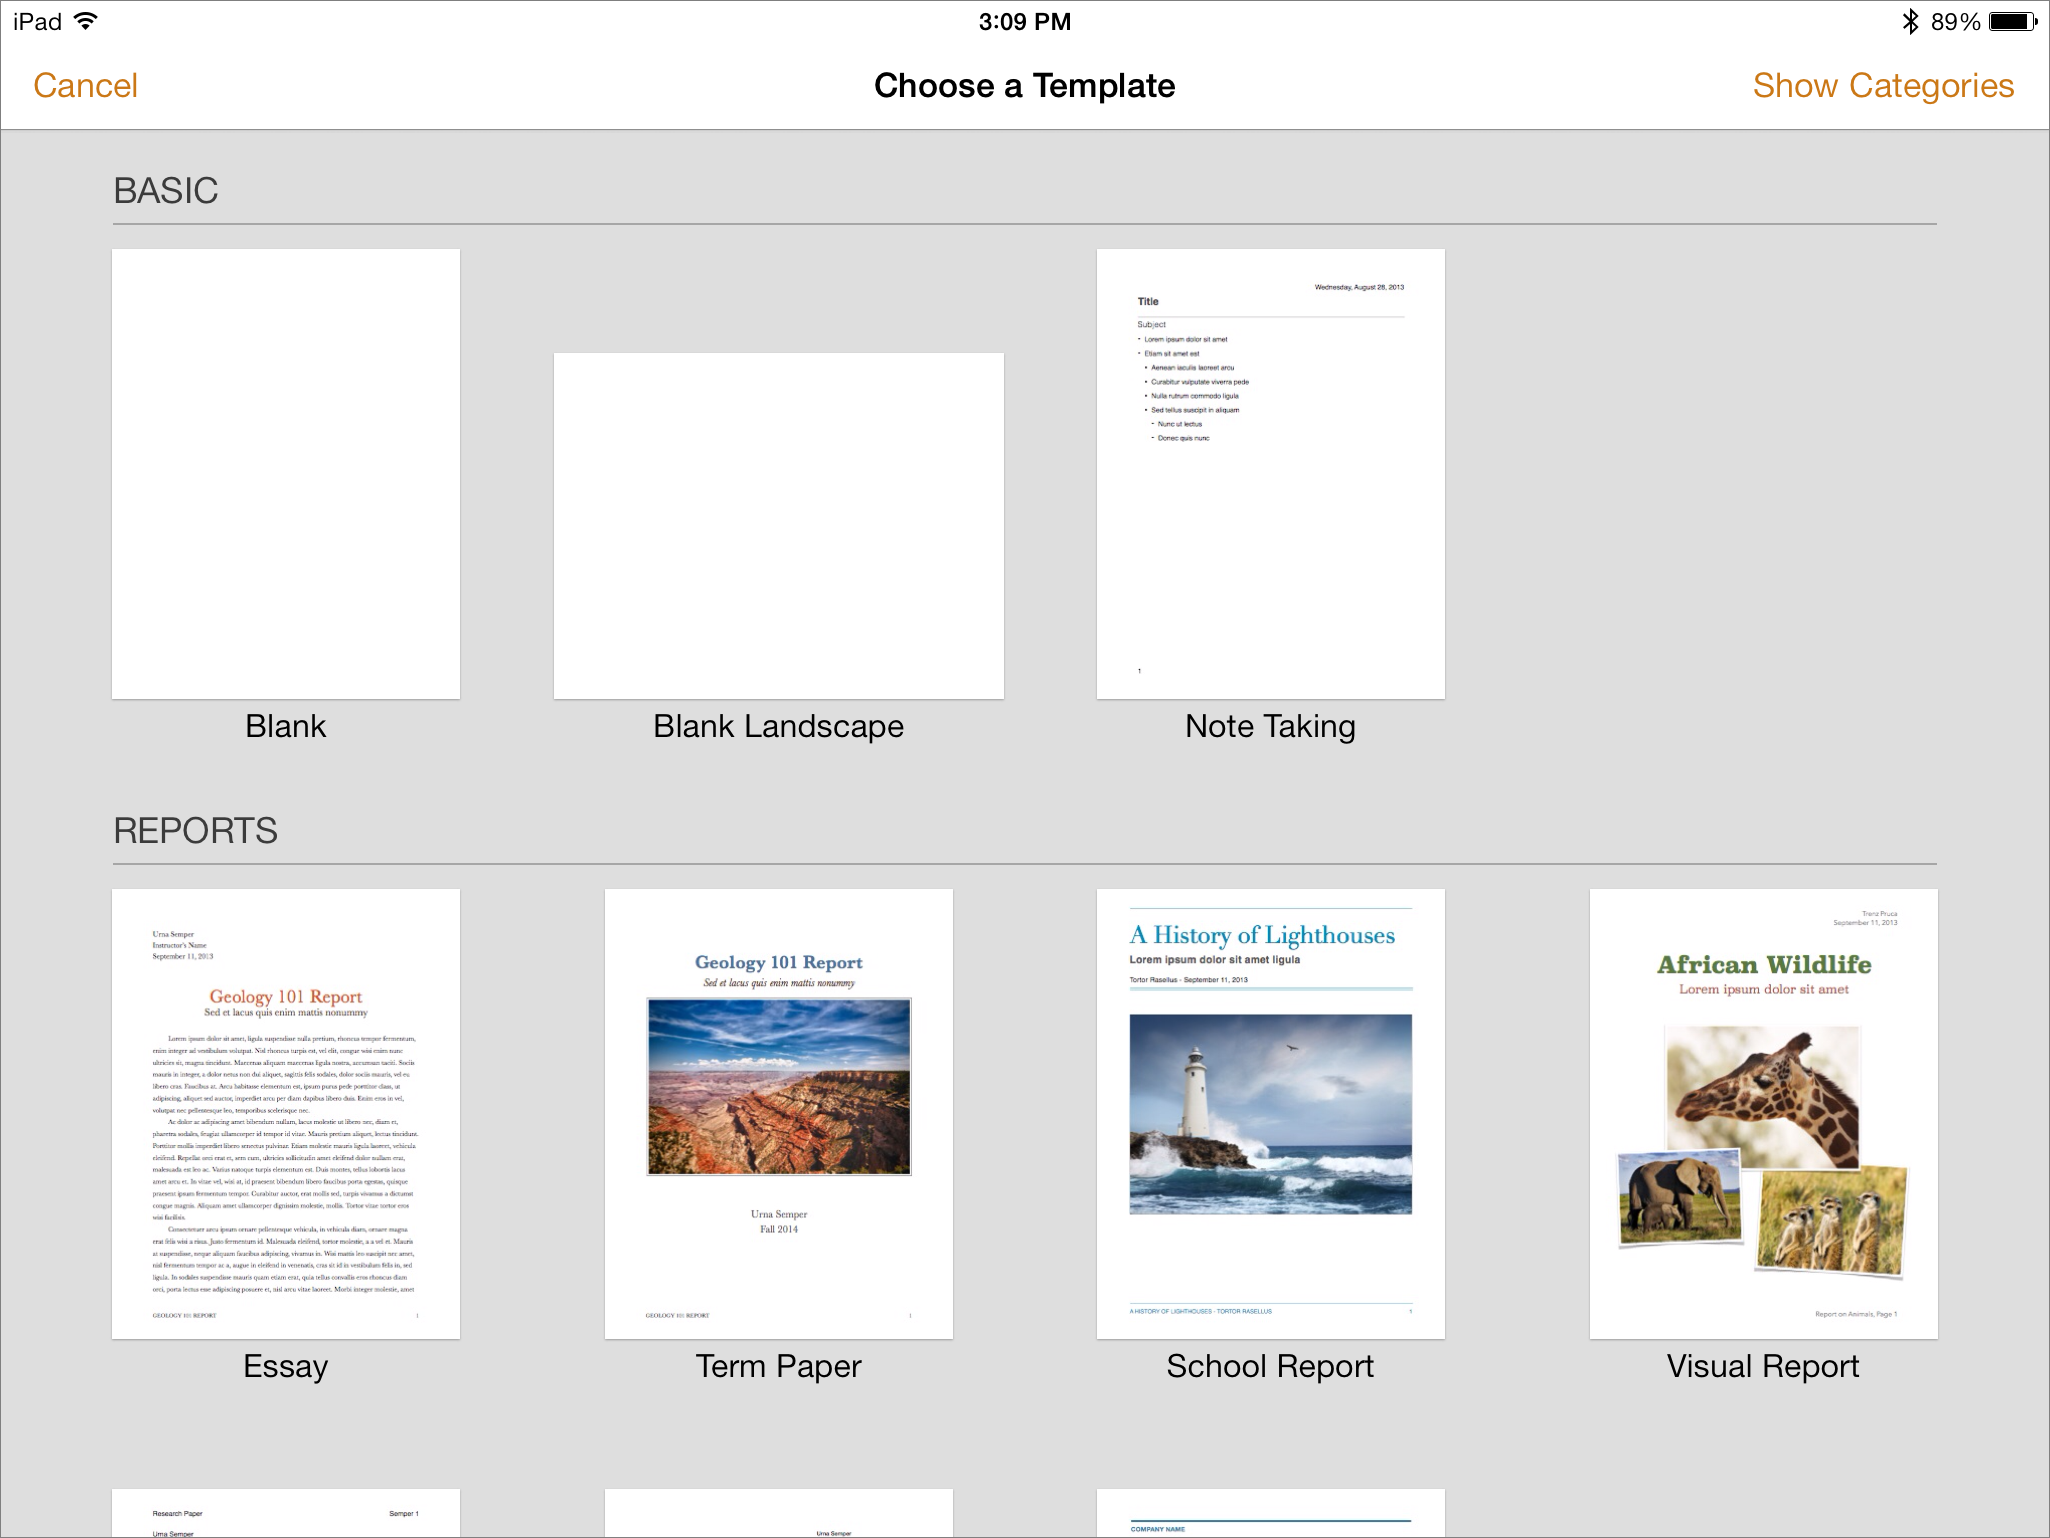
Figure 17: The Template Chooser in iOS.
The new document, named after the template you tapped, becomes the document you are working on; for example, tapping Essay creates and opens a new document named Essay.
To rename it on a large-screen device, tap the name on the document’s toolbar to edit it.
On a small-screen device, do the following:
- Tap Documents (or <) in the upper-left corner to return to the document manager.
- Tap the document’s name under its thumbnail. The Rename Document display appears.
- Type a new name and tap Done.
The document manager reappears, with the new name under the document’s thumbnail.
Create a New Document in a Browser
When you use Pages for iCloud, how you create a new document is quite similar to how you create one in iOS.
The iCloud version of Pages opens to its version of the document manager, which displays all the Pages documents you’ve stored in iCloud (Figure 18).

Figure 18: The document manager in Pages for iCloud.
The Web app’s document manager has a Create Document thumbnail, just like the iOS document manager. Click Create Document to see the Template Chooser (Figure 19). Note that, while it looks like a separate window, it isn’t one: the Template Chooser is superimposed on the document manager window.
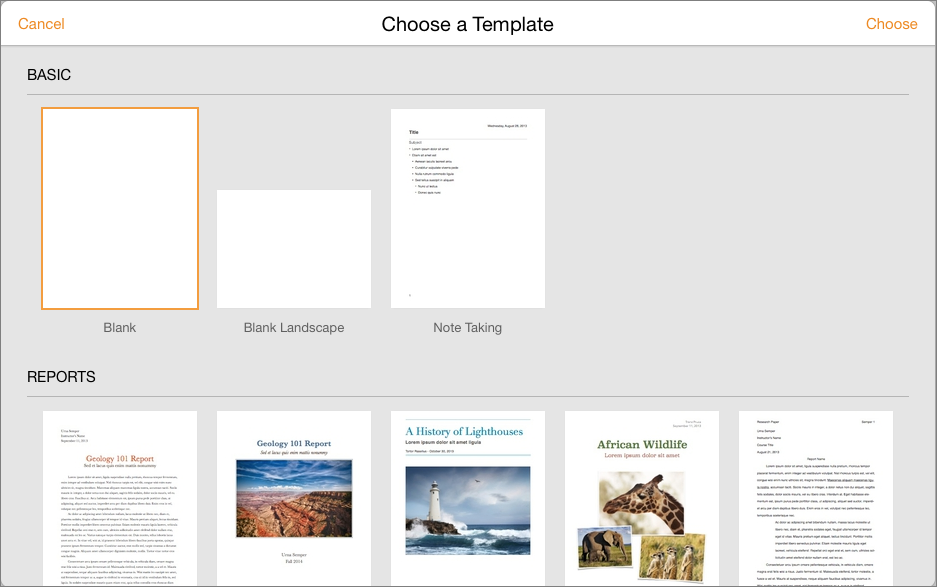
Figure 19: To start a new document, select a template icon in the Template Chooser and then click Choose at the upper right. Or, just double-click the icon for the template that you want.
Click the template you want to use (by default, Blank is selected), and then click Choose (or simply double-click the template you want). The new document, with the same name as the template you chose, opens in a separate window or tab, depending on how you’ve configured your browser: unlike in Pages for iOS, you can work on more than one document at a time, and each document appears in its own tab or window.
To rename your new document, click the Tools ![]() icon at the top of the document window, click the name at the top of the popover, type a new name, and click OK. (You can also rename a document in the document manager window: click its name, type a new name, and press Return.)
icon at the top of the document window, click the name at the top of the popover, type a new name, and click OK. (You can also rename a document in the document manager window: click its name, type a new name, and press Return.)
When you finish working on the document, close the document window or tab: changes to the document are automatically saved to iCloud as you work.
Open an Existing Document
Here’s a brief summary of how Pages opens existing documents:
- On a Mac: Being a full-fledged desktop computer program, this app can open Pages files from any drive connected to your Mac as well as files from iCloud. The app can also open Microsoft Word documents (in both .doc and .docx format); these are converted into new Pages documents, leaving the originals intact. Pages can also open text files, converting those into new Pages documents. It can also open documents from older versions of Pages.
- In iOS: You can open documents from the document manager screen, which presents either documents stored in iCloud or documents stored internally on the device, depending on your Pages settings in the Settings app. Other iOS apps can send compatible documents to Pages to be opened, and you can open documents stored on servers and documents shared via iTunes.
- In a browser: In Pages for iCloud, you can open documents from the document manager window, which presents documents you’ve stored in iCloud. You can also upload compatible documents from the computer on which the browser is running.
The details follow for each member of the Pages family. As you read, if you realize that you need help understanding iCloud Drive, skip ahead a few pages to Navigate in iCloud Drive.
Open Pages Documents on a Mac
To open a Pages document from the Finder (including files on any attached server or drive, including iCloud Drive) simply double-click the file (or select it and choose File > Open).
You can also drag a file to the Pages icon in your Dock to open it, again as you would with any Mac app. You can also open Pages documents from within the app, in the File > Open dialog, as I discuss later in this topic.
No matter how you open a Pages document, though, heed the following warning!
Working in the Open Dialog
As you saw in Create a New Document, when you launch Pages and had no document open the last time you quit Pages, you see the Open dialog. You also see the Open dialog when you choose File > Open (Command-O). You can use this dialog to open documents stored in iCloud Drive or anywhere on your Mac (including servers connected to it).
The Open dialog shares many features with a Finder window, so you can display the documents as icons, in a list, or in columns, and arrange them using the controls on the dialog’s toolbar (Figure 20).

Figure 20: Change how the dialog displays and arranges your Pages documents with these familiar controls.
Opening a document is straightforward:
- To open a document, click to select it and then click Open, or just double-click it.
- To open a document that’s inside a folder, open the folder to see its contents, click a document in the folder to select it, and then click Open (or just double-click the document in the folder).
Opening Documents Stored in iCloud
To get quickly to Pages documents that you’ve stored in iCloud from the Pages Open dialog, click Pages at the top of the Open dialog’s sidebar (Figure 21). The dialog’s main pane then shows both the Pages documents stored in iCloud Drive’s Pages folder (called the Pages app library) and the folders in your Pages app library (see Navigate in iCloud Drive for more about folders in iCloud Drive).
Figure 21: At the top of the Open dialog’s sidebar is a quick link to your Pages app library in iCloud Drive (indicated by the blue arrow).
Tip: If the Open dialog does not display the sidebar, click the sidebar ![]() icon at the dialog’s top left.
icon at the dialog’s top left.
You can also navigate to app libraries created by other apps, or to folders you’ve created, in iCloud Drive; see Use iCloud Drive on a Mac.
Open Pages Documents in iOS
To open a document, go to the document manager (Figure 22). Then tap a document, or tap a folder and then a document in the folder.
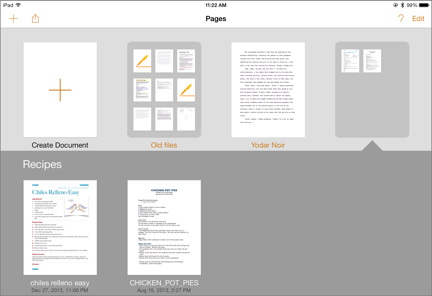
Figure 22: Open files from the document manager screen, shown here with an open folder.
However, the document manager may not display every document you can open in Pages for iOS. Whether or not the document you want to open appears depends on various factors, which I discuss next.
Local vs. iCloud Drive
The document manager shows either the Pages files and folders that you’ve stored in iCloud Drive’s Pages app library, or the Pages files and folders stored locally. Which you see depends on a setting. In Settings > Pages, when Use iCloud is on, the document manager shows your iCloud files and folders. When that setting is off, however, the document manager shows files and folders stored on your device.
Keep in mind that you can’t blithely flip between the two settings:
- When you turn on Use iCloud: All your local documents and folders are copied to iCloud from your device, and become available to Pages running on other devices. Technically, they are stored in the Pages app library in iCloud Drive; see Navigate in iCloud Drive.
- When you turn off Use iCloud: You can choose either to keep the documents, which copies them from iCloud to local storage on your device, or to delete them from your device (Figure 23).
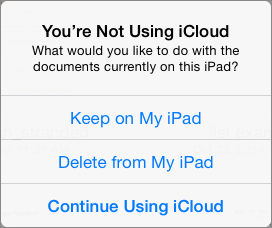
Figure 23: When you turn off Use iCloud in the Settings app, you have a choice to make when you next open Pages on your device.
Happily, choosing to delete the documents deletes them only on your device; the documents remain in your iCloud account and remain accessible to other devices that use the same iCloud account. Similarly, when you choose to keep the documents on your device, they become separate, locally stored copies: changes that you subsequently make to those now-locally-stored documents won’t be reflected in their counterparts still stored in iCloud.
Accessing More Files
Besides tapping an icon in the document manager, there are two other ways to get a document into Pages for iOS:
- Use Send To: On an iOS device, apps can send documents to other apps. For example, if someone mails you a Pages document as an email attachment, you can use the Send To command in Mail to send that document to Pages. Similarly, if you use a file-sharing service like Dropbox, you can send the document from that app to Pages. Documents that you send to Pages are copied and placed either in Pages’ local storage or in the iCloud account used by Pages, depending on the Use iCloud setting in Settings > Pages.
- Obtain from Other Sources: On the document manager’s toolbar, tap Add Document
 to see a popover from which you can bring files into Pages (Figure 24) from a variety of sources.
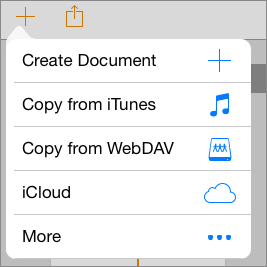
Figure 24: Alternate methods of getting documents in Pages.
The menu provides several choices. Let’s start with the bottom choice:
- More: Tap this to enable access to documents stored by third-party storage vendors (such as Box or Dropbox). When you enable a service that can provide documents to Pages, its name appears above More and below iCloud on the popover. Exactly how each service presents its offerings varies from service to service; consult each service’s documentation to learn how to use it.
- iCloud: Tap this to access other folders in iCloud Drive. See Use iCloud Drive in iOS, ahead.
- Copy from WebDAV: Tap this to see a dialog from which you can specify the address of a WebDAV server and your login credentials. Once you log on, you can choose a document from that server and it is copied to Pages. (WebDAV is a protocol that provides access to file servers via HTTP, the same protocol that is used to deliver Web pages. For example, the iDisk service that Apple formerly provided with MobileMe used WebDAV. See this Wikipedia page for more.)
- Copy from iTunes: This option makes use of the File Sharing service offered by iTunes when you have a device connected to it, with either a connector cable or Wi-Fi. You can access this service in iTunes by selecting your device and viewing its Apps pane; the File Sharing section appears at the bottom of the Apps pane (Figure 25), so you may need to scroll down to see it.

Figure 25: You can use iTunes File Sharing to move a document into Pages on your iOS device. With Pages selected in the Apps list (center), you can work with the Pages Documents panel at the right.
In the File Sharing section, select Pages in the Apps list and then drag a Pages file, Word file, or text file from the Finder and drop it into the Pages Documents panel. This copies the document into a special hidden location on your device. When you tap Copy from iTunes in the popover on your iOS device, you see the Pages documents stored in that special location; tap a document in the list and the document is copied into the Pages document manager.
- Create Document: This choice creates a new document, just as tapping the Create Document thumbnail in the Pages document manager does.
Open Pages Documents in a Browser
The document manager in Pages for iCloud (Figure 26) bears a striking resemblance to the document manager in Pages for iOS.
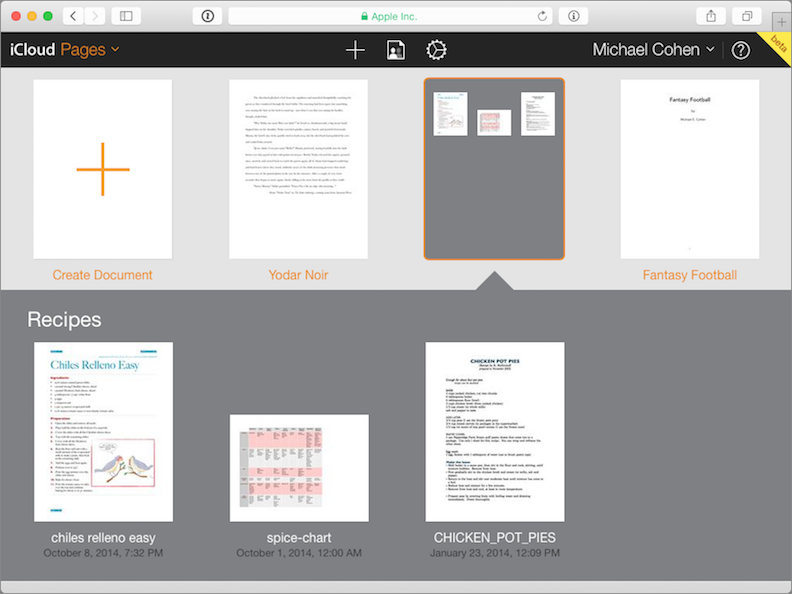
Figure 26: The document manager in the Web version of Pages shows your Pages documents and folders stored in iCloud. Here, the document manager is showing the documents in an iCloud folder.
Unlike Pages for iOS, you can’t switch between local storage and iCloud storage: Pages in a browser shows only iCloud storage.
That’s not to say you are locked into an iCloud-only environment: click the Manage Documents ![]() icon in the document manager’s toolbar and choose Upload Document (Figure 27) to upload any compatible file from the computer on which the browser is running to iCloud.
icon in the document manager’s toolbar and choose Upload Document (Figure 27) to upload any compatible file from the computer on which the browser is running to iCloud.
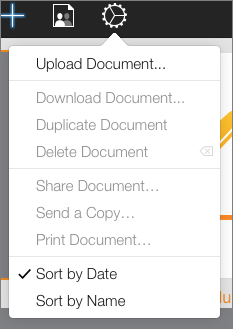
Figure 27: Use the document management popover in the Web app to upload documents to iCloud from your computer.
You can also upload a document by dragging it from the Finder into the iCloud document manager in Safari, or, in Windows, by dragging it from the Windows Explorer to Internet Explorer. Other Mac and Windows browsers may or may not support dragging to upload.
When you upload a document, it is copied, not moved, from the computer to your iCloud account. To open the uploaded document, double-click its thumbnail in the document manager, just as you would any other document.
You can also use the iCloud Drive Web app to open Pages files stored in other folders in iCloud Drive, as described in the next topic.
Navigate in iCloud Drive
Before the arrival of iOS 8 and Yosemite, apps like Pages that stored documents in iCloud each had a private document storage container: in order for you to access an iCloud-stored document you had to go through the app (technically, there were other ways, but they weren’t recommended). That changed when iCloud Drive debuted with Yosemite and iOS 8.
Now, although each app that stores documents in iCloud still has a special storage container that it controls, those storage containers, known as app libraries, are now available to you through iCloud Drive on the Mac, in iOS, and through iCloud in your browser. As is so often the case, you have the most control over iCloud Drive on a Mac.
Use iCloud Drive on a Mac
In Yosemite, iCloud Drive can usually be found in the sidebar of any Finder window; click it to see the app libraries (Figure 28).
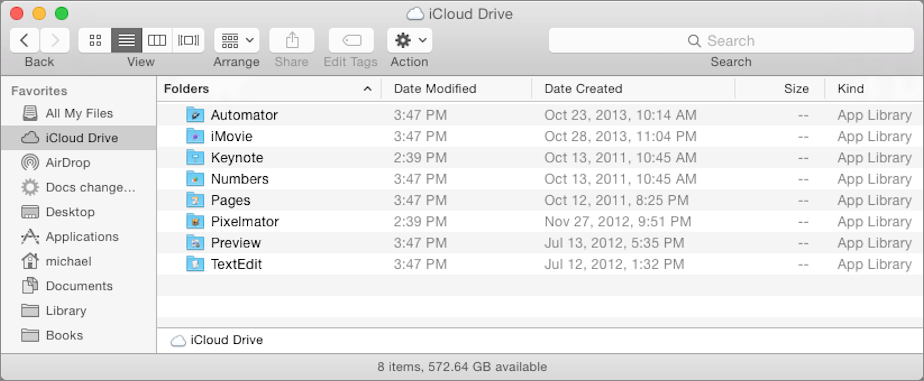
Figure 28: This iCloud Drive contains various app libraries, some dating back several years but now visible in the Finder for the first time.
You can open app libraries in this window to see their contents, and you can manipulate those contents to some extent. I say “to some extent” because although an app library looks like an ordinary folder, its app can have policies regarding what you can do with it. For example, an app may let you put only certain types of files into its app library (Figure 29).
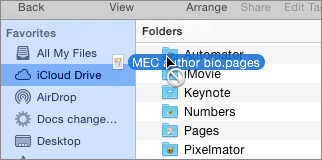
Figure 29: Automator won’t let you put a Pages file into its app library.
When you open the Pages app library in a Finder window, you can add to, rename, or remove its Pages documents, and your changes are seen in the Pages document manager on all your devices that use iCloud Drive. If you double-click a Pages document in the Pages app library, it opens just as though you had opened it from the Pages Open dialog.
iCloud Drive isn’t just for app libraries. You can create your own folders in iCloud Drive, and you can put any kind of document into them. When you put a Pages-compatible document into such a folder, or, for that matter, into any app library that will accept Pages documents, you can open that document in Pages on your other devices.
Once you open a Pages document from anywhere in iCloud Drive other than from the Pages app library, from then on the Open dialog in Pages for Mac displays it in the Pages app library and it appears in the Pages for iOS document manager screen. However, the document is not really in the Pages app library: it remains in the iCloud Drive location where you originally placed it (Figure 30). (If you look at it in the Finder you’ll discover it’s stored in the Pages app library as an alias.)
Figure 30: The top file listed in this Open dialog in Pages for Mac is an alias; the dialog indicates where to find the original in iCloud Drive.
Use iCloud Drive in iOS
Upon a cursory inspection, the appearance and functionality of the document manager screen in Pages for iOS did not seem to change much with the introduction of iCloud Drive. Nonetheless, iCloud Drive has had its impact.
Like Pages for Mac, the Pages for iOS document manager does differentiate between documents stored in the Pages app library and those that are aliases to documents stored elsewhere in iCloud Drive, but it does so subtly: the names of aliases appear in the document manager in dark gray rather than in orange (Figure 31).

Figure 31: The first two documents on this document manager screen, with the gray names, are aliases to documents stored elsewhere in iCloud; the right-most one, with the orange name, is stored in the Pages app library.
To open a document from elsewhere in your iCloud Drive, tap Add Document ![]() in the toolbar and then tap iCloud. The iCloud Drive document picker appears (Figure 32). You can switch between icon view and list view with the controls at the top left, and you can search for document and folder names.
in the toolbar and then tap iCloud. The iCloud Drive document picker appears (Figure 32). You can switch between icon view and list view with the controls at the top left, and you can search for document and folder names.
Figure 32: The iCloud Drive document picker shows app libraries that don’t contain any Pages-editable documents as disabled.
Tap a folder or app library in the document picker to see its contents (Figure 33) and tap any Pages-compatible document shown to open it in Pages. Like Pages for Mac, Pages for iOS puts an alias to the document in the Pages app library when you open it from another location in iCloud Drive.

Figure 33: Tap a Pages document to open it from inside an iCloud Drive folder or app library.
Use iCloud Drive in a Browser
Unlike Pages for Mac or Pages for iOS, the Pages browser app does not display aliases to documents stored outside the Pages app library in iCloud Drive. However, you can use the iCloud Drive Web app to access the rest of iCloud Drive.

Figure 34: The iCloud Drive app is available in any modern browser at iCloud.com.
Open the iCloud Drive app to see all the app libraries and folders in your iCloud Drive (Figure 35). You can use the controls in the app’s toolbar to create new folders, upload documents, download documents, delete them, and email them.
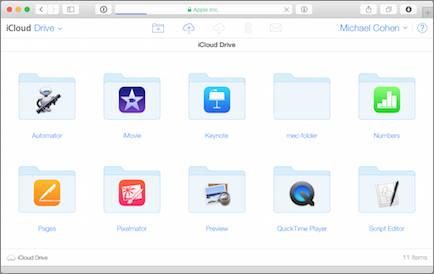
Figure 35: Use the iCloud Drive Web app to manage app libraries, folders, and documents in iCloud.
Double-click any folder to see its contents. Pages documents appear with a Pages icon; click the thumbnail of one to see its information  badge. Click that badge to see details about the file (Figure 36).

Figure 36: To see details about a Pages file, click the information badge on its thumbnail.
Or just double-click the document’s thumbnail to open it in Pages for iCloud. Even though the Pages for iCloud document manager, or the iCloud Drive app itself for that matter, don’t show the alias for the document within the Pages app library, opening a Pages document from another iCloud location with the Web app does create that alias, which you can see in Pages for Mac and Pages for iOS.
Save, Move, Rename, and Delete Documents
With any of the current versions of Pages, saving documents is the least of your worries—literally. That’s because every member of the Pages family automatically saves changes you make within moments of your having made them. Of course, you do still have document handling options, which vary among the family members:
- On a Mac: Documents save automatically, but you can manually save them as well, duplicate them, and revert to prior saved versions. You can also move documents to and from iCloud, and between folders on your Mac and in iCloud. And, of course, you can delete documents.
- In iOS: Documents save automatically. They can be duplicated, deleted, and moved into and out of folders. They can also be moved to other locations in iCloud, or to a third-party storage provider.
- In a browser: You’ll find more or less the same capabilities as in iOS, but you access some of those capabilities differently.
Let’s take a closer look….
Save, Move, Rename, and Delete Documents on a Mac
For decades, saving files on the Mac had not changed: you do some work, choose File > Save (Command-S), do more work, choose File > Save (Command-S) again, and so on. Then 10.7 Lion came along, and with it what Apple calls the Modern Document Model, which changed everything. Apple polished that model in 10.8 Mountain Lion (as explained in Matt Neuburg’s TidBITS article, The Very Model of a Modern Mountain Lion Document), and Pages uses the Yosemite version of the model today.
With the Modern Document Model, you no longer need to save your documents. As you work on a document, your changes are saved automatically. What’s more, Yosemite keeps track of changes, so you can revert to previous versions of a document if you have the need. The model also changes many of the entries on the File menu, which is where you usually look for the commands to save, move, and rename documents.
Here are the notable changes to the File menu commands:
- Save: This command still exists, but its primary function now is to explicitly save a document with a time and date stamp so you can revert to that specific version at a later time.
- Duplicate: The Duplicate command makes a copy of the document and opens it in a new window. The new document has the name of the original with “copy” appended; its name is selected in the title bar of the window so you can immediately rename the duplicate. The original window stays open.
- Save As: This command appears in place of Duplicate when you hold down Option. A dialog appears in which you can change the document’s name and where it is stored.
- Rename: This selects an open document’s name in its window’s title bar so you can type a new name.
- Move To: This presents a dialog with a Where pop-up menu from which you can choose a new location for the document whether on your Mac or in iCloud.
- Revert To: Use this command to revert to a previous version of the document. You can choose the last explicitly saved version, or browse all versions available from a Time Machine-like interface.
The way you delete a document has changed, too, courtesy not of the Modern Document Model but of iCloud. For documents stored on your Mac, of course, deleting is easy: just drag them to the Trash in the Finder as you have been able to do since the first Mac was released.
You can do the same with your Pages documents in iCloud Drive, though you see a warning (Figure 37) when you drag a document from the Pages app library to the Trash in the Finder.
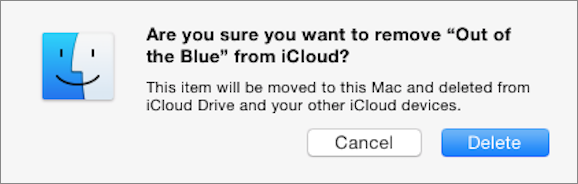
Figure 37: When you drag a Pages document to the Trash from iCloud Drive you get warned.
But what about exporting your documents into another format, such as Word? Skip ahead to Import and Export Your Work. (Hint for the impatient: the File > Export To command has much to offer you.)
Save, Move, Rename, and Delete Documents in iOS
In Pages for iOS, you never have to save documents because they are saved automatically as you work. (This is one reason Apple created the Modern Document Model in the first place: to make Mac apps act more like iOS apps, as described earlier in this chapter).
You perform all of your document management tasks in the document manager. Remember, however, that the items shown in the Pages document manager depend on whether Use iCloud is on in Settings > Pages (see Local vs. iCloud Drive, earlier in this chapter).
Here’s what you can do in the main document manager pane:
- Create a folder: Tap Edit. The toolbar turns blue and the document thumbnails jiggle. Next, tap to select one or more thumbnails, and then drag the selected thumbnails onto another thumbnail. The drag creates a new folder containing the dragged documents and the document onto which they were dragged (you can rename the new folder at this time if you like). Finally, tap Done on the toolbar.
- Move a document into a folder: Tap Edit as in the previous bullet item, and then drag a thumbnail into a folder. Tap Done.
- Move a document out of a folder: Tap Edit in the document manager, tap a folder to open it, drag a document out of the folder, and then tap Done.
- Rename a document or folder: To carry out this easy task, tap a folder name or document name to make it editable. Type a new name and then tap Done.
You cannot, however, rename a document stored in iCloud outside of the Pages app library; instead you see a warning (Figure 38).
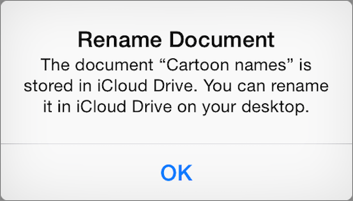
Figure 38: Documents stored in iCloud Drive outside of the Pages app library can’t be renamed in the Pages document manager.
- Delete a document: In the document manager, tap Edit. Tap to select one or more thumbnails. On the toolbar, tap the Delete
 icon, and then tap the confirmation popover that appears.
You can delete documents stored in iCloud outside of the Pages app library, though that requires responding to a dialog: tap Delete from Pages Only to remove it from the document manager, or tap Delete Original to remove it both from Pages and from iCloud (including your other iCloud-using devices) (Figure 39).

Figure 39: You have choices when you delete a document stored in iCloud outside of the Pages app library.
- Bring in a document: To bring a file into Pages from another location, tap the Add Documents
 icon, as described in Accessing More Files.
 - Move a document to another app: Tap the Share
 icon on the toolbar (Figure 40) and then tap Move To. Tap the thumbnail of the document you want to move.
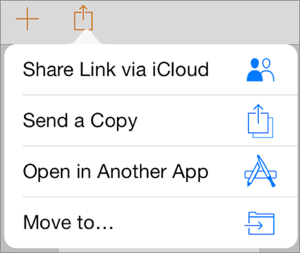
Figure 40: Use the Move To command to move documents outside of Pages.
The document picker opens. In the document picker, tap the location in iCloud Drive where you want to move the file; to move the document to a Pages-compatible third-party storage provider, tap Locations in the document picker and then tap the storage provider (Figure 41).
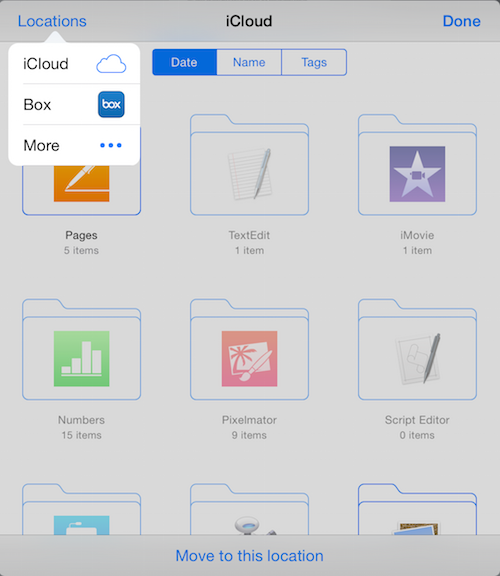
Figure 41: To move the document to another location in iCloud, tap a thumbnail in the document picker; tap Locations to move it to a third-party storage provider (such as Box, shown here).
Save, Move, Rename, and Delete Documents in a Browser
Just as in the iOS Pages app, the Web app automatically saves your documents as you work. But, although you have no Save command, you can move documents into and out of folders in the Pages app library, rename documents and folders, and delete documents and folders. Not surprisingly, the methods are similar to those in the iOS app.
Here are some directions for working in the Web app’s document manager:
- Create a folder: Drag one document onto another. A folder named Folder containing the two documents is created.
- Move a document into a folder: Drag a document thumbnail onto a folder thumbnail.
- Move a document out of folder: Open the folder and drag the document out.
- Rename a document or folder: Click an item’s name in the document manager: the text becomes editable. To rename a folder, you can also open the folder and then click its name.
- Delete a document: Click the document’s thumbnail and then click the Manage Documents
 icon in the toolbar and choose Delete Document—or just press Delete. Confirm the deletion in the dialog that appears.
Choose Fonts
Since Time Immemorial (that is, since January 1984), you have been able to use multiple fonts in documents on a Mac. You can still do that, and these days you can use many more fonts. But, also as it has been since Time Immemorial, you are limited to the fonts available on your system, and that limitation has interesting consequences now that documents are likely to be opened on multiple systems via iCloud.
Here’s an overview of how the Pages family handles fonts:
- On a Mac: You can use any font installed on the Mac, and you have an array of tools for adjusting a font’s appearance (for example, using typeface styles like bold, adjusting character spacing, or using ligatures).
- On iOS: You are limited to the fonts that come with iOS. When you open a document that contains fonts not present in iOS, those fonts are replaced by others, but information about the original font and its appearance settings is retained in the document. You have some appearance options but fewer than on a Mac.
- In a browser: Documents are limited to the same fonts that are available in iOS; missing fonts are substituted as on iOS. You have somewhat fewer appearance options than on iOS.
Generally speaking, you have the most control over fonts and how they appear when you work on the Mac, but, while the other Pages family members don’t provide as much control over fonts and their appearance, they don’t discard settings that you make on the Mac.
Choose Fonts on a Mac
Happily for the long-time Pages users, commands to set fonts and adjust their appearance can be found where they were in Pages 4: in the Format > Font submenu. From there you can choose Show Fonts to open the standard system Fonts window (Figure 42).
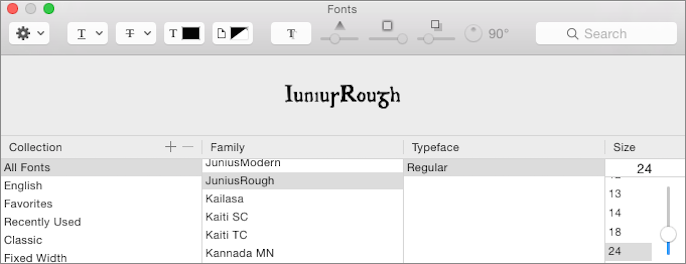
Figure 42: You can choose fonts and adjust their appearance in the standard system Fonts window.
You can also choose commands on the Format > Font submenu to set typeface styles, adjust character spacing, make text bigger or smaller, and select advanced options like ligature substitution (for example, automatically display a single special “fl” glyph for the individual “f” and “l” characters when they appear together). Or, you can bypass the Fonts window and the Format > Font submenu and simply work in the Font section of the Text Format inspector.
The Text Format inspector occupies the Inspector pane when you select text or set a text insertion point.
The Font section of the Text Format inspector is in its Style panel (Figure 43).
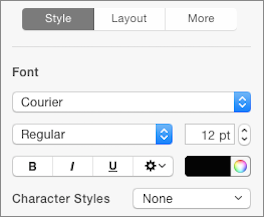
Figure 43: The Font section in the Text Format inspector offers nearly all the font settings that the Fonts window does.
From the Font section of the Text Format inspector you can do the following:
- Choose a font family: A “font family” is usually what we mean by “font”—it includes all the font’s sizes and styles. For example, Courier is a font family, Courier Bold 10 point is a specific font in the Courier font family. You choose a font family from the first pop-up menu in the Font section of the Inspector. The menu can be quite long: in addition to any fonts you’ve installed are the ones that ship with Yosemite, and Yosemite ships with lots of fonts.
- Choose a typeface: A typeface is a particular stylistic variant of a font, such as Regular or Bold Oblique. The second pop-up menu in the Font section itemizes the typefaces associated with the chosen font family.
- Enter a type size: Use the field to the right of the typeface pop-up menu to set the type size. You can type a size in the field or use the arrow buttons next to the field to raise or lower the size.
- Pick a type style: The common bold, italic, and underline type styles can quickly be set by clicking one or more of the first three buttons in the row beneath the typeface menu. If a typeface corresponding to the style is available in the chosen font family, the change is reflected in the typeface pop-up menu. For example, when Courier is the chosen font, click the Italic
 button to choose the Oblique typeface in the Courier family; click both the Bold
  and Italic
  buttons to choose the Bold Oblique typeface in the Courier family.
You can also use the common keyboard equivalents to choose type styles: Command-I for italic, Command-B for bold, and Command-U for underline. (By the way: the underline style is not connected to a font family typeface: underlines are rendered separately by Pages, so any font can be underlined.)
- Pick a type color: Click the color swatch to the right of the type style buttons to assign a color to selected text. This brings up the standard system Colors window, from which you can choose any of more than 16 million colors.
- Set advanced style options: The advanced options
 button at the right of the type style button row produces the Advanced Options popover (Figure 44). These options give you fine-grained control over text appearance, such as how closely characters are spaced, how much they are superscripted or subscripted, whether they should appear as capitals or small-caps, and so on. You can even set background colors for characters, and select special rendered type styles, such as text with shadows or outlined text.
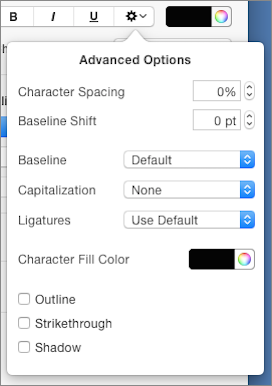
Figure 44: The Advanced Options provide fine-grained control over how fonts appear in selected text.
- Choose, modify, and create character styles: To make the same changes to text appearance repeatedly in your document (for example, you repeatedly need bold red italic text with a shadow), you can create a character style for that set of changes. In addition, some Pages templates come with pre-made character styles. Character styles appear in the Character Styles pop-up menu.
See Choose a Style, Manage Your Styles, and Try Templates for more about character (and paragraph) styles and templates.
Choose Fonts in iOS
Pages for iOS has fewer fonts available to it than the Mac app, and it provides fewer font settings that you can apply to them.
But while iOS, unlike the Mac, provides no facility for users to install fonts, it does come with a healthy assortment of fonts that apps like Pages can use.
Nonetheless, that healthy assortment of fonts does not include all the fonts available with Yosemite, nor does it necessarily include any additional fonts you might have installed on a Mac. Consequently, when a Mac Pages document ends up in Pages for iOS, some fonts in that document might not be available. In that all-too-likely scenario, Pages for iOS does the following:
- Tells you about missing fonts (Figure 45).
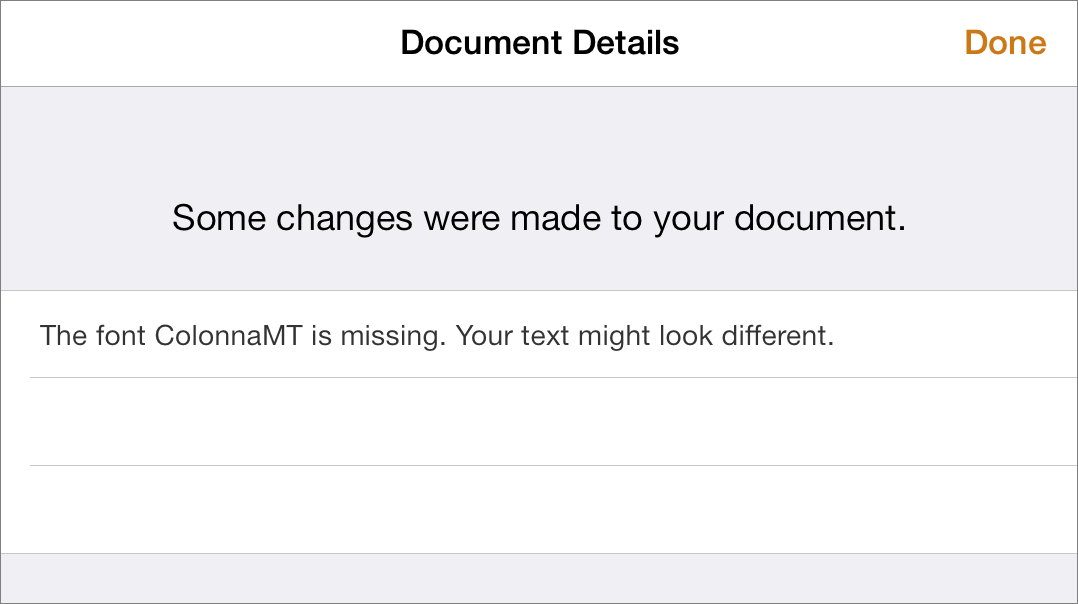
Figure 45: When a document uses a font that isn’t available to iOS, Pages lets you know.
- Substitutes another font for each missing font (usually Helvetica).
- Retains a record of the missing fonts inside the document so that when the document is next edited on a system that has those fonts, they are used instead of the substitute fonts.
You can edit text that contains a missing font in Pages for iOS, including copying and pasting the text, or portions of it, to other locations in the document. As long as you don’t change the text’s font in Pages for iOS, the record of the missing font remains associated with the text. When the document is next opened on a system that has the font, the edited text displays the correct font.
What’s more, you can use a missing font elsewhere in a document: Pages notes the missing fonts in its Font list (Figure 46) and you can apply that missing font to any text in the document. When the document is opened on a system that has the original font, the original font is displayed.
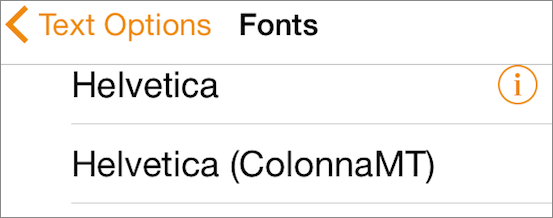
Figure 46: In Pages for iOS, a substitute for a missing font shows the name of the replaced font in parentheses (here, a Helvetica entry substitutes for the missing font ColonnaMT).
Applying a font and adjusting its size and style is easy on a large-screen iOS device: the commands are all available in the format bar above the keyboard (Figure 47). Select some text or an insertion point and the font settings are a tap away.
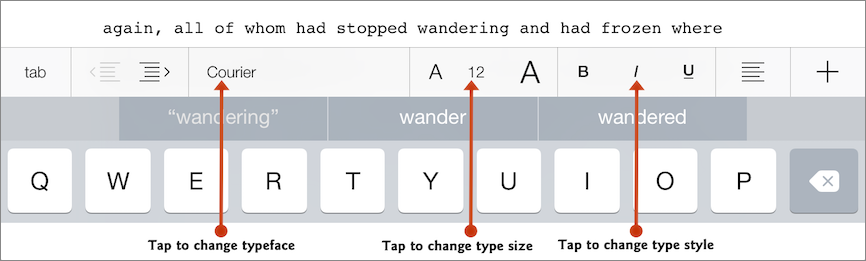
Figure 47: On a large-screen device, the format bar has font setting options.
On small-screen iOS devices, and to access some settings on large-screen devices, you must journey through the Format inspector popover (Figure 48). Select text or set an insertion point, tap the Format ![]() icon, and then tap Style at the top of the popover.
icon, and then tap Style at the top of the popover.
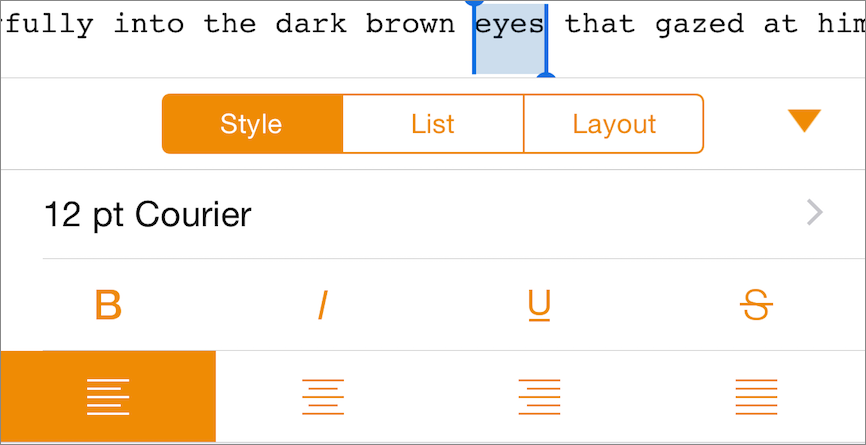
Figure 48: The Format inspector popover is where you adjust fonts on small-screen devices.
Typeface styles, such as bold and italic, appear on the main pane of the popover: tap the styles you want to apply. For other font settings, tap the font specification shown in the popover (for example, “12 pt Courier” in Figure 48, above) to reveal the Text Options pane. From this pane you can set the font size, tap Color to choose a text color from a variety of color swatches, and select a font.
Choose Fonts in a Browser
The fonts available in the Pages Web app are the same ones available in iOS, and the font setting capabilities are similar as well. How you access those capabilities, however, resembles how you access them in Pages for Mac: that is, via the Inspector pane (Figure 49).
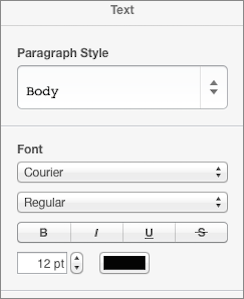
Figure 49: In Pages for iCloud, font settings are made in the Text Format inspector, which appears when text is selected.
The Text Format inspector in the Inspector pane offers many of the same font options found in Pages on the other platforms, though these options are more limited:
- No indication of substituted fonts: The Font pop-up menu does not indicate whether a font is a substitution for another font. However, fonts are substituted in the same manner as they are on iOS, and you can edit text that contains substituted fonts without the document “forgetting” the original font, just as you can on iOS.
- Fewer colors: While Pages for Mac provides access to more than 16 million colors, and while Pages for iOS provides an assortment of color swatch panels, Pages for iCloud currently provides only two sets of color swatches. Nonetheless, colors chosen for text on another platform are displayed in Pages for iCloud.
Set Paragraph Layouts
In Pages, as in many word processors, the paragraph (that is, a string of zero or more characters ending in a Return character) is a basic unit for formatting. Indentation from the margins, alignment between the margins, spacing between lines, bulleted lists, and tab settings, for example, are all paragraph-based settings and can differ from one paragraph to the next.
Paragraph layout capabilities vary among the Pages family members:
- On a Mac: This family member provides the most control over paragraph layout settings, providing access to them from the ruler and from several panels within the Text Format inspector.
- In iOS: Many, but not all, paragraph layout settings provided by Pages on the Mac are available on iOS devices. How you get to those settings differs depending on whether you are using a large-screen or small-screen iOS device.
- In a browser: You’ll find very few paragraph layout settings. The few that are available are accessed in the Inspector pane.
As with fonts, even when a member of the Pages family doesn’t provide a particular layout setting capability, it retains the settings made to a document by a different family member.
Set Paragraph Layouts on a Mac
To set paragraph layouts on the Mac, you need to show the Text Format inspector. If it isn’t visible, choose View > Inspector > Format or click Format ![]() on the toolbar.
on the toolbar.
It also helps to have the ruler visible since several settings are more conveniently made with it: choose View > Show Ruler (Command-R). Or, click the View icon on the toolbar and choose Show Ruler.
Set Paragraph Layouts with the Ruler on a Mac
The ruler shows the margin insets and tab settings for the currently selected paragraph (or paragraphs), and it is where you can go to change them (Figure 50). Although you can use the Text Format inspector to adjust the same settings, you may want to hide the Text Format inspector if you have limited screen space on your Mac.

Figure 50: Use the ruler to set tabs, margins, and first-line indents.
All ruler settings are made with clicks and drags on the ruler; refer to Figure 50, above, for what the different markers on the ruler represent:
- Margins: By default, a paragraph’s margins match the margins set for the document’s pages (see Set Document and Section Layouts). You can drag the left and right margin markers on the ruler to inset a paragraph an additional amount from the page margin; you cannot, however, drag a paragraph margin outside the page margin. The ruler itself displays the entire width of the page, including the page margins.
- First line: By convention, the first line of a paragraph is often indented more than the subsequent lines of a paragraph. You can drag the first line marker to the right of the left margin marker to create such an indent; Figure 50, above, shows this arrangement. You can also drag the first line marker to the left of the left margin marker to create a hanging indent if the left margin marker is inset from the page margin.
- Tabs: By default, tab stops occur every half inch if you have no tabs set for a paragraph (you can change the default with the Text Format inspector as described a little later on). However, you can set a left tab stop anywhere you like on the ruler by clicking where you want the tab stop to go. You can remove a tab stop by dragging it off the ruler.
You can also change a tab stop’s behavior by double-clicking it. Each double-click changes the tab stop as follows:
- Center tab: Double-click a left tab stop to change it to a center tab stop. Tab to it to have text center beneath it.
- Right tab: Double-click a center tab stop to make it a right tab stop. When you tab to this tab stop, text right-aligns beneath it.
- Decimal tab: Double-click a right tab stop to make a decimal tab stop. When you tab to a decimal tab stop, text beneath the tab stop aligns around a specific character—by default, a period (useful for columns of numbers). You can change the character with the Text Format inspector (see the next topic, just below this list). The character you set for a decimal tab stop affects all decimal tab stops in the selected paragraph; however, different paragraphs can have different decimal tab stop characters.
Finally, when you double-click a decimal tab stop, it becomes a left tab stop: the circle is complete.
Set Paragraph Layouts with the Format Inspector on a Mac
The Text Format inspector in Pages for Mac, which appears in the Format inspector when you’ve selected text or set an insertion point in your document, has an extensive array of paragraph formatting controls scattered among its three panels:
- Style: Alignment (including justification), indenting and outdenting, line spacing, and structured lists such as numbered and bulleted list formats
- Layout: Precise indentation control, tab settings, borders and rules, and paragraph background color
- More: Keep paragraphs together, start paragraph on a new page, keep lines together, hyphenation control, ligatures, and widow/orphan control
Now that you know where the various paragraph format settings are buried in the Text Format inspector, here’s how to use them, in alphabetical order:
- Alignment: Pages provides the standard left, center, right, and full justification alignment options; click the appropriate button in the first button row of the Alignment section of the Style panel (Figure 51) to set the selected paragraph’s alignment.

Figure 51: The Alignment section of the Text Format inspector’s Style panel provides alignment buttons (first row) and quick indenting buttons (second row).
- Background color: Head to the last item in the Borders & Rules section of the Layout panel (Figure 52) to set the background color of the selected paragraph. Click the color swatch that displays the current background color to choose from a panel of color swatches, or click the color
 button to choose a color from the standard system Colors window.
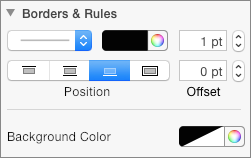
Figure 52: Set rules between paragraphs, give them borders, and set paragraph background colors with the Borders & Rules section of the Text Format inspector’s Layout panel (the selected background color shown in this figure is transparent).
- Borders: The Borders & Rules section of the Layout panel (shown in Figure 52, above) provides the controls for placing a border around paragraphs. You can set a border on any or all sides of a paragraph, adjust the style, color, and thickness of the line, and specify the offset distance from the border to the text.
- Hyphenation: To turn off automatic hyphenation within the selected paragraph, open the More panel and under Hyphenation & Ligatures select Remove Paragraph Hyphenation.
- Indent: You can control paragraph indentation in two different places. For quickly indenting or outdenting paragraphs (for things like block quotes) use the increase indent
 button or the decrease indent
  button in the Alignment section of the Style panel; these two buttons also affect numbering and bullet appearance when you Use Lists and List Styles. To dial in specific indent measurements, including the indent of the first line, go to the Indents section of the Layout panel.
 - Keep lines together: To prevent a paragraph from breaking between pages, go to the More panel and in the Pagination & Breaks section, select Keep Lines on Same Page.
- Keep with next paragraph: To make sure that a page break does not occur between the selected paragraph and the one that follows, open the More panel and under Pagination & Breaks, select Keep with Next Paragraph.
- Ligatures: Pages can automatically substitute ligatures (a single glyph used for two or three characters, such as “ff” or “ffl”) for the individual characters they represent. To turn this substitution off for the selected paragraph, select Remove Ligatures in the More panel’s Hyphenation & Ligatures section.
- Line spacing: You set the vertical spacing between lines within a paragraph and the amount of space above and below a paragraph in the Spacing section of the Style panel. You can specify how the line spacing is applied with a pop-up menu there:
- Lines: Adjusts the spacing between lines in a paragraph proportionally to the type size.
- At Least: Always uses at least the amount specified but may use more to prevent lines from overlapping.
- Exactly: Uses the exact amount of inter-line spacing you specify regardless of overlaps.
- Between: Instead of setting the height of each line in the paragraph, the amount specified is placed between the lines. For example, specifying 24 points and choosing Exactly sets the distance from one baseline to the next to 24 points; choosing Between and specifying 24 points puts 24 points between the bottom of one line and the top of the next (Figure 53).
Figure 53: Line spacing of 24 points with Exactly (left) and Between (right) chosen in the Spacing section of the Style panel.
- Lists: The Bullets & Lists section of the Style panel has a rich set of controls for specifying a list style for a paragraph (Figure 54).
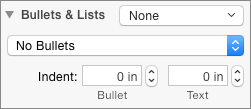
Figure 54: The simplest form of the Bullets & Lists section of the Style panel; it gets more complicated depending on the choices you make in its pop-up menus.
The top pop-up menu offers built-in list styles (very convenient for quick lists), and you can add your own custom styles to it. The second pop-up menu provides choices for the list marker: No Bullet, Text Bullets, Image Bullets, and Numbers. The other controls change depending on which list style or list marker you’ve chosen, but you can always control how much the list marker is indented from the left margin and how much the text in the paragraph is indented from the marker. For a detailed look at how to create lists and list styles, see Use Lists and List Styles.
- Start on new page: To force a page break before the start of the paragraph, open the More panel and under Pagination & Breaks select Start Paragraph on a New Page. You might want to use this for paragraphs that serve as major section headings in a report.
- Tabs: To set tab stops for a paragraph, use the Tabs section of the Layout panel. If you’ve used the ruler to place tab stops, your settings appear in this set of controls as well (Figure 55).
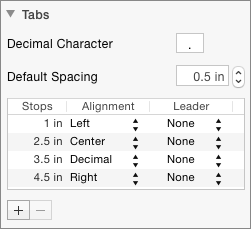
Figure 55: Set tabs precisely with the Tabs section of the Layout panel.
You can also set the default space between tabs, and the decimal character for decimal tabs (described in Set Paragraph Layouts with the Ruler on a Mac): double-click any numerical setting to select it, then type your changes. You can set an additional tab stop property that the ruler doesn’t provide: a leader character that appears repeated in the space before the text that’s aligned at the tab stop. This last is useful tables of contents and similar columnar lists.
- Widows and orphans: Short lines or individual words at the end of a paragraph that fall on the next page or column are called widows; paragraph openings that appear as the last line of a page or column are called orphans. Pages can keep either of them from occurring: select Prevent Widows and Orphans in the Pagination & Breaks section of the More panel to set that option for the selected paragraph.
Paragraphs and Bidirectional Text
All three Pages apps provide paragraph formatting support for languages that are written right to left. When you add an input source for right-to-left writing on the Mac, or a keyboard for a right-to-left writing system in iOS, a new alignment control appears to the right of the text alignment buttons in the Text Format inspector’s Style panel (Figure 56). To see the new button in Pages for Mac, quit and relaunch Pages. Click or tap this control to set the writing direction of the currently selected paragraph.
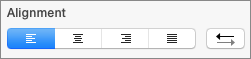
Figure 56: A writing direction control, at the right, appears in the Text Format inspector’s Style panel when your Mac or iOS device has a right-to-left language’s keyboard enabled.
When you set the writing direction to go from right to left, the paragraph’s alignment shifts accordingly, and the ruler markings reverse, with 0 on the right—even in Pages for iCloud, where currently the ruler is otherwise inoperative.
You can add input sources on the Mac in System Preferences: open the Keyboard preference pane, click Input Sources, and then click the plus button at the lower left. In iOS, go to Settings > General > Keyboards > Keyboards > Add New Keyboard to add keyboards for other languages.
Set Paragraph Layouts in iOS
For the finest control over paragraph formats, Pages for Mac is your best friend, but that doesn’t mean that Pages for iOS is bereft of paragraph formatting capabilities. Nonetheless, compared to those in Pages for Mac, the paragraph formatting capabilities in Pages for iOS can best be described as “serviceable.” Fortunately, Pages for iOS respects the settings you make in the Mac app.
Set Paragraph Layouts with the Ruler in iOS
Setting margins and tabs on the ruler in iOS works much as it does when you Set Paragraph Layouts with the Ruler on a Mac, except that in iOS you double-tap a tab stop to change it from one kind of tab-stop to another.
On a large-screen device, when the ruler is enabled, it appears whenever you are working on text. To enable it, in the toolbar tap Tools ![]() > Settings > Ruler. Tap outside the popover to dismiss it.
> Settings > Ruler. Tap outside the popover to dismiss it.
On a small-screen device, the ruler is a separate mode. Here’s how to use it:
- From the toolbar, tap Tools
 > Ruler. The ruler appears, with the paragraph you were working in selected.
 - (Optional) Adjust the selection to include adjacent paragraphs.
- Drag the margin and first-line controls to set indentations; tap in the ruler to set tab stops.
- Tap Done to dismiss the ruler.
Set Paragraph Layouts with the Format Bar in iOS
On a large-screen device only, here’s how you can adjust paragraph layouts from the format bar:
- Type a tab: Insert tab characters into a document’s text with the tab button at the left.
- Quick indent change: The decrease indent
 and increase indent
  icons appear near the left of the format bar.
 - Alignment adjustment: Tap the alignment icon near the right side of the bar (Figure 57).

Figure 57: Paragraph alignment settings appear when you tap the alignment icon on the format bar on a large-screen device. If your document uses bi-directional text, a direction setting also appears.
Set Paragraph Layouts with the Text Format Popover in iOS
Tap the Format ![]() icon in the toolbar when working on text to see the Text Format popover. It has three panes:
icon in the toolbar when working on text to see the Text Format popover. It has three panes:
- Style: Paragraph alignment controls appear on this pane (on small-screen devices, this is the only place that paragraph alignment controls appear). In addition, a text direction control is available when you have a keyboard selected for a language that is written from right to left (see Paragraphs and Bidirectional Text).
- List: Since small-screen iOS devices don’t have a format bar, this is where you go to increase or reduce the indent of paragraphs on those devices and to change the level of items in a hierarchical list (see Use Lists and List Styles). A basic set of list styles also appears in this pane. The available list styles depend on the template you are using (see Try Templates) and on whether you’ve enabled an international keyboard on your device (see Paragraphs and Bidirectional Text); for example, the numbered list styles available for the Arabic keyboard include several special Arabic list formats. If you have created your own list styles for the document on the Mac, those styles also appear on this pane.
- Layout: Use the up and down arrows to adjust the amount of line spacing by 0.25 line increments (Figure 58).
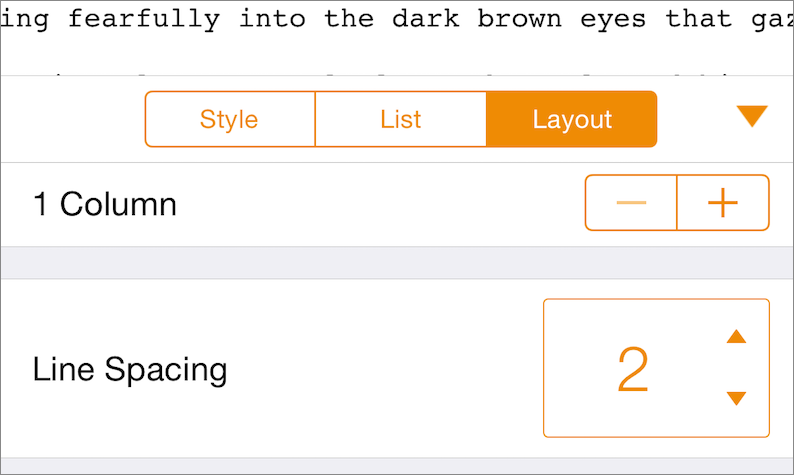
Figure 58: The Text Format popover’s Layout pane is where you set line spacing; the small-screen version is shown here.
To dismiss the Text Format popover on a large-screen device, tap anywhere outside of the popover; on a small-screen device, tap the close ![]() icon at its top right.
icon at its top right.
Set Paragraph Layouts in a Browser
Pages for iCloud confines its paragraph formatting controls to the Inspector pane; they appear when you are working on text in your document (Figure 59).
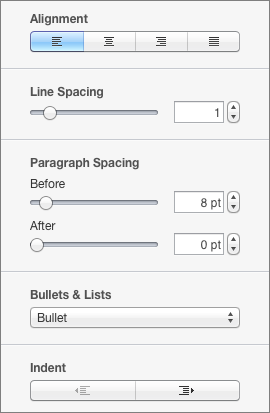
Figure 59: Pages for iCloud puts all its paragraph format settings in its Inspector pane.
Here are the paragraph format settings you can adjust:
- Alignment: Align selected paragraphs to the left, center, or right, or apply justification with the alignment buttons. Pages for iCloud also supports writing direction control (see Paragraphs and Bidirectional Text).
- Line spacing: Adjust line spacing by 0.25 line increments with either the slider or the up and down arrow buttons. You can type exact amounts into the Line Spacing field.
- Paragraph spacing: Set the amount of space that appears before and after a paragraph with these controls. The sliders and arrow buttons adjust the spacing in one-point increments. You can also type exact numbers in the Before and After fields.
- List styles: Choose a list style for a paragraph from the Bullets & Lists pop-up menu. Documents based on the Blank template offer a rudimentary set of styles but additional list styles may be on the menu depending on the template used to create the document. List styles created with Pages for Mac carry over to Pages for iCloud when you edit a document in the latter app.
- Indent: Indent controls appear at the bottom of the Inspector pane. Click one of them to increase or reduce the indent on a selected paragraph or to change the level of items in a hierarchical list (see Use Lists and List Styles).
Add Breaks, Numbers, and Notes
Like most word processors, Pages provides an array of formatting characters (such as non-breaking spaces) and other special text items that you can insert into your documents. Pages for Mac offers the widest range of them, but every member of the Pages family respects the ones that they don’t offer themselves.
Add Breaks
Pages provides various invisible characters that create breaks in the text. How you insert them, and the ones that are available, depends on the Pages family member.
Find the Insert Popover in iOS
In Pages for iOS, you’ll find many of the invisible break characters in the Insert popover. On large-screen devices, tap the Insert ![]() button at the right of the format bar to see the Insert menu (Figure 60).
button at the right of the format bar to see the Insert menu (Figure 60).
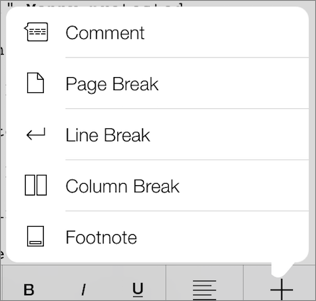
Figure 60: The Insert popover provides invisible characters and other items that you can place in text. The large-screen version is shown here; the small-screen version also has the Tab character.
On small-screen devices, tap the insertion point, and then tap Insert on the menu (you may have to tap the next  button on the menu once or twice to see the Insert command).
Here’s a useful list of what the different break characters do, and how you insert them:
Line Break
This character, also known as a soft return, causes the text that follows it to appear on the next line. Unlike a Return character, a line break does not start a new paragraph. Here’s how to insert one:
- On a Mac/iCloud: Press Shift-Return.
- In iOS: Choose Line Break from the Insert popover.
Tab
A tab character appears as a gap in the text (or as repeated leader characters) that ends beneath the next tab stop on the ruler; see Set Paragraph Layouts with the Ruler on a Mac. To type a tab:
- On a Mac/iCloud: Press Tab.
- In iOS: On large-screen devices, tap Tab on the format bar. On small-screen devices, choose Tab from the Insert popover.
Page Break
This character pushes the text that follows it to the next page of the document. Here’s how to add one:
- On a Mac: Choose Insert > Page Break (Command-Enter, or Fn-Command-Enter for certain keyboards).
- In iOS: Choose Page Break from the Insert popover.
- In a browser: On the Pages for iCloud toolbar, choose Insert
 > Page Break.
Column Break
In text laid out in multiple columns (see Create Columns), this character pushes the text that follows it to the next column. If there is only one column, the visual effect of the column break character is identical to a page break. To add a column break:
- On a Mac: Choose Insert > Column Break.
- In iOS: Choose Column Break from the Insert popover.
- In a browser: Not available in iCloud.
Section Break
Documents in Pages can be organized into sections (see Use Sections). The section-break character pushes the text that follows it into a new section; sections always begin on a new page. To insert a section break, you must be working on the Mac:
- On a Mac: Choose Insert > Section Break.
- In iOS/iCloud: Not available.
Non-breaking Space
Like a normal space character, this character appears as a small gap between adjacent characters. Unlike a regular space, the words on either side of a non-breaking space always remain together on the same line. To type a non-breaking space:
- On a Mac/iCloud: Press Option-Space.
- In iOS: Not available.
Add Dynamic Numbers
You can insert text that automatically updates, such as page numbers and the total page count, and you can insert the current date and time.
Page Number
This text item displays the number of the current page. You often use it in page headers or footers, but you can include it in the document’s main text as well—at least on the Mac:
- On a Mac: To insert a page number at the insertion point, choose Insert > Page Number.
Or, if neither the header nor the footer already contain a page number, you can click in a page header or footer to get a helpful popover (Figure 61): click Insert Page Number on the popover to choose from different page-numbering formats (for example, “1 of 4” or “Page 2”).
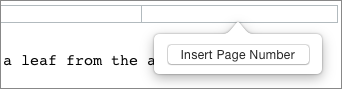
Figure 61: Click in a page header or footer in Pages for Mac to get this helpful popover.
- In iOS: Tap Tools
 > Document Setup. In the Doc Setup screen, tap in the page header or footer and then tap Page Numbers in the menu (Figure 62). You can then choose the page-number format as you can on the Mac. Tap Done.
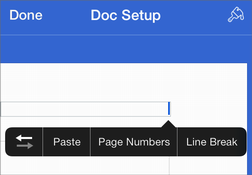
Figure 62: Insert page numbers in the Document Setup screen in Pages for iOS (small-screen version shown here).
- In a browser: On the toolbar, choose Insert
 > Page Number. iCloud offers no number formatting options.
Page Count
You can insert an item that displays the total number of pages currently in the document—choose Insert > Page Count on the Mac. In Pages for iCloud, click Insert ![]() on the toolbar and choose Page Count. This command is not available in Pages for iOS.
on the toolbar and choose Page Count. This command is not available in Pages for iOS.
Date and Time
To add a non-updating item that displays the date and time of the moment of insertion, choose Insert > Date & Time on the Mac (it’s not available in the other Pages apps). After the text is inserted, click it for a popover with which you can adjust the item’s format and what information it includes (for example, only the date or only the time).
Add Notes
By “notes” I mean, of course, footnotes and endnotes (you can also insert comments; I cover those in Be a Collaborator).
To insert a note on the Mac, choose Insert > Footnote; on iOS, tap Footnote in the Insert popover (see Find the Insert Popover in iOS, earlier, for how to invoke the Insert popover). In Pages for iCloud, click Insert ![]() on the toolbar and choose Footnote.
on the toolbar and choose Footnote.
Pages for iOS and Pages for iCloud both support the insertion of footnotes but have no facilities for formatting them or turning them into endnotes. Pages for Mac, on the other hand, provides numerous note formatting options, which are respected by the other Pages apps.
When you create a footnote or click within a note in the Mac app, the Footnotes Format inspector occupies the Inspector pane (Figure 63).
Figure 63: When you are working within a note, the Footnotes Format inspector appears.
The Footnotes Format inspector provides these note customization options:
- Type: You can choose between Footnotes, Document Endnotes (all notes appear at the end of the document), and Section Endnotes (all notes in each section appear at the end of the section).
- Format: You can choose to mark notes by numerals, lower-case roman numerals (e.g., i, ii, iii…), or symbols (e.g., *, †…).
- Numbering: You can number notes continuously throughout the document, restart them for each section, or restart them for each page. This last choice is best when the note type is Footnotes and when the note marker format is symbols.
- Space between Notes: Use this control to increase or decrease the amount of vertical space separating notes on the page.
In addition, to modify the appearance of note text, you can click Text at the top of the Inspector pane to open the Text Format inspector.
Set Document and Section Layouts
Some document-related settings, such as page size and margins, apply to every page in a Pages document, but other document-like settings, such as page numbering, need not. Instead, you can vary these settings within a document by dividing the document into sections: each section can number its pages differently from other sections (or not at all), and each section can have unique header and footer content.
Both Pages for Mac and Pages for iOS provide document settings, but only Pages for Mac provides any capability for adding sections, removing them, and controlling their layouts. Pages for iCloud offers neither document nor section setting capabilities.
Pages for Mac and Pages for iOS employ very distinct document setup approaches: an Inspector-based approach on the Mac, and a screen-based approach in iOS. What the approaches offer differ as well:
- On a Mac: Settings for page margins, printer customization, page size, header and footer, and global hyphenation and ligature substitution are offered. Section setup settings are also provided, along with the capability to add objects that appear on all pages of a section.
- In iOS: Settings for page margins, page size, and header and footer placement are available. Objects can be added that appear on every page of a document. No section settings are offered.
Set Document and Section Layouts on a Mac
The Inspector pane is where you set document and section layouts, so, if you’ve hidden the Inspector pane, it’s time to make it visible: choose View > Inspector > Document Setup, or click Document ![]() on the toolbar. Additionally, you may want to reveal layout guides that show the page margins and header and footer positions: choose View > Show Layout (Shift-Command-L).
on the toolbar. Additionally, you may want to reveal layout guides that show the page margins and header and footer positions: choose View > Show Layout (Shift-Command-L).
You can see a document window with the Inspector pane and the layout guides revealed in Figure 64. The Document Setup inspector pane shown in the figure contains two panels: the Document panel (which is open in the figure) and the Section panel (which is closed). The first handles the settings for the entire document; the second handles settings for the section in which you are currently working.
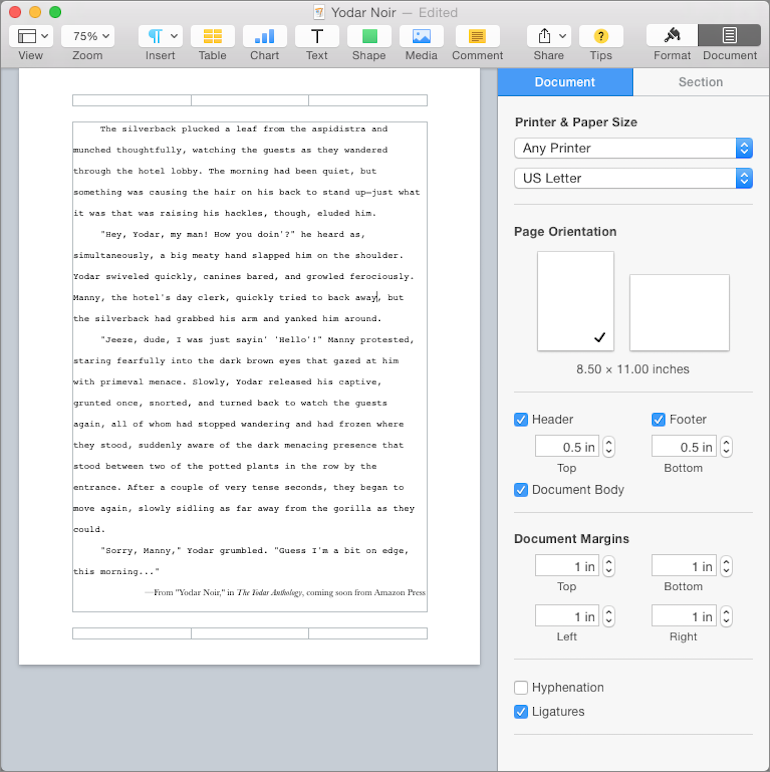
Figure 64: A Pages document with the Document Setup inspector deployed and layout guides made visible.
About Page Layout Documents
Pages supports two kinds of documents: word processing documents, with which you are likely familiar, and page layout documents, which work a bit differently. Unlike word processing documents, page layout documents lack a main body text area that flows from page to page. Instead, page layout documents consist of multiple independent text areas and other objects that you arrange on each page by hand. Page layout documents are suitable for things like posters, brochures, flyers, and short newsletters.
A page layout document behaves differently than a word processing document as follows:
- You must add new pages manually; in Pages for Mac, choose Insert > Page, or click Insert
 on the toolbar and choose Page.
 - The Insert > Section Break command is disabled; to add new sections in Pages for Mac, you must open the Document Setup inspector to the Section panel and use the Create a New Section pop-up menu at the bottom of the panel.
- The pages shown in the Page Navigator in Pages for Mac can be dragged to rearrange their order; choose View > Show Page Thumbnails (Option-Command-P) to view the Page Navigator.
While Pages 5 does not provide the page layout document templates offered by previous versions of Pages, you can still create a page layout document with Pages for Mac. Here’s how: open the Document Setup inspector, and in the Document panel, deselect the Document Body checkbox. Doing this deletes any text in the document’s body text area, but Pages does warn you about this before proceeding.
Note that although you can edit page layout documents in Pages for iOS and Pages for iCloud, only Pages for Mac can create page layout documents and only it allows you to insert pages manually and to rearrange pages.
Set Document Layouts in iOS
To set document layouts on an iOS device, tap Tools ![]() and then tap Document Setup, or tap a document’s header or footer. The Doc Setup screen appears (Figure 65); it is always shown in vertical orientation regardless of the orientation of your iOS device.
and then tap Document Setup, or tap a document’s header or footer. The Doc Setup screen appears (Figure 65); it is always shown in vertical orientation regardless of the orientation of your iOS device.
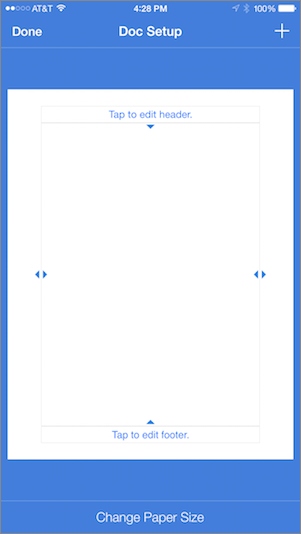
Figure 65: The Doc Setup screen provides margin adjustments, paper size settings, and header and footer editing capabilities.
Choose a Style
In a Pages document, a style is a named collection of format settings. Styles are very powerful: when you apply a style to a selection in a document, all the format settings that constitute the style are applied to the selection at once.
You don’t have to pay attention to styles if you don’t want to, but they’re there if you need them: when you create a new document you have to choose a template (see Create a New Document), and every template includes its own set of styles—even the Blank templates.
Although I delve more deeply into styles in Manage Your Styles and Organize Your Work, I offer some basic information about Pages’ styles here.
Pages supports four kinds of styles:
- Paragraph: These styles contain the same kinds of format settings found in Set Paragraph Layouts and in Choose Fonts, including tab and paragraph margin settings, line spacing, alignment, font, typeface, size, and so on.
- Character: These styles contain only character format settings, such as font, size, and typeface (again, see Choose Fonts for the ways that you can format characters).
- Object: Object styles contain format settings for objects, such as shapes, text boxes, images, and so on (see Add All Sorts of Objects). Object styles include things like object border line thickness and color, fill color, and transparency.
- List: List styles incorporate the settings in the Bullets & Lists section of the Text Format inspector’s Style panel (see Use Lists and List Styles).
The style capabilities of the Pages family members differ as I briefly describe below.
Use Styles on a Mac
Pages for Mac provides the most complete set of style capabilities.
The styles associated with your document are displayed in the Format inspector, and that’s where you go to change them. Figure 66 shows the four types of styles that the Format inspector displays.

Figure 66: The Format inspector provides ways to apply styles. Clockwise from top left: Paragraph Styles popover, Character Styles popover, List Styles popover, and Object Styles choosers (in this case, a Shape Styles chooser).
Tip: If the Inspector is hidden, you can open it by choosing View > Inspector > Format, or clicking Format ![]() in the toolbar.
in the toolbar.
As you know, what you select in your document changes what appears in the Format inspector. Here’s where the Format inspector displays your document’s styles when you have the following selected:
- Text: You can find paragraph styles at the top of the Text Format inspector, character styles in the Font section of the Text Format inspector’s Style panel, and list styles in the Bullets & Lists section of that same panel.
- Object: When you select an object, such as a shape or text box, thumbnails representing the styles that you can apply to that kind of object appear in the Style panel of the Object Format inspector (for chart objects, the thumbnails appear in the Chart panel). Each kind of object has a separate set of style thumbnails associated with it, and the label beneath the list of style thumbnails indicates the kind of object that is selected: for example, when you select a text box, which is a kind of shape object, the “Shape Styles” label is shown, as in Figure 66, above. (For more about adding objects, head over to Add All Sorts of Objects.)
To apply styles in your document, do the following for the kind of style you want to apply:
- Paragraph: Select some text or set an insertion point in a paragraph, and then click the style name shown at the top of the Text Format inspector (“Body” in the top-left example shown in Figure 66, above). In the Paragraph Styles popover, click the name of the style you want to apply. The paragraph reformats to match the style; if portions of more than one paragraph are selected, those paragraphs all reformat.
- Character: Select some text, click the Character Styles pop-up menu at the bottom of the Font section of the Text Format inspector’s Style panel, and then click a style name in the popover (yes, when you click the Character Styles pop-up menu, you see a popover instead of a menu; take a look back at Figure 66). The selected text is reformatted. If you set an insertion point and then choose a character style, what you type at that insertion point is formatted to match the character style you chose.
- List: Select some text or set an insertion point in a paragraph, then click the Bullets & Lists pop-up menu. In the List Styles popover, click a list style name. As with paragraph styles, if any portion of a paragraph is part of the selection, it reformats.
- Object: Select an object, or multiple objects of the same kind, and then in the Style panel of the Object Format inspector (the Chart panel for chart objects), click a style thumbnail to apply that style to the selection.
Use Styles in iOS and in a Browser
Pages for iOS and Pages for iCloud preserve all the styles you apply and modify with Pages on the Mac, but neither the iOS app nor the browser app provide you with a way to modify existing styles. In fact, you can’t even see, let alone set, characters styles with the iOS and browser apps. Nor can you see whether a selection’s format diverges from its assigned style, as you can with the Mac app.
When it comes to styles, all you can do with either app is apply paragraph styles and list styles:
- In iOS: Set an insertion point or make a text selection and then tap the Format
 icon. For paragraph styles, scroll down in the Style pane of the Format popover to see a list of the document’s paragraph styles (Figure 67, left); the current selection’s paragraph style has a check ✓ beside the name. To apply a different paragraph style, tap its name in the list.

Figure 67: In iOS (left) the Format popover’s Style pane includes paragraph styles; in a browser (right), click the paragraph style name in the Text Format pane to see the document’s paragraph styles.
List styles appear in the List pane of the Format popover. Tap a list style name to apply it to the current selection.
- In a Browser: Select text or set an insertion point to see the styles of the current selection in the Text Format inspector. Click the name under Paragraph Style (Figure 67, above right) to see a menu that lists the document’s paragraph styles. To apply a different paragraph style to the selection or at the insertion point, choose it from the menu. (If the Format inspector isn’t visible, click Tools
 in the toolbar; then click Settings > Show Format Panel.)
The label on the Bullets & Lists pop-up menu in the Text Format inspector shows the list style of the current selection. Click an item in the pop-up menu to apply a list style to the selection.
Search, Replace, and Correct Text
Where you find the search command and text correction settings breaks down between the Pages family members like this:
- On a Mac: They’re on the Edit menu, as in most Mac apps, but some system-wide preferences affect Pages, too. For more, keep reading at the end of this list.
- In iOS: Look on the Tools popover, and in Settings > General > Keyboard. For more, see Search, Replace, and Correct Text in iOS.
- In a browser: To find the search command, look on the show/hide
 menu; for the spelling check command, on the toolbar, tap Tools
  > Settings. For details, read Search, Replace, and Correct Text in a Browser.
Search, Replace, and Correct Text on a Mac
Pages on the Mac provides the usual search and replace capabilities common to most word processors as well as a collection of text correcting features.
Search and Replace on a Mac
To search for and replace text, choose Edit > Find > Find (Command-F). This brings up the Find & Replace window (Figure 68, top), a floating window that always appears above document windows. You can expand the window to provide replacement capabilities: click the Find & Replace window’s settings ![]() icon and choose Find & Replace (Figure 68, bottom).
icon and choose Find & Replace (Figure 68, bottom).
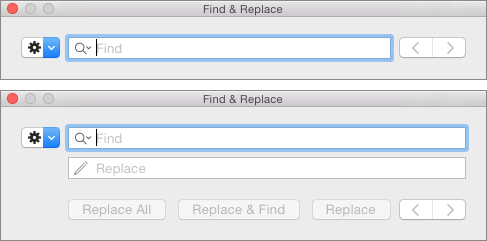
Figure 68: The Find & Replace window; work in the top form for simple searches and the bottom form to perform search and replace operations.
To search for text, type it in the Find field; if you want to replace the found text with other text, enter the replacement text in the Replace field.
The panel’s settings ![]() pop-up menu provides two choices for narrowing your searches:
pop-up menu provides two choices for narrowing your searches:
- Whole Words: Find only whole words that match the contents of the Find field (for example, searching for “king” will not find “sinking”).
- Match Case: Find only text that matches the case of the text in the Find field (for example, searching for “dog” will not find “Dogberry”).
The buttons in the Find & Replace window work like this:
- Arrows: Use these
 buttons to find the previous and next occurrence of the text in the Find field.
- Replace All: Click to replace every occurrence of the Find field’s text with the Replace field’s text.
- Replace & Find: Replace the currently highlighted found text with the contents of the Replace field and then find the next occurrence.
- Replace: Replace the currently highlighted found text, but do not find the next occurrence.
Dismiss the Find & Replace window by clicking its close  button or by choosing Edit > Find > Hide Find Panel.
Correct Text on a Mac
Pages for Mac, and Yosemite itself, provide a slew of text correction capabilities. In Pages, submenus on the Edit menu provide spelling, grammar, substitution, and transformation commands; in Yosemite’s System Preferences, the Text sub-pane of the Keyboard preference pane provides a set of text-related settings as well.
Let’s start with the Edit > Spelling and Grammar submenu. Its first item, Show Spelling and Grammar (Command-: [colon]), is an important one, since it displays the Spelling and Grammar window (Figure 69).
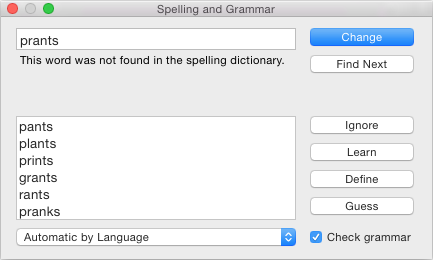
Figure 69: The Spelling and Grammar window is your control center for checking spelling and grammar.
You use the Spelling and Grammar window to check and correct both spelling and grammar (deselect Check Grammar to only check spelling). When you show the window, Pages immediately selects the first possible error that it finds, starting from the current insertion point or text selection. You can then do the following:
- Fix spelling or grammar: Type your change in the top field and then click Change to replace the flagged text in your document with the field’s contents and move to the next problem. You can also click a suggested spelling in the bottom field to move it into the top field and then click Change to replace the flagged word in your document and to move on.
- Identify the next possible problem: If you don’t want to make a change, click Find Next.
- Ignore or learn words: Click Ignore to skip the selected text and subsequent occurrences of the same problem in the document, and to move on to the next problem. Click Learn to add the selected word to the Pages spelling dictionary so it won’t be found again during subsequent spelling checks. Note that Learn is not available for grammar problems.
- Look up definitions: Click Define to look up the selected word in Yosemite’s Dictionary app. Define is not available for grammar problems.
- Suggest changes: Click Guess to see a list of possible replacements in the bottom field for the text that appears in the top field. You can use this feature to look up correct spellings for words you aren’t sure about: type a word in the top field and click Guess to see words that are spelled similarly to the one you typed. Guess is not available for grammar problems.
- Change the language: Choose a language from the pop-up menu at the bottom of the window to check spelling for that language.
Here are the remaining commands on the Edit > Spelling and Grammar submenu; they complement the Spelling and Grammar window’s offerings:
- Check Document Now (Command-; [semicolon]): Choose this to select the next problem, if any, in your document; it’s similar to clicking Find Next in the Spelling and Grammar window. Control-click the selected problem text in your document and then choose an option from the contextual menu.
- Check Spelling While Typing: Enable this to have possible misspellings in your document underlined in red; Control-click an underlined word to see suggested replacements.
- Check Grammar with Spelling: Enable this to have possible grammar and usage problems underlined in green.
- Correct Spelling Automatically: Enable this to have Pages offer auto-corrections for misspelled words as you type. If Pages identifies a word as misspelled and has a replacement for it, Pages replaces the misspelling with its best guess when you continue typing, and it underlines the replacement in blue; Control-click the blue underlined word to choose to revert to the original spelling or to choose a different spelling. To reject a replacement before moving on, click the X
 in the suggested replacement (Figure 70).
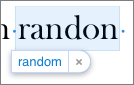
Figure 70: Pages offers auto-correct replacements when you enable Edit > Spelling and Grammar > Correct Spelling Automatically.
The Edit > Substitutions submenu offers choices for particular kinds of automatic text substitutions that you can enable; those choices are mirrored and expanded upon in the Substitutions floating window (Figure 71), which you can see by choosing Edit > Substitutions > Show Substitutions.
Figure 71: The Substitutions window provides various text substitution options. Substitutions occur as you type.
The Substitutions window offers these choices:
- Smart Dashes: When enabled, this replaces two hyphens with an em-dash (—) automatically as you type.
- Smart Quotes: Enable this to replace a
"with either “ or ”, depending on whether the characters appear preceding or following a word. The option also replaces'with either ‘ or ’, also depending on context. (The replacements are sometimes referred to as typographer quotes). Use the pop-up menus to specify quotation mark substitutions for other languages, such as German or French. - Smart Links: Enable this to turn any text that resembles a URL or an email address into a link automatically. Smart links, when clicked, open a browser or email program.
- Text Replacement: Turn this on to make text replacements automatically as you type based upon the settings in the Text sub-pane of the Keyboard system preference pane (Figure 72). Click the Text Preferences button below the Text Replacement option to go to that System Preferences pane.
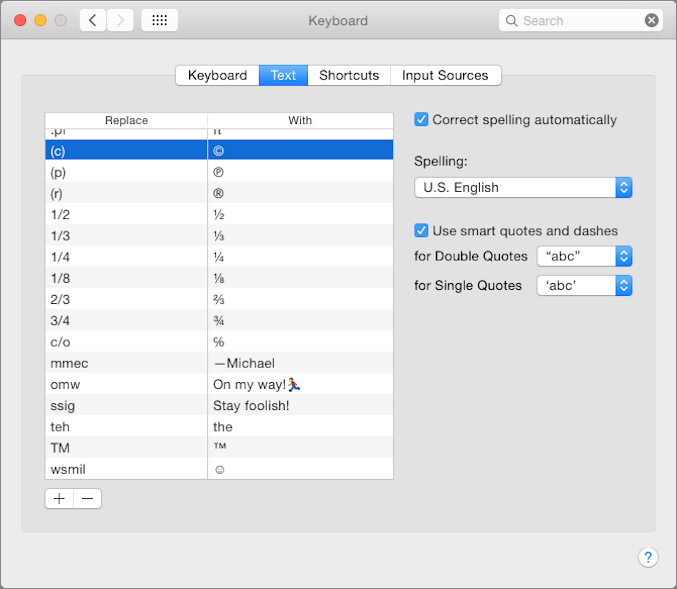
Figure 72: Use the Keyboard > Text sub-pane to choose spelling auto-correct replacements, smart quote and dash replacements, and custom text replacements for many Mac apps.
- Replace All and Replace in Selection: One would think that these buttons would replace quotes, dashes, and other bits of text throughout the document or the current text selection; however, these buttons currently seem to do nothing.
The final correction-related submenu on the Edit menu is Transformations; the choices it offers change the case of selected text:
- Make Upper Case: Makes every character in the selected text upper case
- Make Lower Case: Makes every character in the selected text lower case
- Capitalize: Capitalizes the first letter of each word in the selection
Search, Replace, and Correct Text in iOS
The search, replace, and text correction capabilities available in Pages for iOS, though less extensive than those available on the Mac, suffice for a wide range of writing projects.
Search and Replace in iOS
Search and replace is a modal activity on both large-screen and small-screen iOS devices, though they look rather different on the two types of devices. To begin to search for and, optionally, replace text, tap the Tools ![]() icon in the toolbar and then tap Find.
icon in the toolbar and then tap Find.
On a large-screen device, the Find panel appears above the virtual keyboard (Figure 73), while it appears at the top of the screen on a small-screen device.
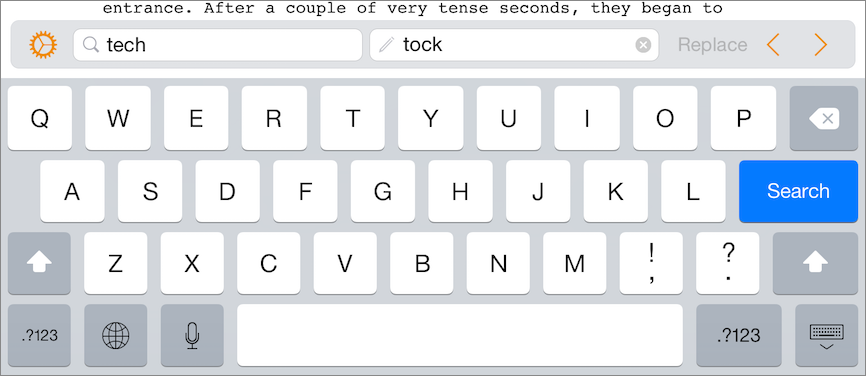
Figure 73: Search and replace on a large-screen iOS device.
On a large-screen device, tap the panel’s settings ![]() icon to switch between a simple search interface (tap Find on the settings popover) and search and replace (tap Find and Replace); on small-screen device, tap the pencil
icon to switch between a simple search interface (tap Find on the settings popover) and search and replace (tap Find and Replace); on small-screen device, tap the pencil ![]() icon to show and hide the Replace field. The panel retains its settings between uses.
icon to show and hide the Replace field. The panel retains its settings between uses.
You use the panel like this:
- Find: Enter text in the Find field (marked with a
 icon) and then tap the Next
  and Previous
  buttons to move among occurrences of found text. On a small-screen device, the Find field appears at the top of the screen and the navigation buttons appear in a separate panel at the bottom of the screen.
 - Replace: Enter replacement text in the Replace field (it has a pencil
 icon), navigate to an occurrence and then tap Replace to change the found text to the replacement. On a large-screen device, hold down on the Replace button to choose Replace All; small-screen devices include both a Replace and a Replace All button on the lower panel.
You can narrow your searches (on large screen devices only) by tapping the Find panel’s settings ![]() icon and then enabling one or both of these choices from the popover:
icon and then enabling one or both of these choices from the popover:
- Match Case: Find only text that matches the case of the text in the Find field (for example, searching for “for” will not find “Fort Collins”).
- Whole Words: Find only whole words that match the contents of the Find field (for example, searching for “man” will not find “manifold”).
When you are done searching for and replacing text, tap anywhere on the document to leave search and replace mode (you can also tap Done in the top panel on small-screen devices).
Correct Text in iOS
Pages for iOS has only one built-in correction capability: spelling check. To enable it, tap the Tools ![]() icon in the toolbar, tap Settings in the popover, and then tap Check Spelling.
icon in the toolbar, tap Settings in the popover, and then tap Check Spelling.
When Check Spelling is turned on, misspelled words appear in the text flagged with red underlining. Tap a flagged word to see a menu of possible replacements. You can tap a replacement, or you can type your own replacement.
In addition to the one correction feature in Pages, iOS offers additional text correcting features that work in Pages. Go to Settings > General > Keyboard to see them (Figure 74) and enable the ones you want.

Figure 74: Keyboard settings in iOS offer several correction options.
Here’s what some of the options do:
- Auto-Capitalization: iOS automatically capitalizes various words and abbreviations, such as “Los Angeles” and “Mr.”
- Auto-Correction: Misspelled words are automatically corrected by the iOS auto-correct feature, sometimes with hilarious results. When a proposed correction appears that you don’t want to accept, tap the X
 in the suggestion popover to reject it. If a proposed correction appears before you finish typing a word and you’d like to accept it right away, press Space or a punctuation key.
 - Check Spelling: This functions exactly like the Check Spelling feature in Pages, only for other iOS apps; however, the Check Spelling option in Pages trumps this iOS setting. Enable it here and disable it in Pages to see red underscores flag possible misspellings in other iOS apps but not see them in Pages.
- “.” Shortcut: Tap the Space bar on the virtual keyboard twice to insert a period (this feature is especially useful on small-screen devices, where you have to switch to a virtual punctuation keyboard to access the period key). Note that this shortcut does not apply to physical keyboards, like a Bluetooth keyboard.
You can also create a list of text shortcuts in the Settings > General > Keyboard > Shortcuts screen. A shortcut, when typed, is replaced by different text. For example, rather than type “Pages for iOS,” you can make “pfi” a shortcut that is replaced by “Pages for iOS” whenever you type it. Tap the Add ![]() button at the top of the Shortcuts screen to create a shortcut and specify its replacement.
button at the top of the Shortcuts screen to create a shortcut and specify its replacement.
Search, Replace, and Correct Text in a Browser
Pages for iCloud offers both search and replace capabilities and spelling check capabilities.
To search for text and replace, click the show/hide ![]() icon and choose Show Find & Replace. A Find panel appears at the bottom of the document window; click the settings
icon and choose Show Find & Replace. A Find panel appears at the bottom of the document window; click the settings ![]() icon in the panel to choose search options (Figure 75).
icon in the panel to choose search options (Figure 75).
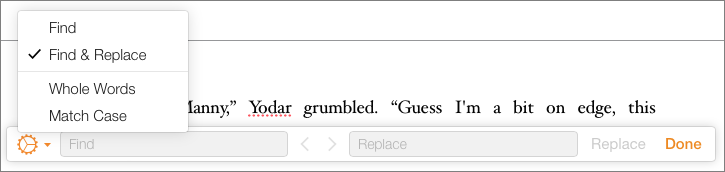
Figure 75: Search and replace, iCloud style.
The options are the same as those for iOS: you can switch between a find and a find-and-replace panel, and you can narrow the search to whole words and to match case. Unlike the Mac and iOS search and replace options, iCloud does not currently offer a Replace All capability.
Also unlike the iOS feature, the Find panel in Pages for iCloud isn’t modal: you can do other editing while the panel is parked at the bottom of the window. To dismiss it, click Done.
To enable spell checking, click the Tools ![]() icon and then choose Settings > Check Spelling. When you enable Check Spelling, possible misspellings are flagged with red underlining; as in iOS, click a flagged word to see a list of possible corrections and either click the one you want or type a replacement.
icon and then choose Settings > Check Spelling. When you enable Check Spelling, possible misspellings are flagged with red underlining; as in iOS, click a flagged word to see a list of possible corrections and either click the one you want or type a replacement.