Frames work by carving a browser window into two or more regions, or frames. Once you split a window this way, you can display a different Web page in each frame.
There are two obvious differences between frames and server-side includes. First, frames do their work in a browser, not on a Web server. That means they don't need any special Web server support. Second, frames bring together distinct Web pages, not just chunks of XHTML content. Each frame holds a complete XHTML document you can look at either in a frame, alongside other pages, or on its own.
The first step in using frames is to create a frameset document, which are the instructions that define the number and location of the frames you want in a browser window, and what page should appear in each one of those frames.
A frameset page is a special type of XHTML document. Like all XHTML documents, it starts with a doctype. But frameset pages use a specialized doctype you haven't seen yet:
<!DOCTYPE html PUBLIC "-//W3C//DTD XHTML 1.0 Frameset//EN"
"http://www.w3.org/TR/xhtml1/DTD/xhtml1-frameset.dtd">
After the doctype, the frameset page uses the standard <html> element. It includes a <head> section, where you define a title for the page, but it doesn't continue with the familiar <body> element, where you usually put the content of a page. Instead, it introduces a new ingredient: a <frameset> element that divides the page into separate frames:
<!DOCTYPE html PUBLIC "-//W3C//DTD XHTML 1.0 Frameset//EN"
"http://www.w3.org/TR/xhtml1/DTD/xhtml1-frameset.dtd">

<html xmlns="http://www.w3.org/1999/xhtml">
<head>
  <title>A Sample Frames Page</title>
</head>

<frameset>...</frameset>
</html>
The information inside your <frameset> element is the heart of your frameset page. It tells a browser how to split the window into separate columns or rows, with each column or row becoming a distinct frame. The <frameset> element also sets the size of each frame.
If you split the window into columns, you have to define the width of each using the cols attribute. You can set the width as a percentage of the total window space, or as a fixed number of pixels. Here's an example that splits a page into two equal columns:
<frameset cols="50%,50%">
  ...
</frameset>
If you carve the window into rows, you use the rows attribute. Here's an example that creates three rows using a percentage value to set their relative sizes, with the middle one being the largest:
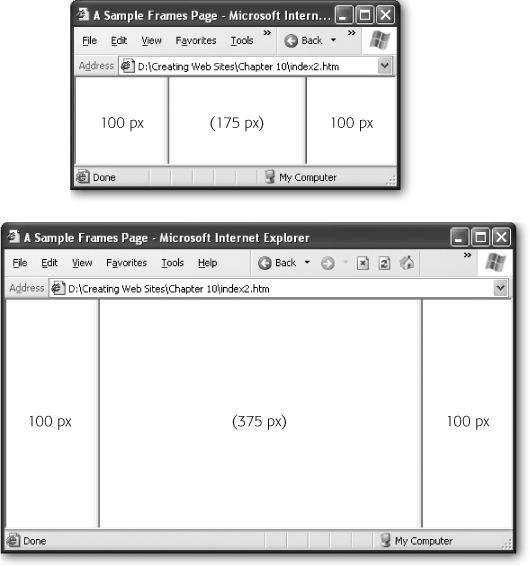
<frameset rows="25%,50%,25%">
  ...
</frameset>
Figure 10-3 shows what this example looks like in a browser.
In addition to percentage values, you can define the size of each column or row using an exact pixel size. Here's a three-column page where the left and right columns are always 100 pixels wide:
<frameset cols="100,*,100">
  ...
</frameset>

Figure 10-3. These browser windows use the same frameset, with a 25/50/25 percent split among the frames. Because the frameset page specifies frame sizes using a percent value (rather than an exact pixel size), the browser resizes all the frames proportionately when a visitor stretches the browser window.
This example introduces another nifty trick—using the asterisk (*). It tells your browser to make that frame occupy any remaining space on a Web page. For example, if this browser window is 800 pixels wide, you have two 100-pixel columns on the flanks and a 600-pixel column in the leftover space. Figure 10-4 shows what this looks like.
Note
If you specify fixed pixel sizes for every row or column, the browser gives them the requested size and then checks to see if there's more space left over in the window. If so, the browser expands all your frames proportionately. This probably isn't the effect you want, so it's a good idea to use the asterisk to give all the extra space to a specific frame.
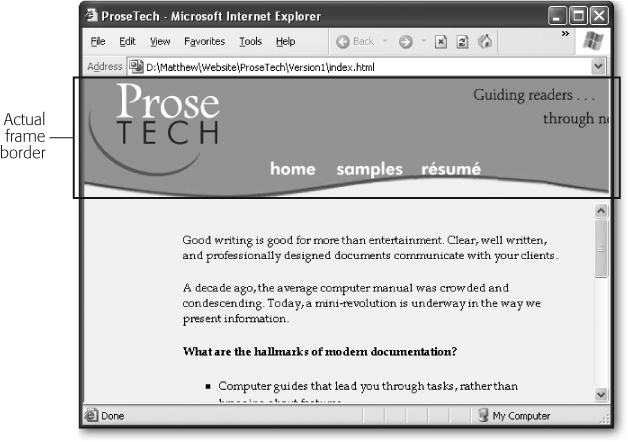
As you probably figured out by now, frames always occupy rectangular regions of a browser window. There's no way to create frames with fancy shapes. That doesn't mean you can't create the illusion of a shaped frame, however. All you do is use the background-image property discussed in Chapter 7 (Background Images) to show some sort of shaped or curved picture as the background for one of the pages in your frameset. Figure 10-5 shows an example.
Splitting a window into frames is a good first step, but to see some actual content on your pages, you need to identify the source of the content you want to put in each frame.
To define a frame source, you add one <frame> element for each column or row your frameset includes. You add these elements inside the <frameset> element, keeping the same order you used to list the columns (left to right) or rows (top to bottom).
Here's the basic skeleton of a page with two frames:
<frameset cols="30%,*">
  <frame />
  <frame />
</frameset>
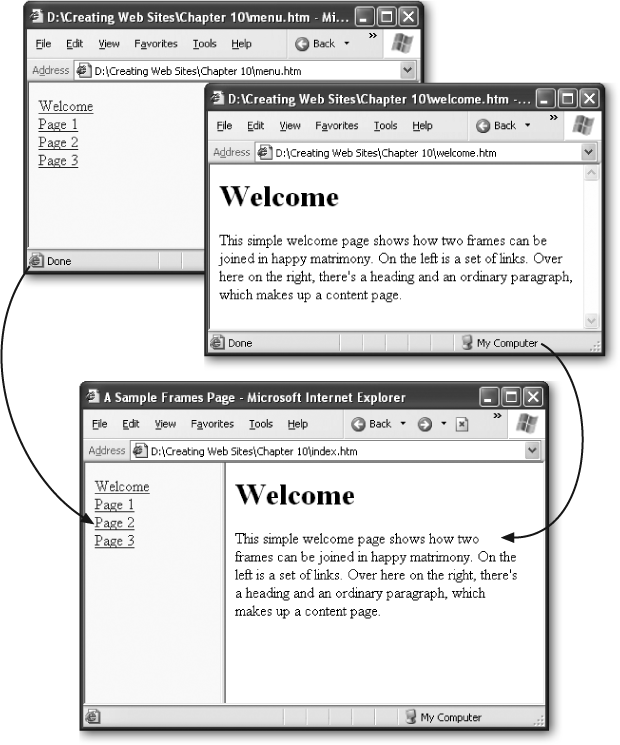
To link a Web page to a frame, you set various attributes of the <frame> element. The most important are src (which is the file name of the Web page you want to display in that frame) and name (which gives the frame a descriptive title so you can use it later in your links). Here's a typical example of a complete frameset page:
<!DOCTYPE html PUBLIC "-//W3C//DTD XHTML 1.0 Frameset//EN"
"http://www.w3.org/TR/xhtml1/DTD/xhtml1-frameset.dtd">

<html xmlns="http://www.w3.org/1999/xhtml">
<head>
  <title>A Sample Frames Page</title>
</head>

<frameset cols="30%,*">
  <frame name="Menu" src="menu.htm" />
  <frame name="Main" src="welcome.htm" />
</frameset>
</html>
In this case, it's likely you'll always put the Menu frame on the left (that is, as the first frame listed) to display the navigation links in menu.htm page. On the other hand, you'll use the Main frame on the right (the second frame listed) to show all kinds of content. Initially, the Main frame displays a welcome page, but that will change as a reader clicks links and moves through your site. That's why the frame name and the XHTML file name don't match.
Tip
When you supply the source for a frame, you follow all the same rules you do when identifying the source for an image or hyperlink. That means you include just the file name if the file is in the same folder as the current page, or you can use a relative or absolute path (see Relative Links and Folders).
To try out this example, save the frameset page using the file name index.htm.
Tip
Many Web servers treat index.htm as the entry point of your Web site. That means they send it to the browser automatically if they receive a request that doesn't specify a page. See Domain Names for more information.
Next, create the menu.htm and welcome.htm pages. All the menu.htm page needs is a simple list of links, as shown here:
<!DOCTYPE html PUBLIC "-//W3C//DTD XHTML 1.0 Strict//EN"
"http://www.w3.org/TR/xhtml1/DTD/xhtml1-strict.dtd">

<html xmlns="http://www.w3.org/1999/xhtml">
<head>
  <title></title>
</head>

<body>
  <p>
    <a href="welcome.htm">Welcome</a><br />
    <a href="page1.htm">Page 1</a><br />
    <a href="page2.htm">Page 2</a><br />
    <a href="page3.htm">Page 3</a>
  </p>
</body>
</html>
When a browser displays frames, it displays the title of the frameset page at the top of the browser window, ignoring the titles of the pages that appear within the frames. That means that the titles in the menu.htm and welcome.htm pages never appear. You still need to include <title> elements, however, because they're a required part of XHTML. Additionally, this title information sometimes appears in search engine listings.
Note
In the examples in this chapter, the <title> element is left blank if it won't appear in a browser. That way, you can quickly sort out which titles are most important.
The welcome.htm page shows some straightforward content:
<!DOCTYPE html PUBLIC "-//W3C//DTD XHTML 1.0 Strict//EN"
"http://www.w3.org/TR/xhtml1/DTD/xhtml1-strict.dtd">

<html xmlns="http://www.w3.org/1999/xhtml">
<head>
  <title></title>
</head>

<body>
  <h1>Welcome</h1>
  <p>This simple welcome page shows how two frames can be joined in happy
  matrimony. On the left is a menu with a set of links.
  Over here on the right, there's a heading and an ordinary paragraph,
  which makes up a content page.</p>
</body>
</html>
As always, you could use styles to make these two pieces look a lot more impressive (see Chapter 6 for more on styles). However, these pages are enough to give you an idea of how this frames business works. Assuming that all the pages are in the same folder, you'll see a single integrated window when you request index.htm (see Figure 10-6).
There's actually a small but important flaw in the frameset shown in the previous example. When you click one of the navigation links, the target page of the link opens in the frame where the link appears (see Figure 10-7).
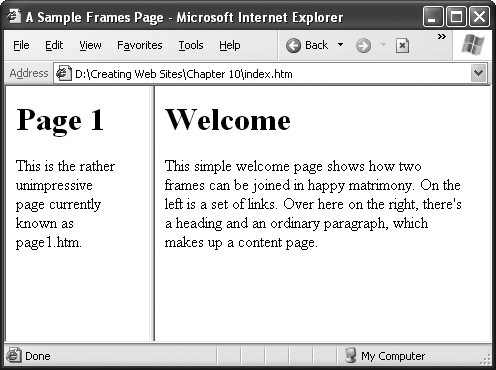
Figure 10-7. Here's what happens when you click the What You Need to Get Started link on the left-hand frame shown in Figure 10-6. The target page (page1.htm) appears, but it's in the frame where the menu bar used to be. Now you're stuck, with no navigation controls to move around.
To correct this problem, you need to change your links so that they explicitly tell the browser to open a target page in the Main frame. To take care of this, you add the target attribute to the <a> element, and supply the name of the target frame.
Here's how you rewrite the menu.htm page to target your links:
<a href="welcome.htm"target="Main">Welcome</a><br /> <a href="page1.htm"target="Main">Page 1</a><br /> <a href="page2.htm"target="Main">Page 2</a><br /> <a href="page3.htm"target="Main">Page 3</a>
Figure 10-8 shows the corrected behavior.
There's one other change you need to make. XHTML strict doesn't support the target attribute, so you need to make sure your Web page uses the doctype for XHTML 1.0 transitional (The Document Type Definition).
Rather than add the target attribute to every link in your page, it would be nice if there were a way to automatically assign a target frame to every one of those links. Fortunately, XHTML makes this easy with the <base> element. Using the <base> element, you can rewrite the menu page as follows.
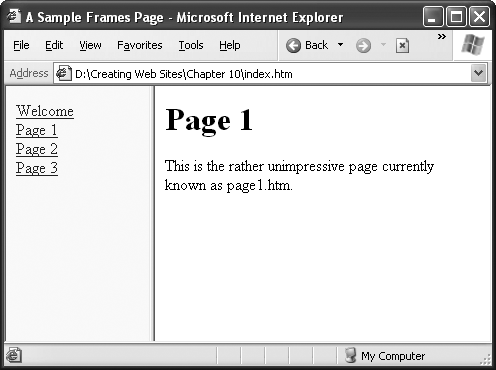
Figure 10-8. Once you add the target attribute to the <a> element, the menu links send pages to the Main frame on the right, keeping the menu links visible at all times.
<!DOCTYPE html PUBLIC "-//W3C//DTD XHTML 1.0 Transitional//EN"
"http://www.w3.org/TR/xhtml1/DTD/xhtml1-transitional.dtd">

<html xmlns="http://www.w3.org/1999/xhtml">
<head>
  <base target="Main" />
  <title></title>
</head>

<body>
  <p>
    <a href="welcome.htm">Welcome</a><br />
    <a href="page1.htm">Page 1</a><br />
    <a href="page2.htm">Page 2</a><br />
    <a href="page3.htm">Page 3</a>
  </p>
</body>
</html>
In all, XHTML defines four target names. You can use these names instead of the name of an actual frame, either in individual links or with the <base> element. For example, you can use the _blank target to open a new page in a pop-up window, as shown here:
<a href="contact.htm" target="_blank">Welcome</a>Table 10-1 lists XHTML's target names.
Table 10-1. Reserved target names
Name | Description |
|---|---|
_top | Opens the target page in the "top" level of a window. That means the browser clears away your frameset to make room for the new document. It's equivalent to typing the URL of the target page into the browser's address box. |
_parent | Opens the target page in the frameset that contains the current frame. In the examples you've seen so far, you've used only one frameset, making this name equivalent to the _top target. But if you start using nested frames (Nested Framesets) the _parent target comes in handy. |
_self | Opens the target in the current frame. This is the standard behavior, unless you change it using the <base> element. |
_blank | Opens the target in a brand-new pop-up window. You should use this technique sparingly, because it can quickly litter the unsuspecting visitor's monitor with a confusing mess of extra windows. |