It's safe to say that the creators of the Internet never imagined it would look the way it does today—thick with pictures, ads, and animated graphics. They designed a meeting place for leading academic minds; we ended up with something closer to a Sri Lankan bazaar. But no one's complaining, because the Web would be an awfully drab place without graphics.
In this chapter, you'll master the art of Web images. You'll learn how to add graphics to a Web page and to position them perfectly. You'll also consider what it takes to prepare pictures for the Web—or to find good alternatives online.
To understand how images work on the Web, you need to know two things:
They don't reside in your XHTML files. Instead, you store each one as a separate file.
To display pictures on a page, you use the <img> element in your XHTML document.
You'll use images throughout your site, even in spots where you might think ordinary text would work just fine (see Figure 7-1).
Tip
If you can't tell whether a piece of content on a page is a graphic, try right-clicking it. If it's an image, browsers like Internet Explorer and Firefox give you a Save Picture As option in a pop-up menu.
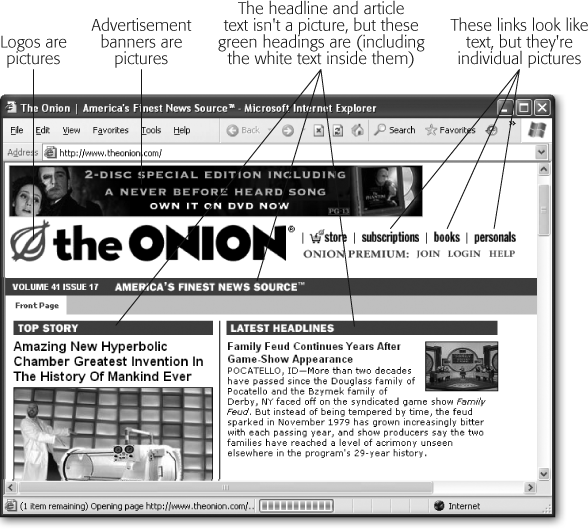
Figure 7-1. It's easy to underestimate how many graphics sit on an average page. Besides just ordinary pictures, adornments like bullets, logos, text headings, and colorful borders are most likely graphics.
Pictures appear on your Web pages courtesy of the <img> element, which tells a browser where to find them. For example, here's an <img> element that displays the file named photo01.jpg:
<img src="photo01.jpg" />
Pictures are standalone elements (Understanding Elements), which means you don't need to include separate start and end tags in the element. Instead, you include the slash (/) character at the end of the tag, just before the closing angle bracket.
Pictures are also inline elements (The 10 Most Important Elements (and a Few More)), which means you put them inside other block elements, like paragraphs:
<p><img src="photo01.jpg" /></p>
When a browser reads this <img> element, it sends out a request for the photo01.jpg file. Once it retrieves it, the browser inserts the file into the Web page where you put the <img> element. If the image file is large or the Internet connection is slow, you might actually see this two-stage process take place, because smaller page components, like text, will appear before the image does.
Tip
You'll usually want to organize your site's many files by putting images in a subfolder of the folder that holds your Web pages. You'll learn how to do this in Chapter 8.
Although it may seem surprising, the <img> element is the only piece of XHTML you need to display a picture. But to get the results you want, you need to understand a few more issues, including how to use alternate text, modify the size of your images, choose a file format, and align your images with other content on a page.
Although a browser can display an <img> element as long as it has a src attribute, the rules of XHTML demand a little more. Technically, you also need to provide an alt attribute, which represents the alternate text a browser displays if it can't display the image itself. Here's an example:
<img src="photo01.jpg"
 alt="There's no picture, so all you get is this alternate text." />
Alternate text proves useful not only in the above circumstance, but in several other cases as well, like when:
A browser doesn't support images (this is understandably rare these days).
A Web visitor switches off his browser's ability to display pictures to save time (this isn't terribly common today, either).
A browser requests a picture, but can't find it. (Perhaps you forgot to copy it to your Web server?)
The visitor is viewing-impaired and uses a screen-reading program (a program that "speaks" text, including the words in an alt tag).
A search engine (like Google) analyzes a page and all its content so it can index the content in a search catalog.
The last two reasons are the most important. Web experts always use meaningful text when they write alt descriptions to ensure that screen readers and search engines interpret the corresponding pictures correctly.
These days, many sites use alternate text for a completely different purpose—as a pop-up message that appears when you move your mouse over a picture (see Figure 7-2). The message might caption the picture rather than describe it, or it might be a humorous remark.
This behavior is a little controversial, because it defeats the true purpose of alternate text. If you want non-descriptive pop-up text like that shown in Figure 7-2, there's a better solution: the title attribute. After all, XHTML's creators designed the title attribute exclusively for this purpose. Here's an example:
<img src="bullhero.jpg" alt="A flying bull-headed superhero."
 title="A flying bull-headed superhero." />
If you specify a title attribute, browsers use it as the pop-up text. But if you don't specify one, different browsers react differently. Internet Explorer uses the alt text instead. Firefox uses the correct approach, and doesn't show any pop-up text at all.
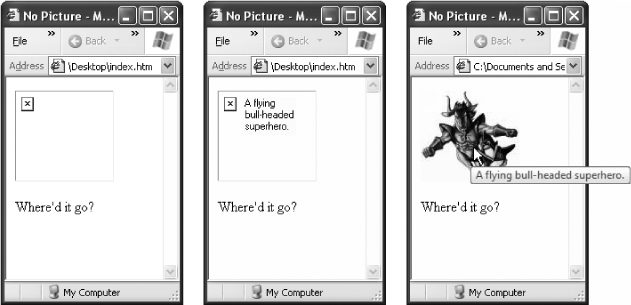
Figure 7-2. Left: For this <img> element to work, you have to put the file it points to in the same folder as the Web page. Otherwise, you'll see the dreaded broken image link icon. Middle: The alternate text helps a bit—use it to explain what your visitor should have seen. Right: In many browsers, if you don't specify a title, the alternate text becomes pop-up text if the picture appears, which can be confusing.
When you start thinking about the size of your images, remember that the word size has two possible meanings: it can refer to the dimensions of the picture (how much screen space it takes up on a Web page), or it can signify the picture's file size (the number of bytes required to store it). To Web page creators, both measures are important.
Picture dimensions are noteworthy because they determine how much screen real estate an image occupies. Web graphics are measured in units called pixels. A pixel represents one tiny dot on a PC screen (see the discussion on Tables). Fixed units like inches and centimeters aren't useful in the Web world because you never know how large your visitor's monitor is, and therefore how many pixels it can cram in. (The Challenge of Screen Space has a detailed discussion of screen size and how to design your pages to satisfy the largest number of potential viewers.)
File size is also important because it determines how long it takes to send a picture over the Internet to a browser. Large pictures can slow down a Web site significantly, especially if you have multiple pictures on a page and your visitor is struggling with a slow Internet connection. If you're not careful, impatient people might give up and go somewhere else. (To understand file size and how you can control it, you need to understand the different image file formats Web browsers use, a topic discussed in the next section.)
Interestingly, the <img> element lets you resize a picture through its optional height and width attributes. Consider this element:
<img src="photo01.jpg" alt="An explicitly sized picture"width="100"height="150"/>
In this line of code, you give the picture a width of 100 pixels and a height of 150 pixels. If this doesn't match the real dimensions of your source picture, browsers stretch and otherwise mangle the image until it fits the size you set (see Figure 7-3).
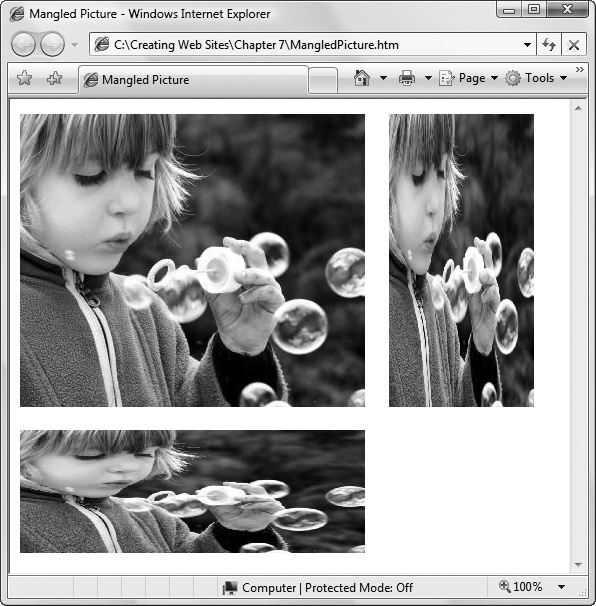
Figure 7-3. Never use the height and width attributes to resize a picture, because the results are almost always unsatisfying. Enlarged pictures are jagged, shrunken pictures are blurry, and if you change the ratio of height to width (as with the top-right and bottom images shown here), browsers squash pictures out of their normal proportions.
Note
Approach height and width attributes with extreme caution. Sometimes, novice Web authors use them to make thumbnails, small versions of large pictures. But using the height and width attributes to scale down a large picture comes with a performance penalty—namely, the browser still needs to download the original, larger image, even though it displays it at a smaller size. On the other hand, if you create thumbnails in a graphics editor like Photoshop, you can save them with smaller file sizes, ensuring that your pages download much speedier.
Many Web page designers leave out image height and width attributes. However, experienced Web developers sometimes add them using the same dimensions as the actual picture. As odd as this sounds, there are a couple of good reasons to do so.
First, when you include image size attributes, browsers know how large a picture is and can start laying out a page even as the graphic downloads (see Figure 7-2, left). On the other hand, if you don't include the height and width attributes, the browser won't know the dimensions of the picture until it's fully downloaded, at which point it has to rearrange the content. This is potentially distracting if your visitors have slow connections and they've already started reading the page.
The second reason to use size attributes is because they control the size of the picture box. If a browser can't download an unsized image for some reason, it displays a picture box just big enough to show a tiny error icon and any alternate text. In a complex Web page, that might mess up the alignment of other parts of your page.
So should you use the height and width attributes? It's up to you, but they're probably more trouble than they're worth for the average Web site. If you use them, you need to make sure to update them if you change the size of your picture, which quickly gets tedious.
Browsers can't display every type of image. In fact, they're limited to just a few image formats, including:
GIF (pronounced "jif" or "gif") format is suitable for graphics with a very small number of colors (like simple logos or clip art). It gives terrible results if you use it to display photos.
JPEG (pronounced "jay-peg") format is suitable for photos that can tolerate some loss of quality. (As you'll learn in a moment, the JPEG format shrinks down, or compresses, an image's file size so that it downloads more quickly.) JPEG doesn't work well if your picture contains text or line art.
PNG (pronounced "ping") format is suitable for all kinds of images, but old browsers don't support it, and it doesn't always compress as well as JPEG.
All of these formats are known as bitmap or raster graphics, because they represent pictures as a grid of dots. Browsers don't support vector graphics, which represent pictures as mathematically rendered shapes.
Raster graphics generally have much larger file sizes than vector graphics. For that reason, Web designers spend a lot of time worrying about compression—reducing the amount of disk space an image takes up. Web page graphics use two types of compression: lossy, which compresses files to a greater degree than its alternative but also reduces image quality; and lossless, which preserves image quality but doesn't compress as much. For full details, see the box on Choosing the right image format. Table 7-1 gives you a quick overview of the different image formats.
Table 7-1. Image file formats for the Web
Format | Type of Compression | Maximum Colors | Best Suited For: |
|---|---|---|---|
GIF | Lossless | 8-bit color (256 colors) | Logos, graphical text, and diagrams with line art |
JPEG | Lossy | 24-bit (16.7 million colors) | Photos |
PNG-8 | Lossless | 8-bit color (256 colors) | Rarely used, since it's similar to GIF but with less browser support |
PNG-24 | Lossless | 24-bit (16.7 million colors) | Images that would normally be GIF files, but need more colors |
Tip
Some browsers give you a few more options, but you're better off steering away from them to ensure widest browser compatibility. For example, Internet Explorer supports bitmaps (image files that end with the .bmp file name extension). Don't ever use them—not only will they confuse other browsers, they're also ridiculously large because they don't support compression.
You'll probably end up using different file formats throughout your site, depending on what kind of image you want to display (photo, illustration, graphical text, and so on). Each format occupies its own niche (see Figure 7-4). The following sections help you decide when to use each format.
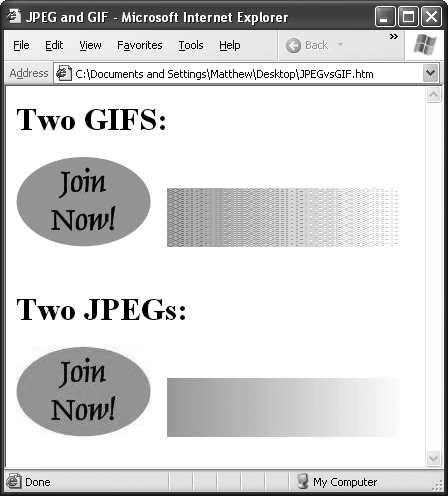
Figure 7-4. JPEGs and GIFs are the two most commonly used image file formats on the Web. You'll notice that GIFs produce clearer text, while JPEGs do a much better job of handling continuous bands of color. GIFs simulate extra colors through dithering, a process that mixes different colored dots to simulate a solid color. The results are unmistakably unprofessional. (You may not be able to see the reduced text quality in this black-and-white screen capture, but if you take a look at the downloadable samples for this chapter, you'll see the difference up close.)
In Web graphics, space is a key concern. You may have tons of storage space on your Web server, but large files take more time to send across the Internet, which means your visitors will experience some frustrating, toe-tapping seconds before your page appears. To make a graphics-heavy Web site run smoothly—and these days, what Web site doesn't have lots of graphics?—you need to pare down the size of your pictures.
Of course, it's not quite that simple. JPEGs give you the best compression, but they throw out some image detail in the process (see the box on Choosing the right image format). As you compress a JPEG image, you introduce various problems collectively known as compression artifacts. The most common artifacts are blocky regions of an image, halos around edges, and a general blurriness. Some pictures exhibit these flaws more than others, depending on the image's amount of detail.
Tip
Most graphics programs let you choose how much you compress a picture, and many even let you preview the result before you save anything.
Figure 7-5 shows the effect of compression settings on a small section of a picture of a church.
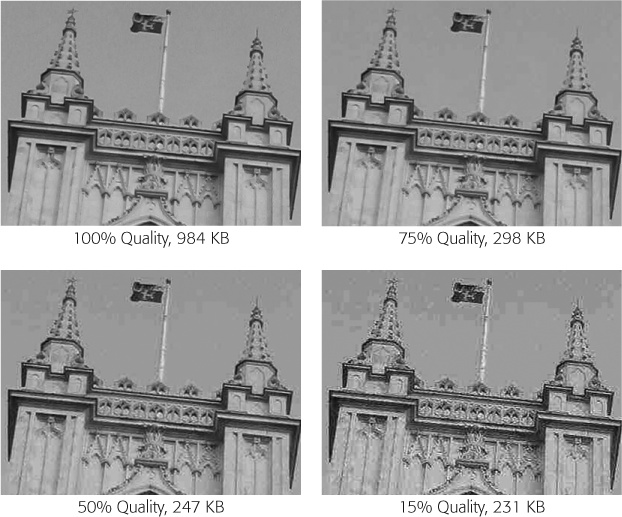
Figure 7-5. Compression can work—up to a point. In this example, cutting the quality factor from 100 percent to 75 percent shaves the file size of the picture to one-third without compromising its appearance. Reducing the quality further doesn't save much more disk space, and introduces a raft of compression artifacts. Note that the file sizes listed are for the whole picture, which is much bigger than the small portion shown here.
It's important to learn which format to use for a given task. To help you decide, walk through the following series of questions.
- Is your picture a hefty photo or does it have fine gradations of color?
YES: JPEG is the best choice for cutting large, finely detailed pictures down to size. Depending on the graphics program you use, you may be able to choose how much compression you want to apply.
- Does your picture have sharp edges, text, or does it contain clip art images? Does it use 256 colors or less?
YES: GIF is your format—it compresses pictures without creating blurred edges around text and shapes (the way JPEG files often do). However, keep a watch on your file size, because GIFs don't compress as well as JPEGs.
- Does your picture have sharp edges and need more than 256 colors?
YES: PNG is the best answer here. It supports full color, gives you lossless compression, and you don't lose any detail. However, there are two caveats. First, old browsers don't support some PNG features (like semi-transparency). Second, PNG files can sometimes end up being bigger than they should be. The problem is that even though PNG offers good compression, not all graphics programs take advantage of it. So check your file sizes to make sure you aren't getting a raw deal.
- Does your picture include a transparent area?
YES: Use GIF. Although PNG supports transparency (and even goes further, with support for partially transparent areas), support for this feature is sketchy in many browsers. But think twice before you use transparency—the next section explains the problems you'll face.
Graphics editing programs always store image files as rectangles, even when the image itself isn't rectangular. For example, if you create a smiley face graphic, your editing program saves that round illustration on a white, rectangular background.
If your page background is white as well, this doesn't pose a problem because the image background blends in with the rest of your page. But if your page has a different background color (Colors), you'll run into the graphical clunkiness shown in Figure 7-6.
Web designers came up with two solutions to this problem. One nifty idea is to use transparency, a feature that GIF graphics support (as do PNG graphics, but not all browsers support PNG transparency). The basic idea is that your graphic contains transparent pixels—pixels that don't have any color at all. When a browser comes across these, it doesn't paint anything. Instead, it lets the background of the page show through. To make part of an image see-through, you define a transparent color using your graphics program. In the example above, for instance, you'd set the white background of your smiley face graphic as the transparent color.
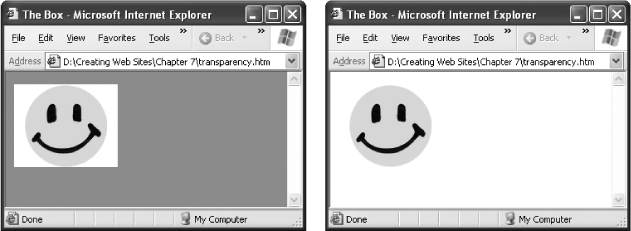
Figure 7-6. Left: With a non-white background, the white box around your picture is glaringly obvious. Right: But when you place the picture on a page with a white background, the smiley face blends right in.
Although transparency seems like a handy way to make sure your image always has the correct background, in practice, it rarely looks good. The problem you usually see is a jagged edge where the colored pixels of your picture end and the Web page background begins (see Figure 7-7).
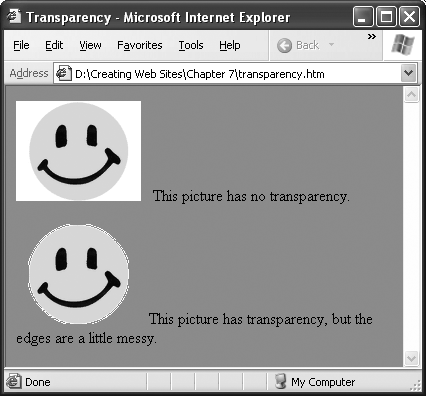
Figure 7-7. The picture at the bottom of this page uses transparency, but the result—a jagged edge around the smiley face—is less than stellar. To smooth this edge, graphics programs use a sophisticated technique called anti-aliasing, which blends the picture color with the background color. Web browsers can't perform this feat, so the edges they make aren't nearly as smooth.
The best solution is to use the correct background color when you create your Web graphic. In other words, when you draw your smiley-face image, give it the same background color as your Web page. Your graphics program can then perform anti-aliasing, a technology that smoothes an image's jagged edges to make them look nice. That way, the image edges blend in well with the background, and when you display the image on your Web page, it fits right in.
The only limitation with this approach is its lack of flexibility. If you change your Web page color, you need to edit all your graphics. Sadly, this is the price of creating polished Web graphics.