2
Customize the Galaxy Tab to Suit You
HOW TO…
• Customize the home screen panels
• Switch quickly among the home screen panels
• Rearrange the widgets on the home screen panels
• Add a folder to a home screen panel
• Choose the most important settings
• Choose firewall settings on the Galaxy Tab
• Connect a Bluetooth device
• Manage your wireless network connections
• Tell a 3G Galaxy Tab when to switch from Wi-Fi to mobile data
• Outfit the Galaxy Tab with accessories
In this chapter, I’ll show you how to customize your Galaxy Tab to suit the way you work and play.
We’ll start by customizing the home screen panels so that you can quickly access the apps you use most. From there, we’ll move on to choosing the most important settings on the Galaxy Tab. The Galaxy Tab has a huge number of settings, so you can make it work the way you prefer—as long as you’re prepared to spend a little time exploring the settings and trying different combinations.
Toward the end of the chapter, I’ll show you how to connect Bluetooth devices to the Galaxy Tab. For example, you may want to pair a Bluetooth keyboard with the Galaxy Tab so that you can enter text more quickly. We’ll then dig into how to manage your wireless network connections, which you’ll almost certainly need to do if your Galaxy Tab connects to more than one wireless network.
Finally, I’ll discuss how you can add accessories to the Galaxy Tab to protect it, make it easier to use, and extend its functionality.
Customize the Home Screen Panels
Chances are you’ll spend a lot of time looking at the Galaxy Tab’s home screen, so it’s a good idea to take a few minutes to customize it with wallpaper you like, the apps and widgets you want, and however many panels you actually need rather than the default number.
Change the Wallpaper
The quick way to make the home screen look different is to change the wallpaper, the picture that appears behind everything else on the home screen.

You can use only a single picture for the wallpaper—you can’t use a different picture for each panel, as many of us would like to do. Each home screen panel shows a different part of the picture (if there’s enough of the picture to go around).
To change the wallpaper, follow these steps:
1. If you’re not already at the home screen, tap the Home button to display it.
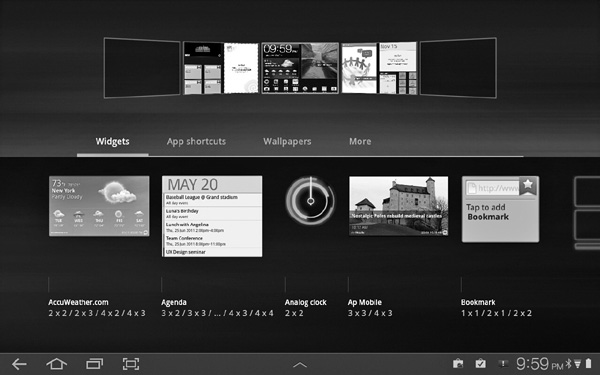
2. Tap the Customize (+) button in the upper-right corner, or tap and hold on blank space anywhere in the main part of the screen—in other words, not at the left and right side, where you tap to display the previous home screen or next home screen. The Galaxy Tab displays the Add To Home Screen Options screen. This is the screen you use for customizing most aspects of the home screen.
3. Tap the Wallpapers tab to display the wallpaper categories in the lower half of the screen (as shown here). You then have three choices:
• Gallery The Gallery app includes screenshots you’ve taken with the Galaxy Tab.
• Live Wallpapers Live wallpapers feature motion, such as a galaxy of swirling stars.
• Wallpapers The Wallpapers Gallery contains static wallpapers, including the default wallpaper.
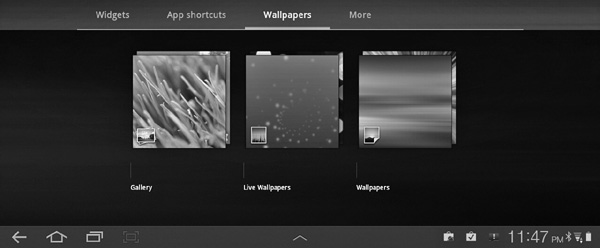
You can then choose a wallpaper as discussed in the following subsections.
Choose Wallpaper from Your Gallery
To choose a wallpaper from your gallery, follow these steps:
1. On the Wallpapers tab of the Add To Home Screen Options screen, tap the Gallery button. The Galaxy Tab displays the Set As dialog box, shown here.
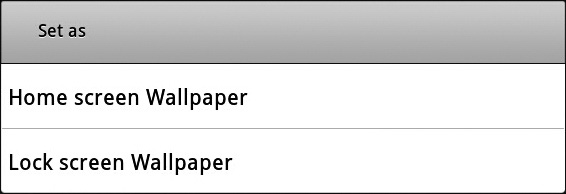
2. Tap the appropriate button to tell the Galaxy Tab which wallpaper you want to change:
• Home Screen Wallpaper Tap this button to set the wallpaper behind the home screens.
• Lock Screen Wallpaper Tap this button to set the wallpaper that appears on the lock screen, the screen you see when the Galaxy Tab is locked.
3. The Galaxy Tab then displays the Select Photo dialog box, shown here.
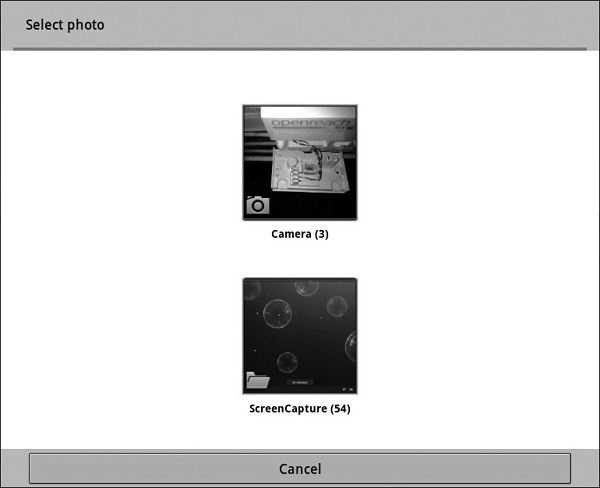
4. Tap the appropriate button:
• Camera Tap this button to see photos you’ve taken with the camera.
• ScreenCapture Tap this button to see screens you’ve captured with the ScreenCapture utility.
5. The Galaxy Tab then displays the photos or screen captures in the Select Photo dialog box, as shown here.
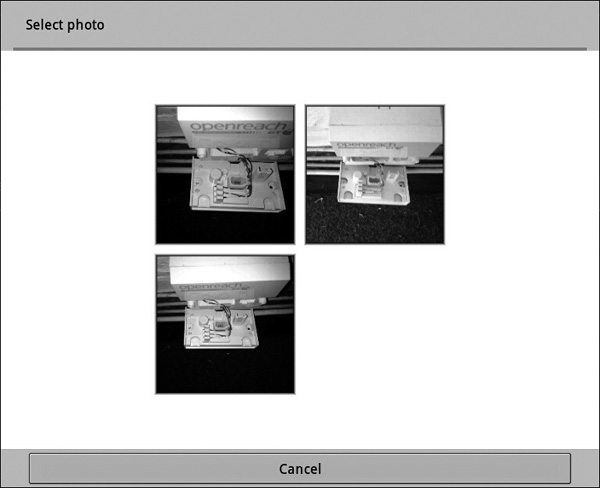
6. Tap the photo or screen capture you want to use. The Galaxy Tab displays it full screen with rectangles showing suggested cropping to fit the screen, as shown in Figure 2-1.

FIGURE 2-1 The Galaxy Tab displays rectangles suggesting how to crop the photo or screen capture to suit the screen.
7. Adjust the cropping as necessary by tapping the crop area and dragging the selection handles that appear.
8. When you have chosen the part you want to keep, tap the OK button in the upper-right corner of the screen. The Galaxy Tab applies the wallpaper and displays the screen for customizing the home screen.
9. Tap the thumbnail of the home screen you want to display. The Galaxy Tab then displays the home screen, and you can get back to work.
Choose a Live Wallpaper
If you want the Galaxy Tab’s lock screen or home screen to display movement rather than a static picture, apply one of the live wallpapers. To do so, follow these steps:
1. On the Add To Home Screen Options screen, tap the Live Wallpapers button on the Wallpapers tab. The Galaxy Tab displays the Select Live Wallpaper dialog box (shown here).

2. Tap the button for the live wallpaper you want. The Galaxy Tab displays a fullscreen preview of the wallpaper (see Figure 2-2).
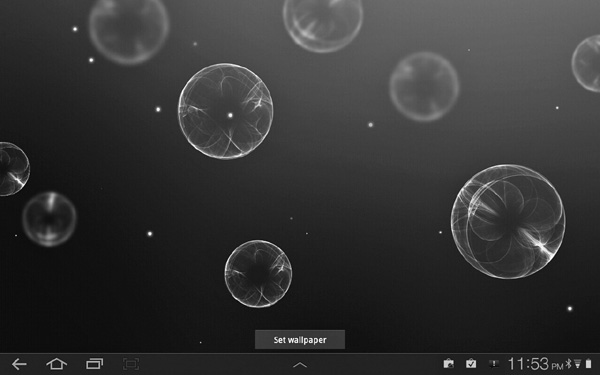
FIGURE 2-2 On the wallpaper preview screen, make sure you like the live wallpaper, and then tap the Set Wallpaper button at the bottom of the screen.

If the live wallpaper you choose displays a Settings button to the left of the Set Wallpaper button, tap this Settings button to access a screen of settings you can change for the live wallpaper.
3. Tap the Set Wallpaper button. The Galaxy Tab applies the wallpaper to the home screen.

The live wallpapers look great, but they make the processor work harder and shorten the Galaxy Tab’s battery life. To get the best battery life, choose a static wallpaper.
Choose Wallpaper from the Wallpaper Gallery
To choose one of the Galaxy Tab’s built-in wallpapers, follow these steps:
1. On the Add To Home Screen Options screen, tap the Wallpapers button on the Wallpapers tab. The Galaxy Tab displays the Set As dialog box (shown here).
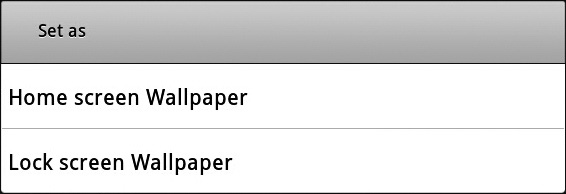
2. Tap the appropriate button to tell the Galaxy Tab which wallpaper you want to change:
• Home Screen Wallpaper Tap this button to set the wallpaper behind the home screens.
• Lock Screen Wallpaper Tap this button to set the wallpaper that appears on the lock screen, the screen you see when the Galaxy Tab is locked.
3. The Galaxy Tab then displays the Select Wallpaper dialog box (shown here).

4. Tap the wallpaper picture you want to apply. The Galaxy Tab applies the wallpaper and displays the screen for customizing the home screen.
5. Tap the thumbnail of the home screen you want to display. The Galaxy Tab then displays the home screen, and you can get back to work.
Add an App Shortcut to a Home Screen Panel
Chances are you’ll need to run some apps much more often than others. To save time launching an app, you can place an app shortcut on a home screen panel like this:
1. Tap the Home button to display the home screen if you’re not already there.
2. Tap or scroll to display the home screen panel you want to add the app shortcut to.
3. Tap the Customize (+) button in the upper-right corner to display the Add To Home Screen Options screen. You can also tap and hold on blank space anywhere in the main part of the screen (not at the left side or right side in landscape view).
4. Tap the App Shortcuts tab in the middle of the screen. The list of apps appears in the lower part of the screen (see Figure 2-3).
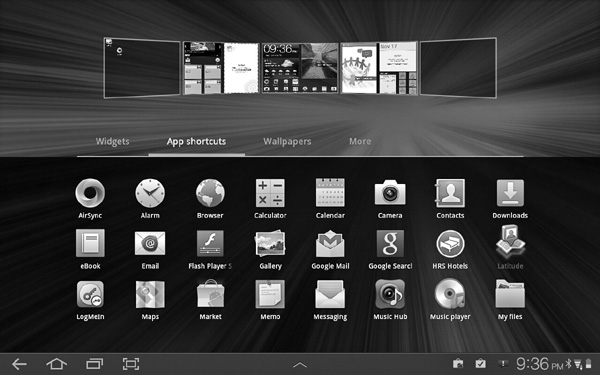
FIGURE 2-3 To add an app shortcut icon to the selected home screen panel, tap the App Shortcuts tab on the Add To Home Screen Options screen, and then tap the icon for the app you want to add. The selected home screen panel has a blue border around it.
5. If necessary, scroll left or right to locate the app you want to add.
6. Tap the app to add it to the selected home screen panel.

You can also tap an app and drag it to one of the other home screen panels.
7. When you finish customizing the home screen, tap the Back button to leave the Add To Home Screen Options screen and return to the home screen.
Add a Widget to a Home Screen Panel
The Galaxy Tab includes various widgets, small apps that you can run on a home screen panel to provide an ever-present feed of information.
To add a widget to a home screen panel, follow these steps:
1. Tap the Home button to display the home screen if you’re not already there.
2. Tap or scroll to display the home screen panel you want to add the widget to.
3. Tap the Customize (+) button in the upper-right corner to display the Add To Home Screen Options screen. You can also tap and hold on blank space anywhere in the main part of the screen (not at the left side or right side in landscape view).
4. Tap the Widgets tab in the middle of the screen. The list of widgets appears in the lower part of the screen.
5. If necessary, scroll left or right to locate the widget you want to add.
6. Tap the widget to add it to the home screen panel. You can also tap an app and drag it to one of the other home screen panels, as shown with the Google Maps widget in Figure 2-4.
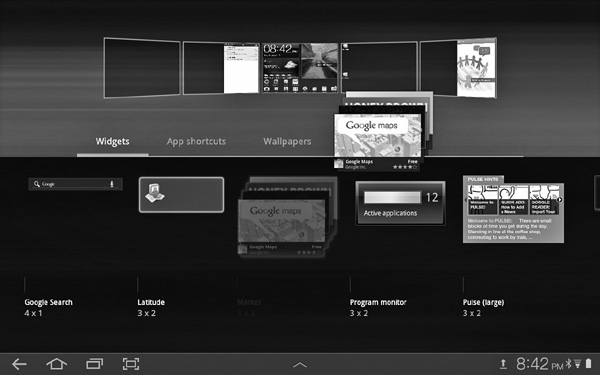
FIGURE 2-4 To add a widget to the selected home screen panel, tap the Widgets tab on the Add To Home Screen Options screen, and then tap the widget you want to add. The selected home screen panel has a blue border around it.

If the home screen panel you’ve chosen doesn’t have room for the widget you’re trying to put on it, the Galaxy Tab displays a message saying “No more room on this home screen.”
7. When you finish customizing the home screen, tap either the Back button or the Home button to return to the home screen so that you can see the items you’ve added.
Add Other Items to Your Home Screen Panels
You can also add items such as bookmarks, contacts, and Kies Via Wi-Fi to your home screen panels. To do so, follow these steps:
1. Tap the Home button to display the home screen if you’re not already there.
2. Tap or scroll to display the home screen panel you want to add the item to.
3. Tap the Customize (+) button in the upper-right corner to display the Add To Home Screen Options screen. You can also tap and hold on blank space anywhere in the main part of the screen (not at the left side or right side in landscape view).
4. Tap the More tab in the middle of the screen. The list of items appears in the lower part of the screen (see Figure 2-5).
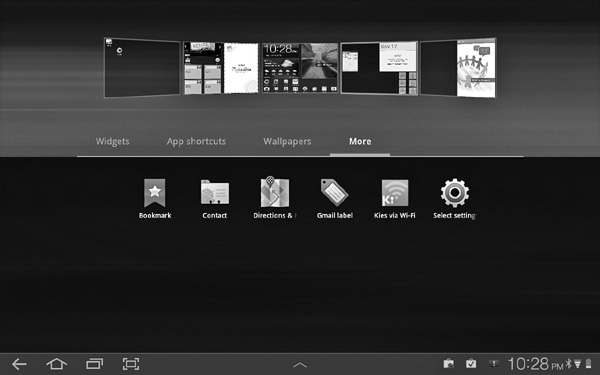
FIGURE 2-5 Tap the More tab on the Add To Home Screen Options screen to add items such as bookmarks, contacts, Gmail labels, and Kies Via Wi-Fi to a home screen panel.
5. Tap the item you want to add to the home screen panel.
6. If the Galaxy Tab prompts you for extra information, provide it. For example:
• When you tap the Select Setting item, the Galaxy Tab displays the Select Settings Shortcut dialog box (shown here) so that you can pick the Settings shortcut you want.
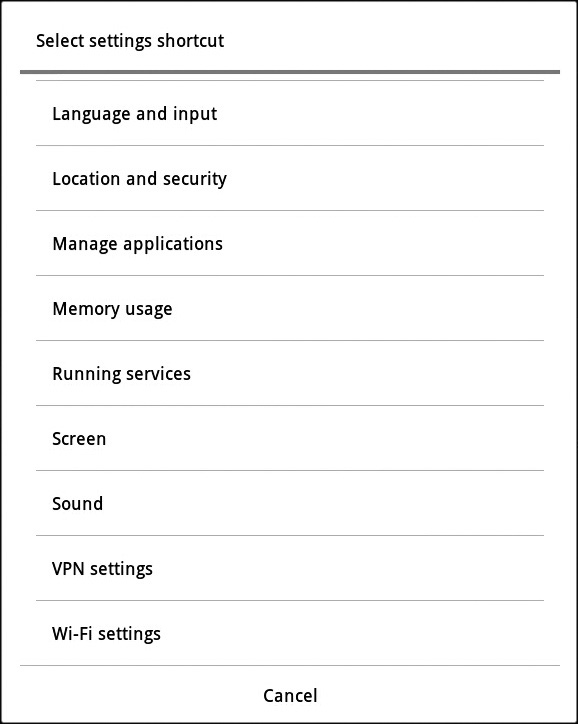
• When you tap the Contact item, the Galaxy Tab displays the Select Contact Shortcut dialog box so that you can choose which contact to put on the home screen panel.
7. When you finish customizing the home screen panels, tap either the Back button or the Home button to return to the home screen so that you can see the items you’ve added.
Remove an Item from a Home Screen Panel
To remove an item from a home screen panel, tap and hold the item’s icon until it grows slightly and the Remove button appears in the upper-right corner of the screen. Then drag the item over the Remove button. When the item turns red, release it, and the Galaxy Tab removes it from the home screen panel.
Choose the Most Important Settings
The Galaxy Tab’s Android Honeycomb operating system has a vast number of settings that enable you to customize the Galaxy Tab’s behavior as needed. In this section, I’ll show you the settings you’ll often want to change to make the Galaxy Tab behave the way you want.

Some of the settings are more esoteric. We’ll look at these settings later in the book along with their topics. For example, we’ll examine the Applications settings in Chapter 12, which shows you how to get the most out of apps.
Open the Settings App
To start working with settings, open the Settings app. From the home screen, tap the Apps icon in the upper-right corner, and then tap the Settings icon. (You may have to scroll to the second Apps screen to find the Settings icon.)
Figure 2-6 shows the Settings screen in portrait orientation, so that you can see the full list of settings categories on the left.

FIGURE 2-6 On the Settings screen, tap the button for the category of settings you want to adjust.
The first category of settings is Wireless And Network. We’ll look at these in the section “Manage Your Wireless Network Connections,” toward the end of this chapter. So we’ll start with Sound settings, the second category.
Choose Sound Settings
Your Galaxy Tab comes equipped with a full range of sound options—and chances are that you’ll want to set most of them. Tap the Sound button on the Settings screen to display the Sound screen (shown in Figure 2-7), and then work through the General settings, Notifications setting, and Feedback settings as discussed in the following subsections.
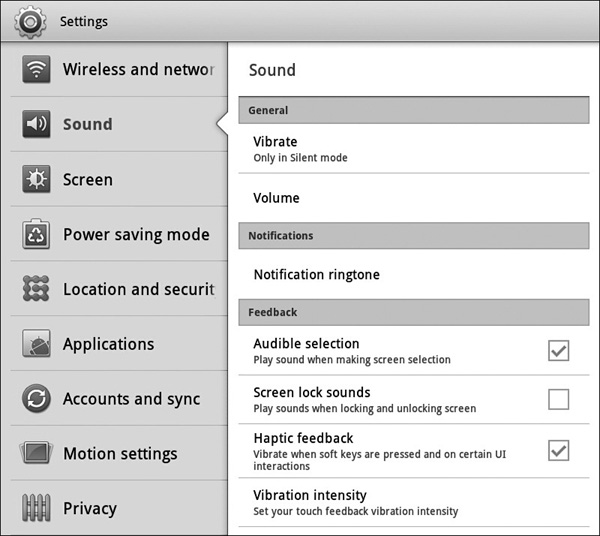
FIGURE 2-7 The Sound screen includes settings for vibration and volume; setting a notification ringtone; and getting feedback.
Choose General Sound Settings
In the General area of the Sound screen, you can choose the following settings:
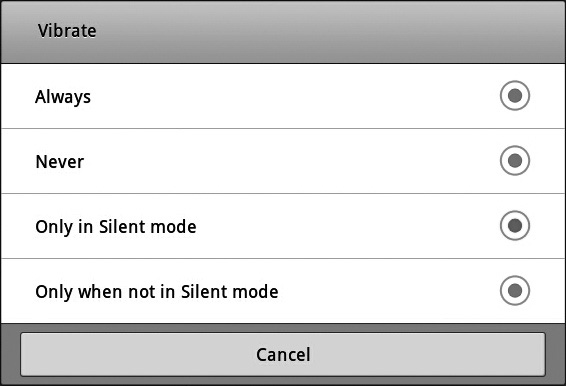
• Vibrate To change when the Galaxy Tab gives you a tickle, tap this button, and then choose the appropriate option button in the Vibrate dialog box (shown here): Always, Never, Only In Silent Mode, or Only When Not In Silent Mode. The Galaxy Tab closes the dialog box when you tap one of the option buttons.
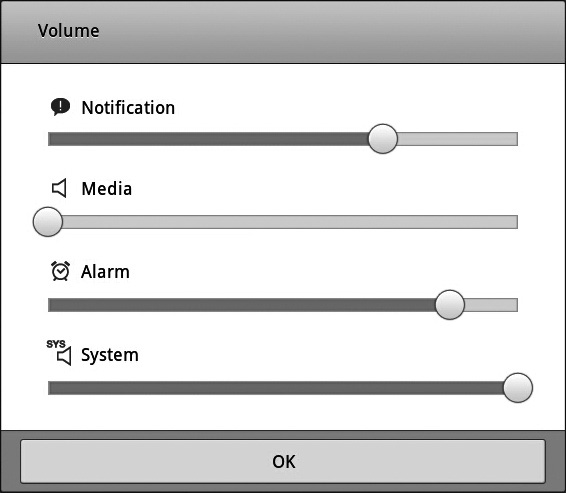
• Volume To set the volume at which the Galaxy Tab plays notifications, media (for example, music), and alarms, tap this button, and then drag the sliders in the Volume dialog box (shown here). The System Volume slider controls the overall volume—for example, turn it down if you find the Galaxy Tab’s sound too loud overall. Tap the OK button when you’ve made your choices.
Choose Notifications Settings
To help you distinguish your notifications from those on all the other devices around you, the Galaxy Tab lets you choose from a wide variety of ringtones.
To set a ringtone, follow these steps:
1. Tap the Notification Ringtone button. The Galaxy Tab displays the Ringtones dialog box.
2. Tap a ringtone to play it and to select its option button. Scroll up and down to see the full range of ringtones.

Tap the Silent option button at the top if you do not want any sound to play for notifications.
3. When you find the ringtone you want, tap the OK button to close the Ringtones dialog box.
Choose Feedback Settings
In the Feedback area of the Sound screen, you can set the following four settings:
• Audible Selection Select this check box to have the Galaxy Tab play a feedback tone when you select an item. For example, when you tap a folder on the home screen, the Galaxy Tab plays a plink noise. This feedback can be helpful when you’re getting the hang of the tap screen, but it quickly becomes annoying.
• Screen Lock Sounds Select this check box if you want the Galaxy Tab to play tones when you lock and unlock the screen. This feedback tends to be helpful as confirmation that you’ve applied or removed the locking.
• Haptic Feedback Select this check box if you want the Galaxy Tab to vibrate gently when you press soft keys and take other actions onscreen. Many people find this response helpful. Others hate it.
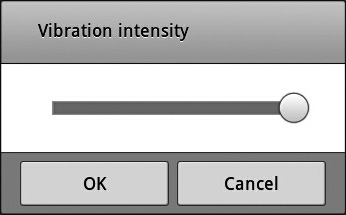
• Vibration Intensity To control how much of a buzz the Galaxy Tab gives you, tap the Vibration Intensity button to display the Vibration Intensity dialog box (shown here). Drag the slider to set anything from a frisson to a minor earthquake, and then tap the OK button.
Choose Screen Settings
To control how the Galaxy Tab’s screen appears, tap the Screen button on the Settings screen to display the Screen settings screen (shown in Figure 2-8). You can then choose the following settings:
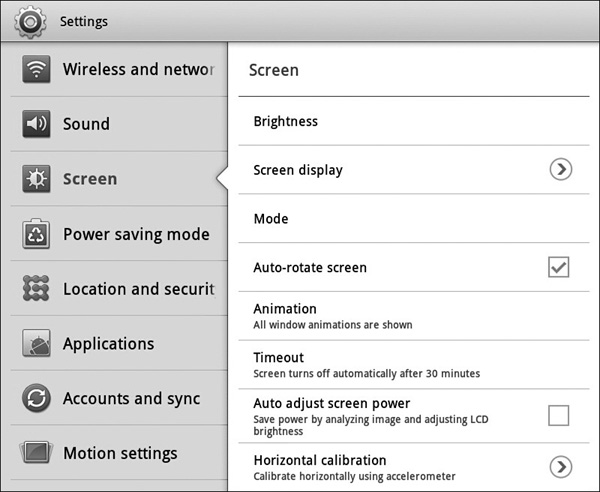
FIGURE 2-8 The Screen settings screen lets you change the font, brightness, colors, and more.
• Brightness To set the screen’s brightness, tap the Brightness button, and then drag the slider in the Brightness dialog box (shown here). You can select the Automatic Brightness check box if you want the Galaxy Tab to automatically adjust its brightness to the lighting conditions it detects, but at this writing this feature is too erratic for regular use.
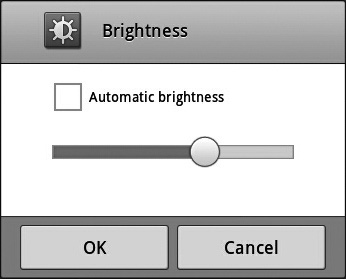

Two things here. First, decreasing the screen brightness is a great way of saving battery power and extending runtime—but there’s little point in turning down the brightness past the point where you can comfortably see the screen. Second, if you find the Automatic Brightness feature suddenly turns the brightness way down for no apparent reason, chances are you’ve put a finger over the light sensor. Move your fingers, and the Galaxy Tab will stop thinking that night has suddenly fallen.
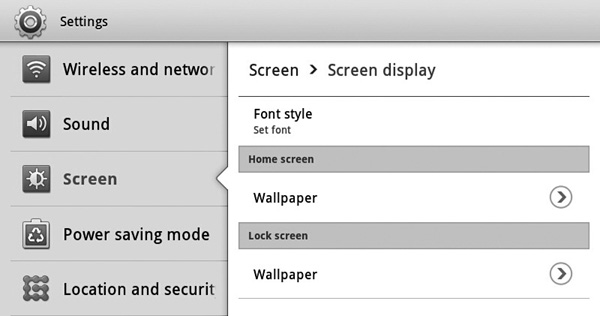
• Screen Display Tap the Screen Display button to display the Screen Display screen (shown here), from which you can change the font style and the wallpaper as discussed next. Tap the Screen link at the top of the screen to return to the Screen settings screen. You can also tap the Back button.
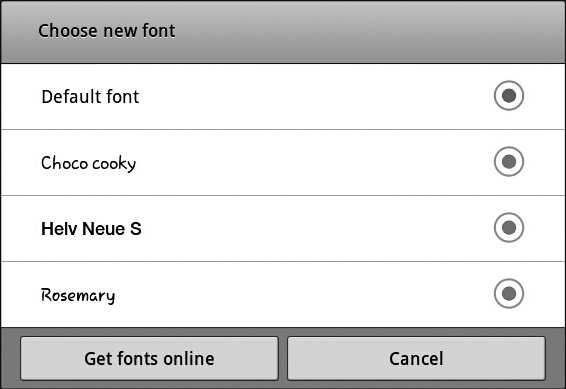
• Font Style Tap the Font Style button to display the Choose New Font dialog box (shown here). You can either tap the option button for one of the current fonts or tap the Get Fonts Online button to download further fonts from Android Market. If this is the first time you’ve used Android Market, you’ll need to agree to the Terms of Service—after reading them through carefully, of course. Tapping a font’s option button closes the Choose New Font dialog box and applies that font.
• Wallpaper You can start the process of changing the wallpaper by tapping the Wallpaper button in the Home Screen area or the Wallpaper button in the Lock Screen area. Unless you like working from the Settings app, it’s usually easier to change the wallpaper starting from the home screen, as discussed earlier in this chapter.
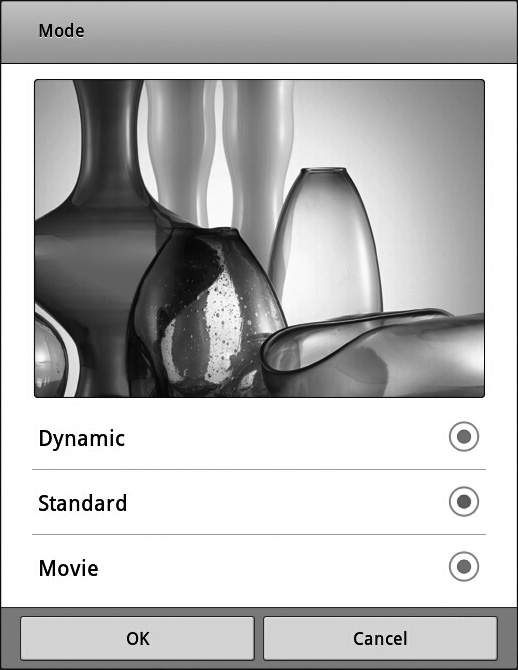
• Mode If the way colors appear onscreen looks wrong to you, tap the Mode button to display the Mode dialog box (shown here). You can then tap the Dynamic option button, the Standard option button, or the Movie option button to see the different color modes available. Tap the OK button when you’ve picked the best of the three modes for your needs.
• Auto-Rotate Screen Select this check box to allow the Galaxy Tab to rotate the screen automatically to match the orientation it detects. Clear the check box to fix the orientation.
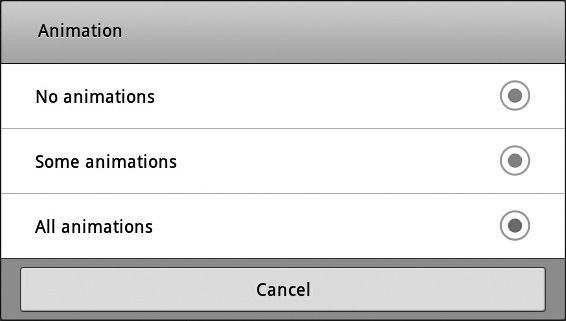
• Animation To choose how many animations the Galaxy Tab displays when opening, closing, and moving windows, tap the Animation button. In the Animation dialog box (shown here), select the No Animations option button, the Some Animations option button, or the All Animations option button (the default).
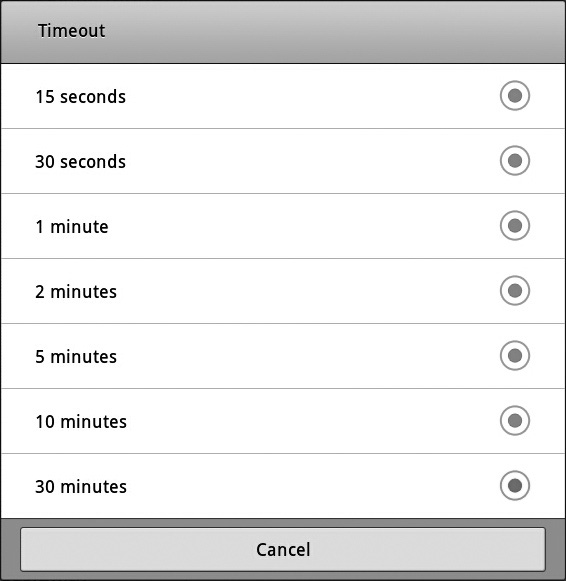
• Timeout To change the length of time the screen stays lit, tap the Timeout button. In the Timeout dialog box (shown here), tap the option button for the length of time you want: 15 Seconds, 30 Seconds, 1 Minute, 2 Minutes, 5 Minutes, 10 Minutes, or 30 Minutes. If saving power is more important than convenience, set the timeout to as short an interval as you can tolerate.
• Auto Adjust Screen Power Select this check box if you want the Galaxy Tab to save power by decreasing the screen brightness when you’re looking at a bright or contrasty image. This setting is well worth trying, but if you don’t like the effects it produces, turn it off again.
• Horizontal Calibration If the Galaxy Tab doesn’t react consistently when you tilt it, you may need to reset the horizontal calibration. To do so, follow these steps:
1. Tap the Horizontal Calibration button on the Screen settings screen to display the Horizontal Calibration dialog box (shown here).

2. Place the Galaxy Tab on a flat surface—for example, a table or desk.
3. Tap the Calibrate button.
Choose Power Saving Mode Settings
To make the Galaxy Tab as miserly as possible with its precious power, tap the Power Saving Mode button in the left column of the Settings screen, and then work on the Power Saving Mode screen (see Figure 2-9).
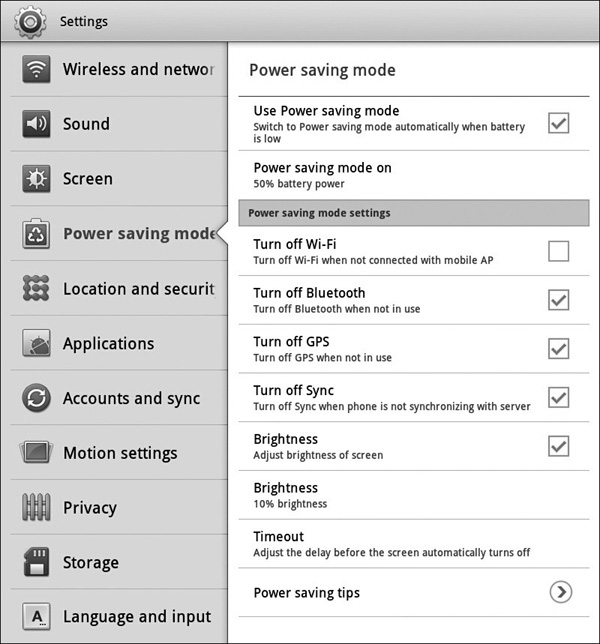
FIGURE 2-9 Use the settings on the Power Saving Mode screen to squeeze the most usage out of each charge of the Galaxy Tab’s battery.
At the top of the Power Saving Mode screen, select the Use Power Saving Mode check box to enable Power Saving mode. Selecting this check box makes the Galaxy Tab automatically turn on Power Saving mode when the battery reaches the level you specify.
To control the battery level, tap the Power Saving Mode On button, and then tap the appropriate option button in the Power Saving Mode On dialog box: 10% Battery Power, 30% Battery Power, 50% Battery Power, or 70% Battery Power. Tapping the option button closes the Power Saving Mode On dialog box.
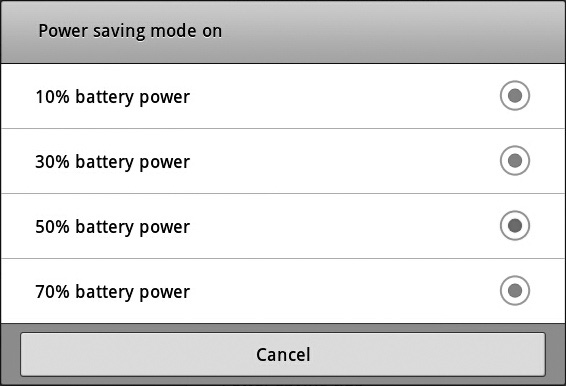

Which option button you should select in the Power Saving Mode On dialog box depends on how aggressively you need to save power. For example, selecting the 50% Battery Power option button lets you burn through the first half of the battery’s capacity before switching to frugal mode.
In the Power Saving Mode Settings area of the Power Saving Mode screen, you can choose the following settings:
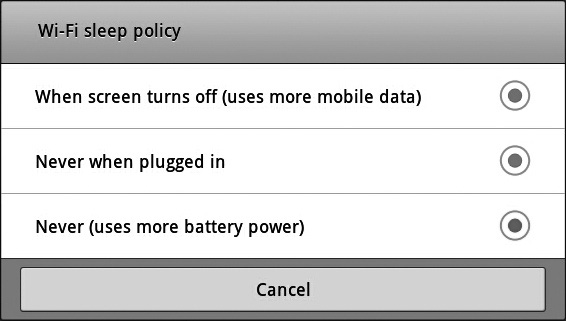
• Turn Off Wi-Fi Select this check box to turn Wi-Fi off unless the Galaxy Tab is actually connected to a wireless access point. Wi-Fi can burn through a surprising amount of power, so selecting this check box can be a big help in eking out more battery life.
• Turn Off Bluetooth Select this check box to turn off Bluetooth when you’re not using it. Unless you use Bluetooth extensively, this is a great way to save power.
• Turn Off GPS Select this check box to turn off the GPS unit when you’re not using it.
• Turn Off Sync Select this check box to turn off automatic syncing.
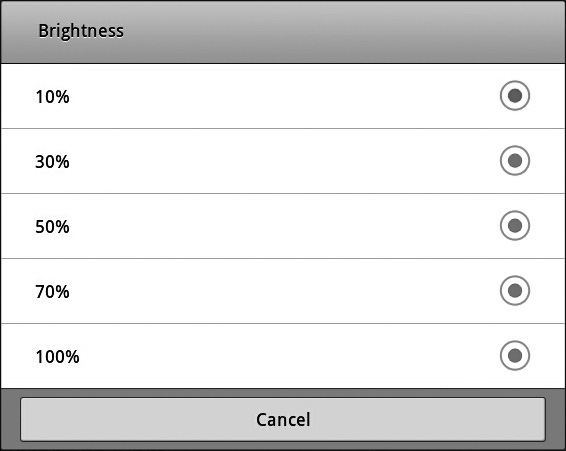
• Brightness To control how bright the screen is when Power Saving mode is on, tap this button, and then tap the appropriate option button in the Brightness dialog box (shown here): 10%, 30%, 50%, 70%, or 100%. Tapping the option button closes the dialog box and applies your choice.
• Timeout To control how long the screen stays on after you finish fondling it, tap this button, and then tap the appropriate option button in the Timeout dialog box: 15 Seconds, 30 Seconds, 1 Minute, 2 Minutes, 5 Minutes, 10 Minutes, or 30 Minutes. For most purposes, 30 Seconds or 1 Minute is a good choice. Tapping the option button closes the dialog box and applies your choice.
• Power Saving Tips Tap this button to display a screen showing tips on saving power.
When the battery level reaches the threshold you set, the Galaxy Tab displays a dialog box prompting you to switch to Power Saving mode. Tap the OK button if you want to do so.
Choose Location and Security Settings
The Location And Security screen (shown in Figure 2-10) contains some settings (such as the My Location settings and the Lock Screen settings) that you’ll probably want to set and others (such as the Device Administration settings and the Credential Storage settings) that you will probably not need to set.

FIGURE 2-10 On the Location And Security screen, you can choose settings for identifying your location and locking the screen.
Choose My Location Settings
In the My Location area, you can control how the Galaxy Tab determines your location:
• Use Wireless Networks Select this check box to use Wi-Fi networks that Google has logged and cellular networks (if your Galaxy Tab has 3G) to determine your location. Using this option gives your approximate location and needs only a modest amount of battery power.
• Use GPS Satellites Select this check box to use Global Positioning System (GPS) satellites to determine your location more exactly. Using GPS takes more battery power, and the Galaxy Tab needs to have a more-or-less unobstructed view of the sky.
• Use Location For Google Search Select this check box to allow the Galaxy Tab to provide your location when searching on Google Search and using other Google services. Providing your location enables you to get more-targeted search results. If you don’t want to provide this information, clear this check box.
Set Up a Screen Lock
To prevent anyone else from using the Galaxy Tab if you mislay it, you can apply a screen lock that uses a pattern of movements, a PIN, or a password.
To set up the screen lock, tap the Configure Lock Screen button in the Lock Screen area of the Location And Security screen, and then work with the Configure Lock Screen controls (shown here). Tap the appropriate button (described next), and the Galaxy Tab walks you through the process of setting up the screen lock:
• Off Tap this button to prevent the screen from locking.
• Unsecure Tap this button to allow the screen to lock but not protect it. Anyone can then unlock the screen.
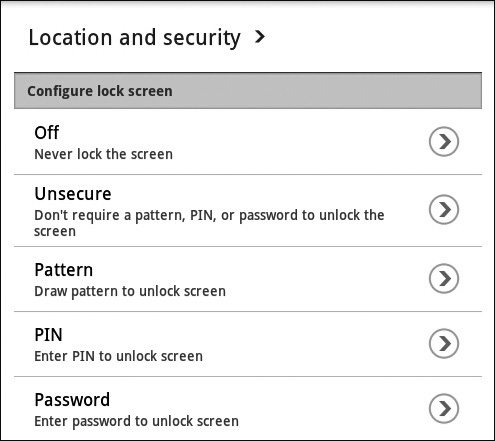
• Pattern Tap this button to set up a pattern that you draw with your finger on a grid of nine dots. The pattern is a neat way of unlocking the screen, because you can draw the pattern more easily than you can type a PIN or a password. The disadvantage is that the pattern is less secure than either a PIN or a password.
• PIN Tap this button to set up a Personal Identification Number (PIN) that you must type to unlock the screen. The PIN must be at least four digits long, but you can make it much longer for greater security.
• Password Tap this button to set up a password that you must type to unlock the screen. The password must be at least four characters long, but you can create a longer password for additional security.

After you apply a Pattern, PIN, or Password screen lock, two more settings appear in the Lock Screen area of the Location And Security screen. To control how quickly the Galaxy Tab locks the screen after the screen turns off, tap the Timeout button, and then tap the appropriate option button in the Timeout dialog box—for example, tap the Immediately option button or the 5 Seconds option button. And if you want the Galaxy Tab to give tactile feedback as you enter the password or PIN, select the Use Tactile Feedback check box.
Add Your Owner Information to the Lock Screen
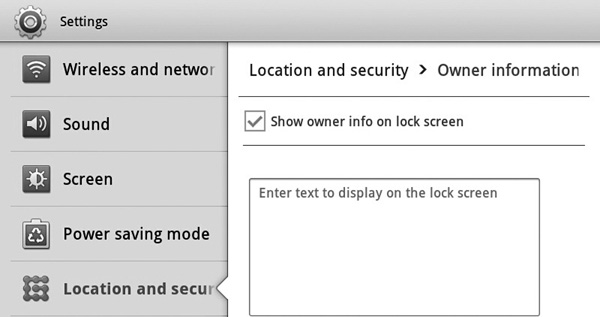
To increase your chance of getting the Galaxy Tab back if you lose it, you can make the lock screen display owner information—for example, the phone number to call to find out how to return the tablet.
To add the owner information, tap the Owner Information button in the Lock Screen area of the Location And Security screen. On the Owner Information screen (shown here) that appears, select the Show Owner Info On Lock Screen check box, and then type the ransom name and number in the text box.
Encrypt the Galaxy Tab and Its Contents
If the Galaxy Tab contains sensitive or confidential data, you can encrypt it so that an attacker can’t read it.

Before turning on encryption, make sure you understand how encryption works.
Here’s how encryption works:
• You specify a password or a numeric PIN for the encryption.
• The Galaxy Tab then encrypts its data. This can take an hour or so, depending on how big the Galaxy Tab’s storage is and how much data you’ve stuffed in there. You mustn’t interrupt the encryption process, because doing so may lose data. To avoid power problems, the Galaxy Tab refuses to start encrypting itself until the battery is fully charged and the charger is plugged in.
• Once the Galaxy Tab is encrypted, you must enter your password or PIN each time you turn the Galaxy Tab on.

If you forget your encryption password or PIN, you will not be able to recover the data from the Galaxy Tab. But you can get the Galaxy Tab working again by performing a factory data reset from Kies. This erases all your data from the Galaxy Tab.
After encrypting your Galaxy Tab, you should power it down to protect it fully instead of leaving it running but locked.
To encrypt your Galaxy Tab, follow these steps:
1. Plug the Galaxy Tab into its charger and charge the battery fully.
2. Set a lock screen PIN or password, as described earlier in this chapter.
3. In the Encryption area of the Location And Security screen, tap the Encrypt Tablet button. The Encrypt Tablet screen appears.
4. Tap the Encrypt Tablet button. The Confirm Password screen appears.
5. Type your lock screen PIN or password, and then tap the Continue button. The Confirm Encryption screen appears.
6. Tap the Encrypt Tablet button. The Galaxy Tab launches the encryption process, which includes several restarts.
7. When you see the password prompt, type your password. The Galaxy Tab then starts and displays the lock screen, where you have to type the password again to unlock the Galaxy Tab.

To decrypt the Galaxy Tab again, tap the Decrypt Device button on the Location And Security screen in the Settings app (the Decrypt Device button appears in place of the Encrypt Tablet button). On the Decrypt Device screen that appears, tap the Decrypt Device button. Type your password on the Confirm Password screen and tap the Continue button, then tap the Decrypt Device button (yes, a third button with this name) on the Confirm Decryption screen. Then wait while the Galaxy Tab decrypts itself; again, this requires several reboots. When the lock screen appears, type your password, and you’ll be back in business.
Set Up Find My Mobile Options
The Find My Mobile area of the Location And Security screen for a 3G-capable Galaxy Tab contains three options you can set in case your Galaxy Tab goes missing:
• SIM Change Alert Select this check box to have an SMS message (a text message) sent to you when someone changes the SIM card in the Galaxy Tab. After selecting this check box, you must accept Samsung’s terms and conditions for this service and then sign up with a Samsung account.

Signing up for a Samsung account involves providing your e-mail address (real), date of birth (old enough to allay any worries under the Children’s Online Privacy Protection Act, COPPA), and a password.
• Alert Message Recipients After selecting the SIM Change Alert check box and accepting the terms and conditions, tap this button, and then set up the list of people who should receive the text message warning of the SIM change. For example, you’ll normally want to add your cell phone number to the list.

On a Wi-Fi–only Galaxy Tab, only the Remote Controls option appears in the Find My Mobile area.
• Remote Controls Select this check box if you want to be able to lock the Galaxy Tab remotely, track where it is, and wipe data from it. After selecting this check box, you must accept Samsung’s terms and conditions for this service and then sign up with a Samsung account. (If you’ve just created a Samsung account for the SIM Change Alert service, you just need to enter your password.)
Lock the SIM Card
If you need to ensure nobody unauthorized makes phone calls with your Galaxy Tab, tap the Set Up SIM Card Lock button in the SIM Card Lock area of the Location And Security screen, and then use the options on the Set Up SIM Card Lock screen to apply a PIN to the SIM card.
Make Passwords Visible
As you’ve seen already, the Galaxy Tab by default hides the characters of passwords you type, in case someone is snooping over your shoulder. You can reveal the characters of any password when you feel safe. But if you want to see password characters all the time, select the Visible Passwords check box in the Passwords area of the Location And Security screen.
Choose Device Administration Settings
If you are setting up the Galaxy Tab for a managed environment (for example, in a company or organization), you may need to add administrators. To do so, tap the Device Administrators button in the Device Administration area of the Location And Security screen, and then work on the Device Administrators screen.
If you are using the Galaxy Tab outside a managed environment, the Device Administrators screen shows the message “No device administrators available”—so you can’t do anything from this screen.
Choose Credential Storage Settings
If you need to use digital certificates to authenticate the Galaxy Tab to servers, work in the Credential Storage area of the Location And Security screen. For example, you may need to add a digital certificate to enable the Galaxy Tab to connect to a virtual private network (VPN) at your workplace.
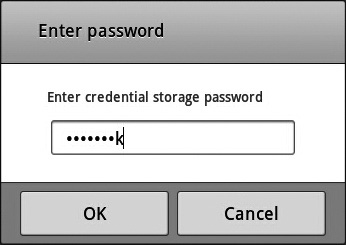
To turn on the usage of secure credentials, select the Use Secure Credentials check box. Type your password in the Enter Password dialog box (shown here) that appears, and then tap the OK button.

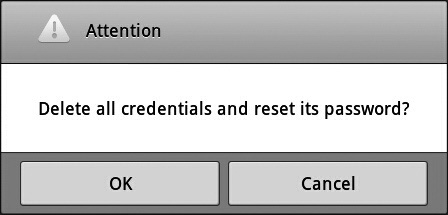
If the Galaxy Tab has a credential password set, and you have forgotten it, you need to wipe out the password and existing credentials so that you can set a new password. Tap the Clear Storage button at the bottom of the Credential Storage area on the Location And Security screen, and then tap the OK button in the Attention dialog box that appears.
To add credentials, connect to your Galaxy Tab a USB storage device containing the credentials. Then tap the Install From USB Storage button.
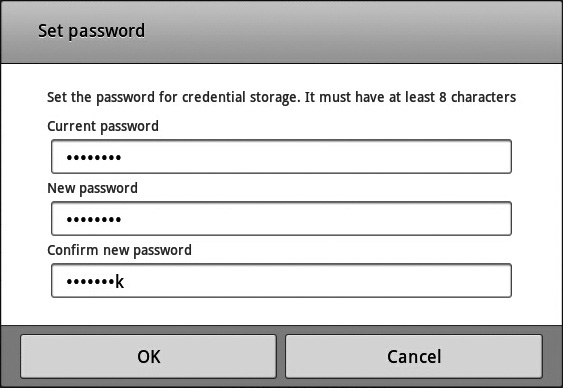
To change the password for credential storage, tap the Set Password button. Type the existing password and the new password (twice) in the Set Password dialog box (shown here), and then tap the OK button.
To clear all your credentials and reset the password, tap the Clear Storage button at the bottom of the Credential Storage area on the Location And Security screen, and then tap the OK button in the Attention dialog box (shown here) that appears.
Choose Applications Settings
To control how apps run on the Galaxy Tab, tap the Applications button in the left column of the Settings screen to display the Applications screen (see Figure 2-11).
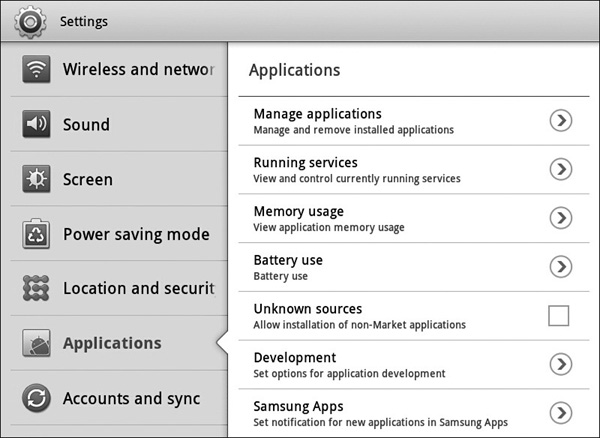
FIGURE 2-11 From the Applications screen in the Settings app, you can manage apps and services, view memory or battery usage, and set extra features for running apps.
We’ll look at how to use the Manage Applications feature, the Running Services feature, and the Memory Usage feature in Chapter 12, which covers apps. So here we’ll look just at the Battery Use, Unknown Sources, Development, and Samsung Apps features.
Check Which Features Have Been Consuming the Battery Power
To see what’s been consuming the Galaxy Tab’s battery power, tap the Battery Use button and look at the Battery Use screen (see Figure 2-12). This screen shows readouts for Android OS, Screen, Wi-Fi, Cell Standby, and Tablet Idle. From it, you can get an idea of how much power you could save by turning down the screen brightness or by turning off Wi-Fi. Tap the Applications link at the top when you’re ready to go back to the Applications screen.
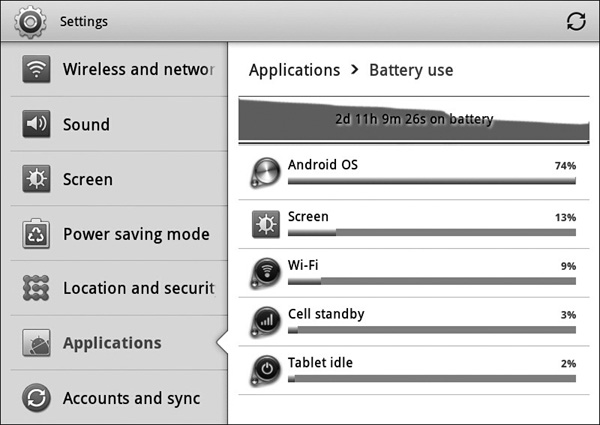
FIGURE 2-12 Use the Battery Use screen to learn which of the Galaxy Tab’s features have been consuming the most battery power.
Allow Yourself to Install Apps from Other Sources Than Android Market
The main source of apps for the Galaxy Tab and other devices that run the Android operating system is Android Market, which Google controls. Here, you can find an incredibly wide variety of apps that cater to almost every need you can imagine (and then some).
Normally, you’ll want to install only apps from Android Market, because this helps you avoid malware and other dangerous apps. But in some cases you may need to install apps from other sources. For example, if your friend is developing an Android app, you may want to load it to see if it will run on the Galaxy Tab.
To allow yourself to install apps from other sources than Android Market, select the Unknown Sources check box on the Applications screen. See the sidebar “Add Apps from Other Sources” in Chapter 12 for instructions on installing apps.
Set Development Options
If you develop Android apps yourself, and you want to test them on the Galaxy Tab, you may need to set development options. To do so, tap the Development button on the Applications screen, and then choose options on the Development screen (shown here):
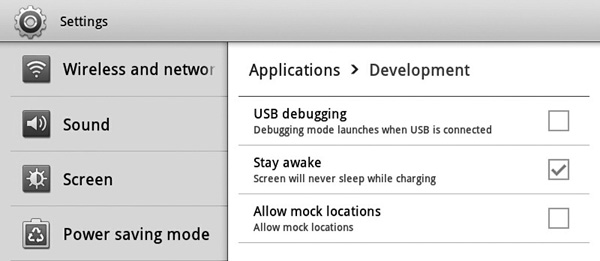
• USB Debugging Select this check box to launch USB Debugging mode when you connect the Galaxy Tab to your computer via USB.
• Stay Awake Select this check box if you want to prevent the Galaxy Tab from going to sleep while it’s connected to power. This setting is sometimes useful outside of development—for example, if you’re demonstrating the Galaxy Tab at an open day or trade show.
• Allow Mock Locations Select this check box if you want to be able to set the Galaxy Tab to believe it’s in a particular location when it isn’t—for example, to tell the Galaxy Tab it’s in Manhattan when it’s actually in Podunk.
Choose Samsung Apps Settings
To choose whether you receive notifications when Samsung apps are using packet data via Wi-Fi or the cellular connection (on a 3G Galaxy Tab), tap the Samsung Apps button. The Samsung Apps screen appears, as shown here.
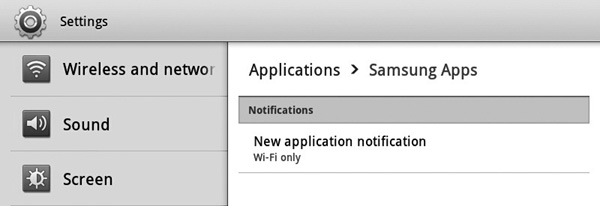
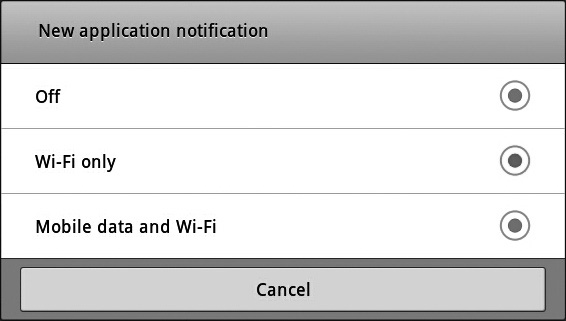
Now tap the New Application Notification button to display the New Application Notification dialog box (shown next), and then tap the appropriate option button: Off, Wi-Fi Only, or Mobile Data And Wi-Fi. Tapping an option button closes the dialog box for you.
Choose Accounts and Sync Settings
To choose how apps and accounts synchronize data, tap the Accounts And Sync button on the Settings screen to display the Accounts And Sync screen (shown in Figure 2-13).
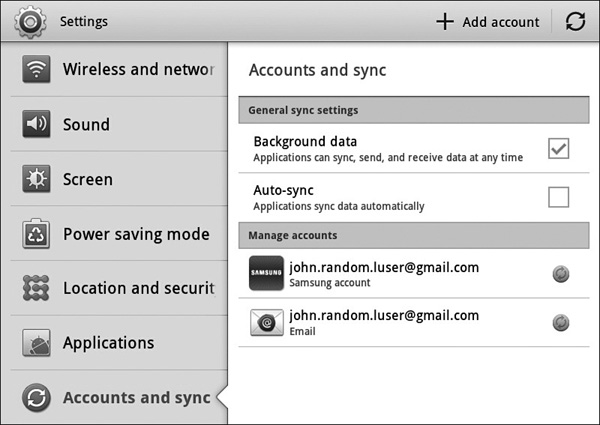
FIGURE 2-13 On the Accounts And Sync screen, choose whether to use background synchronization and auto-sync.
Choose General Sync Settings
In the General Sync Settings area of the Accounts And Sync screen, you can set these two settings:
• Background Data Select this check box if you want apps to be able to send and receive data when they’re in the background (in other words, you’re working with another app—that’s the one in the foreground). Normally, sending and receiving data in the background is helpful.

Clearing the Background Data check box on the Accounts And Sync screen helps reduce the demand on the Galaxy Tab’s battery and should make a battery charge last longer. But even if you clear this check box, some apps may still send data in the background—it doesn’t shut off every data connection.
• Auto-Sync If you select the Background Data check box, you can also select this check box to allow apps to sync data automatically on schedules they determine. If you clear the Background Data check box, this check box is unavailable.
Choose Sync Settings for an Account
The Manage Accounts area of the Accounts And Sync screen shows a button for each account you have set up on the Galaxy Tab.
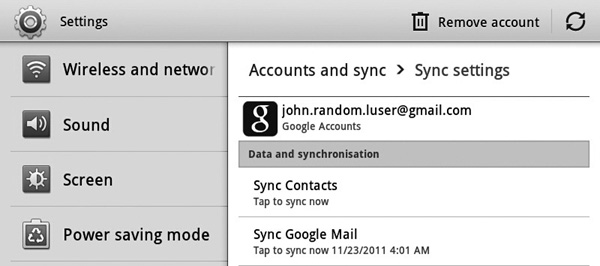
To change the settings for an account, tap the account’s name in the Manage Accounts area. On the Sync Settings screen for the account (an example is shown here), tap the button for the item you want to synchronize now. For example, tap the Sync Contacts button to synchronize your contacts. Tap the Accounts And Sync link when you’re ready to return to the Accounts And Sync screen.
Choose Motion Settings
The Galaxy Tab supports two physical motions that you may find useful:
• Tilt With a picture displayed in the Gallery app, place your thumbs on the screen and tilt the Galaxy Tab away from you to zoom out or toward you to zoom in. (You can use any two fingers, but if you’re holding the Galaxy Tab in two hands, using your thumbs is usually easiest.)
• Pan On a home screen panel, tap and hold an icon, then pan the Galaxy Tab left or right to move the icon to another home screen panel.
To control whether the Galaxy Tab uses these motions, tap the Motion Settings button in the left column of the Settings screen, and then work on the Motion Settings screen (shown here).
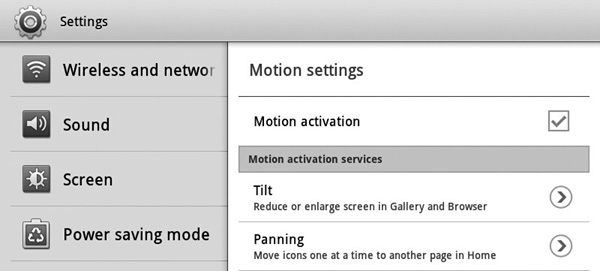
Select the Motion Activation check box if you want to use motion, and then work through the rest of this section. If you don’t want to use motion, clear this check box and skip the rest of the section.
In the Motion Activation Services area, tap the Tilt button to display the Tilt screen (see Figure 2-14). Select the Use Tilt check box to turn on tilt if you want to use it. Then tap the Sensitivity button to display the Try Tilt screen, drag the Slow–Fast slider until tilt works the way you want, and then tap the OK button.
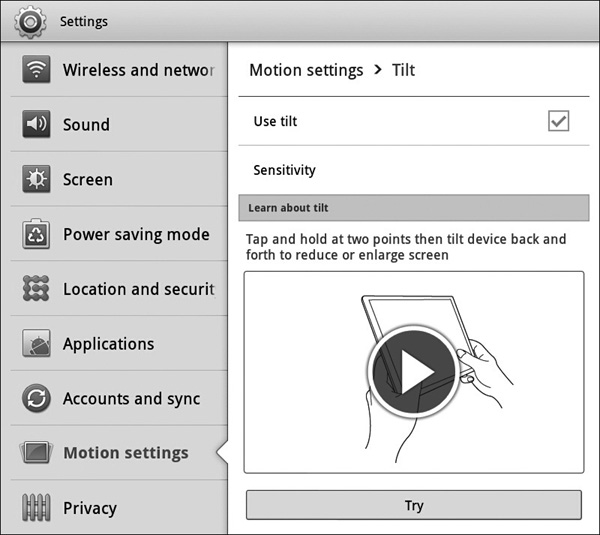
FIGURE 2-14 On the Tilt screen, you can turn the tilt motion on and adjust its sensitivity.
Tap the Motion Settings link at the top of the screen to go back to the Motion Settings screen, and then tap the Panning button to display the Panning screen (see Figure 2-15).

FIGURE 2-15 On the Panning screen, you can turn the panning motion on and adjust its sensitivity.
Select the Use Panning check box if you want to use panning. Then tap the Sensitivity button to display the Try Panning screen, drag the Slow–Fast slider until panning happens at the speed you want, and then tap the OK button.
Choose Privacy Settings
To control whether the Galaxy Tab backs up your settings to the Google server, tap the Privacy button on the Settings screen to display the Privacy screen (shown in Figure 2-16).
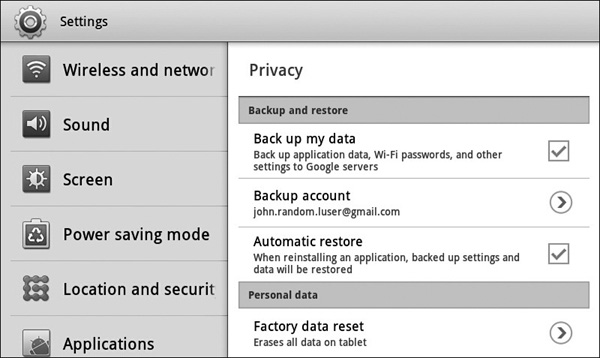
FIGURE 2-16 On the Privacy screen, select the Back Up My Data check box if you want to back up your settings automatically to the Google server.
In the Backup And Restore area of the Privacy screen, you can choose these three settings:
• Back Up My Data Select this check box to back up your Galaxy Tab’s data automatically to the Google server. Backing up your data enables you to recover it automatically if the Galaxy Tab gets messed up, so it’s a good idea—as long as you’re comfortable with the idea of Google storing your data.
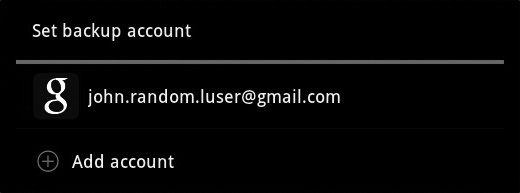
• Backup Account If this button already shows the backup account you want to use, you’re set. Otherwise, tap this button to display the Set Backup Account dialog box (shown here), and either choose the existing account or tap the Add Account button to add another account.
• Automatic Restore If you select the Back Up My Data check box, you can select this check box to allow the Galaxy Tab to automatically restore an app’s settings and data from your backup when you reinstall the app. This too is usually helpful, but again it means that Google is storing your data online. If the Back Up My Data check box is cleared, the Automatic Restore check box is unavailable.
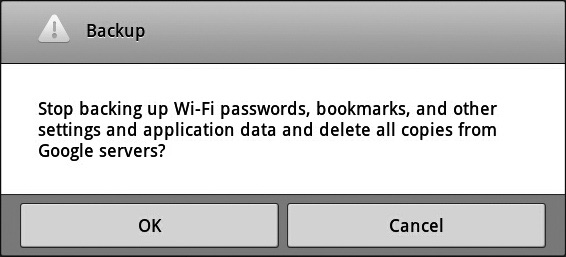
If the Back Up My Data check box was selected, and you clear it, the Galaxy Tab displays the Backup dialog box (shown here) to make sure you know you’re about to delete your backups from the Google server. Tap the OK button if you’re fine with this; otherwise, tap the Cancel button.
From the Privacy screen, you can also reset the Galaxy Tab to factory settings. We’ll go over how to do this—and when you’d need to—in Chapter 14, which shows you how to troubleshoot hardware and software issues.
Work with Storage Settings
To see how much free space you have left in your Galaxy Tab’s internal memory, tap the Storage button on the Settings screen and look at the Storage screen (shown in Figure 2-17). You can also see how much space applications, downloads, pictures and videos, audio, and miscellaneous files are taking up.

FIGURE 2-17 Use the Storage screen to check how much free space remains on the Galaxy Tab.
Choose Language and Input Settings
To choose which language the Galaxy Tab’s user interface uses, to set up voice recognition and voice output settings, and to select keyboard settings, tap the Language And Input button in the left column of the Settings screen. Then work on the Language And Input screen (see Figure 2-18).
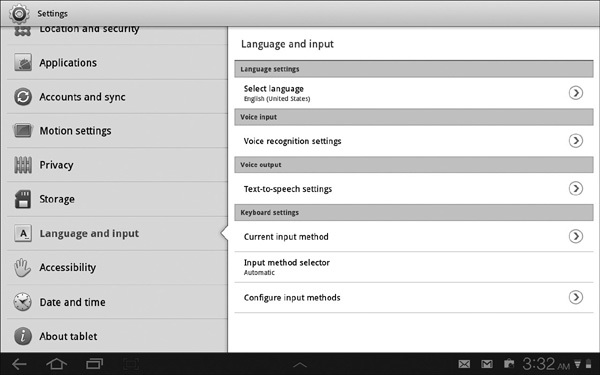
FIGURE 2-18 On the Language And Input screen, you can choose the GUI language, set up voice input and output, and choose keyboard settings.
Choose the Language for the Galaxy Tab’s User Interface
If the Galaxy Tab is using the wrong language in its user interface, tap the Select Language button in the Language Settings area. (At least, this is what the controls are called in English. If the Galaxy Tab is set to a different language, just tap the button under the first heading on the screen.) On the Select Language screen, tap the language you want to use.
Choose Voice Input Settings
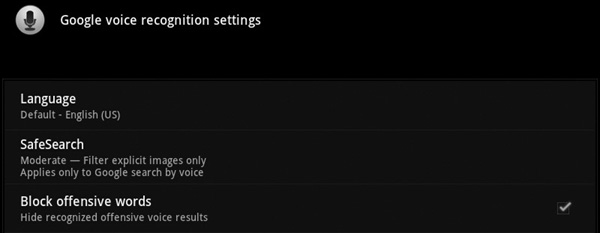
To set up voice recognition, tap the Voice Recognition Settings button in the Voice Input area of the Language And Input screen. On the Google Voice Recognition Settings screen (shown here), select the settings you want, and then tap the Back button to return to the Language And Input screen.
Choose Voice Output Settings
To choose settings for voice output, tap the Text-To-Speech Settings button in the Voice Output area of the Language And Input screen to display the Text-To-Speech Settings screen (see Figure 2-19). Here, you can set various playback options, including the speech synthesis engine, the speech rate, and the language-specific voice to use.

FIGURE 2-19 On the Text-To-Speech Settings screen, choose how the Galaxy Tab should read text to you.
Choose Suitable Keyboard Settings
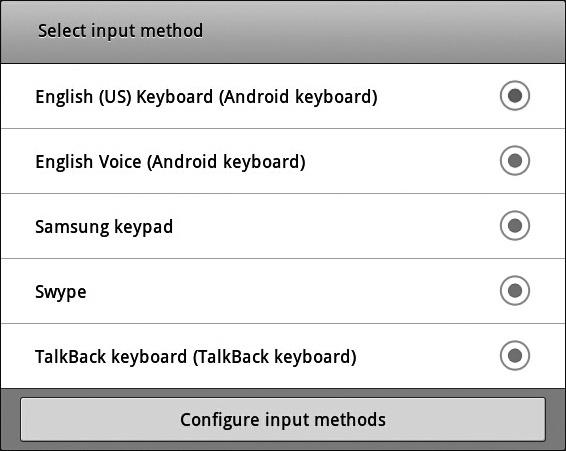
To enable you to enter text quickly on the Galaxy Tab, Samsung provides five input methods:
• Keyboard This is a regular soft keyboard at the bottom of the screen. You tap each key needed in turn.
• Voice You can dictate the text you want, and the voice recognition software transcribes it for you. Results vary depending on your elocution.
• Samsung Keypad This is a keypad that offers different features from the regular keyboard. The most notable of these is the XT9 predictive text feature, which tries to predict the rest of the word you’re typing and offers suggestions. Some people swear by XT9, especially on cell phones with tiny keyboards; rather more people swear at XT9 on the Galaxy Tab. But try it yourself and see if you find it helpful. See the nearby Tip about using Auto-Substitution.
• Swype Swype is an app in which you enter a word by dragging your fingertip across each of its letters in turn rather than tapping them in sequence (see Figure 2-20). Swype sounds awkward, but many people find it not only easy but much faster than the regular keypad—so it’s well worth spending a few minutes seeing if Swype suits you.
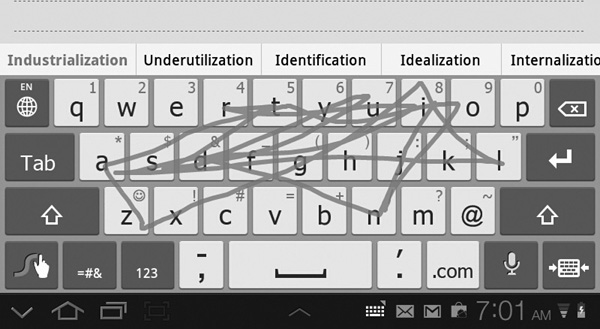
FIGURE 2-20 Swype is an app that enables you to type faster by dragging your finger across each letter of a word in turn. The line here looks messy, but Swype identified “industrialization” just fine.
• TalkBack Keyboard This is a keyboard that gives audio feedback to confirm what you’ve tapped and tell you which screen you’re at. Normally, you’d want to use this only if you have trouble seeing the screen.
To choose which input method you use, tap the Current Input Method button in the Keyboard Settings area, and then tap the appropriate option button in the Select Input Method dialog box (shown here). Tapping the option button closes the dialog box and returns you to the Language And Input screen.
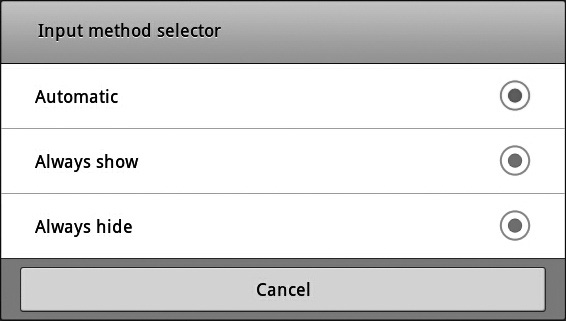
To choose whether the Galaxy Tab automatically selects what it hopes is a suitable input method for you or lets you select automatically, tap the Input Method Selector button. In the Input Method Selector dialog box (shown here), tap the Automatic option button, the Always Show option button, or the Always Hide option button, as needed. Tapping an option button closes the dialog box.
Whichever input method you choose, take a minute to investigate the options it offers. Tap the Configure Input Methods button on the Language And Input screen to display the Configure Input Methods screen (see Figure 2-21), and then tap the Settings button under the appropriate heading to display the Settings screen for that input method. For example, tap the Settings button under the Swype heading to display the Swype Settings screen.

FIGURE 2-21 On the Configure Input Methods screen, tap the Settings button for the input method you want to configure.

The XT9 predictive text feature for the Samsung Keypad can save you many keystrokes, especially if you add words you need to use frequently. On the Samsung Keypad Settings screen, select the XT9 check box, then tap the XT9 Advanced Settings button to display the XT9 Advanced Settings screen. From here, apart from turning options on and off, you can tap the XT9 My Words button to add your custom words, or tap the XT9 Auto-Substitution button to add spellings that you want XT9 to substitute for what you type in.
Choose Accessibility Settings
To make the Galaxy Tab easier to use, you can use accessibility features such as the TalkBack screen reader and the tap and hold delay.
To choose accessibility settings, tap the Accessibility button in the left column of the Settings screen, and then work on the Accessibility screen (see Figure 2-22).
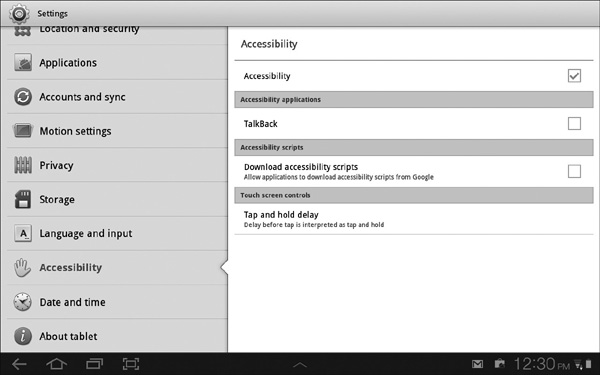
FIGURE 2-22 On the Accessibility screen, you can turn on accessibility settings as a whole, turn TalkBack on, choose whether to let apps download accessibility scripts, and configure the tap and hold delay.
Select the Accessibility check box if you want to use any of the Accessibility features. If not, clear this check box.
In the Accessibility Applications area, select the TalkBack check box if you want to use the TalkBack screen reader. As mentioned earlier, when TalkBack is on, the Galaxy Tab speaks the names of the screens and the keys you tap.
In the Accessibility Scripts area, select the Download Accessibility Scripts check box if you want apps to be able to download accessibility scripts from Google. If you need accessibility features, this is normally a good idea.
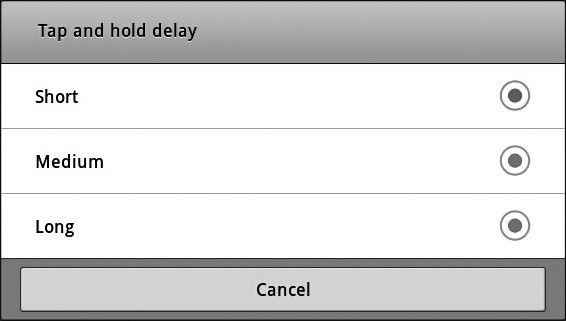
In the Touch Screen Controls area, tap the Tap And Hold Delay button to display the Tap And Hold Delay dialog box (shown here). Tap the Short option button, the Medium option button, or the Long option button, as needed, to make your selection and to close the dialog box.
Choose Date and Time Settings
Normally, once you’ve established an Internet connection, the Galaxy Tab sets its date and time automatically from Internet time servers. If you need to change the date, time, time zone, or format, tap the Date And Time button on the Settings screen, and then work on the Date And Time screen (shown in Figure 2-23).
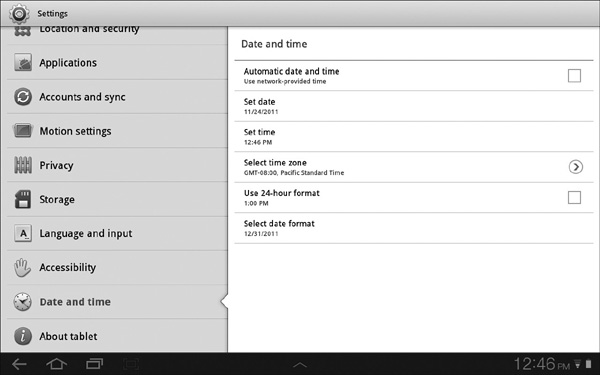
FIGURE 2-23 On the Date And Time screen, you can select the Automatic Date And Time check box to pick up the date, time zone, and time automatically, or clear the check box and set all three manually.
Choose settings on the Date And Time screen like this:
• Automatic Date And Time Select this check box to make the Galaxy Tab set the date, time, and time zone automatically using an Internet time server. When you select this check box, the Set Date button, the Set Time button, and the Select Time Zone button become unavailable.
• Set Date To set the date manually, tap this button, set the date in the dialog box that opens, and then tap the Set button.
• Set Time To set the time manually, tap this button, set the time in the dialog box that opens, and then tap the Set button.
• Select Time Zone To set the time zone manually, tap this button, and then tap the appropriate time zone on the Select Time Zone screen. The time zones are arranged from earliest (Midway Island, GMT –11:00) to latest (Tonga, GMT + 13:00), so scroll up or down as needed.
• Use 24-Hour Format Select this check box if you want to use 24-hour times rather than a.m./p.m. times.
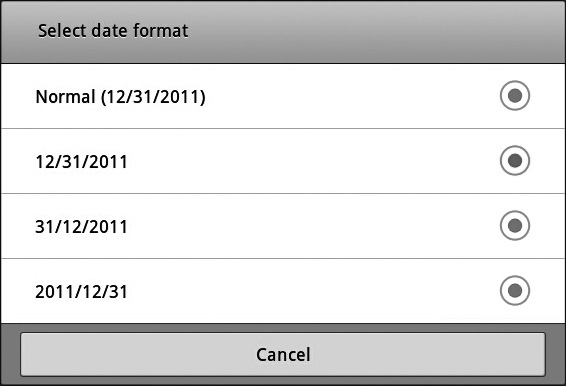
• Select Date Format To control how the Galaxy Tab represents the date, tap this button, and then choose the date format in the Select Date Format dialog box (shown here).
Examine the About Tablet Settings
When you need to run a software update, find out the battery status or what’s using the battery most, or check the details of the Galaxy Tab’s firmware or software version, tap the About Tablet button on the Settings screen to display the About Tablet screen (shown in Figure 2-24).
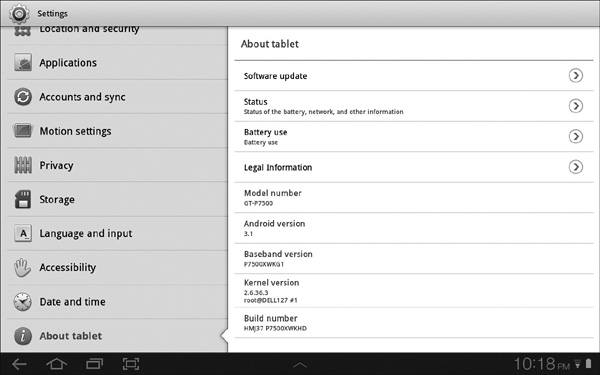
FIGURE 2-24 The About Tablet screen includes the model number, firmware version, and other technical details for the Galaxy Tab.
Choose Software Update Settings
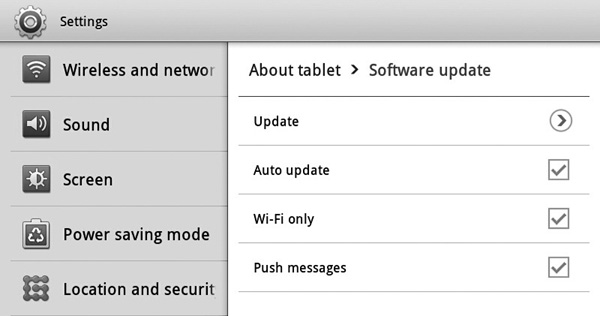
To run a software update right now, or to choose settings for the Software Update feature, tap the Software Update button on the About Tablet screen, and then work on the Software Update screen (shown here).
To run a software update, tap the Update button, and then tap the OK button in the Software Update dialog box (shown here) that appears.
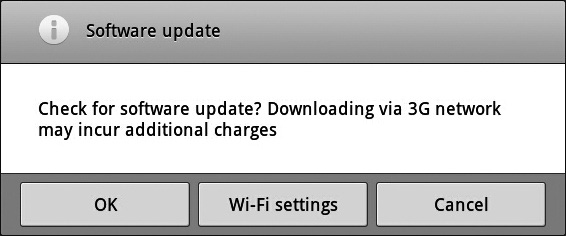

If you have a 3G Galaxy Tab, make sure you use a Wi-Fi network rather than a 3G connection for updating the Galaxy Tab. An update may involve downloading a lot of data, so it can take a big bite out of your data plan.
On the Software Update screen, you can also choose these three settings:
• Auto Update Select this check box to allow the Galaxy Tab to update itself automatically.
• Wi-Fi Only On a 3G Galaxy Tab, select this check box to prevent the Galaxy Tab from updating itself over the 3G network (which may incur extra cost).
• Push Messages Select this check box if you want the Galaxy Tab to receive push messages about software updates. Push messages are messages sent from Samsung’s servers to the Galaxy Tab when updates are available. If you turn off push messages, the Galaxy Tab needs to check in with the servers to find out about updates.
Check the Galaxy Tab’s Status
To check the Galaxy Tab’s status, tap the Status button on the About Tablet screen, and then look at the readouts on the Status screen (see Figure 2-25). Here you can see various pieces of information, from whether the battery is charging or discharging all the way through to the IP address, Wi-Fi MAC address, Bluetooth address, and serial number.

FIGURE 2-25 The Status screen shows a wealth of details about the Galaxy Tab, including its current IP address, the hardware (MAC) address of its wireless adapter, and its Bluetooth address.
Tap the Back button when you want to leave the Status screen.

The MAC address is the hardware address for the Galaxy Tab’s Wi-Fi adapter. This address is hardwired into the device, so it remains constant, unlike the IP address. If you use a wireless network that allows connections only from approved MAC addresses, this is the number you will need to add to the approved list. But because software can spoof (fake) a MAC address, using MAC addresses to control access to wireless networks is effective only against casual intruders.
Check the Battery Usage
To check the battery usage, tap the Battery Use button on the About Tablet screen. The Galaxy Tab displays the Battery Use screen, which appears in Figure 2-12, earlier in this chapter. See the section “Check Which Features Have Been Consuming the Battery Power” for details.
View Legal Information About the Galaxy Tab’s Software
To view legal information about the Galaxy Tab’s software, tap the Legal Information button on the About Tablet screen, and then tap the Open Source Licenses button or the Google Legal button on the Legal Information screen.
View the Model Number, Version Numbers, and Build Number
Further down the About Tablet screen, you can view the following information:
• Model Number This is the Galaxy Tab’s model number. You may need to know it when calling support or troubleshooting hardware-specific issues.
• Android Version This is the version of the Galaxy Tab’s firmware, the permanent software programmed into the device’s read-only memory. You may need to check this to see if a new version of the firmware is available.
• Baseband Version This is the version of the communications hardware the Galaxy Tab is using. Again, you may need to know this number for reference.
• Kernel Version This is the version of the Linux kernel that the Android operating system is running on. You may need to know this number for installing updates, but it’s mostly of interest to techies.
• Build Number This is the build name and number of the Android operating system. You may need to check this to see if a new build of Android is available.
When you’ve finished choosing settings, tap the Home button to display the home screen again.
Connect a Bluetooth Device
The Galaxy Tab includes a Bluetooth chip, so you can connect Bluetooth devices such as keyboards and headphones. Follow these steps:
1. From the home screen, tap the Notifications area to display the Notifications panel.
2. Tap the Settings button to display the Settings screen.
3. Tap the Wireless And Networks button at the top to display the Wireless And Networks screen (see Figure 2-26).
4. Tap the Bluetooth Settings button to display the Bluetooth Settings screen (shown in Figure 2-27).
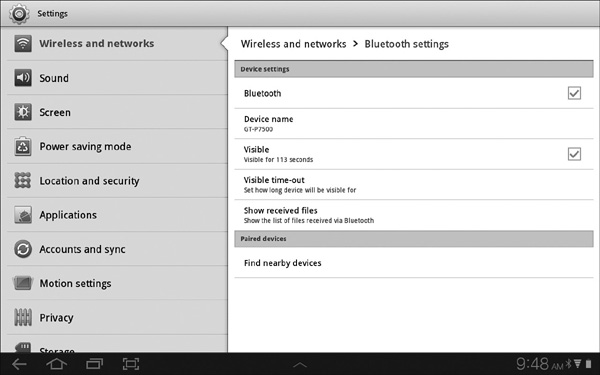
FIGURE 2-27 From the Bluetooth Settings screen, you can turn on Bluetooth, change the Galaxy Tab’s Bluetooth name, make the Galaxy Tab visible to other Bluetooth devices, and pair the Galaxy Tab with other devices.
5. Select the Bluetooth check box if it’s not already selected.
6. If you want to change the Galaxy Tab’s Bluetooth name, tap the Device Name button, type the name in the Device Name dialog box, and then tap the OK button.
7. If you want to make the Galaxy Tab visible to other Bluetooth devices, select the Visible check box. When you’re performing the pairing from the Galaxy Tab to a device that’s visible itself (for example, a keyboard), you don’t need to make the Galaxy Tab visible.
8. Turn on the device you want to pair the Galaxy Tab with.
9. Tap the Find Nearby Devices button to force the Galaxy Tab to sweep the area for Bluetooth devices. The Galaxy Tab displays the Find Nearby Devices screen, which lists the devices found.
10. Tap the device’s name. If you’re pairing a keyboard, the Galaxy Tab displays a dialog box showing the PIN to use for pairing, as in the example here.

11. Enter the PIN on the device, and then press RETURN OR ENTER. The Galaxy Tab pairs with the device and connects to it. When the Bluetooth Devices list shows the device’s status as Connected, you can start using the device.

If you connect a Bluetooth keyboard, and the Galaxy Tab is set to use Swype or another alternative text-input method, the Galaxy Tab displays a dialog box prompting you to change the input method to Samsung QWERTY. Tap the OK button (there’s no alternative).
When you need to check whether Bluetooth is turned on, look at the notifications area in the lower-right corner of the screen to see if the Bluetooth icon appears there. If so, Bluetooth is turned on; if not, it’s turned off.
To turn Bluetooth on or off, follow these steps:
1. Tap the notifications area to reveal the notifications panel.
2. Tap the Settings button to display the Settings screen.
3. Tap the Wireless And Networks button at the top to display the Wireless And Networks screen.
4. Clear the Bluetooth check box.
5. Tap the Home button to return to the home screen.
Manage Your Wireless Network Connections
Cellular connections can be great if your Galaxy Tab has 3G, but you’ll probably want to use your Galaxy Tab on wireless network connections as much as possible to conserve your cellular allowances. Most likely, you’ll need to connect to two or more wireless networks—perhaps many more. In many cases, you’ll need to manage your wireless network connections actively rather than being able to set them and then forget them. This section shows you the moves you’ll need.
Set Up a New Wireless Network
Normally, you’ll connect to your first wireless network when you first set up the Galaxy Tab, as discussed in Chapter 1. When you need to set up another wireless network, open the Wi-Fi Settings screen like this:
1. From the home screen, tap the notifications area to display the notifications panel.
2. Tap the Settings button to display the Settings screen.
3. Tap the Wireless And Networks button at the top to display the Wireless And Networks screen (shown in Figure 2-26, earlier in this chapter).
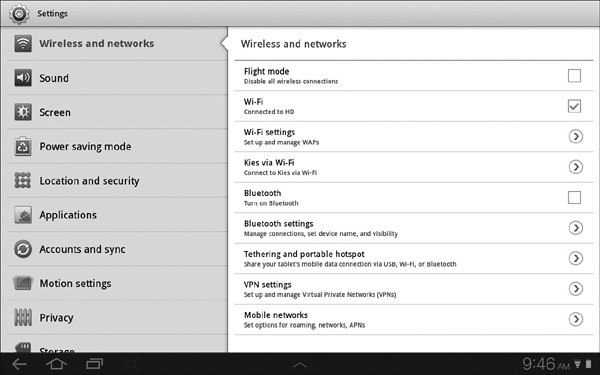
FIGURE 2-26 On the Wireless And Networks screen, tap the Bluetooth Settings button.
4. Tap the Wi-Fi Settings button to display the Wi-Fi Settings screen (see Figure 2-28).
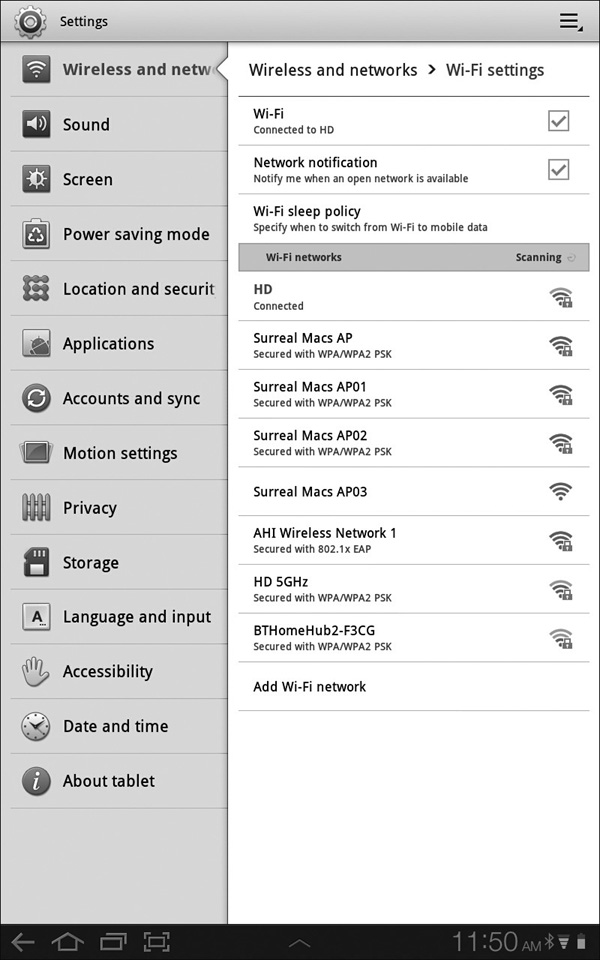
FIGURE 2-28 On the Wi-Fi Settings screen, tap the wireless network you want to connect to. If the wireless network doesn’t appear in the Wi-Fi Networks list, tap the Add Wi-Fi Network button.
If the wireless network appears in the Wi-Fi Networks list, add it as described in the first subsection, “Add an Open Wireless Network.” If the wireless network doesn’t appear, add it as described in the second subsection, “Add a Closed Wireless Network.”

An open wireless network is one that broadcasts its name or (technical term) service set identifier, SSID for short. A closed wireless network is one that doesn’t broadcast its name.
Add an Open Wireless Network
To add an open wireless network, follow these steps:
1. Tap the network’s name in the Wi-Fi Networks list on the Wi-Fi Settings screen. The Galaxy Tab displays a dialog box showing the network’s name, as shown here.
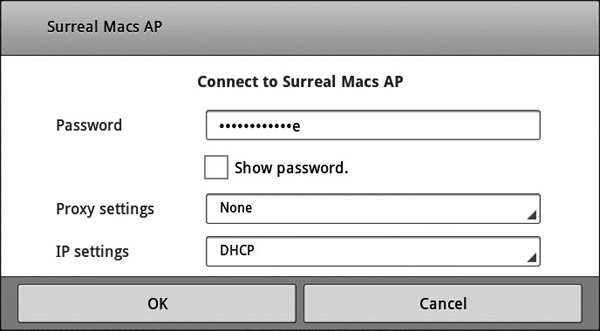
2. Type the password for the wireless network. As usual, you can select the Show Password check box if you want to see what you’ve typed.
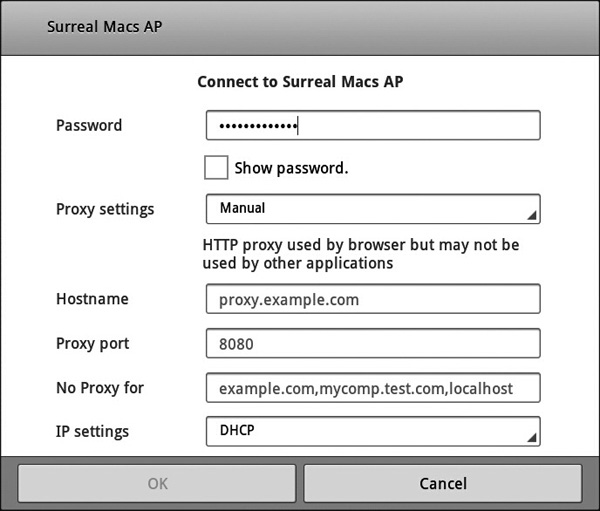
3. If you need to specify proxy settings for the network, tap the Proxy Settings drop-down button, and then tap the Manual item. The dialog box for the wireless network displays three extra boxes for you to enter the proxy information in, as you see in the illustration here:
• Hostname Type the name or IP address of the proxy server—for example, epoxy.surrealmacs.com or 10.0.1.200.

Normally, you don’t need to enter proxy information for a home network—only for a network in a company or organization. If you need to find out the proxy settings, ask the network’s administrator.
• Proxy Port Type the port number to use on the server—for example, 8080.
• No Proxy For If you’re supposed to bypass the proxy for certain domains, type their names in this text box, putting a comma between them—for example, surrealmacs.com, surrealpcs.com.
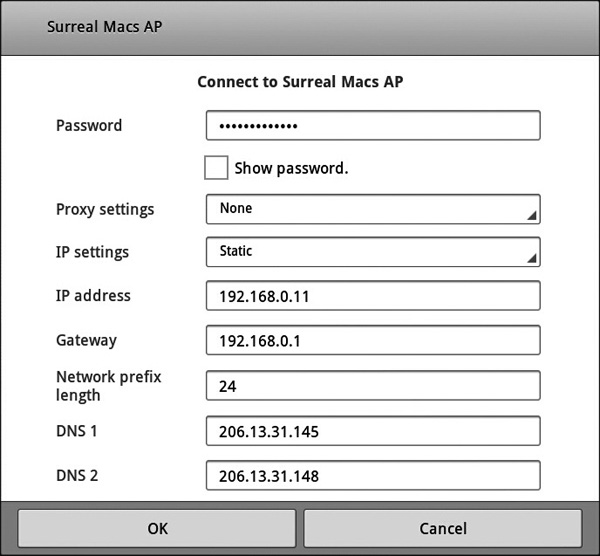
4. If your network uses DHCP, make sure the DHCP item is selected in the IP Settings drop-down list. If you need to specify a static IP address for the network, tap the IP Settings drop-down button, and then tap the Static item. The dialog box for the wireless network displays five extra boxes for you to enter the IP address information in, as you see in the illustration here.
• IP Address Enter the IP address—for example, 192.168.0.11.

Most home networks use Dynamic Host Configuration Protocol (DHCP) to allocate IP addresses automatically. If your network uses DHCP, you don’t need to set a static IP address for the Galaxy Tab. Normally, you’ll need to set a static IP address only if your network’s administrator tells you to. In this case, the network administrator will give you the details for the network.
• Gateway Enter the IP address of the gateway or router that gives the network access to the Internet—for example, 192.168.0.1.
• Network Prefix Length Enter the network prefix length here. Depending on the network, this is 8, 16, or 24.
• DNS 1 Enter the IP address of the primary DNS server.
• DNS 2 Enter the IP address of the secondary DNS server.
5. Tap the OK button to close the dialog box for connecting to the wireless network. The Galaxy Tab connects to the wireless network, and the Wi-Fi Networks list in the Wi-Fi Settings screen shows Connected under the network’s name.
Add a Closed Wireless Network
To add a closed wireless network, follow these steps:
1. Tap the Add Wi-Fi Network button at the bottom of the Wi-Fi Settings screen to display the Add Wi-Fi Network dialog box (shown here with settings chosen).

2. Type the network’s name in the Network SSID box.
3. Choose the security type in the Security drop-down list:
• Open The network has no security.
• WEP The network uses Wired Equivalent Privacy security. This security is weak because it has known flaws—but some wireless networks still use it.
• WPA/WPA2 PSK The network uses Wi-Fi Protected Access (WPA) or Wi-Fi Protected Access version 2 (WPA2) security with a pre-shared key (PSK). This is an effective and widely used security type.
• 802.1x EAP The network uses Extensible Authentication Protocol (EAP) security, which involves using multiple means of authentication (such as certificates and passwords). This type of security is mostly used in corporate networks.
4. For WEP or WPA/WPA2 PSK, type the password in the Password text box. For EAP, provide the many details required.
5. If you need to choose proxy settings, do so as explained in step 3 of the previous list.
6. If you need to specify a static IP address, do so as explained in step 4 of the previous list. Otherwise, make sure the DHCP item is selected in the IP Settings drop-down list.
7. Tap the Save button to save the network’s details and return to the Wi-Fi Settings screen.
8. Tap the new network’s name to connect to it.

To have the Galaxy Tab alert you when an open wireless network is available, select the Network Notification check box on the Wi-Fi Settings screen.
Turn Wi-Fi On and Off from the Notifications Panel
The quick way to check whether Wi-Fi is turned on or off, and to turn it on or off as needed, is to use the notifications panel.
To check whether Wi-Fi is turned on, look for the Wi-Fi icon (the inverted pyramid of blue bars) in the notifications area. If the icon appears, Wi-Fi is on; if not, Wi-Fi is off.
To turn Wi-Fi on or off quickly using the notifications panel, follow these steps:
1. Tap the notifications area to display the notifications panel.
2. Tap the Wi-Fi icon to turn Wi-Fi on (if it’s off) or off (if it’s on).
3. Tap the × button in the upper-right corner of the notifications panel to close the panel.
Make the Galaxy Tab Forget a Wireless Network
When you no longer need to use a particular wireless network, tell the Galaxy Tab to forget the network. This helps avoid connecting to the network unintentionally if you stray within range; and even if the network is far away, it shortens the list of Wi-Fi networks you need to manage.
To make the Galaxy Tab forget a network, tap the network’s name on the Wi-Fi Settings screen, and then tap the Forget button in the network information dialog box that appears, as shown here.

Outfit the Galaxy Tab with Accessories
The Galaxy Tab is great as a self-contained device, but to get the most out of it, you’ll probably want to add accessories. This section discusses the most useful accessories: a case and screen protector, a keyboard, a TV-out cable, and a stand.
Protect the Galaxy Tab with a Case and Screen Protector
With its plastic case, the Galaxy Tab is sturdy enough for conventional use. But even so, it’s a good idea to protect it with a case. You should also apply a screen protector to the screen to protect it from scratches, oil, and other hazards.
You can find a wide variety of cases in both online stores and bricks-and-mortar stores. In particular, Amazon.com and eBay offer many cases—everything from folding leather cases with a handy stand built in, to silicon sheaths that add a little grip and cushioning to the Galaxy Tab.

If you intend to use your Galaxy Tab extensively, get a case that gives you full access to the screen and the camera rather than a slip case you have to take the Galaxy Tab out of before you can use it.
Choosing a screen protector tends to be more straightforward than choosing a case, because there’s less variation. Even so, it’s worth reading reviews of screen protectors before buying to avoid three problems:
• Too thin or flexible If the screen protector is too thin or too flexible, it may be hard to fit without getting air bubbles under it.
• Too thick If the screen protector is too thick, the Galaxy Tab’s screen won’t respond correctly to your caresses.
• Not sticky enough If the screen protector doesn’t stick tightly enough to the Galaxy Tab’s screen, it’ll start coming off the sides as soon as you put the case on.

Two things here. First, clean the screen thoroughly with a soft cloth before applying the screen protector. Second, you may find a credit card, a plastic ruler, or a plastic ice scraper (the kind for getting ice off your car’s windshield) helpful for applying the screen protector evenly across the screen.
Enter Text Quickly with a Keyboard
The Galaxy Tab’s onscreen keyboard works pretty well, and if you learn to use Swype, you can enter text at a good clip. But if you need to enter serious amounts of text, add a hardware keyboard.
The best fit for the Galaxy Tab 10.1 is the Samsung Galaxy Tab 10.1 Keyboard Dock (around $75), which you can buy from retailers both online (for example, Amazon.com) and offline. This keyboard has a built-in stand that holds the Galaxy Tab upright, turning the tablet into a mutant laptop. For the Galaxy Tab 8.9, there’s a Samsung Galaxy Tab 8.9 Keyboard Dock, which costs around the same amount.
If the price of the Samsung Galaxy Tab Keyboard Dock seems too steep, look for an equivalent product from a third-party manufacturer. You’ll find a good selection available online, especially on eBay.
Because the Galaxy Tab has Bluetooth, you can also connect any standard Bluetooth keyboard to it using the technique described earlier in this chapter. If you already have a Bluetooth keyboard, this can be a great solution—particularly if you put the Galaxy Tab in a stand or a case that incorporates a stand.

The disadvantage of a standard Bluetooth keyboard is that it doesn’t have Galaxy Tab–specific buttons and features, but if you’re prepared to use your finger on the screen when necessary, a Bluetooth keyboard can be a good solution—especially because you can use it with other computers and devices as necessary. If you use Swype as your text-input method, you’ll need to turn it off when using the Bluetooth keyboard.
Output Videos and Photos on a TV
When you want to share your videos or photos with other people, you can connect the Galaxy Tab to a TV and show the images on the big screen.
To make the connection to a regular TV, you need either the Samsung TV-Out Cable (around $20) or a functional equivalent—a cable with the Samsung connector at the Galaxy Tab’s end and three composite connectors at the TV’s end.
To make the connection to an HD TV, you need an adapter such as the Samsung Galaxy Tab P4 HDTV Adapter (around $50).
Get a Stand for Hands-Free Use
If you’ve chosen a Galaxy Tab case that includes a built-in stand, or if you’ve picked up the Samsung Galaxy Tab Keyboard Dock, you already have a stand that will hold the Galaxy Tab at an angle and attitude for you to use it on a desk. If not, you may want to get a stand for the Galaxy Tab so that you can watch movies on it or use it with a Bluetooth keyboard that doesn’t have a stand.
As with other accessories, you can find Galaxy Tab stands at various virtual and real-world retailers, but the best selections tend to be on sites such as Amazon.com and eBay.
When choosing a stand, keep these three questions in mind:
• Should you buy a case with a built-in stand instead?
• Should you buy a keyboard with a built-in stand instead?
• Do you want a stand that connects to power and charges the Galaxy Tab? If so, consider getting a stand with an audio connection or built-in speakers.

Various iPad stands work for the Galaxy Tab in either landscape orientation or portrait orientation. So if you can’t find a Galaxy Tab–specific stand you like, it’s worth looking at iPad stands too.

