Distributing selected objects means moving them so that the intervals between them, when measured in a certain way, become equal. The same Align and Distribute dialog has eight object distribution buttons and two text distribution buttons, differing in how they measure these intervals. As with alignment buttons, half of these buttons (the top row) work horizontally and the other half (the bottom row) work vertically:

Exactly under the centering buttons in the Align section, the Distribute section has the two buttons for distributing centers. By pressing one of these buttons, you move selected objects in such a way that their centers (more precisely, the centers of their bounding boxes) are at equal distances from each other horizontally or vertically.
Immediately to the right and left of these two buttons, four more buttons perform the same equispaced distribution for the right and left, bottom and top sides of the bounding boxes.
Two more buttons further to the right, instead of equalizing distances between same-named edges of bounding boxes, make the gaps between them equal. This means that, for horizontal gap equalization, the distances between the right edge of one object to the left edge of the next one will be the same. When objects are different in width, this usually makes more visual sense than evenly distributing their centers. Figure 7-16 shows the difference between distributing centers and equalizing gaps.

Finally, the two buttons furthest to the right distribute the baseline origins of the selected text objects.
Unlike alignment buttons, distribution buttons always use the selection bounding box as its anchor box (i.e., the Relative to: list does not affect the Distribute section of the dialog). In other words, distributing always preserves the bounding box of the selection because it never moves the leftmost and rightmost (for horizontal) or topmost and bottommost (for vertical) objects, but only those that fall between them. (One consequence of this is that distributing only makes sense for three or more selected objects.)
So, if after distributing you find that your objects are too dense or too sparse, just select one of the objects at the edge of your distribution, and move it toward others (to make it denser) or away from others (to make it sparser). Then, reselect all objects again and distribute them once more.
Note that selected objects may overlap, both before and after distributing. Even when equalizing gaps, objects’ edges may overlap; in this case the gaps are considered to be negative, and they are still made equal to each other when you click the button (in other words, all adjacent objects are made to overlap by the same amount).
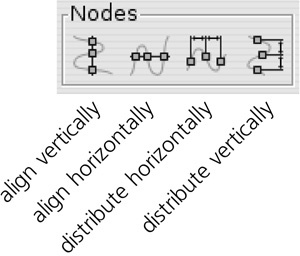
When you are using the Node tool (12.5 The Node Tool), the Align and Distribute dialog shows four buttons that allow you to align and distribute, horizontally and vertically, the selected path nodes:
So far we’ve looked at the basic alignment and distribution commands. They all have one thing in common: Each of them works only in one dimension, either horizontally or vertically. The same dialog, however, provides a number of more interesting capabilities that involve moving objects in both dimensions at once.
Randomizing simply moves each selected object to a random position within the selection’s bounding box. Each click of the button will result in a new random arrangement; you can repeat this until you find a randomization you like the best:

Note
When you click the Randomize button repeatedly, only the first click remembers the current bounding box of the selection; all subsequent clicks will use this remembered bounding box as the area within which to scatter objects, even if the bounding box changes because of the randomization. This prevents the objects from drifting away as you randomize them repeatedly.
Unclumping is an operation that is similar to equalizing gaps (that’s why its button is aligned under the equalize gaps buttons) but works in both dimensions at once, trying to equalize the closest distance between all pairs of adjacent objects in the selection. It works best for a large number of objects:
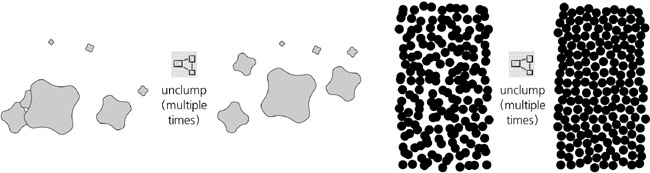
Unclumping is an imprecise operation, and you may want to use it not just once but repeatedly, until you are satisfied with the result. It does not replace your current arrangement entirely but improves it in small steps, nudging each object closer towards a point equidistant from its immediate neighbors. The most noticeable result of this is a reduction of clumps—areas where objects are too dense.
In most cases, the unclumping process converges—that is, visual unevenness in distribution of the objects reduces and each subsequent unclumping has less and less effect. After thorough unclumping is achieved, further attempts to unclump will just slowly disperse and migrate the swarm of the objects in a random direction without further improving its uniformity.
Unclumping objects produces a characteristic texture that appears, at the same time, both random and artificial. It is quite similar to what a human would produce if asked to evenly fill a space with random dots. Traditional examples of such textures include polka-dot patterns (10.8.3 Stock Patterns) and dot engravings where shading is created by smoothly varying the density of scattered dots.
Note
Unclumping does not take into account the actual shape of your objects, only their bounding boxes. It therefore works best with multiple objects of simple consistent shape, such as circles or stars. We will see more examples of unclumping in the section on clone tiler (16.6 Tiling Clones).
In contrast with unclumping, removing overlaps is a deterministic operation: It tries to move each selected object by a minimum distance necessary for all selected objects to be free from overlaps—and usually succeeds on the first attempt. The amount of moving it performs, of course, depends on the initial arrangement of objects, but in most cases, the layout of objects after removing overlaps will be still similar to the original layout, although less so than after unclumping. You can set the horizontal and vertical spacing (in px units) to be added to the objects’ bounding boxes:
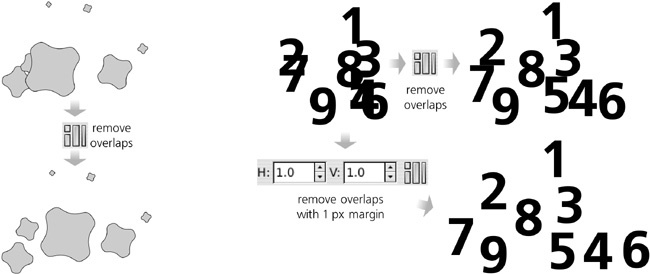
Notice that objects that did not overlap with any other selected object did not move.
Finally, the Connector network layout button at the bottom of the dialog only works on diagrams with automatic connectors.
As a further development of alignment and distribution commands, the Rows and Columns dialog (accessed from the Object menu) arranges selected objects into a two-dimensional table with a number of spacing and layout options, as shown in Figure 7-21.
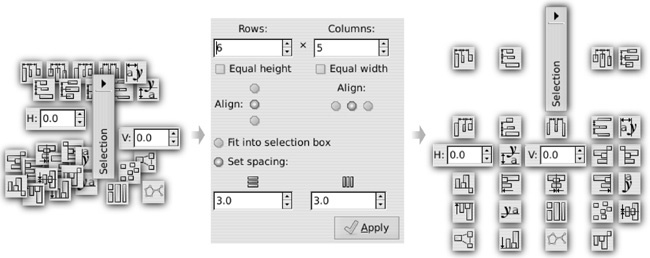
Note that using this dialog only makes sense for different objects that you already have—for example, imported bitmaps from which you want to make a gallery of thumbnails. If what you need is just a pattern, table, or grid of identical objects (or objects different only in size or style), look into the clone tiler (16.6 Tiling Clones).
The first thing you need to decide on is the number of rows and columns in your table. The dialog senses the number of selected objects and, when you change the number of rows (or columns), it recalculates the columns (or rows) so that the table would be just large enough for all objects. For example, if you have 29 objects selected, at first the dialog will offer 1 row and 29 columns; if you increase the number of rows by scrolling up, the number of rows and columns will change to 2 and 15, 3 and 10, 4 and 8, 5 and 6, 6 and 5, and so on.
Under the Rows and Columns fields, two checkboxes control whether all rows and columns will be equal in height and width. For example, when the Equal height checkbox is selected, all rows in the entire table will be as high as the tallest of all objects (plus spacing, see below). If it’s off, each row will be only as high as the tallest of all objects in this row (plus spacing).
Further down, groups of radio buttons control the alignment of objects within their rows and columns; by default they are centered in both dimensions.
The rest of the controls in the dialog define how large your table will be. The Fit into selection box option ensures that the table will be exactly as wide and as tall as your selection before you click Arrange in this dialog. In other words, after creating the table, Inkscape will set the spacing between rows and columns so that the overall dimensions of the selection don’t change; this may result in overlaps (i.e., negative spacing). For example, if you want the table to be sparser, undo arranging, drag one of the objects away from others, reselect all objects, and click Arrange again. Alternatively, you can set spacing for rows and columns explicitly by choosing Set spacing and typing the desired values (in px units).