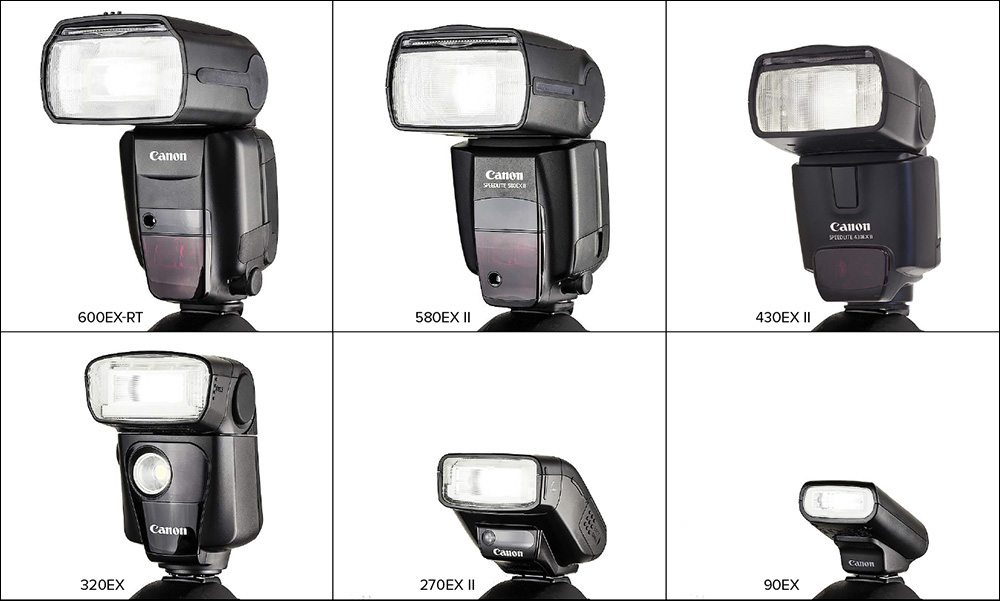
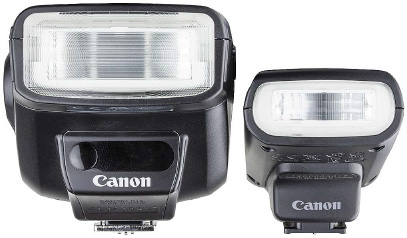
Figure 6.1 Canon’s current line-up of Speedlites runs from the powerful 600EX-RT down to the tiny 90EX. The photos above are shot at the same scale so that you can compare their sizes.
WHICH CANON SPEEDLITE IS RIGHT FOR YOU?
SPEEDLITE 600EX-RT FUNCTION BUTTONS IN NON-WIRELESS MODES
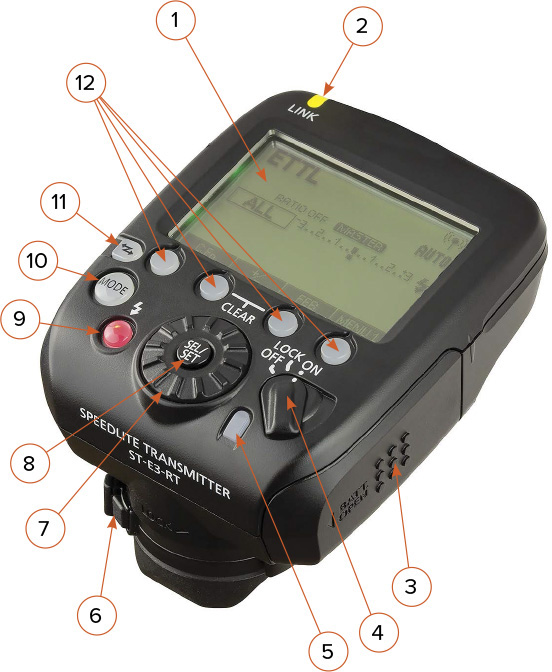
SPEEDLITE TRANSMITTER ST-E3-RT
THIRD-PARTY SPEEDLITES AND TRANSMITTERS
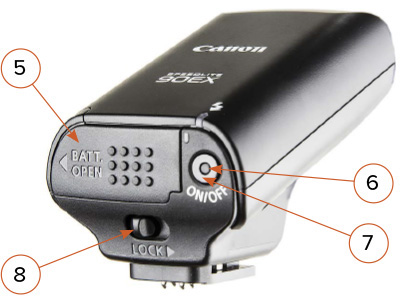
Figure 6.1 Canon’s current line-up of Speedlites runs from the powerful 600EX-RT down to the tiny 90EX. The photos above are shot at the same scale so that you can compare their sizes.
The current members of the Canon Speedlite family are the 600EX-RT, the 430EX II, the 320EX, and the 270EX II. Other Speedlites still in wide use include the 580EX II, 580EX, the 430EX, and the 270EX. Occasionally, a 550EX will pop up in someone’s camera bag.
Although not officially labeled “Speedlites,” Canon currently offers two specialty flashes for macro photography: the Macro Ring Lite MR-14EX II and the Macro Twin Lite MT-24EX. Both of these flashes can be used to command Speedlites in optical wireless mode.
I believe strongly in buying gear that fits within your budget. Canon Speedlites run from about $100 for the tiny 90EX to $550 for the flagship 600EX-RT. Used Speedlites, discontinued models, and third-party brands may seem like a bargain—until you discover that your purchase lacks an essential feature or two.
Control Via Camera LCD —For me, this is an essential feature. The easiest place to control a Speedlite is via the large LCD on the back of your camera. This unique feature of the Canon system enables access to every Speedlite menu item via the LCD on the backs of our cameras. Read all the details in Chapter 0 : Quick Start Guide To Speedliting .
Modes —All Canon EX Speedlites offer E-TTL—Canon’s automatic flash mode. Most offer Manual mode—although on current 300- and 200-series models Manual mode must be accessed via the camera LCD. If you want to go deep into using multiple Speedlites, the new Group mode on the 600EX-RT provides the best user interface available today. The Multi and External modes on the 600EX-RT and 580EX II provide special-use functionality.
Moveable Head —Being able to angle the flashhead independently of the Speedlite body provides creative control. When using a Speedlite as an optical slave, it also allows you to aim the slave sensor (on the front of the Speedlite) directly at the master while aiming the flashhead at the subject.
Auto-Focus Assist —In dim ambient light, an AF-Assist light on the Speedlite provides a bit of light on which the camera can focus. 600-, 500-, and 400-series Speedlites have AF-Assist lights that cast a red grid pattern on the subject. The current 300- and 200-series Speedlites pulse white light from the flash tube as the AF-Assist. For infrequent use, the white light pulses are not a problem. If you frequently shoot in dim light, you might find it annoying.
Power Zoom —600-, 500-, and 400-series Speedlites have power zoom features that position the flashhead so that it matches the coverage of the lens. The creative advantage of power zoom is that it allows you to manually zoom the flashhead so that your flash lights one part of the shot without lighting other areas. 300- and 200-series Speedlites have very limited zoom options that must be adjusted by hand.
Flash Power
—As a general rule, the higher the model number, the greater the maximum flash power. That said, the difference between the power of the 600EX-RT and the 430EX II is about  -stop—which is to say, not huge.
Wireless Slave —If you plan to spend some time Speedliting, I suggest buying a Speedlite that can work as a wireless slave—especially if you already have a camera with a pop-up flash that can serve as an optical master. See the list of cameras that do in Chapter 0 : Quick Start Guide To Speedliting.
Wireless Master —When the limited range of a pop-up flash acting as a master becomes an issue, a 600- or 500-series Speedlite in the hotshoe can provide more options to control slaved Speedlites.
Optical / Radio Wireless —Canon’s introduction of the 600EX-RT in 2012 added the convenience of built-in radio control to wireless Speedliting. The advantage of radio is that it works over greater distances, is not blinded by the sun, and does not need a direct visual path between master and slave—all of which can be limitations when working with optical wireless. That said, as of this edition, only the 600EX-RT includes radio wireless. Fortunately, it also works in optical wireless—so it is fully backward compatible with Canon Speedlites that communicate via optical wireless
External Power —Recycle time is the time it takes for the Speedlite to recharge its capacitors so that it can fire again. If you shoot in situations where you need the fastest recycle times possible, choose a 600- or 500-series Speedlite because they have the ability to get additional power from an external battery pack.
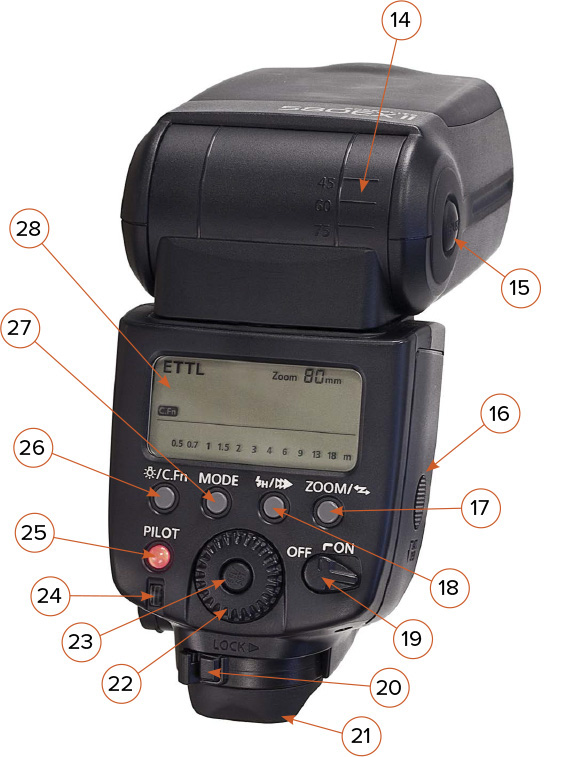
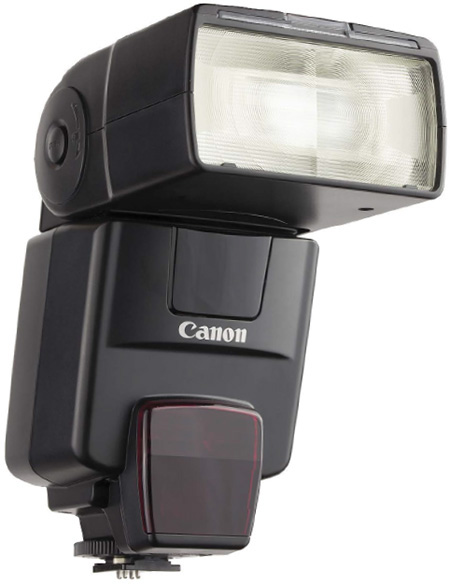
A quick look: The new flagship of the Canon Speedlite system features a completely updated LCD menu system that makes it much easier to use. Additionally, the 600EX-RT opens up new territory with radio-enabled wireless communication between master and slave. Conveniently, the 600EX-RT is fully backward compatible with preceding generations of Speedlites that use optical wireless.
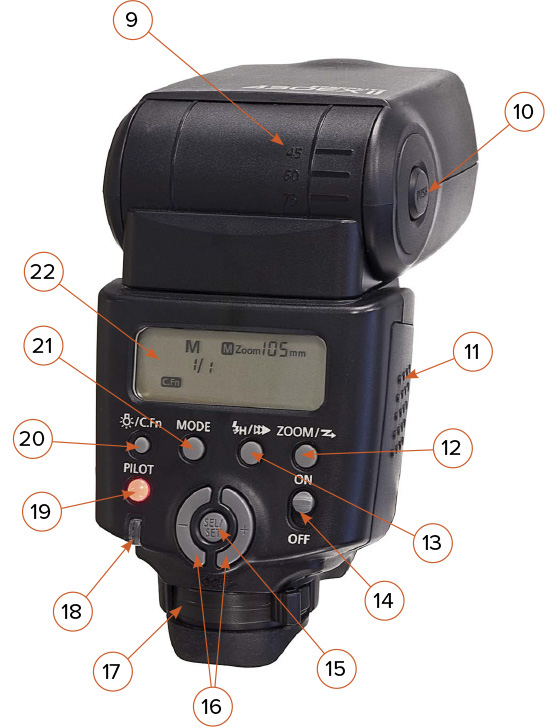
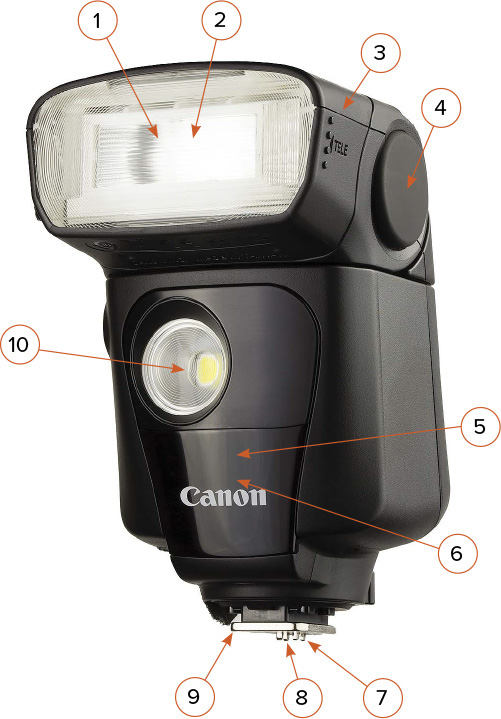
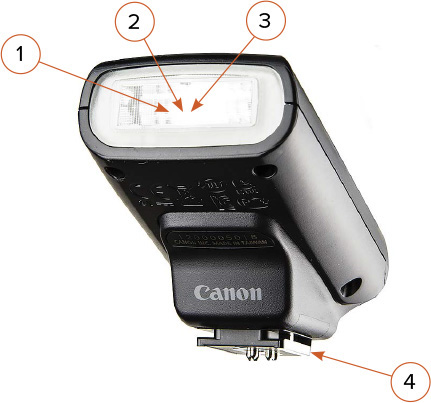
1. Flashhead —Contains the flashtube and the zoom mechanism that pushes it forward and backward. The 600EX-RT automatically senses the focal length of compatible EOS lenses and adjusts the position of the flashtube to match—from 20mm to 200mm.
2. Optical transmitter —When used as an optical master, the flashtube of the 600EX-RT sends the instructions to the slaves through a coded series of pulsed flashes.
3. Catchlight panel —A plastic card that pulls out with the wide-angle panel. When bouncing flash off a ceiling, the catchlight panel throws a tiny bit of light forward.
4. Wide-angle panel —A plastic diffuser that pulls out. Spreads the flash to about the field of a 14mm lens.
5. External power socket —Plug in an external battery pack to provide faster recycling.
6. Bracket fitting —A threaded socket that, unfortunately, is not sized for the industry-standard ¼″-20 thread.
7. Screwlock PC terminal —The connection point for triggering cables, such as those used by third-party radio triggers.
8. Contacts —These five pins connect to the terminals on an EOS camera’s hotshoe.
9. Locking pin —The pin drops down into a receiver when the locking lever is moved. It is spring-loaded so that it will also work with generic hotshoes.
10. Weather-sealed mounting foot —The rubber gasket around the metal foot provides a water- and dust-resistant connection between Speedlite and camera.
11. AF-Assist beam emitter —In low-light or low-contrast situations, the 600EX-RT can emit a red pattern on which the camera will try to focus. The approximate range is 2′ to 33′ at the center and 2′ to 16′ along the edges of the flash’s illumination area.
12. External metering sensor —In External Auto or External Manual, this sensor captures light bouncing off the subject and shuts the flash off when it thinks that enough light has been gathered.
13. Optical wireless sensor —When the Speedlite is working as an optical slave, this sensor must be aimed at the master to receive instructions.
14. Filter sensors —When either of the two Canon-supplied color filters (gels) are used with the filter holder and the camera’s white balance is set to AWB or Flash, these sensors tell the camera which gel is in place.

15. Bounce angle —The flashhead can be tilted upward to 90°. There are detents (notches) at 45°, 60°, 75°, and 90°. Between 0° and 45° the head can be positioned by hand, but not locked.
16. Flashhead release button —Pressing this button enables the flashhead to tilt –7° to 90° and to pan 180° right and left.
17. Battery compartment —The 600EX-RT holds four AA batteries.
18. Button labels —The lower edge of the LCD displays the purpose of each of the Function buttons.
19. Power switch —Off, Lock, and On. Lock deactivates the buttons and dials.
20. Flash exposure confirmation lamp —When shooting in E-TTL mode, this lamp glows green for 3 seconds if a good exposure has been obtained. The lamp is inactive when shooting in other modes.
21. Locking lever —Slide this lever to the right to lock the Speedlite into the hotshoe. Press the button and slide to the left to release.
22. Select dial —Turn this dial to rotate through various menu options.
23. Select/Set button —Press this button to select a menu option.
24. Flash Ready lamp / Test button —This button has five functions. It glows red when the flash is fully charged and ready to fire. It glows green when the flash is partially charged and capable of a Quick Flash. Press it to fire a test flash. If the Speedlite is working as a Wireless Master, pressing it will also test-fire Slaves by Group. This button can also be configured to activate the Modeling Light via Custom Function-02.
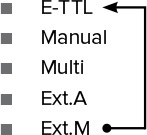
25. Mode button —Press the button to cycle through the five non-wireless shooting modes: E-TTL, Manual, Multi, External Auto, and External Manual. When the Speedlite is set as a radio master, the button cycles through the four radio-wireless shooting modes: E-TTL, Manual, Multi, and Group. When the Speedlite is set as an optical master, the button cycles through three optical-wireless modes: E-TTL, Manual, and Multi. The button is deactivated when the Speedlite is a slave.
26. Wireless / Linked Shooting button —This button cycles the Speedlite through non-wireless (normal), Radio Master, Radio Slave, Optical Master, and Optical Slave. When the Speedlite is in non-wireless mode, hold the button down for several seconds to activate Linked Shooting.
27. Function buttons —The purpose of each of these four buttons changes as the mode and wireless settings change (see the following section for more information).
28. Interactive LCD panel —The 600EX-RT brings a new, interactive menu to the Canon Speedlite system. This is a great improvement over previous generations of Speedlites. Menu options change in response to Mode and Wireless settings.
29. Link indicator —When operating in Radio Wireless, the color of this light indicates whether the Speedlite is communicating with other units—either as master or slave.
 LCD backlight
—Push any button to illuminate the LCD backlight.
LCD backlight
—Push any button to illuminate the LCD backlight.
A quick look: The purpose of each of the four function buttons on the 600EX-RT change based upon the Mode and wireless setting. The bottom portion of the interactive LCD screen displays the purpose of each button.
When the wireless system is not activated, pressing the Mode button cycles through:
Each of these modes will be covered in the chapters that follow. Menus that appear when radio or optical wireless are activated will be detailed in their respective chapters as well. Also see Appendices 1–3 for more details.
Geek Speak: —Custom Functions and Personal Functions—
Canon’s Evaluative Through-The-Lens metering provides an automatic calculation of flash power—which you can fine-tune via Flash Exposure Compensation. See the details in Chapter 9 : E Is For Evaluative .
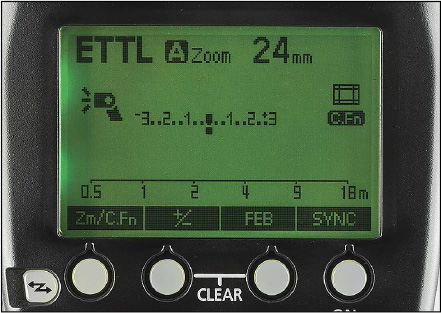
1. Zm/C.Fn —Zoom/Custom Functions
2. +/- —Flash Exposure Compensation
3. FEB —Flash Exposure Bracketing
4. Sync —Synchronization
In Manual mode, you set the power level directly. See Chapter 8 : Flashing Manually .
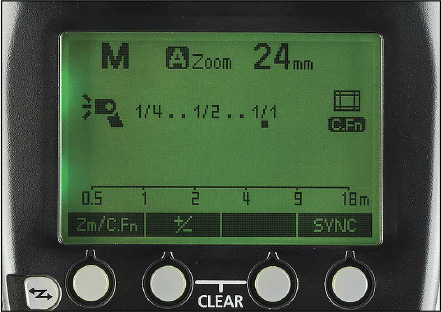
1. Zm/C.Fn —Zoom/Custom Functions
2. +/- —Power Level
3. —
4. Sync —Synchronization
In Multi mode, the Speedlite fires repeatedly so that you can capture multiple images of a subject in motion. See Chapter 10 : Specialty Flash Modes .
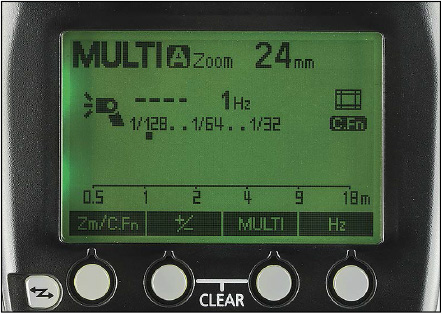
1. Zm/C.Fn —Zoom/Custom Functions
2. +/- —Power Level
3. Multi —Total Number of Flashes
4. Hz —Flashes Per Second
In External Auto mode, the Speedlite turns itself off after the External Sensor (#12) receives enough light—based on camera settings communicated through the hotshoe. See Chapter 10 : Specialty Flash Modes .
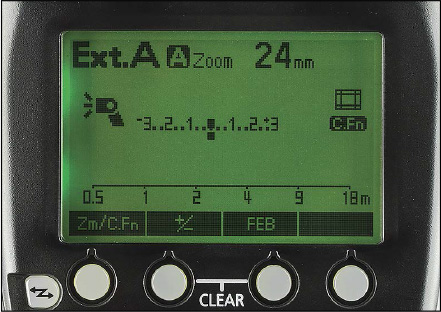
1. Zm/C.Fn —Zoom/Custom Functions
2. +/- —Flash Exposure Compensation
3. FEB —Flash Exposure Bracketing
4. —
In External Manual mode, the Speedlite turns itself off after the External Sensor (#12) receives enough light—based on ISO and aperture settings that you dial into the Speedlite. See Chapter 10 : Specialty Flash Modes .

1. Zm/C.Fn —Zoom/Custom Functions
2. —
3. ISO —ISO Setting
4. A —Aperture Setting
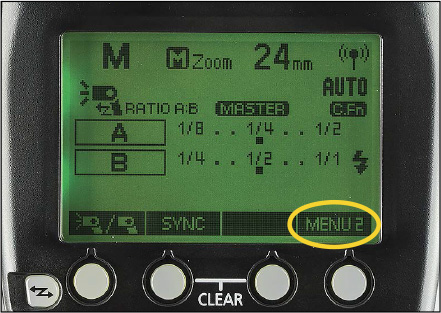
Speedliter’s Tip: —Additional Menus In Wireless Modes—
A quick look: Although replaced in 2012 by the radio-enabled 600EX-RT, the 580EX II is a Speedlite loaded with useful features. In addition to working as a powerful flash on its own, the 580EX II can be used with other Speedlites as an optical master or optical slave—including the 600EX-RT when it is set to optical wireless. At maximum power, the 580EX II essentially has the same flash power as the 600EX-RT.
1. Flashhead —Contains the flashtube and the zoom mechanism that pushes it forward and backward. The 580EX II automatically senses the focal length of compatible EOS lenses and adjusts the position of the flashtube to match—from 24mm to 105mm.
2. Optical transmitter —When set as an optical master, the flashtube sends the instructions to the slaves through a coded series of pulsed flashes.
3. Catchlight panel —A plastic card that pulls out with the wide-angle panel. When bouncing flash off a ceiling, the catchlight panel will throw a tiny amount of light forward, theoretically into the subject’s eyes.
4. Wide-angle panel —A plastic diffuser that pulls out. Spreads the flash to about the field of a 14mm lens.
5. External power socket —A valuable tool for power Speedliters. External battery packs plug in here.
6. Bracket fitting —A threaded socket that, unfortunately, is not sized for the industry-standard ¼″-20 thread.
7. Screwlock PC terminal —The connection point for triggering cables, such as those used by third-party radio triggers.
8. Contacts —These five pins connect to the terminals on an EOS camera’s hotshoe.
9. Locking pin —The pin drops down into a receiver when the locking lever is moved. It is spring-loaded so that it will also work with generic hotshoes.
10. Mounting foot —Upgraded from plastic to metal with the EX II design. A much-welcomed change from the original 580EX.
11. External metering sensor —A feature that was added to the EX II that enables it to meter flash externally (meaning the light bouncing off the subject) rather than metering through-the-lens (TTL). This is a thyristor eye, similar to that found on the venerable Vivitar 283. Activate through Custom Function 5-03.
12. AF-Assist beam emitter —In low-light or low-contrast situations, the 580EX II can emit a red pattern on which the camera will try to focus. The approximate range is 2′ to 33′ at the center and 2′ to 16′ along the edges of the Speedlite’s illumination area.
13. Optical wireless sensor —When the Speedlite is working as an optical slave, this sensor must be aimed at the master to receive instructions.

14. Bounce angle —The flashhead can be tilted upward to 90°. There are detents (notches) at 45°, 60°, 75°, and 90°. Between 0° and 45° the head can be positioned by hand, but not locked.
15. Flashhead release button —Pressing this button enables the flashhead to tilt –7° to 90° and to pan 180° right and left.
16. Battery compartment —The 580EX II holds four AA batteries.
17. Zoom/wireless button —Press this button quickly and the Zoom control menu is activated. Press and hold for 3 seconds to activate the optical wireless control menu.
18. High-speed sync/second-curtain sync button —Press this button to activate the high-speed sync. Press it again to activate second-curtain sync. Press it once more to return to first-curtain sync.
19. Power switch —Simply On and Off.
20. Locking lever —Slide this lever to the right to lock the Speedlite into the hotshoe. Press the button and slide to the left to release. Much improved over the original 580EX.
21. Weather sealing —This was added to the EX II. When mounted onto cameras with compatible hotshoes (1D X, 5D Mark III, 7D, etc.), it creates a seal that is resistant to rain and dust.
22. Select dial —Turn this dial to rotate through various menu options.
23. Select/Set button —Press this button to select a menu option.
24. Flash exposure confirmation lamp —When shooting in E-TTL mode, this lamp glows green for 3 seconds if a good exposure has been obtained. If it does not glow after the flash fires, either the shot was underexposed or the batteries are too low for reliable E-TTL control. The lamp is inactive when shooting in Manual or Multi mode.
25. Pilot lamp/button —This button has four functions. It glows red when the flash is fully charged and ready to fire. It glows green when the flash is partially charged and capable of a Quick Flash. Press it to fire a test flash. If the Speedlite is working as a Wireless Master, pressing it will also test-fire Slaves by Group.
26. LCD panel light/custom function button —A quick press turns on the LCD backlight. Press and hold for 3 seconds to activate the Custom Function menu (see Appendix 4 for complete details).
27. Mode button —Press the button to cycle through the three Speedlite shooting modes: E-TTL, Manual, and Multi. Note: External Auto mode is activated via Custom Function 5-03 and not through the Mode button.
28. LCD panel —This will seem a bit cluttered and confusing when you start out. Once you know how to read it, the LCD panel tells you everything you need to know about the current settings.
Custom Functions
—See Appendix 4
for a listing of Custom Functions available on the 580EX II.
A quick look:
The 430EX II is a great Speedlite to use if you are just starting out. It is simple to operate but includes features that you’ll appreciate as your skills grow. Although it cannot command other Speedlites as an optical master, it can be configured as an optical slave. The 430EX II is not radio-enabled, but it can be controlled by a 600EX-RT working as an optical master. At maximum power, it is about
-stop dimmer than a 580EX II or 600EX-RT.

1. Flashhead —Contains the flashtube and zoom mechanism that pushes it forward and backward. The 430EX II automatically senses the focal length of compatible EOS lenses and adjusts the position of the flashtube to match—from 24mm to 105mm.
2. Wide-angle panel —A plastic diffuser that pulls out. Spreads the flash to about the field of a 14mm lens.
3. Bracket fitting —A threaded socket that, unfortunately, is not sized for the industry-standard ¼″-20 thread.
4. Contacts —These five pins connect to the terminals of an EOS camera’s hotshoe.
5. Locking pin —The pin drops down into a receiver when the locking lever is moved. It is spring-loaded so that it will also work with generic hotshoes.
6. Mounting foot —Upgraded from plastic to metal with the EX II design. A much-welcomed change from the original 430EX.
7. AF-Assist beam emitter —In low light, the 430EX II can emit a red pattern to create contrast that enables the camera to focus.
8. Optical wireless sensor —When the Speedlite is working as an optical slave, this sensor receives signals from the master.
9. Bounce angle —The flashhead can be tilted upward to 90°. There are detents (notches) at 45°, 60°, 75°, and 90°. Between 0° and 45° the head can be positioned by hand but not locked.
10. Flashhead release button —Pressing this button enables the flashhead to tilt upward to 90° and to pan 90° right and 180° left.
11. Battery compartment —The 430EX II holds four AA batteries.
12. Zoom/wireless button —Press it quickly and the Zoom control menu is activated. Press and hold for 3 seconds to activate the optical wireless control menu.
13. High-speed sync/second-curtain sync button —Press this button to activate the high-speed sync. Press it again to activate second-curtain sync. Press it once more to return to first-curtain sync.
14. Power switch —Simply Off and On.
15. Select/Set button —Press this button to select a menu option.
16. Minus / Plus buttons —Use these to rotate through various menu options.
17. Locking lever —Slide this lever to the right to lock the Speedlite into the hotshoe. Press the button and slide to the left to release. Much improved over the original 430EX.
18. Flash exposure confirmation lamp —When shooting in E-TTL mode, this lamp glows green for 3 seconds if a good exposure has been obtained. If it does not glow after the flash fires, either the shot was underexposed (to correct, turn the ISO up or move closer) or the batteries are too low for reliable E-TTL control. The lamp is inactive when shooting in Manual mode.
19. Pilot lamp/button —This feature has three functions. The lamp glows red when the flash is fully charged and ready to fire. It glows green when the flash is partially charged and capable of a Quick Flash. Press the button to fire a test flash.
20. LCD panel light/custom function button —A quick press turns on the LCD backlight. Press and hold for 3 seconds to activate the Custom Function menu (see Appendix 4 for complete details).
21. Mode button —Press the button to cycle through the two Speedlite shooting modes: E-TTL and Manual. Note: The 430EX II will fire in Multi mode, but only as a slave and not on its own.
22. LCD panel —This screen will seem a bit cluttered and confusing when you start out. Once you know how to read it, the LCD panel tells you everything you need to know about the current settings.
Custom Functions
—See Appendix 4
for a listing of Custom Functions available on the 430EX II.
A quick look: The 320EX provides many features that will enable a novice Speedliter to learn on- and off-camera flash photography. It can be used as an optical slave and even features an articulating flash head to allow the slave sensor on the front of the Speedlite to be aimed at the master while the flash is aimed at the subject. Additional features, such as Manual power control and high-speed sync are available when the 320EX is attached to the hotshoe of a camera that enables External Speedlite Control via its LCD.
1. Flashhead —The position of the flashtube in the 320EX is fixed. The lens can be zoomed manually—see 3.
2. Auto-Focus Assist light —When the camera cannot autofocus in dim light, the 320EX pulses the flashtube repeatedly as an AF-Assist light. The LED Light (10) can also be turned on to assist with auto-focus.
3. Manual zoom —In the normal position, the flash covers the view of a 24mm lens on a full-sensor camera (15mm on an APS-C sensor). When pulled out to the Tele position, the coverage narrows to 50mm/32mm.
4. Bounce flash —The head of the 320EX rotates 90° to the right, 180° to the left, and 90° up.
5. Wireless sensor —When the 320EX is used as an optical slave, the wireless sensor must be turned to face the signal coming from the master Speedlite.
6. Remote control transmitter —When using the 320EX as a remote trigger for compatible cameras, this sensor must be aimed to face the from of the camera.
7. Contacts —These five pins connect to the terminals of an EOS camera’s hotshoe.
8. Locking pin —The pin drops down into a receiver when the locking lever is moved. It is spring-loaded so that it will also work with generic hotshoes.
9. Mounting foot —Slides into the camera hotshoe. Made of metal for extra strength.
10. LED lamp —A feature that is unique to the 320EX. This light can be used as a continuous light for videos (subject to the visual limitations that all on-camera lights are). The effective range is about 13′/4m. The LED light can also be turned on manually to help the camera focus in dim light.
11. Bounce angle —The flashhead can be tilted upward by hand from 0° to 90°. It has detents at 60°, 75°, and 90°. Unlike the 580- and 430-series Speedlites.
12. Remote Release button —Press this button to remotely fire a compatible camera. See the adjacent Speedliter’s Tip for details.
13. Wireless Channel switch —When operating as an optical slave, this switch must be set to the same channel (1-2-3-4) that the master Speedlite is using.
14. Manual LED Light button —When the LED Light Switch (16) is set to M, use this button to turn the LED light (10) on/off manually.
15. Battery compartment —The 320EX holds four AA batteries.
16. LED Light switch —When set to M, you can use the LED Light button (14) to turn the LED light (10) on/off manually. When set to Auto, the LED light will turn on automatically when Live View is activated on the camera.
17. Locking lever —Slide this lever to the right to lock the Speedlite into the hotshoe.
18. Power / Slave Function switch —A simple slider switch. To activate the 320EX as an optical slave, slide the switch to Slave. Otherwise, slide it all the way over to On.
19. Ready light —Glows red when the flash is recharged and ready to fire. Unlike the 580- and 430-series, it does not double as a test-fire button.
Speedliter’s Tip: —Using The 320EX and 270EX II As A Remote Camera Trigger—
5D Mark III, 5D Mark II
6D
7D / 7D Mark II
70D, 60D
M, M2
Rebel SL1, T5i, T4i, T3i, T2i, T1i, XSi, XTi
20. Tele/Flash Head Extended lamp —When on, this light indicates that the flash head has been manually extended—see 2.
21. Firing Group Selection switch —When operating as an optical slave, use this switch to assign the 320EX to one of three wireless groups A-B-C.
Custom Functions
—See Appendix 4
for a listing of Custom Functions available on the 320EX.
There is no LCD —The 320EX does not have an LCD. To access the additional features listed below, you must have it connected to a camera that offers access to the External Flash Function Settings menu via the camera’s LCD. See the list of compatible cameras in Chapter 0 : Quick Start Guide To Speedliting .
Flash Exposure Compensation
Manual flash from full to  (7 stops)
High-Speed Sync
Second-Curtain Sync
Custom Functions
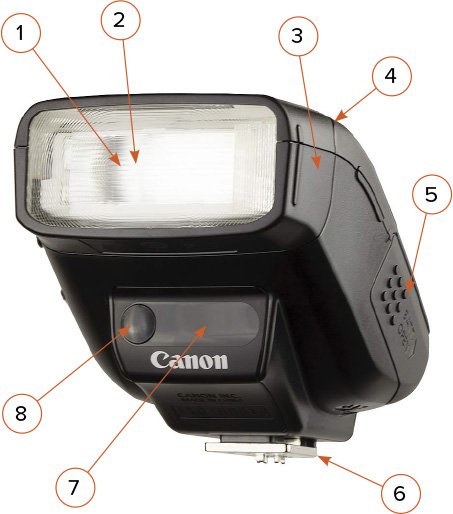
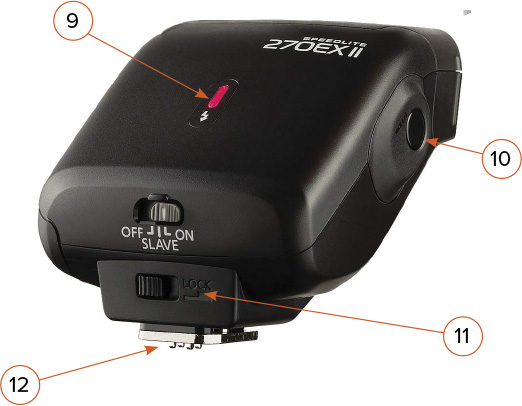
A quick look: The 270EX II is a compact flash that pairs well with the Canon pocket cameras, like the EOS M and PowerShot G-series. Its compact size makes it a good choice for lightweight travel kits, especially when used with a coiled E-TTL cord to move the flash away from the lens. When set as an optical slave, the 270EX II is always a member of Group A.
1. Flashhead —The position of the flashtube in the 270EX II is fixed. In the normal mode, the front diffuser spreads the light to about the coverage of a 28mm lens. The head can be pulled out to concentrate the flash to about that of a 50mm lens.
2. Auto-Focus Assist light —When the camera cannot autofocus in dim light, the 270EX II pulses the flashtube repeatedly as an AF-Assist light.
3. Manual zoom —The flashhead can be pulled out to zoom from 28mm to 50mm.
4. Bounce angle —The flashhead can be tilted upward by hand from 0° to 90°. It has detents at 60°, 75°, and 90°. The 270EX II does not pan to the right or left.
5. Battery compartment —The 270EXII requires two AA batteries.
6. Mounting foot —The 270EX II features a durable metal mounting foot.
7. Remote Control Transmitter —When using the 270EX II as a remote trigger for compatible cameras, this sensor must be aimed to face the front of the camera.
8. Wireless sensor —When the 270EX II is used as an optical slave, the wireless sensor must be able to see the signal coming from the master Speedlite.
9.
Ready light
—Glows red when the flash is recharged and ready to fire. When blinking, the 270EX II will fire in Quick Flash mode at  to
to  normal power.
10. Remote Release button —Press this button to remotely fire a compatible camera. See the preceding Speedliter’s Tip for details.
11. Power / Slave Function switch —A simple slider switch. To activate the 270EX II as an optical slave, slide the switch to Slave. Otherwise, slide it all the way over to On.
12. Locking lever —Slide this lever to the right to lock the Speedlite into the hotshoe.
Custom Functions
—See Appendix 4
for Custom Functions available on the 270EX II.
Features controlled via the camera’s LCD
—See the notes at the end of the discussion of the 320EX for additional features that are available via a camera’s LCD.
A quick look: Introduced with the EOS M mirrorless camera, the diminutive 90EX has about the same power and performs the same functions as a pop-up flash—including the control of off-camera Speedlites as slaves. If your camera does not have transmitter functions on its pop-up (as is the case with the 40D and 50D), then the 90EX can be used as an economical master. Like a pop-up, there is no way to zoom or bounce the flashhead. Further, the 90EX will not fire in high-speed sync and cannot be used as a slave.
To create a bit of off-camera light, the 90EX can be used at the end of an E-TTL cord and held a arm’s length—either alone or as an enabled master (one that sends the instructions to the slaves and then fires when the shutter opens).
1. Flashhead —The position of the flashtube is fixed. The coverage is about that of a 24mm lens (15mm on APS-C sensors).
2. Optical transmitter —When set as an optical master, the flashtube sends the instructions to the slaves through a coded series of pulsed flashes.
3. Auto-Focus Assist light —When the camera cannot autofocus in dim light, the 90EX pulses the flashtube repeatedly as an AF-Assist light. The AF Assist does not work when the Speedlite is activated as a wireless master.
4. Mounting foot —The 90EX features a plastic mounting foot.
5. Battery compartment —The 90EX requires two AAA (not AA) batteries.
6.
Ready light
—Glows red when the flash is recharged and ready to fire. When blinking, the 90EX will fire in Quick Flash mode at
to
normal power.
7. Power switch —Press and hold the power button for at least 1 second to turn on the flash.
8. Locking lever —Slide this lever to the right to lock the Speedlite into the hotshoe.
Features controlled via the camera’s LCD
—The 90EX can be switched from E-TTL to Manual mode via a camera LCD. It also can be switched to fire in second-curtain sync.
Speedliter’s Tip: —The 90EX Is Tiny—
As I said at the beginning of the chapter, the ability to access the entire menu of my Speedlite on the LCD of my camera is an essential part of my workflow. Among the following, only the 270EX can be accessed via the External Speedlite Control menu on a camera LCD. All the others must be controlled on the Speedlite.
The original 580EX has a plastic foot—which has a history of snapping under strain. It also has a plastic disk that must be spun to secure the foot into the hotshoe—a disk that sometimes locked too tightly to unlock without a knife or screwdriver. One beloved feature on the 580EX that was removed to make way for 580EX II’s weather-sealing was the external Off-Master-Slave lever—which enabled quick access to the optical wireless system. The 580EX II requires that the Zoom button be pressed for several seconds to activate the wireless system—a bit slower and not as obvious. Modes: E-TTL, Manual  to
to  , and Multi. Marketed: 2004–2007.
550EX
In many ways, the 550EX is a less-streamlined version of the 580EX. Like the 580EX, all of the controls on the 550EX are external—quick to use, but not weather-resistant. Also like the 580EX, the 550EX can be used as an optical master to control off-camera slaves or as an optical slave. Modes: E-TTL, Manual
to
, and Multi. Marketed 1998–2004.
550EX
The relationship between the original 430EX and the 430EX II is similar to that between the 580EX and 580EX II. The original version is a good worker and the successor is more robust. The 430EX can be used as an optical slave. Modes: E-TTL and Manual
to
. Marketed 2005–2008.
The 420EX, as the original 400-series EX Speedlite, lacks an LCD. Instead, it uses a simple layout of buttons and switches on the back to control the settings. Can be used as an optical slave. E-TTL only. Marketed 2000–2005.
A moderately-powered Speedlite with limited use today. The flashtube will zoom automatically with an EF lens, but cannot be zoomed manually. Also, the 380EX cannot be used as an optical slave. E-TTL only. Marketed 1995–2001.
Similar to the current 270EX II, but cannot be used as an optical slave or as a remote camera trigger. Modes: E-TTL and Manual
to
(via camera LCD). Marketed 2009–2012.
Although not as streamlined as the 270EX, the 220EX remains an old favorite among photographers who are looking for a compact, travel Speedlite. The 220EX has a “real” AF-Assist lamp that casts a red grid—which does not startle subjects the same way that the AF pulse of the flashtube on the 270EX II does. Since the 220EX is powered by four AA batteries, it recycles faster than the 270EX. E-TTL only. Marketed 1996–2009.
Speedliter’s Tip: —Avoid EZ And Other Non-EX Canon Speedlites—
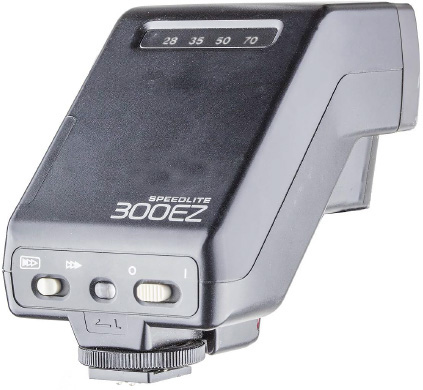
300EZ
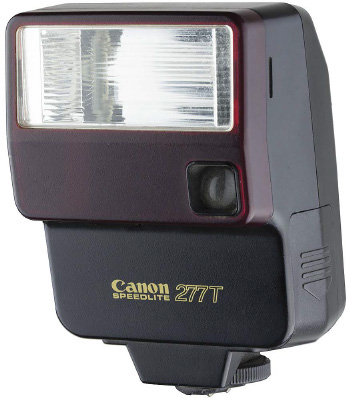
277T
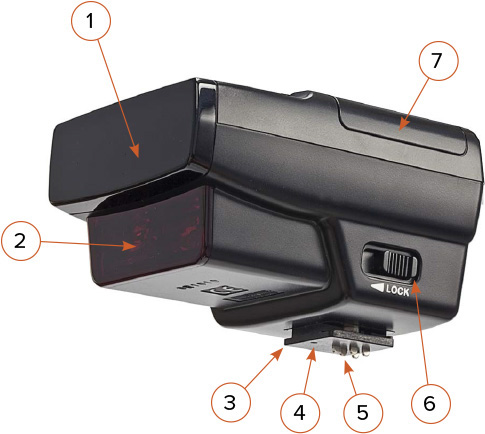
A quick look: The ST-E3-RT is a radio-only transmitter designed to work with the 600EX-RT. It cannot control optical slaves. The design of the user interface is identical between the transmitter and Speedlite—so once you know how to work the 600EX-RT, you also know how to work the ST-E3-RT. The advantage of the transmitter over having a Speedlite in the hotshoe is the lower profile and lighter weight. The transmitter costs about half the price of the Speedlite, so buying an ST-E3-RT is a more affordable way to move your 600EX-RT off-camera as a radio slave.
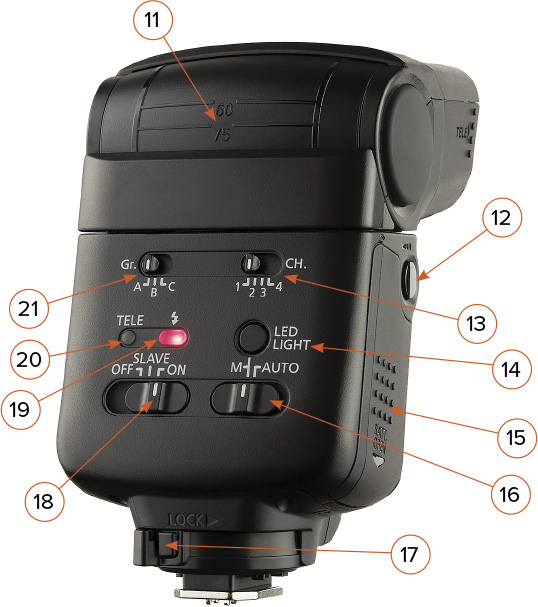
1. Interactive LCD panel —The ST-E3-RT uses the same interactive LCD used on the 600EX-RT. Menu options change in response to Mode and Wireless settings.
2. Link indicator —When operating in Radio Wireless, the color of this light indicates whether the Speedlite is communicating with other units—either as a master or slave.
3. Battery compartment —The ST-E3-RT holds two AA batteries.
4. Power switch —Off, Lock, and On. Lock deactivates the buttons and dials.
5. Flash exposure confirmation lamp —When shooting in E-TTL mode, this lamp glows green for 3 seconds if a good exposure has been obtained. The lamp is inactive when shooting in other modes.
6. Locking lever —Slide this lever to the right to lock the transmitter into the hotshoe. Press the button and slide to the left to release.
7. Select dial —Turn this dial to rotate through various menu options.
8. Select/Set button —Press this button to select a menu option.

9. Flash Ready lamp / Test button —This button has three functions. It glows red when the slave(s) are fully charged and ready to fire. Pressing it test-fires the slave by firing group. This button can also be configured to activate the Modeling Light via Custom Function-02.
10. Mode button —Press the button to cycle through the four shooting modes: E-TTL, Manual, Multi, and Group.
11. Linked Shooting button —When this button is held down for several seconds, it activates/deactivates Linked Shooting.
12. Function buttons —The purpose of each of these four buttons changes as the mode and wireless settings change. Their labels appear along the bottom edge of the LCD screen
13. Remote release terminal —The ST-E3-RT can be used as a remote release to fire cameras by radio. For 2012 and newer camera models, the release operates through the hotshoe. For pre-2012 cameras, the SR-N3 Release Cable is connected to the transmitter and the camera.
14. Weather-sealed mounting foot —The rubber gasket around the metal foot provides a water- and dust-resistant connection between Speedlite and camera.
15. Contacts —These five pins connect to the terminals on an EOS camera’s hotshoe.
16. Locking pin —The pin drops down into a receiver when the locking lever is moved. It is spring-loaded so that it will also work with generic hotshoes.
Custom / Personal Functions
—See Appendix 4
for a listing of Custom and Personal Functions available on the ST-E3-RT.
LCD backlight
—Push any button to illuminate the LCD backlight.
AF-Assist light
—The ST-E3-RT does not have an AF-Assist light—perhaps to allow for the use of two AA batteries rather than the four batteries used in the 600EX-RT. When I am shooting in low-light situations where I need an AF-Assist, I use a 600EX-RT in the hotshoe rather than the ST-E3-RT.
A quick look: Introduced in 1998, the Canon ST-E2 Speedlite Transmitter can be used instead of a 500-series Speedlite to control optical slaves. The advantages are: (1) price, (2) lower profile, and (3) easy ratio control for A/B groups. That said, the age of the ST-E2’s design and circuitry imposes many limitations on the modern Speedliter.
1. Transmitter —The flashtube in the ST-E2 emits an infrared pulse that is invisible to the human eye. The range is about 26′ outdoors and 39′ indoors. The spread of the beam is approximately 80° horizontally (40° from center) and 60° vertically (30° from center). So, unless there are light colored walls nearby, your optical slaves must be in front of the transmitter to see the instructions.
2. AF-Assist beam emitter —In low light, the ST-E2 emits a red pattern to create contrast that enables the camera to focus.
3. Mounting foot —This is a plastic fitting, so use extra care when attaching the ST-E2 to your camera.
4. Locking pin —The pin drops down into a receiver when the locking lever is moved.
5. Contacts —These five pins connect to the terminals of an EOS camera’s hotshoe.
6. Shoe lock slider —Slide this forward to drop the locking pin down into the hotshoe receiver.
7. Battery compartment —The ST-E2 uses one lithium 2CR5 (6 volt) battery. It’s best to keep an extra in your bag. You can find them when you don’t need them, but when you do need them, it may be a different story.
8. Ratio button —If ratio is Off, all slaves will fire at the same flash power lever. If ratio if On, all slaves will be fired according to the ratio setting.
9. Ratio indicator —An LED indicates the ratio setting from 8:1 to 1:8, in half-stops.
10. Ratio adjustment buttons —Push these buttons to move the ratio in one direction or the other.
11. E-TTL indicator —This light glows when the ST-E2 is attached to an E-TTL-compatible camera, which includes all Canon DSLRs.
12. High-speed sync button —Push this button to activate or deactivate high-speed sync. The ST-E2 will control the slaves accordingly.
13. High-speed sync indicator —Glows when high-speed sync (HSS) is activated.
14. Power switch —O turns the power off; I turns the power on. The Hold button locks the settings so that you cannot change them accidentally while shooting.
15. Flash exposure confirmation lamp —When you are shooting in E-TTL mode, this lamp glows green for 3 seconds if a good exposure has been obtained.
16. Pilot lamp/button —The lamp glows red when the ST-E2 is fully charged and ready to fire. Press the button to fire a test flash, which will fire slaves by group (A then B). This lamp does not indicate that the slaves are ready to fire.
17. Channel select button —Push this button to choose the operating channel: 1, 2, 3, or 4. All slaved Speedlites must be on the same channel. If a nearby photographer is shooting Canon Speedlites via optical wireless, you must be on different channels.
Many Speedliters are fond of using the ST-E2 Speedlite Transmitter instead of a master Speedlite. I have never been among them.
The thinking in favor of the ST-E2 is that it is about half the price of a 580-series Speedlite. I concur: about half the price and less than half the functionality.
Foremost among the limitations of the ST-E2 is that its menu cannot be displayed on the camera LCD. As a guy who has become addicted to the convenience of reading the Speedlite menu in large letters on my camera’s LCD, this alone is a deal-killer for me.
Another limitation is that the ST-E2 operates in E-TTL only. So, if you want to adjust the power of your Speedlites manually (for consistency from shot to shot), the ST-E2 will not help you.
My experience has shown that the range of the ST-E2 is shorter than that of a mastered Speedlite, both indoors and out. This is due to the fact that the flashtube on a 500-series Speedlite is much stronger than the small tube inside the ST-E2. Further, the range of the ST-E2 flashtube is impeded by the thick red plastic panel that is there to block the visible portion of the flash. (If it was not blocked, it would add uncontrolled light to the exposure.)
In terms of flexibility, the ST-E2 literally has none. Unlike a 580EX II, which can rotate 360°, the ST-E2 will only control Speedlites that are within an 80° angle in front of the lens. In contrast, by panning the head on a 580EX II, I can hit a slave that is to the side or behind me. The flexibility of the 580EX II is a huge advantage when it comes to creative Speedliting.
A final limitation of the ST-E2 is that it can only control two groups of slaved Speedlites. So, if you want to do a traditional three-light portrait, the ST-E2 creates an additional challenge. On the positive side, the ST-E2 provides the A:B ratio control quite easily via a sliding lever. So, for novice Speedliters, this trade-off is fine.
Gear recommendation #1: If economy is a concern, start with a 430EX II or a 320EX and an extra-long E-TTL cord. Many people think that they need to spend $200 on an ST-E2 to get their one Speedlite off-camera. I say spend $65 on an E-TTL cord instead. Not only will you save a big chunk of dough, you’ll be able to control the Speedlite via the camera LCD.
Gear recommendation #2: While you are learning to master your first Speedlite, start saving for a 600EX-RT or a used 580EX II. Then, when you want to start shooting with multiple lights, you can buy a masterable Speedlite and use it as an off-camera master (thanks to the extra-long E-TTL cord you bought earlier). Now you have a master/slave combo for about the same price as two 430s and an ST-E2. I’ve no doubt that you’ll find the versatility and power of the off-camera master + slave to be far greater than a pair of off-camera Speedlites that have to remain in front of the ST-E2.
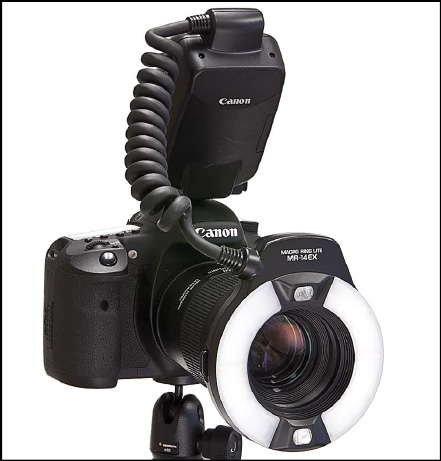
Updated in 2014*, Canon’s Macro Ring Lite MR-14EX II is a specialty flash that connects to the front of your macro lens with an appropriately sized adapter ring. The benefit of this position is that it throws nearly shadowless light onto macro subjects.
The MR-14EX II consists of two flashtubes behind translucent ring diffusers. The ring spins, so you can adjust the position of the lights. You also have the ability to control the ratio of light from each side.
The MR-14EX II is fully compatible with the Canon E-TTL II system. It can be used as a master but will not work as a slave.
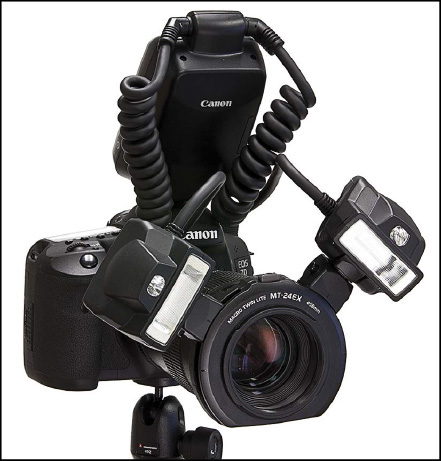
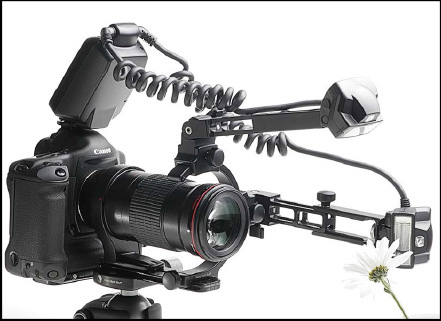
The Macro Twin Lite MT-24EX builds upon the front-of-lens concept behind the MR-14EX. The difference in design is that the MT-24EX has a pair of movable strobe heads rather than flashtubes contained in a ring diffuser.
The advantage is directionality. Each head can be rotated over an 80° range around the lens. The brackets enable the heads to be tilted in or out. Either or both can also be removed completely from the bracket and handheld or attached to special macro lighting brackets, such as the one shown below in Figure 6.2 .
Figure 6.2 The MT-24EX can be used on special macro lighting rails, such as the B-Series flash bracket from Really Right Stuff (photo courtesy of Really Right Stuff, reallyrightstuff.com ).
In terms of functionality, this unit has full ratio control and E-TTL II compatibility. It can be used as a master to wirelessly control 580- and 430-series Speedlites. This can be helpful if you are trying to avoid the overly dark backgrounds of many macro shots. The MT-24EX will not work as a slave.
* Note: The MR-14EX II can be controlled via the camera LCD. The original MR-14EX and the MT-24EX cannot.
The market is awash with non-Canon Speedlites designed to work with Canon cameras. Some are cloned so closely that, other than the label, they look like the Canon gear they copy.
The number one reason that Speedliters search for third-party gear is price. At the outset, the price of a genuine Canon Speedlite may seem high compared to the price of a third-party flash. However, Canon gear holds its value in the resale market. I have sold loads of used gear through the years and am always surprised at how much people will pay for Canon gear that is two or three generations old. So, the actual price of a new Canon Speedlite may be much less if you factor in the future resale value.
If price is a leading consideration and a new Canon Speedlite is not an option, here are the factors that I would consider when looking at non-Canon flashes.
Control via camera LCD
—“Canon compatible” does not guarantee that you will be able to control the flash via the LCD on your camera. Most economy-priced flashes cannot display their menu on the camera, but a few will. As I have said previously, this is a must-have part of my workflow.
Mode options
—The least expensive flashes offer only Manual mode. This is not necessarily a negative. For portraits, I shoot in Manual mode most of the time. If you want E-TTL, expect to pay more.
Sync options
—Confirm whether the unit offers high-speed sync and second-curtain sync. The cheapest units do not have HSS.
Flash power
—If the specifications say something like “GN58 @ ISO 100 105mm” they are claiming that the power is similar to that of a 500-series Canon Speedlite.
Power increments
—Avoid units that only offer power settings in whole-stop increments. You will want to fine-tune the power in
- or
-stop increments.
Optical slave
—If the flash features an “optical slave” confirm whether it is an optical slave eye that fires the flash when it sees a burst of bright light (like a studio strobe) or if it actually works as an optical slave in the Canon system—meaning that the power and mode settings can be changed remotely via a master Speedlite.
Optical master
—Not all third-party flashes that work as a master can control a Canon Speedlite as a slave. If this is important to you, research the details.
Radio wireless
—As of this edition, there are no third-party flashes on the market that are compatible with Canon’s 600EX-RT radio system. There are units that say they have “2.4 gHz radio built-in”—the frequency range used by the 600EX-RT. This is also the frequency range used by computer routers and many other wireless devices. So 2.4 gHz does not guarantee compatibility with Canon’s radio system.
User interface
—Look at the photos and read the reviews online closely before you buy. If the buttons and menus are hard to navigate, you may not think of your purchase as a value in the long run.
Warranty/repairs
—Find out where you will have to send your flash if it fails or breaks.
Speedliter’s Tip: —A Starter Flash Under $80—
The YN 560EX IV is a basic, manual-only flash. The power range runs from
to
in
-stop increments. The head zooms from 24mm to 105mm. Other features include a PC-sync port, a beep when recycled, and an optical slave eye that fires when it sees the flash of another strobe.