Excavations for basements may be roughly classified as the dig-and-pile and the dig-and-haulaway types, which will be referred to in this discussion as residential and commercial, respectively, as the larger part of them fall into these categories.
Backfilling around the foundation may be a problem. It must be emphasized here that a wet fill can crumple in a foundation and even move footings, and that this danger is especially severe if the masonry has not had time to cure.
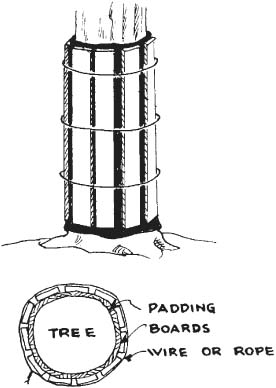
Tree Protection. In residential excavation, any clearing that may be required is likely to be of the selective type. Large trees, or trees of desirable species, may determine the location of the house, and they must be guarded against damage and burial. It may be advisable to wrap the trunks of such trees in cloth, and protect them by a collar of vertical boards, as in Fig. 4.1. If their bases may be temporarily buried, the original ground line should be marked on the bark with paint, so that the fill may be removed accurately, and burial or overcutting avoided.
Topsoil. Topsoil is usually present, and if it will be needed for landscaping, it should be saved. This involves taking it off the area to be excavated, and preferably from the areas where spoil is to be piled. This stripping may be a substantial part of the cost of the excavation but is required in most localities.
In places where there is no well-defined topsoil, or the topsoil makes up one-third or more of the spoil and the subsoil will mix well with it, stripping may not be needed.
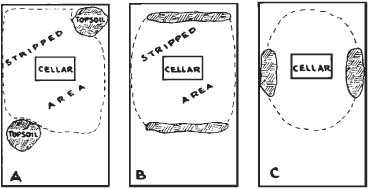
A method of stripping topsoil which is often most economical in the long run is to remove it completely from all areas to be involved in the digging. Figure 4.2(A) shows one method of doing this by placing it in compact piles well away from the two corners of the proposed house. This will usually keep it out of the way of digging, piling, and ditching, and will leave it in a position for straight-line spreading. But it should not be put in corners where a dozer will be unable to get behind it.
Figure 4.2(B) shows a more usual method. The digging and piling area is stripped, the topsoil being pushed into two piles, so placed as to be just beyond the spaces for the piles of spoil. If too small an allowance is made for the spoil, the topsoil may have to be moved back farther, or may get buried by the fill and partly lost. In any case it will probably interfere with backfilling.
In (C) the topsoil is pushed to the sides and fill piled to the front and rear.
Topsoil stripping is discussed in Chap. 10. It is customarily done by a dozer, which does the cleanest work. Backhoe excavators, and to a lesser extent other shovel rigs, will remove topsoil rapidly, and if the soil is heavy and wet, may be preferred because they do not compact it and cause it to cake. If large areas are involved, scrapers may be used.
If the topsoil is thin and will be required for finishing off, it may be deliberately mixed with some fill while stripping to increase its bulk. If the subsoil has a loose texture, little or no harm will be done to fertility, and regrading will be simplified.
FIGURE 4.1 Protection for tree trunk.
Artificial Obstacles. Serious digging difficulties may be caused by obstructions placed by the builder. Batter boards are used for reference in exact placement of foundation walls. They will increase the excavation cost by restricting the movement of machinery, particularly if the house is to be irregular in shape. Piles of building material may also be much in the way.
Corner stakes, with back reference points such as are described in Chap. 2, are adequate location marks for the excavator, and other preparations for building should be postponed until digging is complete.
Depth. The depth of the excavation depends on the first-floor height relative to original grade, and the depth of substructure below it. Substructure might include floor thickness, rafters, sills, cellar headroom, and thickness of the basement floor and gravel or crusted rock under it. If the full area is to be dug to the bottom of the footings, their depth must be considered also.
On sloping ground, excavation depth will vary at different points.
Factors in determining first-floor level, including a way to probe for rock, are discussed in Chap. 7.
Rock. Digging in ledge rock or large boulders may increase excavation cost three to five times, or more. Its presence may result in raising the house, or substituting a slab or crawlway for a basement.
If it is to be removed, dirt removal should be completed and the rock surface cleaned before drilling.
Most basement jobs are so located that mats must be used to cover blasts, and particular care taken to safeguard passersby and traffic, and to avoid damage to property.
The three standard machines for digging small basements are the front-end loader, the bulldozer, and the backhoe excavator.
Bulldozer. A bulldozer can dig a basement very deeply if there is no heavy rock or mud, but it is at its best if the excavation is shallow. This is because it must dig away a considerable amount of the bank to ramp itself in and out, and the whole weight of the machine must come up out of the hole with every pass. It can push much larger 1oads on a level or a moderate upgrade than on the steep rises from a deep basement.
Digging techniques vary with the operator and the locality. Several methods will be described, but they are presented only as samples and should be followed only where they give satisfactory results.
It is good practice to leave a ramp that will allow trucks to back into the floor of the excavation, for convenience in delivering foundation materials to the point of use.
Example. The first case to be considered is that of a basement 30 × 40 feet (9.1 × 12.2 m), 4 feet (1.2 m) deep, dug in a large, level, treeless lot, from which topsoil has been stripped. The dimensions given are of the outside of the foundation walls, and an additional 18 inches (46 cm) on each side should be allowed for wide footings and working space for the masons, so that the dimensions of the hole should be 33 × 43 feet (10 × 13 m). Stakes are set 6 inches (15.2 cm) outside the digging line, as in Fig. 4.3(A) to avoid accidents to them. Any temporary guide pegs the operator needs are set along the edge, or just outside it.
Top Layers. The bulldozer is first worked along the short dimension, inside the stake lines. The blade may be dropped at the front or south line for a fairly deep bite, and when filled, it is lifted to ride the load over the undug ground until the north line is crossed. The dirt may be dropped at the line or pushed a few feet back. The dozer then backs to the south line and takes another bite in a strip adjoining or overlapping the first. It may work the whole width of the front line, as in (A), or only a section of it, before digging the area over which the soil has been pushed. The back edge of the cut is worked north by successive bites until the rear line of the excavation is reached, approximately as shown in the cross section (B).
FIGURE 4.3 Basement digging sequence.
After completing the removal of the top layer, the dozer may cut out and pile a second layer in the same manner, as in (C). This deeper cut will not extend to either digging line, as the slope down and the slope up are kept inside these lines.
If the soil is so hard that the blade cannot be filled in a short distance, the dozer may be worked over a short digging area only, for several passes, after which the pile of loosened dirt may be pushed to the spoil pile. If a ripper or subsoil plow is available, it might be profitably used to break up layers of dirt in advance of digging.
Ramping Down. A hydraulic dozer can cut hard soils, but will usually not cut a steep ramp down without special handling. Figure 4.4(A) shows a dozer cutting down from a line in soft soil. If digging is good, the blade will penetrate rapidly until maximum depth is reached. It will make a level cut until the machine’s center of gravity moves over the cut. It will then fall forward, and the blade will resume cutting until full penetration is reached, when it will level off again. Such a series of steps makes an unsatisfactory ramp.
One way to make a smooth ramp, shown in (B), is to start it well back from the edge with a gradual curve that is made steeper at the digging line. Cutting is then regulated so that the full depth of penetration will be reached as the center of gravity crosses the steepened part of the curve. Several passes are made in digging this ramp as indicated. This curve may be made steadily steeper as depth increases, because the tractor itself is at a downward slope.
If the cut cannot be made far enough back into the bank for ramping in, the procedure shown in (C) may be followed. Dirt is pushed out of the excavation into a steep pile, the dozer is backed up on this, and is thus pitched down a steep enough angle to cut down sharply.
Piling. The area to be occupied by the pile should be calculated or guessed at, and the first piles placed at its far side. Successive loads may be dropped toward the excavation, then a load carried over these, pushing the tops off some of the heaps, and dropped at the back. The pile is thus built up in a series of wedges, with their thin ends toward the excavation.
FIGURE 4.4 Cutting down from edge.
Lower Layers. After the digging has reached the half depth, the dozer should be moved out onto the west bank and headed east along the south line of the excavation. An entrance ramp should be started several feet (meters) back of the west line, as in Fig. 4.5(A), and a steep ramp cut down toward the 2-foot (0.6 m) level. As the blade fills, the machine is swung toward the center of the hole, and the dirt is left on its floor. The dozer returns to the south line, makes another cut, again swinging the spoil out into the center, pushing it somewhat farther. It thus cuts out the full-width ramp by which the dozer entered the pit from the south, and occasionally shifts to pushing the dirt obtained from the ramp up on the north pile. As the east edge is approached, dirt may be pushed up on its bank, cutting a ramp, instead of to the north.
The north slope may then be cut away in the same manner, the spoil first being pushed up the undestroyed section of the ramp, as in (B), and finally onto the west bank. These cuts result in vertical walls along the two long sides of the hole.
The inside ramps may also be removed by oblique passes from near the center (C), steering the dozer so that the blade is parallel with the bank by the time it reaches it. The slope ahead of the dozer can be gouged away in this manner, with the spoil being edged out into the open and pushed up the west bank. With the west section of ramp removed, the dozer can be turned to cut away the east part as in (D).
Finishing. After removal of the north and south slopes, the floor of the cut may be deepened by pushing to east and west. These ramps up to original grade should have their lower ends at the excavation line, and will therefore be cut back deeply into the bank, as in Fig. 4.6(A). Since a steep ramp means less extra excavation, the slopes should be made as steep as practical. They may be cut all the way through to begin with, for an easy gradient, and steepened as the hole deepens. The amount of dirt removed for ramps can be slightly reduced by narrowing them as they go up, as in (B). The ramps can be partly filled by the last loads pushed, as in (C), except where space is left for supply trucks.
FIGURE 4.5 Cutting lower layers.
As the bottom of the hole approaches final grade, it should be checked. A 4-foot (1.2-m) stick, or a rule, may be used to measure down from the edges, if they are well enough preserved, or from a string stretched diagonally between two corner stakes. The mason contractor generally expects to do some hand leveling and trimming, but will be pleased to find it unnecessary.
It is not practical to dig narrow footwall trenches below the pit level with a dozer.
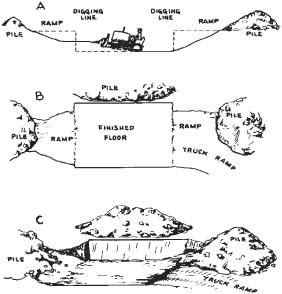
FIGURE 4.6 Finishing excavation.
Results. The procedure outlined above should produce an excavation such as shown in Fig. 4.6(C) with two straight walls correctly spaced. Ramping out of the short sides reduces the amount of extra digging that is one of the drawbacks of dozer work. The whole front is left free for access and for piling building material.
However, the spoil may not be properly placed for backfill and grading. In such a location, a house would usually have the fill spread all around it, with particular attention to building up the front. Here, fill for the front yard would have to be obtained from the sides, which, in turn, might need to be partly replenished from the back. This involves extra pushing, and the presence of a few trees might make distributing it a major problem.
Time. This basement involves about 220 yards (168 cu.m) of excavation. It might take an 80-horsepower (60-kw) bulldozer (a good size for the job) from 1 to 3 hours to strip the topsoil, and 2 to 6 hours to do the digging.
Rock (even if not removed), water, irregularities, or obstacles will increase the cost of the work.
Irregular Basement. Figure 4.7 shows a basement of irregular shape. This may be dug by the open-front method by cutting back the jog as indicated in (A), and by pushing dirt for the small south room into the main basement, to be piled on the east side.
Figure 4.7(B) shows the same basement pushed up into four piles. The jogs are handled by simply moving the ramps and piles outward the extra distance.
Limited Access. Figure 4.8 shows a difficult situation where trees or other buildings permit entrance by the dozer at only three points, and where all the spoil must be pushed out at one of these spots. A detailed description of the work would be lengthy and tedious, and it is hoped that the successive diagrams are sufficiently clear. The dozer movements indicated by the arrows would have to be repeated on each cutting level.
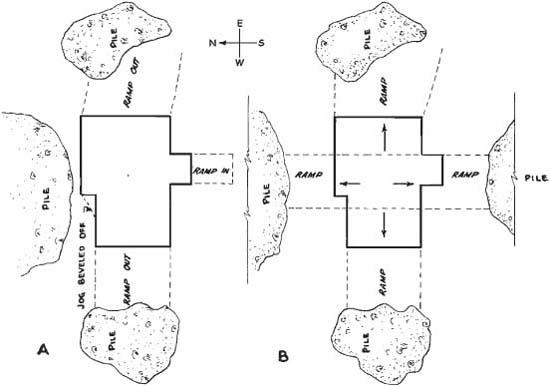
FIGURE 4.7 Irregular basement.
In soft soils it might be possible to cut the corners with the dozer by pushing the dirt to loosen it, then backdragging. However, it may be cheaper to dig them by hand and to throw the dirt out into the dozer path.
This type of excavation takes several times as long as open digging.
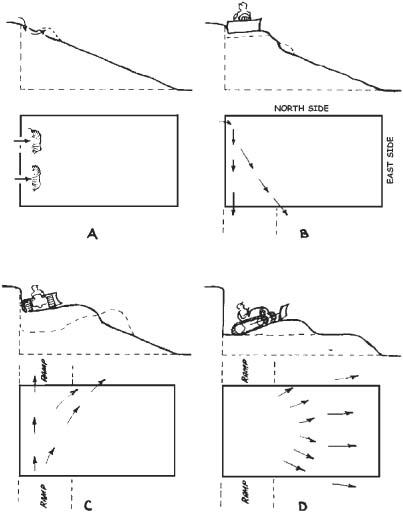
Figure 4.9 shows a succession of steps in excavation of a basement in a hillside. This floor base is at grade on the east (right) and requires a cut of 8 feet (2.4 m) along the west line. The slope of this hill is about 1 on 3, which a dozer can negotiate going up or down, but cannot safely work sideward, unless it is a wide model.
The easiest way to dig would be to push straight down the hill, but the yardage removed to ramp down would be about two-thirds as much as for the basement itself; and the spoil would be left in such a position that it could not be conveniently used to backfill the ramp.
Dirt may be pushed to the side as well as the bottom by pushing down from the center of the upper line of the excavation to build a step which would be level or tipped oppositely to the hill slope. The dozer may then be operated on this step, pushing to the north and south, along the west line. The step will broaden as it is deepened, and will allow the dozer space to push downhill, first diagonally and then directly, in addition to the back cut parallel to the rear wall. By leaving the two rear corners for hand cutting, the excavation can be completed with small ramp cuts. If the dozer must do the whole job, the back wall cuts can be continued into slot ramps, which should be at least a foot or two wider than the blade to avoid getting the machine jammed against boulders or in slides.
Landslides on Hillsides. Excavating on a hillside needs to be done with care, because of the potential for a landslide. This could be due to an existing weakness in the soil condition, which might be detected by a gully with an alluvial fan at the end or a scarp indicating a previous landslide in the area. Soil creep could be occurring, but the rate of movement is in fractions of an inch (centi meter) per year, so it is hard to detect. Creep is caused by gravity with seasonal freezing and thawing or alternating shrinking and swelling of clay minerals in the soil.
Building a house with a basement dug into the ground may actually unload a slope and make it safer from a landslide, provided that the soil dug out is hauled away and not left to overload an area where it might be piled. That leaves a decision for the owner or excavator who might need some of the dug material for backfilling. Is it cheaper to take the needed precaution of hauling away material that may be used later for backfill? Or is it worth taking a chance that no slide will occur and do the necessary cleanup if one occurs? The latter choice might be in order for a location in the country, whereas in a built-up urban area where other buildings might be in jeopardy, taking the precaution would be in order.
Digging. A front-end loader, with a standard full-width hydraulic dump bucket, may dig an open type of basement in the same manner as a bulldozer. It should be expected to do a quicker job than a dozer of the same power, because of better penetration in hard soil and ability to push larger loads.
The ability of the front-end loader to cut straight ahead, then back and turn with the load, makes it possible to reduce the amount of excavation outside the digging lines for ramps. If the basement is dug by the three-pile or open-front method, the procedure shown in Fig. 4.10 may be followed. The first layer is not cut quite to the ends of the excavation, (A), and the ramps built in reaching the bottom are inside the digging lines, (B). They are cut back to the steepest practicable grades on the last pushes, and then one ramp, a foot or so wider than the machine, is cut into the bank. All soil left inside the digging line is then removed by being picked up and carried or pushed out the slot ramp.
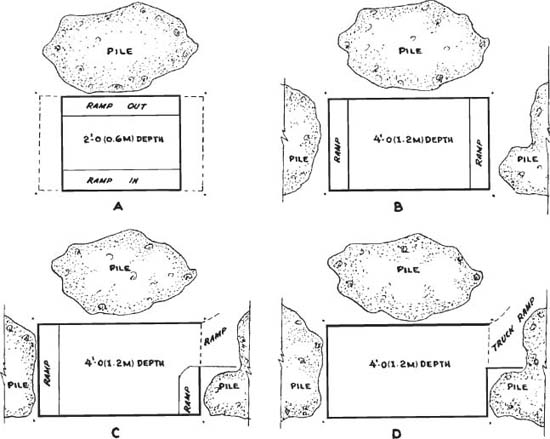
FIGURE 4.10 Three-pile system.
The machine can carry a larger load up the ramp when moving forward than when reversing. This is because it is nose-heavy when loaded, a condition which is made worse in backing up an incline, both by the shift of the center of gravity toward the front and by the reaction from the driving torque which pushes the front down. In ascending a grade forward, both of these forces tend to raise the front and improve stability. These effects become more pronounced as the incline becomes steeper.
Turning around in a small excavation may be difficult, or impossible, so that it is often better to back out with a small load than to take the time to turn in order to carry a larger one.
Cutting Walls. So far as possible, the excavation should be finished with vertical walls. Long ones may be cut neatly by digging parallel to the edge, but because of limited space, much finishing must be done by working straight toward the digging line.
Until the line is reached, the bank digging procedures in Chaps. 10 and 16 may be followed.
A vertical face may be cut by allowing bank resistance to move the tractor back as the bucket rises. This may be managed by slipping the clutch with mechanical drive, or slowing the engine that has a torque converter. If the wall is high, the machine must be moved forward again after the bucket lip gets above the push arm hinges.
This back-and-forth motion compensates for the curved path of the rising bucket. The same effect may be achieved by careful regulation of the bucket tilt, as it makes a shallower cut when rolled back than when flat.
Any jogs or irregularities can be cut by digging into the wall from the excavation without making additional ramps. It is easiest to take these out in layers as the floor of the hole is worked down, but they can also be dug after completion of the main work.
Soil carried out of the hole may be spread or distributed to nearby low spots much more easily than by a dozer, and can also be readily loaded into trucks.
Crawler loaders are usually preferred for basement work, but it is done by four-wheel-drive machines also.
Digging under Buildings. A special feature of most small front-end loaders is their ability to dig basements under existing buildings. Particular attention must be paid to bracing the structure over the hole through which entrance is effected, and across any interior pillars which are to be moved. Digging should be done cautiously to avoid damaging the building through collision with rocks, beams, or soil pipes in direct contact with it.
If the building is not large enough that the machine can dig a turning place inside it, it will be necessary to use hand labor to cut back to some of the walls.
Ventilation is very important, and usually requires at least the use of a powerful electric fan to keep the air reasonably free of exhaust fumes.
A machine that is to do much work indoors must be diesel, with a scrubber (fume reducer) on the exhaust.
Hydraulic shovels equipped with telescopic booms can dig under a building from outside, either directly or by removing hand-dug dirt.
The backhoe is a principal competitor for small basement work. There are two types: full-revolving hydraulic or tractor-mounted part-swing hydraulic. Tractor mountings get into difficulties because of restricted swing, and often limited reach. But they can dig a basement efficiently.
Any hoe is capable of shallow digging, but compares most favorably with the dozers when the hole is to be over 6 feet (1.8 m) deep, or when unfavorable bottom conditions, such as water, mud, boulders, or ledge, are encountered. It is able to take care of any necessary ditching without change of attachments.
It is recommended that the digging lines be set a few inches outside of the required excavation, although in even-textured soil the backhoe can do a very exact job. In addition to the corner stakes, intermediate guide pegs should be set at short intervals along the digging lines, as the operator cannot sight along these lines without getting down from the shovel, and the finished wall is established with the first cut.
Figure 4.11 shows the 20 by 30 foot (6 × 9 m) basement with the depth increased to 8 feet (2.4 m).
Lining Up. Accurate lining up of the machine is essential for a clean job. If the cut is to begin along the south line, the shovel is placed as in (A), with the bucket about three-quarters extended and resting a few inches beyond the southwest corner. The boom and the tracks are parallel with the south digging line. Lining it up in this manner is greatly simplified by marking the width of the bucket (including side cutters, if used), centered, on the bottom of both dead axles, with paint, or better yet, with stubs of welding rod. Sighting across the outside pair of these marks from the rear, the outer edge of the bucket should be exactly in line with them, and all three points should be on the digging line.
Digging. A ditch is now dug to bottom grade with its left edge on the digging line, and the spoil is dumped to the south. The far end of the ditch will curve rather sharply inward. When the backhoe has dug as much of the south wall as it can from its position, it reaches to the center of the west line and digs a trench back from there. The triangle included in these ditches is dug in layers to bottom grade, which may be found by a measuring stick, and as near to straight down from the west line as possible.
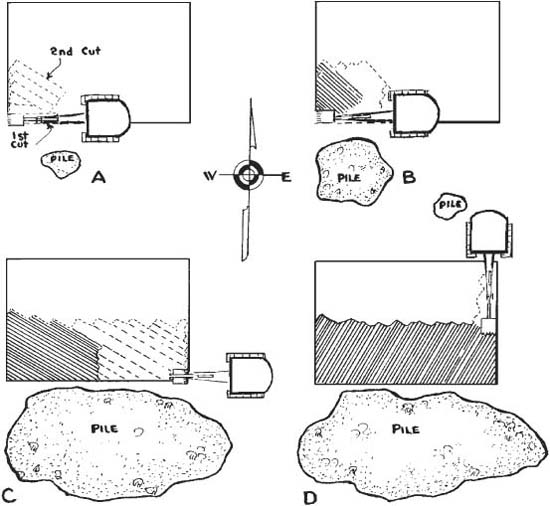
FIGURE 4.11 Basement digging with a backhoe.
The shovel is then backed up a few feet (meters) to position (B). It can now cut the west end of the ditch to be almost vertical, because of the more extended position of the bucket. The south wall ditch is then extended as near the shovel as possible, and material between it and the center cut down in layers to the bottom. The center-line will be irregular.
The spoil pile will tend to build up too sharply at the edge of the hole unless pushed back. This pushing may be done by regulating the outward swing of the bucket during the dump, so that it strikes the pile at a spot where its momentum will push a considerable quantity of dirt outward, without stopping its own motion. Knocking dirt back should be started early, before the pile gets high. The hoist clutch must be engaged during this operation. The quantity of dirt that can be put in a pile is greatly increased in this way.
Digging is continued in the same manner, with careful attention to a clean, level bottom until the east end is reached. The backhoe can probably cut this to a nearly vertical wall immediately in front of it, but will leave a ragged edge, as (C) farther north. The backhoe is then turned and walked into the unexcavated north section. When its center is a half-bucket width inside the east line, as in (D), it stops and shaves the end of the excavation, then trenches to the north edge. It next straddles the north line, and is lined up in the same manner as before, with the bucket resting in the hole in the northeast corner.
The north section is excavated in the same manner as described for the south, and completes the excavation. The west edge may be cleaned up, if necessary, by turning the backhoe to walk parallel to the edge, so that the bucket can dig straight up. The backhoe should not be put in this position, however, unless the soil is firm and is known to have good load-bearing qualities, as a crawler machine is vulnerable to cave-ins or slumping under one track.
This edge may also be trimmed from the north and south banks.
The completed excavation and spoil piles are shown in Fig. 4.12. It will be noticed that the piles are somewhat offset from the hole, so that the south pile can easily be used for fill on the east end, and the north pile on the west end. Both ends are left open for access and storage.
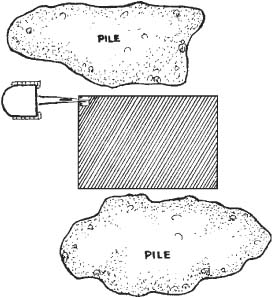
FIGURE 4.12 Finished excavation.
The north cut could have been made in the same direction as the south cut, if the east ditch were shorter, but the fill would then have been concentrated toward the east end.
A more finished hole could be made by starting the digging with a ditch along the west edge, dug from the south. The spoil pile would largely block the access to that side, unless the soil were piled in the basement area for rehandling. If access were not important, this ditch could be widened toward the center, reducing the amount to be piled to south and north. Existence of such a ditch would make it necessary to work the north section toward the east.
Loading Trucks. A backhoe can load the spoil in trucks instead of dumping it on the ground. Where the piles will be so large that they will have to be dragged back, a truck or trucks may be used to take part of it away, the backhoe continuing to dump on the piles when no truck is in loading position. If grading plans have been prepared requiring use of the fill away from the foundation, it may be cheaper to truck it than to push it later with a dozer. However, enough of a pile should be left by the hole for backfilling between the foundation and the edge of the excavation.
The backhoe can dig footing trenches below the floor level where it is working parallel to the edge, as along the south, east, and north walls in Fig. 4.11. The hydraulic backhoe can dig them anywhere, but the parallel position is easiest.
Checking Grade. Cutting the bottom to proper grade is more difficult with a backhoe than with a dozer, as the backhoe operator looks down at the grade rather than along it; has more difficulty climbing down to check it; and cannot move the machine back to grade over mistakes.
It is very helpful to the operator to have someone to check the work, although the operator can manage alone if necessary. The corner stakes, and preferably some other stakes, may be marked at a certain height, as 9 feet (2.7 m) above the bottom. In a level field the marks would all be 1 foot (0.3 m) above the ground; in a sloping one the highest stake should be marked a little above the ground, and the others with the aid of an instrument or a string level. A stick should be cut 9 feet (2.7 m) long.
If the operator is checking the grades alone, he or she may fasten a taut string between two stakes so that it will go over the spot in question and measure the distance from the floor to the string with the stick. Spots which cannot be crossed by the string, or measured directly from the height of the wall, may be checked from a known spot by eye, or with a hand or carpenter’s level. See Fig. 4.13(A).
If two people are doing the work, a string may be stretched between stakes on one side. Another string fastened to another stake across the excavation may be held in any desired position on the first string, as in (B), while the other person holds the stick.
Hand, transit, or laser levels may be used. A long rod is required when the instrument is set outside the hole.
A backhoe cannot cut a perfect floor to a pit, because of the projection of the teeth and the tooth bases. The smoothest grade is obtained when the bottom of the bucket is used for finishing, rather than the teeth.
Irregular Edge. Figure 4.14 shows a basement of the same irregular shape as that in Fig. 4.7. The principal considerations in doing complicated excavations with a backhoe are to avoid digging it into a trap; to avoid surrounding it or blocking it from other work by piles of spoil; and to work either parallel or at right angles to outside edges.
There are several ways in which this basement can be dug. The north side can be dug from the east end, as in (A) and (B). When the jog is reached it is finished off with a vertical cut, the backhoe backed away, and brought back in position to cut along the inner line. If the start is made at the west, the cut is brought a little beyond the jog, and the position then shifted to dig along the outer line.
The machine may dig the south side by entering from the west and starting at the southeast corner. Excavation is carried back to the west line, first ditching the edge then digging out the center. Care is taken to begin the spoil pile well west of the south room. The backhoe is then moved off to the south and up to the room. It is first lined up to the west side of this room and makes a cut from the main excavation to the south line of the room. It is then moved so as to cut the east wall of the room, then digs out the rest of the room.
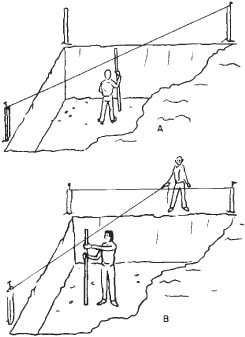
FIGURE 4.13 Checking bottom grade.
Another way to do this would be in the same manner as the north wall, treating the room as a double jog. However, this would involve extra digging because the bucket needs considerable width in which to cut down.
If the excavation site is a hillside, the work should be managed so that backhoe tracks will head up- or downhill, not across. If the grade is steep, the backhoe should dig from downhill to avoid the danger of being pulled into the hole if the bucket hooks into something solid.
If work must be done from the upper side, the stability of the ground should be checked, and both tracks must be securely blocked against sliding.
Dipper or Front Shovel. Front shovels (refer to Fig. 13.1) are seldom used in residential basement excavations, but they can do a good job. For satisfactory results, the ground should be firm at bottom grade, and the spoil should build into steep-sided piles.
A 30 × 40 foot (9 × 12 m) basement, 6 feet (1.8 m) deep, can be dug as shown in Fig. 4.15. A ramp must be dug outside the excavation line with a slope, usually 3½ or 2½ on 1, which the shovel can climb when the job is finished.
The spoil piles can be pushed back from the edge of the hole to some extent by crowding against them with a closed bucket.
The walls of the hole tend to slope in at the bottom, and to be somewhat jagged because of the different angles at which the bucket cuts them. Both of these features can be reduced or eliminated by careful digging, but extra time will be consumed.
Clamshell. Clamshells are not ordinarily used in this type of excavation because they do not move as many yards (cubic meters) per hour as competitive types. However, they turn out as accurate a job as a backhoe, and for small, deep excavations, will do the work more cheaply than a bulldozer. Digging is done from the top so that no ramps are required.
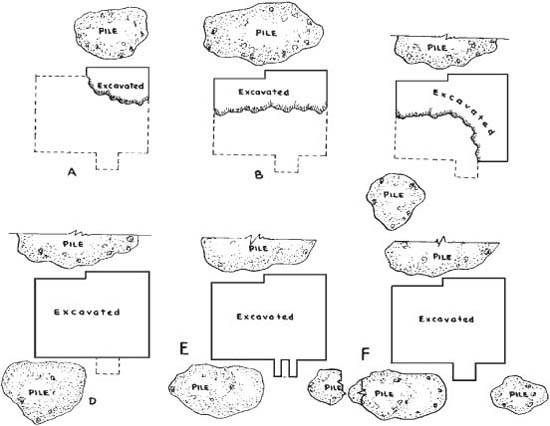
FIGURE 4.14 Cutting jogs with a backhoe.
An edge may be cut with the tracks parallel with it, and the tagline chains attached to one jaw, or with the tracks at right angles to the digging line, and the tagline on both jaws. Either of these arrangements will permit cutting straight-sided trenches along the outer lines. The center is best cut in layers, or in sections behind completed edges.
A medium- or heavy-duty bucket should be used. The spoil may be placed in isolated piles, in windrows, or in trucks as desired.
In many residential developments, small houses are built close together in straight rows. Under such circumstances, it may be economical to dig a wide trench straight through the block, and backfill between the houses after the foundations are built.
In Fig. 4.16 the digging is done by a dragline or a large hydraulic backhoe or front shovel which piles the spoil on both sides. Materials for foundations are trucked and piled on the floor of the trench. After the foundations are up, the piles are bulldozed around and between them, and the surplus used to build up the grade throughout the area.
Use of part of the spoil for raising the ground level decreases the depth of digging necessary.
FIGURE 4.15 Large shovel in small basement.
Another method of line digging is to load most of the spoil into trucks, sell or dispose of part of it, and save only as much as is necessary for backfilling spaces between other houses in the same development.
A third method is to haul away all the spoil for use elsewhere, and obtain backfill by dozer cutting on the uphill side of the houses.
It is also possible to dig such a trench with dozers, working across it and piling soil on one or both sides. Or scrapers, working the long way of the cut, can haul to any desired location.
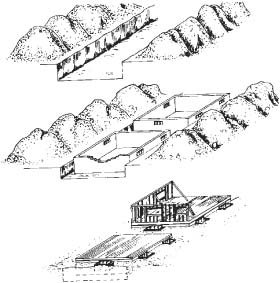
FIGURE 4.16 Multiple-basement cut.
The first method requires at least partial backfilling as soon as the foundations are up, to provide access to building material. The weight of the fill and of the large dozers commonly used is likely to break in uncured foundations, particularly if they are not braced by first-floor beams.
A large dragline might be able to pile all the spoil on one side to allow access to the other.
The other methods give immediate access to the front and back, and allow space for piling materials. Backfilling can be postponed until the building is completed.
Relative cost will depend partly on the value of the spoil removed.
A contractor setup to do basement excavations, one at a time, will probably have a combination of equipment including a backhoe, a small bulldozer, and possibly a dump truck for hauling the spoil material away. The backhoe does the digging, and the dozer moves the material that may be needed for backfill out of the way for the backhoe and then is available for backfilling, when that is to be done. If there is excess material to be hauled away, the fact that the contractor has a dump truck for that purpose means that the owner, or building contractor, does not have to get another subcontractor to do that part of the job. A contractor who does a lot of basement excavations, for either residential or commercial construction, will probably have a fleet of backhoes of various sizes for the variety of excavations to be done, small and large dozers, and various sizes of dump trucks. The fleet may not be large enough to warrant having repair facilities. Instead, the contractor can have extended warranties from the dealers of the equipment, so that they service the equipment as needed. Paying for the dealer’s service department is probably going to be more economical than hiring a full-time mechanic and setting up one’s own repair facility.
Trucking Spoil. In large commercial excavations of the haulaway type, one of the most important considerations is arranging for the disposal of the spoil, except when it is to be used as fill on the same project. It may be possible to sell it profitably, or it might be necessary to pay someone for the privilege of dumping it.
Disposal arrangements may not only determine the price to be charged for the digging, but also the time of starting the work, and the number and type of excavating and hauling units to be used.
The distance to the dump may be much farther for the trucks than for a car because of restrictions on trucking on residential streets. An inspection should be made of the dumping site, and any price quoted for fill should contain provision for additional charges for dumping delays.
Permits. An excavation contract should specify that the owner, or general contractor, is responsible for obtaining all permits necessary for the work. If the job is stopped because of failure to have such permits in order, the excavator should have the privilege of charging for the tied-up equipment on an hourly basis.
Machinery. In a medium to large excavation, a crawler front-end loader, a backhoe, or a front shovel unit is usually preferred, unless the bottom is too wet or sandy for trucks. The backhoe needs less space, does not tear up the floor, is better in rock, and can tolerate rough or steep footing.
Increasing size and decreasing depth favor the loader. It can replace the shovel on most jobs.
A hydraulic backhoe of sufficient size does the neatest work. If the bottom is bad, it can load on top, but production is greatest with haulers below it.
Ramps. In most cases, the power backhoe or front shovel cuts a ramp down, inside the digging lines, which must be of such grade and material that loaded trucks can climb it. The grade may be between 1 on 5 and 1 on 12, depending on the power of the trucks and the loads placed on them. The slope is made as gentle as the length and depth of the hole permit, for larger loads and fewer breakdowns.
If the plot is sloped, the ramp should be cut in from the lowest point on the edge to which trucks have access.
Earth ramps are generally removed immediately upon completion of the excavation they serviced. It is usually necessary to bring in a backhoe or a clamshell for this job, as the yardage is too great for hand labor.
Timber ramps afford less tractive resistance and better footing than earth, and so can be built with a steeper slope. They can be left in place during construction of the foundation for convenience in moving building material. However, timber work is so expensive that these ramps are largely limited to use in excavations that are very deep in proportion to their size.
Pit Floors. The shovel may dig the floor of the pit exactly to grade, or may dig portions of it below grade, to allow room for disposal of spoil from hand-dug trenches or removal of the ramp.
Figures 4.17 and 4.18 show a basement layout for a business building. The excavation is to be 90 by 120 feet (27 × 37 m) for an 88-foot (26.8-m) by 116-foot (35.4-m) building, 18 feet (5.5 m) deep in firm clayey material, in a level plot measuring 100 feet by 200 feet (30 × 60 m). The structure will be against the sidewalk line, 17 feet (5.2 m) back from the curb, will touch an existing store building on the east, a 12-foot (3.7-m) driveway backed by another building on the west, and a proposed parking lot. The footings of the east building are below the 18-foot (5.5-m) level, those on the west are 12 feet (3.7 m) below the surface.
The site has been cleared, but two large stumps have been left. The topsoil is of such poor quality that it will not be separated. The contractor owns a three-quarter yard (0.57-cu.m) shovel with dipper, backhoe, and clamshell attachments. This machine is somewhat undersize for the job but may be used unless a premium is placed on speed.
The front shovel is used because of digging and loading efficiency. The ramp is located at the street as there is no access to the other sides except through the driveway, which is too narrow for heavy trucks and will be undermined by the digging. The ramp is next to the driveway, because if the other corner were used, the store building might be damaged by collision or vibration.
Moving In. Arrangements are made to prohibit parking in front of the work area before machinery is brought in.
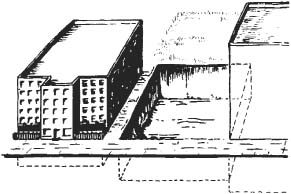
FIGURE 4.17 Haulaway basement job.
FIGURE 4.18 Starting large basement.
The shovel is unloaded from the trailer onto planks laid on the street to protect the pavement, or directly onto the sidewalk which is not protected because the trucking will destroy it anyhow. Digging is commenced in the sidewalk, or at its rear edge, and sloped down at about a 1-on-5 or 20 percent grade, in a cut 30 to 40 feet (9 to 12 m) wide. Trucks are first loaded when standing in the street, parallel to the curb. As the digging progresses, they are backed across the sidewalk and down the ramp, as in Fig. 4.18.
It is necessary to have one person, preferably two, assigned to prevention of tangles between traffic and trucks. These should be police officers or contractor’s employees authorized by the police to do this work.
Trucks should be backed into both sides of the ramp, as in Fig. 4.19(B), and faced directly away from the shovel while being loaded. At least one truck should always be in loading position.
Trimming. As the cut progresses, the foreman checks the left edge for accuracy. Because of the angle at which the bucket works, it cannot make flat cuts on the wall, and one or more laborers should trim the face, working either from the top or from the ramp surface beside the boom. Checking may be done by stretching a string along the digging line at the top, and lowering another string to which a plumb bob is attached.
Bank Height. The front shovel or backhoe would be able to take the full 18-foot (5.5-m) depth in one cut, but this would not be good procedure. The shovel cannot cut a straight face higher than the level at which the bucket teeth start to turn away from the bank, and the face above might overhang or break back beyond the digging line. Hand trimming is more difficult on a high face, and caving is more likely and more serious than from a lower one.
The bottom is more likely to be muddy or to contain rock outcrops than higher levels, and it is economical to remove as much soil as possible under good conditions, before tackling the difficulties. In addition, trucks hauling from an upper level have an easier climb to the street.
Under average conditions, this job would be dug in two levels or benches of about 9 feet (2.7 m) each.
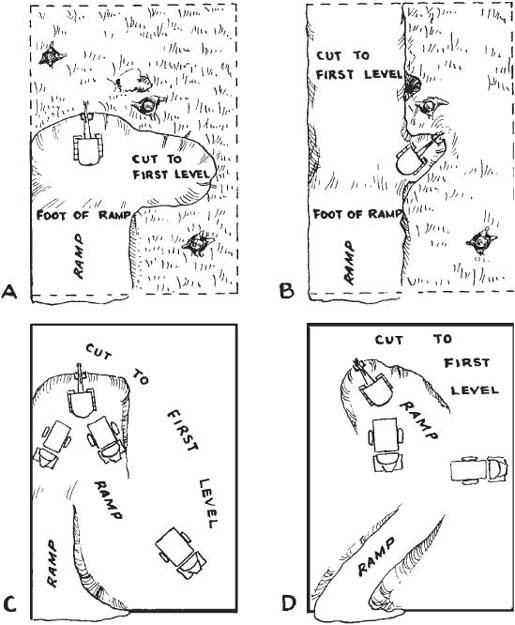
FIGURE 4.19 Cutting first level and ramp.
Support for Bank. Most deep excavations for buildings in a built-up area need to have support to guard against cave-ins. Certainly this is true when the excavation is alongside a building, as on the east side, even though the foundation for that building goes below the new excavation. There could be a cave-in above the excavation depth, which could affect the basement of the existing building. The building to the west, with foundations above the depth of the excavation, needs to be protected against any settlement that could lead to a lawsuit.
The method of support generally used is either to drive continuous-sheet piling or soldier piles with timber lagging between them. This support system would need to be along the length of each adjacent building and the street. It would not be needed along the north side of this excavation where a cave-in would not cause a serious problem.
There are other methods for supporting an excavated wall of earth. The use of tiebacks, such as with the sheet piling, is a popular method. A variation on tiebacks has been called soil nailing, which starts by using about 2 inches (5 cm) of shotcrete, i.e., a mortarlike mix sprayed at high velocity on the earth surface, and wire mesh on the first 3 to 6 feet (0.9 to 1.8 m) of excavated depth. Then 4-inch (10-cm) holes are drilled on an incline down into the remaining earth in a set pattern and depth. A lightweight reinforcing bar, perhaps of ½-inch (1.3 cm) diameter, is placed in the center of each hole, which is grouted up nearly to the top. Another layer of shotcrete is applied, and the excavation is extended for the next lift depth until the full planned depth is reached.
Dozer. A bulldozer or front-end loader may be used to advantage to dress up the ramp, smooth the pit floor, and be ready to push overloaded or weak trucks up the ramp.
A crawler loader is preferred, as it does better trimming and can help with loading in an emergency. A big one is most useful, but also most in the way.
Trucks. Trucks with 6- to 8-yard (4.6- to 6.1-cu.m) capacity are well matched to this size shovel, but anything from 6- to 14-yards (4.6- to 10.7-cu.m) can be used. Small ones can maneu -ver more easily and work well on certain types of soft ground. Large ones cause less traffic congestion, and under favorable conditions will move soil at lower cost. If the pit is wet or sandy, all-wheel-drive machines are preferable. Trucks must be in good condition to carry capacity loads up the ramp.
First Cut. In making the ramp, the shovel has worked straight ahead. Upon reaching the floor level of the first cut, it may continue to the back wall, or it may first make a side cut, as in Fig. 4.19(A), so that trucks can turn around in the pit. If it works straight through to the back wall, it is then walked to the foot of the ramp again to take another slice toward the back, as in (B), as double spotting of trucks is easier when working away from the ramp than toward it.
Once the pit floor is widened enough to allow trucks to turn, the digging may be extended in any direction so long as the shovel may be easily reached by trucks. Sooner or later the bank to the east of the ramp is dug away, and usually part of the ramp itself, leaving it wide enough for one truck only.
Stumps. When stumps are encountered, the shovel should dig around them before tackling them directly. The depth of this cut is such that they can be undermined enough that their own weight will help to break them out. Roots can be cut easily at a distance of a few feet from the trunk, and the stubs splintered back. Many operators will waste much time, strain their machines, by direct attacks on stumps which would shortly fall out in the ordinary course of digging.
When the stump is loose, it should be knocked around with the bucket to loosen the dirt, then placed in a truck. The tailboard should be folded down or removed, unless the stump is to be lifted off. With skill and luck, the shovel operator may be able to balance the stump on the bucket, then tip it off onto the truck. It may be picked up also by a chain. If it is too heavy for the shovel to lift, the dirt should be dug out of it by hand, and all possible wood removed from it by sawing and chopping.
Barricades. As digging approaches the sidewalk, barricades must be erected to keep spectators from climbing or falling into the pit, and from using any part of the sidewalk likely to cave in. These barricades may be solid wood fences, or may be perforated so that sidewalk superintendents may watch the work. The contractor may be able to build up local goodwill by encouraging spectators.
Furnishing adequate windows or peep holes reduces the dangerous practice of spectators standing in the truck driveways to watch the work.
Finishing First Cut. The floor grade of this first drop is approximate, and a foot (× meter) up or a foot (× 3.05 for meter) down is not important as long as it is easily passable to trucks. However, the walls must be cut to whatever finish the job calls for. A good operator can cut a straight wall and an almost-square corner with the bucket, but hand finishing is neater and saves machine time.
Bottom Cut. When the first level is complete, ramp cutting is resumed until the bottom is reached, as in Fig. 4.19(C). Trucks will drive down the upper section, turn on the upper level, and back down to the shovel. It is not necessary that the ramp continue in the same direction, but this is the most economical method where the pit is long enough. Any turn must be made very wide for the convenience of the trucks.
Cutting of the lower level proceeds in much the same way as for the upper, except that the floor grade must be carefully watched. This is usually checked with a transit or a builder’s level. If foot wall trenches below the floor level are required, they may be dug by hand immediately after trimming of the wall is complete, and the spoil moved to the shovel by bulldozer or spread on the pit floor.
A somewhat gentler ramp gradient could be obtained by using a diagonal or a zigzag ramp, as in (D).
Two Power Shovels. This job is big enough to justify the use of two shovels of three-quarter (0.57 cu.m) size or larger. The second shovel might ramp down from the sidewalk along the east side, and cut through to meet the first one at the center. After this, one ramp might be used as an entrance and the other as an exit; or one might be cut away. Or the second shovel might be brought after the first one reaches the upper level, and using the same ramp assist it on that level or ramp down to the bottom.
Traffic. An external factor which may limit the number and size of shovels in such an excavation is traffic congestion on the street. This may create a bottleneck that would leave a line of empty trucks parked waiting in the street, with the shovels half-idle for lack of trucks to load. In congested areas, traffic may be one of the principal problems of the digging.
Ramp Removal. When the digging is complete except for removal of the ramp, a backhoe or a clamshell must be employed. This ramp may contain 300 to 500 yards (230 to 383 cu.m), a sufficient amount to make the use of the faster-digging backhoe better than the clam. If the hoe has an effective downward reach of 16 feet (4.9 m), it will leave a bit of the foundation of the ramp for hand labor; but the clam, in taking the whole ramp out, is apt to require a larger amount of hand labor assistance while working. Another factor may be that the shovel at this job with a crane (clamshell) boom might pick up extra work lowering materials into the excavation. The hoe rig is awkward to handle and to transport when detached, so that it might be more economical to move the shovel to the yard to change over and bring it back than to pick up the hoe attachment, bring it to the pit, and take away the front shovel attachment. The clam rig could be loaded on a truck by a chain hoist or a tractor loader, and moved with little or no blocking.
It might also be good business for the contractor to hire a backhoe or a clamshell rig and move the shovel onto another job.
Whatever machine is used, it will probably stand on the ramp as it tears it up, as the driveway is too narrow for swing space, and for safety at such height.
Teaming Front Shovel and Backhoe. If two shovels are to be used for the whole excavation, it may be that the larger would be a front shovel and the other a backhoe, although under the ideal conditions considered so far, this is not likely. In such a case, the front shovel ramps down on the building side, unless danger of vibration damage is unusually severe. The strength of the foundation wall might be checked, and permission obtained to brace it from inside if the weight of trucks on the ramp seems to threaten it.
The backhoe is assigned to cutting the north and west walls of the pit because of its ability to make a smooth straight cut without hand trimming. It would preferably start on the north side, cutting from east to west, keeping the line in the manner described earlier, and digging out as much of the center as can be conveniently reached, as in Fig. 4.20. The edge ditch should be made as deep as it can reach, but the rest of the digging only 9 feet (2.7 m). The center digging is discontinued in the last few feet of the north line as the shovel is then backed up against the building beyond the driveway, and turns to get in digging position on the west line. Whether this corner can be cut square will depend on the length and tail swing of the shovel, but in general, it cannot. In any case, it cannot be squared to full depth.
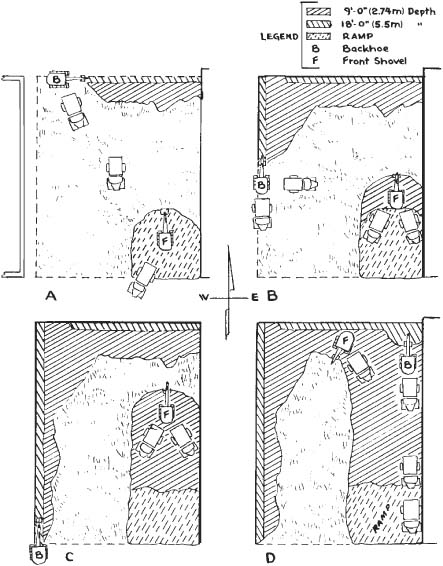
FIGURE 4.20 Teaming front shovel and backhoe.
The west line is ditched back to the sidewalk, with some additional material moved from the center as in (C). This leaves room to install bank supports. The backhoe can then work a wide cut back from any convenient starting place, taking care that its efforts, combined with those of the front shovel below, do not cut off its exit.
The trucks carrying the spoil from the backhoe may be loaded sideward to the shovel for safety, or from the back for convenience. If the body sides are very high, loading will be inconvenient and spillage excessive. This difficulty may be reduced by loading directly behind the shovel, so that it will have to walk over the spilled material, which will raise it so that loading will be easier. This spillage needs some manipulation to make a smooth ramp, particularly if the soil contains boulders.
Another method of loading trucks easily would be to start the cut at the sidewalk, making a ramp down for a truck wide enough to be backed against one part of the face to be loaded, while the hoe digs beside it.
When the combined efforts of the shovels have removed enough of the top cut that there is room for both of them on its floor, the backhoe may be moved down to do the digging to final grade, while the front shovel completes the upper cut, as in (D). Both shovels will be working on the same floor, but one will be digging material above, the other below. When the upper layer is finished, the front shovel will leave the job to be completed by the other.
The hoe will move from 10 to 30 percent less dirt each hour than a front shovel of the same size, a loss which may be only partly compensated for by the straight-wall cuts and the ability to take away the ramp without calling in another shovel or rig. However, if certain difficulties develop, the backhoe output will be unaffected, while that of the front shovel will be sharply reduced, and the presence of the hoe is insurance against undue loss of time from such causes.
This basement might also be dug entirely by one full-revolving hydraulic backhoe, bucket size 1½ yards (1.15 cu.m) or larger. Such a machine may take an 18-foot (5.5-m) depth in one layer, and cut foot wall trenches also.
If ground conditions permit, trucks are loaded on the pit floor, for maximum output (Fig. 4.21). The hoe would cut the ramp first, backing away from the street.
This 90-foot (27.2-m) width is best taken in three strips, the first from front to back, the others from back to front. Walls are trimmed and trenches cut as parts of the main digging.
The final step is to move around onto the ramp, then dig it, backing up.
The most common difficulty is groundwater. It may be in the form of springs or underground streams, or a nearly stagnant water table with capillary water moistening the soil for several feet above it. Wet soils usually turn to mud when loaded or disturbed and impede or bog down trucks.
If the first level should have a firm floor, but water be encountered in the next layer, trucks would not be able to operate on the bottom without expensive aids, so that removal of this bottom layer with a dipper stick would be impractical. The backhoe would not be bothered unless there were sufficient water to hide the bottom, in which case it would have to be pumped out. Special dangers connected with such pumping will be discussed below.
Information about underground conditions may be obtained from test borings or pits on the site; from people who have dug basements or ditches in the neighborhood; and from geologists. Such data may predict with reasonable accuracy the depth at which mud, water, loose sand, or rock might be expected, and digging plans can be made accordingly.
FIGURE 4.21 Full-depth excavation with a hoe.
Special conditions might require taking out the ground in three levels, or in one. The pattern should be such that the maximum amount of dirt would be dug by front shovel, on levels which permit trucking. When thin cuts are made, the front shovel can load trucks standing on the upper level, but the extra dumping height slows the digging, and in some materials the bank would not be stable enough to support trucks.
Drainage. Mud can be dried by draining or pumping the water. If the stormwater drain in the street is sufficiently low, arrangements should be made to connect with it before excavating. A ditch is dug from the pipeline in the street to a spot several feet inside the excavation area, and a pipe with sealed joints laid, opening into the storm drain. At the basement end, a vertical pipe of tile or concrete sections with unmortared joints or a perforated pipe is erected, as in Fig. 4.22(A) and (B). Sand or clean gravel is placed around the vertical pipe as the trench is backfilled, or a wooden barrier is placed to prevent backfill from closing the hole around it.
Each level made during the digging should be sloped to drain to this pipe, which can be opened at any level.
This installation will also serve to remove some groundwater from the site, before excavation.
A general lowering of the water table may be obtained by ditching on the three open sides, as in (C), or ditching the center also, as in (D). The edge ditches make the digging easier, but the interior trenches complicate it. Heavy wood mats are required wherever shovels or trucks cross them, and these are expensive to build and a nuisance to handle.
If the stormwater drain is not low enough to be useful, similar ditches may be dug and connected with a piped or open sump from which water can be pumped to a catch basin in the street.
An overloaded storm drain may push water into an otherwise dry excavation, unless a check or shutoff valve is provided.
Well Points. A satisfactory but expensive way of predraining the area is to use well points, which are discussed in the next chapter. Points may be driven outside of the digging line on the north and west, and probably, by special permission, in the sidewalk. Seepage from the east might be blocked by the building. If not, arrangements should be made to put well points in its basement.
Open Pumping. Digging may be done without predraining and water pumped out of the hole as it appears. If the water is very dirty, and quantities are small or moderate, a diaphragm pump should be used. If the inflow exceeds the capacity of a diaphragm, about 1,500 to 3,000 gallons (5680 to 11360 liters) per hour, several may be used. More often, in holes of this size, centrifugal pumps are employed. Best results will be obtained by locating centrifugal pumps as close to the water level as possible, as their discharge is more efficient than their suction. Holes should be dug so that the inlet will be a foot or more below the water surface. Sucking air in shallow water may be reduced by floating a piece of board over the inlet, where it will block the formation of whirlpools which would conduct air down to the inlet center, or by arranging the hose so that it rises vertically out of the water.
Pumping may be done on a 24-hour per day basis, or only during or just before digging operations. If pumps are to be shut down overnight and on holidays in very wet holes, it may be wise to take them up each time, or to put them on floats for protection against unexpected rises in water level. Other equipment should be moved up to a safe level when work is shut down at the end of the day.
Caving. Caving of banks and undermining of adjacent structures must be guarded against, particularly in connection with pumping. Caving banks involve hazards to people and equipment, and to adjoining structures, and increase the amount of excavation and backfill necessary.
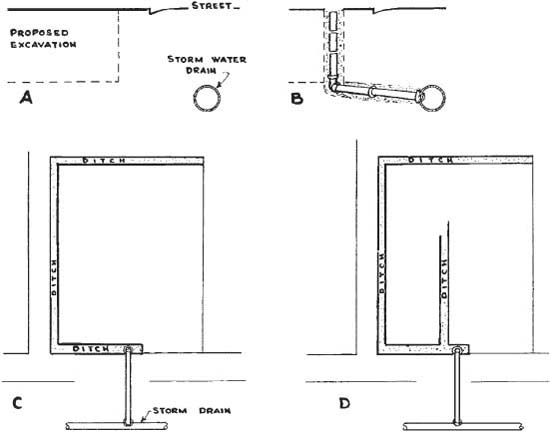
FIGURE 4.22 Drainage for excavation.
Some materials, such as dry sand, will not stand in vertical walls, and digging must be figured to include natural slopes from the foundation line outward to the surface, or provision made to drive sheeting, or erect other barriers, to hold it from sliding. Sands or sandy soils containing the right amount of moisture will stand vertically, but they cannot be trusted, as drying will result in surface disintegration and sliding, and heavy rainfall may increase their weight and undermine them by washing grains out at the bottom so that massive caving will follow.
Silts, clays, and loams usually stand well, if not too wet, but if resting on a saturated layer draining into the excavation, may be undermined so as to fall. Vibration of machinery or street traffic may cause clay to creep or flow.
Gravel may stand or may slide, depending on the shape and grading of the coarse particles, presence of cementing material, and the amount of fines. Angular gravel of several sizes, with just enough fines to stick it together, will stand wet or dry unless subject to excessive water flow, or wave action. Very clean gravel, particularly if it includes a large proportion of cobbles and rounded pebbles, may slide in much the manner of dry sand.
Causes of Caving. Danger of caving continues for days or sometimes weeks after the cut is made. In its natural state the soil is in both static and dynamic balance—static, because of inertia and the manner in which its particles are fitted and stuck together, and dynamic, because the weight overlying soil or structures exerts a sideward as well as downward thrust, which is met by equal counterthrusts from surrounding soil on the sides and below.
When a cut is made, the soil pressure toward it is balanced only by the soil inertia. This may hold it permanently in place, or the pressure may deform the soil and cause breaking apart and rearrangement of its particles, gradually weakening it until it falls. The effect may be likened to the collapse of a building under the weight of snow on its roof, which may occur hours or days after the storm and even after part of the snow is gone.
Groundwater is very effective in both holding and bringing down banks. While in very thin films it serves as a glue or binder. In contact with clay minerals it forms a lubricant, making it easier for particles to change position in response to pressure to such an extent that certain plastic clays will flow slowly. In larger quantities, water will seep or flow through the soil, carrying fine particles with it and cutting minute channels that weaken the structure. The flow of water is much slower through soil than through an open ditch, and it exerts pressure proportional to the restriction of flow.
If the water is allowed to stand in the excavation at its natural level, it will cease to carry particles out of the bank, and will exert a back pressure against the bank that will tend to hold it in place. However, this will not prevent the part of the bank above water from creeping under soil pressure or absorption of capillary water, and wave action set up by wind or dropping of stones or clods will cut into the bank at water level and undermine the top.
In general, where unstable soils or abundant groundwater is expected, open excavation should not be done until preparations have been made to build walls immediately after its completion; and if construction is delayed, it is better not to keep it pumped dry.
Side Effects of Dewatering. Often the most serious aspect of removing water from an excavation is the effect on adjoining property. Water makes up a substantial part of the bulk of some soils, and its removal, even if it does not carry particles, sometimes causes shrinkage, with settlement of the surface and overlying structures. Damage to structures may also be caused by creeping of plastic soils from beneath them into the pit.
Wall Bracing. Movements of soil into a pit can almost be stopped, and water intake reduced, by the use of timber bulkheads or sheet piling. These are required by law in many cities, and are often good, although expensive, insurance against costly repairs and underpinning.
Installing such bulkheads is a highly technical operation, involving knowledge of soil behavior, engineering calculations, and skilled personnel. There is sufficient space available in this volume for only a brief sketch of one method.
Another method would be to drive interlocking steel sheet piling to several feet below the pit floor and, if needed, tiebacks into the ground the piling is holding back. The tiebacks must be solidly embedded in stable ground, preferably bedrock.
Bracing Stable Soil. Figure 4.23 illustrates installation of thorough bracing in an excavation where a short section of face will stand for awhile without support. A long section is cut back by the shovel to a slope which is expected to be stable, (A) and (B). Then a short section, perhaps 10 feet (3.05 m), is cut and trimmed to final shape, (C). Sheeting plank, 12 by 3 inches (30 by 7.6 cm) or heavier, is placed vertically against the dirt wall. This plank should be long enough to reach a foot (meter) or two below the bottom of the pit, and 1 or 2 feet (0.3 to 0.6 m) above the ground surface. Bottom penetration may be obtained by ditching, or by driving the planks down with an air hammer fitted with a special head for the thickness of plank used.
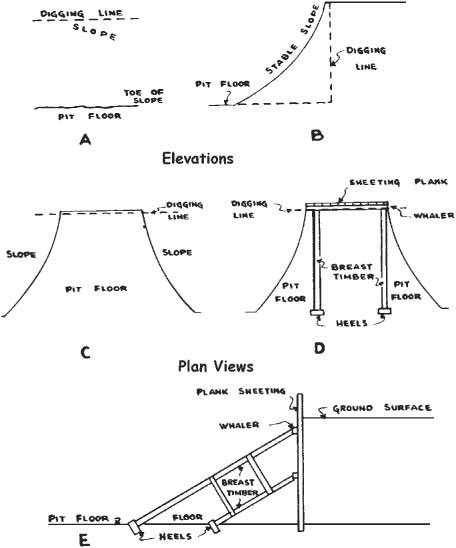
Horizontal timbers, called whalers, are placed along the face of the sheeting, being temporarily supported on cleats nailed to the planks. The whalers should be 6 inches by 6 inches (15 cm by 15 cm) or larger, and should not be more than 5 feet (1.83 m) apart vertically.
Beams or plank mats called heels are placed on firm, undisturbed soil in the pit floor, sloping down toward the wall. These are used as abutments to take the thrust of the breast timbers that extend from the heels to the whalers. These should be 10 inches by 10 inches (25 cm by 25 cm) or larger. Each whaler must have two or more breast timbers, spaced 5 or more feet (1.5 or more meters) apart. If the heels are firm, the spacing of breast timbers can be increased by using heavier whalers.
While this bracing is being installed, an adjoining section of the wall is trimmed. This is braced in the same manner and the work continued in successive sections.
The sections may be tied together in several ways. The breast timbers may be placed against the whalers where they are butted together, as in Fig. 4.24(A), with or without the plate shown. The joints in different whalers may be staggered, as in (B), or may be overlapped, as in (C).
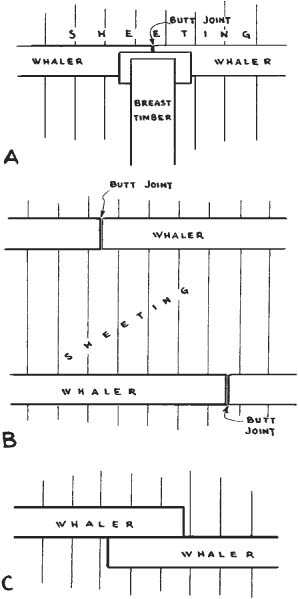
FIGURE 4.24 Detail of bracing.
FIGURE 4.25 Bracing, trench method.
Nailing is kept to a minimum to avoid damage to the lumber. The bracing is dismantled after the foundation is placed and the material removed for reuse. The sheeting is usually pulled by a crane or pile driver equipped with a special clamp for gripping the tops of the planks.
Unstable Face. If the soil is so unstable that it cannot be trusted to stand even in short sections, the sequence shown in Fig. 4.25 may be followed. A trench is dug with the outer edge at the digging line. This is braced with sheeting, whalers, and sheeting jacks in the manner described in Chap. 5, except that planks are left out of the sheeting on the inner wall at regular intervals.
Additional trenches are now dug into the excavation at right angles to the edge ditch. Heels are placed in them at or below floor level, and breast timbers run from the heels to the whalers on the out wall, through the spaces in the inner sheeting. The dirt between the breast timbers is now dug out, usually with a clamshell with laborers assisting, and the sheeting jacks and inner wall bracing removed.
Steel sheet piling may be driven along the digging line without the ditch. Breast timber ditches are dug in the same manner as described. A ditch is then dug on the inner side of the steel piling, and a whaler and breast timbers are placed. Digging is then carried down to the level of the next whaler, which is placed and braced.
Steel piling does not require as close spacing of the whalers as wood sheeting. A single whaler near the top is often sufficient, and in some cases it is not braced at all.
Cofferdams. When dry excavation is carried a considerable distance below the water table without dewatering the area, the heavy walls constructed to keep out soil and water are called cofferdams. Cofferdams consisting of single rows of interlocked steel pilings that enclose areas, with interior bracing, have been used for depths up to 60 feet (18.3 m), although ordinary practice limits them to 40 feet (12.2 m). They may be installed by hammering the piling in undisturbed ground until it reaches bedrock, or to sufficient depth below the excavation floor to be considered safe. All the sections should be placed and driven to moderate depth before any of them are driven all the way, to make sure that all joints interlock properly.
Excavation is likely to be done by clamshells. Bracing is placed against the inside of the wall as it becomes exposed.
If the soil is very porous, great difficulty may be experienced getting the water down the first few feet, as the joints between sections leak quite freely until forced together by water pressure. More or larger pumps may be used at this stage of the job than at any later time. It may be necessary to trench outside the wall to place a clay seal partway down, or to partially seal the soil with cement grout.
Porous soil under the bottom of the wall may permit excessive quantities of water and sand to boil up in the bottom of the excavation as final grade is approached. If the bottom is in clay, but porous soil is immediately below, the job may proceed easily, and then suffer from a sudden and disastrous blowup of the bottom.
An area protected by a cofferdam may be dug wet, in which case the structure serves to prevent soil from slumping into it.
Caissons. A caisson is a structure which serves to keep soil and water out of an excavation, and forms part of the permanent structure for which the excavation is made.
A simple type of open-top caisson and stages in its growth are shown by cutaways in Fig. 4.26. A hollow square, ring, or other shape is made of reinforced concrete, with the bottom tapered to an inside edge. If the work starts on dry ground it may be built in a shallow excavation where it is to be used. If the start is underwater, it is made elsewhere with walls high enough to keep out water when it is lowered into place. Transportation is usually by barge.
The caisson is lowered by digging inside to undermine it, and building the top to provide more weight, and to keep it above ground or water as it descends. Most of the digging is done underwater, and it is a very ticklish job to do it accurately enough that the caisson will sink straight. When it comes to the bottom, investigation must be made to determine whether it is on bedrock or boulders. If the rock surface slopes, concrete must be pumped underneath to give it firm bearing on the low side.
The pneumatic caisson has an airtight cap above the bottom, with sufficient air pressure maintained under it to keep water out. Air locks and chambers are provided for entrance and exit of personnel and material. Much of the digging is done by hand, and in deep work at high pressures workers may be limited to less than an hour of work at a stretch, with long periods spent in entering and leaving the high-pressure work chamber. Depths up to 100 or 110 feet (30 or 33 m) can be reached.
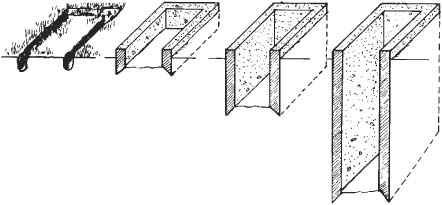
FIGURE 4.26 Sinking a caisson.
Bedrock. If bedrock is encountered that is too hard for the shovel to tear apart, it must be blasted. Generally it is best to complete the earth excavation first, to reveal the full extent and as much of the grain and quality of the rock as possible, before going to work on it.
Sometimes, however, drilling and blasting are started as soon as the rock is found, and the shovel doing the earth excavation can be utilized for handling logs or blasting mats. This may save shovel time, as under city conditions it is not often practical to blast rock fast enough to keep a shovel busy, and a shovel whose only duties are handling mats and removing blasted rock is likely to be idle most of the time. On the other hand, earth-hauling trucks will be stopped while the shovel places mats and during blasting.
Backhoes and small dozers are good machines for cleaning the bulk of earth off ledges, but there is almost always need for hand work also.
Procedures for the rock blasting and removal are outlined in Chap. 9. However, it should be emphasized that blasting near streets and buildings is a much more dangerous and specialized job than the same work in a quarry or a country highway cut. Elaborate precautions must be taken to prevent material from flying, and large blasts, or small blasts following each other quickly at regular intervals, must be avoided because of danger of concussion and vibration damage to nearby buildings. Jobs must be inspected in advance by the insurance company in order to set a rate in line with the risks.
Boulders. Boulders in the soil slow excavation by creating digging resistance and complications, and often by difficulties of disposal after they are dug out.
The hydraulic backhoe, such as a Gradall, usually does the best job in proportion to its size. The comparatively narrow, toothed bucket with wrist action can work around and under large objects, and has great prying force in its closing action.
It is competent at picking them up, but only if they are small enough to be held in or on the bucket, or clamped between it and the stick. Larger ones may be held against the wall of the excavation, or a specially dug slope, and pulled to the top.
The front loader is clumsier at digging out boulders, but does much better at removing the big ones. The wide, deep bucket can pick many up directly, or by crowding against a bank while lifting and curling the bucket. Extra large ones that would fall out can sometimes be chained, or just pushed out of the way to wait for equipment to break them.
Boulders may be loaded into a truck by a hoe or a loader, or more gently by a clamshell, grapple, or crane. For crane work, the rock must be firmly gripped by chains or slings.
Chains should be of the lightest size that will lift the weight, as a thin chain grips rock much more closely than a thick one. Undersize chains break frequently, and spares and repair links and hooks should be kept on hand.
Alloy chains are expensive but are small and light in proportion to strength.
Small cables grip rock well but wear and fray rapidly, so that sharp ends of broken wires make them dangerous to handle.
Slings may be made of several strands of light cable or chain, and combine the grip of small sizes with the strength of large ones.
Boulders may be broken by blasting, but in city areas mud capping is not permissible. Splitting may also be done with sledge hammers, air hammers, or drills and plug-and-feather sets.
Downslope. So far we have considered excavation in a level plot. As the basement depth is calculated from street or sidewalk level, a downward pitch to the rear would decrease the amount of excavation, and an upward one would increase it.
If the lot slopes down to the north, as in Fig. 4.27, the natural grade can be cut to the proper slope for a ramp by a bulldozer, and the material removed used to build a flat shelf at the first cutting level on which the front shovel and trucks can start work. If insufficient dirt is cut in making the ramp, the shovel can dig into the hill and sidecast below, to build it up to the desired size.
FIGURE 4.27 First cut in a downslope.
Excavation is carried back to the side of the ramp and to the south and west digging lines, in any convenient manner, while the bulldozer shapes the bottom level, making a flat space as before.
When the front shovel starts work at the bottom (Fig. 4.28), the excavation and ramp removal are carried out in the manner described earlier.
If two shovels are used, one can work on each level. The upper one should work across to the east side and finish it first, so that the one on the lower level can work in without cutting it off.
It is unlikely that a backhoe would be used on such a job, except in removing the ramp, unless mud conditions are encountered. Sometimes soft footing can be economically handled by surfacing the truck road with gravel, crushed stone, or dry fill.
Bottom Access. It may be possible to arrange for the movement of machinery and trucks into the lower end of the lot, as in Fig. 4.29. A bulldozer may then cut a truck road and turn around into one side of the lot. Loaded trucks will now move downhill, and maximum loads can be carried.
It may be difficult for the empty trucks to turn on the slope and to back uphill, particularly in sloppy going. If the shovel first digs a wide shelf as in Fig. 4.29, the trucks can turn on it, and another roadway can be graded later for exit so that no uphill backing will be necessary.
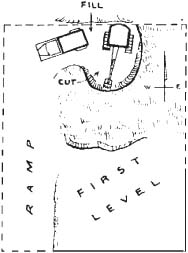
Cut and Fill Digging. Figure 4.30 shows the same sloping lot with a retaining wall built along its back lines. The spoil from the basement is to be used to fill up to this wall for parking area.
A front shovel and trucks may still be effectively used for the digging, but the short haul makes possible the use of other machines.
However the soil is moved, it should be spread in thin layers and thoroughly compacted by rolling in open spaces, and tamping where rollers cannot reach. This will prevent serious mud difficulties during the work, possible damage to the retaining wall from pressure or fluid mud after heavy rain, and excessive settling of the finished fill.
The average length of push is about 120 feet (36.6 m), very slightly downhill. This is within the economical range of medium to large bulldozers, or small, self-loading scrapers, but help will be needed from a loader or hand labor to cut out the south corners. The equipment should be small enough to leave by the driveway when the job is done.
A dozer first cuts a shelf, level or sloping opposite to the hill at the top, just below the sidewalk. This is done by digging along the edge line until a bladeful is obtained, then turning downhill, lifting the blade at the same time, so that the fill is built higher than the cut to allow for compaction. Scrapers can be used to cut down this shelf as soon as it is a few feet (meters) wider than they are, but a dozer will be needed to keep the walls trimmed back to a vertical. The dozer can also cut much farther into the corners than the scraper can, by the process of gouging and then swinging out.
The front-end loader can square the corners by working against one side, parallel to it, and digging into the bank until the other side of the corner is reached. The spoil is picked up, moved back, and dumped in the path of the scrapers. Best work can be done if the corners are kept cut down within a few feet of the level on which the scrapers are working.
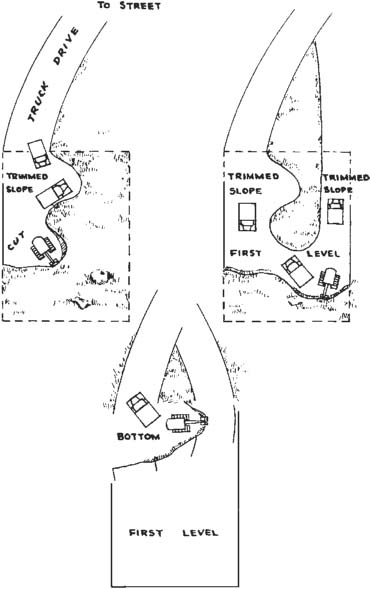
FIGURE 4.29 Slope with rear access.
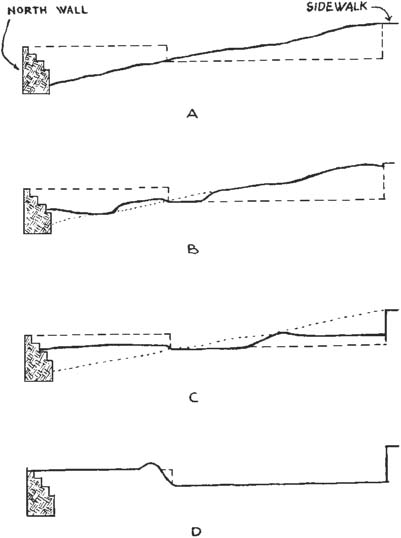
FIGURE 4.30 Filling against retaining wall.
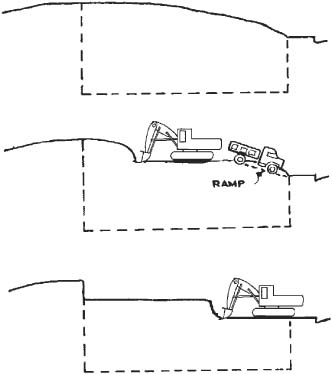
FIGURE 4.32 Basement digging in a hill.
The scrapers may be kept moving in a rotary path, as in Fig. 4.31, digging at the south end, and dumping and spreading along the retaining wall. As the fill rises, it will enlarge to the south. At the same time, a bulldozer can be working down the center section in the soil to be moved the shortest distance. This dozer may also take care of trimming the fill for the scrapers and pushing it into the corners.
A self-powered tamping roller should be kept moving over the fill in both scraper and dozer sections. Hand, gasoline, or air tampers should be used along the wall.
The parking lot fill, and that needed in the rear part of the driveway, cannot be placed on the south side until the foundation of the building is in place. Material needed for this can be piled on the edge, ready to be pushed in place.
The sidewalk edge of the pit might also be cut by a clamshell standing on the sidewalk. The dirt could either be loaded into trucks or cast out into the pit in reach of the scrapers.
If additional fill is needed in the parking area, it should not be trucked in until the building foundation has set long enough to give support to the driveway.
Hill Removal. It often happens that the building site slopes up from the street, sometimes very abruptly. The hill must be removed, in layers if it is high enough, before digging down from the street.
Figure 4.32 shows one such situation. The first cut starts above the street level so a ramp is dug up to it. When the top has been removed, digging is started at the street level, and the underground cuts are taken afterward. Two or more shovels can work on the job, usually on different levels.
The upper cuts should be sloped so as to drain toward the street, but not steeply enough to cause gullying and washing of dirt onto the street, as the contractor is responsible for any damages caused by the work.