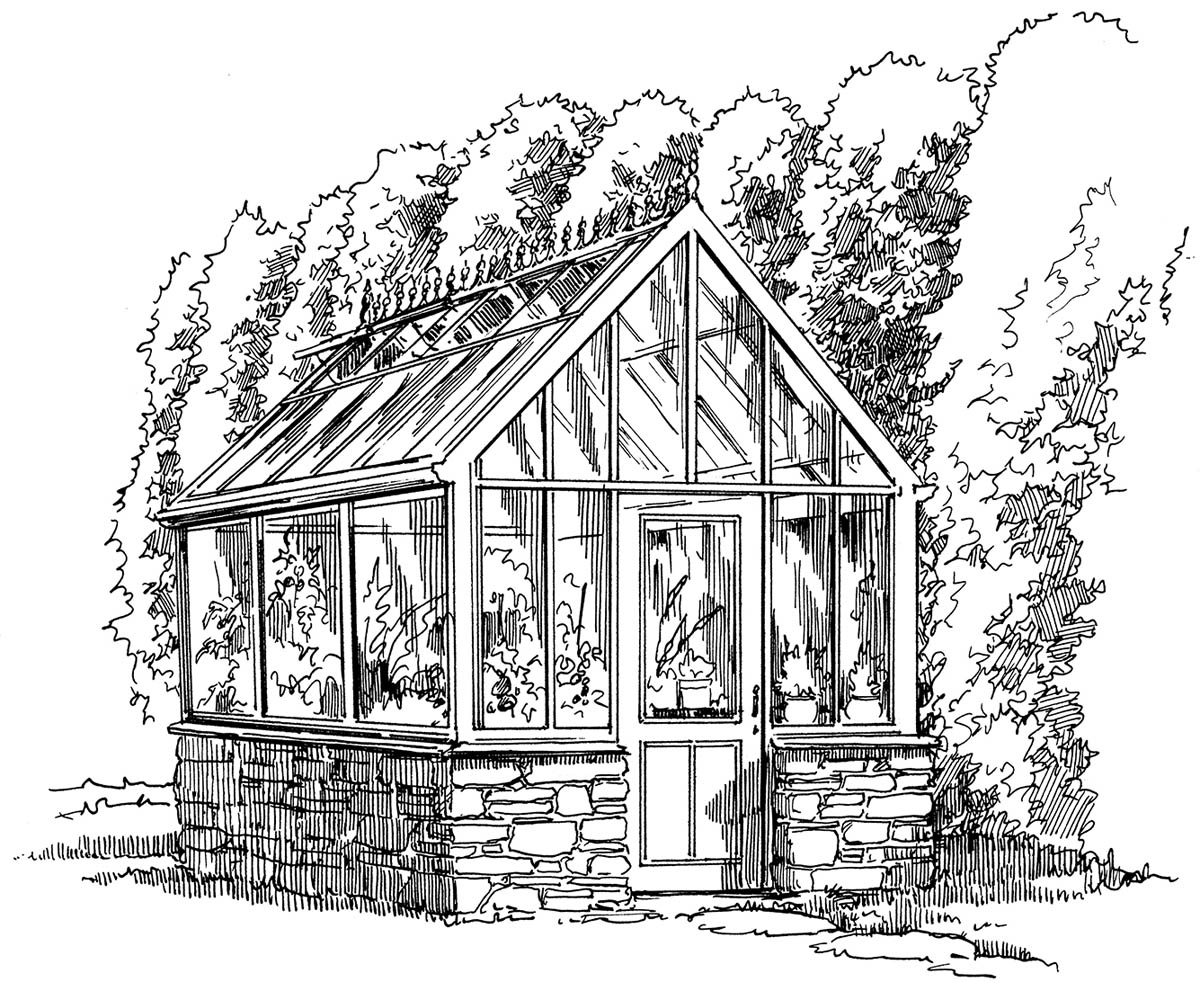
This greenhouse is shaded for part of the day by the nearby shrubs and trees. The shading can be helpful in summer, but evergreens and branches may block important winter sun.
THE LOCATION AND SIZE of your greenhouse are extremely important. They can affect how much heat the greenhouse retains, the amount of sunlight it gets, the ease with which you can enter or leave it and carry things to and from it, and many other factors.
For example, different options and issues are presented by building your greenhouse against your home either as part of the structure or as a lean-to (typically, sunrooms and conservatories — see chapter 3 — are part of your home’s structure, while a lean-to greenhouse is simply attached to the home) than by installing a freestanding greenhouse. If you are installing a freestanding greenhouse and heating costs are a consideration, you can locate the structure near other buildings or a hedge, where the topography may shelter the greenhouse from the wind and help to keep it warm.
No matter where you place the structure, however, it will require a great deal of sunlight during winter and not as much in summer, which should play an important role in determining where you site it.
Another important consideration in site selection is the greenhouse’s desired proximity to various places and supplies on your property. Will the greenhouse be near the garden? Will the greenhouse be near electricity and water sources?
This chapter deals with all the factors that go into the decisions of where to site your greenhouse, what size it should be, and how to plan for use of its space. It also addresses the issue of permits as they relate to size and location of the structure. For example, you may need to get a permit for a greenhouse built onto a permanent structure and you may have to pay additional property taxes on it once it’s built, whereas building a “temporary” structure — one that does not have a concrete foundation — may require no permits and may cost nothing in additional taxes.
Factors in site selection for your greenhouse include the amount of available light and seasonal changes of this light; wind patterns and protection from/exposure to the wind as it blows on your property; the topography that can create frost pockets; drainage around and in the greenhouse; and proximity to power sources, water, and your home. Because a greenhouse is a structure that is usually more than temporary and may be permanent, you should weigh carefully each of these factors to ensure that you select the most effective site possible.
The amount of light the greenhouse will receive is a key factor in determining where it will be located. In most cases, it will require a great deal of sunlight in winter and less sunlight in the warm summer months. This means that your greenhouse should face south rather than north (unless you don’t mind spending a fortune on heat in the winter or you plan to grow ferns and other shade-loving plants in a cool greenhouse; see chapter 3 for more on requirements for a cool greenhouse). Southeastern or southwestern exposure is also possible, but each of these provides fewer hours of daylight and may require that you shade your greenhouse during the summer months and supplement the lighting during the winter.
Of course, any decision based on the amount of sunlight the greenhouse receives will naturally be affected by what times of year you plan on using the structure. If you will be using it primarily in winter, it should have a southern exposure and there should be few or no obstructions to sunlight reaching it — the object is for it to be heated by direct sunlight for as long as possible during the daytime without the shady obstructions of trees, shrubs, or other buildings. If you intend to use the greenhouse only during summer and plan on it remaining empty all winter, you can accept long shadows over the growing area when the sun is low, as long as they are not present in summer. From my experience, however, it can be difficult to get typical greenhouse vegetables such as tomatoes, peppers, and eggplant to grow in the filtered shade of deciduous trees.
Before you install your greenhouse, determine how many hours the sun will shine on it during the seasons in which you will use it. The illustration below shows the angle of the winter and summer sun, important factors in choosing an orientation for your greenhouse that allows it to get the most year-round light. The intensity of the winter sun is about one third the intensity of the sun in summer, so it is important that the glass is at nearly a right angle to the sun’s rays and that the greenhouse is not shaded in winter. As the illustration shows, the sun will shine on the greenhouse during winter, but care must be taken to ensure that the tree in the foreground does not grow large enough to shade it. Having shadows from a tree may not be as big a drawback as you might think, however. One of my greenhouses is half shaded by a plum tree. In winter the tree sheds its leaves and the weak winter sun shines through its branches. In summer, the tree is fully leafed out and shades part of the greenhouse, preventing it from becoming too hot. After monitoring, I did prune the lower branches of the tree to allow some light to get to the greenhouse when the tree was fully leafed out. If a greenhouse is shaded by conifers, though, which keep their foliage all year along, they should be removed (or site the greenhouse to avoid their shade altogether).
When selecting a greenhouse site, you should also check the location of buildings that might shade it and how the sun behaves with those buildings. For example, you may find that the sun shines over the top of a building in summer but that in winter it shines lower and is blocked by the building. Of course, if you are not using the greenhouse for winter growing, this configuration won’t be a problem.
This greenhouse is shaded for part of the day by the nearby shrubs and trees. The shading can be helpful in summer, but evergreens and branches may block important winter sun.
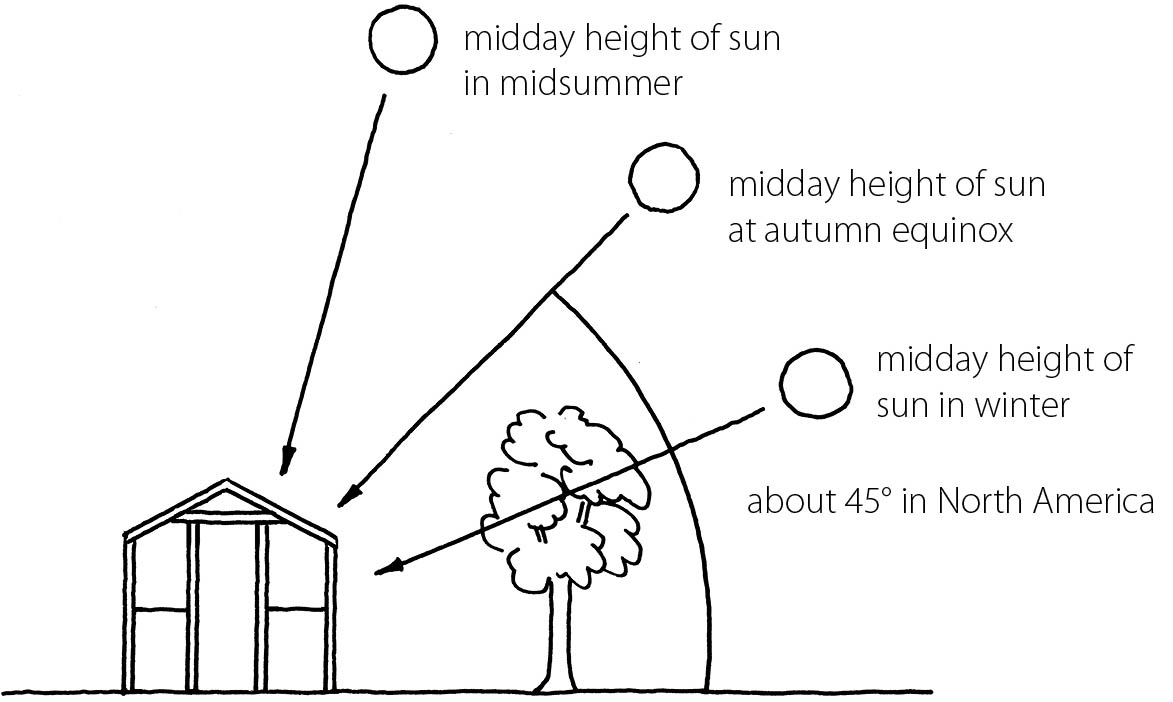
Although winter lighting is not so important in southern areas during summer, it is important at a latitude of about 35 degrees north, or about Zone 5 on the USDA Hardiness Zone map. This illustration shows how to orient a greenhouse for the most year-round light.
The amount of light getting to your plants depends on a number of physical, geographical, and time-related factors as well as the characteristics of the greenhouse itself. Among these are:
When you locate your greenhouse, you need to be aware of wind patterns as well as shade. Placing a greenhouse in a windy location, such as at the top of a hill, is likely to keep it cool and may significantly shorten the growing season. If you absolutely must locate your greenhouse in an area where the wind is strong, figure out how to protect the side that will get the most wind.
A hedge of arborvitae (Thuja accidentalis) develops into a dense wall that can protect your greenhouse from cold winds, and it can be trimmed if desired. You can substitute any trees from the cedar family that are indigenous to your area.
For example, if it is on the north, you can insulate that side or plant a windbreak of trees and shrubs. If prevailing winds are from the east or west, you can install double-pane glass on those sides to cut down on heat loss. You might also make an air lock, a small entryway between the door to the outside and the door to the greenhouse itself that allows the outside door to be closed before the inner door is opened. (You can use also the air lock as a cold room for wintering perennials and other dormant plants.) An air lock minimizes the amount of warm air lost when the greenhouse door is opened.
If you decide to plant shrubs on the north side of the greenhouse, choose your plants with care. They should be evergreen to shelter the structure year-round. They also need to grow fairly quickly — but be sure to select a species that you can trim if they grow too tall. Which plants fill the bill? I’ve used arborvitae (members of the cypress family originally from northern China and Korea) to shelter my greenhouse, and after twelve years of growing, the trees are close to 15 feet tall and have been trimmed once. I like this plant because, unlike spruce and cedar, which have a cone-shaped growth habit and may get so wide that they must be trimmed at ground level to keep them from touching the greenhouse, arborvitae have a more columnar growth pattern. Depending on which part of the country you garden in, you might want to use some of the fast growing Cupressus leylandii or slower growing cedars and cypresses indigenous to your area.
Whatever you decide to plant, don’t place the screening plants too close to the greenhouse. Even if a tree or shrub doesn’t end up touching the greenhouse, its roots may gravitate toward the structure, especially if you are growing plants in beds and fertilize those plants regularly. When planting, think about how large the screen of trees and shrubs will be in 10 or 15 years. When you have determined a planting position based on this, move the trees an additional 10 feet from the greenhouse.
Finally, if you live in a climate with cold winters, note how snow builds up on the downwind side of the house or any other building when the north wind blows. Once your screen or hedge is more mature, there will be a similar area immediately adjacent to it where the snow piles high. You don’t want your greenhouse to be in that area. I’ve found that a greenhouse should be 10 to 20 feet away from the screen you plant to place it outside the snow zone and to allow for the growth of the trees and their roots. If you have any doubts, move the greenhouse farther away from the screen (or, if you’re planting the trees after the structure has been sited, set them farther away from the greenhouse).
A tree screen does make the wind more turbulent on the downwind side. This zone of turbulent air can extend beyond the barrier by as much as 15 times the height of the trees or barrier. In other words, if your trees are 10 feet tall, the turbulent area may extend 150 feet downwind of them. Locating your greenhouse in this area of turbulent air (generally 50 to 100 feet downwind of your screen) can help to keep it warmer because the air is not flowing as quickly over the greenhouse and cooling it.
An air lock (a small area between the door to the greenhouse and the door to the outside environment) helps to regulate the temperature inside the greenhouse by keeping out the brunt of outside cold air in winter. It can also serve as a useful storage area and a cold room for wintering perennials or hardening-off plants in spring.
As we noted, you should not situate your greenhouse on the top of a hill where it is open to the wind, but locating it in a sheltered spot can have its drawbacks too. The location shown in the following illustration may seem ideal. The hill on the left of the greenhouse shelters it from the worst of the wind. The rise on the right is slight so it doesn’t prevent the sun from shining directly into the greenhouse year-round. The big problem, however, is that cold air flows downhill and rests in the low spot where the greenhouse is located. This air can be several degrees colder than the air higher up, and those few degrees may mean the difference between your plants surviving and dying. This type of area is called a frost pocket and should be avoided as a greenhouse site. If such a locale is the only spot for your structure, try to regrade the slope in front of the greenhouse, as shown in the illustration, to allow cold air to flow away from it.
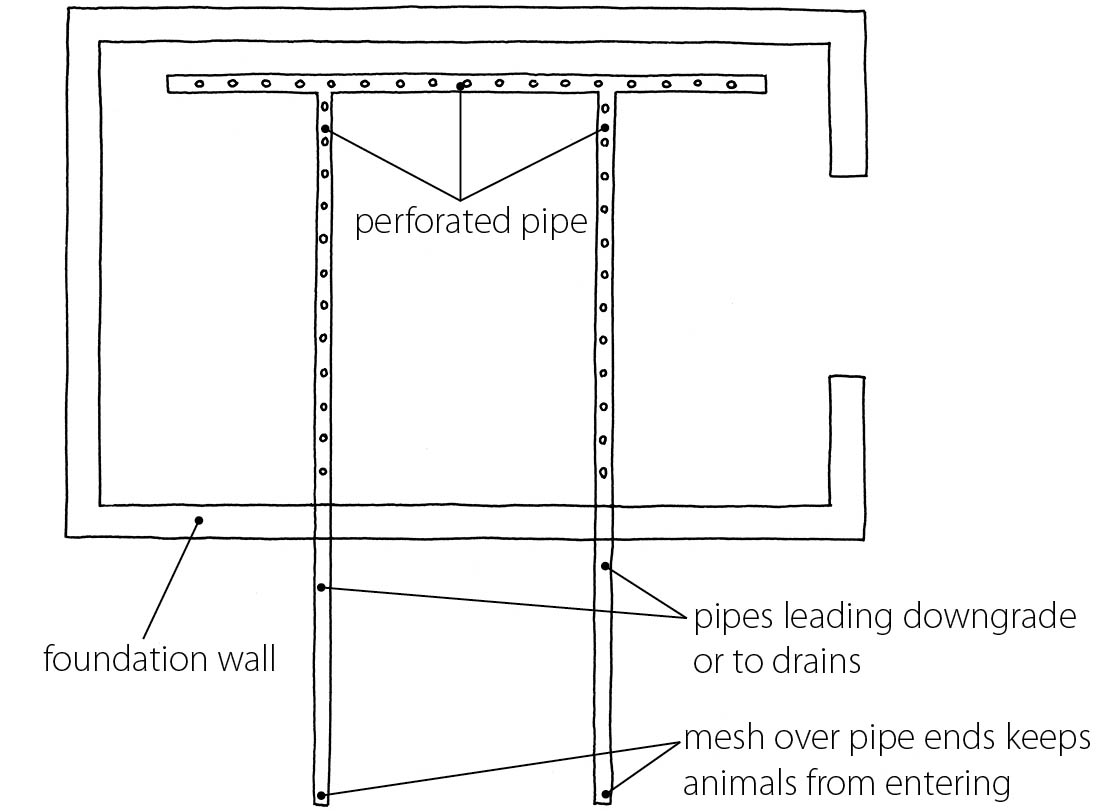
Your greenhouse must be well drained. A greenhouse with poor floor drainage may contribute to the breeding of insects and force you to spend time getting rid of water rather than working with your plants.
If your property suffers from flooding during heavy rains, think about building your greenhouse on a platform or installing a drainage system when you put in the foundation. Note that most greenhouses have drainage systems, but in an area that is prone to flooding, the system must be more robust to get rid of water quickly.
Before you install a system like this, however, you must decide on the type of flooring and where the drainage system will be located. Position a center drain before the foundation walls are built and the structure is erected (see chapter 8, The Concrete Slab and Setting the Drainpipe, for information on locating the drain when pouring a slab foundation). The greenhouse floor should slope slightly toward the drain so that water will flow toward it and the drainpipe should be sloped so water will move through it away from the building.
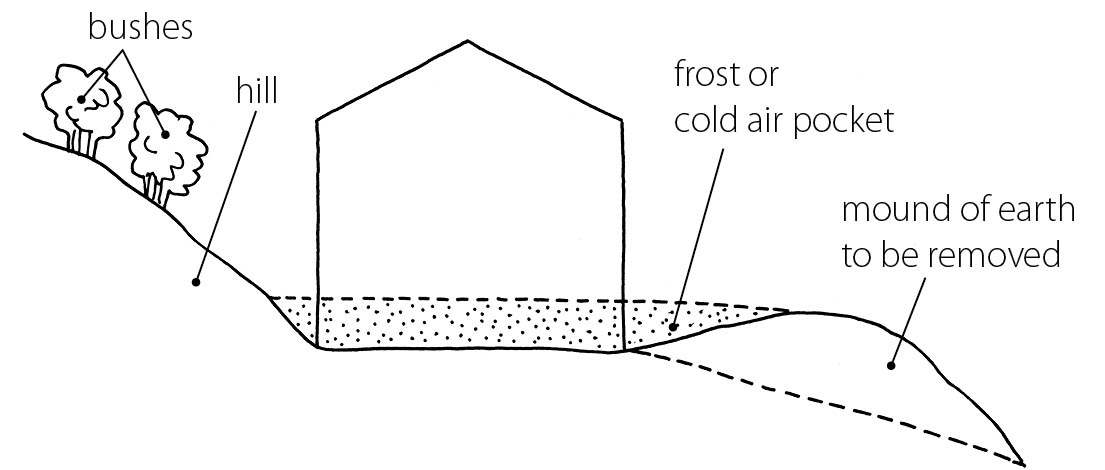
Don’t locate your greenhouse in a frost pocket at the bottom of a hill, where it will be cooled by settling cold air. If this is the only place to site your structure, grade the space in front of the greenhouse (as shown by the dashed line) to allow cold air to continue down the slope.
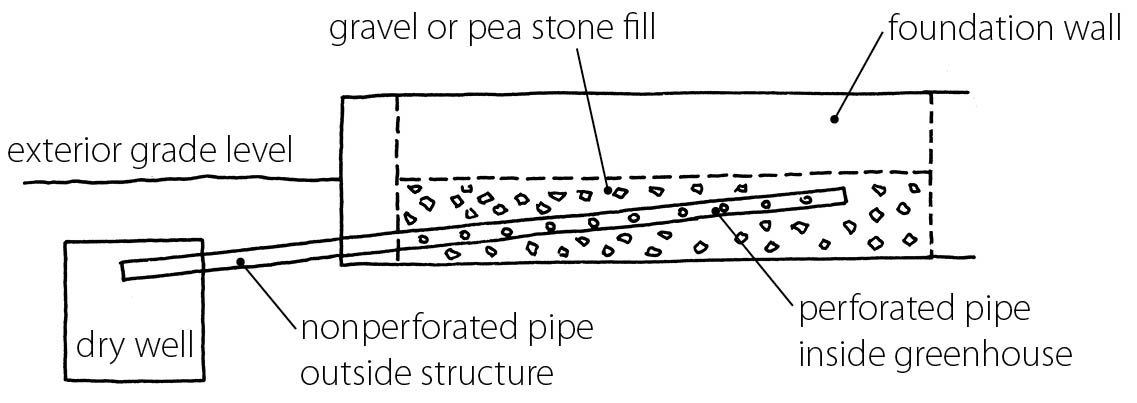
One option for a greenhouse drainage system
It’s important to consider the proximity of the garden and a power and water source when you decide where to site your greenhouse.
Remember, you’ll be spending a lot of time carting plants between the greenhouse and the garden. Locating your greenhouse near garden space makes this journey much shorter and quicker and allows you to get more done in less time.
If you intend to light or heat your greenhouse or use a fan or venting/air circulation system, consider how close the structure will be to a power source. And while a garden hose can suffice as a water supply if you don’t plan on using the greenhouse during winter, if you do intend to use it in the winter months, you’ll have to have access to a water source. This will involve digging a trench for power and water lines to the structure — and in colder climates, the trench will have to be deep enough to ensure that the water line is below the frost line. Unless you prefer to get your exercise by digging instead of going to the gym, it can be very expensive to prepare a long trench! Keeping the greenhouse close to both a power and a water source will make it far easier to bring these services to the structure. (See chapter 5 for more on greenhouse lighting, heating, and water.)
In conjunction with deciding where your greenhouse should be located, you must determine how large it will be. Earlier, I advised you to build the largest greenhouse you could afford — you will definitely grow into the space, especially if you’re a serious gardener — but exactly how wide and how long you make it depends on several factors. Builders of greenhouse kits have developed standard-sized greenhouses that take these factors into account, but if you are going to build your own structure, they are presented here.
The width of a greenhouse is critical to its success. It is much more comfortable to work in a wide greenhouse with wide walkways than it is in a narrow structure. That said, most garden-center or kit greenhouses tend to be a standard width, usually 6 or 8 feet. The benches in these greenhouses are 36 or 38 inches wide (because greenhouse manufacturers know that people cannot reach more than 3 feet into a bench or bed without knocking over plants).
Given that the minimum door width that a person can walk through is about 22 inches at the shoulder, the optimal greenhouse width is at least 8 feet. This would allow for a 2-foot-wide walkway and a 3-foot-wide bench or bed along each side. Of course, greenhouses that are wider than this have room for wider benches and walkways. Those with two aisles are usually 12 to 14 feet wide to enable you to have a center bench or growing bed. In a wider greenhouse, the growing bed or bench in the middle of the greenhouse can be up to 5 feet wide because it is accessible from both sides.
To accommodate wheelchair-bound individuals, a walkway should be about 45 inches wide. Therefore, a greenhouse for a person in a wheelchair should be much wider overall to allow for beds that are wide enough to hold many plants. Such a greenhouse should also have lower benches with no obstructions (such as support posts) beneath them so that a wheelchair can be easily navigated around the space.
A greenhouse can be as long you want, but most manufacturers make greenhouse lengths in increments of 2 to 4 feet to suit standard glazing sizes. To figure out how much growing space you’ll need, work out how many plant trays you want to put on the benches and use this figure to determine length. For example, many seedling trays measure 11 inches by 21 inches. Making the benches 21 inches or 42 inches wide means that one or two trays can fit on them set either widthwise or lengthwise. The length of the benches can be determined in multiples of 11 inches or 21 inches.
One of the major factors in determining overall greenhouse width and length is glazing size. Glass and other glazing materials come in certain widths, and a greenhouse that uses the widest glazing possible requires fewer supports between pieces and the glazing therefore admits more light. For example, I was given seven double-pane windows, each 34 inches wide, that I used to make a 20-foot-long freestanding greenhouse on an existing garage foundation 20 feet in length. The length of the windows in total was 238 inches, or 19 feet 10 inches. Each of the two 4-inch-wide end walls allowed for a 3-inch overlap of the glass, making the total greenhouse length 20 feet. The support between each pane of glass was a 2×6 joist, with the glass almost butting at the joint. I used a wooden strip with a rubber gasket to cover each joint, but the fit between the panes was tight and I needed to take care that the screws holding the covering strips did not touch the glass. I’ve found that with a tight fit, as the glass expands, it may crack where it touches screws or nails. One way around this is to set between the glass panes (and screws) rubber inserts that are wider than the screws or nails. Another method is to put a couple of hard rubber washers around each screw when you install it. (See chapter 7 and the individual projects in chapter 13 for further information on installing glazing.)
Polyethylene sheeting comes in 100-foot lengths, which means that you can cover a hoop house that is up to 80 feet long with plastic sheeting and have some left over to cover the end walls if they are not made of wood or some other solid material. If your hoop house is to have solid end walls, you can make it 100 feet long and have enough plastic sheeting to cover it. The width of the plastic becomes the governing factor in a hoop house. The material is available in widths from 4 feet to 16 feet in increments of 2 feet, and to 40 feet wide in increments of 4 feet. Figuring the radius of the hoop house semicircle, as shown in the following illustration, gives you an idea of how wide the sheeting should be to suit the width of the greenhouse. Also see the following chart for information on determining the required width of polyethylene sheeting from a hoop house’s specific height and width.
Polycarbonate glazing is available in 4-foot-wide panels. Because these panels are lighter than glass, they can be supported on 2×4 rafters or even aluminum angle bars, with a rafter along the middle of each panel to act as an extra support.
Determining the Width of Polyethylene Covering for a Quonset or Hoop House |
||
| WIDTH OF HOOP HOUSE (IN FEET) | HEIGHT (IN FEET) | MINIMUM WIDTH OF PLASTIC (IN FEET) |
8 |
4 |
12 |
10 |
5 |
15 |
12 |
6 |
18 |
16 |
8 |
25 |
20 |
10 |
31.5 |
24 |
12 |
37.6 |
The length of a greenhouse glazed with 4-foot-wide polycarbonate panels can increase in increments of 4 feet, adding in the thickness of the end walls and the width of the spacing between the glazing: In a five-panel greenhouse, you might include 1⁄2 inch between glazing panels and a 6-inch-thick end wall to make the total length of the greenhouse 21 feet 2 inches. This assumes that the glazing is butted at each joint. If you used single-pane glass or corrugated glazing panels, you might have to overlap the joints to ensure that they were watertight. In that case, the total length would be shorter, depending on how much you overlap the panels. For example, if flat panes are overlapped 1 inch, as they might be in a single-pane, fiberglass-paneled greenhouse, the total length of the greenhouse would be 20 feet 8 inches.
It pays to figure out what you will use for glazing and how it will be installed before deciding on the length of a do-it-yourself greenhouse to avoid having to cut an extra panel of polycarbonate or fiberglass in order to completely cover the glazed surface. In the case of a glass-covered greenhouse, you might have to get a specially cut piece of glass to make up the length, and that could get expensive. When figuring out the length for the glazing, remember to include the thickness of the end walls. A 2×4 stud wall may be 31⁄2 inches thick + 1⁄2-inch plywood outside + 1-inch rigid foam (polystyrene) insulation + 1⁄2-inch drywall for a total thickness of 61⁄2 inches. Of course, you can eliminate the polystyrene insulation or the drywall to reduce the overall thickness.
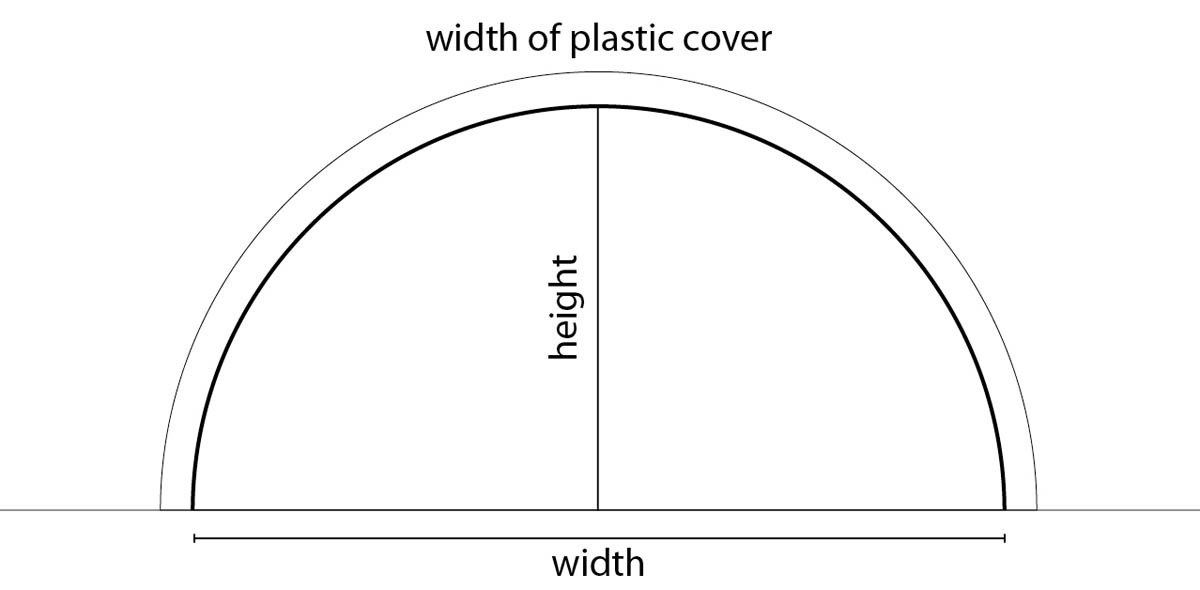
The height and width of a high tunnel or hoop house govern the width and amount of polyethylene sheeting needed for the cover.
It really doesn’t matter what the greenhouse height is where the roof meets the wall as long as it is high enough to give the plants enough headroom whether they are in the ground or on a shelf and for you to be able to tend to them comfortably in growing beds or if they’re positioned on a shelf. If you are growing cabbages in the ground, for example, the height where the roof meets the wall of the greenhouse needs to be only a foot or two. But if you were to grow trees on shelving, you must add together the height of your plants and the height of the shelving to be sure there is ample headroom.
Of course, height of the structure is important in areas where you’ll be walking. Less than 6 feet may be all right for shorter people, but taller people may hit their head or have to duck to get into the greenhouse. A low roof could limit the amount of time you’ll want to spend in the greenhouse. If you grow hanging baskets, either place the baskets out of a walkway or, if they will be above a walkway, increase the height of the greenhouse to accommodate the baskets. With this in mind, the height over walkways should be at least 6 feet 6 inches, but at the side walls, the height can be 4 or 5 feet or even less. If the side walls are 5 feet high and benches are 3 feet high, you will be able to set plants that are 2 feet tall at the back of the bench against the glazing.
If possible, the roof should be steep enough to shed rain or snow easily. (Remember that any plants around the outside walls of the greenhouse may be damaged when the greenhouse heats up after a snowstorm and the snow slides off the roof.) Greenhouses with a shallow roof pitch do not shed water and snow as easily, making them susceptible to leaking with heavy rain or snow loads. In addition, you may find that a roof with a shallow pitch is difficult to clean because you cannot easily reach over the eaves. This couples with the fact that a shallow-pitched roof collects moisture that contributes to the growth of algae, which keep dirt from washing off the glazing, leading to reduced light levels transmitting into the greenhouse.
With some greenhouse styles, such as hoop houses, you may not be able to adjust the roof pitch. Snow will definitely build up on top of a hoop house unless it is heated. In some cases, the weight of the snow is enough to cause the hoops (especially if they’re made of PVC) to collapse. I find the easiest way to get rid of unwanted snow on a hoop house is to walk through the inside and bang the underside of the plastic with my hand.
Your greenhouse floor plan will be affected by both the site and the size of the structure, so it’s important to consider it early on. For example, if the only possible spot for your greenhouse is in a frost pocket, in addition to placing external insulation around the foundation, you can make some provision for raising the beds inside the greenhouse and designing the beds so that you can protect them against early frosts.
When configuring the floor plan, you should think about features such as a quarantine area, where you can put new plants for a few weeks to enable them to become acclimated to the greenhouse and where you can monitor them for early signs of insects or disease. You might also want to include a space to store tools, pots, and potting soil; consider different bench sizes and heights; plan for an air lock to make it easier to enter the greenhouse without letting in cold winter winds; and decide where to locate items such as heaters, fans, and watering and misting systems.
Making a floor plan is an essential part of getting the most enjoyment from your greenhouse. The right floor plan makes a greenhouse easy to enter and easy to work in and allows the plants optimal space and growing conditions.
The possible location and configuration of beds in a greenhouse are often determined by the greenhouse style and can have an impact on what you want to grow in it. With an A-frame greenhouse, the slope of the walls is very shallow and the greenhouse is very tall. Because it’s desirable to keep warmer air around the plants, a tall greenhouse works best if you are growing trees, but is not optimal for starting plants or growing short plants in low beds and offers only limited space for hanging baskets. For growing plants in beds, a better solution might be a Quonset or hoop house or a conventional, slope-sided, or gambrel-roof greenhouse, which will offer you plenty of growing space without unwanted height.
Whether you plan on growing plants on benches or in beds, the width of each should be no more than 4 feet, which is about as far as you can reach without stepping in a bed. (Aside from the possibility of harming plants, when you walk on a growing bed, it compacts the soil, which slows water permeation and makes it difficult for plant roots to penetrate the soil.) In most cases, you will find that either 36 inches or 38 inches is suitable. Just remember that wide benches or beds, while increasing the growing area, also make it more difficult to tend plants. (For more on bench width, see Benches.)
If the aisle in the middle of the greenhouse is intended to accommodate a wheelbarrow or garden cart, it will need to be about 3 feet wide. But if you’ll be using the aisle only for walking, you could decrease its width to as little as 20 inches.
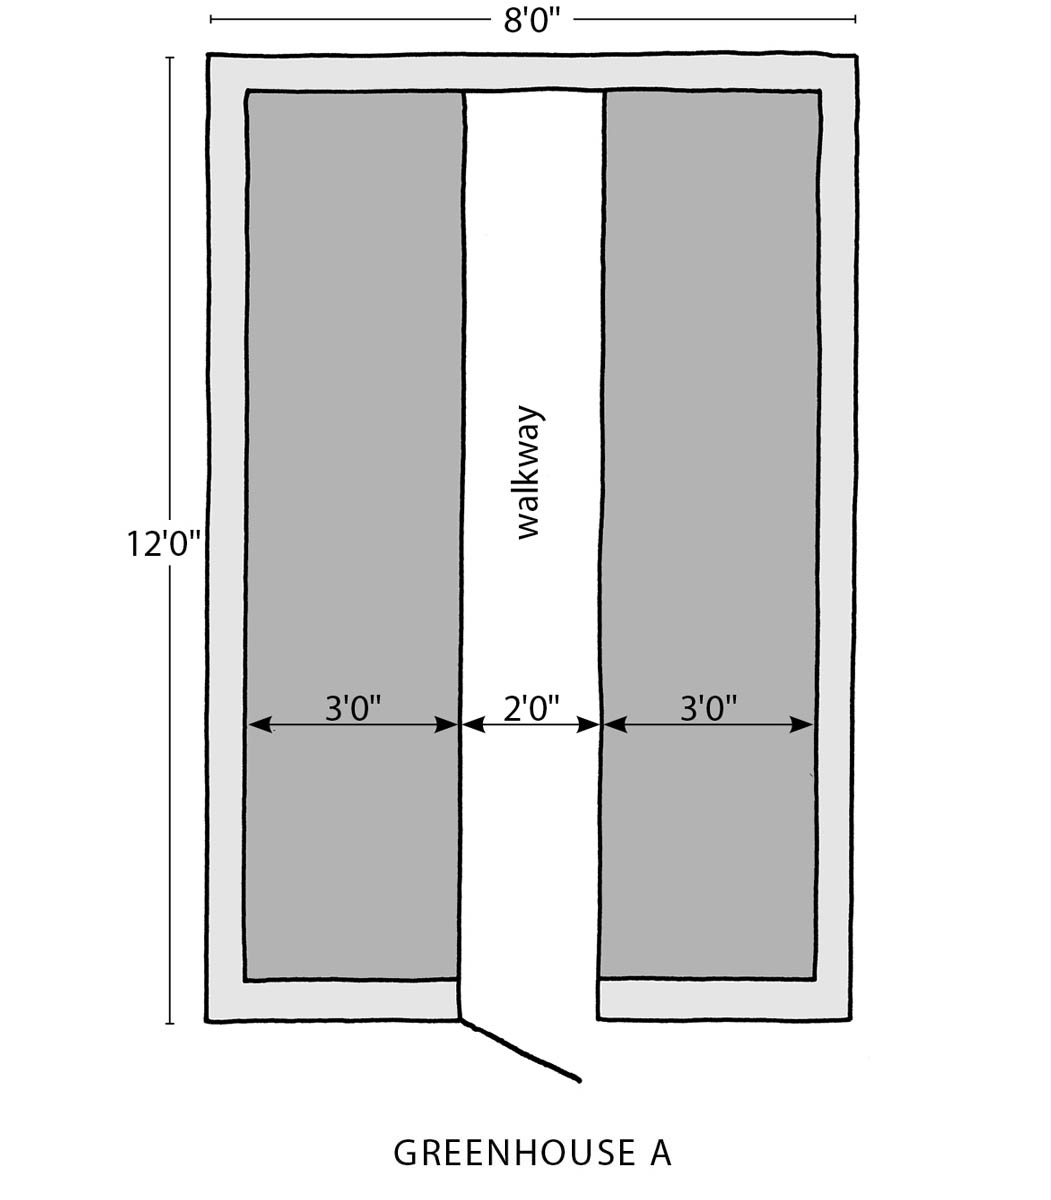
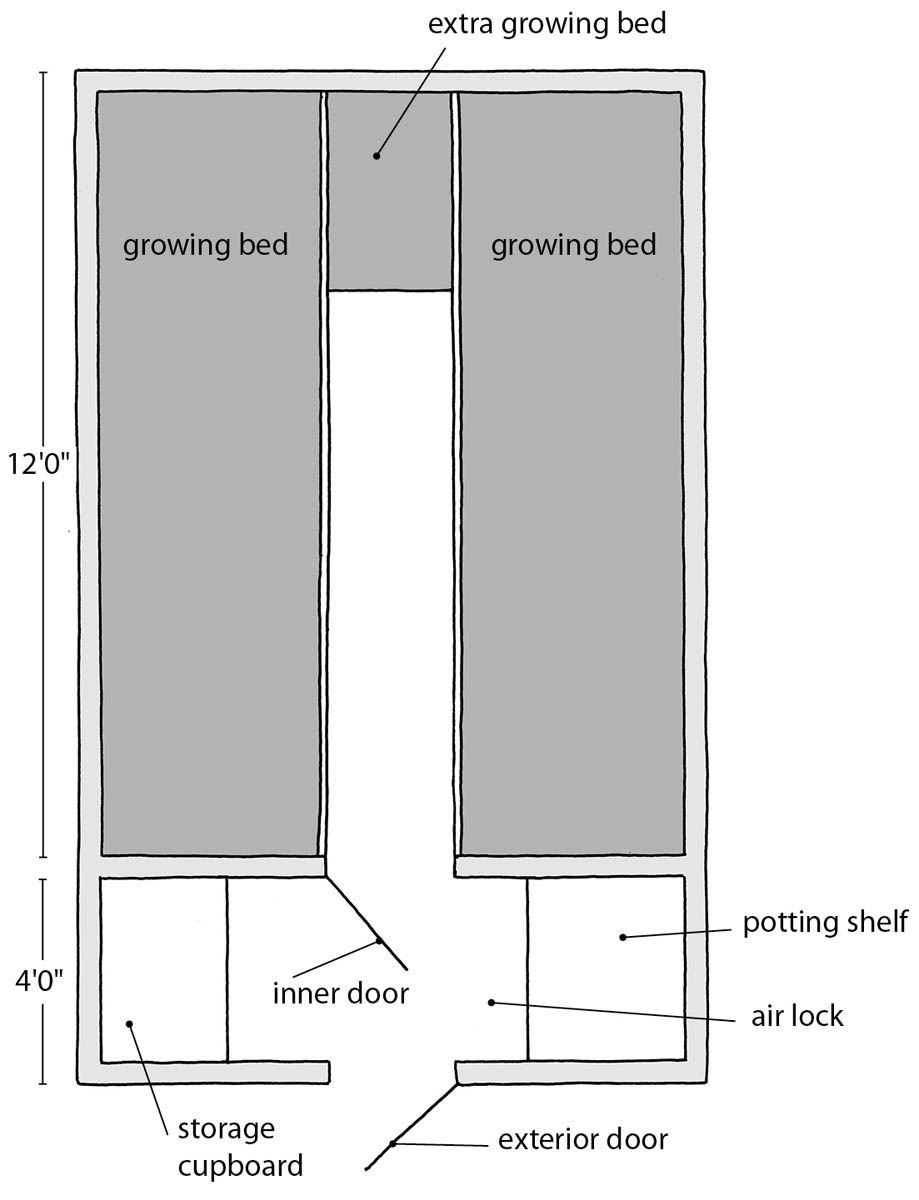
If you are growing plants directly in the ground in your greenhouse, I recommend making the beds as wide as possible (up to 4 feet) and the walkways wide enough to accommodate a wheelbarrow. I often use the wider walkway for plants in pots and tubs. Keep in mind that some structures limit headroom. Consider the four possible greenhouse layouts illustrated below. If we assume that the greenhouse is 8 feet wide and 12 feet long and the measurements are as indicated, the percentage of bed area to the area of the entire greenhouse is as follows.
Greenhouse A: 75 percent (3-foot-wide beds with a 2-foot-wide walkway)
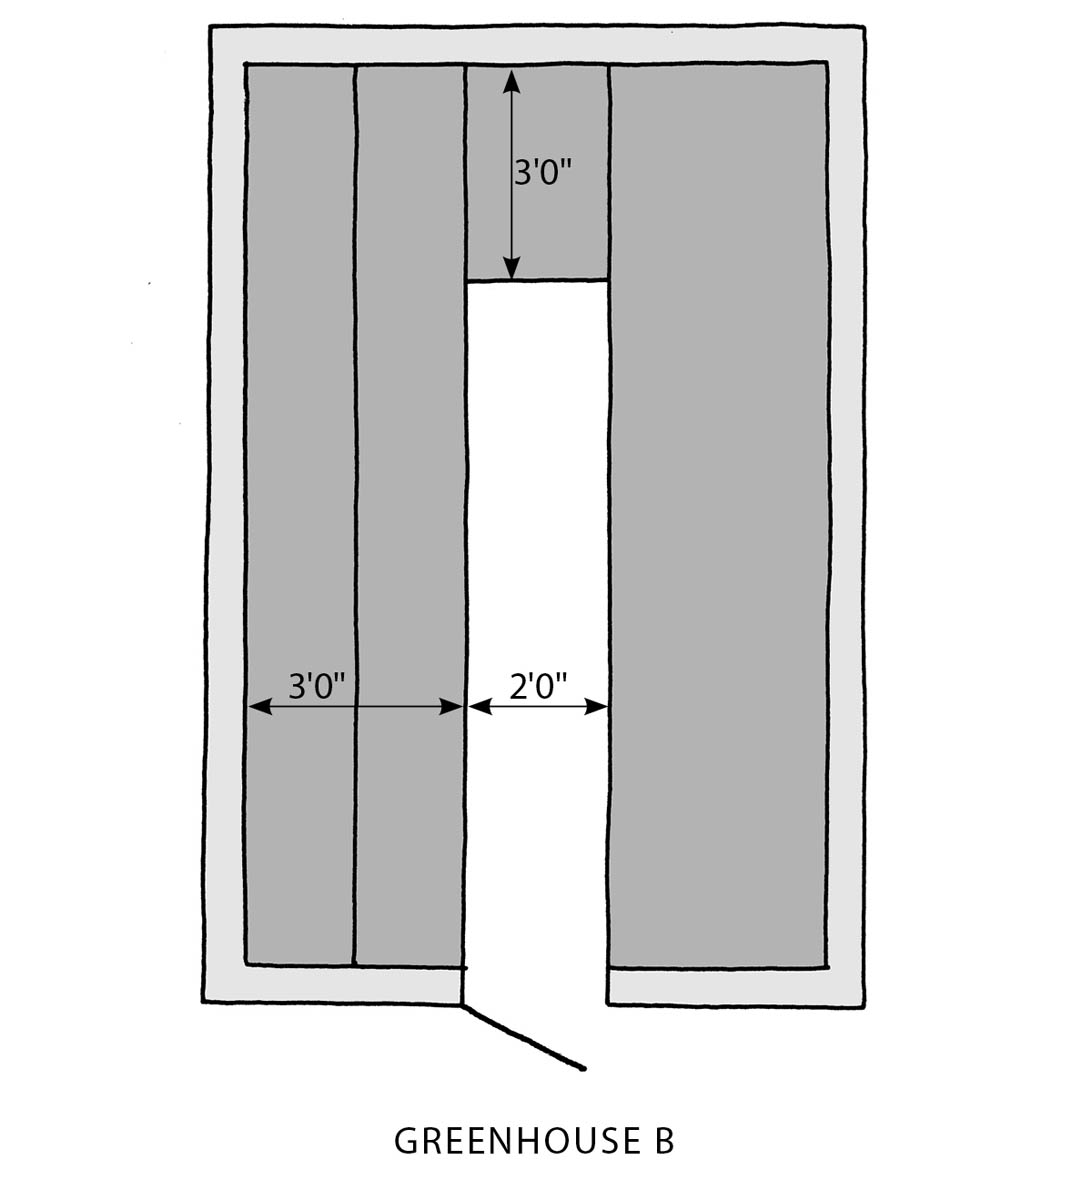
Greenhouse B: 83 percent (same as A with a 4-foot-wide bed at the end)
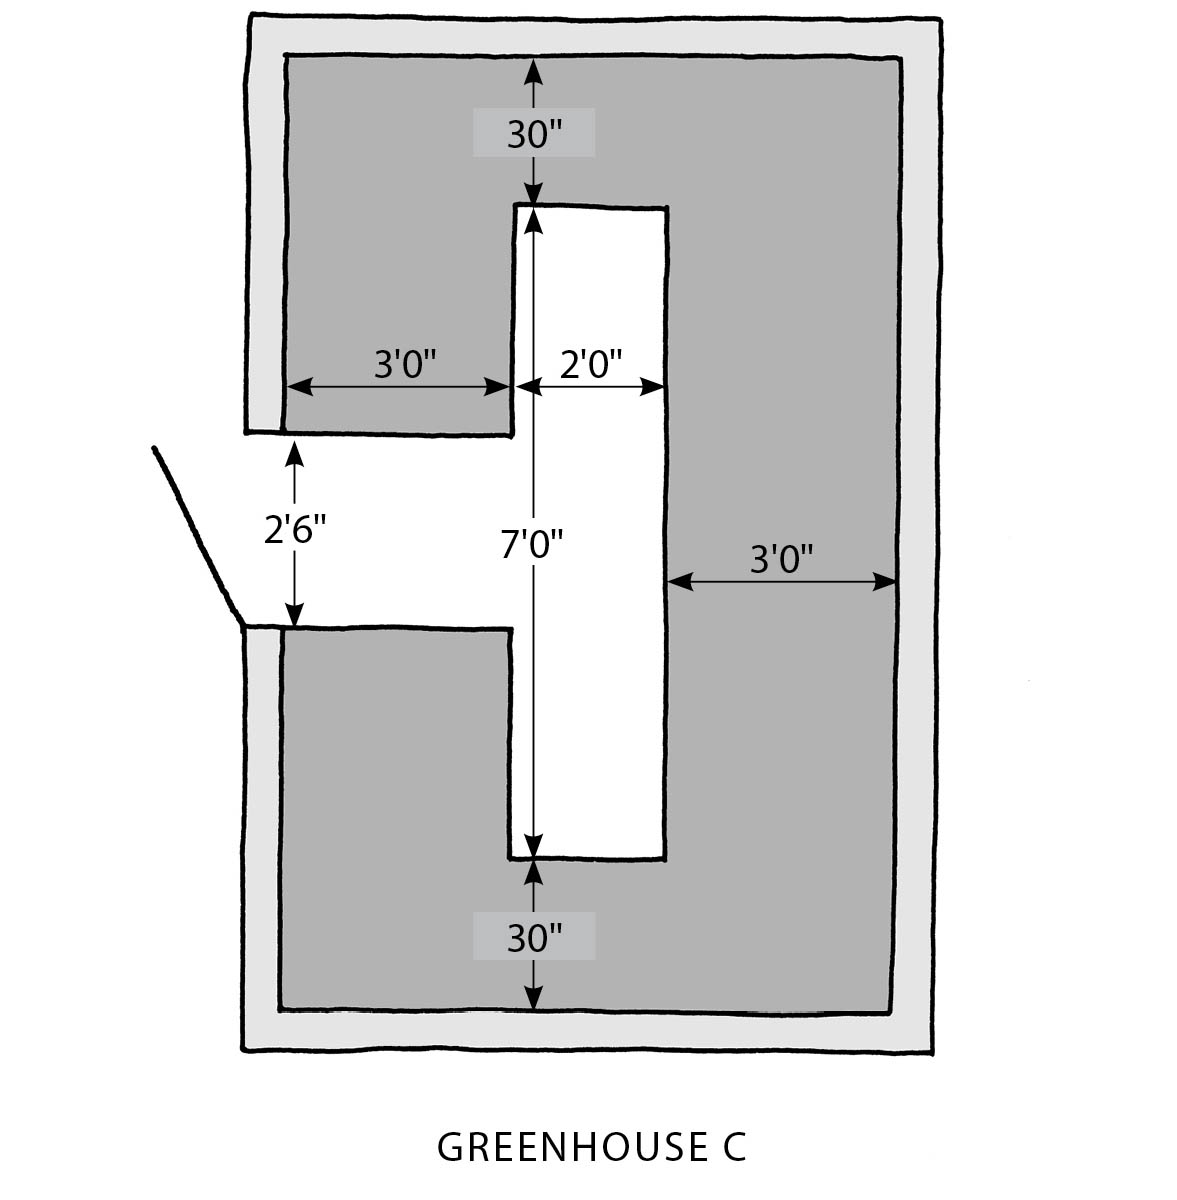
Greenhouse C: 79.7 percent (3-foot-wide beds with a 2-foot-wide walkway and 3-foot-wide end beds)
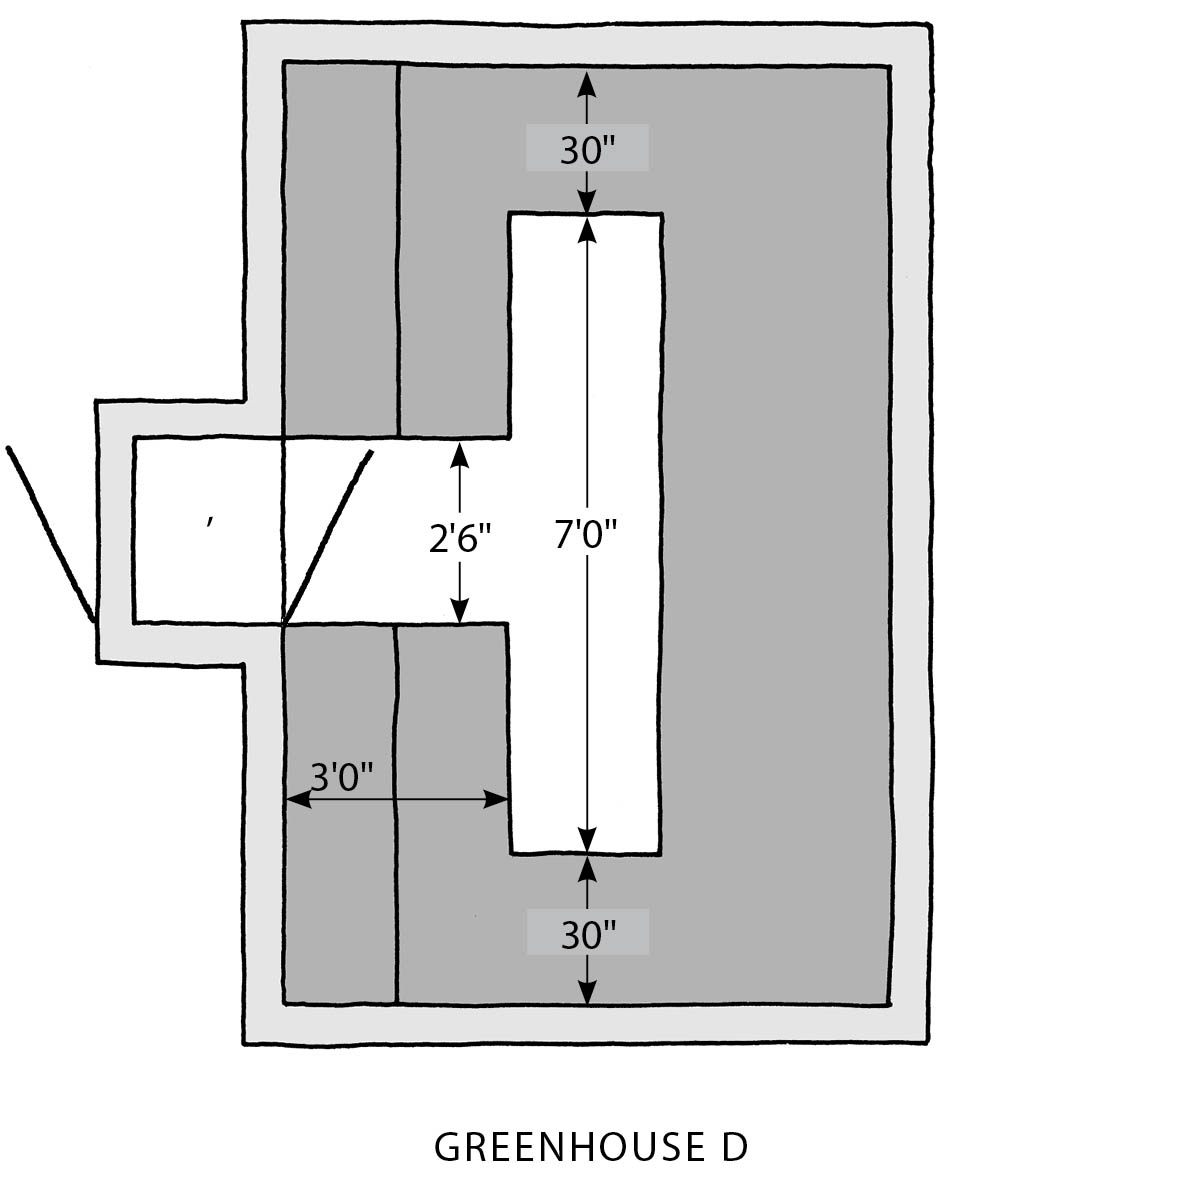
Greenhouse D: 79.7 percent (same as C with an air lock)
I prefer a floor plan that offers as much growing area as possible, and originally used a simple rectangular plan similar to Greenhouse B, although I recently altered it to accommodate three 4-foot-wide beds and a double walkway only 12 inches wide to gain much more growing area. At times, however, I’ve had to walk in the beds to tend plants. My simple solution for this problem is shown in the top illustration below: I placed concrete blocks in the beds and a block in the walkway to support a plank that rises above the plants in the beds. By resting the plank on various stationary blocks in the beds, I can move this plank from bed to bed simply by moving the block in the walkway. The plank easily supports my weight, and if the blocks in the beds are spaced right, all plants in the greenhouse beds are within reach.
Floor plans can vary enormously, depending on the greenhouse style. For example, a geodesic dome greenhouse (see the center illustration below) might have 3- or 4-foot-wide beds around the perimeter of the dome with a large water tank in the middle that serves as a heater for the space. If the structure is large enough, there could be additional beds around this central tank. If the path around the greenhouse is 2 feet wide, the central area could be 8 feet in diameter, allowing for a central tank that is 4 feet in diameter and 2-foot-wide growing beds. The larger ground area of a dome, as compared to the area in a square or rectangular, lean-to, or A-frame greenhouse, allows for much more flexibility in your floor plan. Some dome structures have waterfalls, fishponds, and all manner of exotic plants in the center area, and of course a water tank in the middle of the dome is optional; if it isn’t included, the central area could become a raised bed.
You can be creative or conventional with your greenhouse floor plan (the illustration at right shows another option for an entryway), but one final consideration is whether or not you will be using a garden cart or wheelbarrow in the structure. For maneuverability of a wheelbarrow, straight lines work best, but if you don’t plan on using such a cart in the greenhouse, curved paths and beds might be more attractive.
Along with considering the dimensions and locations of the walkways in the greenhouse, you should give some thought in the design process to the material that will be used for the greenhouse floor and paths.
The first consideration should be drainage: Every floor and walkway should drain easily. In a greenhouse with a dirt floor, the walkway material should be able to absorb moisture or allow moisture to pass through it. Note that floors of dirt or sand can sprout weeds in summer. As discussed above, if the floor is made of concrete, it should slope slightly toward the drain (see chapter 8, Setting the Drainpipe). In addition, in finishing the concrete (see chapter 8, Smoothing the Slab), you might want to make the walkways rough so they’ll be less slippery and the other areas smooth so that it’s easier to slide plant trays and pots around on them.
In my cool greenhouse, I use wood chips as a walkway. In a heated greenhouse pea stone, crushed stone, or gravel makes an attractive surface that is easy to walk on and drains well (see chapter 8, Types of Floors). It tends to be difficult, however, to drag large pots or bags across a floor of wood chips or pea stone. Some of my fig and citrus trees are 8 feet to 10 feet tall and stand in 36-inch diameter pots! To get around the problem of dragging them across the floor to the outdoors in spring, I’ve made a flat dolly from an old wheelbarrow, which moves more easily over the walkways (with help from my sons, whom I press into service).
To put in a pea stone or gravel walkway in the greenhouse, first install wood or plastic or composite lumber support boards on either side of the path. Once you have delineated the pathway, lay a strip of black plastic sheeting on the surface of the soil in the walkway to keep weeds from growing through the stone. Punch a few small holes in the plastic to help with water drainage. Then lay the pea stone or gravel on top of the plastic.
If the greenhouse is attached to your home, you can install ceramic tile over the concrete slab to make the floor more attractive or decorative — especially if the room doubles as a dining room or family room. I wouldn’t push a full wheelbarrow or heavy dolly over a tiled floor, however; doing so may crack the tiles. A concrete floor can be made more attractive by painting it with a water-resistant epoxy paint or sealer designed for concrete, or a pigment can be added to the wet concrete before it’s poured. Remember that the floor will most often be covered with pots and potting soil!
You can also install what my grandfather, who fought in World War I, called duckboards. Originally used to cover the bottoms of water-logged trenches during the war, duckboards are wooden slats that are laid over the width of the walkway. By making duckboards in sections (as opposed to fastening them together), they can be removed for cleaning or repair. While duckboards are usually wood, you could use plastic or recycled decking material, which will not rot. To make them, simply screw or nail 1⁄2-inch-thick, 2- to 3-inch-wide slats to a 2×4 cross brace. Make each section 4 feet to 6 feet long so that they are easy to remove. These boards can be painted as well. An added benefit is that the boards are much warmer to stand on for long periods in cold weather than is either concrete or bare ground.
If you decide to install a brick floor or walkway, you’ll first need to dig out the path and put down a 2- to 4-inch layer of well-compacted crushed bluestone to provide a solid base. Next, lay 1 or 2 inches of sand over the bluestone and compact this material as well. Lay the bricks in the sand and then brush sand into the crevices between the bricks until the cracks are full. Finally, rinse the entire path with water to settle the sand before brushing more into the crevices. A brick path will last for years and looks beautiful.
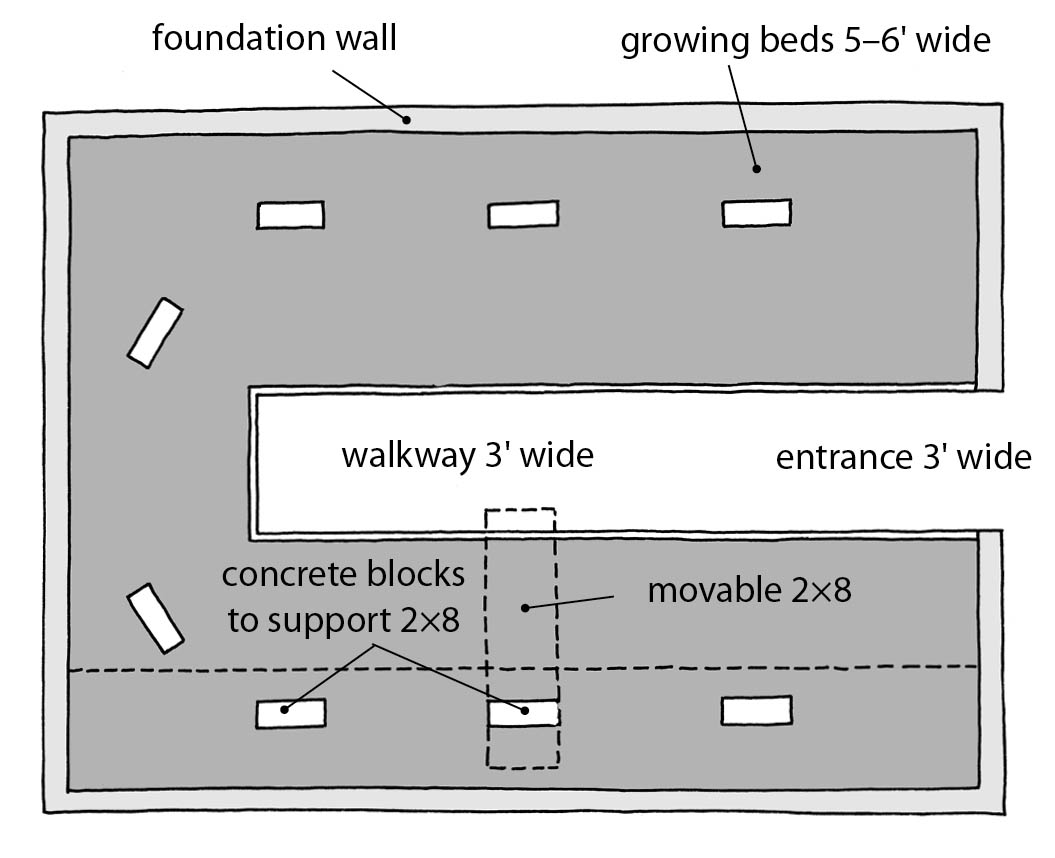
You can solve the problem of tending wide perimeter beds without stepping in them by placing concrete blocks in the beds and the walkway and stretching a plank between them to stand on as you work.
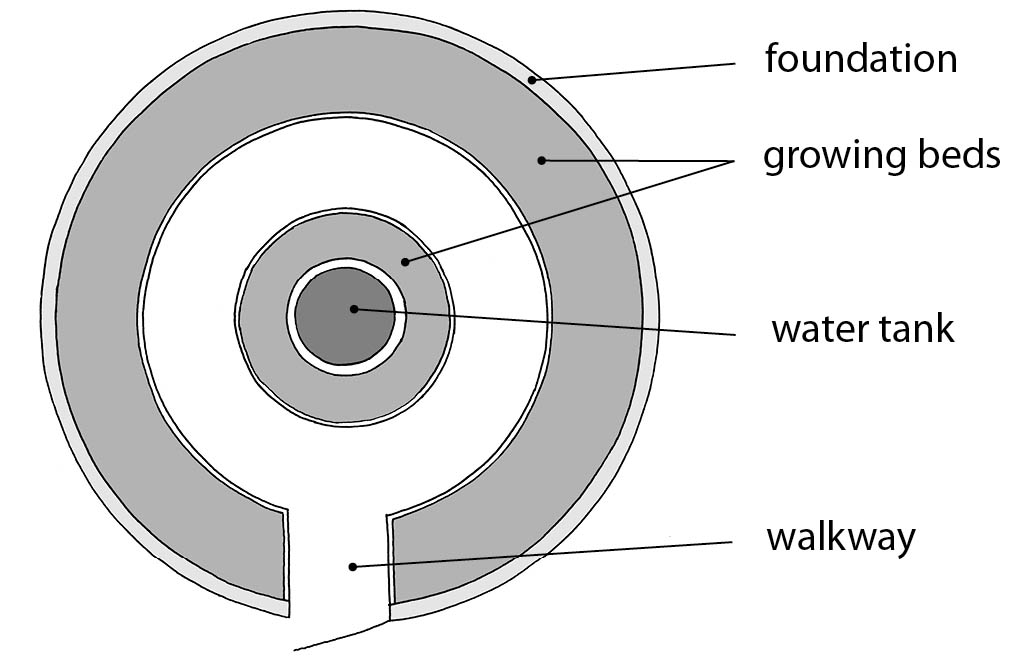
A geodesic dome greenhouse can be designed with beds around the exterior walls and a central water tank.
Benches can be used as growing areas in place of or in addition to beds, easily holding pots and seed trays. In addition, you can use the area under a bench as storage space for plants, materials, or tools. You can also increase your growing area by installing grow lights under the benches and placing plants beneath them.
Benches can be arranged to allow all kinds of work to be done in a compact area. For example, they can be arranged to form a U-shape around the perimeter of the greenhouse to maximize their area with only a 20-inch walkway in the middle. The supports below the benches can be offset to allow easy access for a wheelbarrow. A small area at the end of one of the benches can be protected with additional glass and lighting to form a seed-starting bed.
Before choosing the kind of bench to install in your greenhouse, you should familiarize yourself with possible bench dimensions. As we’ve learned, the deepest bench you buy will most often be 36 or 42 inches wide, but for many people, 42 inches is too deep. Unless plants at the back of the bench are set a little higher than those in front, a 42-inch-wide bench may make it difficult to reach them. (Note: In the northern hemisphere, always set plants higher on the north side of the greenhouse to allow those farthest “north” on the bench to receive enough sunlight.) For the average person, the maximum bench depth should be between 32 and 38 inches if it’s to be accessed from only one side, 60 inches if can be accessed from both sides.
The bench height should be determined by how tall you are. Look at the countertops in your kitchen. If you find that they are at a comfortable working height, measure them and duplicate their height in your greenhouse benches. If you are tall, feel free to make the benches higher. Bench height should be comfortable for the person who is going to work in the greenhouse the most. A bench that is too low will make your back and shoulders ache when you stand next to it, potting plants over a long period.
Plant size and type can determine bench height too: If you are growing taller bushes and trees, you’ll want benches that are about 20 inches tall. If you are growing orchids, 30 to 36 inches is optimal height, so that the tops of the plants are at or just below eye level.
If you are building a greenhouse for a person in a wheelchair, you may have to raise the bench height to at least 31 inches, so that it clears the arms of the wheelchair, and make the benches narrower (22 to 24 inches) to allow easy access to the plants farthest back. Any benches or shelves lower than 31 inches from the ground shouldn’t be more than 12 to 18 inches wide so as to allow access from a wheelchair to the plants farthest back, and any shelves above benches should be no more than 48 inches high and 12 to 15 inches wide. Remember to move bench supports inward to allow room for a wheelchair to maneuver partway under the bench tops. Of course, all these modifications can be adjusted according to the dimensions of individual wheelchairs, which vary substantially.
Every time you introduce a plant into your greenhouse you could be bringing in a new insect or disease that will decimate your other plants. If you buy a plant in a store, for example, it has likely been sprayed with pesticide to kill insects, but insect eggs may not have been killed in the process, and when you bring the plant home and put it in your greenhouse, these eggs may hatch. Ridding your greenhouse of an insect infestation can be extremely time-consuming and difficult. Because it’s always better to eliminate a potential source of trouble before it can do its damage, you should allocate a small area of your greenhouse — enough to hold one or two plants — as a quarantine area. This setup doesn’t have to be elaborate: You can use a simple 20- or 30-gallon aquarium tank set on end with a tight-fitting cover or pane of glass (which you’ll have to remove at times). The idea is to keep a new plant in the quarantine area for a few weeks, or until you’ve determined that it does not harbor a deadly disease or insects. Keep the quarantine area shaded so it won’t get hot enough to damage a plant.
As mentioned above, if you have benches in your greenhouse, the area beneath them is perfect for storing pots, pesticides, fertilizers, and all other paraphernalia, but if you plan on growing plants directly in in-ground beds, when you make your floor plan, you’ll need to consider a place to hide all the unsightly debris of gardening as well as the tools and materials that you’ll use. It’s a good idea to install a lockable cupboard underneath a bench to store all the chemicals that you might use. This keeps them safely out of reach of both toddlers and animals if you let them into your greenhouse. For greenhouses with or without benches, an air lock either with or without shelving provides another option for storage. As with other elements in your plan, if a wheelchair-bound individual will be using the greenhouse, all storage cabinets and cupboards should have handles installed within easy reach of those who can’t stand — between 27 and 45 inches from the ground.
Also consider where you’ll store heavier or bulkier items such as bags of potting soil and fertilizer if you start plants from seed.
Along with figuring out where you’ll store tools and potting soil, you should determine where you will fill seed trays and pots. If you plan on doing this type of work in the greenhouse, make sure you include a protected, warm space where you can work while winter’s chill still grips the outdoors. It should include room for a potting table. A collapsible one allows you to remove it for more room when it’s not in use. (For one type of potting bench, see project 11 in chapter 13.)
Another factor to consider early in the design and layout process is where the switches, faucets, thermostats, and electrical outlets are going to be located. Often these items are an afterthought and end up being in less optimal places. (See chapters 5 and chapter 10 for more on this topic.)
For maximum effectiveness, switches should be located near the entry door, but you can position them so that they won’t inadvertently be turned on or off when you are moving plants and materials into and out of the greenhouse.
For maximum effectiveness, switches should be located near the entry door, but you can want to position them so that they won’t inadvertently be turned on or off when you are moving plants and materials around or into and out of the greenhouse. Remember that you will need to install them in a watertight outlet box for safety when you water your plants.
The location of the thermostat deserves careful thought. If you put it at chest height, the thermostat may be 4 feet above the plants, which means plants may freeze before the thermostat registers the cooler temperature down at their level and causes the heat to kick on. A better location for a thermostat is at the same level as the plants. If they are situated on a bench, the thermostat can be at bench height. If the plants are grown directly in the ground, install the thermostat less than a foot above the plants. Like the electrical boxes and switches in the greenhouse, the thermostat should be installed with a watertight cover. Additionally, it should be shaded from the sun; often, bright sunlight can raise the thermostat thermometer 10 to 20 degrees, which may not at all reflect the air temperature at the other end of the greenhouse. This increases the possibility that your plants will freeze before the thermostat turns on the heat.
Electrical outlets should be at bench level if you want to use heating mats, water pumps, foggers, or an automatic watering system for your bench plants. If you plan to use an electric heater placed on the floor, you may need an outlet lower in the greenhouse so that the heater’s cord can reach it. Remember, however, to take into account the possibility of flooding in the greenhouse. In a future renovation of my greenhouse I plan to add a couple of outlets in water-resistant outdoor boxes and I’ll locate them about 2 feet from the floor to ensure that they do not get soaked when the greenhouse is watered.
Also consider the height of switches, faucets, thermostats, and outlets if a wheelchair-bound individual will be using the greenhouse. In this case, these should be located between 27 and 45 inches from the ground, at a height easily reached from a wheelchair.
In planning the interior layout of your greenhouse, you should carefully consider design of the entrance. For example, I once built a pit greenhouse into a bank, with the door located at ground level at the bottom of the bank and the garden located at the top of the bank, level with the top of the greenhouse. Acting as a retainer for the bank was a 4-foot-high stone wall. Though it was easy enough to bring the wheelbarrow to the door of the greenhouse, to bring it back to the garden I had to push it — often laden with plants — up a plank resting on steps in the brick wall. This effort to get plants into and out of the greenhouse became one of the factors that ultimately led to the demise of the structure. Of course, the groundhog that tunneled under the foundation, the rotting of the non-pressure-treated wood used for the framing, and the lack of enough headroom in the greenhouse were other factors that started me down the path toward building a much taller, larger, better-designed structure.
Ideally, a greenhouse’s entrance will allow you easily to reach the garden and will be wide enough to allow you easily to move a wheelbarrow or garden cart into and out of the structure. An added feature is that it will enable water to run away from the greenhouse.
As for the actual design of the entryway, my preference is to have a tight-fitting door that swings open rather than a sliding door. Unless a sliding door is an expensive, heavily insulated model from a top-quality manufacturer, it’s not likely to make a tight seal when it’s closed. Garage-style retracting doors don’t seem to seal tightly either, and often allow rodents into the greenhouse. If you intend to heat your greenhouse, a tight-sealing entry door is very important to avoid heat loss. If you do decide on a sliding door, you’ll have to make extensive use of weather stripping and other sealants to ensure that you keep out the worst of winter’s cold.
I prefer to install a storm door outside the entry door. In winter, this door helps to keep warm air in the greenhouse, and in summer, the glass panels can be replaced with screens and the inner door can be removed or left open to permit ventilation without letting insects inside.
Remember that you may have to shovel snow to get to a freestanding greenhouse in winter; you may have to tote heavy bags of manure or potting soil to the greenhouse; you may have to carry plants, equipment, and tools to and fro; and you may need to ensure that the greenhouse is accessible to those who are physically challenged. For these reasons, your greenhouse door must be easily accessible and wide enough to negotiate through it with larger objects in hand.
In most greenhouses, the door is placed on one end and reaches to the highest part of the roof to enable people to enter without bending over. But this location may not be best for certain greenhouse types or for certain sites. For example, an entrance might be located in a greenhouse’s rear wall to allow for construction of an air lock/storage or for easy access to the garden behind the structure.
The ideal entrance will be at least 6 feet high, simply to help prevent head knocks. You can bet your life that if you make the door header any lower, someone will hit his or her head on it — and will spill a huge wheelbarrow load of manure or loam as well. For width, the door need be no wider than the walkway inside the greenhouse, although if your walkway is only 20 inches wide, you can make the door wider, and if you are going to push wheelbarrows and garden carts into the greenhouse, the door will need to be at least 3 feet wide. If you are planning a handicapped-accessible greenhouse, most experts say the door should be at least 34 inches wide; 45 inches is the recommended width.
Another feature that you can consider is an air lock, especially if you plan to heat the greenhouse and grow plants during winter. The idea of an air lock is to provide a space where the warm air of the greenhouse cannot flow directly to the cold outside and the colder outside air cannot directly enter the warmer greenhouse. As mentioned, with careful design, an air lock can also become a potting shed as well as a storage area for tools and materials.
The path outside of the greenhouse leading to the entrance ideally should have no sharp curves, to make it easy to wheel a garden cart or wheelbarrow directly into the structure. If the greenhouse is on a slab or is raised in any way, consider constructing a ramp instead of steps. This will make it easier for everyone to use and access the greenhouse. If your ramp will be accommodating a wheelchair, a 1:12 slope (1 inch of rise per 12 inches of run) is the maximum allowed in both the United States and Britain. If the ramp is long, a level section midway is an important addition, as are rails along one or both sides. The ramp width should be at least 4 feet and should allow room for a wheelchair to turn around. It should have no sudden shifts in direction, and there should be no steps or sills between the ramp and the entrance to the greenhouse.
Before building, while your greenhouse is in the planning phase, it’s important to check with the local building department to learn if a building permit is required to install a greenhouse. In most cases, if the structure is to be built on a permanent foundation, you’ll need a permit. In addition to providing permits, your town or city building office can tell you what types of glazing have been approved for use in your area. Note that if you do have to obtain a permit, you’ll need a drawing or plan of the greenhouse so that the building official can verify that the structure will be built to current code.
Recently, in certain areas such as Florida and Rhode Island, there has been a trend toward requiring installation of hurricane-proof glass in all buildings. This extremely expensive laminated glass is able to withstand (without shattering) the stress of impact from a 2×4 flying through the air and striking it like a missile. If you are installing an attached greenhouse with glass glazing in a hurricane-prone area, you may have to install this glass.
If you plan to install lighting, water, or a heating system or plan to incorporate any kind of open flame or furnace, you may also need an electrical, plumbing, and heating permit. A heater that has an open flame may also require a fire code inspection. All these permits will add to the cost of your project and should be considered early on.
In addition, you may need a zoning or site plan showing the location of the greenhouse on your property so that building officials can verify that you have obeyed all the setbacks (especially if the greenhouse is to be situated close to one of your property lines) and have, for safety’s sake, taken into consideration the location of the septic system and all power lines. If you have buried power lines on your property, it would be best to call your utility company early in the planning stage and have it locate these for you. Most companies provide this service for free. (For the Dig Safe website, which provides information and phone numbers to call if you plan on digging for a foundation or power and water installation anywhere on your property, see Resources).
Check with your city or town to determine whether there are any other requirements to meet before you build. Some requirements, such as setbacks, can involve a public hearing, and in many areas such hearings are scheduled only on set days of the month, which can affect the building schedule if you wait till the last minute.
Planning where you will situate your greenhouse, how large it will be, and its layout or floor plan certainly takes some time. It’s best to tackle these issues on a cold winter night, next to a roaring fire, long before the growing season begins, when you have the time to make sketches until you get it right. Planning these elements is essential to erecting a greenhouse in which everything functions smoothly. Remember that making changes once construction has begun can be very expensive, but it costs little or nothing to make changes during the planning stage.