BASICS

TOOLS & MATERIALS
Drawing is not only fun, it is also an important art form in itself. Even when you write or print your name, you are drawing! If you organize the lines, you can make shapes, and when you carry that a bit further and add dark and light shading, your drawings begin to take on a three-dimensional form and look more realistic. One of the great things about drawing is you can do it anywhere—and the materials are very inexpensive. You get what you pay for though, so purchase the best you can afford at the time, and upgrade your supplies whenever possible. Although anything that makes a mark can be used for some type of drawing, you’ll want to make certain your magnificent efforts will not fade over time. Here are some of the materials that will get you off to a good start.

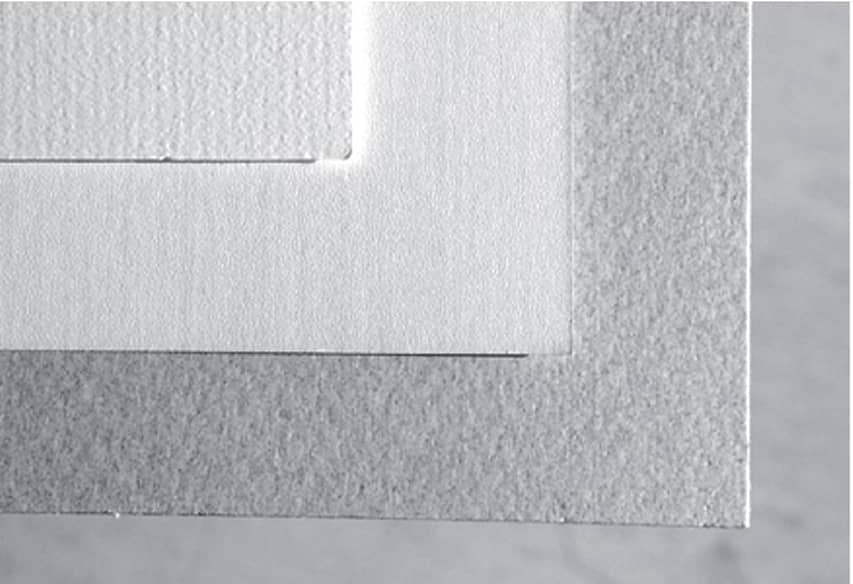
Charcoal Papers Charcoal paper and tablets are available in a variety of textures. Some of the surface finishes are quite pronounced and can be used to enhance the texture in your drawings. These papers also come in a variety of colors, which can add depth and visual interest to your drawings.
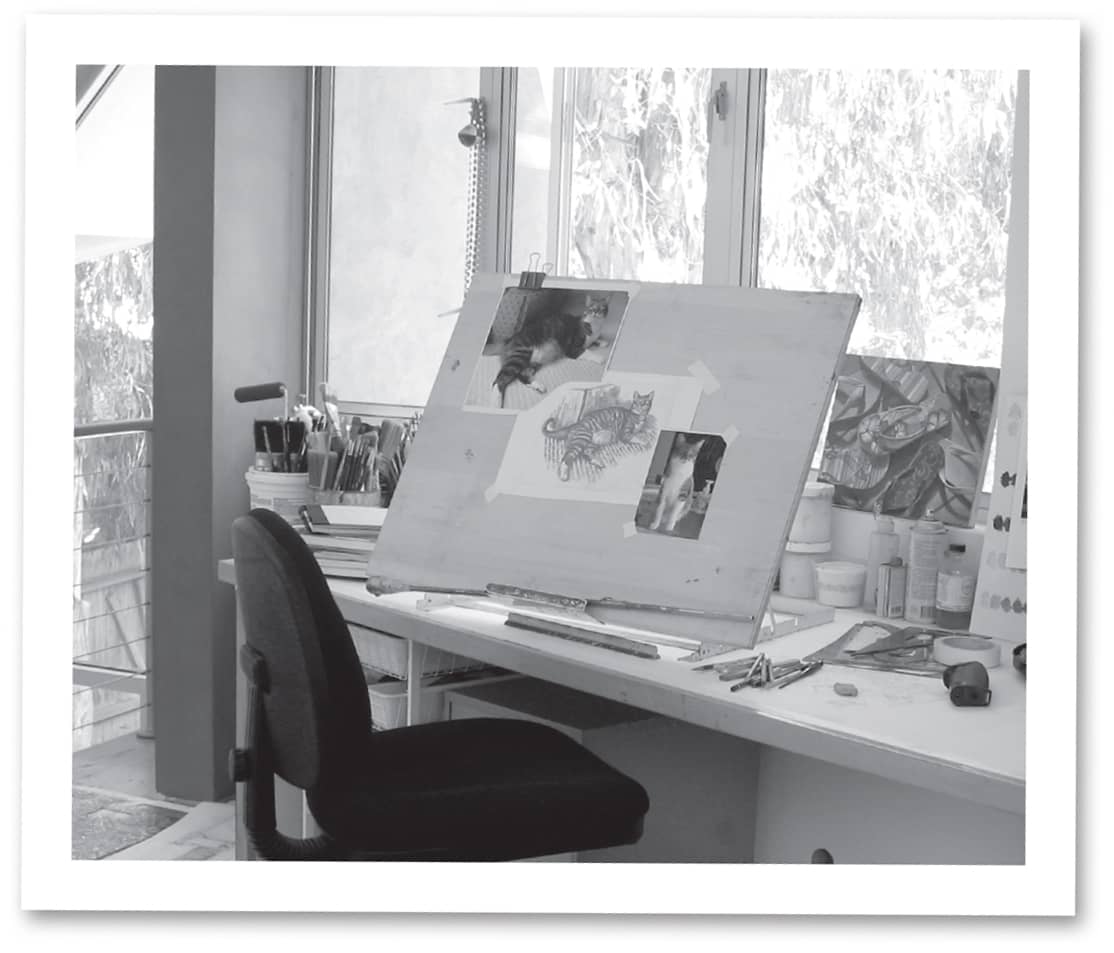
Work Station It is a good idea to set up a work area that has bright lighting and enough room for you to work and lay out your tools. Of course, an entire room with track lighting, an easel, and a drawing table is ideal. But all you really need is a place by a window for natural lighting. When drawing at night, use a soft white light bulb and a cool white fluorescent light so you have both warm (yellowish) and cool (bluish) light.
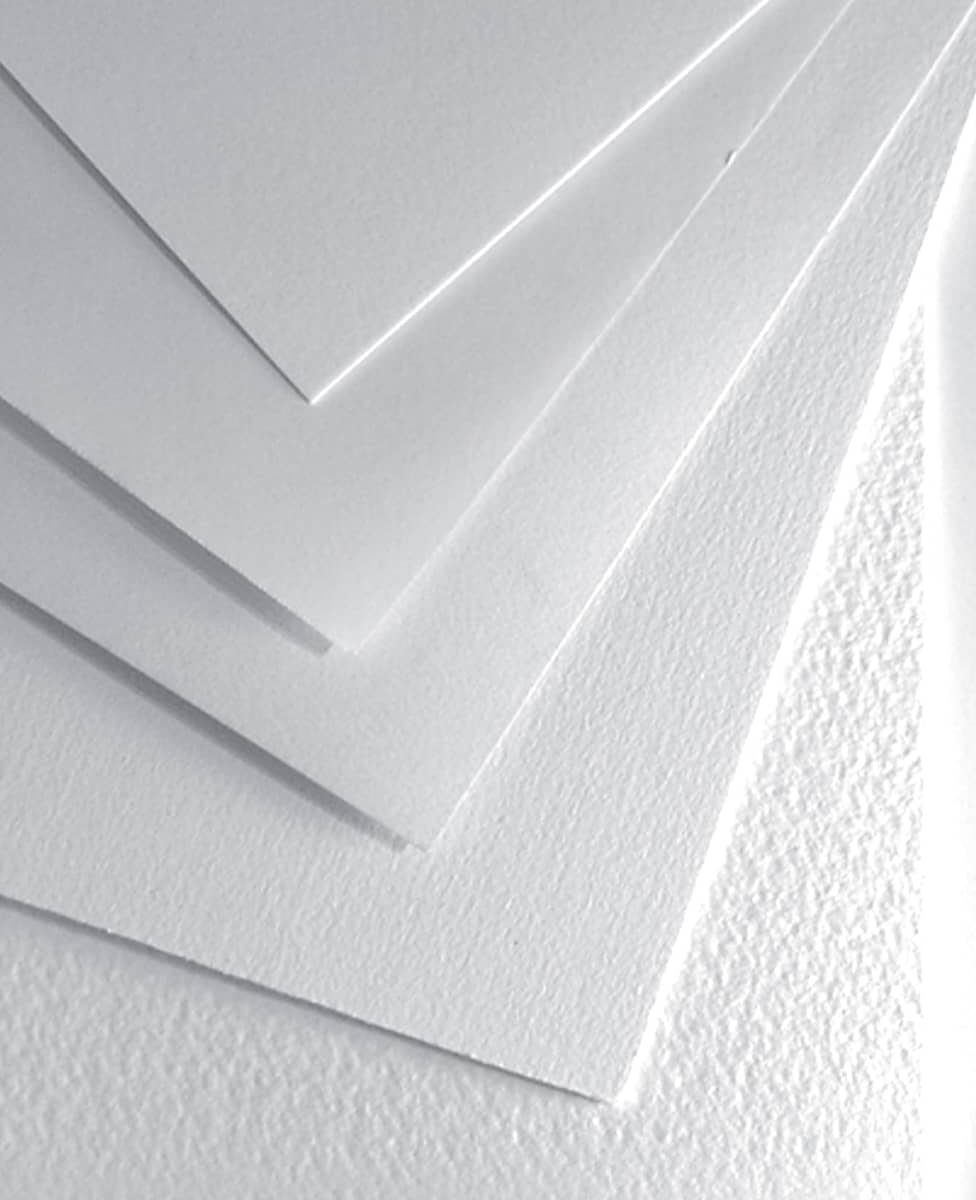
Drawing Papers For finished works of art, using single sheets of drawing paper is best. They are available in a range of surface textures: smooth grain (plate and hot pressed), medium grain (cold pressed), and rough to very rough. The cold-pressed surface is the most versatile. It is of medium texture but not totally smooth, so it makes a good surface for a variety of drawing techniques.
GATHERING THE BASICS
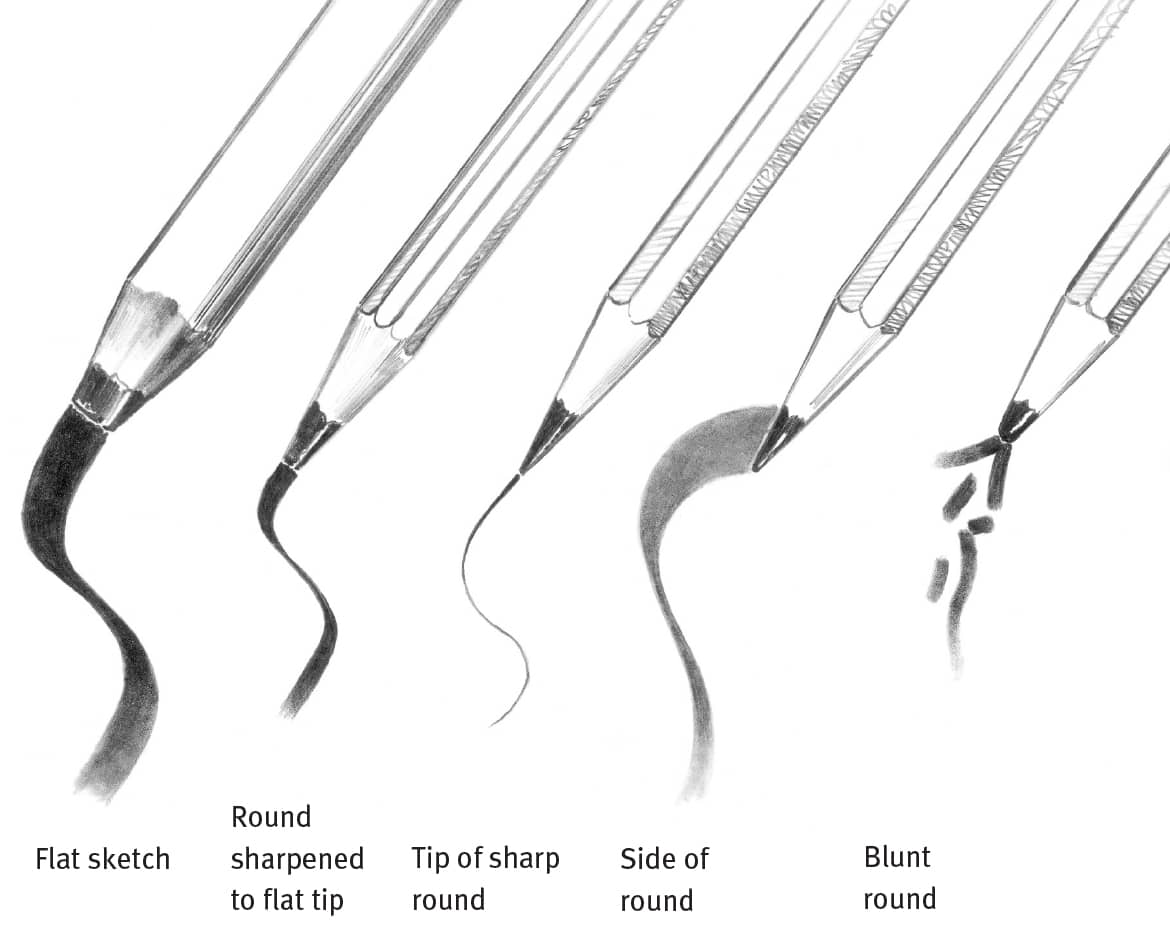
You don’t need a lot of supplies to start; you can begin enjoying drawing with just a No. 2 or an HB pencil, a sharpener, a vinyl eraser, and any piece of paper. You can always add more pencils, charcoal, tortillons, and such later on. When shopping for pencils, notice that they are labeled with letters and numbers; these indicate the degree of lead softness. Pencils with B leads are softer than ones with H leads and make darker strokes. An HB is in between, which makes it very versatile and a good beginner’s tool. The chart on the right shows a variety of drawing tools and the kinds of strokes that are achieved with each one. As you expand your pencil supply, practice shaping different points and creating different effects with each pencil by varying the pressure you put on it. The more comfortable you are with your tools, the better your drawings will be!
GATHERING OTHER DRAWING TOOLS
I start my drawings with graphite pencils, but I also like to use other tools as my pieces progress. For example, Conté crayons and charcoal produce chalky, smudged lines that soften the look of a subject. Outlining a drawing with black ink really makes a subject “pop” (see here), and thin washes of ink (or black watercolor) applied with a paintbrush produce smooth shadings.
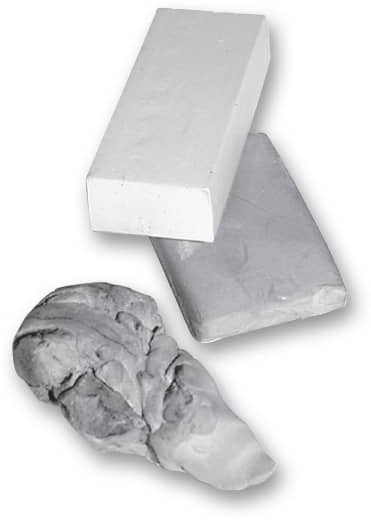
Artist’s Erasers A kneaded eraser is a must. It can be formed into small wedges and points to remove marks in very tiny areas. Vinyl erasers are good for larger areas; they remove pencil marks completely. Neither eraser will damage the paper surface unless it is scrubbed too hard.
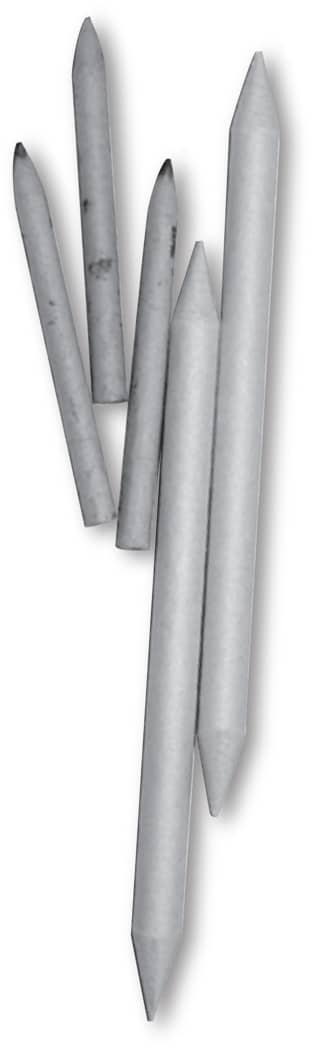
Tortillons These paper “stumps” can be used to blend and soften small areas where your finger or a cloth is too large. You can also use the sides to quickly blend large areas. Once the tortillons become dirty, simply rub them on a cloth and they’re ready to go again.

Utility Knives Utility knives (also called “craft” knives) are great for cleanly cutting drawing papers and matboard; you can also use them for sharpening pencils. (See the box on the right.) Blades come in a variety of shapes and sizes and are easily interchanged. But be careful; the blades are as sharp as scalpels!
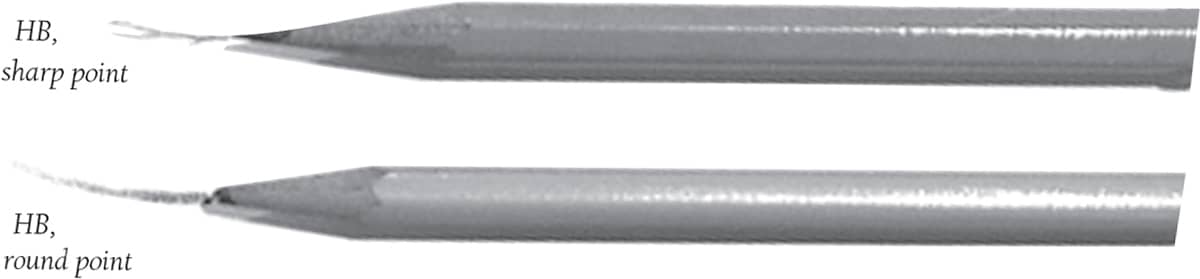
HB An HB with a sharp point produces crisp lines and offers good control. With a round point, you can make slightly thicker lines and shade small areas.
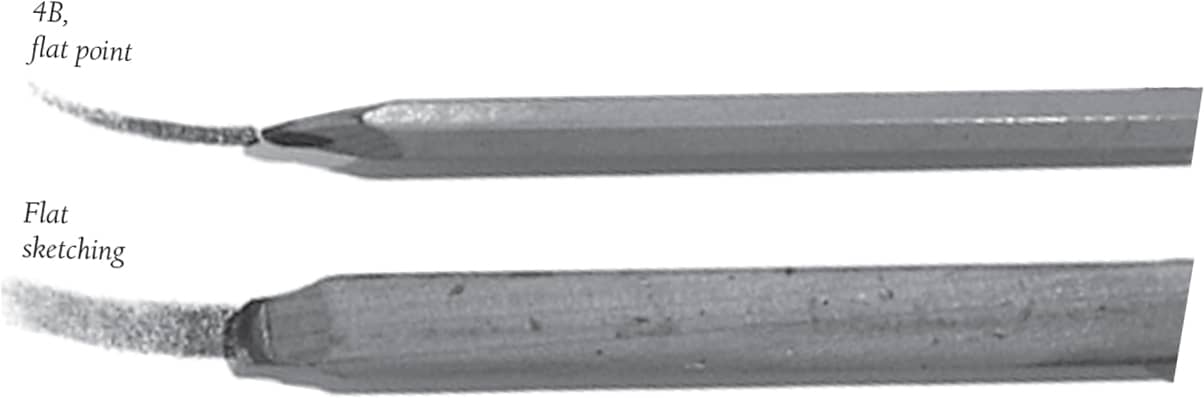
Flat For wider strokes, use the sharp point of a flat 4B. A large, flat sketch pencil is great for shading large areas, but the sharp, chiseled edge can also be used to make thinner lines.
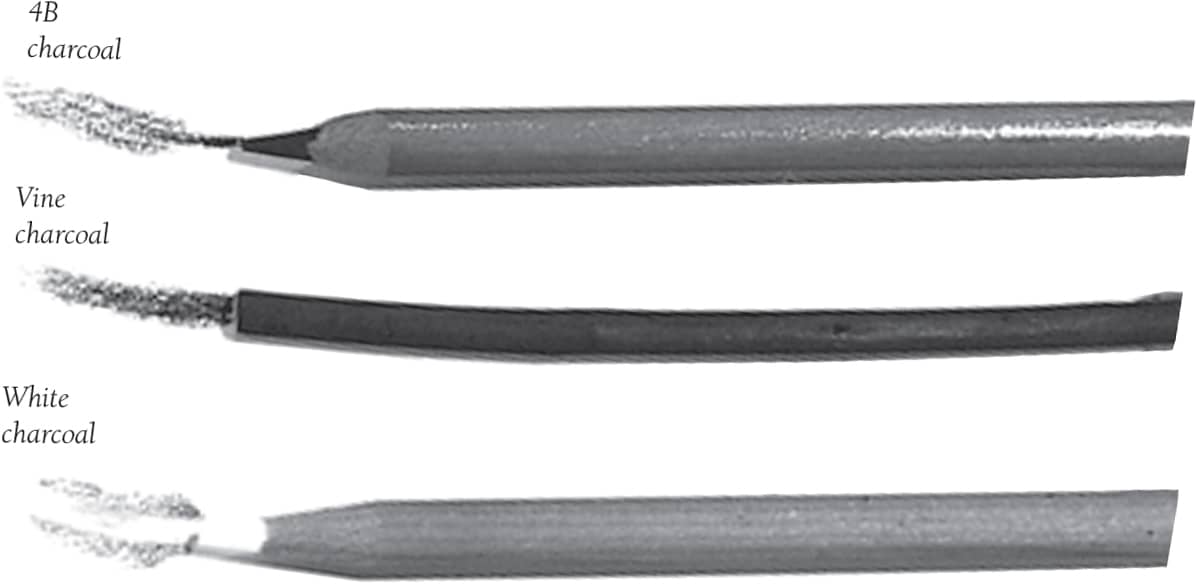
Charcoal 4B charcoal is soft, so it makes a dark mark. Natural charcoal vines are even softer and leave a more crumbly residue on the paper. Some artists use white charcoal pencils for blending and lightening areas in their drawings.
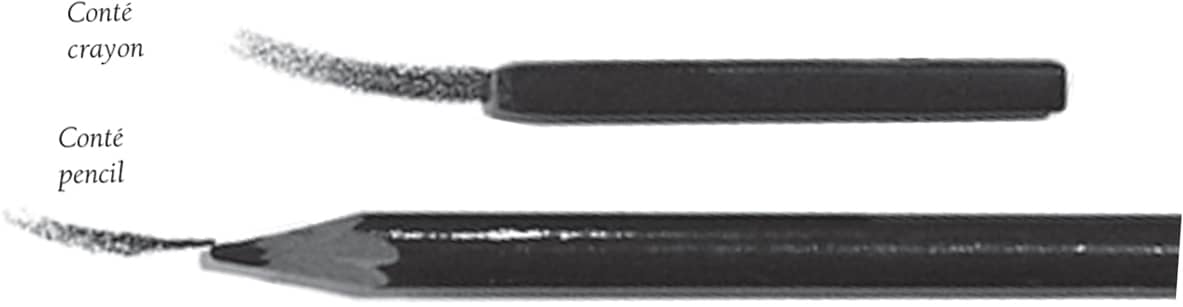
Conté Crayon or Pencil Conté crayon is made from very fine Kaolin clay. It used to come only in black, white, red, and sanguine sticks, but now it’s also available in a wide range of colored pencils. Because it’s water soluble, it can be blended with a wet brush or cloth.
SHARPENING YOUR DRAWING IMPLEMENTS
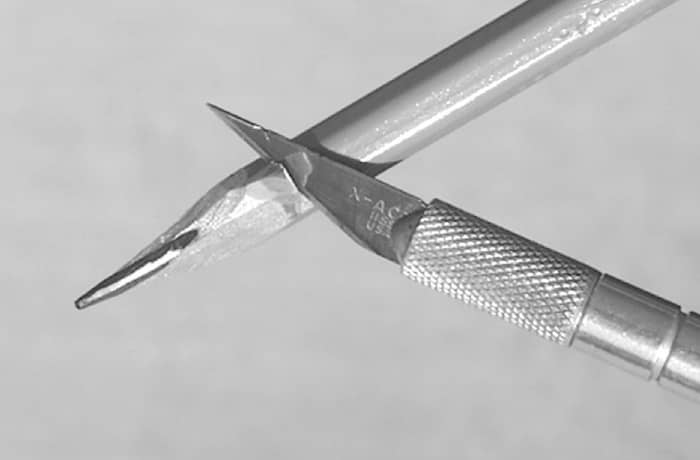
Utility Knife A knife can be used to form different points (chiseled, blunt, or flat) than those which are possible with an ordinary pencil sharpener. Hold the knife at a slight angle to the pencil shaft, and always sharpen away from you by taking off only a little wood and graphite at a time.
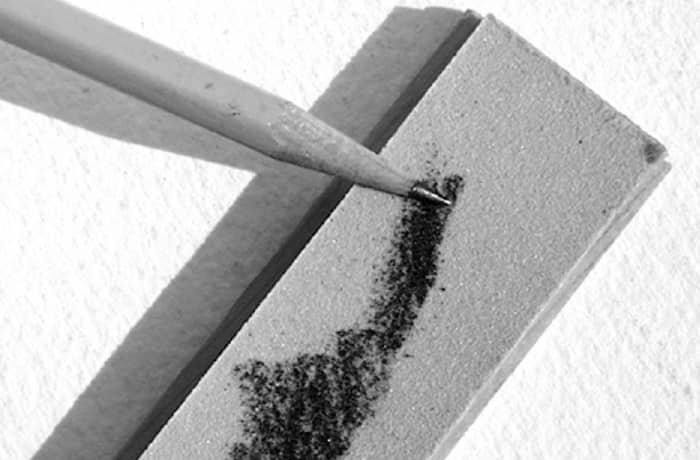
Sandpaper Block Sandpaper will quickly hone the lead into any shape you wish. It will also sand down some of the wood. The finer the grit of the paper, the more controllable the resulting point. Roll the pencil in your fingers when sharpening to keep the shape even.

Rough Paper Rough paper is wonderful for smoothing the pencil point after tapering it with sandpaper. This is a great way to create a very fine point for small details. It is also important to gently roll the pencil while honing to sharpen the lead evenly.
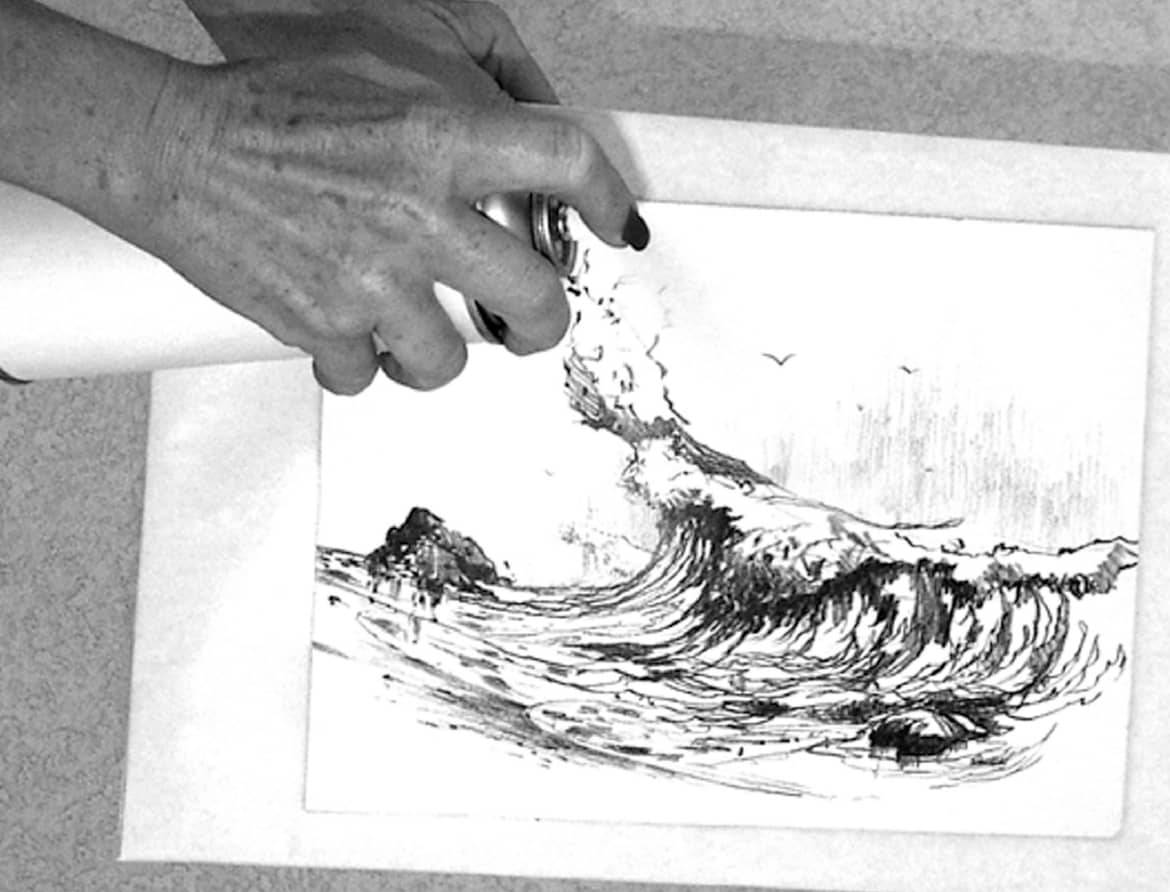
Spray Fix A fixative “sets” a drawing and protects it from smearing. Some artists avoid using fixative on pencil drawings because it tends to deepen the light shadings and eliminate some delicate values. However, fixative works well for charcoal drawings. Fixative is available in spray cans or in bottles, but you need a mouth atomizer to use bottled fixative. Spray cans are more convenient, giving a finer spray and more even coverage.
ADDING ON
Unless you already have a drawing table, you will probably want to purchase a drawing board. It doesn’t have to be expensive; just get one large enough to accommodate individual sheets of drawing paper. Consider getting a drawing board with a cut-out handle, especially if you want to draw outdoors, so you can easily carry it with you.
Basic Underhand The basic underhand position allows your arm and wrist to move freely, which results in fresh and lively sketches. Drawing in this position makes it easy to use both the point and the side of the lead by simply changing your hand and arm angle.
Underhand Variation Holding the pencil at its end lets you make very light strokes, both long and short. It also gives you a delicate control of lights, darks, and textures. Place a protective “slip sheet” under your hand when using this position so you don’t smudge your drawing.
Writing The writing position is the most common, and it gives you the most control for fine details and precise lines. Be careful not to press too hard on the point, or you’ll make indentations in the paper. Also remember not to grip the pencil too tightly, as your hand may cramp.
GETTING STARTED
Before you begin sketching, you’ll want to get accustomed to using your whole arm, not just your wrist and hand, to draw. (If you use only your wrist and hand, your sketches may appear stiff or forced.) Practice drawing freely by moving your shoulder and arm to make loose, random strokes on a piece of scrap paper. Try to relax, and hold your pencil lightly. You don’t need to focus on a particular subject as you warm up; just get used to the feel of a pencil in your hand and the kinds of strokes you can achieve.
LEARNING CONTROL
Once your arm is warmed up, try the strokes and techniques shown here. Although making circles, dots, scribbles, and lines may seem like senseless doodling, creating these marks is actually a great way to learn control and precision—two traits essential to pencil drawing. You should also experiment with different pencil grips to see how they affect the lines you draw. The more you practice with different strokes, sketching styles, and grips, the quicker and more skilled your hand will become!
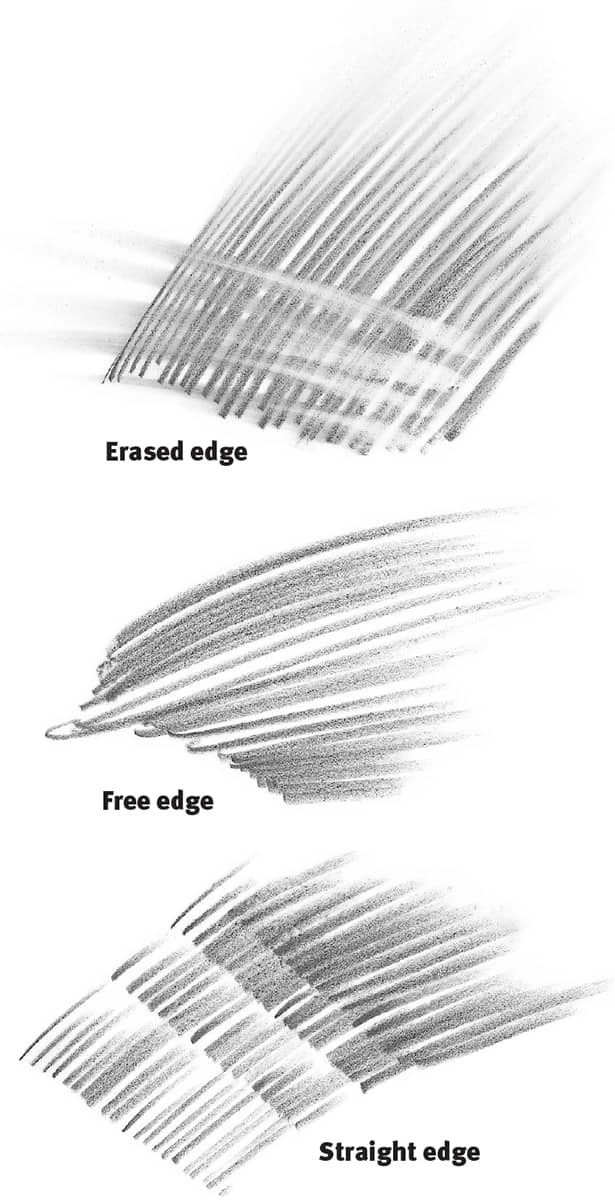
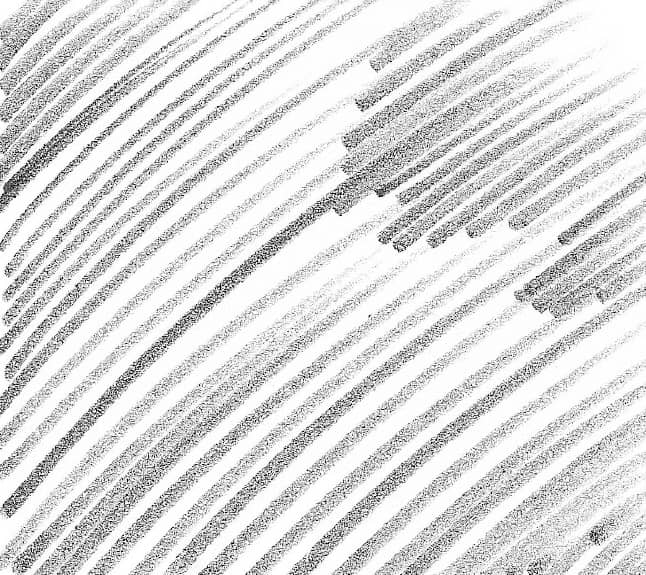
Varying Edges Making small adjustments in your drawings to suit your subject is important. For example, pencil strokes that follow along a straight edge are ideal for creating striped fur. But free edges are more appropriate for creating a natural-looking coat, as straight edges can make the hair seem too stiff and structured. Edges created with an eraser also have their place—these lines can be used to provide a smooth transition between textures or values.

Practicing Loose Strokes Although drawing requires a certain amount of precision, loose strokes are also essential to art. Free, circular strokes are great for warming up or quickly recording subjects, such as the rough shape of a pot-bellied pig.
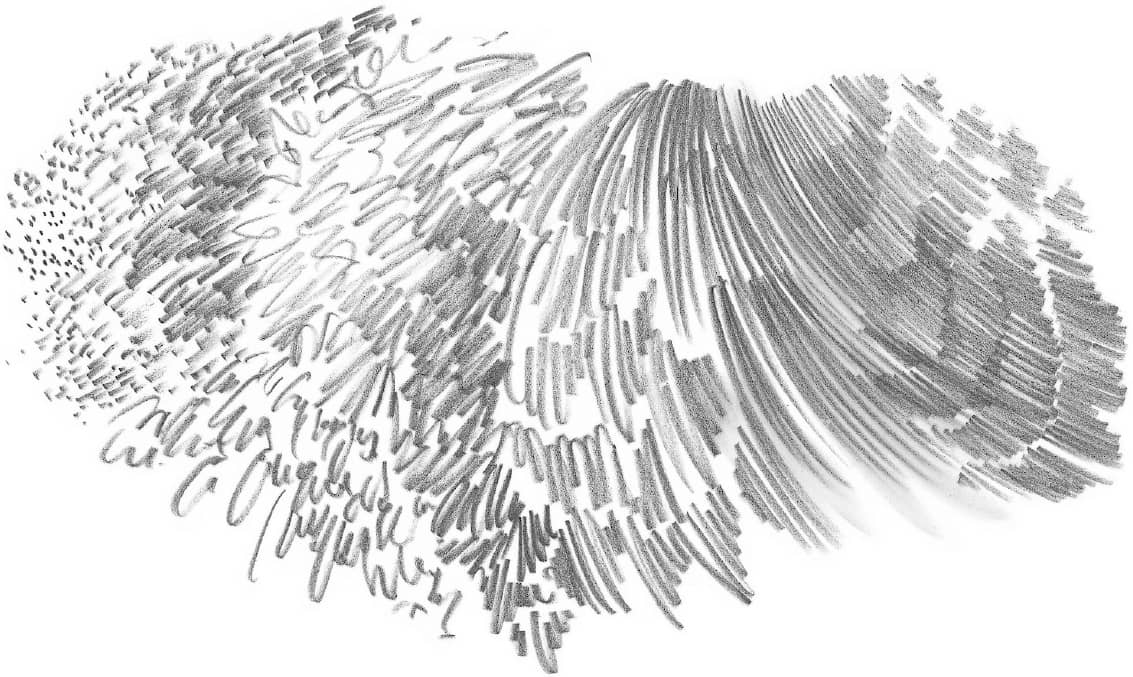
Modifying Strokes You can capture the length, thickness, and texture of an animal’s hair by varying the length and curve of your strokes. Small dots are perfect for short, bristly fur; scribbles are appropriate when hair is thick and frizzy; and long, sweeping strokes imply smoothness. Try varying the pressure of your pencil and the length and curve of your strokes to see what other textures you can produce.
EXPERIMENTING WITH STROKES
Learning to draw requires a certain amount of control and precision, so get used to the feel of a pencil in your hand and the kinds of strokes you can achieve. Before you begin sketching, experiment with different pencil grips to see how they affect the lines you produce. Fine, detailed work is more easily accomplished with a sharp pencil held as though you are writing, whereas broad shading is best done with the side of your pencil as you hold it in an underhand position. Practice holding the pencil underhand, overhand, and in a writing position to see the different lines you can create.
You can also vary your strokes by experimenting with the sharpness or dullness of your pencil points. A sharp point is good for keeping your drawings detailed and refined; the harder the lead, the longer your pencil point remains sharp and clean. A flat point or chisel point is helpful for creating a wider stroke, which can quickly fill larger areas. Create a flat or chisel point by rubbing the sides of a pencil on a sandpaper block or even on a separate sheet of paper.
BASIC TECHNIQUES
Practicing basic techniques will help you understand how to manipulate the pencil to achieve a variety of effects. Pencil can be used to recreate everything from the scaly skin of a snake to the soft, fluffy fur of a bunny. But before you attempt to render animal textures (see here), it’s a good idea to get to know your tools and the variety of strokes you can make. On this page, you’ll learn a number of shading techniques as well as how to make a two-dimensional drawing appear three-dimensional.
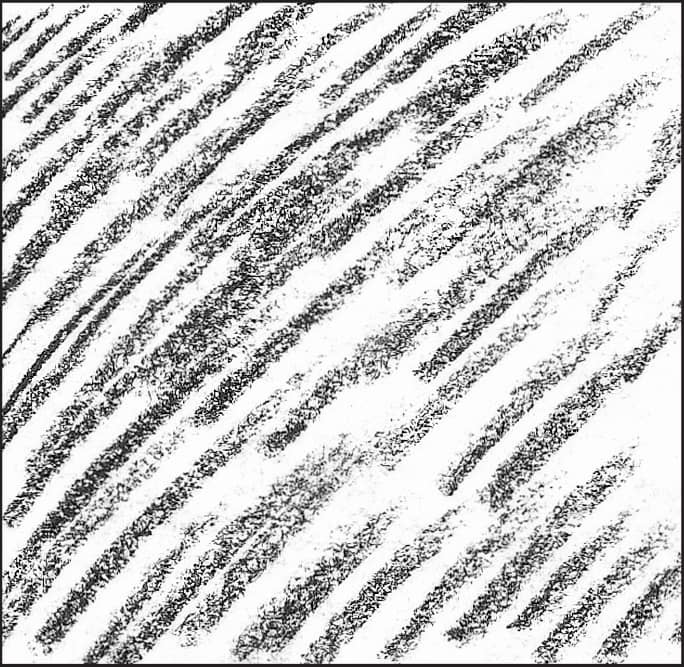
Hatching
A basic method of shading is to fill an area with hatching, which is a series of parallel strokes.
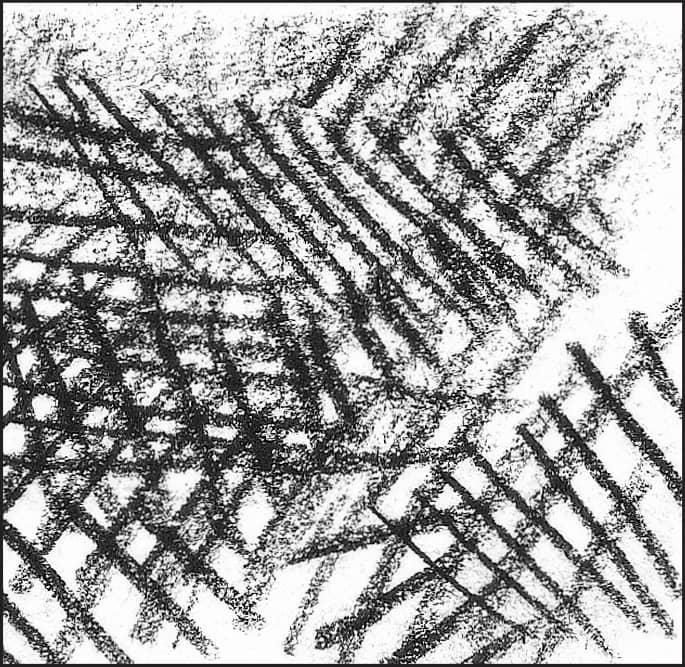
Crosshatching
For darker shading, go over your hatching with a perpendicular set of hatch marks.
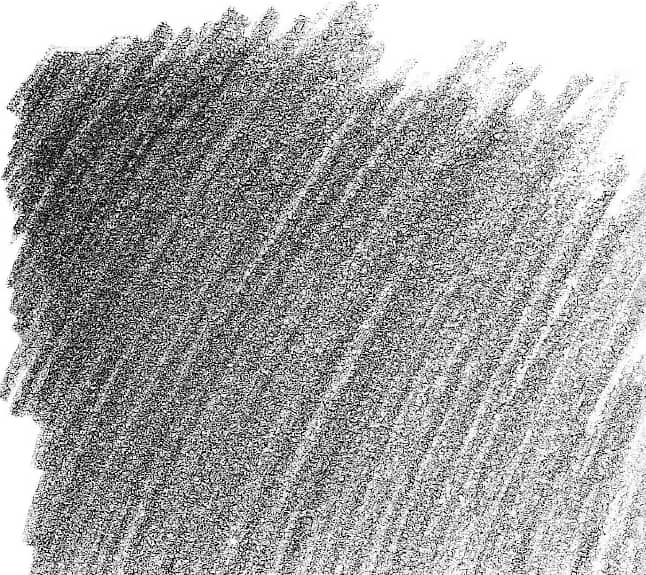
Shading Darkly

By applying heavy pressure to the pencil, you can create dark, linear areas of shading.
Blending
For smoother shading, rub a blending stump over heavily shaded areas to blend the strokes.
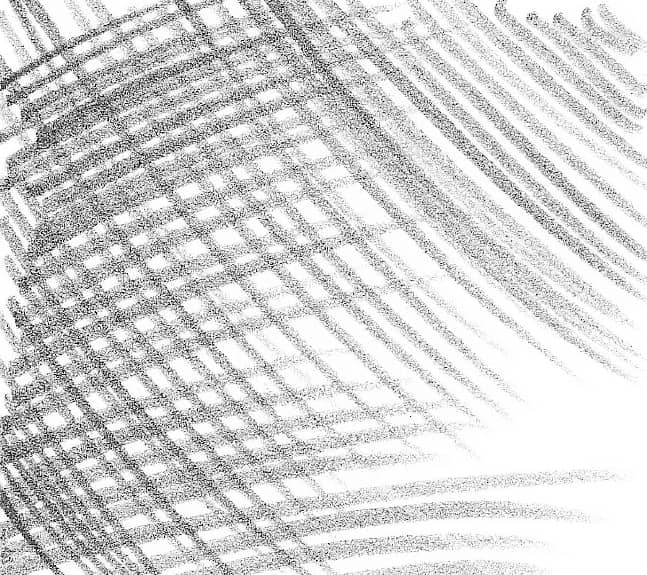
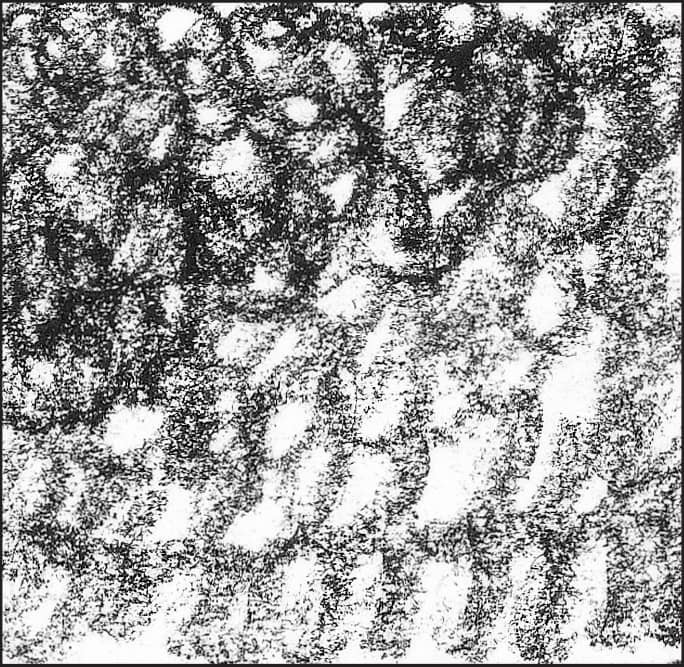
Shading with Texture

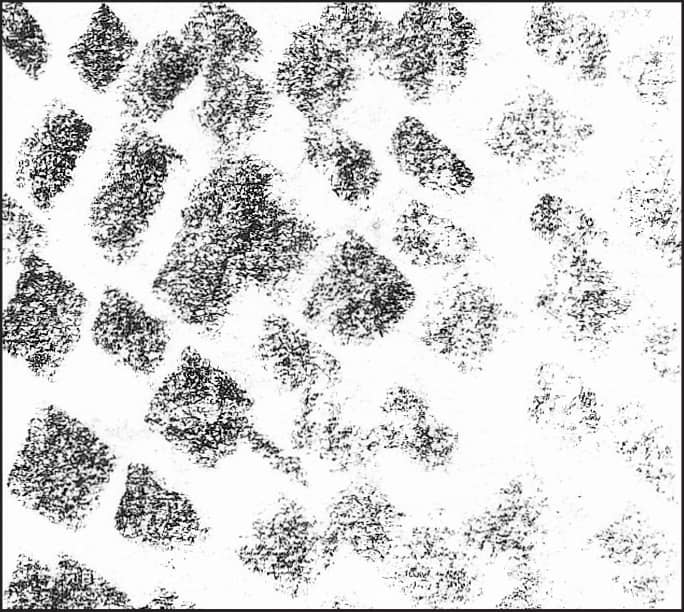
To fill in any area with mottled texture, use the side of the pencil tip and apply small, uneven strokes.
Gradating
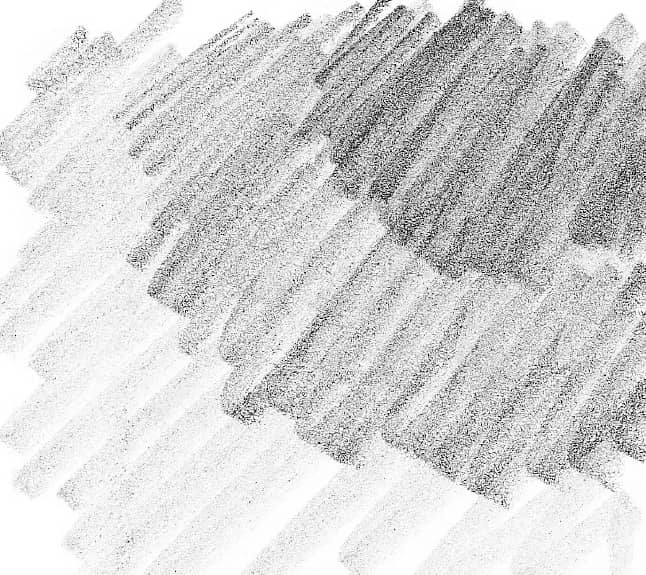
Create a gradation of dark to light by stroking from heavy to light pressure with the side of the pencil.
BUILDING UP FORMS
Values tell us even more about a form than its outline. Value is the basic term used to describe the relative lightness or darkness of a color. In pencil drawing, the values range from white to grays to black, and it’s the variation among lights and darks (made with shading) and the range of values in shadows and highlights that give a three-dimensional look to a two-dimensional drawing. Once you’ve established the general shape and form of the subject using basic shapes, refine your drawing by applying lights and darks. Adding values through shading allows you to further develop form and give depth to your subject, making it really seem to come to life on paper!
SEEING VALUES
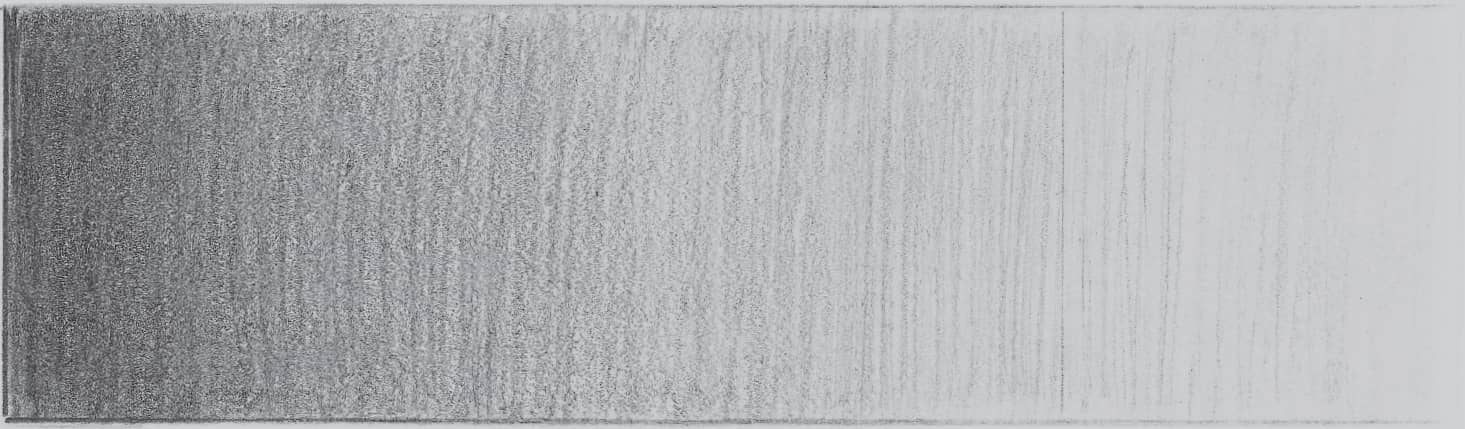
This value scale shows the gradation from black, the darkest value, through various shades of gray, ending with white—the lightest value.
DROP SHADOW
With a little bit of knowledge and training, you can easily draw a detailed motif such as this leaf.
PREPARATION
Lay out your tools before you begin drawing. I recommend sitting in a good, ergonomic chair since you’ll likely spend many hours at your drawing table. Attach your sheet of drawing paper to the table so it doesn’t slide as you draw. It may be helpful to use a ruler to draw a narrow border near the edges of the paper to center your drawing. This border may also prove helpful later on if you choose to frame your drawing.
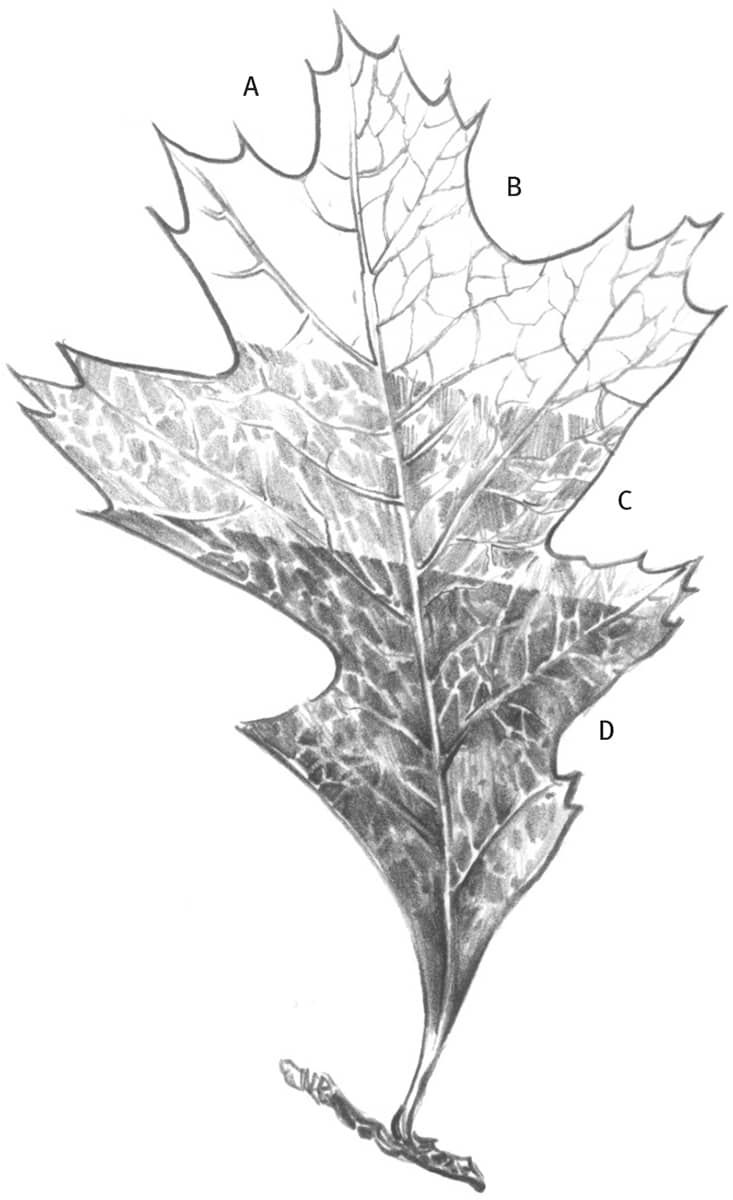
(A) Begin by drawing the basic leaf shape and vein pattern using a pointed HB pencil. (B) Add more vein pattern. (C) Begin middle-value shading using the side of the lead. To create the vein patterns, leave areas clean, or use a kneaded eraser to lift out the highlights. (D) Add darker shading using the point of a 2B pencil. Develop surface textures and detail.
LEARNING TO SEE
Many beginners draw without carefully looking at their subject; instead of drawing what they actually see, they draw what they think they see. Try drawing something you know well, such as your hand, without looking at it. Chances are your finished drawing won’t look as realistic as you expected. That’s because you drew what you think your hand looks like. Instead, you need to forget about all of your preconceptions and learn to draw only what you really see in front of you (or in a photo). Two great exercises for training your eye to see are contour drawing and gesture drawing.
PENCILING THE CONTOURS
In contour drawing, pick a starting point on your subject, and then draw only the contours—or outlines—of the shapes you see. Because you’re not looking at your paper, you’re training your hand to draw the lines exactly as your eye sees them. Try doing some contour drawings of your own; you might be surprised at how well you’re able to capture the subjects.
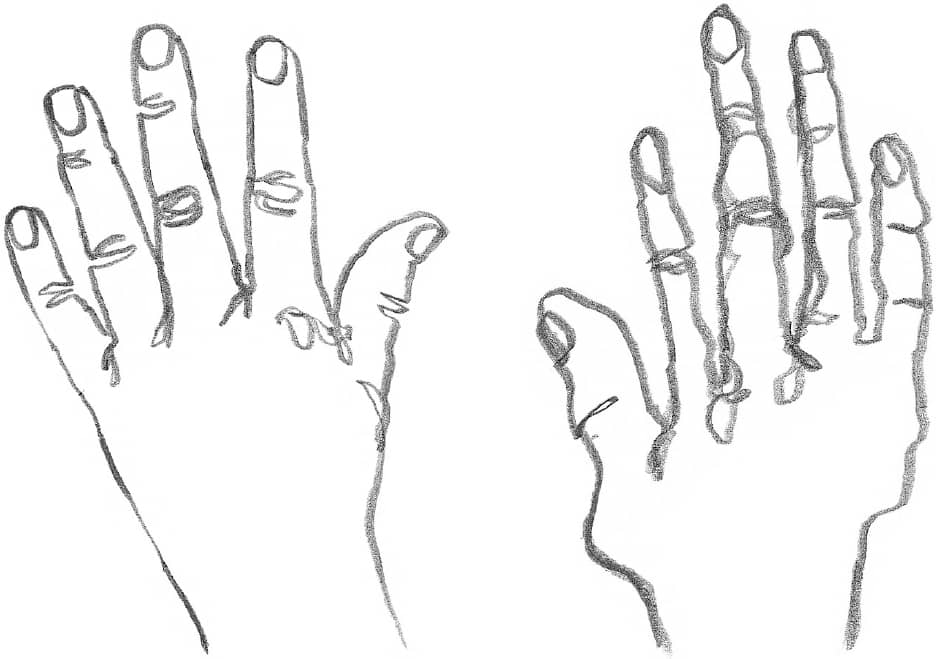
Drawing “Blind” The contour drawing above can be made while occasionally looking down at the paper while you draw your hand. The drawing on the right is an example of a blind contour drawing in which you draw without looking at your paper. It will be a little distorted, but it’s clearly your hand. Blind contour drawing is one of the best ways to make sure you’re truly drawing only what you see.
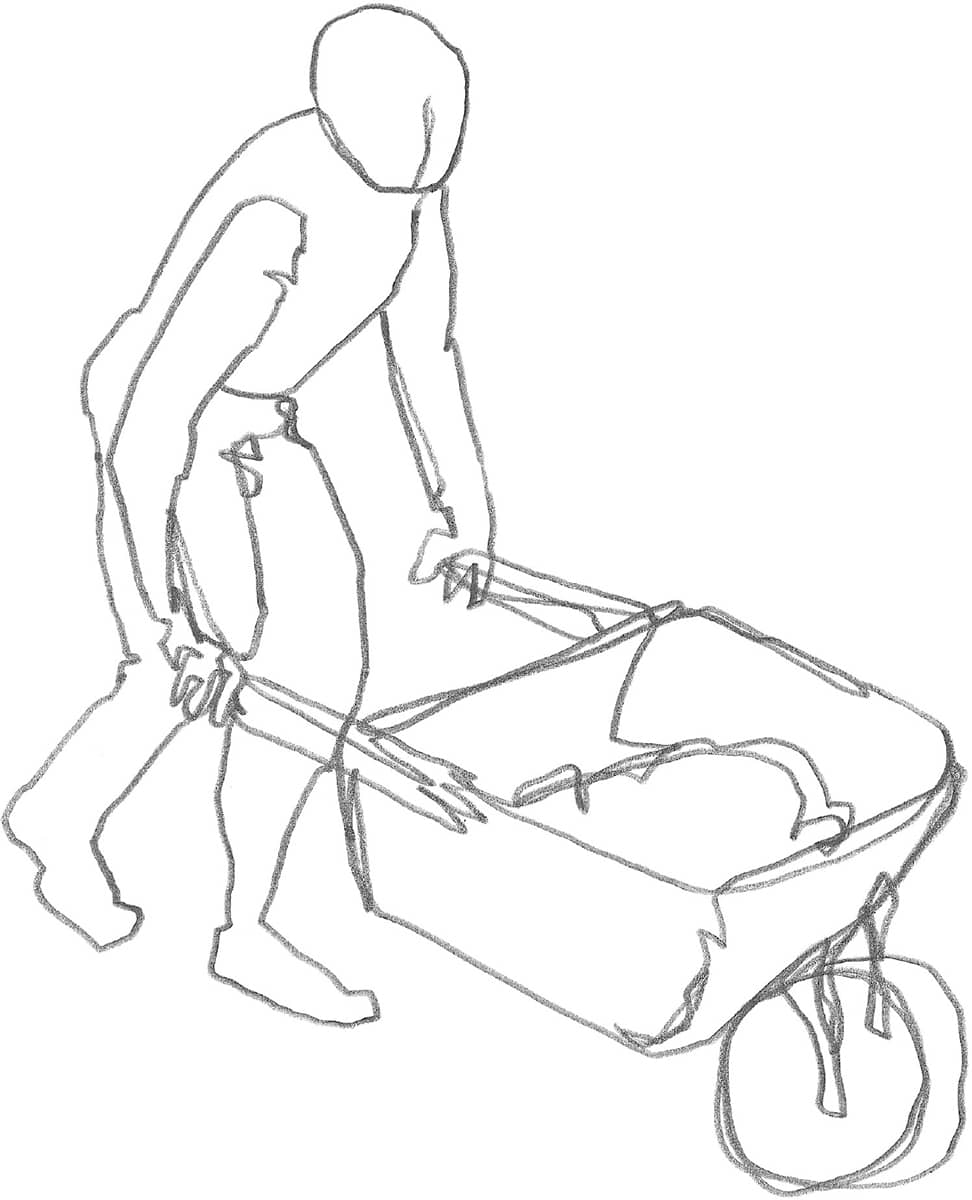
Drawing with a Continuous Line When drawing a sketch like the one of this man pushing a wheelbarrow, glance only occasionally at your paper to check that you are on track, but concentrate on really looking at the subject and tracing the outlines you see. Instead of lifting your pencil between shapes, keep the line unbroken by freely looping back and crossing over your lines. Notice how this simple technique effectively captures the subject.
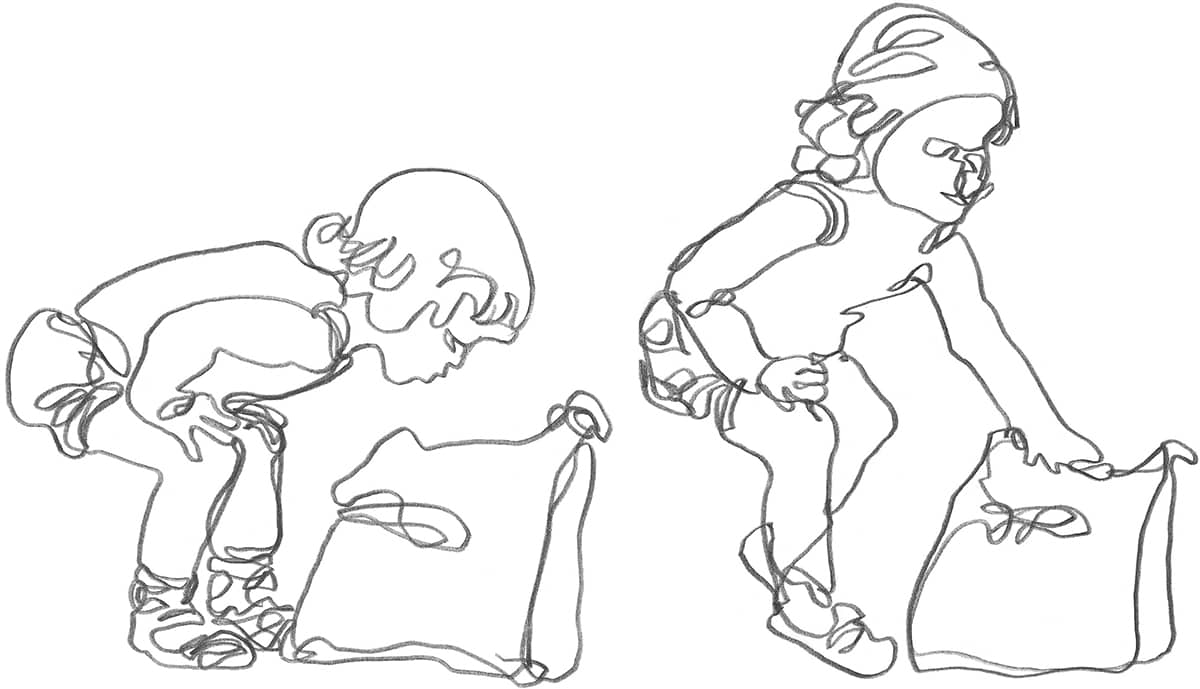
Drawing Children By training your eye to observe carefully so that you can draw quickly, you can easily capture the action of this child looking and then reaching into the bag.
DRAWING GESTURE AND ACTION
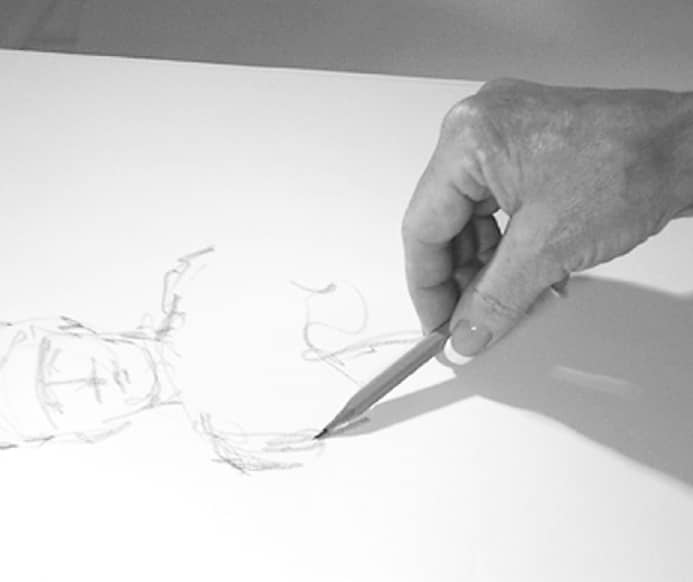
Another way to train your eye to see the essential elements of a subject—and train your hand to record them rapidly—is through gesture drawing. Instead of rendering the contours, gesture drawings establish the movement of a figure. First determine the main thrust of the movement, from the head, down the spine, and through the legs; this is the line of action, or action line. Then briefly sketch the general shapes of the figure around this line. These quick sketches are great for practicing drawing figures in action and sharpening your powers of observation. (See here for more on drawing people in action.)
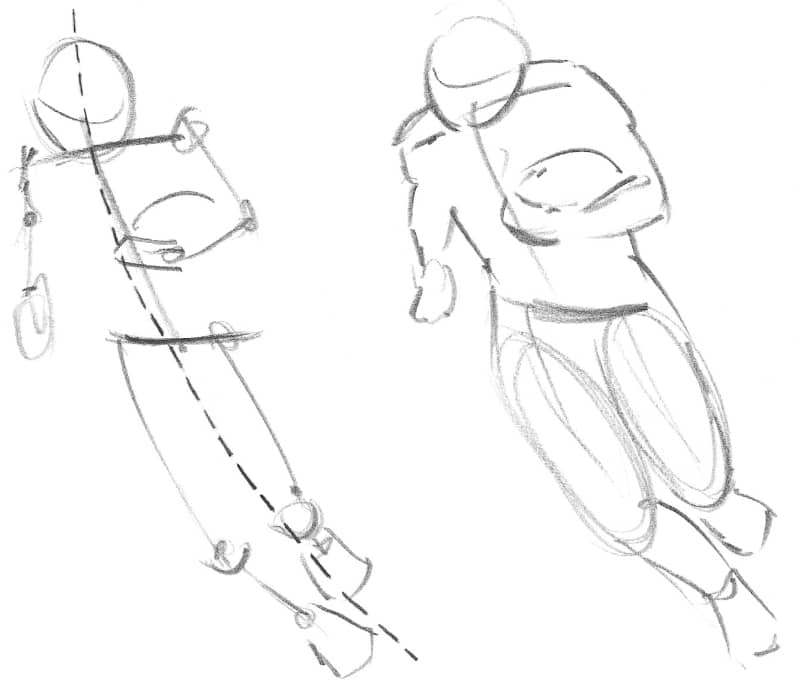
Starting with an Action Line Once you’ve established the line of action, try building a “skeleton” stick drawing around it. Pay particular attention to the angles of the shoulders, spine, and pelvis. Then sketch in the placement of the arms, knees, and feet, and roughly fill out the basic shapes of the figure.
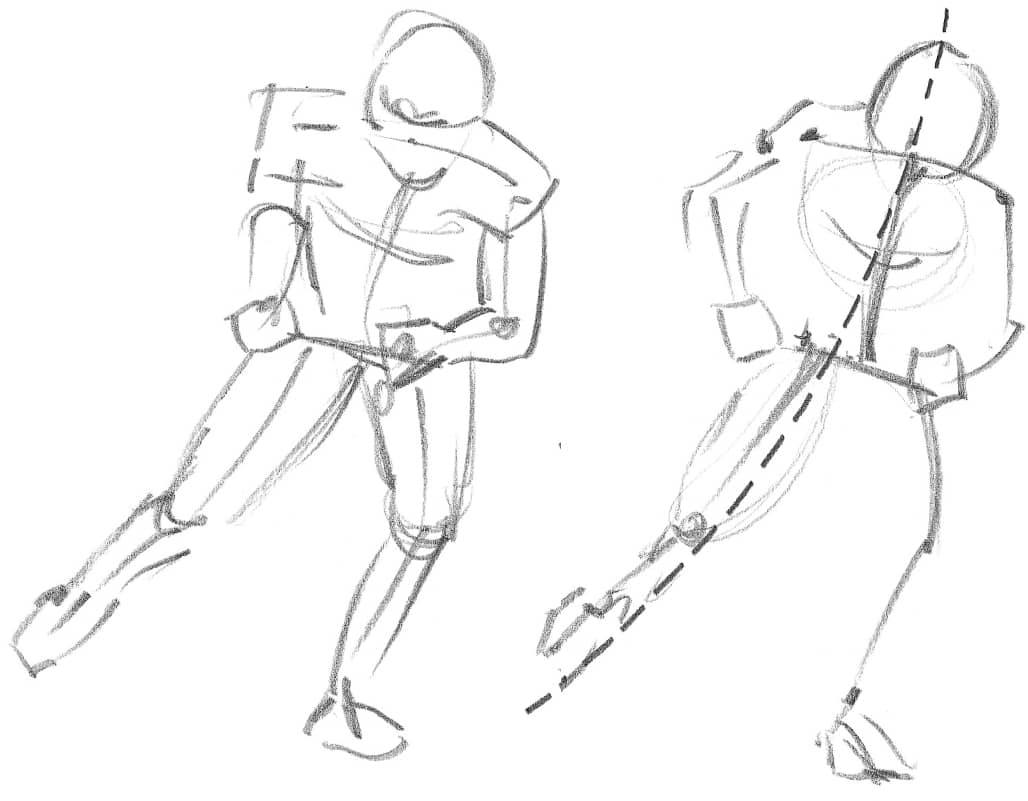
Studying Repeated Action Group sports provide a great opportunity for practicing gesture drawings and learning to see the essentials. Because the players keep repeating the same action, you can observe each movement closely and keep it in your memory long enough to sketch it correctly.
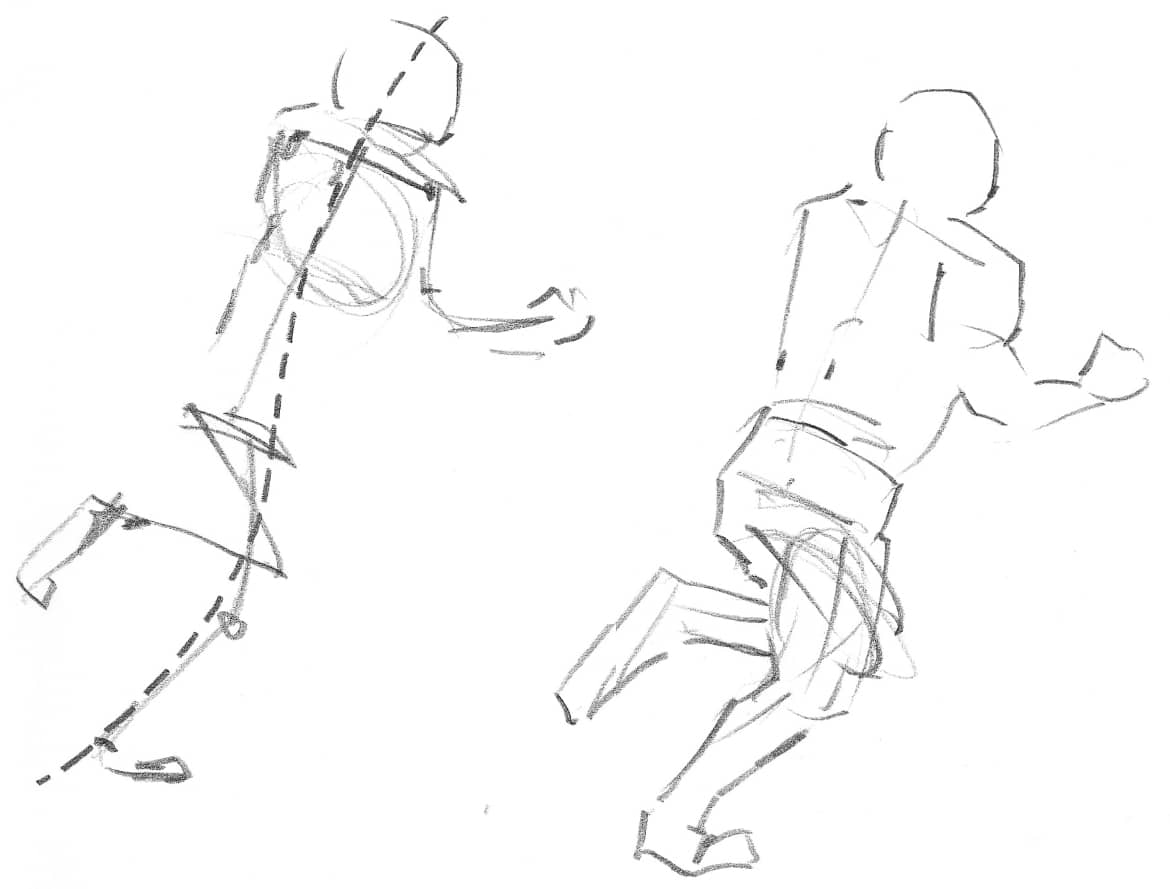
Working Quickly To capture the action accurately, work very quickly, without including even a suggestion of detail. If you want to correct a line, don’t stop to erase; just draw over it.
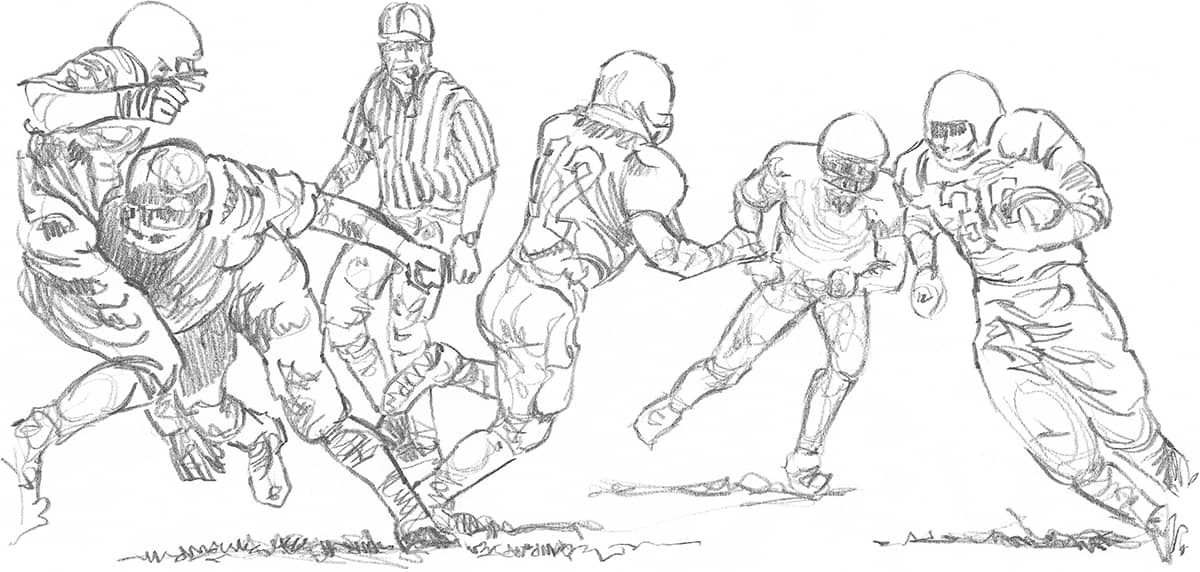
Drawing a Group in Motion Once you compile a series of gesture drawings, you can combine them into a scene of people in action, like the one above.
STARTING WITH SKETCHES
Sketching is a wonderful method for quickly capturing an impression of a subject. Depending on the pencil lead and technique used, you can swiftly record a variety of shapes, textures, moods, and actions. For example, dark, bold strokes can indicate strength and solidity; lighter, more feathered strokes can convey a sense of delicacy; and long, sweeping strokes can suggest movement. (See the examples below for a few common sketching techniques.) Some artists often make careful sketches to use as reference for more polished drawings later on, but loose sketches are also a valuable method of practice and a means of artistic expression, as the examples on these pages show. You might want to experiment with different strokes and sketching styles. With each new exercise, your hand will become quicker and more skilled.
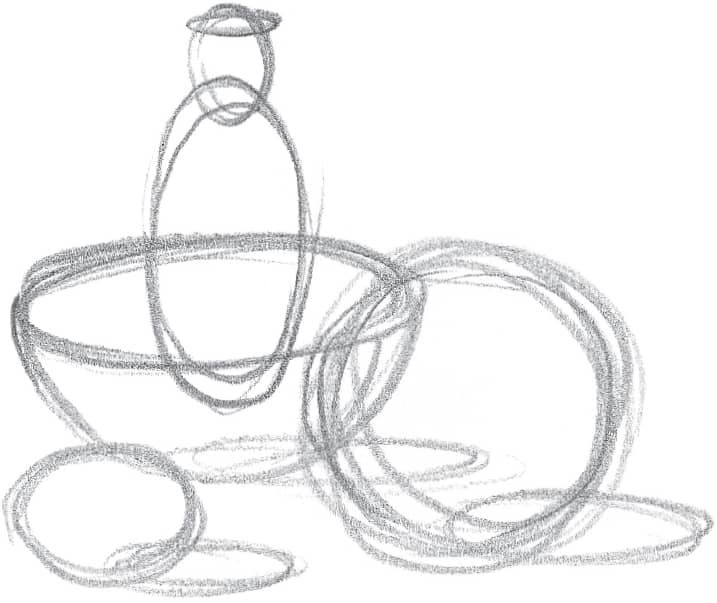
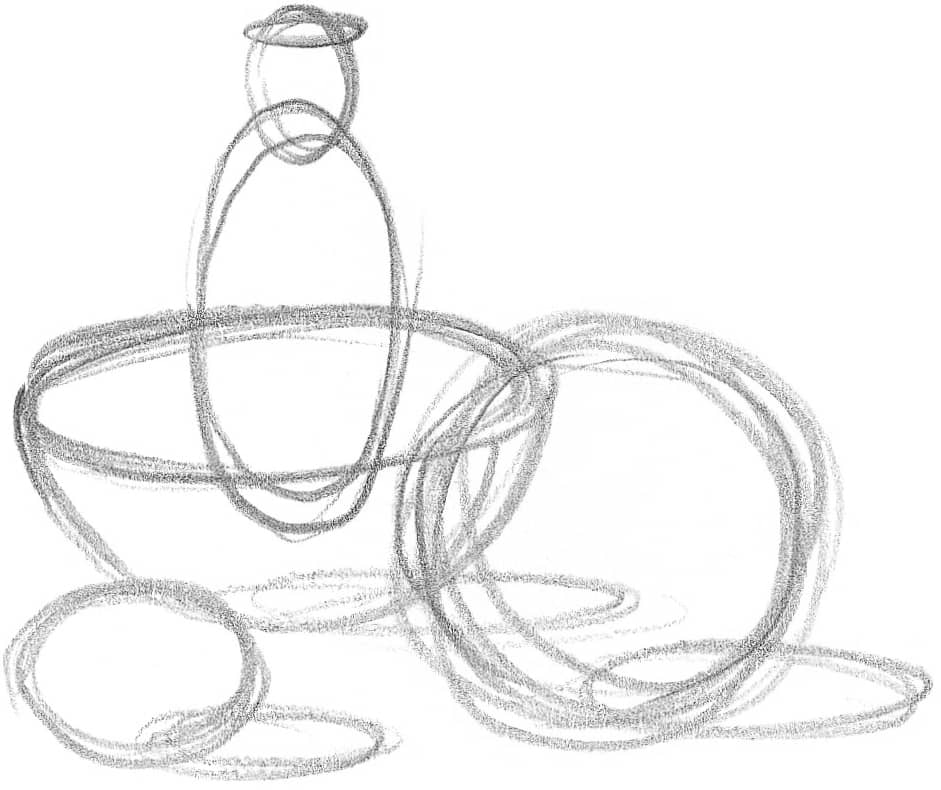
Using Circular Strokes Loose, circular strokes are great for quickly recording simple subjects or for working out a still life arrangement, as shown in this example. Just draw the basic shapes of the objects and indicate the shadows cast by the objects; don’t pay attention to rendering details at this point. Notice how much looser these lines are compared to the examples from the sketchbook at right.
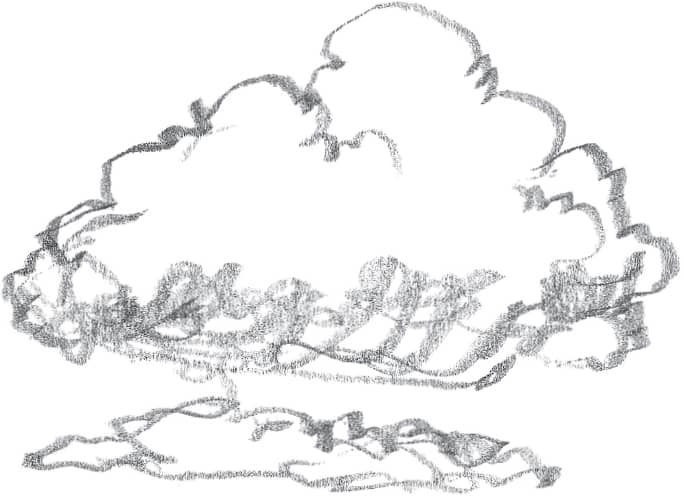
Scribbling Free, scribbled lines can also be used to capture the general shapes of objects such as clouds, treetops, or rocks. Use a soft B lead pencil with a broad tip to sketch the outlines of the clouds; then roughly scribble in a suggestion of shadows, hardly ever lifting your pencil from the drawing paper. Note how this technique effectively conveys the puffy, airy quality of the clouds.
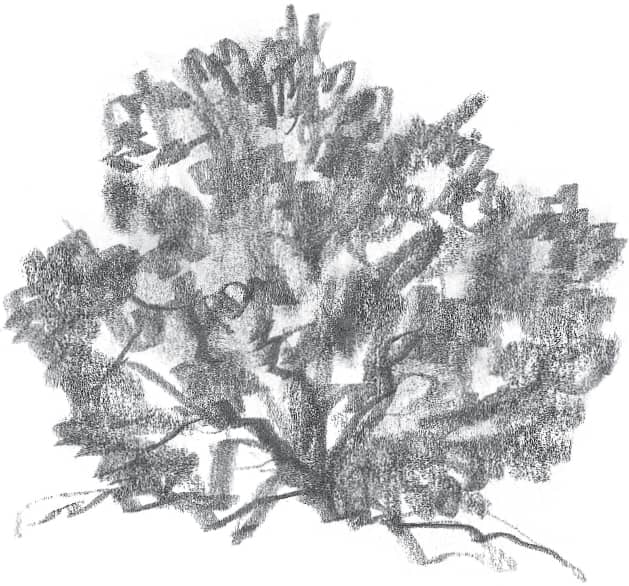
Using Wide, Bold Strokes This method is used for creating rough textures and deep shadows, making it ideal for subjects such as foliage, hair, and fur textures. For this example, use the side of a 2B pencil, varying the pressure on the lead and changing the pencil angle to produce different values (lights and darks) and line widths. This creates the realistic form and rough texture of a sturdy shrub.

Recording Your Impressions Here are examples of a few pages that might be found in an artist’s sketchbook. Along with sketching interesting things you see, make notes about the mood, colors, light, time of day, and anything that might be helpful when you refer back to them. It’s a good idea to carry a pad and pencil with you at all times, because you never know when you will come across an interesting subject you’d like to sketch.
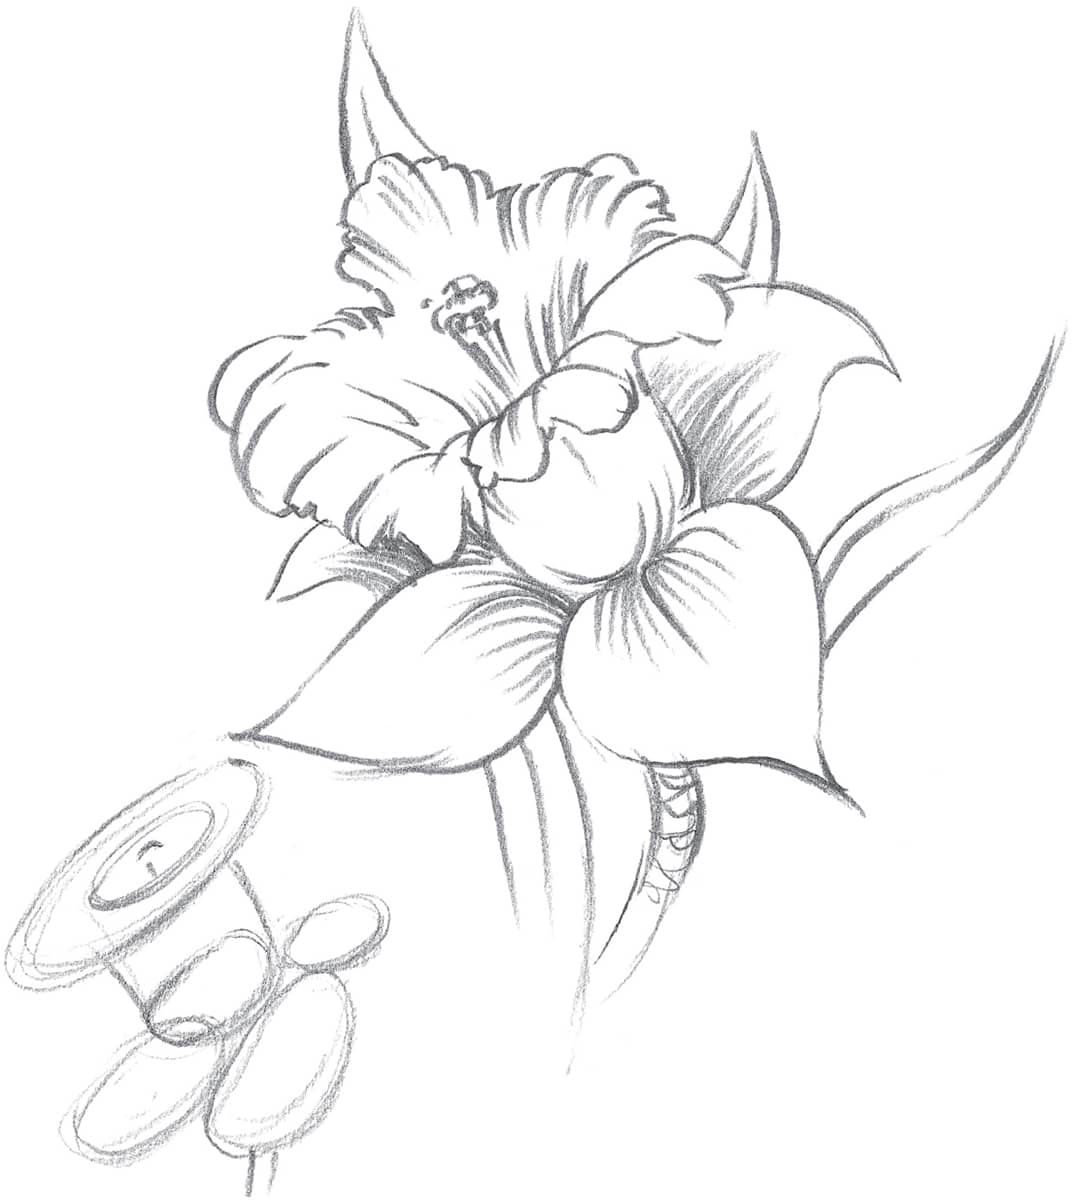
Sketching for Reference Material Here is an example of using a rough sketch as a source of reference for a more detailed drawing. Use loose, circular strokes to record an impression of the flower’s general shape, keeping your lines light and soft to reflect the delicate nature of the subject. Then use the sketch as a guide for the more fully rendered flower above.
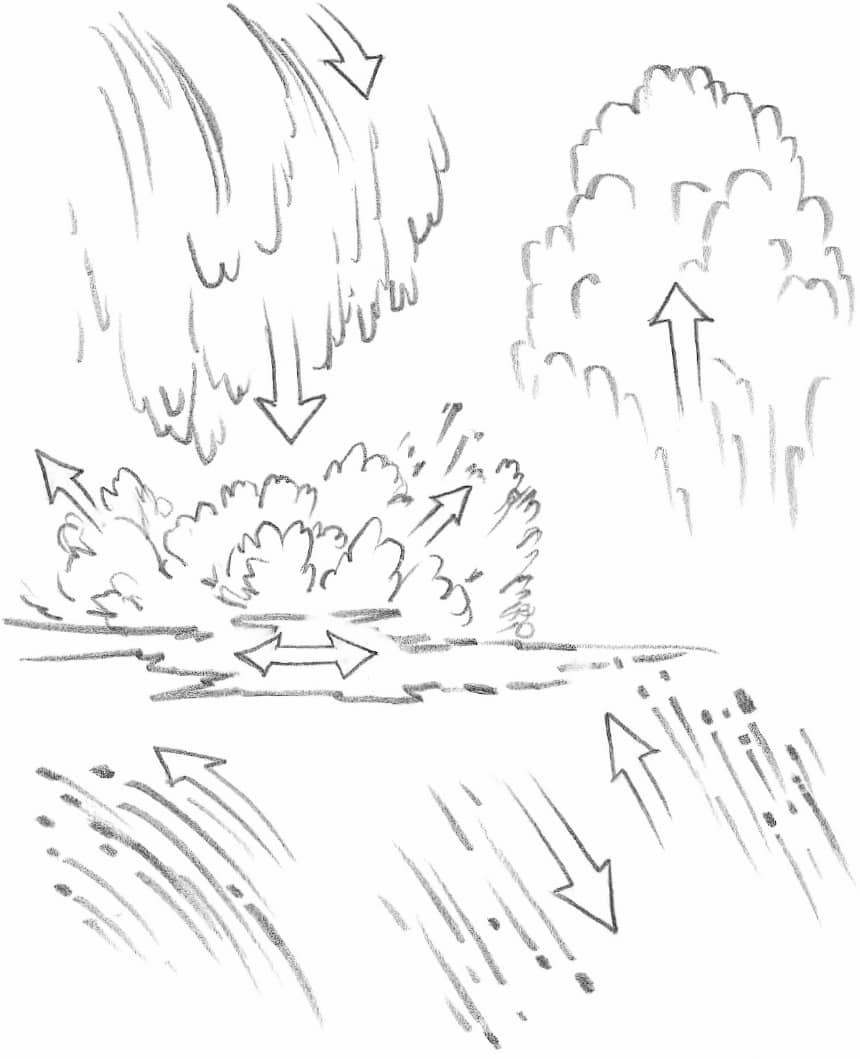
Conveying Movement To show movement in a drawing, you need to fool the viewer’s eye and make it appear as if the object is moving up, down, or sideways. In the examples above, the arrows indicate the direction of movement, but your pencil strokes should actually be made in the opposite direction. Press down at the beginning of each stroke to get a strong line, lifting your pencil at the end to taper it off. Note how these lines convey the upward and downward direction of water and the rising and billowing movement of smoke.
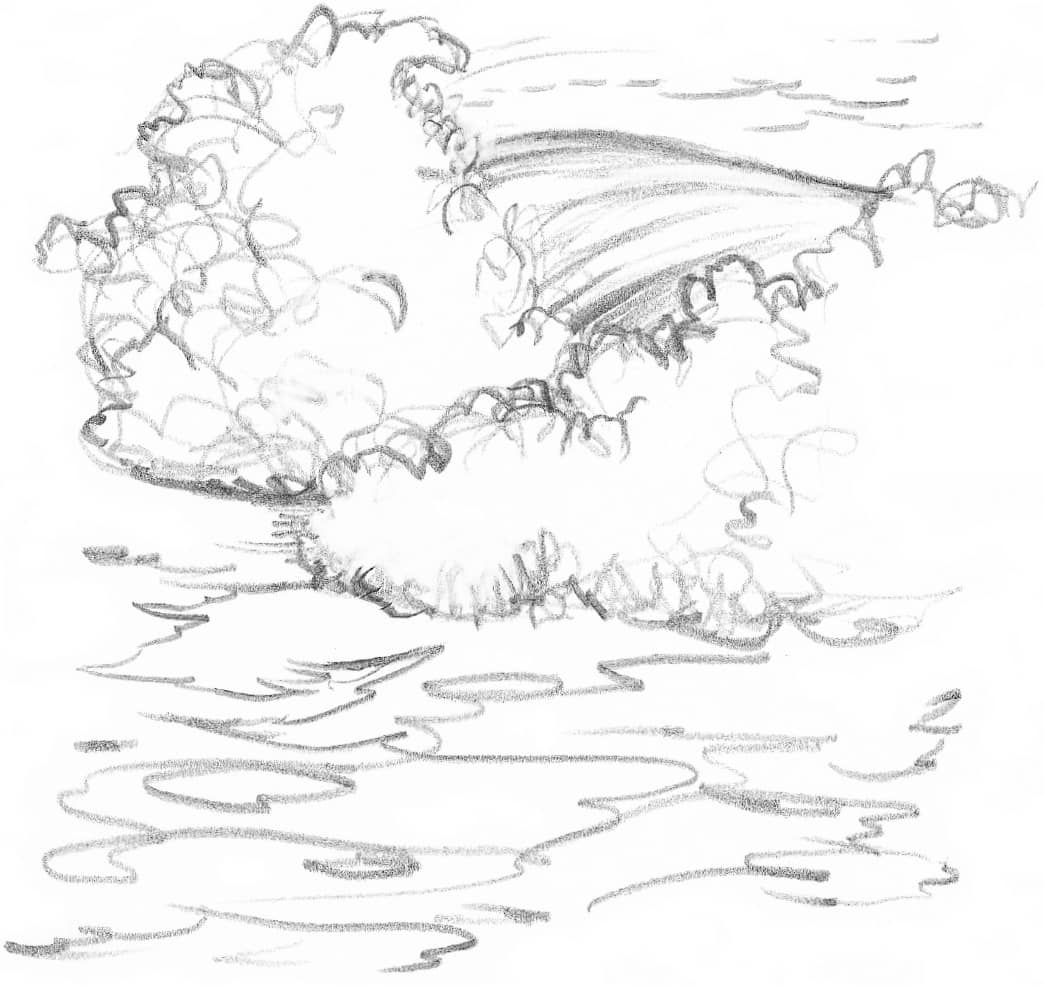
Rendering Wave Action Quickly sketch a wave, using long, flowing strokes to indicate the arcing movement of the crest, and make tightly scribbled lines for the more random motions of the water as it breaks and foams. As shown above, your strokes should taper off in the direction opposite the movement of the wave. Also sketch in a few meandering lines in the foreground to depict the slower movement of the pooled water as it flows and recedes.
FOCUSING ON THE NEGATIVE SPACE
Sometimes it’s easier to draw the area around an object instead of drawing the object itself. The area around and between objects is called “negative space.” (The actual objects are called “positive space.”) If an object appears to be too complex or if you are having trouble “seeing” it, try focusing on the negative space instead. At first it will take some effort, but if you squint your eyes, you’ll be able to blur the details so you see only the negative and positive spaces. You’ll find that when you draw the negative shapes around an object, you’re also creating the edges of the object at the same time. The examples below are simple demonstrations of how to draw negative space. Select some objects in your home and place them in a group, or go outside and look at a clump of trees or a group of buildings. Try sketching the negative space, and notice how the objects seem to emerge almost magically from the shadows!
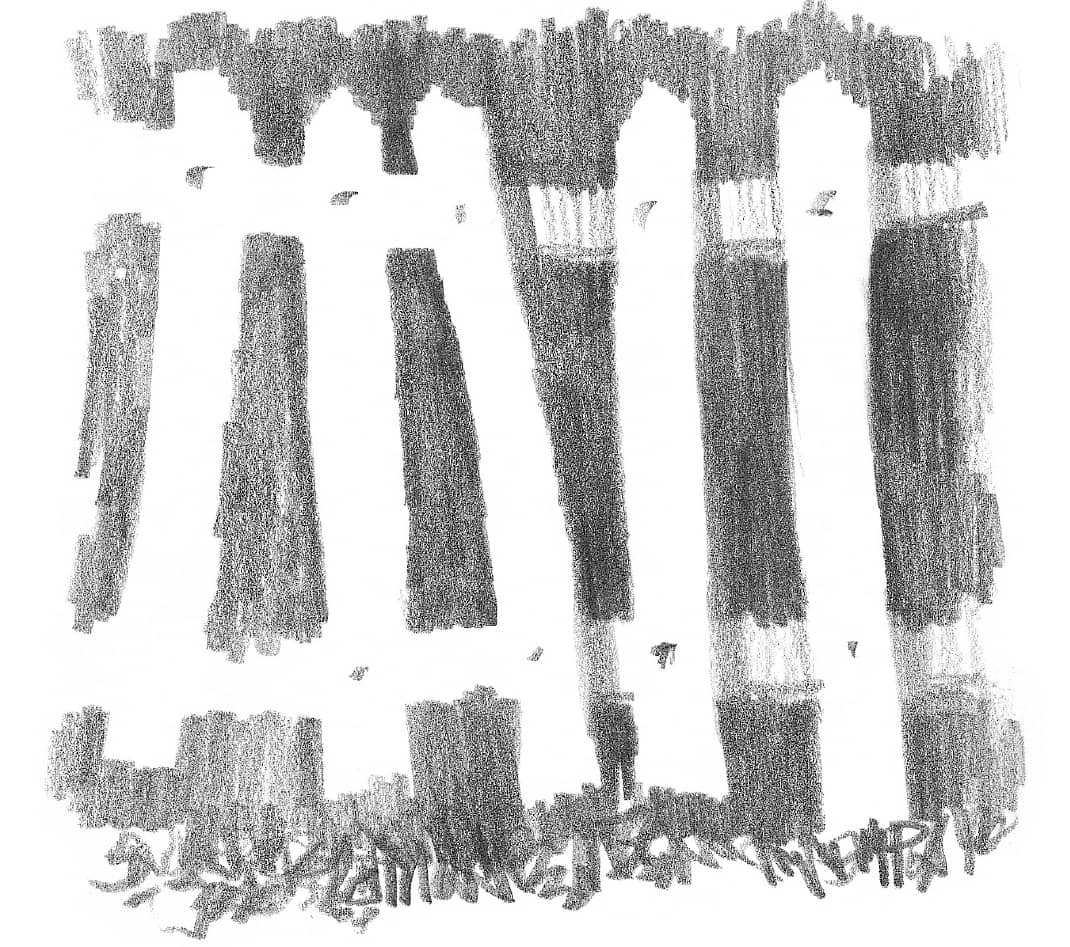
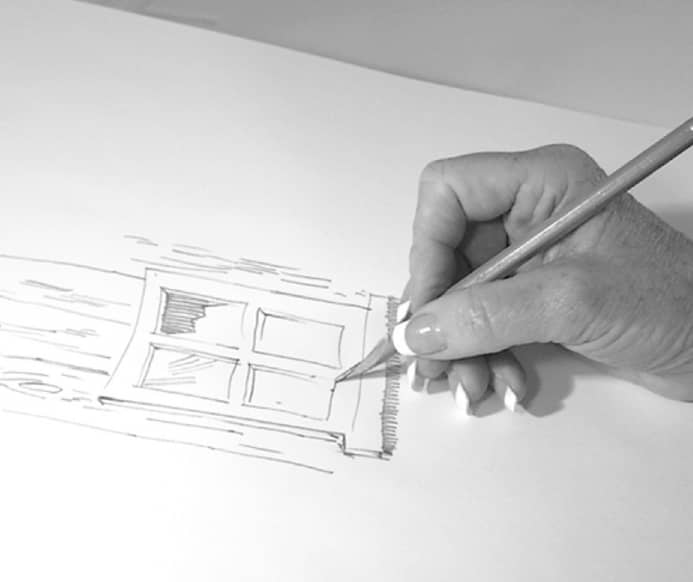
Filling In Create the white picket fence by filling in the negative spaces around the slats. Don’t draw the slats. Instead, draw the shapes surrounding them, and then fill in the shapes with the side of a soft lead pencil. Once you establish the shape of the fence, refine the sketch a bit by adding some light shading on the railings.
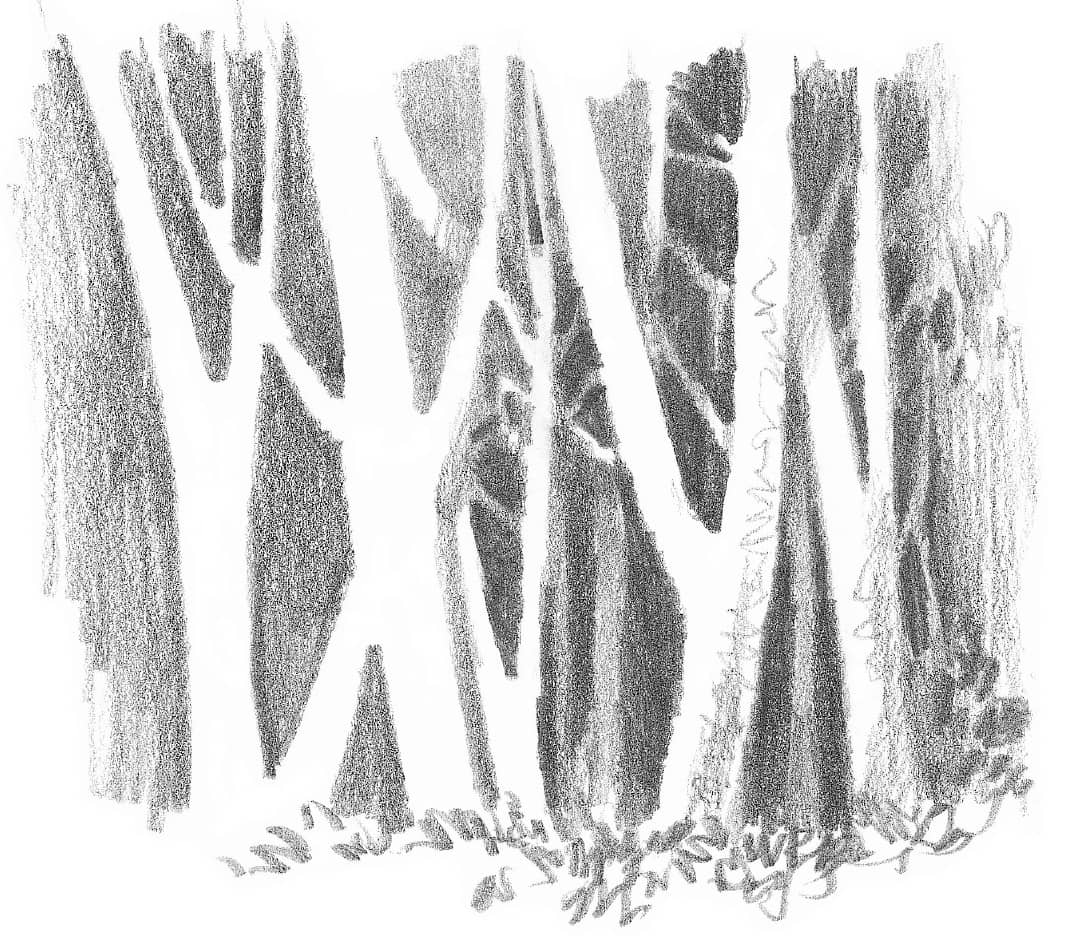
Silhouetting This stand of trees is a little more complicated than the fence, but having sketched the negative spaces simplified it immensely. The negative shapes between the tree trunks and among the branches are varied and irregular, which adds a great deal of interest to the drawing.
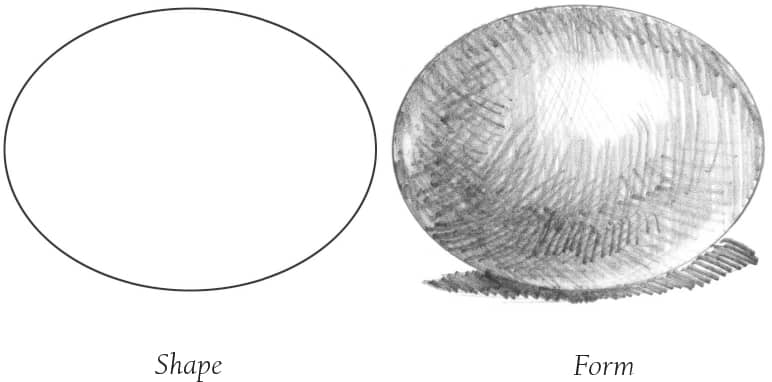
BEGINNING WITH BASIC SHAPES
Anyone can draw just about anything by simply breaking down the subject into the few basic shapes: circles, rectangles, squares, and triangles. By drawing an outline around the basic shapes of your subject, you’ve drawn its shape. But your subject also has depth and dimension, or form. The corresponding forms of the basic shapes are spheres, cylinders, cubes, and cones. For example, a ball and a grapefruit are spheres, a jar and a tree trunk are cylinders, a box and a building are cubes, and a pine tree and a funnel are cones. Sketching the shapes and developing the forms is the first step of every drawing. After that, it’s essentially just connecting and refining the lines and adding details.
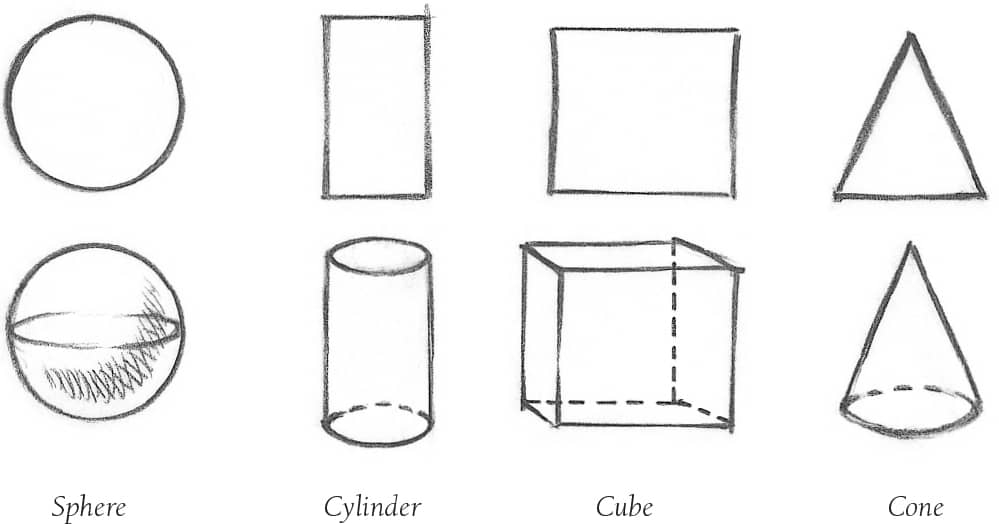
Creating Forms Here are diagrams showing how to draw the forms of the four basic shapes. The ellipses show the backs of the circle, cylinder, and cone, and the cube is drawn by connecting two squares with parallel lines. (page 10 shows you how to shade these forms.)
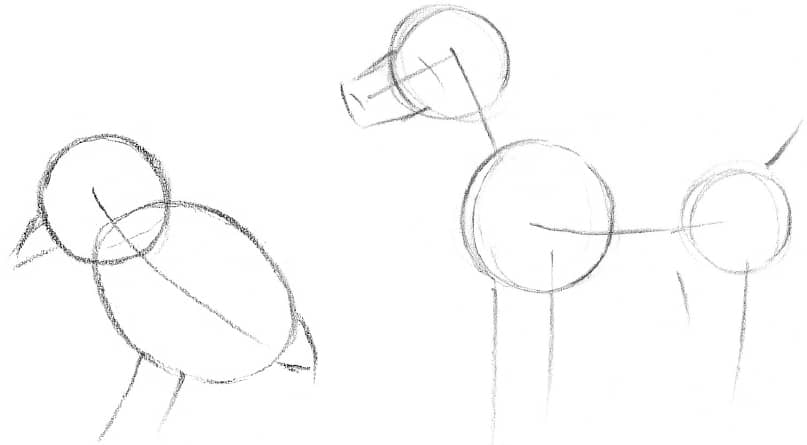
Combining Shapes Here is an example of beginning a drawing with basic shapes. Start by drawing each line of action (see here); then build up the shapes of the dog and the chick with simple ovals, circles, rectangles, and triangles.
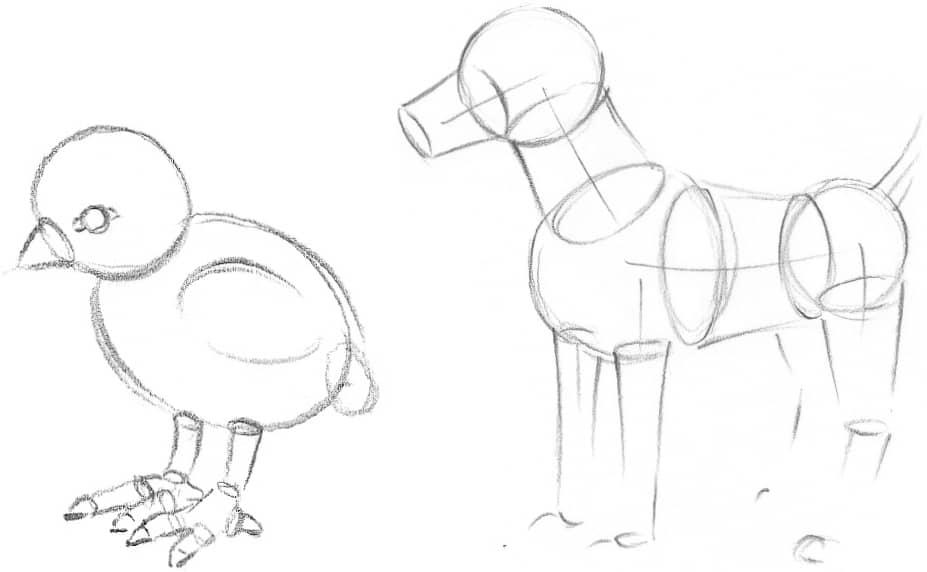
Building Form Once you establish the shapes, it’s easy to build up the forms with cylinders, spheres, and cones. Notice that the subjects are now beginning to show some depth and dimension.
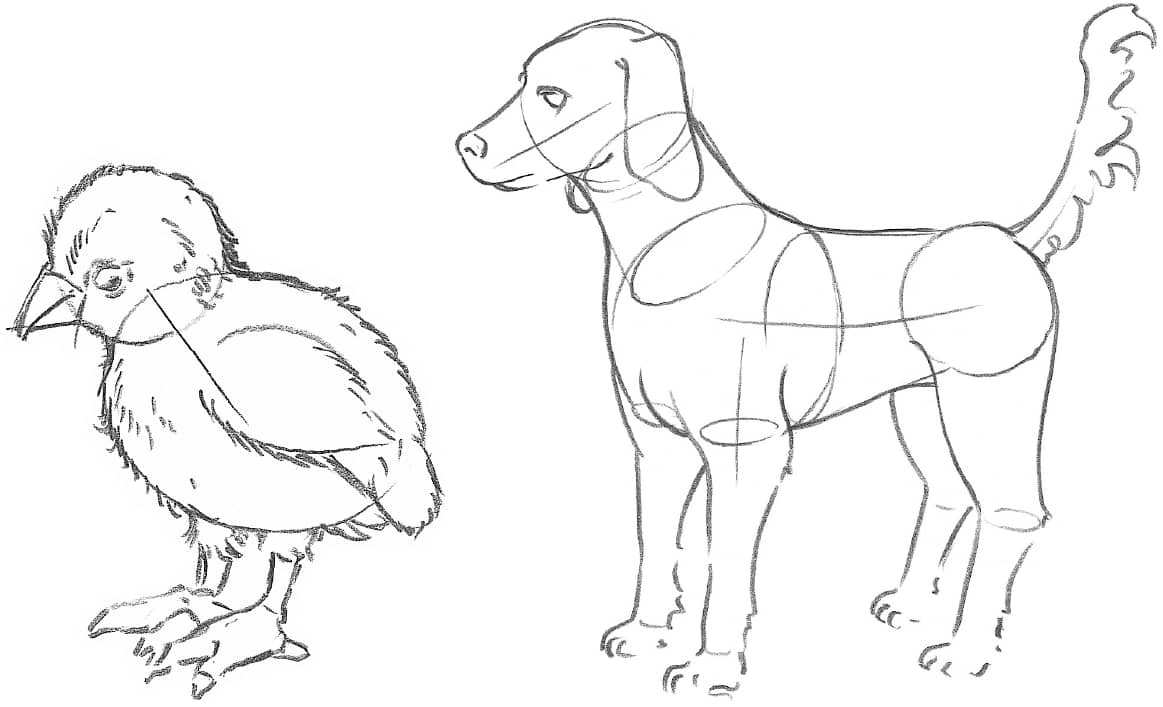
Drawing Through Drawing through means drawing the complete forms, including the lines that will eventually be hidden from sight. When the forms were drawn, the back side of the dog and chick were indicated. Even though you can’t see that side in the finished drawing, the subject should appear three-dimensional. To finish the drawing, simply refine the outlines, and add a little fluffy texture to the downy chick.
SEEING THE SHAPES AND FORMS
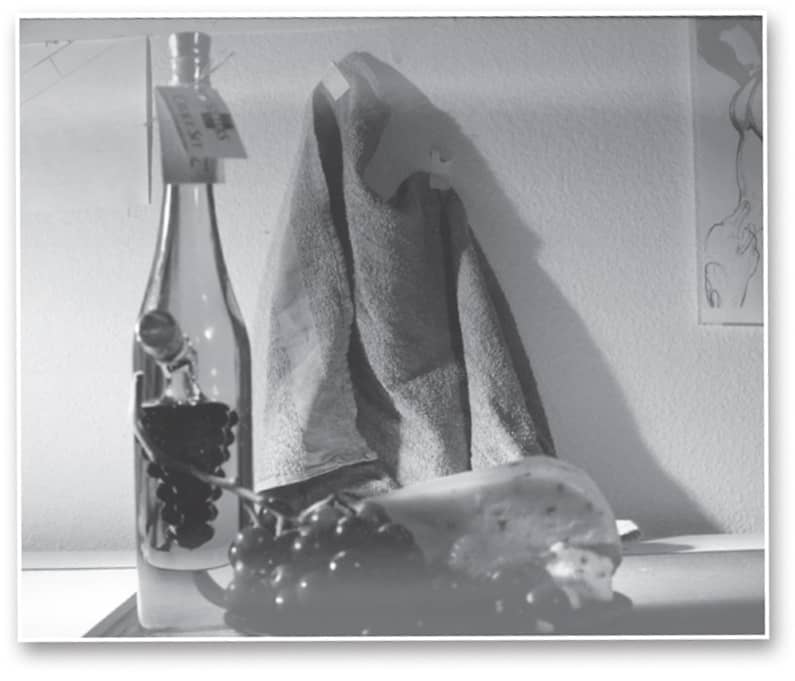
Now train your eye and hand by practicing drawing objects around you. Set up a simple still life—like the one on page 202 or the arrangement below—and look for the basic shapes in each object. Try drawing from photographs, or copy the drawings on this page. Don’t be afraid to tackle a complex subject; once you’ve reduced it to simple shapes, you can draw anything!
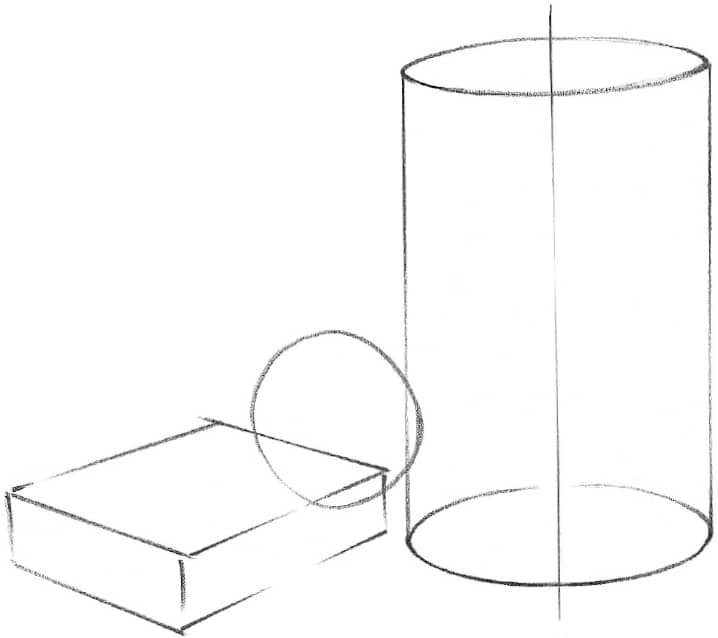
Step 1 Begin with squares and a circle, and then add ellipses to the jug and sides to the book. Notice that the whole apple is drawn, not just the part that will be visible. This is another example of drawing through.
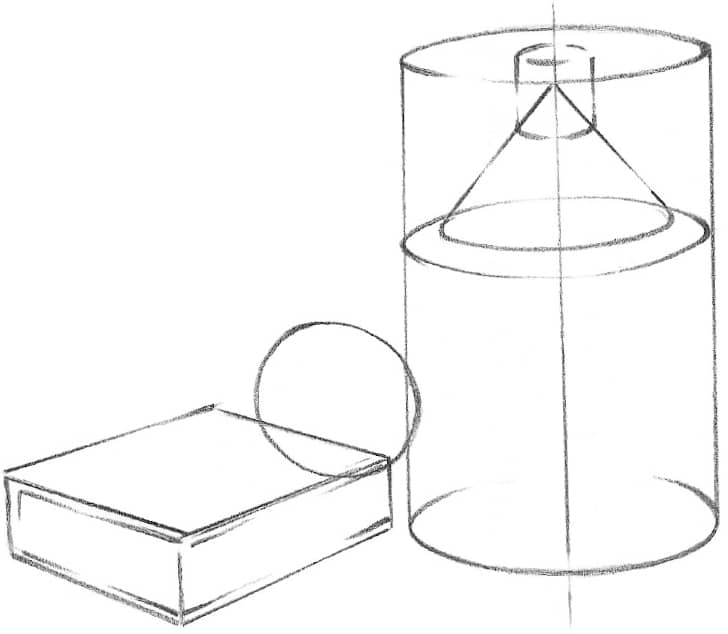
Step 2 Next add an ellipse for the body of the jug, a cone for the neck, and a cylinder for the spout. Pencil in a few lines on the sides of the book, parallel to the top and bottom, to begin developing its form.
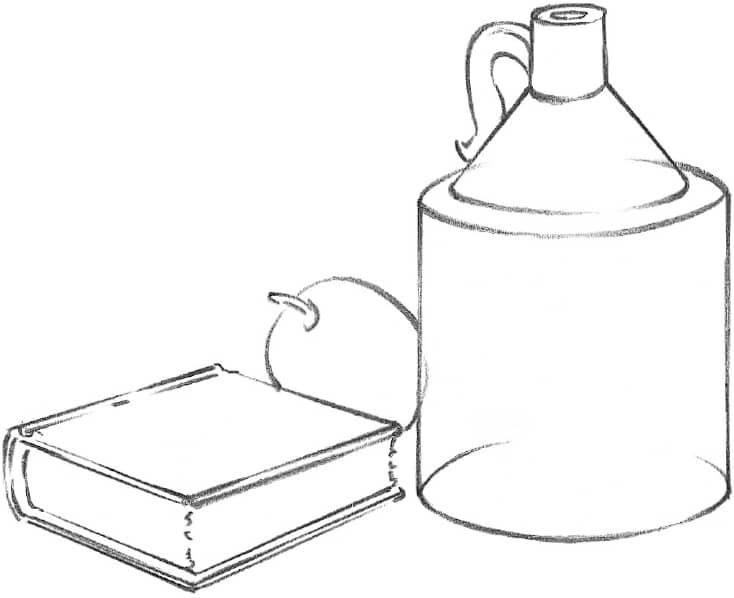
Step 3 Finally, refine the outlines of the jug and apple, and then round the book spine and the corners of the pages. Once you’re happy with your drawing, erase all of the initial guidelines to complete your drawing.
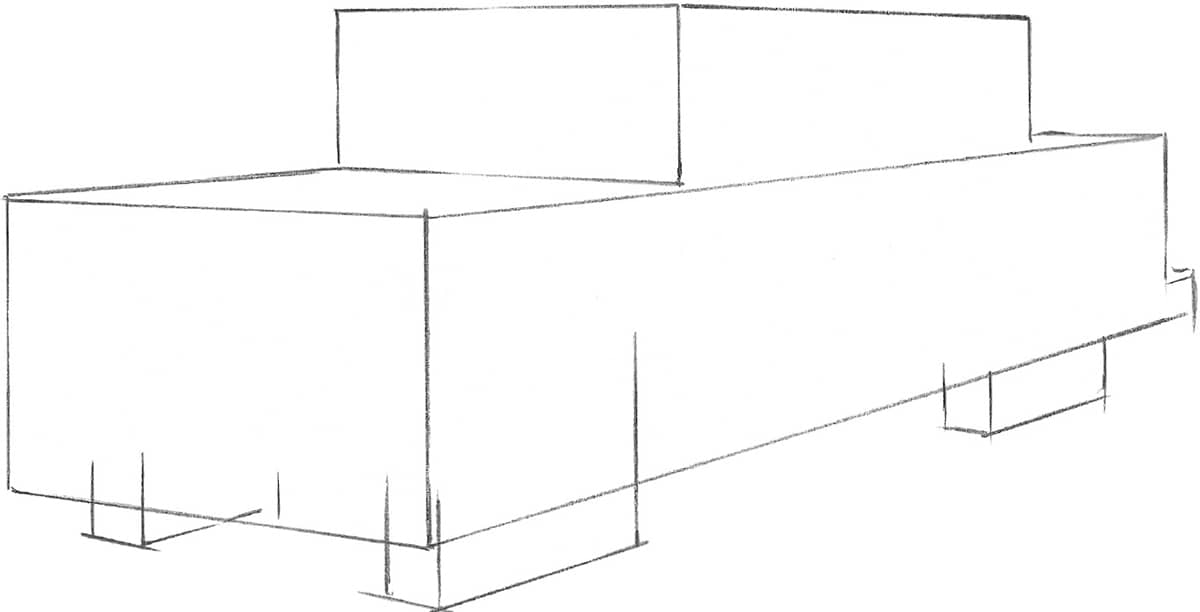
Step 1 Even a complex form such as this ’51 Ford is easy to draw if you begin with basic shapes. At this stage, ignore all the details and draw only squares and rectangles. These are only guidelines, which you can erase when your drawing is finished, so draw lightly, and don’t worry about making perfectly clean corners.
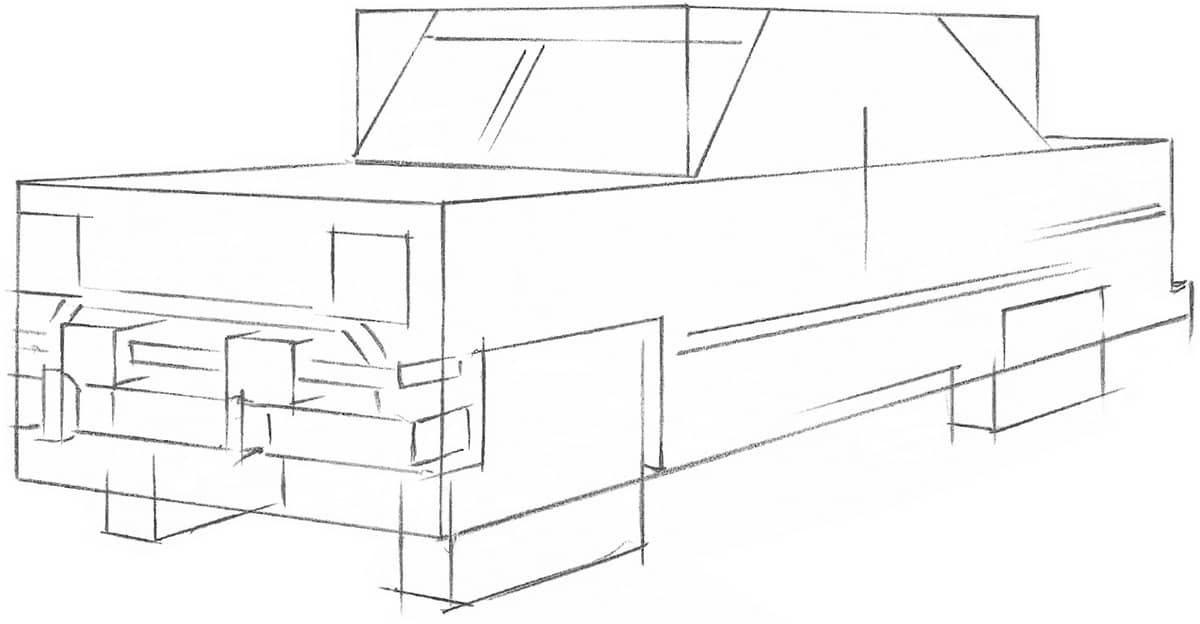
Step 2 Using those basic shapes as a guide, start adding more squares and rectangles for the headlights, bumper, and grille. Start to develop the form of the windshield with angled lines, and then sketch in a few straight lines to place the door handle and the side detail.
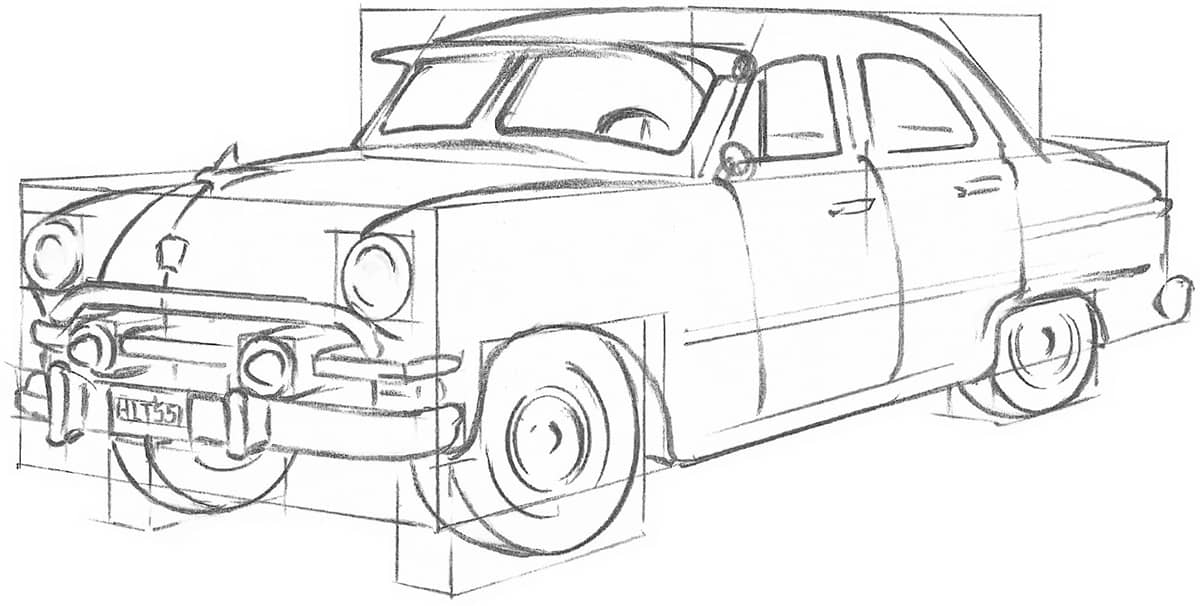
Step 3 Once you have all the major shapes and forms established, begin rounding the lines and refining the details to conform to the car’s design. Your guidelines are still in place here, but as a final step, clean up the drawing by erasing the extraneous lines.
WARMING UP
Drawing is about observation. If you can look at your subject and really see what is in front of you, you’re halfway there; the rest is technique and practice. Warm up by sketching a few basic three-dimensional forms—spheres, cylinders, cones, and cubes. (See here for more on basic shapes and their corresponding forms.) Gather some objects from around your home to use as references, or study the examples here. (By the way, feel free to put a translucent piece of paper over these drawings and trace them. It’s not cheating; it’s good practice.)
STARTING OUT LOOSELY
Begin by holding the pencil loosely in the underhand position. (See here.) Then, using your whole arm, not just your wrist, make a series of loose circular strokes to get the feel of the pencil and to free your arm. (If you use only your wrist and hand, your sketches may appear stiff or forced.) Practice drawing freely by moving your shoulder and arm to make loose, random strokes on a piece of scrap paper. Keep your grip relaxed so your hand does not get tired or cramped, and make your lines bold and smooth. Now start doodling—scribble a bunch of loose shapes without worrying about drawing perfect lines. You can always refine them later.
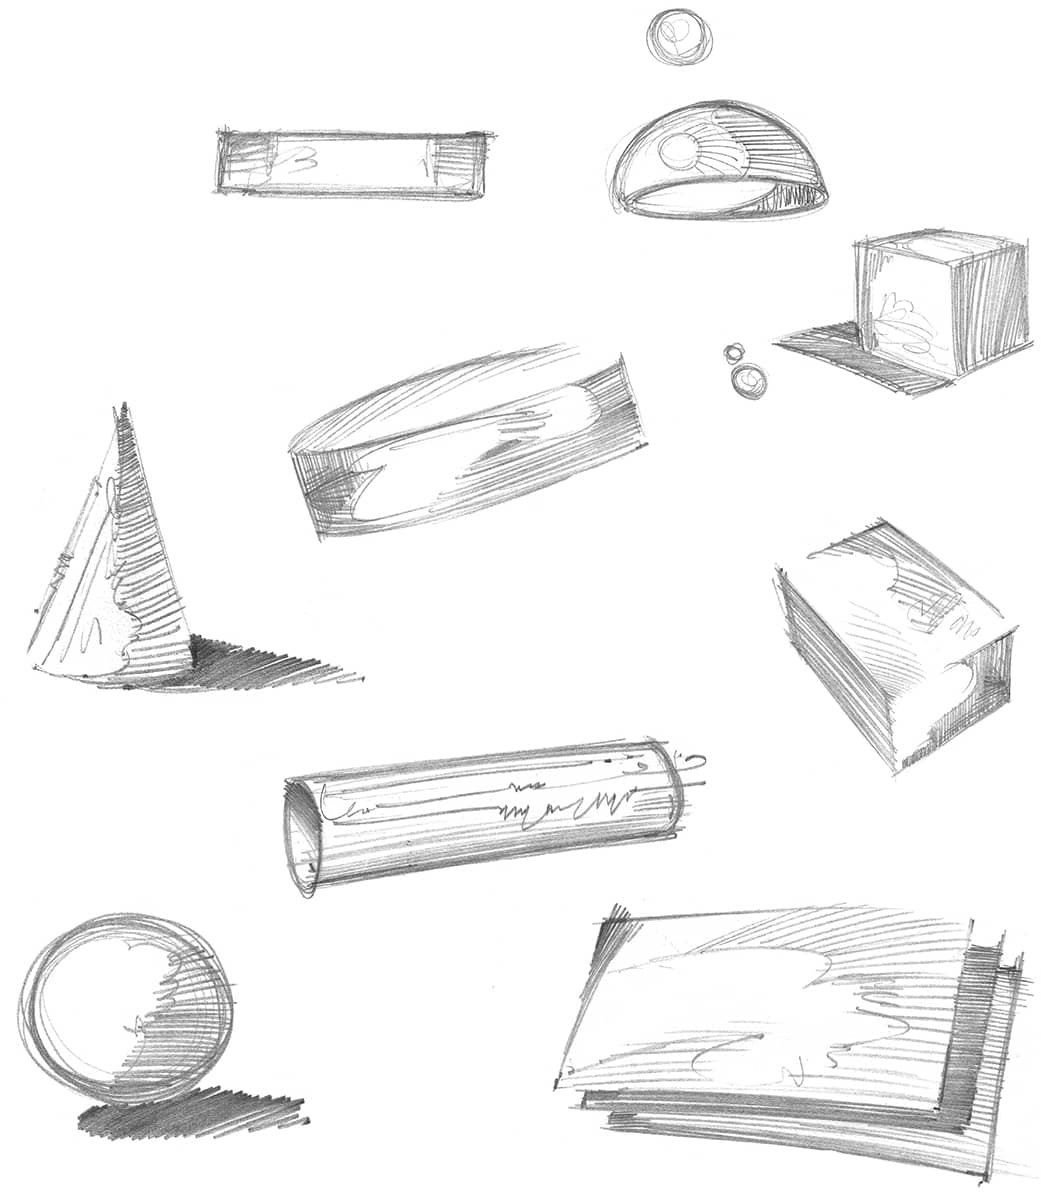
Roughing In Lightly sketch the general shapes of a variety of objects, roughly indicating the shaded areas. Also look at the shape of the shadow the object throws, and use your darkest shading here. Experiment by using different types of pencils (H, HB, 2B), changing the pressure on your pencil, and seeing the different lines you can create.
APPLYING SHADING
Artists give a three-dimensional look to a two-dimensional drawing by manipulating values. Value refers to the relative lightness or darkness of a color. It is the variation in value that helps define an object’s form. Since value tells us even more about a form than its outline, figure artists use a variety of techniques to create a full range of shades and highlights—including the ones demonstrated here. The result is more realistic form and dimension in a drawing.
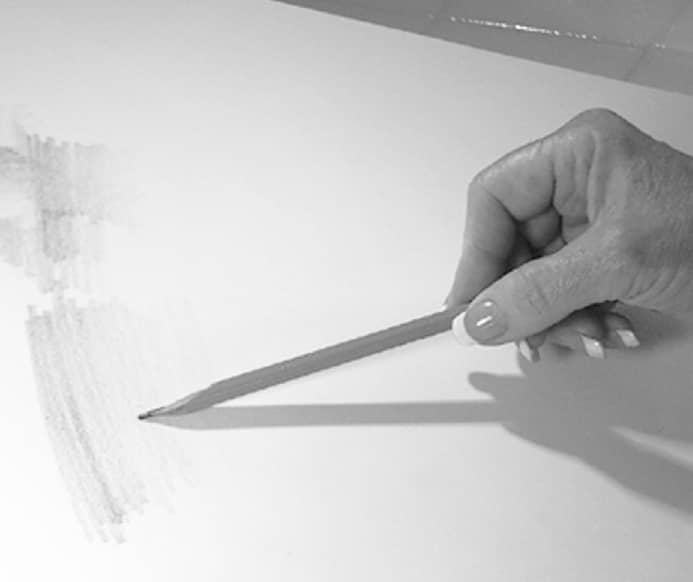
Gradation To produce a gradual shift in value, use the underhand position, varying the pressure from heavy to light.
Blending To produce subtle value transitions and soft edges, smudge with your finger or a blending stump.
Eraser Strokes To soften edges and vary the line quality, use a small piece of kneaded eraser. (You can also cut off a sharp piece of vinyl eraser.)

Expressive Lines To draw fluid lines with a dynamic feel, use the mid-hand position; then push, pull, twist, and vary pencil pressure as you draw.
Dotting To create background textures, such as those of a wall or carpet, vary the pressure of your strokes, and use your imagination.
Crosshatching To deepen shadows and enhance form, use crisscrossing strokes. The more strokes that overlap one another, the darker the area becomes.
Linear Hatching To create form with shading, make parallel strokes that follow the shape, curve, or direction of the surface. Change the pressure of your strokes to vary the value.
Squiggles For more contrast in your drawings, include loose, circular strokes and squiggles. When used with hatching, these strokes create many interesting textures.
SIMPLE SHAPES
Study your subject closely, and lightly sketch the simple shapes to which details will later be added. The pear below is made up of two joined circles—one large and one small. Once these basic shapes are drawn, begin shading with strokes that are consistent with the pear’s rounded form, as shown in the final drawing.

For the peach and the slice, draw their general shapes in step A. In step B, place guidelines for the texture of the peach pit and the cavity on the slice. Begin shading the skin of the peach with long, smooth strokes to bring out its curved surface in step C. Use a sharp 2B pencil to create the dark grooves on the pit and the irregular texture on the slice. Finish with lines radiating outward from the seed and the top of the slice.
To draw chestnuts, use a circle and two intersecting lines to make a cone shape in steps A and B below. Then place some guidelines for ridges in step C.
Shade the chestnuts using smooth, even strokes that run the length of the objects. These strokes bring out form and glossiness. Finally, add tiny dots on the surface. Make the shadow that is cast by the chestnuts (the cast shadow) the darkest part of the drawing. Giving an object a cast shadow adds depth and realism to your drawing.
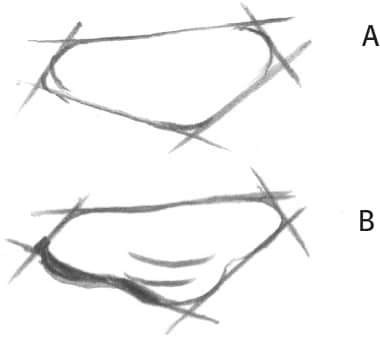
To draw a cherry, lightly block in the round shape and the stem in step A, using a combination of short sketch lines.
In step B, smooth the sketch lines into curves, and add the indentation for the stem. Then begin light shading in step C.

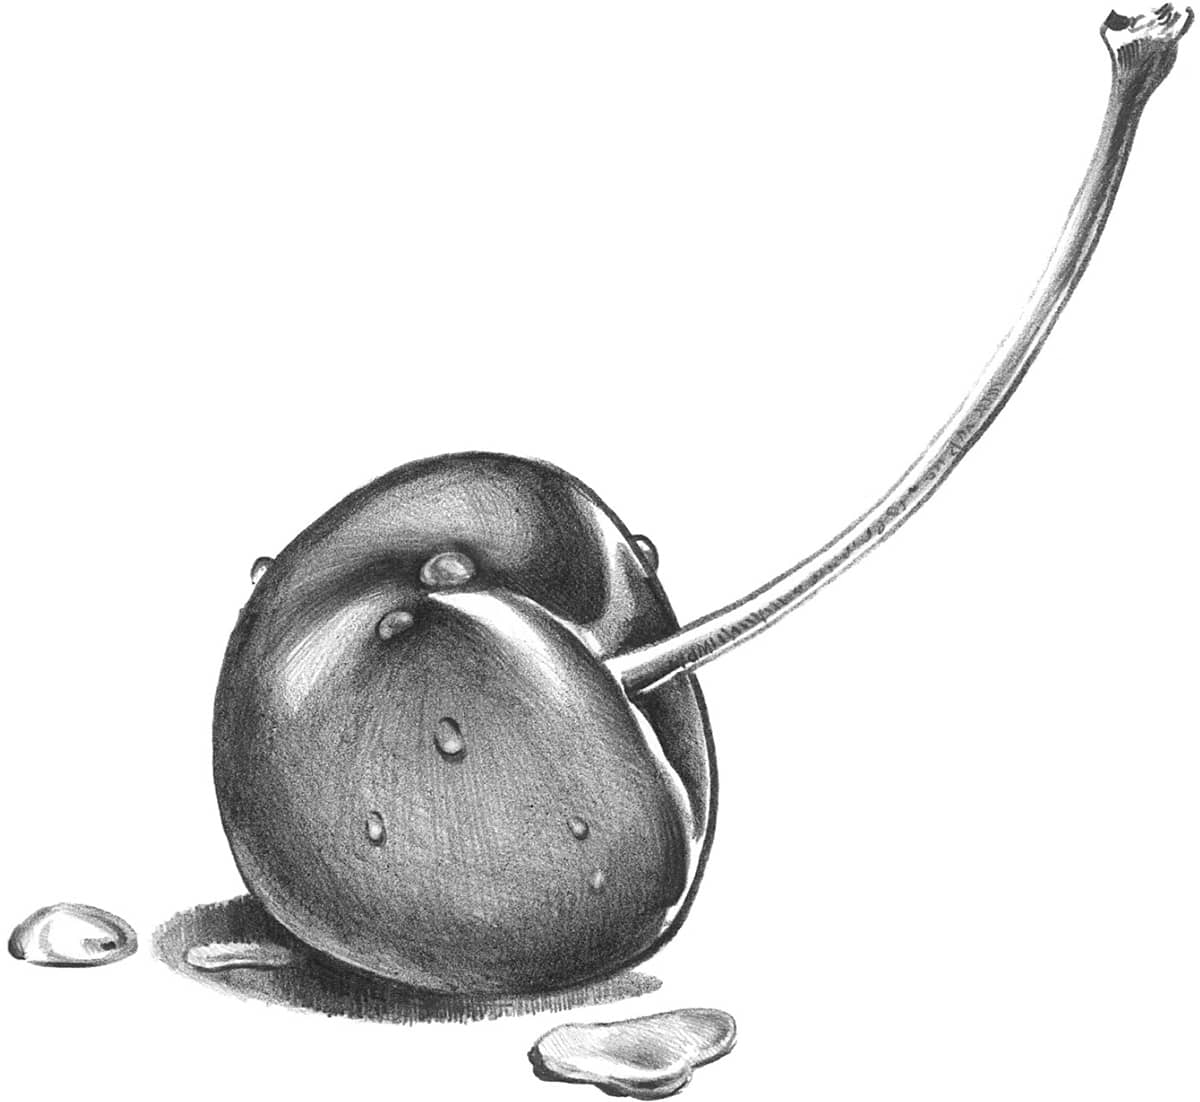
Use the arrow directions shown below as a guide for shading the cherry according to its contour. Leave light areas for the water drops, and shade inside them, keeping the values soft.
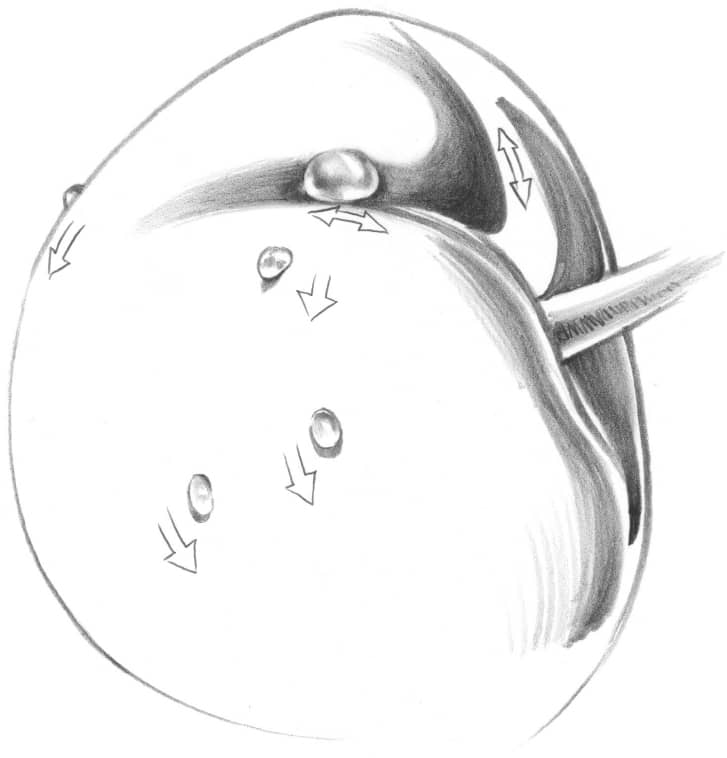
Sketch the outline shape of the pool of water with short strokes, as you did with the cherry. Shade softly, and create highlights with a kneaded eraser.
Continue shading until the cherry appears smooth. Use the tip of a kneaded eraser to remove any shading or smears that might have gotten into the highlights. Then fill in the darker areas using overlapping strokes, changing stroke direction slightly to give the illusion of three-dimensional form to the shiny surface.
STRAWBERRIES
These strawberries were drawn on plate-finish bristol board using only an HB pencil. Block in the berry’s overall shape in steps A and B to the right. Then lightly shade the middle and bottom in step C, and scatter a seed pattern over the berry’s surface in step D. Once the seeds are in, shade around them.
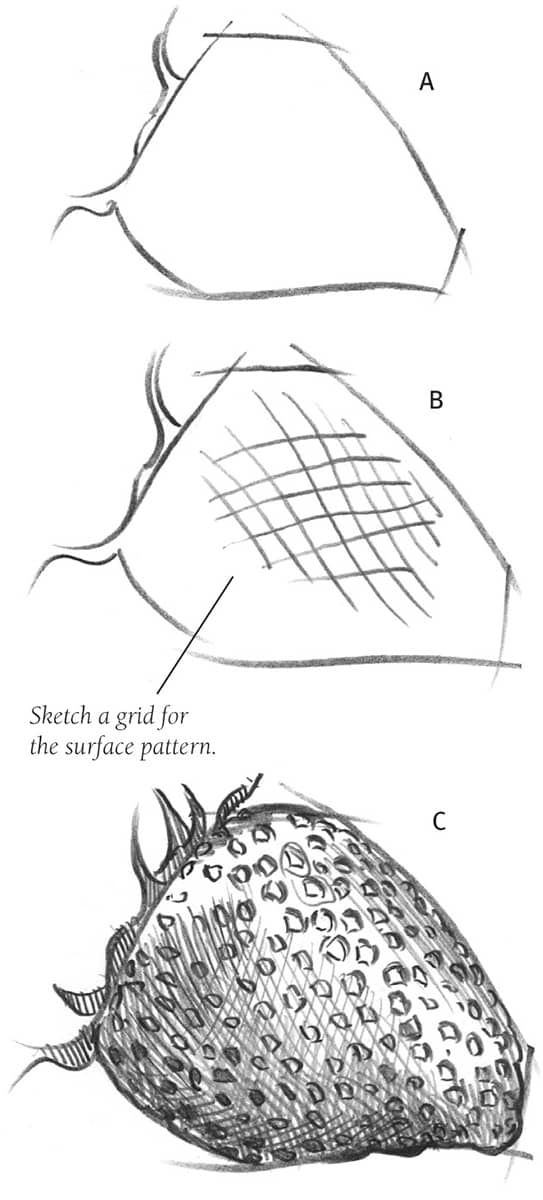

Draw a grid on the strawberry; it appears to wrap around the berry, helping to establish its seed pattern and three-dimensional form.
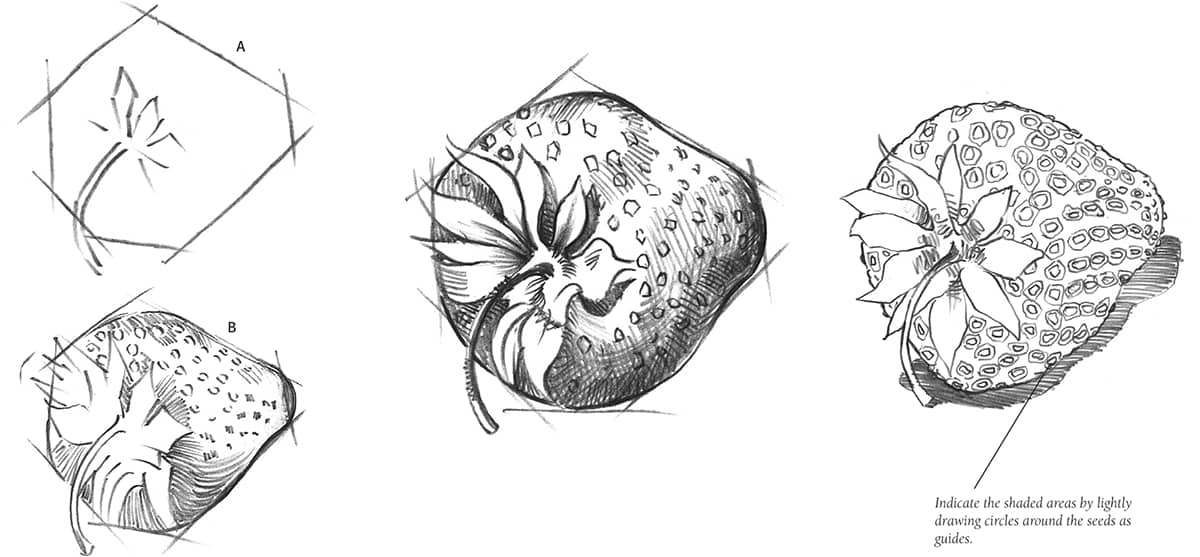
It’s important to shade properly around the seeds, creating small, circular areas that contain both light and dark. Also develop highlights and shadows on the overall berry to present a realistic, uneven surface.
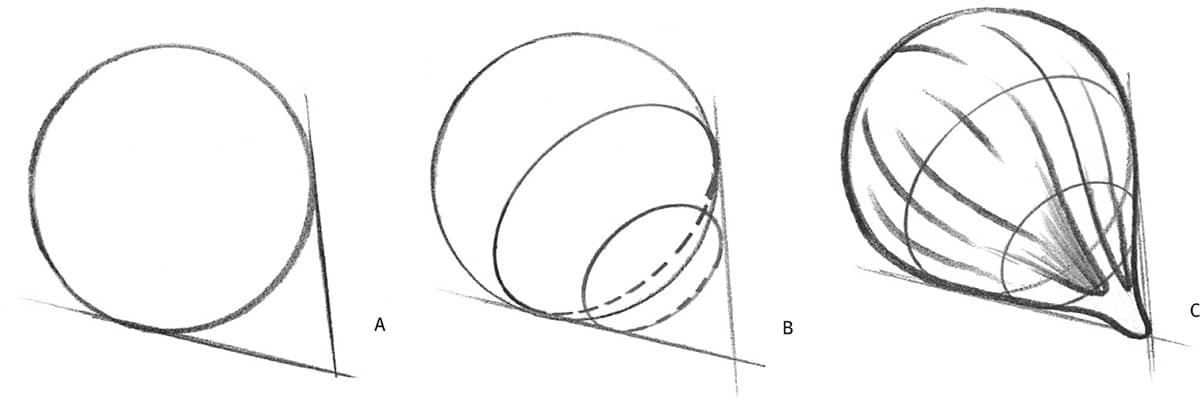
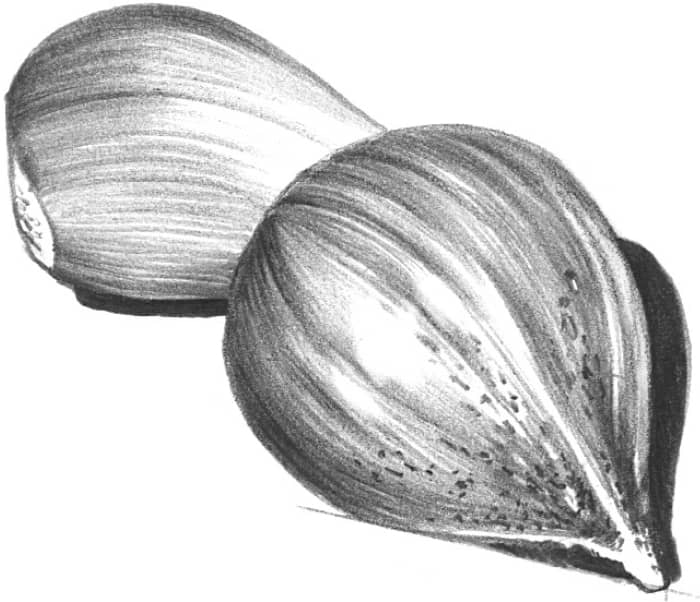
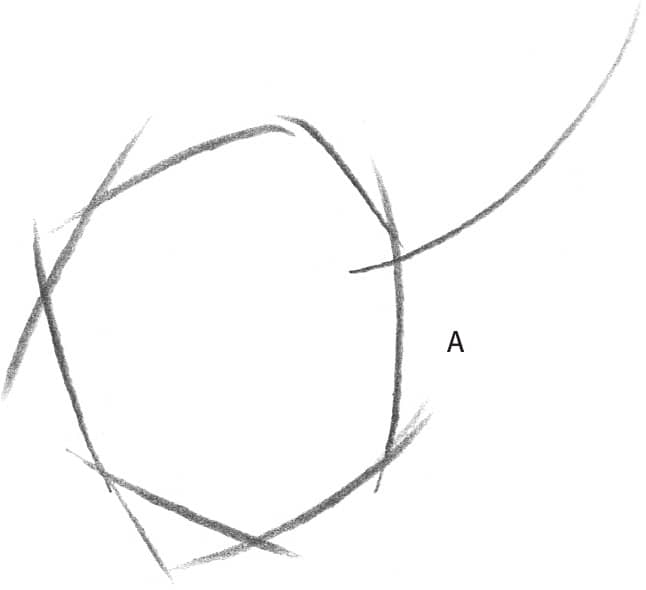
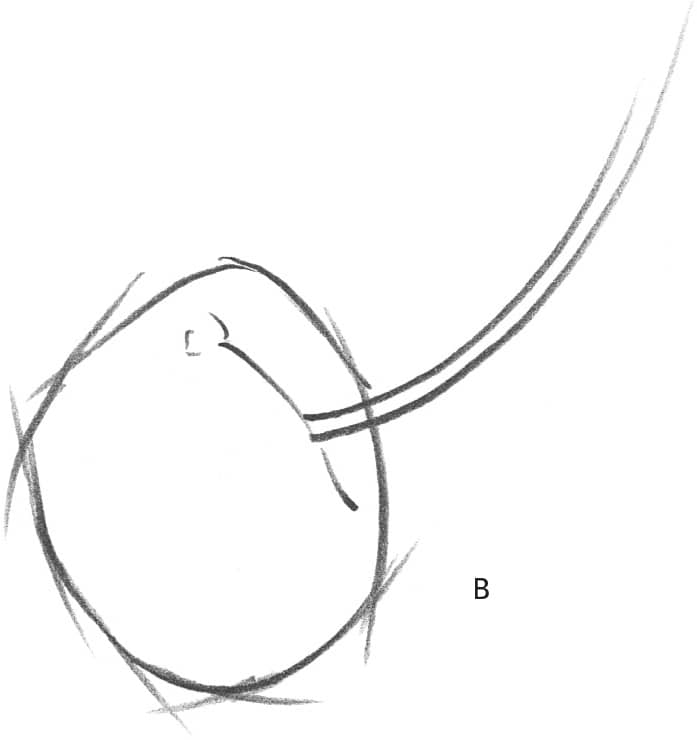
PINEAPPLE
Like the strawberry, a prickly pineapple has an involved surface pattern. The pineapple below was done on plate-finish bristol board using an HB pencil for the main layout and light shading as well as a 2B for darker areas.

Sketch the primary shape in step A, and add block-in lines for the pineapple’s surface pattern in steps B and C. Use a sharp 2B to draw subtle texture lines at various angles on each pineapple “section,” using the stroke and lift technique; begin at the edge, stroke toward the middle, and lift the pencil at the end of the stroke. Shade the cast shadow smoother and darker than the fruit surfaces, and add drops of juice for an appealing effect.
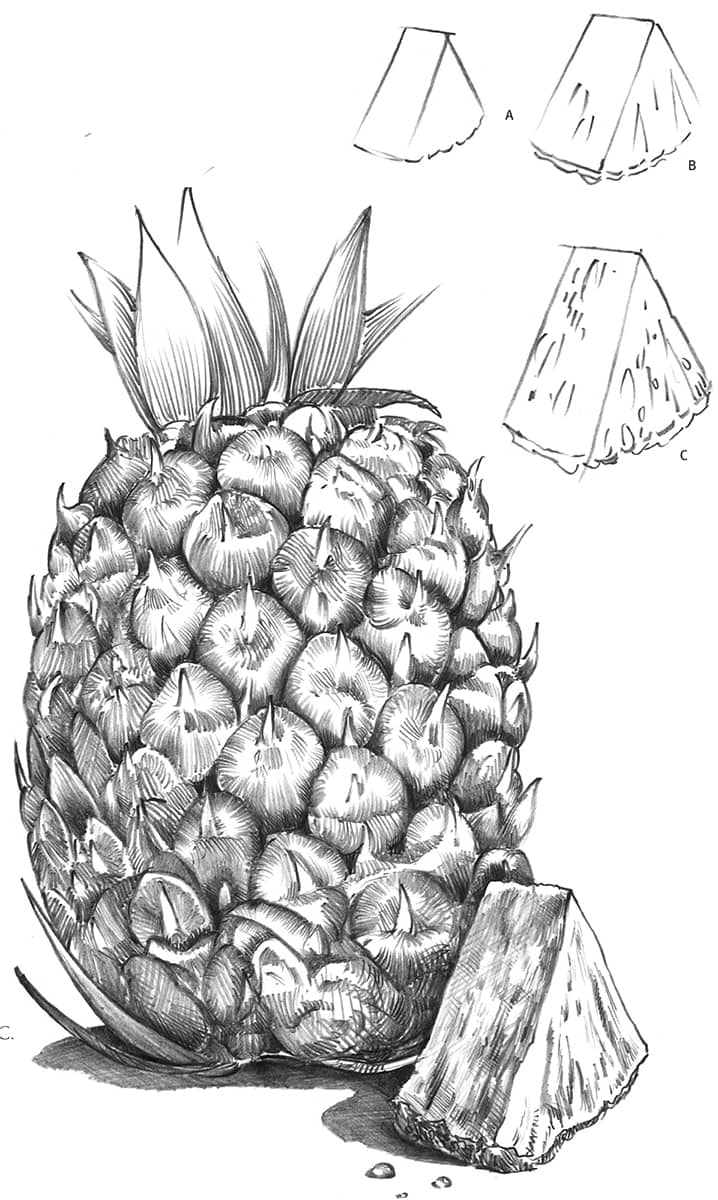
Practice drawing other fruits and vegetables you have at home, focusing on the varied textures and patterns of their seeds, pulp, and skins.
DEVELOPING FORM
Values tell us even more about a form than its outline. Values are the lights, the darks, and all the shades in between that make up an object. In pencil drawing, the values range from white to grays to black, and it’s the range of values in shading and highlighting that gives a three-dimensional look to a two-dimensional drawing. Focus on building dimension in your drawings by modeling forms with lights and darks.
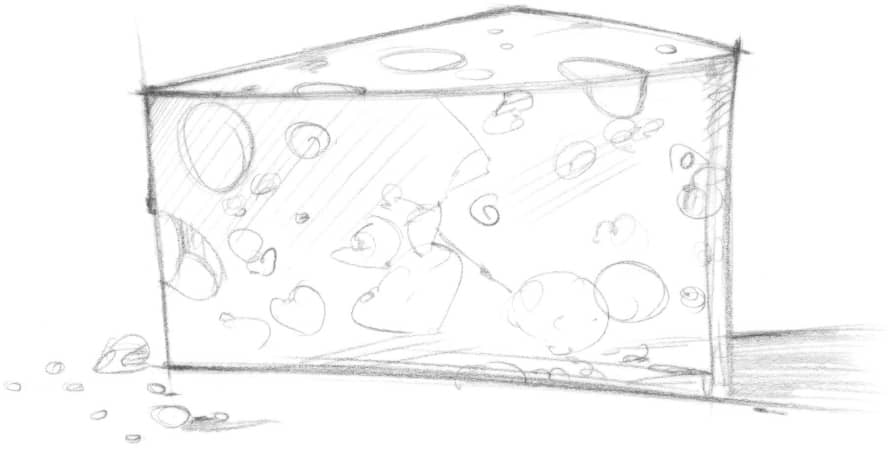
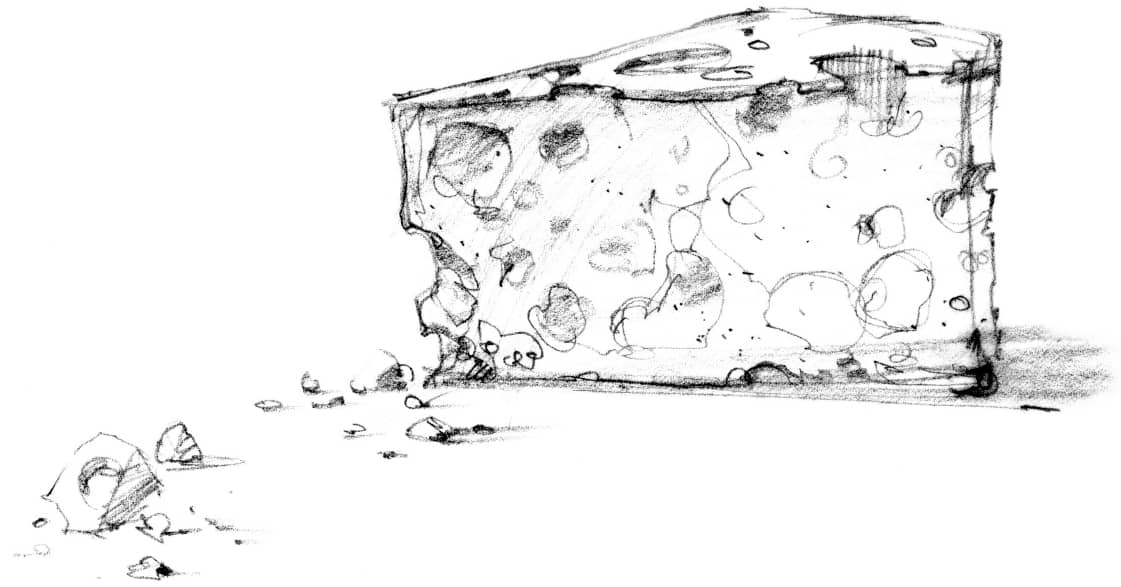
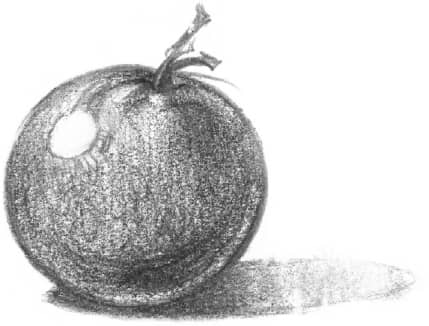
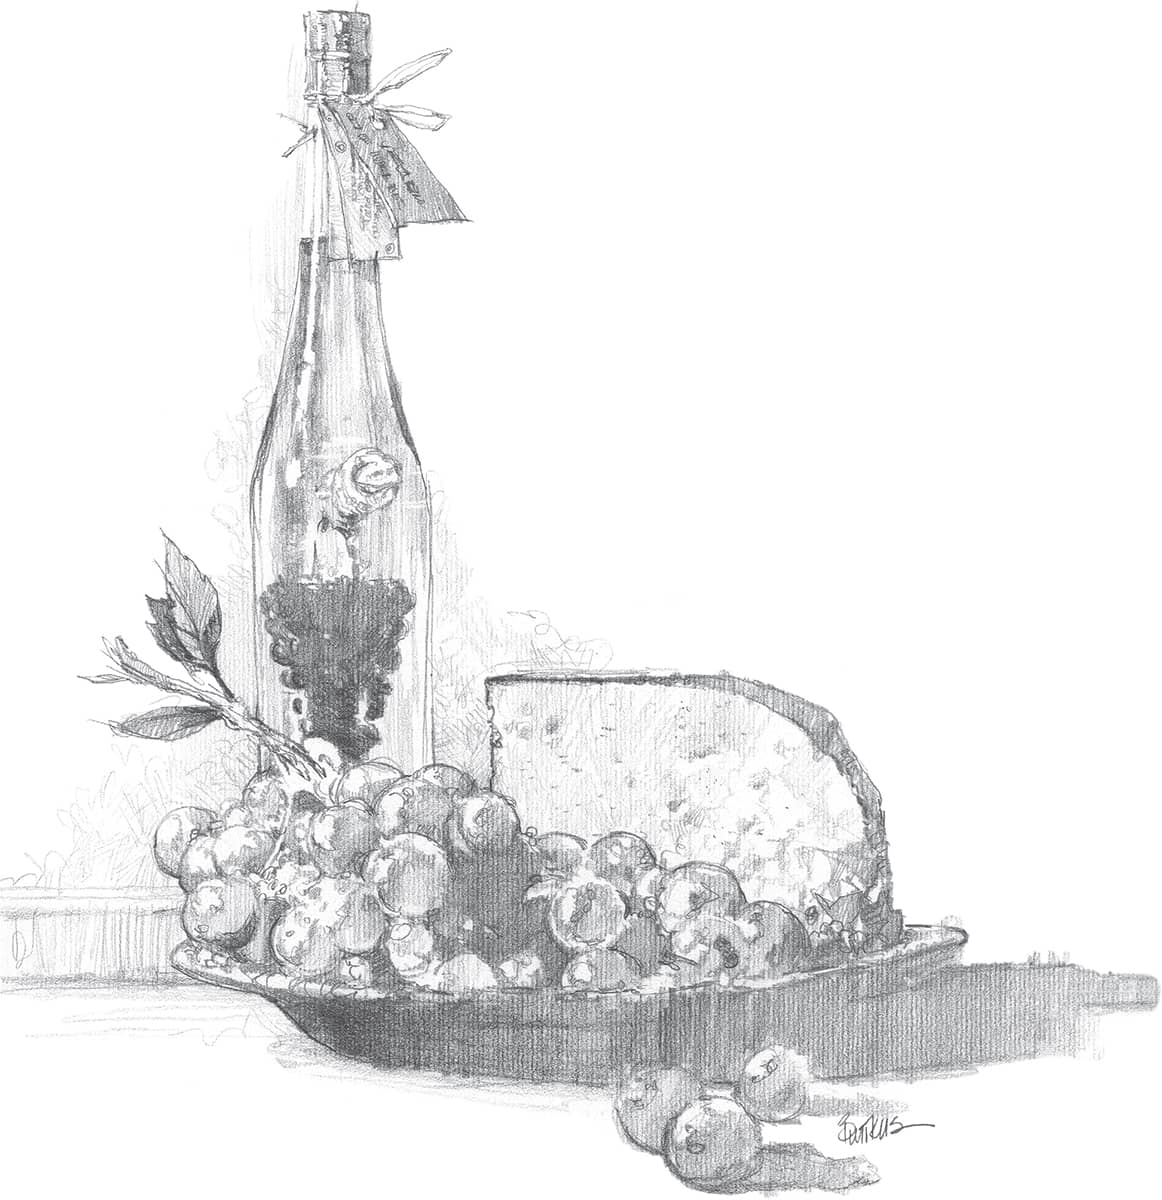
Laying in Values Here the light is coming from the left, so the cast shadows fall to the right. Lightly shade in the middle values on the side of the cheese, and place the darkest values in holes where the light doesn’t hit.
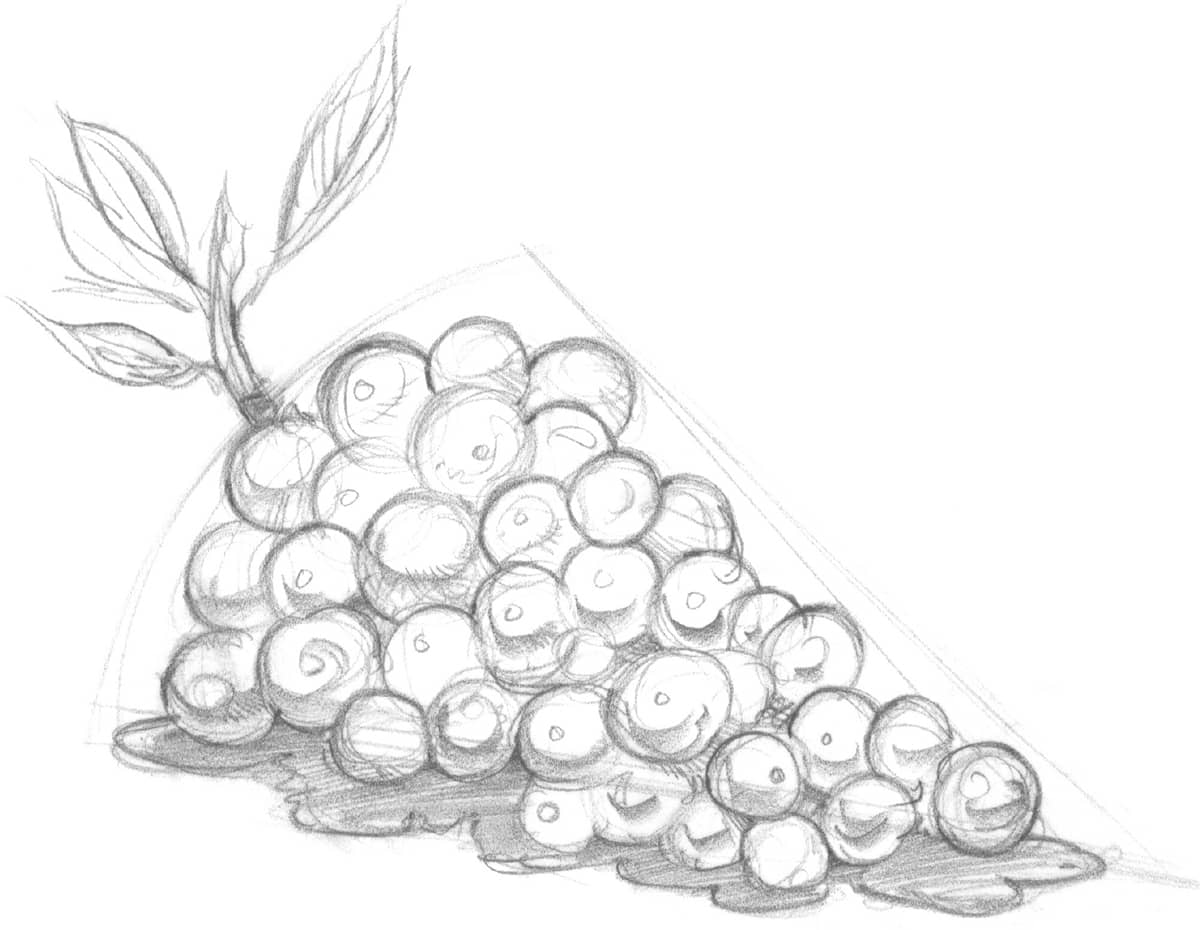
Adding Shadows Look at a bunch of grapes as a group of spheres. You can place all the shadow areas of the grapes (form shadows) on the sides that are opposite the light source. Then you can also block in the shadows that the grapes throw on one another and on the surrounding surface (cast shadows).
DRAWING CAST SHADOWS
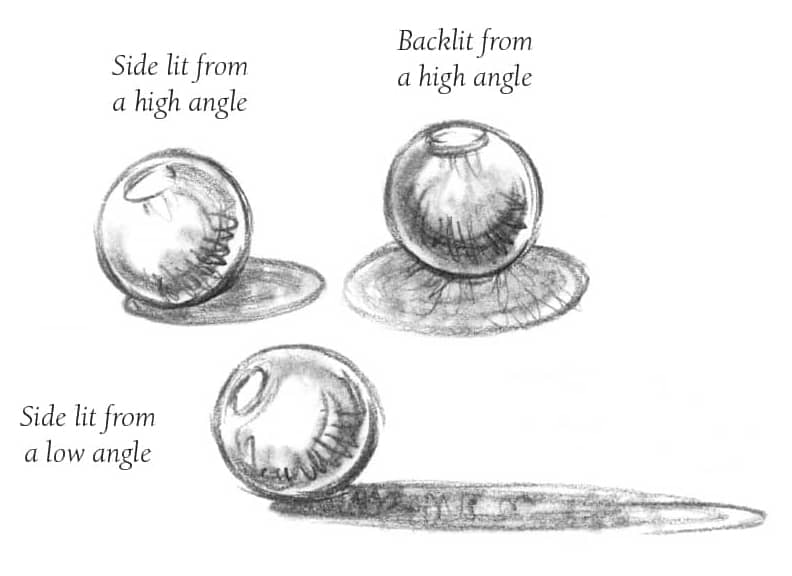
Cast shadows are important in drawing for two reasons. First, they anchor the image, so it doesn’t seem to be floating in air. Second, they add visual interest and help link objects together. When drawing a cast shadow, keep in mind that its shape will depend on the light source as well as the shape of the object casting it. For example, as shown below, a sphere casts a round or elliptical shadow on a smooth surface depending on the angle of the light source. The length of the shadow is also affected: the lower the light source, the longer the shadow.
UNDERSTANDING LIGHT AND SHADOWS
To develop a three-dimensional form, you need to know where to place the light, dark, and medium values of your subject. This will all depend on your light source. The angle, distance, and intensity of the light will affect both the shadows on an object (called “form shadows”) and the shadows the object throws on other surfaces (called “cast shadows”; see the box above). You might want to practice drawing form and cast shadows on a variety of round and angular objects, lighting them with a bright, direct lamp so the highlights and shadows will be strong and well-defined.
Highlighting Either “save” the white of your paper for the brightest highlights or “retrieve” them by picking them out with an eraser or painting them on with white gouache.
Shading Shade in the middle value of these grapes with a couple of swift strokes using the side of a soft lead pencil. Then increase the pressure on your pencil for the darkest values, and leave the paper white for the lights.
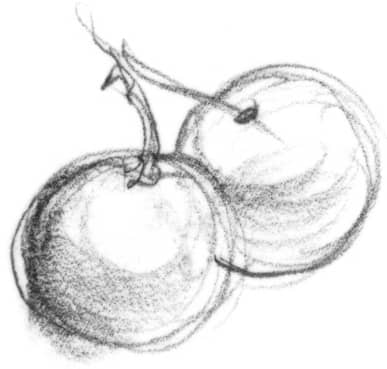
Using Photographs Many artists often draw from photo references, changing them as they see fit. They may prefer to “interpret” in their drawings rather than simply copying a photograph.
Shading Consistently If you have only one light source, make sure that all the highlights are facing one direction and all of the shadows are oriented in the opposite direction. If you mix them up, your drawing won’t be believable.
BUILDING DIMENSION
Some artists often sketch with a single HB pencil, but they rarely render a complete drawing with one. Instead they change pencils depending on which values they are applying, using hard leads such as H and HB for light areas and a soft 2B lead for darker areas. You can also make very dark areas by increasing pencil pressure and bearing down harder for the darkest values. Build darkness by shading in layers—the more layers you apply, the darker the area will become. Most of your shading can be done with the side of the pencil in an underhand position, but you can add details with the point in the handwriting position. (See here.)
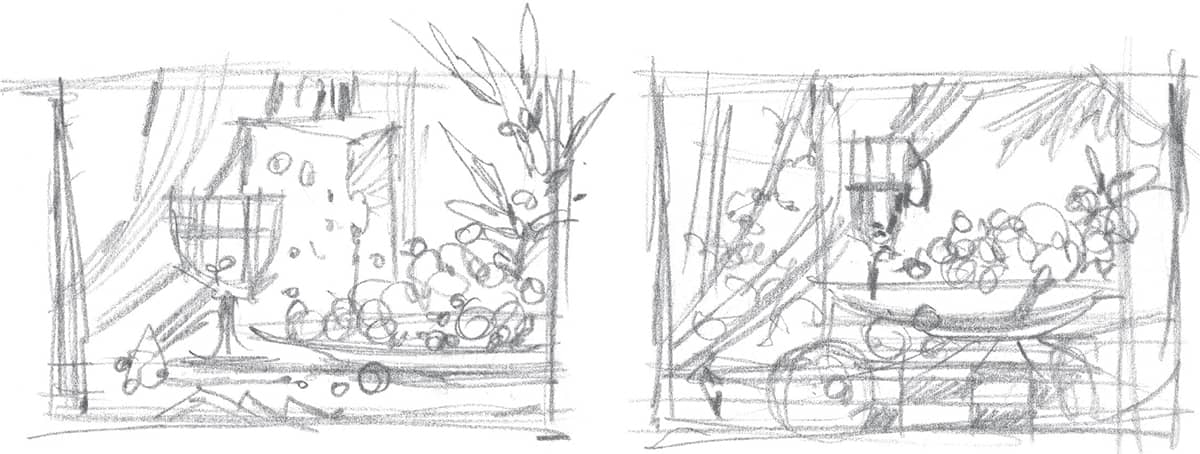
Getting to Know Your Subject Quick, “thumbnail” sketches are invaluable for developing a drawing. You can use them to play with the positioning, format, and cropping until you find an arrangement you like. These aren’t finished drawings by any means, so you can keep them rough. And don’t get too attached to them—they’re meant to be changed.