Classes and IDs are great for marking specific tags for styling. For example, you can add a class to a paragraph—<p class="intro">—and pinpoint just that one paragraph with its own look as determined by the .intro class style. Trouble is, it's so easy to add a class or ID to a tag, lots of designers tend to add classes and IDs to everything (well, almost everything). The pros even have a diagnosis for this disease—classistis. Adding a class to every tag is not only a waste of your time, it also makes your HTML slower to download. Most important, there's a better way to exert pinpoint control over your tags without resorting to too many classes or IDs—descendent selectors.
Descendent selectors are a powerful tool for efficient website building. As discussed in Chapter 3, they let you pinpoint the tags you want to style with greater accuracy than tag styles, with less work than class styles. Most of the time you want to format all the links in a navigation bar the same way, but that doesn't mean you want to format all of the links in the entire page the same way. What you need is a way to say (in CSS), "Format only the links in the nav bar this way"—without having to apply a class style to each of those links. In other words, you need the ability to format the same HTML in different ways depending on where it's located—and that's exactly what descendent selectors offer (see Figure 15-6).
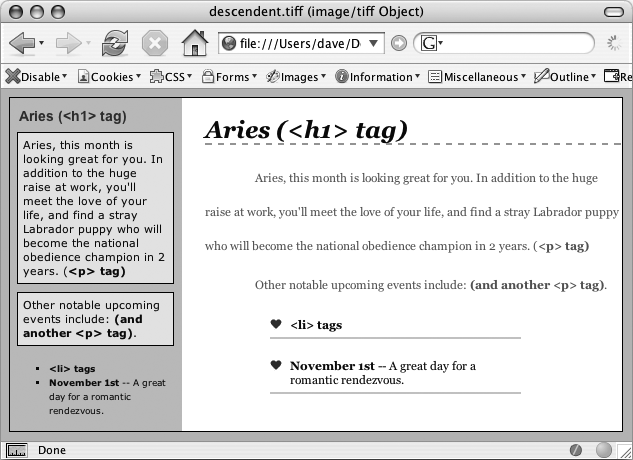
Figure 15-6. The same HTML was pasted into both the left sidebar and the larger right area of this web page. By using descendent selectors, identical HTML tags (<h1>, <p>, <ul>, and <li>) are formatted differently based solely on where they're located on the page.
One of your biggest allies in using descendent selectors effectively is the <div> tag. Since this HTML tag lets you create logical divisions in a page, you can use it to identify different layout elements like a banner, a sidebar, a column of text, and so on. As discussed on The Mighty <div> Tag, you can organize the content of your page into different areas by wrapping HTML in a <div> tag.
Group the title of a story and a list of links used to navigate the story's pages like this:
<div><h2>The CosmoFarmer Revolution</h2> <ul> <li><a href="page1.html">Page 1</a></li> <li><a href="page2.html">Page 2</a></li> <li><a href="page3.html">Page 3</a></li> </ul></div>
After adding the <div>, identify it for CSS purposes with either a class or ID attribute: <div class="pullQuote"> or <div id="banner">. When you want to include the same type of layout element more than once on a page—multiple pull quotes in a single story perhaps—use a class. For regions that appear only once per page—like the banner—an ID is the common choice.
Suppose the list of links in the HTML above appears twice on a page—at the beginning of the text and at the end. You'd apply a class to it like this:
<div class="storyNav">
  <h2>The CosmoFarmer Revolution</h2>
  <ul>
    <li><a href="page1.html">Page 1</a></li>
    <li><a href="page2.html">Page 2</a></li>
    <li><a href="page3.html">Page 3</a></li>
  </ul>
</div>
Note
You don't always need to add a <div> tag to style a group of elements. If the HTML above had only an unordered list of links and didn't include the <h2> tag, then you could just as easily skip the <div> tag and simply add a class to the unordered list: <ul class="storyNav">.
Once you identify each <div> on a page, it becomes very easy to use a descendent selector to target tags inside a particular <div>. Say you want to create a unique look for each of the links in the above HTML. You'd create a descendent selector like this:
.storyNav a {
  color: red;
  background-color: #ccc;
}
Now links will appear as red text on a light gray background, but only when they appear inside another tag with the storyNav class applied to it. Best of all, if you want to add another link (like page4.html) to this list, then you don't have to lift a finger to format it like the other links. The browser handles all of that automatically when it applies the descendent selector.
Formatting other tags inside that <div> is a simple matter of creating a descendent selector that begins with the class name—.storyNav, for instance—followed by a space and the tag you want to style. To format the <h2> that appears inside the <div>, create the descendent selector .storyNav h2.
Because descendent selectors provide such specific targeting of styles, you can easily create styles that not only apply to one particular area of a page, but also apply only to particular types of pages on your site. Say you want to style the <h1> tag differently on the home page than on other pages of the site. An easy way to distinguish <h1> tags on the home page is to add a class or ID to the <body> tag of the home page:
<body id="home">
or
<body class="home">
You can style the <h1> tag on the home page using a descendent selector: #home h1 (if you're using an ID) or .home h1 (if you're using a class). With this technique, you can create entirely different looks for any tag on any particular page of your site. One approach is to identify the section of the site each page is in. Say your site is divided into four sections—news, events, articles, and links. On each page within a section, add either a class or ID to the <body> tag. So each page in the news section might have the following HTML: <body class="news">, while pages in the events section would have <body class="events">.
Note
Another common CSS technique is to use a class to identify the type of layout you want for a particular page (like a one-, two-, or three-column design).
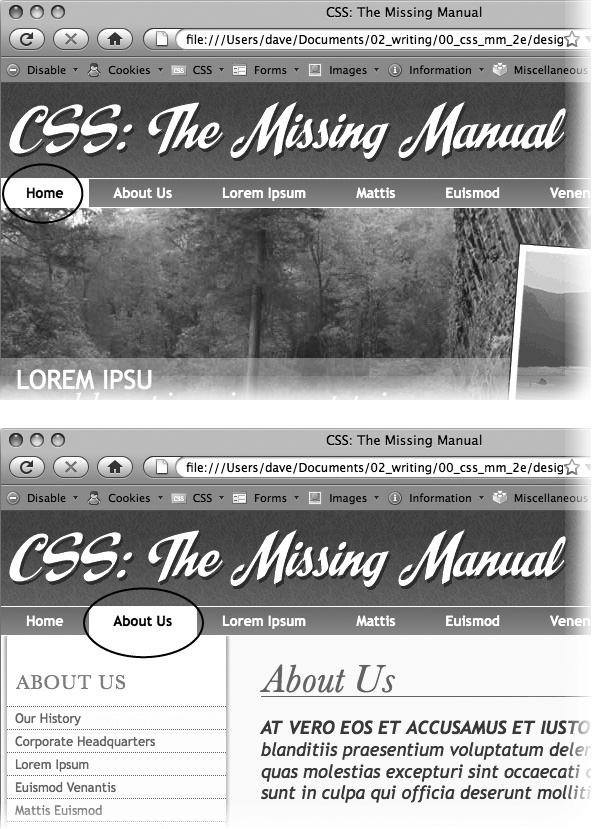
One great use for identifying a page's section in the site is to highlight that section's button in a navigation bar. The highlighted button acts as a kind of "you are here" marker, as shown in Figure 15-7 If a page is in the news section of your site, you can highlight the "news" button so visitors can tell immediately which section they're in.
Here's how to format a navigation button differently depending on which section of your site it's in:
Add an identifier to the <body> tag indicating the section the page is in.
For example, <body id="home">. Do the same thing for each section, so pages in the news section of the site would have code like this: <body id="news">.
Add a navigation bar to the page.
Step-by-step instructions are on Using Unordered Lists.
Identify each link within the navigation bar.
For a link to the home page, you might have this code: <a href="/index.html" id="homeLink">Home</a>. The ID lets you identify that particular link as the one going to the home page. (You could do the same thing using a class instead of an ID.) Repeat for the other links: <a href="/news/" id="newsLink">News</a> and so on.
At this point, you have enough information in your HTML to uniquely format each section's link using CSS. In this example, you know that the Home page link is nested inside a <body> tag with the ID of home only on the Home page.
Create a descendent selector to format each section's link differently when the link is inside a page for that section.
For the home page in this example, the descendent selector would look like this:
#home #homeLink
Figure 15-7. Using descendent selectors, you can highlight a button in a navigation bar simply by changing the class or ID applied to the <body> tag. In this example, when the body tag has the ID home applied to it, the Home button lights up (circled, top). Change the ID to about, and the About button highlights (circled, bottom).
This selector formats the #homeLink only when it's inside another tag with the ID #home. In most cases, you'll want the look of the "you are here" button to be the same for each section of the site, so you can use a group selector (Adding Rollovers and Creating "You Are Here" Links) to group all the descendent selectors for each section's button. That way, you can apply the same formatting to each button without creating separate rules for each button. A group selector to highlight the current section's navigation button with a light yellow background may look like this:
#home a#homeLink,
#news a#newLink,
#articles a#articlesLink,
#links a#linksLink {
  background-color: #FBEF99;
}
Using the same technique, make additional styles to apply different looks for the links when you hover over them, click them, or when they've been visited. See Highlighting Different Links for the details.
These few examples are just some of the ways you can take advantage of descendent selectors. They can make your style sheets a little more complex. You'll have styles like #home .navbar a, for example, instead of a simple class like .navLink. But once the styles are set up, you'll need to do very little further formatting. HTML pasted into different areas of the page automatically gets formatted in strikingly different ways. Almost like magic.