9 Organizing your Artwork with Layers
Lesson overview
In this lesson, you’ll learn how to do the following:
-
Work with the Layers panel.
-
Create, rearrange, and lock layers and sublayers.
-
Move objects between layers.
-
Merge layers into a single layer.
-
Locate objects in the Layers panel.
-
Isolate content in a layer.
-
Copy and paste objects and their layers from one file to another.
-
Make a layer clipping mask.
-
Apply an appearance attribute to objects and layers.

This lesson takes approximately 45 minutes to complete. Please log in to your account
on peachpit.com to download the lesson files for this chapter, or go to the “Getting Started” section
at the beginning of this book and follow the instructions under “Accessing the lesson
files and Web Edition.”
Your Account page is also where you’ll find any updates to the chapters or to the
lesson files. Look on the Lesson & Update Files tab to access the most current content.
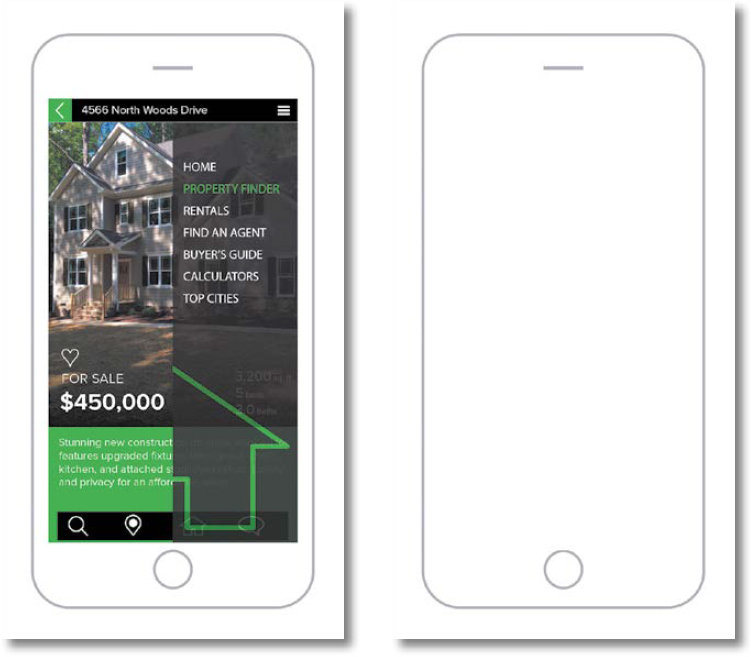
Layers let you organize your work into distinct levels that can be edited and viewed
individually or together. Every Adobe Illustrator CC document has at least one layer.
Creating multiple layers in your artwork lets you easily control how artwork is printed,
displayed, selected, and edited.
Starting the lesson
In this lesson, you’ll organize the artwork for a real estate app design as you explore
the various ways to use the Layers panel.
-
To ensure that the tools function and the defaults are set exactly as described in
this lesson, delete or deactivate (by renaming) the Adobe Illustrator CC preferences
file. See “Restoring default preferences” in the “Getting Started” section at the
beginning of the book.
 Note: If you have not already downloaded the project files for this lesson to your computer
from your Account page, make sure to do so now. See the “Getting Started” section
at the beginning of the book.
-
Start Adobe Illustrator CC.
-
Choose File > Open, and open the L9_end.ai file in the Lessons > Lesson09 folder,
located on your hard disk.
-
Choose View > Fit All In Window.
-
Choose Window > Workspace > Reset Essentials.
 Note: If you don’t see Reset Essentials in the Workspace menu, choose Window > Workspace
> Essentials before choosing Window > Workspace > Reset Essentials.
-
Choose File > Open. In the Open dialog box, navigate to the Lessons > Lesson09 folder,
and select the L9_start.ai file on your hard disk. Click Open.
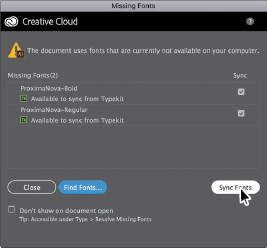
The Missing Fonts dialog box may appear, indicating that a font (ProximaNova) was used in the file that Illustrator
can’t find on your machine. The file uses a Typekit font that you most likely don’t
have synced with your machine, so you will fix the missing font before moving on.
-
In the Missing Fonts dialog box, ensure that Sync is selected for each font in the
Sync column, and click Sync Fonts. After some time, the font should be synced with
your machine, and you should see a success message in the Missing Fonts dialog box.
Click Close.
This will sync the Typekit font to your computer and ensure that the font shows as
intended in Illustrator.
 Note: If you see a warning message in the Missing Fonts dialog box or cannot select Sync,
you can click Find Fonts to replace the font with a local font. In the Find Font dialog
box, make sure that Proxima Nova is selected in the Fonts in Document section, and
choose System from the Replace With Font From menu. This shows all the local fonts
that are available to Illustrator. Select a font from the Fonts In System section,
and click Change All to replace the font. Do the same for Proxima Nova Bold. Click
Done.
 Note: If the font is unable to sync, you may not have an Internet connection or you may
need to launch the Creative Cloud desktop application, sign in with your Adobe ID,
choose Assets > Fonts, and click Turn Typekit On. If you went through Lesson 8, “Adding Type to a Poster,” you would have this already turned on. For more information, visit http://helpx.adobe.com/creative-cloud/help/add-fonts-typekit.html.
-
Choose File > Save As, name the file RealEstateApp.ai, and select the Lesson09 folder. Leave the Format option set to Adobe Illustrator
(ai) (macOS) or the Save As Type option set to Adobe Illustrator (*.AI) (Windows)
and then click Save. In the Illustrator Options dialog box, leave the Illustrator
options at their default settings and then click OK.
-
Choose Select > Deselect (if available).
-
Choose View > Fit All In Window.
Understanding layers
Layers are like invisible folders to help you hold and manage all of the items (some of
which can be difficult to select or track) that make up your artwork. If you shuffle
those folders, you change the stacking order of the items in your artwork. (You learned
about stacking order in Lesson 2, “Techniques for Selecting Artwork.”)
The structure of layers in your document can be as simple or as complex as you want.
When you create a new Illustrator document, all of the content you create is organized
in a single layer. However, you can create new layers and sublayers (like subfolders)
to organize your artwork, as you’ll learn about in this lesson.
-
Click the L9_end.ai tab at the top of the document window to show that document.
-
Click the Layers panel tab on the right side of the workspace, or choose Window >
Layers.
In addition to organizing content, the Layers panel offers an easy way to select,
hide, lock, and change your artwork’s appearance attributes. In the following figure,
the Layers panel is showing the content for the L9_end.ai file and won’t match what
you see in the RealEstateApp.ai file. You can refer to this figure as you progress
through the lesson.
 Note: The figure shows the top and bottom of the Layers panel. The Layers panel in the
Essentials workspace is very tall, which is why the figure shows a split in the panel.
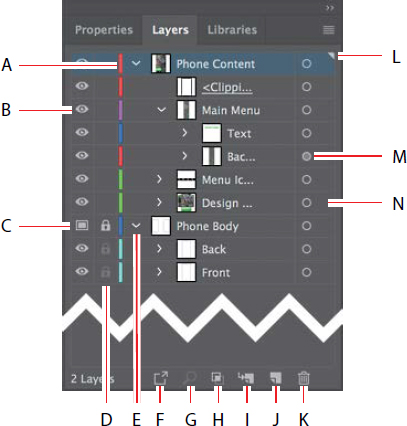
- Layer Color
- Visibility Column (eye icon)
- Template Layer icon
- Edit Column (lock/unlock)
- Disclosure Triangle (expand/collapse)
- Collect For Export
- Locate Object
- Make/Release Clipping Mask
- Create New Sublayer
- Create New Layer
- Delete Selection
- Current Layer Indicator (the triangle)
- Target Column
- Selection Column
Creating layers and sublayers
By default, every document begins with one layer, named “Layer 1.” As you create artwork,
you can rename and add layers and sublayers at any time. Placing objects on separate
layers lets you more easily select and edit them. For example, by placing type on
a separate layer, you can focus on the type without affecting the rest of the artwork.
Creating new layers
 Note: How many layers you create, what you name them, and how content is organized within
those layers varies depending on the project you are working on. For this lesson,
I thought about what would make sense for layer organization, so you’re creating layers
based on that. There is no “wrong” layer structure, but, as you gain more experience
with layers, you’ll see what makes more sense for you.
Next, you’ll change the default layer name and then create new layers using different
methods. The idea for this project is to organize the artwork so you can more easily
work with it later. In a real-world situation, you’ll set up layers before you begin
working on the artwork or as you create your artwork. In this lesson, you’ll organize
artwork with layers after the artwork is created, which can be a bit more challenging.
-
Click the RealEstateApp.ai tab at the top of the document window.
-
If the Layers panel isn’t visible, click the Layers panel tab on the right side of
the workspace, or choose Window > Layers. Layer 1 (the default name for the first
layer) is highlighted, indicating that it is active.
-
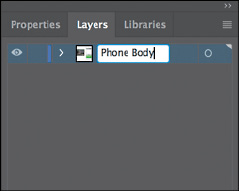
In the Layers panel, double-click directly on the layer name “Layer 1” to edit it
inline. Type Phone Body and then press Enter or Return.
Instead of keeping all the content on one single layer, you’ll create several layers
and sublayers to better organize the content and to make it easier to select content
later.
-
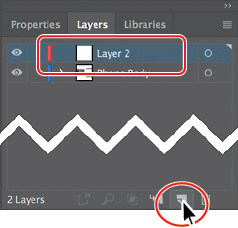
Click the Create New Layer button ( ) at the bottom of the Layers panel.
Layers and sublayers that aren’t named are numbered in sequence. For example, the
new layer is named Layer 2. When a layer or sublayer in the Layers panel contains
other items, a disclosure triangle ( ) appears to the left of the layer or sublayer name. You can click the disclosure
triangle to show or hide the contents. If no triangle appears, the layer has no content
on it.
 Tip: You can easily delete a layer by selecting the layer or sublayer and clicking the
Delete Selection button (
 ) at the bottom of the Layers panel. This deletes the layer or sublayer and all content
on it.
-
Double-click the layer thumbnail for Layer 2 (the white box) or to the right of the
layer name “Layer 2” in the Layers panel to open the Layer Options dialog box. Change
the name to Phone Content, and notice all the other options available. Click OK.
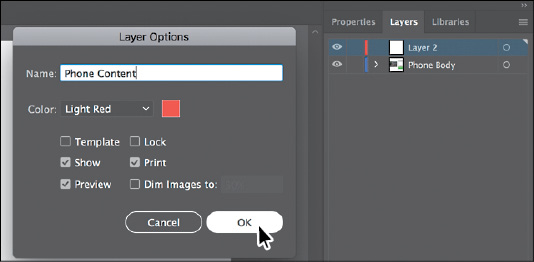
 Note: The Layer Options dialog box has a lot of the options you’ve already worked with,
including naming layers, Preview or Outline mode, locking layers, and showing and
hiding layers. You can also deselect the Print option in the Layer Options dialog
box, and any content on that layer will not print.
By default, the new layer is added above the currently selected layer (Phone Body,
in this case) in the Layers panel and becomes active. Notice that the new layer has
a different layer color (a light red) to the left of the layer name. This will become
more important later, as you select content. Next, you will create a new layer and
name it in one step, using a modifier key.
-
Option-click (macOS) or Alt-click (Windows) the Create New Layer button ( ) at the bottom of the Layers panel. In the Layer Options dialog box, change the name
to Menu Icons and then click OK.
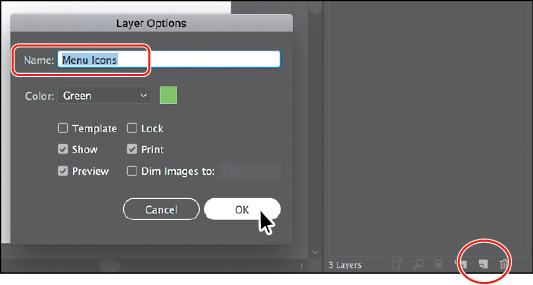
 Tip: Choosing New Layer from the Layers panel menu (
 ) will also create a new layer and open the Layer Options dialog box.
-
With the “Menu Icons” layer selected in the Layers panel, click the Layers panel menu
( ) and choose Duplicate “Menu Icons” to create a copy of the layer.
-
Double-click directly on the new layer name in the panel, and change it to Design Content. Press Enter or Return to accept the change.

 Note: The layer copy has the same layer color as the original layer (Menu Icons). In this
lesson, that’s okay, but in the real world you may want to make the layer color different
for each layer. This can be helpful when selecting artwork later.
Creating sublayers
Next, you’ll create a sublayer, which is a layer nested within a layer. Sublayers
can be useful for organizing content within a layer without grouping or ungrouping
content.
-
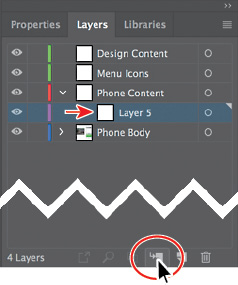
Click the layer named “Phone Content” to select it and then click the Create New Sublayer
button ( ) at the bottom of the Layers panel.
A new sublayer is created on the Phone Content layer and is selected. You can think
of this new sublayer as a “child” of the “parent” layer named “Phone Content.”
 Note: To create a new sublayer and name it in one step, Option-click (macOS) or Alt-click
(Windows) the Create New Sublayer button or choose New Sublayer from the Layers panel
menu to open the Layer Options dialog box.
-
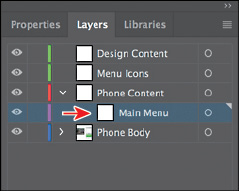
Double-click the new sublayer name (Layer 5, in my case), change the name to Main Menu, and then press Enter or Return.
Creating a new sublayer opens the selected layer to show existing sublayers and content.
-
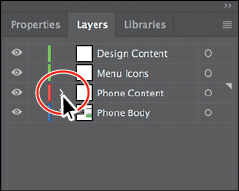
Click the disclosure triangle ( ) to the left of the Phone Content layer to hide the content of the layer.
-
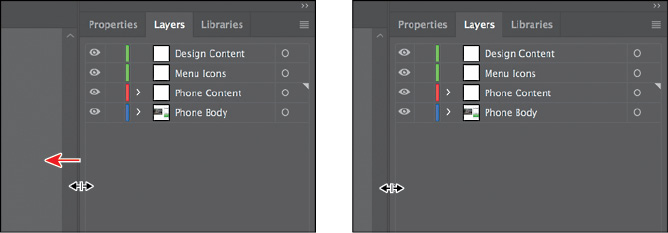
Drag the left edge of the Layers panel to the left to make it wider.
Editing layers and objects
By rearranging the layers in the Layers panel, you can change the stacking order of
objects in your artwork. On an artboard, objects in layers that are higher in the
Layers panel list are in front of objects located on layers lower in the list, and
each layer has its own stacking order as well. Layers are useful for a variety of
reasons, including the ability to move objects between layers and sublayers to organize
and more easily select your artwork.
Locating layers
When working in artwork, there may be times when you select content on the artboard
and then want to locate that same content in the Layers panel. This can help you to
determine how content is organized.
-
With the Selection tool ( ), click to select the green rectangle with text on it toward the bottom of the left
artboard. Click the Locate Object button (
 ) at the bottom of the Layers panel to reveal the group of objects within the Layers
panel.

Clicking the Locate Object button will open the layer that the layer content is on,
and the Layers panel will scroll, if necessary, to reveal the selected content.
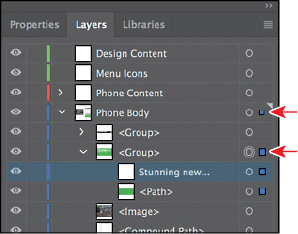
In the Layers panel, you’ll see a selection indicator ( ) to the far right of the layer that the selected content is on, the <Group> object,
as well as the objects in the group.
-
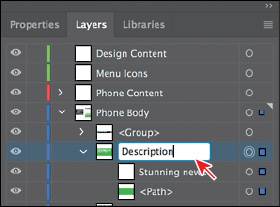
In the Layers panel, double-click the <Group> text, and rename it Description.
When content is grouped, a group object (<Group>) is created that contains the grouped
content. Look at the top of the Properties panel to see the word “Group” in the Selection
Indicator. Renaming a group doesn’t change the fact that it’s a group, but it can
make it easier to find in the Layers panel.
-
Choose Select > Deselect.
-
Click the disclosure triangle ( ) to the left of the Description group to collapse the group and then click the disclosure
triangle (
 ) to the left of the Phone Body layer name to collapse the layer and hide the contents
of the entire layer.
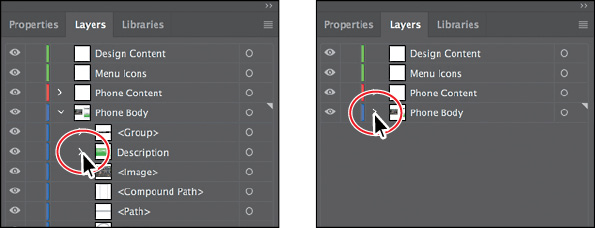
Keeping layers, sublayers, and groups collapsed is a great way to make the Layers
panel less visually cluttered. The Phone Content layer and Phone Body layer are the
only layers with a disclosure triangle because they’re the only layers with content
on them.
Moving content between layers
Next, you’ll move the artwork to the different layers to take advantage of the layers
and sublayers you’ve created.
-
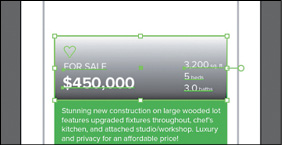
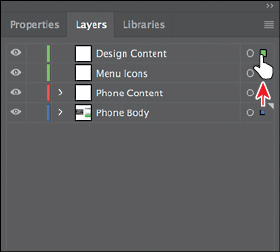
In the artwork, using the Selection tool ( ), click the text “FOR SALE $450,000” to select a group of content.
In the Layers panel, notice that the Phone Body layer name has the selected-art indicator
(the color square); it’s circled in the figure.
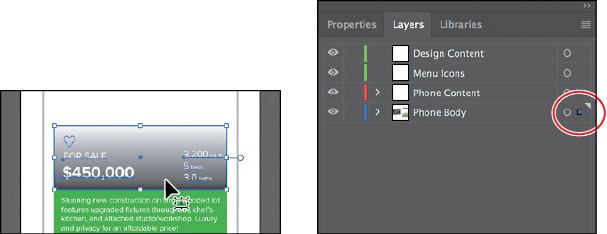
Also notice that the color of the bounding box, paths, and anchor points of the selected
artwork matches the color of the layer.
If you want to move selected artwork from one layer to another, you can either drag
the selected-art indicator to the right of each sublayer or drag the selected-art
indicator to the right of the layer name. That’s what you’ll do next.
-
Drag the selected-art indicator (the little blue box) from the far right of the Phone
Body layer name straight up to the right of the target icon ( ) on the Design Content layer.
This action moves all of the selected artwork to the Design Content layer. The color
of the bounding box, paths, and anchor points in the artwork changes to the color
of the Design Content layer, which is green (in my case).
 Tip: You can also press Option (macOS) or Alt (Windows) and drag the selected-art indicator
to another layer to duplicate the content. Remember to release the mouse button and
then the key.
-
Choose Select > Deselect.
-
Click the disclosure triangle ( ) to the left of the Phone Body layer to show the layer content.
-
Click the top <Group> object that contains the top navigation artwork. Press the Shift
key and click the <Image> object to select the <Group>, Description, and <Image> layers
without selecting the artwork on the artboard.
-
Drag any of the selected objects to the Design Content layer at the top of the list.
When the Design Content layer shows a highlight, release the mouse button.
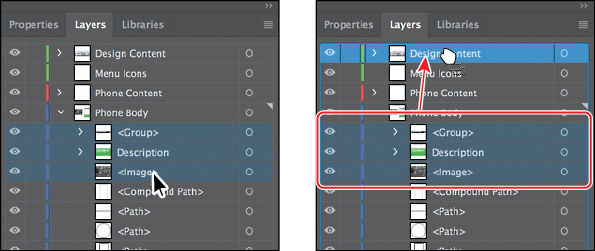
 Note: This is another way to move artwork between layers. Any content that is dragged to
another layer is automatically at the top of the layer stack on that layer.
-
Click the disclosure triangle ( ) to the left of the Phone Body layer to hide the layer contents.
Viewing layers
The Layers panel lets you hide layers, sublayers, or individual objects from view.
When a layer is hidden, the content on the layer is also locked and cannot be selected
or printed. You can also use the Layers panel to display layers or objects individually,
in either Preview or Outline mode. In this section, you’ll learn how to view layers
in Outline mode to make artwork potentially easier to select.
-
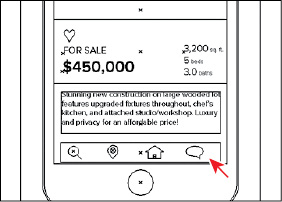
Choose View > Outline. This displays the artwork so that only its outlines (or paths)
are visible. You should be able to see the menu icons that are hidden beneath the
green shape. An arrow is pointing to them in the figure.
Notice the eye icons ( ) in the Layers panel now. They indicate that the content on that layer is in Outline
mode.
-
Choose View > GPU Preview or View > Preview On CPU (or Preview) if GPU Preview is
not available to see the painted artwork.
Sometimes, you may want to view part of the artwork in outline mode while retaining
the strokes and fills for the rest of the artwork. This can be useful if you need
to see all artwork in a given layer, sublayer, or group.
-
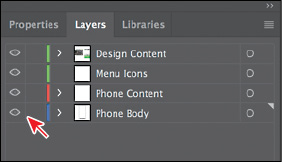
In the Layers panel, click the disclosure triangle ( ) for the Design Content layer to reveal the layer content. Command-click (macOS)
or Ctrl-click (Windows) the eye icon (
 ) to the left of the Design Content layer name to show the content for only that layer in Outline mode.
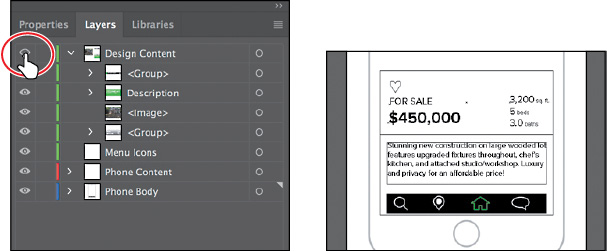
 Tip: To view layer artwork in Outline mode, you can also double-click either the layer
thumbnail or just to the right of the layer name to open the Layer Options dialog
box. You can then deselect Preview and click OK.
Displaying a layer in Outline mode is also useful for selecting the anchor points
or center points on objects.
-
Select the Selection tool ( ), and click one of the mobile icons to select the group.
-
Click the Locate Object ( ) button at the bottom of the Layers panel to see where the selected group is in the
Layers panel.
-
Choose Edit > Cut to cut the mobile icon group from the document.
Cutting content or deleting content will remove it from the Layers panel.
-
Click the disclosure triangle ( ) to the left of the Design Content layer and the Phone Body layer to hide the layer
content for each.
-
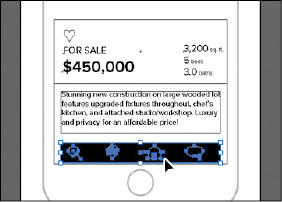
Click to select the Menu Icons layer, and choose Edit > Paste In Place to paste the
group into that layer.
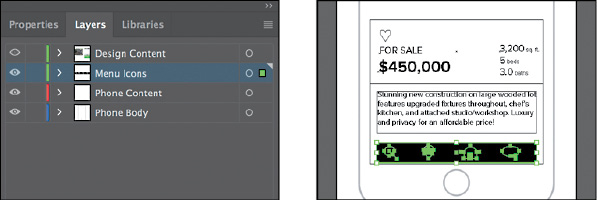
Selecting a layer before you create or paste content is something you will be doing
a lot of in Illustrator. This way, you can organize content, keeping it on the layer
you think is best, as you go.
 Note: In the figure, all of the layers are toggled closed. Yours may look different, and
that’s okay.
 Note: The Paste In Place and Paste on All Artboards commands paste artwork on the active
artboard at the same position as the artboard from where the artwork is copied.
-
Command-click (macOS) or Ctrl-click (Windows) the eye icon ( ) to the left of the Design Content layer name to show the content for that layer
in Preview mode again.

The menu icons will be behind the design content now since the Menu Icons layer is
beneath the Design Content layer in the Layers panel. You’ll fix that next.
Reordering layers
In earlier lessons, you learned that objects have a stacking order, depending on when
and how they were created. That stacking order applies to each of the layers in the
Layers panel. By creating multiple layers in your artwork, you can control how overlapping
objects are displayed. Next, you’ll reorder layers to achieve a different stacking
order.
-
Click the disclosure triangle ( ) to the left of the Design Content layer to show the layer content.
-
Option-click (macOS) or Alt-click (Windows) the eye icon ( ) to the left of the Design Content layer to hide the other layers.
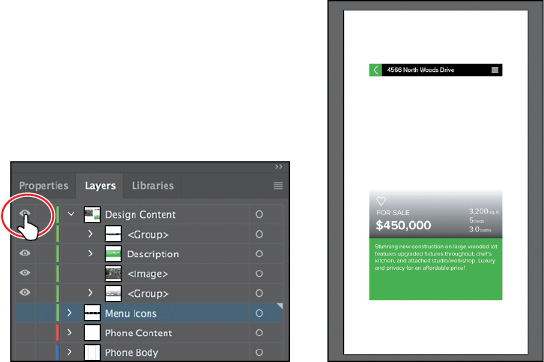
Hiding all layers except those that you want to work with can be very useful so you
can focus on the content at hand.
-
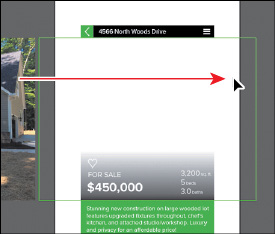
With the Selection tool ( ) selected, click in a blank area, away from artwork to deselect, if necessary. Shift-drag
the image off the left edge of the artboard into the approximate center of the artboard.
Release the mouse button and then the Shift key.
Notice the <Image> object in the Design Content layer in the Layers panel.
-
Choose Object > Arrange > Send To Back.

 Tip: You can also drag the <Image> object down below the <Group> object beneath it in
the Layers panel. When a highlight line appears, release the mouse button to reorder
the layers. The Arrange commands work within the layer that the selected content is
on.
-
Choose Select > Deselect.
-
Click the disclosure triangle ( ) to the left of the Design Content layer to hide the layer content.
It’s a good idea to get in the practice of collapsing layers in my opinion so you
can more easily find content and work with layers in the Layers panel later.
-
Choose Show All Layers from the Layers panel menu ( ) or Option-click (macOS) or Alt-click (Windows) the eye icon (
 ) to the left of the Design Content layer to show all layers again.
-
Click the Design Content layer to select it in the Layers panel, if necessary. Shift-click
the Menu Icons layer to select both.
-
Drag either layer down on top of the Phone Content layer. When the layer is highlighted,
release the mouse button to move the layers into the Phone Content layer. They are
now sublayers of the parent Phone Content layer.

Collecting into a new layer
To streamline your artwork, you can merge layers, sublayers, content, or groups to
combine the contents into one layer or sublayer. Note that items will be merged into
the layer or group that you selected last. Next, you will merge content into a new
layer and then merge a few sublayers into one.
-
Click the disclosure triangle ( ) to the left of the Phone Content layer to hide the layer content. Click the disclosure
triangle (
 ) to the left of the Phone Body layer to show the layer content.
-
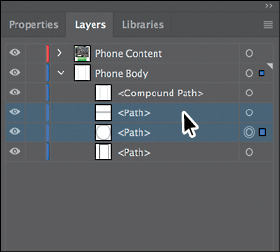
Press the Option (macOS) or Alt (Windows) key, and click the <Path> object that has
a circle in the thumbnail to select the content on the artboard.
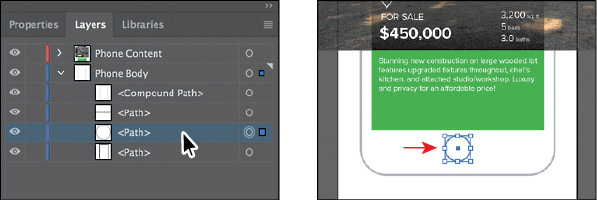
This can be helpful if you are looking at content in the Layers panel and need to
select it or, in the least, see where it is in your document. You could also click
the Selection column (where the selection indicator appears) to select content without
selecting the layer.
-
In the content for the Phone Body layer, with the <Path> layer selected, Shift-click
the <Path> object above it to select both objects. See the figure.
 Tip: You can also Command-click (macOS) or Ctrl-click (Windows) layers or sublayers in
the Layers panel to select multiple, nonsequential layers.
-
Click the Layers panel menu icon ( ), and choose Collect In New Layer to create a new sublayer (in this case) and put
the selected content in it.
The objects in the new sublayer retain their original stacking order.
 Tip: Choose Merge Selected from the Layers panel menu to merge selected content into a
single layer. The last layer you select determines the name and color of the merged
layer. Layers can only merge with other layers that are on the same hierarchical level
in the Layers panel. Likewise, sublayers can only merge with other sublayers that
are in the same layer and on the same hierarchical level. Objects can’t be merged
with other objects.
-
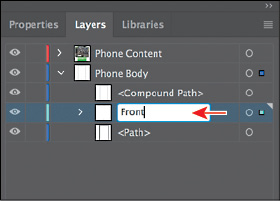
Double-click the new sublayer name (mine is Layer 6), and change the name to Front. Press Enter or Return. The layer color you see may be different from what you see
in the figure and that’s okay.
-
Choose Select > Deselect.
-
Choose File > Save.
Duplicating layer content
You can also use the Layers panel as another method for duplicating layers and other
content. Next, you’ll duplicate the Front sublayer, then move the content onto the
right-hand artboard, and finally duplicate content between layers.
-
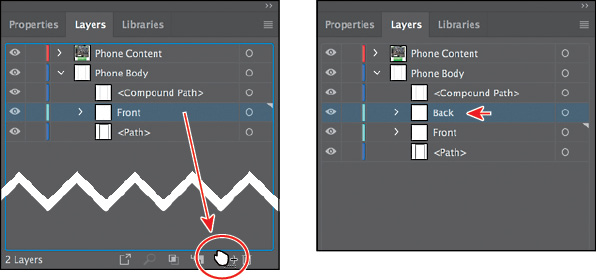
Drag the Front sublayer down to the Create New Layer button ( ) to make a copy of the layer. Double-click the new layer name (Front copy) and name
it Back.
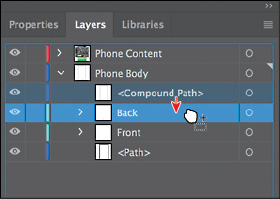
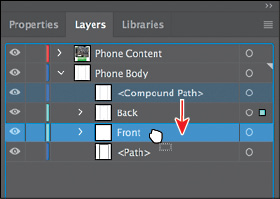
The <Compound Path> object at the top of the Phone Body layer also needs to be in
the Front sublayer and the Back sublayer. Next, you’ll drag a copy into the Back sublayer
and then drag the original into the Front sublayer.
-
Click to select the <Compound Path> object. Pressing Option (macOS) or Alt (Windows),
drag the object onto to the Back sublayer. When the layer is highlighted, release
the mouse button and then the key.
This copies the <Compound Path> content (the shape of the phone) onto the Back sublayer.
Dragging with the modifier key copies the selected content. This is the same as selecting
the content on the artboard, choosing Edit > Copy, selecting the Back sublayer in
the Layers panel, and then choosing Edit > Paste In Place.
Next, you’ll move the Back sublayer content onto the artboard on the right.
 Tip: You can also Option-drag (macOS) or Alt-drag (Windows) the selected-art indicator
to duplicate content. You can also select the <Compound Path> row in the Layers panel
and choose Duplicate “<Compound Path>” from the Layers panel menu to create a copy
of the same content.
-
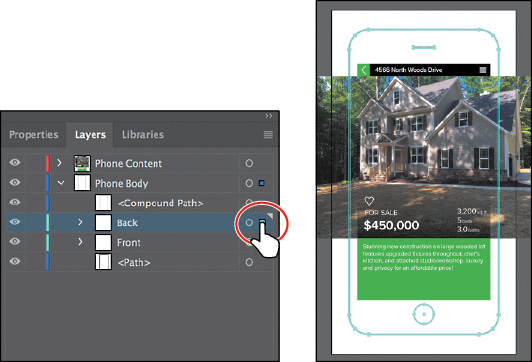
Click the Selection column to the far right of the Back layer name. Even if you already
see a color box, click it again to select all content on the layer.
-
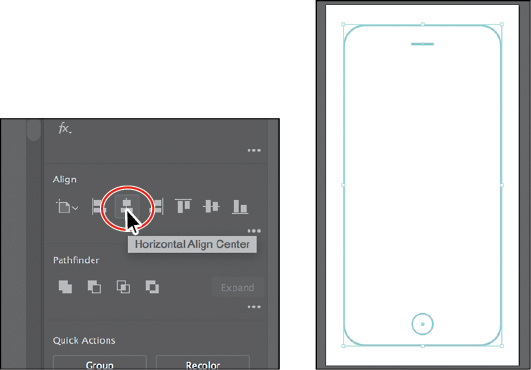
Choose 2 Phone Back from the Artboard Navigation menu in the lower-left corner of
the Document window to center that artboard in the window and select it.
-
Click the Properties panel tab to open the Properties panel. Choose Align To Artboard
from the Align To Selection menu in the Properties panel. Then click the Horizontal
Align Center button ( ) to align the contents of the Back sublayer to the horizontal center of the 2 Phone
Back artboard.
-
Click the Layers panel tab to show the Layers panel again. Click to select the original
<Compound Path> object in the Layers panel. Drag it onto to the Front sublayer to
move it onto that sublayer.
 Note: I dragged the left edge of the Layers panel to the left to see more of the layer
names.
-
Click the disclosure triangle ( ) to the left of the Phone Body layer to hide the contents.
-
Choose View > Fit All In Window.
-
Choose Select > Deselect and then choose File > Save.
Pasting layers
To complete the app design, you’ll copy and paste the remaining pieces of artwork
from another file. You can paste a layered file into another file and even keep the
layers intact. In this section, you’ll also learn a few new things, including how
to apply appearance attributes to layers and how to reorder layers.
-
Choose Window > Workspace > Reset Essentials.
-
Choose File > Open. Open the Menu.ai file in the Lessons > Lesson09 folder on your
hard disk.
-
Choose View > Fit Artboard In Window.
-
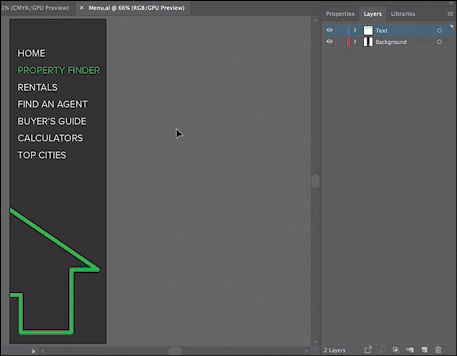
Click the Layers panel tab to show the panel. To see how the objects in each layer
are organized, Option-click (macOS) or Alt-click (Windows) the eye icon ( ) for one layer at a time in the Layers panel to show one layer and hide the others.
You can also click the disclosure triangle (
 ) to the left of each layer name to expand and collapse the layers for further inspection.
When you’re finished, make sure that both layers are showing and that they are collapsed.
-
Choose Select > All and then choose Edit > Copy to select and copy the content to
the clipboard.
-
Choose File > Close to close the Menu.ai file without saving any changes. If a warning
dialog box appears, click No (Windows) or Don’t Save (macOS).
-
In the RealEstateApp.ai file, choose Paste Remembers Layers from the Layers panel
menu ( ). A checkmark next to the option indicates that it’s selected.
When Paste Remembers Layers is selected, artwork is pasted into the layer(s) from
which it was copied, regardless of which layer is active in the Layers panel. If the
option is not selected, all objects are pasted into the active layer, and the layers
from the original file are not pasted in.
 Note: If the target document has a layer of the same name, Illustrator combines the pasted
content into a layer of the same name.
-
Choose Edit > Paste to paste the content into the center of the Document window.
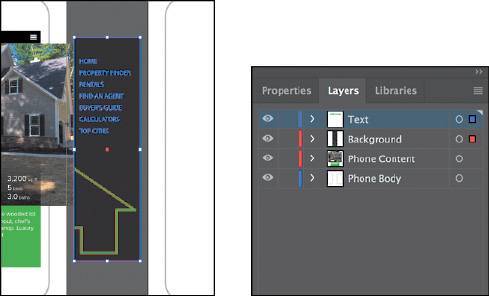
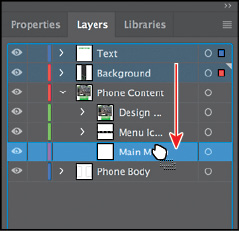
The Paste Remembers Layers option causes the Menu.ai layers to be pasted as two separate
layers at the top of the Layers panel (Text and Background). Now you’ll move the newly
pasted layers into the Main Menu sublayer of the Phone Content layer and then change
the ordering of the layers.
-
Select the Text layer (if it’s not already selected), and Shift-click the Background
layer name in the Layers panel to select both layers.
-
Click the disclosure triangle ( ) to the left of the Phone Content layer to show the layer contents.
-
Drag either of the selected layers (Text or Background) down on top of the Main Menu
sublayer to move the content to the new layer.
The two pasted layers become sublayers of the Main Menu sublayer. Notice that they
keep their individual layer colors.
-
Choose Select > Deselect.
Changing layer order
As you’ve seen, you can easily drag layers, sublayers, groups, and other content in
the Layers panel to reorganize the layer ordering. There are also several Layers panel
options for commands such as reversing layer ordering and more that can make reorganizing
layers easier.
-
Click the disclosure triangle ( ) to the left of the Main Menu sublayer to hide the contents.
-
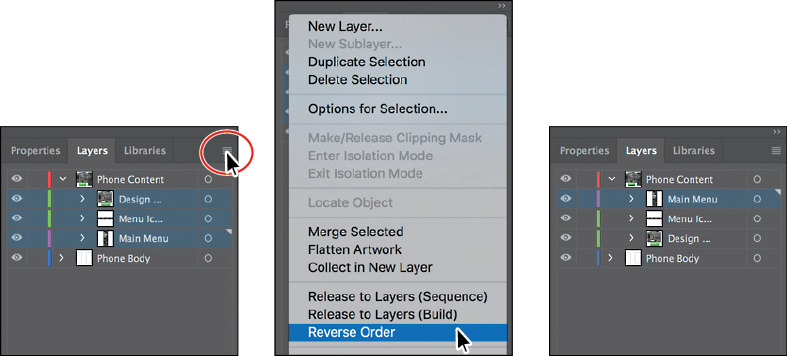
Click the Design Content sublayer, and Shift-click the Main Menu sublayer name to
select all three layers (Design Content, Menu Icons, and Main Menu).
-
Choose Reverse Order from the Layers panel menu ( ) to reverse the layer ordering.
-
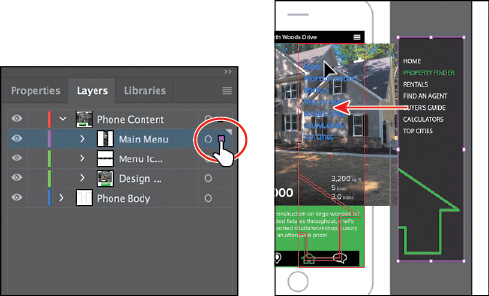
Click the Selection column to the far right of the Main Menu layer name to select
the layer content.
-
With the Selection tool selected, drag the content onto the artboard on the left.
-
Choose Select > Deselect (if available).
Applying appearance attributes to layers
 Note: I dragged the left edge of the Layers panel to the left to make it easier to see
the names.
You can apply appearance attributes, such as styles, effects, and transparency, to
layers, groups, and objects, using the Layers panel. When an appearance attribute
is applied to a layer, any object on that layer takes on that attribute. If an appearance
attribute is applied only to a specific object on a layer, it affects only that object,
not the entire layer. Next, you’ll apply an effect to artwork on one layer.
-
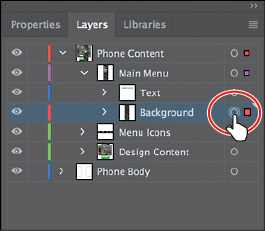
Click the disclosure triangle ( ) to the left of the Main Menu sublayer to show the layer contents, if necessary.
Click the target icon (
 ) to the right of the Background sublayer in the target column.
 Note: Clicking the target icon also selects the object(s) on the artboard. You could simply
select the content on the artboard to apply an effect.
Clicking the target icon indicates that you want to apply an effect, style, or transparency
change to that layer, sublayer, group, or object. In other words, the layer, sublayer,
group, or object is targeted. The content is also selected in the Document window. When the target button appears
as a double-ring icon (either  or
or  ), the item is targeted; a single-ring icon indicates that the item is not targeted.
-
Click the Properties panel tab to show the Properties panel. Change the Opacity to
75 in the Properties panel.
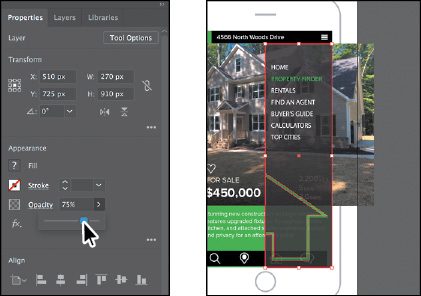
The target icon ( ) for the Background layer in the Layers panel is now shaded, indicating that the
layer has at least one appearance attribute (an opacity change) applied to it. All
content on the layer has the opacity change applied.
-
Choose Select > Deselect.
Creating a clipping mask
The Layers panel lets you create clipping masks to control whether artwork on a layer
(or in a group) is hidden or revealed. A clipping mask is an object or group of objects that masks (with its shape) artwork below it in
the same layer or sublayer so that only artwork within the shape is visible. In Lesson 14, “Using Illustrator CC with Other Adobe Applications,” you will learn about creating clipping masks that are independent of the Layers
panel. Now you’ll create a clipping mask for the phone content.
-
Click the Layers panel tab to show the Layers panel. Click the disclosure triangle
( ) to the left of the Phone Body layer to show its contents, and click the disclosure
triangle (
 ) to the left of the Phone Content layer to hide its contents.
 Note: Once again, collapsing the Phone Content layer will keep the Layers panel a little
neater.
-
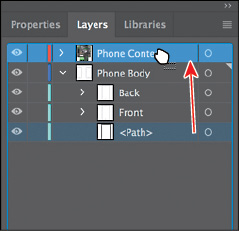
Drag the layer named <Path> onto the Phone Content layer to move it to that layer.
This path will be used as the clipping mask for all of the content on the layer.
-
Click the disclosure triangle ( ) to the left of the Phone Content layer to show the layer content.
In the Layers panel, a masking object must be above the objects it masks. In the case
of a layer mask, the masking object must be the topmost object on the layer. You can
create a clipping mask for an entire layer, a sublayer, or a group of objects. You
want to mask all of the content in the Phone Content layer, so the clipping object
needs to be at the top of the Phone Content layer, which is what you just did.
-
Press the Option (macOS) or Alt (Windows) key, and click the <Path> object at the
top of the Phone Content layer to select the content on the artboard.
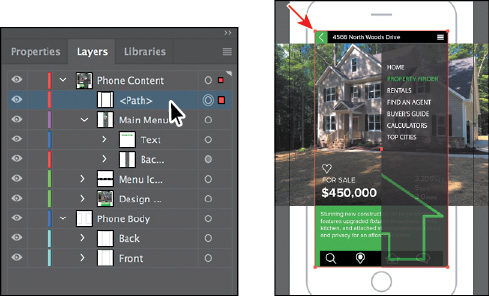
You don’t need to select the shape to make a mask. I really just wanted you to see
how big it was and see where it was positioned.
-
Choose Select > Deselect.
-
Select the Phone Content layer to highlight it in the Layers panel. Click the Make/Release
Clipping Mask button ( ) at the bottom of the Layers panel.
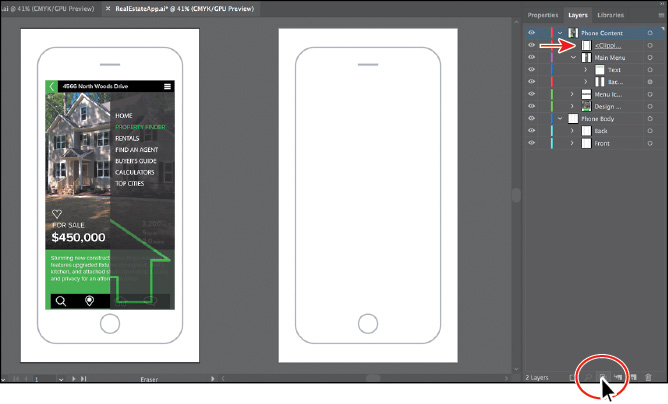
The name of the <Path> sublayer is underlined to indicate that it is the masking shape,
and it has been renamed to “Clipping Path.” On the artboard, the <Path> sublayer has
hidden the parts of the phone content that extended outside of the shape.
Now that the artwork is complete, you may want to combine all the layers into a single
layer and then delete the empty layers. This is called flattening artwork. Delivering finished artwork in a single-layer file can prevent accidents,
such as hiding layers or omitting parts of the artwork during printing. To flatten
specific layers without deleting hidden layers, you can select the layers you want
to flatten and then choose Merge Selected from the Layers panel menu ( ).
).
 Note: For a complete list of shortcuts that you can use with the Layers panel, see “Keyboard
shortcuts” in Illustrator Help (Help > Illustrator Help).
 Tip: To release the clipping mask, you can select the Phone Content layer again and click
the same Make/Release Clipping Mask button (
 ).
).
-
Choose File > Save and then choose File > Close.



 ) at the bottom of the Layers panel.
 ) appears to the left of the layer or sublayer name. You can click the disclosure
triangle to show or hide the contents. If no triangle appears, the layer has no content
on it.

 ) at the bottom of the Layers panel. This deletes the layer or sublayer and all content
on it.


 ) will also create a new layer and open the Layer Options dialog box.
 ) and choose Duplicate “Menu Icons” to create a copy of the layer.


 ) at the bottom of the Layers panel.
 ) to the left of the Phone Content layer to hide the content of the layer.

 ), click to select the green rectangle with text on it toward the bottom of the left
artboard. Click the Locate Object button (
 ) at the bottom of the Layers panel to reveal the group of objects within the Layers
panel.

 ) to the far right of the layer that the selected content is on, the <Group> object,
as well as the objects in the group.


 ) on the Design Content layer.



 ) to the left of the Design Content layer and the Phone Body layer to hide the layer
content for each.



 ) or Option-click (macOS) or Alt-click (Windows) the eye icon (

 ), and choose Collect In New Layer to create a new sublayer (in this case) and put
the selected content in it.


 ) to align the contents of the Back sublayer to the horizontal center of the 2 Phone
Back artboard.





 or
or  ), the item is targeted; a single-ring icon indicates that the item is not targeted.

 ) for the Background layer in the Layers panel is now shaded, indicating that the
layer has at least one appearance attribute (an opacity change) applied to it. All
content on the layer has the opacity change applied.
 ) to the left of the Phone Content layer to hide its contents.

 ) at the bottom of the Layers panel.

 ).
).
 ).
).