Lace panels feature heavily in my house; they can be found hung at windows, on tables as covers, on chairs as throws and on beds as canopies. I absolutely adore the romantic feel they give. Hanging a single lace panel at the window will diffuse light and provide a little privacy as well as giving a soft and delicate look to the room.
you will need
Lace panel, to match the size of your window
Sewing machine (optional)
Net curtain wire with eye hooks at each end to fit the width of your window frame
2 screw eyes
1 Choose a panel that is the same width as the window so that the attractive edging needn’t be cut off. Cut the panel so that it is about 7.5cm (3in) longer than the height of the window.
2 For the top hem, press in 1cm (½in) and then 4cm (1¾in) and stitch with a running stitch or use a sewing machine close to the inside folded edge. Pin in place and stitch along the double folded fabric. Don’t stitch up the sides of the hem, so that you can slide the curtain wire through. Stitch a very narrow double hem at the bottom of the panel. If it has scalloped edges, the panel won’t need hemming at the sides.
3 Thread the panel onto the net curtain wire and hang at the window frame using the screw eyes.
Anyone who knows my designs can’t fail to realise that I love lace. Just one piece of strategically placed lace can turn the day-to-day into something decadent, and make the ordinary seem glamorous – at very little cost. And who doesn’t want a little inexpensive glamour in their life?
My love affair with lace began when I first discovered Stevie Nicks, who made wearing lace and chiffon rock-star cool during the 1970s and 1980s. Growing up I was a classic Goth – my signature style was black boots and black lace, topped off with a red velvet hat. Ever since, lace has been a vital ingredient for me – whether in the home or on clothes – and I can’t get enough of it.
So it isn’t surprising that it was that single lace curtain that set my change in career from singing to vintage design in motion, and I still make dyed curtains to order now, just as I did back then. Although I first started using lace in the home as curtains, I was never going to confine it to one purpose. That’s the beauty of this fabric; you can use it anywhere you like: as tablecloths or runners, on furniture, on coffee tables, or draped over curtain poles or bedheads – wherever you think it looks good. It doesn’t have to be obvious, either, just a fragment here and there adds femininity and grace to a room – try hanging vintage lace dresses on pretty fabric-covered hangers from the doors of wardrobes or on walls.
Lace adds drama and elegance to the boudoir when draped over bedspreads or quilts, and I have used it several times to cover the top and sides of a four-poster bed. Used this way, you do need one long piece of lace, otherwise it can look odd if there are panels sewn together. Also, if you want to use lace on sofas, make sure it is fairly thick to prevent tears, and add fringing or tassels around the edge to stop it getting ‘lost’. Equally, for curtains, make sure the piece you buy is big enough to cover the window, and choose one that has no damage to it, as any holes or pulls will be more obvious when the panel is dyed and hung up against the light.
Smaller pieces of lace are ideal for covering lampshades, for upcycling cushion covers or for decorating silk or satin covers with lace butterflies, hearts or whatever shape takes your fancy. You can also make lavender hearts from fabric and lace to hang on walls, armoires and wardrobes, which look pretty and have a practical, fragrant purpose.
Although I love lace, I don’t like it when it’s white, so I dye virtually every piece I get hold of. When I first started doing this I had a washing machine in my house that I kept specifically for the purpose, but that’s not necessary if you only want to do the odd piece. If the lace is cotton, this can be dyed using any of the wonderful range of Dylon colours. Simply put the lace in the drum of any washing machine with the dye and set to a 40-degree cycle. (Be careful to make sure nothing is in the drum when you start dyeing, or else you'll end up with one dyed sock or similar!) Once the fabric is dyed, make sure you run a 90-degree cycle with just a washing tab in the machine to clean the drum before you chuck in your laundry.
Be bold with colour when you are dyeing lace – pastels look great for shabby-chic style, black really works for a bit of gothic glamour, while dark reds or burgundies look rich and more masculine.
If you need a large piece of lace, you might find it easier to buy modern lace because you will be more likely to get a piece cut to the right size – department stores or haberdashery shops will stock lace in rolls. But if size isn’t such an issue, you will have more choice of patterns if you get hold of gorgeous vintage designs. Decent-sized scraps are surprisingly cheap to buy – if you’re willing to rummage through fabric offcuts, you can often find charity shops, auction houses and flea markets selling pieces for small amounts of money. Look online, too. As with anything vintage, if you see a beautiful piece of lace, buy it – you may never see the like again and you will be able to find a use for it somewhere – trust me!
Changing your soft furnishings is the easiest way to instantly refresh a room. One of the simplest and most affordable ways you can do this is with cushions; upcycle with trims or other embellishments, or make your own creations to showcase your favourite fabrics or embroidery. Don’t be afraid to mix patterns, but consider the colour tones.
you will need
2 pieces of 45 x 45cm (18 x 18in) satin fabric
2 pieces of 45 x 45cm (18 x 18in) lace
40cm- (16in)-wide heart-shaped cushion pad
Dressmaker’s chalk
114 x 7cm (45 x 2¾in) lace edging
Sewing machine (optional)
50 x 2.5cm (20 x 1in) black satin ribbon
50cm x 3mm (20 x ⅛in) black satin ribbon
4 beads, for threading onto the narrow satin ribbon
1 Lay out both pieces of satin fabric and cover with both pieces of lace (it doesn’t matter if the fabric is right side up or down). Pin the layers together all over. Then lay the cushion pad over the top in the centre of the fabric and draw around the edge with dressmaker’s chalk, adding a 1cm (½in) seam allowance. Cut out the heart shapes and separate the layers.
2 To stitch the layers and the lace edging together, lay them out in the following order:
Lace heart
Lace edging with the shaped outside edge facing towards the centre of the heart; tack these layers together around the outer edge
Lace heart
Ensure all edges are aligned, and pin together.
3 Sew the layers together with a small running stitch (or use a sewing machine), leaving a 1cm (½in) seam allowance (taking care to ensure the lace edging isn’t caught in the stitching). Start at the bottom of the heart and stitch all around, stopping about 20cm (8in) before you reach the end. Trim the seam and turn right side out.
4 Insert the cushion pad and then close the opening with slip stitch.
5 Decorate the cushion with the satin ribbons. Tie the wider ribbon into a bow and stitch it in the middle to prevent the bow from coming undone, then stitch the bow onto the centre of the heart’s ‘V’. Fold the narrow ribbon in half and then in half again. Stitch together in the centre to hold and then stitch onto the bottom of the cushion. Snip through the loop to leave four separate pieces of ribbon. Thread the beads onto one loose end and tie a knot to prevent them falling off.
you will need
36 x 15cm (15 x 6in) bolster cushion pad
60 x 36cm (24 x 15in) satin fabric
Sewing machine (optional)
60 x 54cm (24 x 21in) lace, plus small offcuts for the buttons
2 x 3cm (1¼in) diameter self-covering buttons
1 To line the bolster cushion, fold the satin fabric in half along its width with right sides facing, so that you have a rectangle that measures 30 x 36cm (12 x 15in).
2 Stitch together the longer edge using running stitch, or use a sewing machine. Trim the seam and turn right side out. Pull the sleeve onto the bolster cushion pad so that only the ends of the bolster remain uncovered.
3 For the lace cover, press in a 5mm (¼in) hem to the wrong side on each shorter edge and then fold once more by 1.5cm (⅝in). Press again, then pin and stitch. Fold the lace fabric in half along its width with right sides facing. This time you will have a rectangle that measures 30 x 51cm (12 x 20¼in). Stitch the cover and pull onto the bolster as in Step 2, ensuring the excess fabric is an equal length at each end.
4 Cover the buttons with the lace offcuts following the manufacturer’s instructions.
5 To gather the fabric at the ends, thread a double length of thread onto a needle and make loose running stitches along the seam at one end of the lace cover. It is important to ensure that the thread is secured tightly. When you get back to the beginning of the seam, gently pull the thread to gather the seam as much as you can. You will be able to push this down onto the centre of the bolster end. Stitch the gathered end together very firmly to prevent it from coming undone, then cover the end by sewing on one of the self-covered buttons. Repeat this step for the other end of the bolster.
you will need
2 pieces of fabric, 53cm (21½in) square
53cm (21½in) lace trim, about 12.5cm (5in) wide
Sewing machine (optional)
50cm (20in) zip, in a contrasting colour if you want to make a feature of it
50cm (20in) square cushion pad
1 Cut one of the fabric squares in half. Along one cut edge, with the right side up, pin and then tack the lace trim to the fabric. Along each of the edges you have just cut (including the lace-trimmed edge), press in 5mm (¼in) and then 1cm (½in) and stitch close to the inside folded edge with running stitch, or use a sewing machine. These will form the centre back (or front if you want to make a feature of the lace decoration and contrasting coloured zip) of the cushion, joined by the zip. Lay them face down on your work surface, with the hems about 1cm (½in) apart.
2 Lay the zip over the gap between the fabric pieces, right side down, and pin and tack the zip to both sides of the cushion back, maintaining the 1cm (½in) gap so that the zip will be clearly seen when the cushion cover is finished. Stitch the zip to the fabric using back stitch or a sewing machine. Remove the tacking thread.
3 Pin the front and back pieces together, with right sides facing. Use either end of the zip as a guide to where to start pinning. The seam of the cushion should be in line with each end of the zip, which is about 2cm (¾in) in from the edge of your fabric.
4 Stitch the cushion pieces together, taking a 1.5cm (⅝in) seam allowance. Cut off any excess fabric from the sides and corners, turn right side out and stuff with the cushion pad.

you will need
Bondaweb (fusible webbing): enough for the size of your cut-out motif(s)
Patterned fabric with obvious images
Cushion cover: a 58cm (23in) square cushion cover was used here
1 Lay the Bondaweb over the fabric and cut out sufficient webbing to cover the image you are going to appliqué to the cushion cover. Make sure the piece of Bondaweb that you are left with is slightly smaller than the overall size of the fabric or else it will stick to your ironing board cover and make a sticky mess.
2 Lay the fabric on your ironing board, right side down, and place the trimmed Bondaweb over the part of the fabric that you will be appliquéing, with the adhesive side (the ‘rough’ side) facing the fabric. With a medium-hot iron, press the Bondaweb onto the fabric.
3 Once cool, cut the fabric motif neatly to shape. Peel off the paper layer of the Bondaweb, then position the fabric on the cushion cover, Bondaweb side down. Lay a damp cloth over the top. Press the appliqué onto the cushion until the fabric of the cushion has bonded with the appliqué. This should only take a few seconds, but it’s always good to check the manufacturer’s instructions, too.
4 To finish, you can either leave the appliqué un-stitched or add a blanket stitch for decoration. Repeat with more appliqué if you wish.
Often it is the details that make a room, and accessories such as quilts and cushions can really enhance a vintage look while at the same time echoing the mood you want to create. It seems such a simple thing, but it’s something that you can get so wrong if you don’t give it a bit of thought.
Quilts are beautiful objects that add instant interest to a room, and the old ones in particular just ooze history and romance because of the wonderful fabrics used in them – the prints of some have even inspired some of my dress designs. You can make your own quilt – a great use for vintage fabric offcuts – but vintage quilts can also be found in all the usual places and may be cheaper than some modern handmade versions. If you prefer new ones, they can be found in department stores or online. Some old quilts can be a little marked or smelly (usually just a mothy, dusty smell rather than anything unpleasant), but most can be washed in a washing machine on a gentle hand-wash setting, or you can have them dry cleaned by specialists. Check with whoever is selling the quilt before you have it cleaned; they should be able to advise you.
Quilts have traditionally been used as bedspreads, but why stop there? They look beautiful draped over the ends of beds or over chairs or linen chests, and some people lay them on sofas, but this works better if the quilt is not too bulky. Quilts also work well on the wall, hung up as they are or in frames, or thrown over a banister rail. If you buy a slightly damaged vintage quilt, display it with its best face out – they look really pretty folded and piled up in glass-fronted cupboards, especially if there are a few together in different patterns and colours. The only advice I would give is don’t buy quilts if you have cats – my feline friends love curling up in them, but they also love scratching them.
Just as quilts can add colour and texture to a monochrome room, so too can cushions, and often the two work well together. There is a temptation to go mad with cushions and scatter them everywhere – on sofas, chairs, the floor, window seats, you name it – but try to rein in that urge. Few things suggest luxury and comfort like cushions and quilts, but you need to keep the overall effect uncluttered if you want an inviting, relaxing feel. Cushions look best when grouped together, but don’t use too many in one place – on chairs or sofas, in particular, they all end up falling on the floor or leaving you with no space to sit down. Alternatively, if you prefer a simpler look, just use one or two as a focal point and to pep up a plain sofa.
When grouping cushions, keep them all roughly the same size for a less messy look and just mix and match their shapes and colours. However, don’t overdo it with too many patterns or colours. In white rooms, cushions can denote the colour scheme, but where there is wallpaper or paint on the walls, the cushions should reflect this and not clash. Ideally, use cushions that share a common colour in their patterns so they have some unity, particularly when the room has a specific colour scheme. Try to blend fabrics and textures, too; for instance, silk looks glamorous with lace, but odd with tapestry, while tapestry looks great with velvet. Cushion covers are an obvious area where you can upcycle – with a little lace, ribbon or fringing you can add interest to a less-exciting cushion, or make it work with the look of your room.
Cushions, and particularly bolster cushions, add romance and movie-style glamour to a bedroom, particularly when they are made from silk or lace, or they can make a bed look pretty and inviting if they have a feminine pattern. You need to be a little practical here too, and not go mad in a quest to create a luxurious look; keep cushions on a bed to a minimum, as heaving loads on and off the bed every time you use it can be a bit of a pain.
Wherever you use them, choose cushions and quilts that you especially like and use them as an opportunity to add a really personal touch to your design. Go glam, go cosy, go seductive … or just go with what you love to add the final flourish to your style.
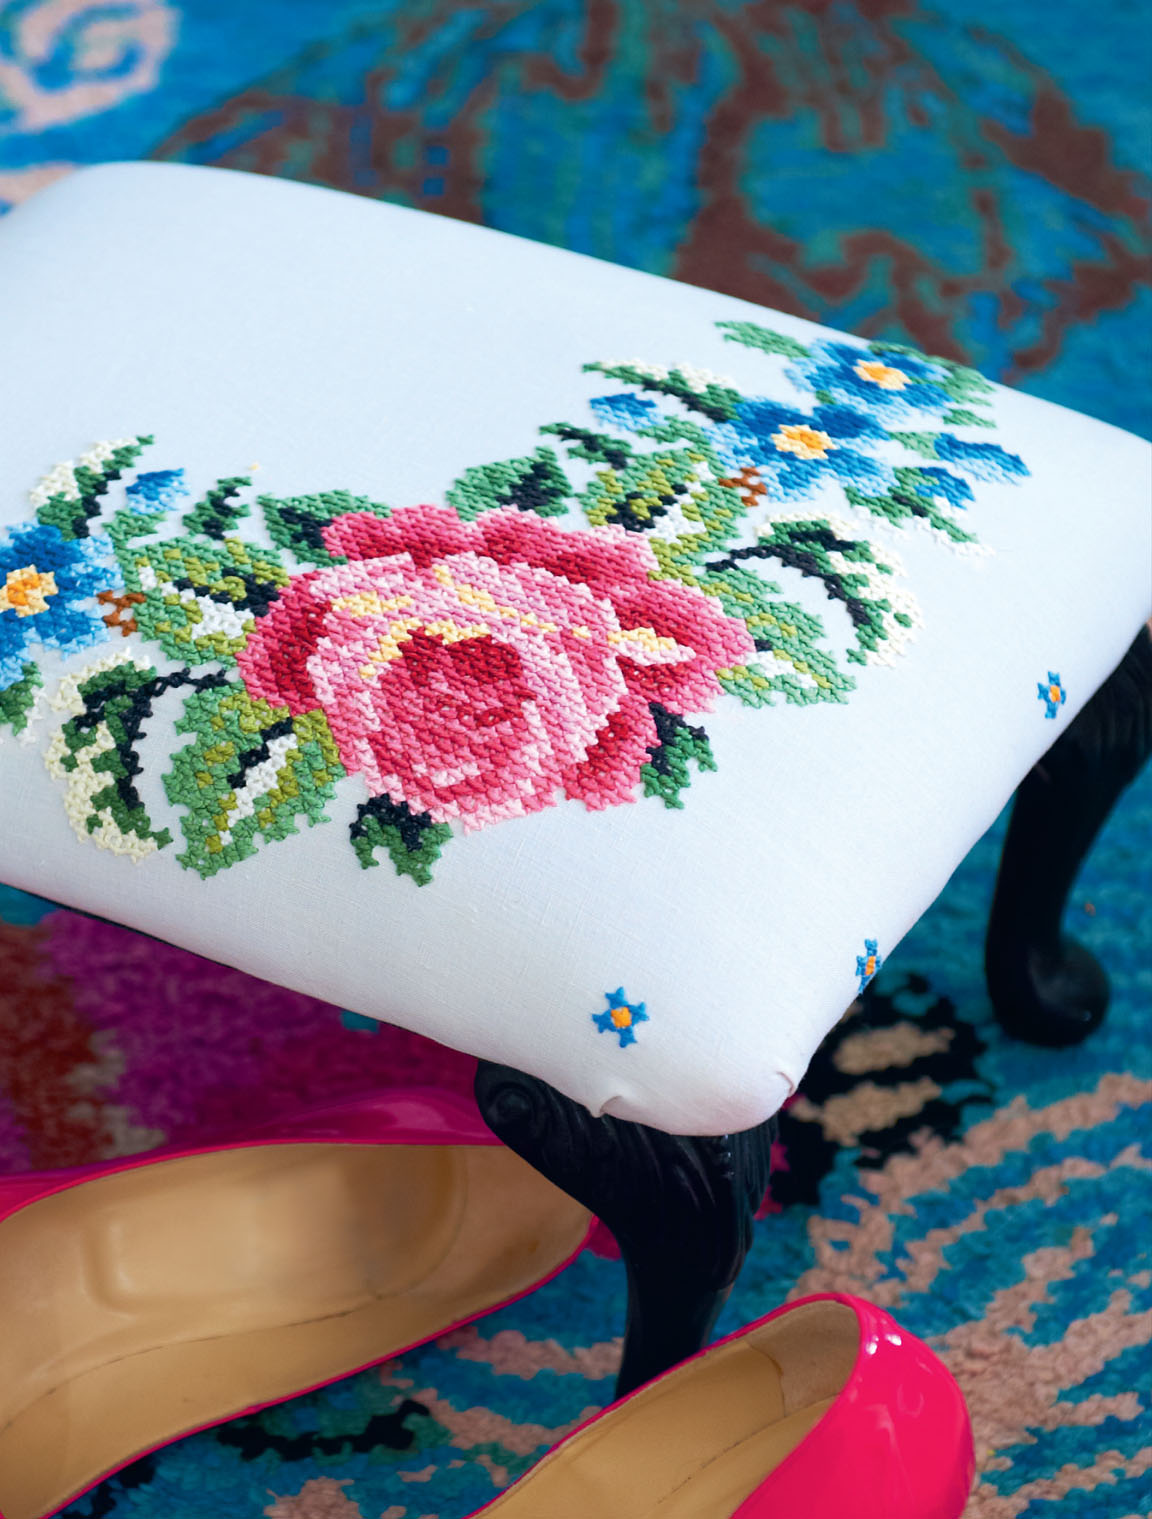
Being able to relax and put your feet up after a long day is one of life’s little luxuries; this footstool will help you do just that. Here a gypsy rose inspired design is cross-stitched onto vintage linen – copy this design or create one of your own.
you will need
Old footstool
Sandpaper and paint of your choice (optional)
4oz density polyester quilting wadding (optional)
Spray glue (optional)
Hot glue gun
Vintage linen: measuring about 1m (1yd) square
30 x 17cm (12 x 6½in) piece of 14-count soluble canvas
15cm (6in) embroidery hoop (optional)
Cotton embroidery threads
Towel
Staple gun
Fabric: enough to back the underside of the footstool
Heavyweight fusible interfacing
1 On a prepared work surface, turn the footstool upside down and remove the feet. Then remove the old fabric and backing together with any nails and staples from the woodwork. If your footstool is old and battered, you might want to give it a lick of paint. If necessary, cut out some new wadding to fit the top and stick it in place with spray glue or using the hot glue gun.
2 Lay the linen on a flat surface and mark with pins where you want the pattern to appear. Then pin and tack the soluble canvas onto the linen in the same place. If you are using an embroidery hoop, place it around the soluble canvas and gently pull the fabric taut.
3 Stitch the pattern using cross stitches following the chart. You will only need to stitch with two strands of the thread. To separate them, cut a length of embroidery thread from the skein roughly twice the length of your forearm and gently separate out the strands by running your thumb down the thread, making sure you continue to hold the two groups tightly.
4 When you have finished stitching, remove the hoop and the tacking stitches.
5 Soak the embroidered material in a bowl of clean lukewarm water for around 10 minutes until all the soluble canvas has dissolved and you are left with just your stitches. Leave the linen to dry naturally, laying it flat on a towel.
6 Once dry (or nearly dry), turn your embroidery face down on a towel and iron on the back to ensure that you don’t crush your stitches with the iron.
7 Lay the linen over the top of the footstool, ensuring the pattern is positioned correctly. Holding the fabric firmly in place, flip the footstool top over and use the staple gun to fix the fabric in place. Work on one edge at a time, always starting in the centre and working out to the edges, and keeping the fabric taut.
8 Cut off any excess fabric at the corners and place staples along the remaining edges, remembering to keep the tension even. Trim any excess material.
9 Cut the backing fabric to the same size as the back of the stool, add 2cm (1in) to each dimension. Finish the backing by covering it with the fusible interfacing following the manufacturer’s instructions. Press in 1cm (½in) on each edge and glue to the underside of the stool, hiding the staples and raw edges of the embroidered fabric.
10 Screw the feet back on, turn the footstool over and put your feet up!
With its wonderful range of patterns, colours and styles – vintage or new – I never throw away offcuts of wallpaper; they always come in handy. It’s easy to attach wallpaper to just about any surface with craft glue or wallpaper paste, and it’s a simple and stylish way to transform your furniture. Whoever said wallpaper was just for walls?
you will need
Occasional or side table
Your choice of wallpaper: enough to cover your chosen surface
Pencil
Scissors or craft knife
Wallpaper paste and brush
1 Place the wallpaper face up, on the top of the table (or whatever object you are covering) and mark lightly with a pencil where you need to cut it out. If the wallpaper has a bold design, check that it is positioned in an appropriate place – centred or aligned with one of the edges, for example. It also needs to be straight.
2 Cut around the lines with scissors or a craft knife. Protect your work surface and make up the wallpaper paste, then brush it onto the back of the paper.
3 Stick the paper onto the table; you can move the paper around gently, but be careful, as paste temporarily weakens the paper.
4 Brush paste over the top of the paper to seal it. Apply a layer and allow it to dry, then repeat two or three times to build up a protective coat. Leave the table to dry for at least 5 hours.
This is a really quick way to upcycle a picture frame, whether it’s one you’ve had lying around for ages or one you’ve bought specially. Use the tray to hold vases or perfume bottles, or sit your keys or telephone on. This is one of my favourite projects because it is pretty and ornate, yet so simple to make.
you will need
Ornate vintage or vintage-style wooden picture frame, roughly 40 x 60cm (16 x 24in)
Your choice of fabric, the same size as the glass in your frame
Pins or dressmaker’s chalk
Hot glue gun
2 small drawer handles
Tacks
Hammer
45mm- (1¾in)-wide masking/sealing tape (optional)
1 Remove the glass from the picture frame and dispose of it safely. Remove the stiff board from the back of the picture frame together with any tacks or tape if it is an old frame.
2 Lay the fabric over the board, centring the design if necessary. Mark the edge of the board on the fabric with pins or dressmaker’s chalk and then cut the fabric to size.
3 Using the hot glue gun, stick the fabric to the inside of the backing board.
4 Attach the handles to the front of the frame, one on each side as in the photograph. Use tacks and hammer them in place. Put the board back into the frame and secure with the existing tacks. For greater durability, replace the glass. Secure the board more firmly by stapling it into the frame or by using the masking/sealing tape.
Any interior designer of any style will tell you that lighting is the most important element in any room scheme – the right lighting can make even a blank canvas seem exciting and interesting.
Before you decide on the type of lighting you want, think about the mood you want to create in the room, and what its natural light level is like. For example, our sitting room is quite dark, even in summer, but I like it to have a cosy feel, so we have a few standard lamps around for subtle, subdued lighting and to reflect the mood. Of course, if you want much more light in a darker room, you could add overhead lighting and a few carefully placed lamps on tables and bookcases. Bright, lightly decorated rooms filled with natural light may need less lighting, or perhaps just an overhead shade. Rooms with low ceilings are better illuminated with low-level lights or lamps, whereas rooms with high ceilings just cry out for fabulous chandeliers.
Sometimes you will find a lamp that shouts ‘buy me’, but you just can’t think where it will go. Follow your instincts – you might find that that lamp then dictates the whole look of a room. It happened to me when I fell in love with a 1920s standard lamp I saw in Paris; it had a beautiful, black wrought-iron base topped with a pale cream shade fringed with hanging tassels, which had gorgeous beading on them. As with all things vintage, anything I buy has to have character and history, both of which this lamp had in spades. I couldn’t get on the train without it, so much to his annoyance Danny had to help me get it back to England, where it became my muse for the sitting room.
If you do go for lamps, keep them simple: mix and match with a few beautiful and unique lampstands and shades, but don’t use too many different styles in one room or you will create a messy look. I have a beautiful blue peacock-fringe lamp in my dressing room by designer Zoë Darlington. When choosing lamps, remember that the stand is as important as the shade. Sometimes you might find just a stand or a shade you love in a vintage flea market or shop, so if you come across such a thing, buy it – you can find the other bit later. If you have a stand and no shade, you could even buy a modern shade that fits it and upcycle it with lace or fringing to get the vintage look you want.
When buying vintage lights, or even some modern lights, there are a few dos and don’ts you should first bear in mind. Do try to see the light before you buy it, and preferably get someone to demonstrate it. There’s nothing worse than getting a light home only to find it doesn’t work. Be wary, too, of lights that need specialist fitting, and get a quote before you commit to the light – you could find that the cost of having it fitted ends up being a lot more than you spend on the light. If you are buying a chandelier, make sure it is not too heavy for your ceiling, and that you have access to a joist from which you can hang it. For any vintage light fitting, also make sure that you can easily get bulbs that will work in it, so you can replace them when they blow.
Your lighting scheme should reflect your personality as much as any other feature of your design, so go with what really takes your fancy – rules are made to be broken! Aside from formal lighting, I often find that a string of fairy lights or candles can be the perfect finishing touch.
I love chandeliers, from small, simple candelabras to large crystal centrepieces, and have sourced and restored many vintage chandeliers over the years. If you haven’t got a large enough room or the budget to buy a genuine antique you can still get the look with these really simple ideas. And better still, your chandelier will be truly unique.
you will need
Vintage-inspired candelabra-style chandelier
Cleaning cloth
Vintage accessories, including beads, brooches and necklaces, feathers, silk flowers, baubles; even little figurines – the more the merrier, but be careful to check the materials or components to ensure that they are fireproof
Plastic-coated garden wire
Wire cutters
1 Give your chandelier a good clean, then hang it in the place where it will live (for the time being, at least – I am always moving mine around). This will help you to get a sense of proportion. You don’t want to add too many adornments and make the chandelier appear too ‘heavy’ for the space it’s hanging in. To decorate, bring the chandelier down to your work surface.
2 Start with accessories that will hang and drape from the chandelier, such as the beads and necklaces. Hang them carefully, layering as you go, but not in a uniform way. Then add your smaller accessories – the brooches, ornaments, feathers and other finishing touches.
3 Don’t be afraid to experiment – you can always swap things around. When you are happy with the end result, use short lengths of garden wire to fix everything discreetly into place. Ensure that neither the objects nor the wire are too close to any light bulbs or candles.
I am something of a magpie when it comes to lampshades – whether they are adorned with droplets and tassels or heavily patterned and ornately shaped. This fringed two-tone shade is a great way to capture vintage style in your home. I would recommend using a plain circular lampshade rather than a more ornate one, to make this project less fiddly.
you will need
Lampshade frame
Heavily patterned fabric: enough to fit twice around the inside of the shade
Plain cotton or linen fabric: enough to fit around the outside of the shade
Black lace or voile: enough to fit around the outside of the shade
Sewing machine (optional)
Hot glue gun
Long black tassel fringe: enough to fit twice around the circumference of the shade
1 Source a lampshade from a secondhand or charity shop or upcycle one of your own. You only need the frame, so if there is fabric already on the lampshade, remove it.
2 Measure the circumference and height of the lampshade and cut out both sets of fabric and lace as follows:
Heavily patterned fabric: double the circumference x the height + 2.5cm (1in)
Plain cotton or linen: the circumference + 2.5cm (1in) x the height + 2.5cm (1in)
Lace: the circumference x the height + 2.5cm (1in)
3 Along both long edges of the heavily patterned inner fabric, fold and pin pleats at 1cm (½in) intervals until you have a pleated strip that measures slightly longer than the circumference of the lampshade. Stitch along the bottom and top edges with running stitch or using a sewing machine to keep the pleats in place.
4 Heat the glue gun and apply the glue to the top and bottom of one section of the inside of the frame. Making sure the pleats are facing inwards, swiftly stick the top and bottom hems onto the frame, wrapping the material slightly over the top and bottom. You may find another pair of hands useful here as the hot glue gun is only effective if the material is applied when the glue is very hot. Repeat by gluing the next section of the frame until you have entirely covered it. Overlap the excess length to finish it off.
5 Attach the plain outer fabric to the outside of the lampshade. Apply the glue to the top and bottom of the frame, sticking the plain outer fabric over the patterned fabric, sandwiching the frame in between. Keep the plain fabric taut as you stick it in place around the outside of the shade and finish by overlapping one edge over the other.
6 Place the lace over the plain fabric, neatly wrapping the excess over the top and bottom of the frame and glue in place as in Step 5.
7 Attach the fringe to the bottom of the lampshade by first applying the glue in small sections and then pulling the fringe around onto it. For a luxurious feel, the fringe on this lampshade has been wrapped around twice.
You may have guessed already that I am a very big fan of flowers, from delicate displays in jam jars to big bold hydrangeas, peonies and roses, but also floral wallpaper, floral printed fabric and lace with floral patterns. Pressed and dried flowers are also beautiful to display, as in this calendar, or simply framed or used on homemade cards. It’s also very easy to make your own press.
2 pieces of plywood, each measuring 34 x 25cm (13½ x 10in)
Cordless drill
16 1.5cm (⅝in) diameter washers
8 5.2cm (2¼in) screws
4 A4 sheets of corrugated cardboard
6 A4 sheets of blotting paper
8 butterfly wing nuts
Vintage fabric or wallpaper, to decorate the plywood
Braid, to decorate the plywood
Hot glue gun
Flowers and leaves for pressing
1 On a prepared work surface and following the manufacturer’s instructions, mark and then drill four equally spaced holes down each side of both pieces of plywood. Keep them close to the edge so that the screws won’t touch the cardboard and card inside the flower press.
2 Take the bottom piece of plywood and thread a washer onto a screw. Push it up through one of the holes. Repeat for each of the remaining seven holes. Layer the cardboard and paper, starting with a layer of cardboard topped with two pieces of blotting paper. Continue to add layers of cardboard and paper, finishing with a sheet of cardboard. Top with the remaining piece of plywood, threading the screws through the holes. Add another washer to each screw and finish with a butterfly wing nut.
3 Decorate the press covers with the fabric or wallpaper and stick braid around the edge using a hot glue gun. Once the glue is dry you can press your leaves and flowers.
4 Suggestions for flowers that are good to press include apple and cherry blossom, gypsophila, clover, cranesbill, heather, larkspur and pansies. For greenery, consider maple, virginia creeper and weeping willow leaves, as these all have varied and beautiful shapes. Ivy, fern and artemisia leaves also press very well.
5 Make sure your specimens are trimmed and 100 per cent clean and dry. Undo the butterfly wing nuts and remove the top of your press, followed by the top three layers of cardboard and paper. Lay as many leaves and flowers as you can without them overlapping on the bottom piece of blotting paper. Cover with the second piece of blotting paper, as before, and then continue to build up the layers, but this time positioning the leaves and flowers between the layers of blotting paper.
6 Thread the screws through the holes of the top piece of plywood, then add the washers and butterfly wing nuts and tighten as much as you are able. Label the press with the date, as it is so easy to forget when you put the flowers in. Leave them to dry for about 4 weeks.
7 Use the template to create a calendar so you can admire your pressed flowers all year round.
Here are a couple of my favourite floral decorations – a full-bloom summer wreath and a dried flower heart-shaped wreath, which makes the perfect Christmas decoration. They are both very different, but the method is the same, and lots of fun. All of the materials you need will be available from your local florist.
you will need
Oasis foam wreath ring
Florist wire
Lace, ribbon or twine offcuts
Flowers and greenery, such as gypsophila, roses, hydrangea, scabiosa (flowers and seedheads), lavender, flowering mint and rosemary
1 Fully submerge the oasis in a bucket or sink full of water. Leave it for a couple of minutes until soaked through.
2 Wrap a length of the wire around the wreath ring and then twist it into a hook. Conceal the wire with some lace, ribbon or twine.
3 Start decorating the wreath by inserting greenery all around it. Push the stems (trimmed if necessary) into the oasis to the required depth and check that they are evenly spread around the wreath. The wreath shown here has about three times as many flowers in it as it does greenery.
4 Select the largest flowers, trim their stems to an appropriate length and insert them into the oasis. Depending on the weight of the flower head, you could also fix the largest flowers into the oasis with wire for support. Take a length of florist wire and wrap it around the stem, leaving the wire ends free to anchor into the oasis.
5 Insert smaller flowers, and then finally fill any gaps with soft small flower heads, such as the gypsophila and lavender. They support the other flowers and create a sense of balance.
6 Now you are ready to hang your wreath. Hang it out of direct daylight and spray the flowers with water daily to keep them fresh. Also add a small amount of cold water every few days to the oasis to help keep it damp. Dribble it in slowly from a small watering can or jug. The oasis should be damp but not so wet that it starts dripping. The wreath will be quite heavy when it is finished, so ensure it is hung on a secure hook on a wall.
you will need
Heart-shaped twig wreath
Florist wire
Lace, ribbon or twine offcuts
Dried flowers and greenery such as hydrangeas, berries, grasses, firs and holly
1 Follow the steps for the Midsummer’s dream wreath, using pieces of florist wire to fix the dried flowers into the wreath.
2 Hang out of direct sunlight and keep indoors.
Capture the feel of a vintage Christmas with lace and velvet stockings hung by the fireplace; vintage-inspired handmade paper chains; lacy crackers at the Christmas table; and inspirational vintage decorations threaded onto decorative ribbons and hung from lights, trees, picture frames or door handles.
you will need
Satin fabric: about 60cm (24in) square
Sewing machine (optional)
Lace or voile: about 60cm (24in) square
Decorative trimmings such as ribbons, fringes, buttons, sequins, beads, appliquéd motifs (optional)
1 Enlarge the stocking template to the desired size on a photocopier and cut it out.
2 To make a lining for the stocking, cut out two stocking shapes from the satin fabric using the template. Sew the two stocking shapes together (use a sewing machine if you like) with right sides facing and with a 1cm (½in) seam allowance. Leave the top open. Trim the seams and turn right side out.
3 Cut out two more stocking shapes from the lace outer casing. Sew them together with a 1cm (½in) seam allowance and, again, leave the top open. Trim the seams and then turn right side out so the seams are on the inside.
4 Insert the satin stocking inside the lace stocking, aligning the seams. Turn in 1cm (½in) of the satin and lace at the top of the stocking so the hems are facing each other and you have neat edges. Stitch together with a sewing machine or by hand using slip stitch. If you wish, you can then turn over about 4cm (1¾in) at the top to make a small cuff.
5 Sew on any decorative ribbons, fringes, buttons, sequins, beads or appliquéd motifs that you like. You could also use gold or silver thread to embroider a name onto the stocking, or simply leave it plain.
6 To hang the stocking, stitch a length of ribbon or lace onto the top of the back seam.

you will need
Strips of paper: leftover vintage-style wrapping paper or wallpaper offcuts, each about 2cm (¾in) wide and 7.5cm (3in) long; the chain in the picture uses 30 strips
Glue, double-sided sticky tape or a stapler
1 Take one of the strips of paper and paste, tape or staple the ends together to form a loop.
2 String a second strip of paper through the newly-made loop. Again, join the ends of the strip together with glue, tape or staples.
3 Continue until you reach the desired chain length. Hang the chain across ceilings and walls, or simply drape over mirrors and windows.
you will need
Vintage baubles with wire loops: 1 per place setting
Cleaning cloth
Sticky-back foam pads
Card to make nameplates
Pen (or printer)
Sticky tape
1 Once you have sourced your baubles, give them a good clean, as the chances are that they have been tucked away in a cupboard for the last few years.
2 As baubles are round, attach a sticky-back foam pad to the bottom of each one so that it won’t topple over.
3 Cut out 5 x 2cm (2 x ¾in) nameplates from the card. You don’t want to make the top too weighty, so the smaller the card, the better. Then write the names of your guests in your neatest handwriting. If you don’t trust your handwriting, print the names instead.
4 Attach a nameplate to the wire loop at the top of each bauble with some sticky tape and then set the baubles all around your Christmas dining table.

you will need
Sufficient lightweight card for however many crackers you wish to make
Craft knife
Cutting mat
Cracker snaps
Double-sided sticky tape
String
Cracker gifts
Tissue paper
Colourful lace cut to the size of the cracker template
Coloured card or paper the size of the cracker template
Narrow ribbon, to finish
1 Enlarge the cracker template on a photocopier to the desired size, and cut it out. Draw around the template onto the lightweight card however many times you need. Cut these shapes out too.
2 For each cracker, score along the dotted lines with a craft knife on a cutting mat and, also using a craft knife, cut out the diamond shapes. Fold the vertical and horizontal lines as shown on the template.
3 Tape a cracker snap at each end of the inside of the prepared card using double-sided sticky tape. Then roll the card into a cracker shape and join the edges with double-sided sticky tape. Tie one end with a length of string.
4 Wrap your gifts in some tissue paper and pop one inside each cracker. Then tie the other end with more string.
5 Wrap each cracker in decorative lace, placing coloured card or paper underneath in either a complementary or contrasting colour to set it off. Tie a piece of ribbon around each end of the cracker and finish in a bow.
you will need
White lace or fabric offcuts, enough for 20 triangle flags
Card triangle template: 5 x 7.5 x 7.5cm (2 x 3 x 3in)
Dressmaker’s chalk
2.5m (2½yd) white ribbon
Sewing machine (optional)
1 Lay out your lace or fabric offcuts, wrong side up, and place the template on top. Draw around the template with dressmaker’s chalk for as many triangles as you need. For 1.5m (1½yd) of bunting, you need 20 flags. Cut around each one.
2 Pin each flag to the ribbon at close intervals and leaving 50cm (20in) of ribbon free at each end for hanging the bunting.
3 Stitch the flags onto the ribbon with a sewing machine or by hand using running stitch. Ensure that the triangles sit behind the ribbon. Perfect mini bunting, ready to hang!
you will need
8 pre-cut wooden hearts and stars
Cordless drill
Lace or fabric offcuts
Hot glue gun
4m (4yd) ribbon, the same thickness as the edge of the shapes to stick around them and for hanging
1 To make a hole in the top of each wooden shape for hanging, on a prepared work surface and following the manufacturer’s instructions mark and then drill a small hole in each.
2 Lay out the lace or fabric on your work surface, wrong side up, and place each wooden shape on top. Draw around the shapes and cut out the fabric. You will need two pieces of fabric for each shape. Stick the cut-out fabric shapes to either side of the wooden shapes with the hot glue gun.
3 Measure the outer edge of a star and a heart and cut the lengths of ribbon required. Starting at the top of your shape stick the ribbon to the outer edge, again using the hot glue gun.
4 To hang the decorations, cut the remaining ribbon into eight equal lengths. Make a snip in the lace above the hole on each side, feed through a length of ribbon and tie.