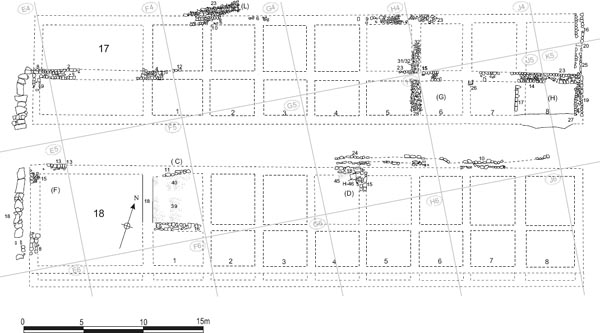
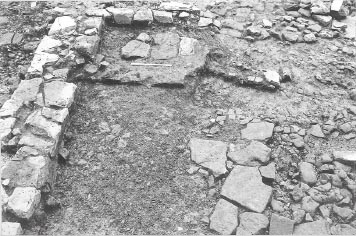
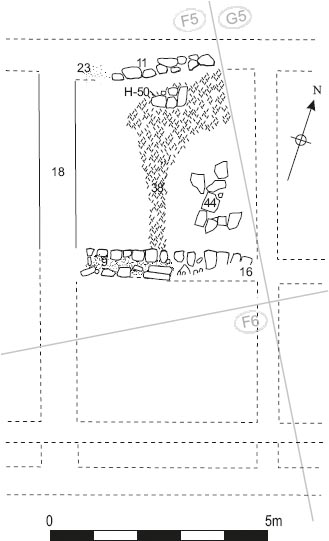
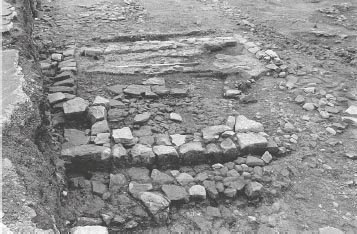
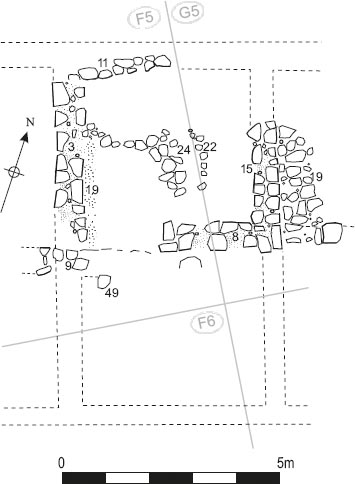
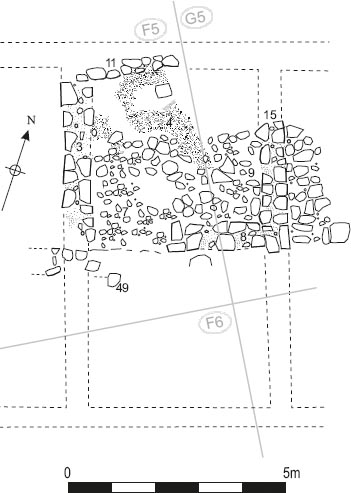
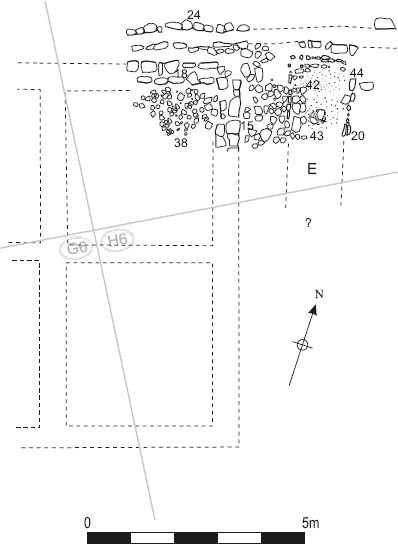
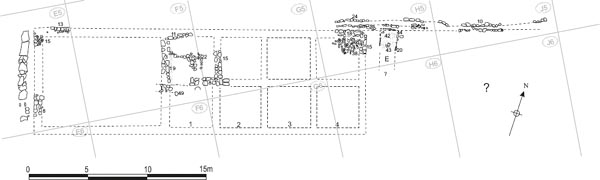
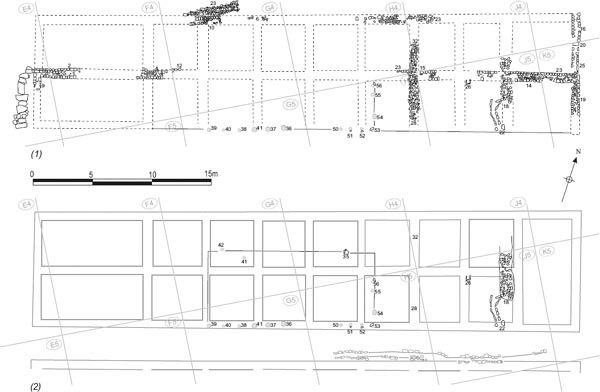
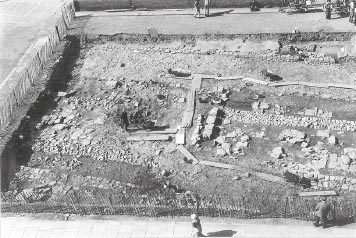
Figure 14.17: Surviving third-century structures in the north-west praetentura, showing walling possibly retained from the previous phase and newly built. Sclae 1:300.
A layer of rubble and cobbles extended over much of Building 2 (L05:07, 25, M05:11) and the alley to the north (L05:29, M05:10), although the manner in which some of the contubernia walls remained exposed lead the excavators to believe that the range of supposed shacks (‘B, K and M’) continued in use until the end of the life of the fort. Parts of the north wall of the building, and the entire exposed length of the wall separating Contubernia 6 (K) and 7 (B) had been robbed out, probably during the post-Roman period.
FINDS
Decorated samian: 160–200 (no. D21, n05:04); 125–140 (no. D120, n05:04); 130–160 (no. D121, n05:04); 90–100 (no. D134, n05:04)
Samian stamp: Hadrianic or early Antonine (no. S107, P05:03), Antonine (no. S120, P05:03)
Mortarium stamp: 150–170 (no. 18, Q04:02), 120–170 (no. 36, M04:06)
Amphora stamp: unknown (no. 11, M04:06)
Graffiti: (no. 23, N05:04)
Coin: Vespasian, 69–79 (no. 8, M04:03), Nerva? 96–98? (no. 27, n05:04)
Pottery: BB2 spindlewhorl (no. 33, Q04:02), BB2 counter (nos 58, N05:04; 72, Q04:02)
Copper alloy: brooch (no. 20, P05:03)
Copper alloy: stud (no. 268, M04:03)
Iron: holdfast (no. 41, N05:04), hobnails (no. 76, N05:04)
Glass: two pieces of window (no. 42, N05:04) Quern: lava (no. 13, P05:03)
Samian stamp: 125–50 (no. S42)
Graffito: (no. 28)
Glass: armlet (no. 1)
Coin: Trajan, 98–117 (no. 41, N05:13)
Copper alloy: trumpet brooch (no. 4, N05:15); harness mount (no. 184, N05:14), handle (no. 215, N05:13)
Iron: hobnail (no. 76, N05:14)
Pottery: samian counter (no. 85, N05:14)
Stone: throwing stones (two lost, N05:13)
The fill of the clay puddling pit (N05:13, 14) contained three sherds from at least two Lower Nene Valley mortaria dated after 240, including an incomplete multi-reeded hammerhead rim, and three body sherds of black sand amphora of the second half of the third century.
The demolition/dereliction rubble over Building 1 contained a very large group of pottery with late fourth-century material in, including two Huntcliff-type rims and Crambeck parchment ware of 370+, plus a little post-medieval pottery (N05:04). The material from other contexts of cobble, clay and stone spreads over the north-east area was not catalogued in full, but included at least one Huntcliff-type rim of the late fourth century (P05:03).
The material over verandah and the intervallum road to the north was consistently made up of over 70% BB2 and allied fabrics (e.g. L04:17, M04:03). Sherds of black sand amphora would indicate a date in the second half of the third century.
The dereliction material over the alley contained a lot of residual mid-second century material, BB2 and allied fabrics and only three sherds dating to the late third century (Crambeck reduced ware and a flanged bowl in an unidentified reduced ware).
The puddling pit and its clay backfill provided a useful pottery assemblage which points towards a date around the middle decades of third century for the demolition of Building 1 and one probably before the end of the third century given the absence of East Yorkshire grey wares and calcite-gritted wares from these deposits. If the pit was associated with the preparation of clay for the floors of the structures which succeeded Buildings 1 and 2 in the north-east praetentura, as suggested above, it was probably open for a relatively short period and was covered by the general spread of demolition material laid over Building 1. Sherds of later third-century wares were recovered from a few contexts in the interior of Building 1 – although some of this material may have been intrusive (e.g. P05:14) – and from the upper levels of clay in the alley (e.g. L05:29, N05:07), but none of these contexts was demonstrably sealed.
The inclusion of post-medieval pottery and a significant quantity of later fourth-century coarseware in the rubble over Building 1 might imply that these levels actually resulted from the destruction of the later Roman layers by post-Roman ploughing, rather than representing a discrete demolition episode which could be assigned to a specific date, such as the end of Period 4. In other words it probably represented the interface of disturbance between post-Roman activity and the stratified Roman levels.
The layout of the buildings in the west praetentura was also substantially reconfigured during the third century. Although many of the details are uncertain because of the very fragmentary survival of the late Roman remains in this part of the fort, it is clear that the new layout took a different form to that observed in the north-east part of the fort. Instead of a straightforward rebuilding and internal remodelling of the three earlier stone barracks (4, 5 and 6), comparable with that undergone by Buildings 1, 2 and 3, the former were replaced by a pair of entirely new barracks, which are designated Buildings 17 and 18 here. These were disposed on either side of a newly constructed east-west street (Alley 10), which overlay the southern part of Building 5. Their remains correspond to the two rows of ‘shacks’ (C, D, E, F and G, H, J, L respectively) which Daniels’ envisaged as representing the fourth-century pattern of occupation in this area (see Fig. 14.17; Chapter 1: Figs 1.07–1.08). Fig 14.18 demonstrates that these surviving fragments could in most cases form part of a more coherent restored layout comprising two conventional barrack blocks, like Building 2 to the east, with stone partition walls separating the contubernia and dividing the latter into front and back rooms. The officer’s quarters were probably located at the end next to the intervallum road (here the west end), as was the case with all the barracks at Wallsend, and there may have been as many as eight contubernia in each block, but probably no more. The cobbled street separating the two buildings was probably 3.00–3.50m wide, though there are problems in estimating its exact width, as there are in gauging the width of the new barrack blocks, though it is likely these were somewhat wider than the earlier barracks, including those still use on the other side of the praetentura.
However Fig 14.18 also highlights how small was the proportion of the barrack plan which actually survived, meaning that the remains could quite conceivably be restored in other ways – perhaps even as a pair of chalet-barracks for instance. Furthermore some of the features, such as the small timber structure, E, and the post-holes associated with Daniels Building J, can only be convincingly integrated into the suggested scheme if it is assumed they belong to a later phase, representing alterations to or replacements for the original barrack blocks. In other words the surviving evidence appears to represent a fragmentary palimpsest of multiple, badly damaged phases of activity.
An awareness of the scale of post-Roman disturbance is thus essential to appreciate the difficulties associated with any attempt to understand the thirdcentury and later occupation of this part of the fort. The Roman levels here had been heavily truncated, with particularly severe damage being evident in three, parallel linear strips, varying in width between 3.5m and 9.0m. These were interpreted by the excavators as a series of eighteenth/nineteenth-century colliery trackways, but it is not easy to envisage why three trackways would have lain so close together and they can be more plausibly explained as broad plough furrows associated with medieval or early modern cultivation. The furrows traversed the area from north-west to south-east, in effect cutting up the thirdcentury and later levels into a series of islands and, inevitably, making it more difficult to reconstruct the layout of the north-west praetentura.
The assorted wall footings and foundation deposits which made up the identified structures were variously composed of occasional lengths of newly constructed walling and stretches of the preceding barrack block walls which appeared to protrude through the surrounding cobbled surfaces and rubble spreads and were therefore considered to have been reused in this phase (Figs 14.19–14.21). Most of the newly constructed walls were set directly on top of the previous Roman ground surface with no discernable foundations and certainly lacked any foundation trench (as made explicit in the context record for wall G04:10, for example), a practice paralleled in the Severan and later barracks at South Shields (cf. Hodgson and Bidwell 2004, 145–6). Hodgson and Bidwell (ibid.) have emphasised how easily walls constructed in this manner could have been robbed out without leaving any trace, particularly if any contemporary floor surfaces laid up against the edge of the lowest course were also destroyed. Furthermore, with regard to Building 17, it is often uncertain which if any of the surviving traces of walling from the previous phase were actually reused rather than merely incorporated in the cobbled surfaces.
With such a degree of uncertainty, as a consequence of the fragmentary nature of the surviving evidence, it is the analogy with the better preserved third-century barracks in the east praetentura which ultimately underpins the reconstructed scheme presented here. Even so, as newly constructed blocks, 17 and 18 were clearly not identical to their eastern counterparts, which were adapted versions of earler buildings, and many aspects therefore remain unclear, in particular, the width and orientation of the blocks.
Figure 14.17: Surviving third-century structures in the north-west praetentura, showing walling possibly retained from the previous phase and newly built. Sclae 1:300.
Nevertheless, despite the uncertainties one crucial point appears certain. Only two barracks, whatever their form, can be accommodated in the revised layout of the west praetentura. The locations of Building 18 and Alley 10, which are clear, are decisive in this regard as they leave insufficient room for two barracks further north, whatever the precise width of the street. Nor was there sufficient room for another street and a full block to the south of 18, where much of the room seems to have been taken up by a large square pit (‘Cistern 2’ – see Chapter 10). This has important implications for the size of the garrison in the third century.
The surviving components of the two barracks are described below with cross referencing to the building designations of the individual structures envisaged by the 1975–6 excavators. Building 18 is treated first because its remains, although far from complete, survived better than those of 17 and can be used to inform the interpretation of the latter barrack’s more ephemeral traces.
Grid squares: E5, F5, G5, H5, J5, K5
Although Building 18 was the better preserved of the two barracks, its analysis still poses a severe challenge. Only isolated pockets of stratigraphy and short lengths of walling survived, whilst much of the building lay beyond the southern edge of the excavation. The extant remains comprised the exterior wall at the north-west corner (corresponding to Daniels Building F) and a short section of the west wall further south, the north room of Contubernium 1 (Daniels Building C) and the north-east corner of Contubernium 4 (Building D).
The estimated length of the building, based on its restored plan, was c. 45.40m. However the east wall lay entirely outside the excavated area and its position could only be determined by comparison with that of Building 17. The overall length of the officer’s quarters, from east to west, could be gauged at c. 10m (8.5m internally), based on the position of the west wall of Contubernium 1, which was evident as a distinct robber trench (F05:18), with the remainder of the block taken up by an estimated eight contubernia.
No part of the south wall was available for examination, either, and the overall width of the block is therefore uncertain, particularly as such evidence as does exist is rather contradictory. The north-south length of the northern room of Contubernium 1 in its primary phase was c. 5.50m, including the north wall and the block’s 0.70m wide medial partition. If the southern room was of equivalent size the overall width of the block would therefore have been around 10.30m. However Building 17 would appear to have been rather narrower than that (see below). The location of the edge traced between the surfaces of the new street and the internal levels of Building 17, although somewhat irregular, would imply that barrack was no more than 9m wide. Similarly, in its second phase the north room of Contubernium 1 was reduced in size, its north-south length being shortened to between 4.50m and 4.70m, including the medial partition wall (the width and precise alignment of the north wall were difficult to gauge exactly), which would in turn suggest the block was c. 8.30–8.50m wide overall, assuming the south room was equal in size to the north one. Thus it is possible that the north room, which probably formed the inner living quarters to the rear of the contubernium, was initially larger than the south room and, rather than marking a reduction in the width of the barrack, the Phase 2 remodelling evident in Contubernium 1 may simply have made both rooms the same size.
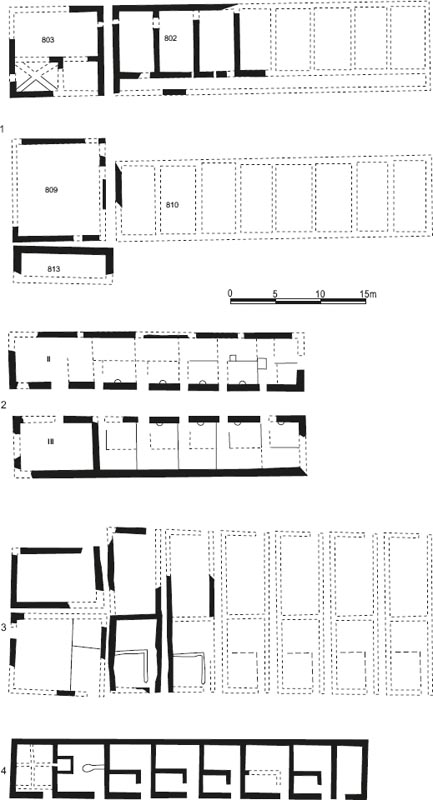
Figure 14.18: Third-century Barracks 17 and 18, with two alternative restorations of the contubernia of 18 with smaller southern front rooms like 17, and with front and rear rooms of equal dimensions. The Daniels building codes are shown in brackets. Scale 1:200
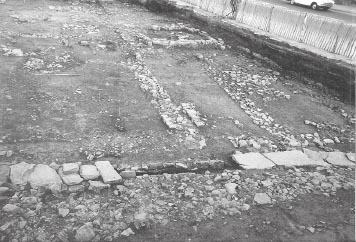
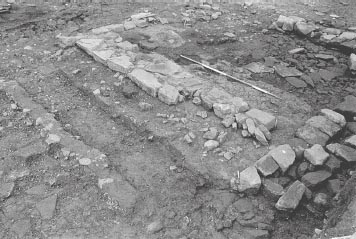
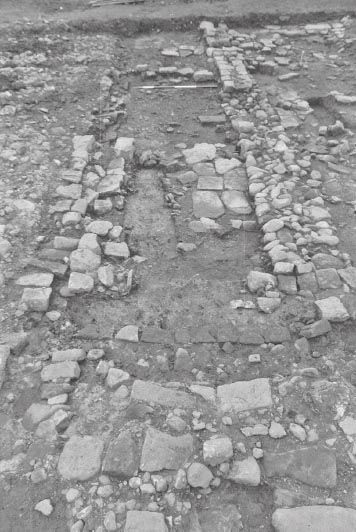
Figure 14.19: The intervallum drain, fragments of the thirdcentury barracks next to the south wall of Building 5 and overlying the unfinished foundations of Building 6 (right), looking east.
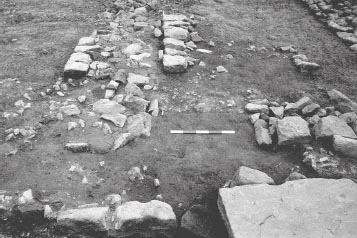
Figure 14.20: Detail showing the north wall (E05:13) of third-century Barrack 18 (right) next to the south wall of second-century Barrack 5 (E05:14) at a lower level.
Although not conclusive such evidence as existed, notably the presence of clay floors rather than stone surfaces in the north rooms of Contubernia 1 and 4 during their initial phases, may point towards the block being south-facing.
The exterior walls of the barrack survived best at the building’s north-west corner where short stretches of the outer facing survived (north wall: E05:13, F05:13; west wall: e05:15, 1.70m and 0.80m in length respectively), with a very thin line of the dark grey black soil connecting them and forming the remnants of a robber trench (E05:18). The facing stones appeared to sit on angular cobble foundations (E05:36), but these may simply represent surviving fragments of the earlier street surface (equivalent to E05:12). Daniels restored this as a distinct structure (F) measuring at least 3m east to west (and perhaps up to 9m) and 7.5m north to south. To the south a stretch of the west wall of Building 6 may have been reused (E05:08) as the base of the new wall. A 1.50m length of this wall was exposed at the southern edge of the excavation site and originally formed the northwest angle of 6, but was clearly extended northward subsequently. The angle of the earlier building was abutted by a further surviving fragment of masonry, some 0.65m long, which represented part of that northward continuation and incorporated two stones set upright to block the eavesdrip gutter (E05:29) running along the north side of 6.
Away from the north-west corner, most traces of the north wall of 18 had been removed with the exception of the stretches associated with Contubernia 1 and 4. In the former case the remains had been greatly disturbed with only the inner face surviving (F05:11), its stones perhaps somewhat displaced, and two small underlying patches of possible yellowpink foundation clay (F05:23/62). (The excavators considered this stretch of wall was a secondary rebuild – see below Building 18 Phase 2.) At the northeast corner of Contubernium 4 the north wall (H05:18) was 0.60m wide and composed of two lines of facing stones only, with no apparent rubble core. Many of the roughly dressed rubble blocks making up the wall were relatively long and narrow in proportion and were either laid lengthways along the face or tied back into the thickness of the wall. It may have been bonded with clay but this is not made explicit in the context record. The wall here lay c. 0.30m south of the stone-lined drain which ran along the southern edge of the street separating Buildings 17 and 18, but some 8m further east, where the drain adopted a slightly more southerly alignment (J05:10), the latter’s southern side wall may also have functioned as the footing course for the outer face of the barrack north wall.
No demonstrably intact floor levels or other internal features survived in the officer’s quarters. Only a light pink/orange-brown clayey soil layer (F05:08) containing a number of stones was recorded to the west of the robber trench for the Phase 1 west wall of Contubernium 1 (F05:18). The interpretation of this layer is unclear. It was not plotted precisely on the any site plan, but is shown, rather schematically, extending north of the limits of Building 18 on a site notebook sketch plan (F5 p.12) and was reported to ‘cut’ the successive cobbled surfaces of the street separating Buildings 17 and 18 in this area (F05:25, F05:06). It was cut by robber trench F05:18, but it is unclear whether that robber trench was associated with the demolition and replacement of the Phase 1 wall or occurred at a much later date and simply removed the footings of the already demolished wall.
The westernmost contubernium represented the bestpreserved part of the barrack. Only the north room of the contubernium was available for investigation, as the edge of the excavation ran obliquely along the line of the medial partition wall which separated the two rooms, and Daniels interpreted this as representing the full extent of a small rectangular stone structure (Building C), measuring around 6m by 5m. The room was most clearly defined by the 0.70–0.75m wide robber trench (F05:18) marking the position of the west wall (see Fig. 14.28 below), by the remains of the east-west aligned medial partition wall (F05:09, G05:16) and by the extent of the internal floor surfaces and occupation deposits in the western and central parts of the room. The east wall had been robbed out in the course of the Phase 2 remodelling which also resulted in the removal of the Phase 1 floor levels along the east side of the room, its position being estimated on the basis of the likely contubernium spacing. The resultant internal dimensions of the room are estimated at 4m (N-S) by 4m (E-W). The robber trench for the west wall was apparent as a dark grey soil filled linear feature, containing smallmedium sized stones, which cut through the floor levels and deposits originally laid up against the wall to a depth of 0.10m. To the south, the medial partition wall survived over a length of 3.80m and was 0.70m wide, but the stratigraphical relationship between this and F05:18 had been lost as a result of later intrusion. The surviving footing course was carried across the full width of the contubernium with no indication of the position of the threshold.
It was possible to record a fuller sequence of internal floors levels and associated deposits and features here than elsewhere in the two barracks, although all deposits in the north-east corner of the room had been removed by later intrusion. The secondary cobbled surface (F05:14) of the street separating Buildings 5 and 6 was covered by a layer of light grey-green clayey soil (F05:52), incorporating many lumps of charcoal and some small stones, which might be interpreted as a build up of trampled debris over the street surface or a makeup deposit. This was overlain by a 10–30mm thick spread of orange sand and grit (F05:51), which was not, however, noted in the north-west corner of the room. On the west edge of the room these levels had been intermixed (as F05:53), perhaps as a result of disturbance resulting from the subsequent remodelling of the barrack and this disturbance apparently extended to the underlying street metalling (disturbed cobble layer F05:54, part of F05:14). The sand and grit layer was very tentatively interpreted by the excavators as ‘decayed wall plaster’ but was perhaps actually a bedding layer for a flagged floor which survived in a very fragmentary condition in the south-east corner of the room (F05:44). At the northern end of the room a stone-flagged hearth (F05:50), measuring 0.80m by 0.50m, sat on clayey soil F05:52 about midway along the length of the north wall (Fig. 14.23). The hearth was composed two yellow sandstone slabs and three flat white stones, all some 30–50mm thick and showing signs of burning at the edges. It was associated with an extensive deposit of grey-black ashy soil (F05:38), containing much charcoal and coal and flecks of orange iron pan, which stretched right the way to the medial wall, reducing in thickness from c. 50mm around the hearthstones to 10mm at its southern edge, with thin but distinct lenses of burnt material where it was thickest.
PHASE 1 SUB-PHASE 2
A second sub-phase in the contubernium was marked by a pink clay floor (F05:39, 40) which survived over an area 4m × 3m (Figs 14.25, 14.26). The earlier hearth (F05:50) was replaced by another occupying the same position (F05:45). This was represented by an oval patch of fire reddened clay and dull yellow sand, 0.45m × 0.35m in extent and surrounded by a ring of blue charcoal. A row of three small flagstones, 1m long in total, was present on the west side of the hearth with a single flag on the opposite side. It is not clear if these were related to the hearth’s functioning in any way. The excavators suggested the hearth had not been much used as there was no ash layer associated with the burnt clay.
Figure 14.22: Section Drawing S11: Reconstruction of the SW-NE section through Building 18 contubernium 1 (Daniels ‘Building C’). Scale 1:30.
Figure 14.23: Phase 1 hearth F05:50 (the flagged setting at the top of the view) in Building 18 Contubernium 1, looking north.
The excavators also considered that the room was subdivided at this stage by an east-west partition wall (F05:42, 43) which cut through this floor, although all other trace of the partition had subsequently removed. The function of such a wall is by no means clear, however, and the plans do not suggest there was a distinct linear robber trench cutting through the pink clay, simply an irregular gap in the northern half of the room where the clay was absent. It seems more plausible to interpret this ‘wall’ as simply a false impression conveyed by the patchy survival of the clay floor.
Use of the contubernium in this sub-phase may be represented by a dark grey/black deposit (F05:15, 17, 41, G05:14), up to 0.1m thick and comparatively rich in finds, which directly overlay the pink clay floor and other surviving Phase 1 levels plus the cobbled surface of the earlier street and was sealed in places by walls F05:03 (as F05:41) and F05:10 belonging to the next phase. The deposit had a greasy texture and contained concentrations of heavy pinkish clay and areas of slightly lighter brown soil. It may comprise a mixture of occupation debris and makeup or other material deposited when the barrack was remodelled in Phase 2.
The second phase of Building 18 involved a substantial remodelling of Contubernium 1 which was shifted 1.20m to the east with the construction of new west (F05:03) and east (G05:15) walls. These walls were c. 0.65m wide and were constructed with two lines of roughly dressed, sandstone facing stones with a thin rubble core. They survived only course high, with the exception of one block apparently belonging to a second course at the southern end of east wall G05:15. A 0.20m wide and 0.10 thick deposit of fairly clean and firm orange-pink clay (F05:19) was packed along the east side of wall F05:03, the purpose of which was unclear. The north wall (F05:11) may have been rebuilt at this stage as well, as supposed by the excavators, since the surviving remains were reported to lie over the edge of the deposit of grey-green soil (F05:15) marking the end of Phase 1. The original medial partition wall, F05:09, was also replaced by a new one, some 0.7m wide, located immediately to the north (F05:10, G5:08). This reduced the size of the north room, which now measured 4m × 3.5m internally. An entrance through the medial wall was apparent in the south-west corner of the room and was some 1.35m wide (assuming the full length of the wall was preserved). In the interior, a floor surface (F05:24, G05:22), composed of small flagstones and flat stones, and including a tile and an amphora sherd, was present, though it survived only sparsely, mainly in the centre of the room. A few flagstones (F05:49) overlying earlier medial wall F05:09 may represent the sparse remnants of a floor in the south room.
As remodelled, the north room would now have been roughly equivalent in size to the south room, assuming that the block was roughly similar in overall width to that estimated for Building 17. By moving the west wall of Contubernium 1 eastwards the alterations would also have enabled an increase in the size of the officer’s quarters and these may have been the aims the rebuilding was designed to satisfy.
The final activity recognised within the north room of Contubernium 1 was represented by stone packing (F05:07, G05:09), some 0.10–0.15m deep, composed of a mixture of smallish stones, large cobbles and building rubble in a matrix of dark clayey soil, which filled most of the interior. In the north-west corner of the room a layer of yellow sand mixed with brown soil (F05:04), 0.05m thick, was present instead and overlay the edge of the stone packing. The stone layer was also present on the east side of wall G05:15, overlying the cobble surface (G05:19) in Contubernium 2. The excavators considered this stone layer to be a deliberate pack perhaps to create some form of platform or conceivably a replacement stone floor. Some of the smaller, flatter stones were pitched vertically, as is evident in the site photographs, which might imply they simply represented structural collapse, but these may have overlain the main pack or had conceivably been dislodged by post-Roman ploughing.
Figure 14.26: Views of successive phases of the north room of Building 18 contubernium 1 from the east. 1. Phase 1 Sub-phase 2 (with later east wall G05:15 visible); 2. Phase 2; 3. Phase 3.
Levels directly equivalent to the Phase 1 and 2 floors in Contubernium 1 were not present in the area of Contubernium 2 immediately to the east. The Phase 2 wall separating Contubernia 1 and 2 (G05:15) appeared to sit more or less directly on top of the surface of large cobbles (G05:19) forming the secondary metalling of the street which occupied this area before the construction of Building 18. It is possible this surface was reused as a stone floor in the Phase 2 contubernium, with any Phase 1 floor levels here perhaps having been truncated by the Phase 2 reconstruction works. One large roughly squared boulder rose proud of the rest of road cobbles G05:19 and could conceivably have formed part of a Phase 2 medial partition wall since it lay on the same alignment as the equivalent medial partition in Contubernium 1. Any trace of the Phase 1 medial partition would, however, have lain beyond the southern limit of the excavation.
The north-east corner of Contubernium 4 also survived the widespread destruction of the third-century levels (Figs 14.30, 14.31) and was interpreted by Daniels as part of another freestanding stone structure (Building D). In addition to a 2m long stretch of the north wall (H05:18 – see above), a 1.6m length of the east wall (H05:15) survived here. This wall was 0.60m wide and was bonded with the north wall. The excavators regarded this junction as marking the intact corner of a distinct building, but the surviving remains of the two walls did not form a properly finished angle, suggesting the north wall originally continued further east and had simply been robbed away at a later stage.
Figure 14.28: The robber trench for Phase 1 west wall F05:18 contubernium 1 with later wall F05:03 beyond, from the SW.
A succession of floor surfaces were recognised inside the contubernium. The lowest level was apparently a deposit of grey-blue ashy soil, charcoal, and mortar (H05:47), 20–30mm thick, which sat directly on the upper cobbled surface (H05:02) of the former street between Buildings 5 and 6. This deposit may have been associated with a possible hearth (H05:46) which took the form of a stone slab, 0.50m square, set against the north wall and surrounded by a scatter of other smaller flat stones in the corner. However the ashy deposit was recorded as underlying the flags and may therefore have been associated with an earlier version of the hearth. To the west, a patch of pink clay (H05:45), c. 0.75m square and also reportedly overlying ashy soil H05:47, may represent the remains of a more extensive floor in the western half of the room. A small spread of rubble including one facing stone (H05:48) was also recorded over H05:47 to the south of the possible hearth slab. It is not clear whether this was part of the same floor as the flags of H05:46 or perhaps more likely represented debris connected with the end of Phase 1 and was incorporated in the susequent stone surface.
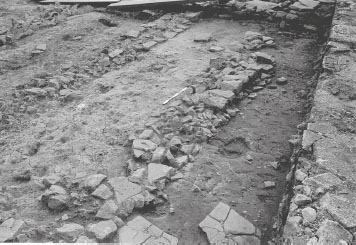
Figure 14.30: NE corner of 18 contubernium 4 (Daniels Building D) from the west with the street drain to left and Building E beyond.
All the features belonging to this floor level were overlain by a dark grey soil (H05:39), perhaps part of an occupation deposit or conceivably a makeup level for the next phase of flooring, which comprised a rather rough surface of shattered flagging (H05:38). It is possible this secondary stone floor was contemporary with the Phase 2 remodelling of Contubernium 1, but the stratigraphic separation and limited amount of datable material from Contubernium 4 means there is no way of confirming this.
Only a small area of Building 18 was excavated to the east of Contubernium 4, but it is clear that no definite traces of further contubernia were exposed there. Instead the remains of a small timber structure labelled Building E by Daniels were exposed. This may relate to a later phase of the building and perhaps reflects the replacement of the block’s four easternmost contubernia by a series of timber buildings, the remainder of which lay beyond the edge of the excavation (Fig. 14.32).
A gap of 1.30m separated Building E from the east side of Contubernium 4. The small structure was constructed on wooden sill-beams which were laid in stone-lined slots. Traces of these beam-slots (of about 0.2m width) were recognised on the west (H05:19) and north (H05:44) sides, in the form of parallel lines of thin vertically set slabs or small facing stones marking the edges of the beam settings. The east slot (H05:20) was less obvious, however, consisting of only one or two vertically set slabs plus some other stones on the same alignment, which appeared to form the west side of a possible slot. The three slots enclosed a floor of pink clay (H05:42) which was cut by a circular posthole (H05:43), 0.35m in diameter, containing two pitched packing stones towards its western edge. The building measured 1.5m east to west by at least 2m north to south, and evidently continued southward beyond the excavation area.
The laying of a stone floor (H05:22) in the interior represented a second phase of Building E. This was composed of small shattered flagging, including several large pieces of tile, laid on top of a 50mm deep layer of fine, dirty grey soil (H05:23, 41) which covered the earlier clay floor.
Figure 14.31: Building 18, Contubernium 4 (Daniels ‘Building D’) Phase 2 and adjacent Building E, 1:100
Immediately to the west and east of E there were only deposits of dark earth and rubble (H05:21, 29), which clearly represented modern disturbance, overlying the metalling of the earlier street.
The excavators noted the similarity between pink clay floor H05:42 inside Building E and clay floor H05:45 inside Building D (i.e. Contubernium 4). A similar floor was also present in the north room of Contubernium 1 in Phase 1 Sub-Phase 2 (F05:39–40). It is possible that clay H05:42 actually represents the surviving remnant of a more extensive floor which formerly covered the interior of the north room of Contubernium 5, and which was protected by the stone floor of Building E that was more resistant to plough disturbance. However the clay did appear to encroach on the projected line of the north wall of Building 18 so its interpretation as the Phase 1 floor of E is retained here.
Building E, as restored above, is a rather peculiar structure resembling a very small timber-built chalet with an internal space no more than 1m wide. An alternative way of interpreting these remains would be to envisage them as forming part of a rebuilding of the eastern end of the block, involving the reorientation of the block to face north (assuming it originally faced south) and the provision of a timber frontage and internal partitions. In this case slot H05:44 would form part of the new façade of Contubernium 5, with an opening for a doorway to the west next to Contubernium 4. The west slot (H05:19) would represent the wall of a side passageway leading from the doorway to the rear of the contubernium, with the earlier street cobbling of Alley 4 (H05:02) being adapted to serve as the floor of the passage, any previous floor levels having been stripped away. It is, however, more difficult to integrate slot H05:20, to the east, into this hypothetical scheme. If it formed the east wall of the Contubernium 5 the latter would have an internal width of no more than 2.50m, whereas contubernia at Wallsend were generally in excess of 3m. It was described as a very scanty remnant and perhaps could have been associated with an internal bench or screen in the front room rather than a timber wall slot, but, from that point eastwards, all contemporary levels had been destroyed so the exact form and function of H05:20 is impossible to confirm. Such remodelling could conceivably be associated with the later phases of Contubernia 1 and 4, which saw the laying of rough stone floors in their north rooms and, in the case of 1 at least, a reduction in the area of that room, all perhaps consistent with the reorientation of the barrack to face northwards.
Figure 14:32: Secondary phase of third-century Barrack 18, showing possible reduction in length of block, 1:200.
Grid squares: E4, F4, F5, G4, G5, H4, H5, J4, J5, K4, K5
The remains of Building 17 were regarded by Daniels as forming three small distinct structures, which he labelled, from east to west, H, G and L (see Fig. 14.17 above; cf. Fig.1.07). As restored by Daniels, Building H was a rectangular structure, measuring 4m by 5.5m, which reused the east and north walls of Building 5, along with a newly constructed west wall of which only the external face survived, and was open-fronted to the south. Directly adjoining H on its west side, G was envisaged as a larger structure, some 8.5m (E-W) by 6.7m (N-S), again rectangular and openfronted, which reused the south wall of Building 4 as its north wall and featured newly constructed east and west walls represented only by strips of rubble marking the position of their foundations. To the north-west, L lay on the edge of the excavated area, with a fragmentary length of newly constructed walling forming its south wall (G04:10) whilst its west wall was apparently represented by the wall which had separated the contubernia and officer’s quarters of Building 4 (G04:14). A cobbled floor surface was identified inside the building (G04:23), but most of the putative structure would have lain beyond the northern edge of the excavated area, beneath the back alley of Buddle Street and Winifred Gardens, whilst to the east it was destroyed by a broad plough furrow, and hence no clear estimate of its overall size or form was advanced. Some 3m to the west of G, lines of post holes were interpreted as forming the remains of an east-west aligned, rectangular timber building (J), measuring perhaps 14m by 6m. The south and east walls of this structure were well-represented, the north wall less so and the west wall not at all. Daniels suggested this building was a secondary addition to the stone structures in this area.
Daniels considered that the plan of this phase was substantially intact and therefore reconstructed a series of structures more or less solely made up of the visible remains. If, on the other hand, it is assumed that a great deal of the original layout has been obliterated by post-Roman destruction then the plan of a rectangular barrack block, composed of many of the very same structural components that figure in Daniels’ buildings L, G and H, can be recognised on the north side of the new east-west street (see Fig. 14.18). Some other walls which Daniels thought were reused at this stage, notably sections of the south wall of Building 4 and the wall dividing the officer’s quarters from the remainder of that block, are likely to have been redundant. They had probably been demolished down to their footings at the end of the life of Building 4, but were not yet robbed away completely. The remaining features, such as the post holes of Building J and the east wall of G, can also be accommodated if it is assumed that more than one phase of activity is represented. The north-west corner of the block (corresponding to the south-west corner of 4) lay outside the excavation area altogether. The layout and likely development of the barrack block are set out in detail below with reference to the surviving features uncovered in 1975–6.
The block was probably c. 45m long, like Building 18 and the earlier barracks in this part of the fort (the length of Building 5 was 44.90m and Building 4: 45.60m). The width of the block could not be determined precisely owing to the complete removal of the south wall. However, based on the position of the suggested robber trench for the south wall (K05:27), the extent of partition wall foundation H04:31–32/H05:28 and the northern edge of the metalling of Alley 10, the building’s overall width can be estimated at roughly 9m.
On this basis, the distance between the estimated position of the south wall and the building’s medial partition – the reused north wall of Building 5 – was about 3m, whereas the distance between medial wall and the north wall was 4m, implying that the southern rooms of the barrack’s contubernia were significantly smaller internally than the northern ones. The apparent smaller size of the rooms on the southern side of the block combined with the presence of utilitarian stone floor or makeup deposits there (see below: Interior floors) might in turn indicate that this area was occupied by the storage and utility rooms located at the front of each contubernium, in which case the block would have been south-facing.
The north and south outer walls of the block were newly constructed, but the east wall and probably the west wall appear to have reused parts of the corresponding end walls of Barracks 4 and 5. Presumably the reused walls were demolished down to their bottom few courses with new masonry being erected on these footings and tied in with the new north and south walls. The limited preservation means this arrangement could not be definitively substantiated, but a 2.20m long linking wall (K05:25) was constructed across the former narrow back alley to connect the reused east walls of 4 and 5 (K04:16/ K05:20 and K05:19). This was originally attributed by the excavators to Phase 2 of buildings 4 and 5 and interpreted as a blocking wall designed to close off the east end of the narrow back alley (Alley 3) separating those two buildings. Up to two courses remained of the connecting wall, which was 0.55m wide (narrower than the earlier barrack wall footings it was joining) and was composed of fairly regular, faced, keyed sandstone blocks, on average 0.23m wide × 0.18m deep. The core was grey clay and small fragments of sandstone. It butted up against the wall footings at the respective corners of the earlier blocks and appeared to have subsided slightly, midway along its course, as a result of the looser fill of the alley drip trench compressing beneath the weight of the wall. No trace of a equivalent connecting wall survived at the west end of the block, but it is noteworthy that a similar wall (L05:36) was erected across the alley between Buildings 1 and 2, and abutted the Phase 2 rebuild of the south wall of Building 1.
The north wall was most clearly represented by a 2.40m length of masonry (G04:10) which survived some 13m from the west end of the block and was interpreted by Daniels as the south wall of Building L. This was 0.65m wide and composed of coarsegrained sandstone rubble blocks. Its roughly worked facing stones were small to medium-sized, some tapering inwards to key into the rubble core whilst others were more rectangular in shape. The north face survived better than the south face. The context records explicitly state there was no construction trench or foundation deposits, the wall simply being laid on top of the earlier Roman surfaces, however the site photographs (B8/12–15) show that the masonry of G04:10 was set on a base of small rubble. Rather than being a discrete foundation deposit however this seems to have been a continuation of the street surface (G04:23) immediately to the north, implying that the road surfaces were laid before the barrack blocks were constructed. A little further east a linear spread of small flat stones (G04:06) on the same alignment might represent the very disturbed remains of a thin footing course. These stones clearly extended over contubernium partition slots associated with both phases of Building 4 (G04:31, 34) so probably do not form part of the flagged flooring of the earlier barrack (G04:22, 29). No other traces of this wall were identified by the excavators, but possible evidence for its presence may perhaps be detected still further to the east on site plans P62a-b, where a 5m long band of small rubble stonework is apparent on the same alignment as G04:10. The rubble is noticeably smaller than the adjacent flagstones which formed the contubernia flooring in Barrack 4 (H04:09, J04:23) and may mark either the intrusion of material from the later wall into the level of the earlier barrack floor or perhaps the disturbance caused to the flagging by the construction of the wall over the top.
No definite remains of the south wall were found, suggesting it had been completely removed at a later stage. A distinct strip of smallish, angular stone tumble (K05:27), 0.90m wide, which might possibly represent a robber trench for the south wall, was recognised at the east end of the block. The southern edge of this strip lay 3.60–4.00m from the southern face of medial wall J05:14/K05:23. Otherwise the best guide to the south wall’s location was the distinct edge which could be traced between the successive surfaces of the street to the south (H05:26/J05:19/ K05:21 and H05:27/J05:20) and the internal rubble flooring (J05:25, K05:26) of the front rooms in the easternmost contubernia, with the wall probably being laid on or immediately alongside this edge of the cobbled road metalling.
The north wall of Building 5 was probably reused to form the base of the medial partition between the north and south rooms of the contubernia throughout the block. Several lengths of this wall had survived later robbing and plough distubance to be exposed by the excavators (E04:08, F04:02, 04, G04:12, H04:23, J04:15, J05:14, K05:23). At its west end (E04:08, F04:02, 04) this wall may have functioned as an internal partition within the officer’s quarters.
Fragmentary remains of two of the internal, north-south aligned walls which separated the contubernia were apparent towards the east end of the block (H04:31–32/H05:28, J05:17). Their spacing is consistent with the comparable walls associated with Contubernia 1 and 4 in Building 18 and suggests the barrack contained eight contubernia in its initial phase. The wall dividing Contubernium 7 from 8 (corresponding to the west wall of Daniels Building H) was marked by a 2.15m length of its west face (J05:17) to the south of medial wall J05:14. Traces of underlying rubble foundations were also identified amidst the surrounding rubble flooring or levelling deposits and the width of the wall was thereby estimated at 0.60m. This gave Contubernium 8 and internal width of 4m.
No trace of the wall between Contubernia 6 and 7 was found but a rectangular post setting (J05:26), surrounded by upright slabs and measuring 0.35m by 0.45m, which was situated next to the presumed line of the wall may conceivably have been associated with a doorway between the front and rear rooms of Contubernium 7.
The partition between Contubernia 5 and 6 was represented only by a 0.90–1.10m wide strip of rubble foundations (H04:31–32/H05:28) distinguishable from adjacent and road surface (H05:26) and rubble floor or makeup level (H05:36) in being composed of larger material and less well-packed. The rubble foundations extended for 6m as far as the south wall of Building 4 (J04:07). The final stretch had probably removed by the disturbance (H04:20, J04:18) recorded along the north side of J04:07. There was evidence for a possible entrance at the south-west corner of Contubernium 6, where street cobbling H05:26 continued around southern end of rubble foundations H05:28 and along their east side as though forming the surface of an entrance passage. A roughly linear spread of very large, worn cobbles and slabs (H05:33), each up to 0.50m in diameter, extended for c. 4m along the suggested line of the partition wall between Contubernia 4 and 5 and might have been intended to provide a solid base for the wall, though it was interpreted by the excavators as a surface rather than a wall foundation. No further evidence was recovered for partition walls associated with the initial phase of the barrack. Daniels considered that the northern part of the earlier wall separating the officers quarters and contubernia of Building 4 was reused as the west wall (G04:14) of Building L, but the position of this wall does not conform to the spacing of the other contubernia in either Barrack 17 or 18. It is more likely that this wall was demolished down to its lowest courses like the south wall of Building 4, but not actually robbed out, with the north wall of 17 cutting through or riding over its remains (the actual relationship between the walls was not preserved as the surviving masonry of wall G04:10 did not extend sufficiently far west).
From the medial wall southwards the interior of the block was covered with stone deposits variously composed of cobbles, flags and rubble, which appeared to form a continuation of the road surface to the south (Alley 10). However a distinction was noted between the cobbled street surfaces proper and the deposits to the north, which were perhaps laid down immediately following the demolition of Building 5. This distinction was most apparent to the east, which was the best-preserved area. Here the suggested internal levels incorporated a variety of sizes of cobbled stone and flags (H04:29, H05:33, 34, 36, J05:24, 25, 27, K05:26). Further west, the rubble deposits in the equivalent internal area were more disturbed, but did appear distinct from the street metalling proper (F05:25, G05:20). They were recorded as being composed of rounded stones of all sizes, set in a dark grey clayey loam matrix on a base of very small stones (F04:19, F05:21, G04:16, G05:17), the whole level being some 0.10–0.30m thick overall. At the west end of the block the context records treat the rubble over the street and the building interior as a single level (E04:10, E05:19, F04:23), but they do provide clear indications of multiple layers which may represent successive phase of street surfaces, whilst to the north only one layer was recognised, perhaps again an internal level.
It is unclear whether the cobbled layers in the southern half of Building 17 served as floor surfaces or just represented makeup levels with the actual floors having been destroyed by post-Roman disturbance. The former is possible, particularly if the block was south facing. This would make the southern room in each contubernium the front room, or arma, which is generally considered to have been used for storage and perhaps food preparation and other processes, for which a rough but hard wearing stone floor might be appropriate, rather than for accommodation (but cf. Hodgson and Bidwell 2004, 140, noting the presence of hearths in the front rooms of barracks at South Shields and Lorch). No trace of any contemporary floor deposits were found in the northern half of Building 17 and these may simply have been destroyed by post-Roman activity. However, if the north rooms represented the inner room (papilio) in the contubernium, and were consequently furnished with less utilitarian flooring than the southern front rooms, it is possible that they may have had raised wooden floors consisting of planks and perhaps joists laid across and perhaps resting on demolished and apparently redundant walls, in particular the south wall of Building 4. Such a method of flooring would not necessarily leave much archaeological trace, particularly if the walls were demolished below the level of any joist sockets, as it would obviate the need for clay or stone floor surfaces and would minimise the potential for survival of any occupation deposits.
There is evidence that Building 17 underwent some degree of remodelling at a subsequent stage although the remains were too fragmentary to allow any coherent overall pattern to be discerned. A 4m length of of rubble foundation (J05:18) was traced on the west side of partition wall J05:17, cutting through the line of the north wall of Building 5 and extending across the width of the former Alley 3. This resembled the rubble foundation for the possible partition between Contubernia 5 and 6 (H04:31–32/H05:28) and was interpreted by Daniels as the east wall of Building G. It might represent a replacement for wall J05:17 and signify that Contubernium 8 had been enlarged at the expense of Contubernium 7 or form part of a more substantial remodelling.
A channel lined with sandstone slabs (J05:22), aligned roughly north-south, was 1.7m long and 0.5m wide was located in the southern part of Contubernium 7, close to the line of wall foundation J05:18. It was filled with rubble and dirty soil and resembled the stone-lined drains present in the front rooms of the cavalry barracks in the retentura, which could imply that horses were stabled in this part of the barrack at some stage in its life.
Grid squares: G4, G5, H4, H5
The most substantial structural alteration was represented by the group of postholes designated Building J by Daniels. Constructed mainly in the postin-pit fashion, this was located in the central third of Barrack 17. Most of the surviving postholes lay on the southern side where ten postholes were identified (G05:36–41 and H05:50–53), some clearly set in a c. 0.35m wide trench (H05:32), and on eastern side, with three more postholes (H05:54–56). In addition, occasional outliers (H04:35 and G04:41–42) may have belonged to a northern side of the building, although only two of these (G04:42, H04:35) lay directly in line. Alternatively the medial wall of Building 17 might have provided the base for a sleeper beam. The posts were placed between about 0.8m and 1.2m apart and averaged 0.3m in diameter. The minimum dimensions of the structure were 14m east to west and 4m north to south, although this last measurement may actually have been 6m if the outliers did indeed belong to a north wall. The line of the south wall trench and post holes ran along the edge between the surface metalling of Alley 10 (H05:26 etc ) and rubble deposits identified as the interior floors or levelling up deposits of Building 17 (H05:33–34).
Daniels interpreted these post holes as forming a rectangular timber building around 14m in length (E-W) and 6m wide (N-S), regarding it as a secondary feature of the late Roman layout in the west praetentura. This remains the most straightforward interpretation of the evidence – a post-in-pit building erected over the central third of Building 17 (perhaps in the fourth century?) after that structure had gone out of use and been demolished. Any floor levels and occupation deposits associated with the timber building would presumably have been destroyed by later activity.
Nevertheless there is an alternative possibility, namely that the post holes marked the remodelling of Building 17 as a hybrid timber and stone-built barrack block. Such hybrid construction is apparent in the case of Building 12, one of the earlier cavalry barracks in the retentura, where the frontage of the contubernia range as well as its internal partitions was built of timber (see Chapter 16 below ). A similar mixture of stone and timber construction was also encountered in some of third-century phases of barrack block at South Shields (cf. Hodgson and Bidwell 2004, 125–8), extending so far as to include the end wall of the contubernia in some instances. It could be argued that something similar obtained in the case of Building 17, with the main east-west row of posts which Daniels assigned to Building J potentially forming part of a timber frontage and the east wall representing an internal partition. It seems unlikely that any such arrangement formed part of the primary layout of Building 17 since the very fact that the internal partition walls both in Building 17 and in 18 were all built of stone, including those used to divide front rooms from rear, as well as those separating the individual contubernia one from another, would imply that the use of stone walling was the defining characteristic of the third-century barracks in the praetentura, at least as initially laid out. The outer walls would surely therefore all have initially been built of stone, as sleeper walls at the very least, if not to their full height, as substantiated at South Shields with regard to one phase of barrack in this general period (Hodgson and Bidwell 2004, 144, fig 11). However, a later rebuilding which incorporated a timber frontage in the central third of the block cannot be ruled out. It is, admittedly, less easy to fit the three isolated posts attributed to the north wall of Building J into any such pattern, unless they were unconnected, perhaps belonging to an earlier phase of Building 17, but this north wall was too uncertain for this to be a decisive factor either way. Unfortunately only one of the Building J post holes (G05:39) produced a few sherds of pottery and these may well have been residual.
Figure 14.33: Two alternative restorations of the latest features in Building 17, (1) with the posts of ‘Building J’ interpreted as part of the south façade of Barrack 17, (2) with Building J restored as a separate rectangular timber building, replacing part of 17. Scale 1:200.
The demolition of Buildings 4, 5, and 6, and the construction of the two new barrack blocks in the western praetentura was accompanied by a revision of the internal road system, with a new east-west street passing between Buildings 17 and 18 (labelled Alley 10 here). The street was was laid over the southern half of Building 5. It was divided into three separate sections by the broad post-Roman cultivation furrows and was best preserved towards the east, in grid squares H05, J05 and K05, where a clear distinction was noted between the street metalling and the cobbled stone floors inside Building 17.
The first surface covering the easternmost stretch of the new street (H05:26, J05:19, K05:21) contained many large, worn cobbles, though the size was more variable in H05, and formed a good, well-packed layer. This was associated with a newly constructed stone-lined drain (H05:24, J05:10) which ran along the south side of the street next to the north wall of Building 18, having been built on top of the remains of the south wall of Building 5. Although its northern limit was somewhat irregular, the overall width of the street, including the drain, can be estimated at 3.00–3.50m from the north wall of Building 18 to the edge of the stone surfaces associated with the interior of 17. The latter were marked by clear signs of differential wear (H04:29, H05:33, 34, 36, J05:24, 25, 27, K05:26 – see above). To the east the large cobbles of street surface J05:19/K05:21 appeared to terminate in a north-south oriented line of similarly sized stones (K05:18) which may have formed the west sidewall of a drain running along the western edge of the via praetoria. Five of these stones remained in situ and did seem to form a distinct face, extending for 1.90m.
In the central section of the road there remained one clearly undisturbed strip of the initial street surface (F05:25, G05:20) comprising medium sized cobbles resting on a base of small pieces of rubble. This area of intact primary and secondary levels was not clearly differentiated from the surrounding disturbed levels on the site plans, only in the context records and associated sketch plans, and its dimensions cannot be accurately estimated. To the north lay an extensive rubble spread (F04:19, F05:21, G04:16, G05:17) which was interpreted as a disturbed area of the road surface, but appears to correspond to the interior of Building 17 and may therefore represent disturbed floor levels of the building comparable with those identified further east. To the south there was only a band of rubble disturbance (F05:22, G05:18), c. 1.50m wide, composed of a mixture of small angular stones and some very large stones lying between the intact layers of street metalling and Building 18 Contubernium 1. This probably marked the course of a later robber trench responsible for removing the stone-lined drain on the south side of the street and/or the north wall of 18, which was largely absent here except for the few possibly displaced facing stones of F05:11.
To the west only one level was identified (E04:10, E05:19, F04:23), extending over the area of the demolished Building 5 and thus encompassing the southern part of 17 as well as the street south of Building 17. It reportedly also overlay those stretches of Building 5 walling which had been removed with no sign of robber trench. The level was composed of small and medium-sized cobbles, many sub-rectangular in form, in a grey soil matrix. The context descriptions do imply that this was a deliberately laid surface, albeit somewhat rough, and make clear reference to there being more than one layer of cobbling, though only one layer was present at the north end (F04:23). Thus the sequence here may be more complex than the use of a single context number in each grid square would suggest, with the possible presence of successive levels of street metalling and conceivably even an internal cobbled floor base at the west end of 17. Beyond this the north-south drain (E04:12, E05:05) on the east intervallum road apparently continued in use during this phase.
A second surface was subsequently laid over the street (perhaps corresponding with the construction of Building J), although the existing drains from Phase 1 were retained. Again this resurfacing was clearest towards the eastern end of the street, where it was composed of worn small cobbles in crumbly, sandy loam, which was a mixture of light yellow and dark brown in colour (H05:27, J05:20), but even here it did not survive over the full extent of the earlier cobbling, being absent over K05:18/21.
A second street level (F05:06, G05:06) was also recorded further west, overlying the earlier metalling there (F05:25, G05:20). The new level was c. 0.10m thick and made up of cobbles of all sizes, which formed a fairly good surface, but did not appear to be heavily worn.
A rubble street surface (G04:23), was identified immediately to the north of Building 17, in 1975, in a narrow tapering area, some 8m in length, between the building’s north wall and the northern edge of the excavation area. This was interpreted by Daniels as the internal floor of Building L. The surface was composed mainly of small rubble stones with some larger ones, all set in a firm, dark grey clay (perhaps in fact pressed into the underlying clay floor levels of the redundant Barrack 4). The site plans and photgraphs suggest the rubble perhaps continued beneath the north wall of Building 17 (G04:10), forming a solid base for that wall.
A subsequent possible surface (G04:09), pre-dominantly made up of very small, tightly packed cobbles, but also incorporating several large, reused building stones, covered G04:23 and abutted wall G04:10. This may be Roman, and contemporary with the last phases of Building 17, but it might equally be later, as it included modern brick and coal in close association. The surface was 50mm thick and was overlain by a thin lens of hard dark clay.
The latest surviving level of the via praetoria consisted of a 3.50m wide carriageway (K04:04, K05:14) located towards the east side of the original broader roadway and running northward towards the porta praetoria. It was composed of medium-sized cobbles, averaging 0.10–0.20m in length, and was clearly distinguished from the rubble spreads to the west and east (K04:13/ K05:07 and K05:15 respectively) in the site records. Its relationship to these levels was not clearly defined.
Two further levels of the north intervallum street were recorded in grid squares G03 and H03, at least one of which was probably of Roman date. These could not related to road levels to the west or south with any certainty although some possible equivalences can be suggested. The sequence was clearest in G03 where the third road level (G03:14) was partially overlain by a surface composed of fairly large cobbles (0.10–0.30m in length) and some building rubble (G03:20). For the most part this did not extend as far as the northern edge of G03:14. It was regarded as equivalent to context H03:05, immediately to the east, described as medium-sized, river-washed cobbles and small angular stone intermingled with colliery waste. As a result of the presence of that waste H03:05 was initially interpreted as a road associated with colliery activity, but no such contamination is referred to with respect to G03:20 and the context record was later revised to acknowledge the possibility that the surface was associated with the intervallum road. The colliery waste may have intruded into the cobbling when the modern overburden was machined off, as suggested in the context record, or perhaps the overlying deposits were removed by colliery period activity, resulting in the renewed exposure of surface G03:20/H03:05 at that stage.
The extent of G03:20 shown on the relevant sketch plan (G03 p 22) implies there should have been an equivalent layer in grid square F03 to the west. No such layer was recorded however, unless F03:05 (the only street surface examined in F03) was equivalent to surface G03:20, rather than the underlying third phase of street metalling (G03:14) as stated in the context records. F03:05 was partially overlain by a spread of angular rubble (F03:12) which also extended over the remains of Building 4 (as F03:10), but the description of these contexts does not particularly resemble that of G03:20 and the rubble does not appear to have formed a deliberately laid surface.
A very hard, compact cobble surface (G03:05, H03:06) overlay much of G03:20/H03:05, incorporating a number of large sandstone blocks, particularly towards the west where the cobbling survived more extensively. The blocks were interpreted as reused Roman stonework. Modern material (pan tiles, clay pipe stems, cinder and relatively modern ironwork), as well as Roman period finds, were found in association with this surface, although it was not clear from the context record whether this was actually sealed by the metalling or simply pressed into the surface by later activity. However G03:05/ H03:06 was certainly interpreted as a colliery period surface by the excavators with G03:05 said to cut the post-Roman ploughsoil.
To the north of the intervallum surfaces G03:14 and G03:20 there was a linear spread of sparse rubble and cobbles intermingled with colliery waste (G03:04), which followed a broadly similar alignment to that of the street. Towards the west a smaller patch (G03:08), similar in composition – river-washed cobbles and small angular rubble – but perhaps less disturbed, was recorded as overlying G03:04. Both G03:04 and G03:08 were recorded as underlying the post-Roman ploughsoil layer (G03:13) extending to the north. Compact surface G03:05 was also recorded as overlying G03:04, but the latter’s relationship to adjacent levels, such as G03:14 or G03:20, is not clearly expressed in the context record and associated sketch plans.
Interpretation of the later levels of the north intervallum street is complicated by the lack of a clear horizon between the Roman levels and those associated with 18th and 19th-century colliery activity. The post-Roman ploughsoil layer encountered across parts of the site was not present over much of the intervallum street (although it did survive – as G02:11, G03:13, H02:03, H03:03 – over the rampart deposits immediately to the north). Presumably this reflects the truncation of the deposits overlying the Roman levels resulting from colliery era disturbance. Moreover finds were absent or not recovered from all but the uppermost surfaces (including an eighth- or ninthcentury strap end from sparse cobbling G03:04 – see Chapter 25, no. 2). The very hard, compact cobble surface (G03:05/H03:06), which formed the uppermost layer of cobbling exposed by the excavations, was associated with modern material and was consistently interpreted as a colliery era surface rather than part of the intervallum metalling. This remains the most plausible interpretation but it is possible that a Roman period surface was reused during the colliery era, with modern material being pressed into the surface through constant wear.
The description of the uppermost hard compact surface, G03:05/H03:06, is similar to that given to the upper of the two cobbled layers recorded on the north side of Building 17 (G04:09) a little further to the south. It is possible therefore that these represented the same surface which extended continuously over the former area of Building 4 between Building 17 and the original intervallum road. However further to the west, F03:05 was not seen extend over interior of Building 4.
An extensive stone spread, comprising cobbles and building stones (E04:07, E05:04, F04:03, F05:02, G04:03, G05:03, 05, H04:18, 19, 28, H05:12 J04:05, 06, J05:07, K04:13, K05:07) was present over Building 17, the western part of 18 and the intervening Alley 10. The excavators thought this represented a third distinct phase of deliberately laid road metalling and that it was associated with the demolition of Buildings G, H, and J. The east-west drain along the eastern part of the road was believed to have remained in use at this stage, with occupation also continuing in the buildings on the south side of the street (C, D, E).
The excavators’ interpretation of the rubble spreads as a metalled road level is very much open to question in view of their great extent – covering virtually the entirety of Sites 2 and 3 – and relative lack of wear. Variations were noted in the rubble, but none appear to represent significant functional distinctions. The rubble lies at the interface between the Roman levels and the overlying ploughsoil (E04:03, E05:03, F04:01.3–4, F05:01.5, G04:02, G05:02, H04:01.3, H05:01.3, J04:03, J05:03, K04:02, K05:03), and must instead, in large measure, simply reflect the impact of the ploughing on the later Roman archaeological remains. It is matched by the broad band of similar rubble encountered beneath the ploughsoil (F03:03) in site 4, covering the north-west corner of Building 4 (F03:10) and extending northward across the north intervallum road (as F03:12). The deposits of tumbled angular stone in the alley between Buildings 4 and 5 (E04:15, F04:10, 11, G04:15, H04:24, J04:16, J05:15, K05:22) should likewise be grouped with the overall rubble spread. Only the reference to ‘worn cobbles and shattered flagging’, making up part of deposits H04:24 and J04:16, hint at any kind of surface over the alley, but such an interpretation was largely dismissed in the context record. Furthermore the rubble spread was cut by a series of three broad deep furrows running roughly north-south (west: E05:31, F04:18, F05:27; central: H04:21, H05:16; east: J04:13, 17, J05:15, 23, K04:10), probably resulting from ridge and furrow ploughing, with further loose rubble deposits being encountered at a lower level in the base of the furrows (e.g. central plough furrow: G05:12, H05:04). The rubble was less dense along the southern edge of the excavation site, overlying Building 18 (clay soil and rubble deposit H05:13), and particularly so to the east of Contubernium 4 (‘Building D’) where the clay soil contained relatively little rubble (H05:14, 29, J05:16) and was clearly disturbed with modern pottery and clay pipe recorded in H05:29 and in the dirty black earth layer, H05:21, which underlay H05:14. The reduced density of rubble here may simply be a result of the eastern contubernia of Building 17 having been demolished and their remains entirely removed during the Roman period to be replaced by timber structures such as Building E, which meant there was less stonework present here to be converted into rubble spreads by the action of the plough.
The end of the third-century barracks, whenever that occurred, may have been followed by their demolition and the deposition of a rubble levelling deposit to provide a base for the next phase of construction. It is conceivable that the rubble deposits encountered across the west praetentura may derive from and some way reflect such a levelling deposit, but even so the rubble was without doubt substantially impacted by later ploughing which must have compromised its integrity as a level representing a deliberate structural action undertaken at a particular point in time. It is clearly safer to treat it as plough disturbance and the material associated with it cannot be regarded as securely stratified.
FINDS
North wall
Coin: Antoninus Pius, 152–5 (no. 92, G04:10)
Iron: handle (no. 22, F05:39)
Stone: palette (no. 1, F05:39)
Copper alloy: loops (nos 350, 360)
Stone: whetstone (no. 32)
Quern: (no. 16, F05:07)
Samian stamp: mid to late Antonine (no. S36, E04:10)
Mortarium stamp: 150–70 (no. 28, E04:10)
Mortarium stamp: 120–60 (no. 13, G05:06)
Copper alloy: strip (no. 303, J05:20)
Glass: window (no. 42, G05:06)
Graffiti: (no. 48, G04:16)
Copper alloy: handle (no. 216, G04:16)
Pottery: lamp (no. 10, G04:16), spindlewhorl (no. 32, G04:16)
Quern: (no. 59, G05:17)
Stone: throwing stone (no. 86, F04:19)
Copper alloy: pendant (no. 169, G04:09 – later street surface N of Building 17)
Coin: ‘Elagabalus’, ‘219’ (no. 131, K04:04), illegible, c. 202–35 (no. 262, K04:04)
Bone: shell (no. 57, K04:04)
Coin: Titus and Divus Vespasian, 80–1 (no. 16, G04:19),
Robbing of the street drain or north wall of 18
Decorated samian: 125–45 (no. D54, G05:18)
Samian stamp: 85–110 (no. S145, H05:25)
Quern: (no. 49, H05:25)
Stamped samian: 160–85 (no. S3, H04:18), 150–80 (no. S69, H04:19)
Coins: Vespasian, 69–79 (no. 11, H04:19), Trajan, 98–117 (no. 33, H04:19), Septimius Severus, 202–10 (no. 118, E05:04), Julia Domna, 193–6 (no. 122, H05:12), Magnentius, 350–1 (no. 221, K05:07), Valens, 376–75 (no. 228, J05:07)
Copper alloy: brooches (nos 10, 18, both E05:04), bead (no. 60, H05:12), pendant (no. 170, H04:19), mount (no. 237, E05:04), loop (no. 335, J04:05)
Iron: ringmail (no. 17, J04:05), stud with copper alloy plate (no. 51, E05:04), double spiked loop (no. 69, H04:19), escutcheon (no. 73, H04:19), stud (no. 263, G04:03)
Lead: cramp (no. 7, H04:19), counter? (no. 21, H04:19), weight (no. 22, J04:05)
Glass: inset (no. 6, G04:03), bead (no. 28, G04:03), window (no. 42, J05:07)
Pottery: counter (no. 68, J05:07)
Stone: disc (no. 36, H04:19), throwing stones SF812, WSS167, WSS155, WSS163 (all J04:05), WSS148, WSS169, WSS215 (all J05:07)
Quern: (no. 15, E05:04)
Metalworking debris (no. 5, E05:04)
Clay pipe (E05:04, J04:05)
Decorated samian: 125–40 (no. D36, F04:11)
Coin: illegible (no. 287, G04:15)
Graffito: no. 57, H05:04
Stamped samian: Antonine (no. S117, G05:12)
Glass: counter (no. 9, G05:12),
Coin: Commodus, 190–1 (no. 114, J05:15)
Decorated samian: 125–45 (no. D6)
Stone: throwing stone (no. 34)
Pottery: statuette (no. 2), model lamp (no. 12)
Mortarium stamp: 150–80 (no. 39, H05:13)
Coins: Commodus, 180–92 (no. 113, H05:13), Claudius II?, 268–70 (no. 150, H05:13)
Copper alloy: knob (no. 205, H05:13), mount (no. 235, H05:13)
Copper alloy: bell-shaped stud (no. 272, J05:16)
Pottery: spindlewhorl (no. 16, H05:14)
Graffiti: (no. 37, H05:21)
Glass: window (no. 42, H05:21)
The robber trench for the south wall of Building 5 produced three sherds of BB2 (G05:13, H05:06) and a scrap of late second or first half of the third-century samian (H05:06).
Very little pottery was found in association with the remains of Building 17. Some material including second-century grey ware and Antonine Central Gaulish Samian, plus a coin of Antoninus Pius dated to 152–5, derived from the north wall (G04:10). Three sherds of pottery were recovered from the rubble foundations of the wall between Contubernia 5 and 6 (J05:18) – a third-century south-east reduced ware Gillam 151 rim and two south-east reduced ware body sherds – and a single sherd of south-east reduced ware cooking pot from the possible south wall robber trench at the southern edge of Contubernium 8 (K05:27).
Significantly more pottery was found in Building 18, particularly in the various levels and features associated with Contubernium 1
CONTUBERNIUM 1 (c), PHASE 1 CONSTRUCTION
The make up deposits for Building C produced only about 15 sherds of pottery, almost all of which was BB2 (F05:51–53). The medial partition wall produced a sherd of south-east reduced ware (F05:09).
CONTUBERNIUM 1 (c), OCCUPATION
The initial occupation deposit (F05:38) produced little pottery, but included BB2.
CONTUBERNIUM 1 (C), PHASE 1 SUB-PHASE 2 OCCUPATION/PHASE 2 REMODELLING
The thick deposit of debris (F05:15) overlying the pink clay floor and other Phase 1 levels in Contubernium 1 produced 0.569kg (c. 20 sherds) of pottery, including a third-century Gillam 151 rim and the rim and handle of a countersunk lug-handled jar, probably from Yorkshire (F05:15).
The equivalent deposit along the west edge of the contubernium (F05:17) and sealed beneath Phase 2 wall F05:03 (F05:41) produced little pottery, the majority of which was BB2 and allied fabrics.
CONTUBERNIUM 1 (C), PHASE 2 WALLS
The secondary walls (F05:11, G05:15) produced very little pottery, but included BB2 and a sherd of Antonine samian.
CONTUBERNIUM 1 (C), PHASE 3 STONE PACKING
The stone packing (F05:07, G05:09) produced a few large sherds of Dressel 20 amphora (3.450kg) and 0.614 (c. 25 sherds) of other coarse wares, including some of third-century Nene Valley ware. BB2 and allied fabrics made up approximately 98% of the coarse wares. There was a single sherd of samian, of Antonine date.
CONTUBERNIUM 1 (C), ROBBER TRENCH OF THE PHASE 1 WEST WALL
The pottery from the west wall robber trench included nene Valley ware and a high percentage of BB2 and allied fabrics, as well as a sherd of calcite gritted ware (F05:18).
CONTUBERNIUM 4 (D)
Little pottery was recovered from Contubernium 4. It included a rim, possibly a waster, of a second-century mortarium from secondary stone surface H05:38 and a high proportion of BB2 and allied fabrics from the underlying dark grey layer (H05:39).
PHASE 2 – ‘BUILDING E’ The little pottery recovered from the building derived from the soil makeup (H05:41) beneath secondary (?) stone floor H05:22. Most of the coarse ware was BB2, and there was one sherd of Hadrianic to midantonine samian.
The post hole at the south-west corner of J (G05:39) produced a few sherds of pottery, including a scrap of Hadrianic or Antonine samian, some BB1 cooking pot body sherds and a scrap of BB2.
STREET NORTH OF BUILDING 17 (L)
The rubble road surface north of 17 produced a sizeable group of pottery (G04:23). It contained BB1 with obtuse angle lattice, a Lower Nene Valley mortarium rim of 230–400 and a third- or fourthcentury mortarium body sherd. There was also a Nene Valley ware beaded-rimmed funnel-necked beaker, dating from the late third or fourth century.
The later surface in this area (G04:09) had almost equal quantities of BB1 and BB2, including a BB1 flanged bowl of the late third century.
ALLEY 3
Context J05:15, probably representing Building 4/5 demolition rubble over Alley 3, produced mainly second century material, both locally produced wares from the middle of the century and later BB2, probably residual material from the alley. K05:22, on the other hand, produced a Huntcliff-type rim of the late fourth century or later.
EAST-WEST STREET (ALLEY 10)
The initial surface metalling of the east-west street (E04:10, E05:19, F04:10, 19, F05:25, G04:16, G05:17) produced three East Gaulish vessels of the late second or first half of the third century (E04:10, E05:19, F04:19, G04:16), four third-century Gillam 151 rims (F04:10, 19, G04:16, G05:17), a sherd of Campanian amphora (E04:10), a body sherd of third or fourth century Mancetter-Hartshill mortarium (E04:10) and the base of a Crambeck mortarium of the late third century or later (G04:16).
Most of the coarse wares from the Phase 2 street surface (F04:23, F05:06, G05:06, H05:27) were BB2 and allied fabrics. There were also four sherds of mid- to late Antonine samian.
The large group of pottery from the rubble/cobble spread over the alley produced four sherds of late second or first half of the third century samian sherds, three third-century Gillam 151 rims and large quantities of BB2 and allied fabrics. Context G04:03 also included some later third or fourth century material, with flanged bowls in Crambeck reduced ware and an unidentified reduced ware, and a proto-Huntcliff calcite-gritted ware rim.
The tumble produced a large quantity of pottery, with a lot of BB1 and a smaller quantity of BB2 and allied fabrics (F04:11). Although there was no Crambeck reduced ware, there were a few sherds of late third century gritty grey ware and two sherds of calcite-gritted ware, although the one Huntcliff-type rim is presumably contamination.
RUBBLE IN ALLEY 3
The rubble in the former alley between Buildings 4 and 5 (H04:24) contained third-century material, with BB1 and allied fabrics and sherds of an indented Nene Valley beaker.
RUBBLE OVER BUILDINGS
The loam/rubble over Building 4 (J04:05) produced a number of sherds of Crambeck reduced ware of the late third century or later, and a Nene Valley bead rim in the orange fabric more typical of the fourth century.
ROBBER TRENCH
The robber trench of the south wall of Building 4 (K04:14) produced only seven sherds of pottery, including a body sherd of third or fourth century Lower Nene Valley mortarium, and a Huntcliff-type rim of 370+.
STONE SPREAD
Context H05:12 produced over 100 sherds of pottery (3.77kg excluding samian), which included some residual material, such as sherds from six second century mortaria. Material that could be dated to the late third century or later made up approximately 10% of the coarse wares. There was one sherd from a possible late fourth century Crambeck parchment ware vessel, but it was in poor state.
RUBBLE OVER BUILDINGS (SURFACE??)
Material dating to the late third century and later made up about 22% of the coarse wares in context J05:07; three Huntcliff-type rims and a Crambeck parchment ware vessel indicate a date after 370+. Context K05:07 had a Nene Valley ware colour coated flanged bowl, a Huntcliff-type rim and a painted Crambeck parchment ware Corder type 9, also indicating a date after 370, plus a coin of Magnentius (350–51).
COBBLE SURFACE NORTH OF 18 CONTUBERNIUM 1 (C)
Although this produced over 50 sherds of pottery, much of this was BB2 and allied fabrics, and there was only one sherd of a later third century or later Crambeck reduced ware flanged bowl (G05:12).
DERELICTION?
The assemblage in J05:16 consisted of over 25 sherds, but included only one sherd of Crambeck reduced ware and two of calcite-gritted ware, although one of these was a Huntcliff-type rim.
Aspects of the third-century infantry barracks
It is an unfortunate consequence of the position of Buddle Street that the Daniels excavations were unable to reveal a complete barrack block belonging to this period. The road covered the frontages of both of the barracks blocks – 2 and 3 – in the better preserved, eastern part of the fort, whilst Building 1, which provided the best evidence relating to the second-century infantry barracks, was converted into a stable at this stage. The equivalent buildings in the western praetentura probably took a similar form, but their preservation was so patchy that they can only be restored by analogy with blocks on the other side of the via praetoria (Fig. 14.34). They were however clearly built on different footprints from the Period 2 barracks unlike those in the eastern praetentura which adapted the pre-existing structures.
The distinguishing feature of these barracks by comparison with their second-century counterparts is the use of stone walls to form the internal partitions separating the contubernia and dividing the latter into front and rear rooms. This increased use of stone is not necessarily a third-century trend. Barracks incorporating stone internal partitions were already in existence at many other sites, as noted previously, whilst contemporary infantry blocks at South Shields retain timber internal partitions throughout the life of the third-century supply base (Periods 5 and 6: c. 210–286/312). It is not until the Period 7 rebuild dated to 286/312 that the barracks there feature stone partitions (Hodgson and Bidwell 2004). However, the third-century infantry barracks at Wallsend, like their third and fourth-century counterparts at South Shields, retain simple rectangular plan form of their second-century predecessors, with no trace of the attached colonnaded verandahs which were a common element of barrack blocks further west (Fig. 14.35). Again this would appear to reflect localised regimental tradition rather than contemporary fashion. The third-century (Period 3) rebuild of the barracks in the north-west quadrant at Birdoswald retained the L-shaped form of the previous secondcentury barracks, although the officer’s house was now detached from the contubernia and a wall was erected along the edge of the verandah of one of the barracks, probably a low stylobate wall supporting the columns or posts of the verandah (Wilmott et al 2009, 227–36).
Where they survived (in Building 2 Contubernium 7, Building 18, Contubernia 1–2), the partitions separating the front and rear rooms of their respective contubernia took the form of simple cross walls like those in use in infantry barracks at Housesteads and Birdoswald. There was no indication that any of these cross walls were attached to a side passage wall in an L-shaped arrangement, like that prevailing in the fourthcentury barracks at South Shields (Bidwell and Speak 1994, 35; Hodgson and Bidwell 2004, 131, fig 7, no 9), which replicated the layout of the timber partitions in the third-century barracks at that site (ibid., 125–8, figs 2–4, nos 3–4) or the second-century infantry barracks at Wallsend. So little survived of the front rooms that it is impossible to be certain whether or not they were furnished with timber partitions to divide a passage off from the front room, but none was traced, where part of that room was exposed, as in Building 2 Contubernium 7, for example. Curiously, a possible partition or screen was noted in the rear room of that same contubernium, apparently defining a passage along the side of that room with access to the main area of the room being gained at the far end. This may have functioned in association with a hearth next to the doorway into the room, perhaps screening it.
Figure 14.35: Third-century infantry barracks: 1. Birdoswald (after Wilmott et al 2009), 2. South Shields Barracks II and III c. AD 225/35–300 (after Hodgson and Bidwell 2003), 3. Vindolanda (after Bidwell 1985), 4. South Shields Period 7 barrack c. AD 286/312–c. 350 (after Hodgson and Bidwell 2003). Scale 1:400.
If the use of stone walling – internal as well as external – was the distinguishing characteristic of this phase of barracks the question remains as to what this actually signified in practice. The generally accepted view has been that Roman barracks were actually constructed with sill walls supporting a timber-framed superstructure. The discovery of the collapsed front wall belonging one of the third-century barracks at South Shields (dated 225/235–286/312) has prompted Hodgson and Bidwell to review this issue (2004, 144–5, fig 11). They argue convincingly that many of the phases of barrack examined at South Shields and Wallsend were probably constructed with external walls, at least, which were built entirely of stone. Of course, even if the external walls were carried up in stone to their full height, the internal partitions may have been built of timber and wattleand-daub panelling above stone wall footings, which would have increased the available interior space by comparison with comparable full height stone partitions. In Building 17, the former north wall of Building 5 would appear to have been used as a longitudinal spine wall and in this case it is quite likely that the wall was demolished down to its footings and then used as a base for timber cross-wall superstructures separating the front and rear rooms of the contubernia. However there is no certainty that this was always the case. Stone partitions had compensatory benefits, being more fire proof, for example, a significant factor when hearths were set right against the internal walls.
As regards hearths, few were identified in the four barracks. In Building 18 two successive stone-flagged and clay hearths, associated with ashy deposits, were placed midway along the north wall of Contubernium 1, whilst another possible example was found in the north-east corner of Contubernium 4, in the form of a flagstone over an ashy spread. Only one hearth was revealed in Building 2, located in the rear room of Contubernium 7, at the end of the partition cross wall next to the doorway between the two rooms. The latter matches the positioning of many of the hearths in the third-century barracks at South Shields (ibid., 140).
One of the most important questions concerning the third-century blocks at Wallsend is the number of contubernia they contained. This is surprisingly difficult to establish, the evidence being somewhat contradictory, but it was clearly less than the nine found in the second-century blocks. Neither Building 2 nor 3 could be examined in its full length, as a result of the oblique course of Buddle Street, and all trace of the barrack frontages has been lost. The clearest picture is presented by Building 2, where traces of five partition walls were recognised and a fairly uniform spacing can be restored. Assuming the officer’s quarters – entirely obscured by Buddle Street – occupied the same area as its equivalent in Building 3 and the Period 2 Building 1, eight contuberniumsized suites could be fitted into the available space with one next to the officer’s house perhaps being rather wider (c. 5m wide internally) and the end unit narrower (3.20m) than the remainder, which ranged in width internally between an estimated 3.30m and 4.20m, with most c. 3.40–3.60m. A similar number of contubernia could be restored in the case of Building 18, although only three contubernia were partially uncovered there. The fragmentary remains of Building 17 could also be compatible with that figure, but in that case the evidence is even more tenuous. Most problematic, however, is Building 3 where the position of the sole surviving contubernium wall does not correlate with any of those plotted towards the east end of Building 2. If the wall formed part of a fairly uniform spacing the block would contain only five large contubernia. With only one such wall remaining there is no guarantee this was the case, however. The first contubernium or suite may have been abnormally large, or perhaps there was an exceptionally narrow chamber then a normal width contubernium, the two separated by a wall which has not survived. In the rest of the block, beyond the existing partition, there was room for six contubernia of average internal width (c. 3.40–3.60m) with a half width to spare, but seven 3.30m wide suites could have fitted neatly into the available length. What is clear in this barrack is that the officer’s quarters did take up the anticipated proportion of the block, being some 11.60m in overall length (10.50 internally) divided into two unevenly sized rooms by a stone wall. This is of relevance to any restoration of the arrangements in Building 2, as noted above.
A reduction in the number of contubernia per barrack can be observed elsewhere, implying its occurrence at Wallsend is a real phenomenon and not simply a problem of interpretation caused by the inferior preservation there. At South Shields the number of contubernia in each block decreased to five from 225/235 onwards. These Period 6 barracks, which were excavated in the east quadrant of the fort, replaced a early third-century layout of six half barracks arranged in pairs to form three complete barracks are much shorter than normal blocks, perhaps in part because of the confined area they were occupying to the south of the supply base granaries (Hodgson and Bidwell 2004, 125–7). However the reduced complement of five contubernia was maintained in the fourth-century Period 7 barracks, even though these blocks are full length. The best-preserved example can be seen to have contained a large undivided room next to the officer’s quarters and a smaller room at the opposite end again devoid of internal partitioning. The large room housed a stoking pit serving the channelled hypocaust in the adjoining officer’s house and a hearth for ironworking and probably functioned as a workshop (ibid., 131–2). The small room at the other end of the block may be comparable with the equivalent end room in Building 2, which was furnished with a flagged floor, extending across the entire chamber, and also lacked any trace of internal subdivision. At 3.20m wide internally (but later reduced to c. 2.70m), the end room in Building 2, like its counterpart at South Shields, was slightly narrower than the contubernia in the rest of the block and this together with the lack of a partition dividing it into front and rear rooms suggests it may have performed a specialised function within the block, such as storage. This would further reduce the number of proper contubernia, designed to accommodate troops, down to a maximum of seven in the case of Building 2. There is as yet no definite evidence at Wallsend for the presence of a workshop and service room next to the centurion’s house and these were not a feature of the third-century barracks at South Shields either.
Grid squares: K04, K05, L04, L05, N04, N05
Most of the stratigraphic evidence for the late Roman period in the praetentura had been removed by medieval ploughing and colliery-related activity, but traces of structures belonging to this period did survive in one area. Overlying the demolished remains of the third-century stable block (Building 1 Phase 2), in the north-east corner of the fort, were the very fragmentary remains of a completely separate group of structures, recorded in the 1975–6 site notebooks (Fig. 14.36). These were initially interpreted as late Roman features (labelled Building A), then reinterpreted as colliery period features. Crucially, however, they were overlain by a deep ploughsoil deposit which covered this part of the fort and which must relate to the prolonged medieval and earlymodern agricultural cultivation carried out over the site. The ploughsoil took the form of a heavy clay loam (K04:02, K05:03, L04:03, L05:03), greybrown in colour and ranging in depth from 0.10m to 0.25m. The underlying series of walls probably do therefore represent the remnants of a late third- or fourth-century structural phase after all, rather than colliery-period features. These remains for the most part followed broadly the same orientations and alignments as the earlier Roman buildings, implying that the previous building plots were still in use when the new structures were erected. However the surviving walls were too few and too widely dispersed to enable any coherent pattern of a barrack block or chalet range to be discerned.
These structures appeared to be associated with the late road surface on the via praetoria (K04:04, K05:14) which, like the surviving walling, was covered by the post-Roman ploughsoil.
Four stretches of walling were identified, each aligned roughly north-south and surviving no more than a single course in height (see Fig. 14.37). The most westerly of these (K05:17, L04:12) was c. 7.0m in length and was composed of very large, roughly-faced blocks which may have been reused. It was located just beyond the west end of the former Building 1 and was lined on its west side by a stone-faced drain or gutter, again one course deep, which was traced over a distance of 15m along the east edge of the via praetoria. The gutter made a 90 degree turn towards the east (L04:23) at the north end of the wall, suggesting this represented the northern limit of any building associated with the wall, but there was no firm evidence for any walling running alongside this stretch of guttering, which extended for a further 5.0m. Although the alignment of the new wall did not correspond exactly with that of the west gable wall of Building 1, the two were broadly similar and K05:17/L04:12 could therefore represent the end wall of a building or range of buildings occupying broadly the same plot as the earlier Building 1 (see Fig. 14.38).
A much shorter stretch (L05:11), no more than 1.0m long and 0.40m wide, survived some 12m to the southeast of K05:17/L04:12. It sat on a layer of loose, dark grey-blue loam which in turn extended westward over the line of the robbed out wall (L05:49) which had separated Contubernia 7 and 8 of the previous Building 2, implying that particular partition wall had been robbed out at some point prior to the erection of the later Roman structures. No detailed plan exists for the third of these walls (M04:15, M05:20), apart from its northern end, though its approximate position can be estimated. The fourth and final stretch of walling (N05:10) was more substantial at 7.0m long and 1.0m wide, and was located 24.0m to the east of west wall, K05:17/L04:12. The easternmost wall comprised large, roughly faced blocks with a rubble core (Figs 14.39, 14.40). A dark earth layer (N05:20) formed a matrix between and beneath the wall’s stones.
The orientation of these different structures is not identical. The short stretch of walling, L05:11, followed virtually the same orientation as wall and drain K05:17/L04:12. These features did not quite run parallel to the easternmost wall (N05:10), but their respective orientations were sufficiently similar to suggest that all three walls may have formed part of the same structural phase. However wall M04:15/ M05:20 followed a very different alignment and extended across the intervallum road, implying that it belonged to a later phase of activity. Moreover the crucial relationship of this last wall to the post-Roman ploughsoil is not defined in the relevant site notebooks so this feature could conceivably represent a colliery period feature, as supposed by the excavators.
FINDS
Mortarium stamp: 155–180 (no. 26, N05:10)
Figure 14.36: Late structures in the north-east part of the fort shown in relation to the earlier buildings. Scale 1:400.
Lots of Roman objects, plus Charles I coin and clay pipe.
PLOUGHSOIL L05:03 (ROMAN FINDS)
Coin: Constans
Iron hobnail
Pottery counters
Two glass beads, one (no. 25) of ‘late Roman’ date
Copper alloy loop, terret
Window, bottle, cup glass
Decorated samian
Amphora stamp
Mortarium stamp
Quern
(POST MEDIEVAL FINDS (AS KEPT))
Coin: Charles I, 1625–49
Bone button, C18 or later
Clay pipe bowl, C18 or C19
The only pottery associated with the walls came from the soil under and between the stones of the eastern section of north-south wall (N05:20). This produced 0.3kg of pottery, of third-century material, with only a single flanged bowl probably dating to after 270. The possibly later wall M04:15/M05:20, produced only a few sherds of undiagnostic pottery (0:019kg).
Two contexts from the post Roman ploughsoil produced pottery of third century date, although nothing certainly of the late third century (K04:02, L04:03). The only context to produce fourth-century material, including a coin of Constans dated 346–8 (cat. no. 196) and a late fourth-century Crambeck mortarium, was L05:03, which also produced postmedieval material.
A new surface of small cobble rubble (K05:15) was present over the east side of the via praetoria. This overlapped the remains of the west wall of Building 2, and merged with the demolition rubble which extended eastward over the building (L05:07, 25). In these areas it included broken fragments of stone and flagging from the demolition. However no clear distinction between the cobble/rubble over the via praetoria and the demolition rubble overlying the building was defined leading the excavator to suppose that the road had been widened by 3.50m, extending over the area of the westernmost contubernium of Building 2 (8). This was regarded as contemporary with the occupation of Shacks B, K and M over the remainder of Building 2 (which, as argued above, actually just represent the latest occupation levels in that building). The same widening of the via praetoria was also suggested in relation to the final phases of Building 16, which was interpreted as having been reduced in length to accommodate the broader road. However a layer of cobbles and rubble, very similar in character to K05:15 etc., was also present along the west side of the via praetoria (K05:07) and extended without any evident differentiation over the area of Buildings 4 and 5 in the north-west part of the praetentura (as K05:07, K04:13, J05:07, J04:05, 06, H04:18, 19). A very similar rubble level (L04:11, L05:32) was found over the drain (L04:27, L05:52) immediately west of Building 1 and extended eastwards across the demolished remains of Building 1, as described above. The cobble and rubble layers on either side of the via praetoria were separated by a cobbled road surface (K04:04, K05:14), c. 3.5m wide, composed of medium sized cobbles, which ran down the centre of the earlier via praetoria, leading from the north gateway. This road surface was interpreted as a cobbled track of eighteenth- or nineteenth-century date by the excavators. However, it underlay the thick clay-loam deposit which extended across the entire site and which, as noted above, is most plausibly interpreted as the agricultural soil associated with the post-Roman use of the fort as arable and meadowland. Furthermore, no road, lane or track can be identified on the line of the via praetoria on any of the eighteenthor nineteenth-century historic maps. Road surface K04:04/K05:14 was, therefore, probably the latest roman road level laid over the demolition rubble in the north part of the fort.
Figure 14.38: The north-west corner of Building 1 showing the later north-south wall (L04:12) and east-west gutter and possible walls (L04:23), looking east.
Figure 14.40: Central section of Building 1 viewed from Simpson’s Hotel in 1975. Late wall N05:10 can be seen in the centre of the photograph.
One problem with this reinterpretation is that further to the north, where it passed through the north gateway, the via praetoria cobbling appeared to extend over the area of the gate’s east guardtower (see below: north gate). This relationship is not certain – the cobbling over the tower remains is separated by 1920s excavation trenches from that in the passageway, which is definitely associated with the late road. However, the two cobbled layers do lie at the same level and have very similar characteristics. If they are equivalent this would imply that the road is either post-Roman (medieval?) or that the east tower went out of use and was raised to the ground during the later Roman period, before this phase of the via praetoria was laid.
At any rate, whether or not K04:04/K05:14 does represent a late Roman road surface, there is no evidence that the via praetoria was widened at any stage nor that the buildings in the north-east part of the fort were reduced in length. Indeed position of the stone-lined drain or gutter (K05:17), which extended along the east side of the via praetoria carriageway and was closely associated with the west wall of ‘Building a’ (L04:12), suggests the carriageway was slightly narrower in this phase. A 2.0m length of similar stone kerbing (K05:18) was identified on the west side of the via praetoria and might form part of a corresponding gutter on that side of the road.
This consisted of large areas of irregular cobbles (L04:07, P04:02, P05:11, Q04:11, Q05:13) and stone fragments, presumably from the demolition of Building 1. Although this surface was badly disturbed by post-Roman activity and did not show the kind of wear encountered on the earlier roads, it did appear to be a consistent, well packed, deliberately laid surface. The north side of the road ran up to the face of the new kerb (N04:02, P04:03) of the rampart and to the south extended over the former verandah of Building 1. The south edge was not clearly defined as the road merged with the general spread of demolition material.
General demolition material including clay and fragments of flagging (Q05:04) were found in and over the street drain east of Building 1, but there was no evidence of a Phase 3 re-surfacing of the type which occurred over the north intervallum street. The Phase 2 surface must have continued in use.
FINDS
Coin: M. Antonius, 32–1 BC (no. 3, P04:02)
Metalworking debris: casting waste (no. 8, P04:02)
Copper alloy: tripod support (no. 84, Q05:04)
Most of the pottery came from context P04:02. The high proportion of BB2 and allied fabrics (approximately two-thirds) suggest a date round the middle of the third century.
Context Q04:02 contained a possible late third-century Crambeck reduced ware flanged bowl and some sherds of calcite-gritted ware, but most of the coarse wares were made up of BB1 and BB2.