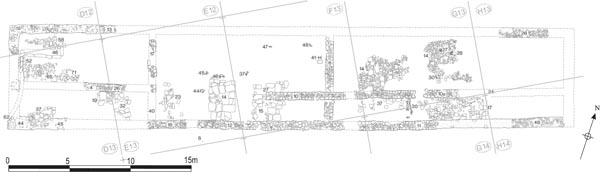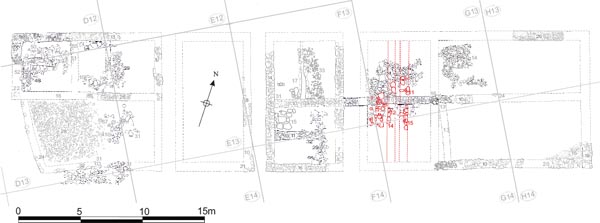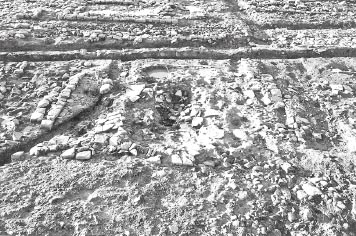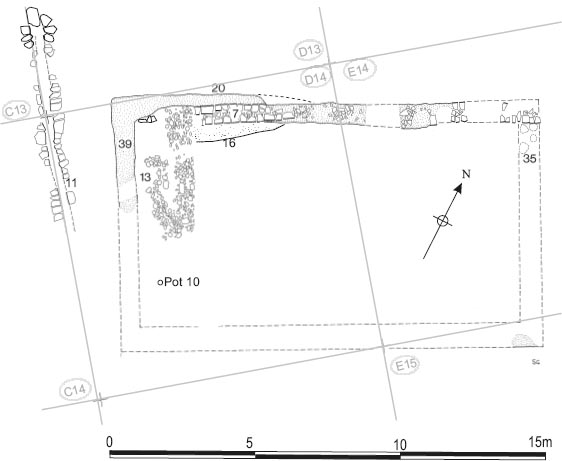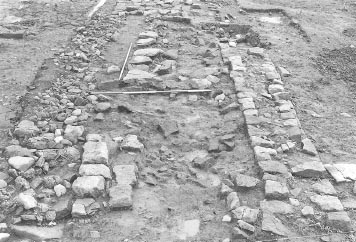
Figure 16.01: Building 9, Daniels Phase 2a, initial interpretation at 1:200.
The four stable-barrack blocks in the retentura were all rebuilt at some point, probably in the second quarter of the third century (Period 4). The new barracks took a markedly different form from their predecessors, comprising ranges of freestanding structures, which for convenience are labelled chalets. However, the basic characteristics of the block were not so different from their predecessors as first appearances might suggest, implying a broadly similar function. Most significantly, the survival of drains in the front of several chalet-contubernia implies these were still barracks intended to house cavalry turmae. An officer’s house was also still found at outer end of each range, next to the east or west intervallum road, as was the case in the earlier barrack blocks, but the number of contubernia does appear to have been reduced to five or six in each range.
This chapter includes detailed description and analysis of the 1978–9 Daniels excavation data relating to the four later barracks, which was more extensive and informative than that surviving when Chalet Ranges 9 and 12 were re-examined in 1997–8. It includes full discussion of the interpretive schema proposed by Daniels and TWM. The improved conceptual understanding of these buildings as cavalry barracks, which has resulted from the more recent work, is applied to the detailed evidence of the Daniels excavations, and, where these appear to conflict, revised interpretations of the barrack layout are presented, which can be more easily reconciled with the excavation data.
Grid squares: D12, D13, D14, E13, E14, F13, F14, G13, G14, H13, H14
Daniels considered that Building 9 underwent a further phase of modification, prior to its replacement by a row of free-standing chalets (Chalet Range 9 comprising Chalets U, V, W and AK) in Fort Phase 3. Under Daniels scheme, which was unaware of the primary timber barrack phase, this represented the second overall phase of the structure – Building 9 Phase 2 – and was assigned a third-century date, corresponding with his Fort Phase 2. The defining feature of this phase is the construction of a long cross-wall (F13:10, G13:10) running through the eastern half of the building. Over the course of the 1978 excavation and subsequent post-excavation analysis two divergent hypotheses were developed to explain this enigmatic structure. Subsequent reexcavation by Tyne and Wear Museums in 1997–8 has substantially clarified the function of the cross wall, integrating it into the layout of the chalet range. However, the resultant plan possesses a number of anomalous characteristics by comparison with other chalet barrack plans, which suggest the significance of Chalet Range 9 and its medial wall as evidence for changing ideas regarding the preferred form of barrack layouts has not hitherto been fully appreciated.
Initially, the medial wall was seen as part of a modification to the barracks reducing the number of contubernia in the central portion of the block from four to two and providing a corridor in front of the main rooms of the enlarged contubernia. The two contubernia were defined by surviving partitions F13:38 (west end), and G13:32 (east end) and possibly a north-south stone dividing wall, F13:06. The latter wall apparently separated the two contubernia from one another (with Phase 1 partition F13:54 immediately to the west going out of use), but also divided the front corridor in two, although the incongruity of this arrangement was recognised. Gaps between the timber partitions and the east and west ends of the cross wall were thought to represent doorways giving access from the contubernia into the new corridor. The flagged floors laid during earlier phases in the southern half of the contubernia were retained in use, as were some of the timber partitions, notably the pair separating Contubernia 1, 2 and 3 (E13:37, F13:38). This scheme restored two contubernia west of the central rooms and, tentatively, three contubernia east of them, but the east end of the building was so badly damaged that the arrangements here were regarded as obscure. Moreover the stratigraphic evidence for the layout as a whole was acknowledged to be somewhat problematic. A second structural sub-phase (2.2 or 2b) was envisaged involving the extension of the medial wall to the east end of the building and the removal of the partitions at that end. The extension (G13:10a and foundation/robber trench H13:24, H14:37?) was recorded as being of rougher construction than the original length. Flags G13–14/37, north and south of the cross wall, were assigned to this sub phase. A further sub-phase (2.3 or 2c) was postulated on the basis of a series of post holes (E13:37, 44–46, F13:47–48, G13:27–30) thought to represent the screening off of areas within the rooms and presumably replacing the earlier partitions.
A reassessment of Phase 2 was prompted by the recognition that cross wall F13–10 almost lines up with the medial wall, D13:04, constructed across the officer’s quarters at some stage (see above). It was suggested that this medial wall might have been designed from the outset to serve along with cross wall F13:10/G13:10 as the south wall of the building, rather than forming a medial east-west partition, with the whole building being foreshortened on the south side, possibly to function as a stable, paralleling the change which takes place in Building 1 in Phase 2. Although the interim structural report stated that the stratigraphic evidence in Building 9 did not support this interpretation (but without any further explanation), it was ultimately adopted as the favoured version, incorporated in interim summary reports (cf. Daniels 1989, 79–80), in the context phasing and depicted amongst the most recent series of inked plans, catalogued when post-excavation analysis resumed in 1997–8. As reconstructed, the building comprised a long, narrow, open room, measuring 33.10m by 4.10m–4.50m internally and stretching the full length of the former contubernia. The room was somewhat irregular, being wider in the middle (5.85m externally) than at either end (5.40m–5.50m). Only the area of the former officer’s quarters at the west end remained separated from the rest of the building. The main room was floored with a flagged surface (G13:20), observed towards the east end of the building. Two flagstone and clay hearths were recorded in this area (G13:21, 22). The flagging was covered by yellow, sandy clay (G13:19), interpreted as an occupation deposit or conceivably a later makeup layer. An overlying floor of mixed cobbles and flags (G13:14) presumably marked a later sub-phase, similar flagging being present immediately outside the building on the south side (G13:37). Two rows of post holes (E13:37, 45–46, F13:47–48, G13:27–30), inset roughly 1.00m from the main longitudinal walls, were also attributed to this phase rather than the preceding barrack, giving the structure the apparent form of an aisled hall in its latest phase. No internal drains were identified in association with Phase 2, however, though these would have been expected if the excavator’s interpretation of the building’s function as a stable was correct.
Both Daniels’ hypotheses contained serious flaws. The initial scheme was actually an assortment of features from different phases and the resultant layout had no clear parallels. It was ultimately rejected by the excavators themselves. The alternative ‘stable’ was a more coherent structure, this interpretation being based on the better preserved Building 1 Phase 2. However, the two surviving stretches of its suggested south wall, D13:04 at the west end of the building and F13:10/G13:10 to the east, clearly do not line up particularly well implying these were separate structures rather than fragments of a single feature. Indeed the west end of the building seems to have served as officer’s quarters in both the stone barrack and chalet range phases with no evident interruption in function. Many of the other features attributed to Daniel’s stable, such as the flagstone and clay hearths (G13:21, 22), the lower flagging (G13:20) and even the post settings (G13:27–30), fit comfortably into the internal layout of the contubernia at the east end of the stone barrack (see above Building 9 Phase 2). The remaining elements such as the long wall, F13:10/ G13:10, and the cobble and flagstone floor (G13:14) can be allocated to the succeeding chalet phase, effectively eliminating Daniels’ Phase 2 building altogether.
This was essentially the interpretation presented by Tyne and Wear Museums following re-excavation of Building 9 in 1997–8 (Hodgson 2003, 91–121). Wall F13:10/G13:10 was examined detail and reinterpreted as an integral part of Daniels chalet range, a spine wall running through much of the length of an enlarged barrack range. This remodelling was assigned to Period 4 beginning in c. 225–235 and extending up to the late third or early fourth century. As reenvisaged, the Period 4 barrack was widened and reorientated to face north, rather than south as before. It was composed of five enlarged contubernia, with the officer’s house located at the west end of the range, as previously. The spine wall formed a medial partition separating the front and back rooms in the four easternmost contubernia. Three of these, which occupied the same area as Daniels’ Building AK and an undesignated chalet here labelled ET1, were restored as adjoining contubernia numbered 1–3, whilst the fourth contubernium, located in the centre of the range and equivalent to Daniels’ Building U, was a freestanding structure of typical chalet form save that it was connected to the remainder of the range by the spine wall. The remaining contubernium (5, equivalent to Daniels’ Chalet V) was entirely freestanding. The officer’s quarters at the west end of the range was also remodelled and now probably faced westwards.
The 1997–8 excavations resulted in a much improved understanding of the third-century arrangements in Building 9. Daniels’ Phase 2 has essentially been eliminated, key elements being combined with the chalet phase layout (Daniels’ overall Phase 3, dated to c. 300, but now shifted considerably earlier to correspond to TWM Period 4). This interpretation is largely followed here. Where the Daniels’ excavation record suggests an alternative interpretation this is highlighted below.
Owing to later disturbance there was considerable variation in the degree to which the remains of this phase survived. However sufficient remained to show that the extent of the reconstruction undergone by Building 9 in this phase was substantial. The east wall was retained and the north wall may conceivably have been, though this is by no means certain as very little of it has survived and the contubernia, or ‘chalets’, may have been timber-fronted along this side. There was also a degree of continuity in the arrangements in the officer’s quarters. In contrast the south wall, which had previously formed the barrack’s frontage, was demolished and the building extended over the street to the south, increasing the width of the building, perhaps to well over 9.00m internally. This enlargement reduced the street between Buildings 9 and 10 to a narrow alley, no more than 1.10m in width, and must therefore have been associated with a reorientation of the barrack range to face northwards onto the via quintana. A wall was built down the approximate centreline of this widened building extending for a distance of 24.60m from the eastern end into the middle of the range. It did not however continue for the full length of Building 9. The east-west aligned partition wall in the officer’s quarters (D13:04, E13:26) was treated as part of the same wall in the Daniels revised Phase 2 scheme and as a contemporary and related structural component in the 1997–8 interpretation. However, the evidence of the Daniels excavation record would suggest that this was erected as part of the earlier Period 2/3 officer’s quarters. Where it did exist the spine wall divided the barrack contubernia into front and back rooms. The wall was studied in detail in 1997–8 and was shown to have been built in discrete sections which displayed slight structural variations (Hodgson 2003, 92), a not uncommon feature of Roman barrack construction. The 1978 excavators had noted the same point, though in a less thorough fashion. The context number G13:10a was used to distinguish the surviving fragment of the wall in the easternmost pair of contubernia, which displayed rougher construction using ‘inadequately squared off stones’, from the stretch further west (G13:10) in the same grid square, which was faced with care. The excavators suggested that G13:10a might be a later addition, but there is no need to accept this supposition.
The layout comprised five contubernia and an officer’s house. The three contubernia in the centre of the range (1978 Buildings ET, U and V; 1997–8: Contubernia 3–5), certainly faced north on to the via quintana and measured externally up to 11.30m north-south by 6.20m east-west. V and U were essentially freestanding structures separated from each other and the remainder of the range by alleys, U being connected to the contubernia to the east only by the spine wall which partitioned it into two rooms. At the east end of the range, arrangements were more obscure due to the greater degree of post-Roman destruction here. Daniels considered that ET was another freestanding contubernium, or ‘chalet’, independent of the remaining contubernia to the east, whereas the 1997–8 excavators argued that ET/Contubernium 3 adjoined them, forming a block of three contubernia (1–3), all of which faced north. Daniels, on the other hand, envisaged the two easternmost contubernia (which he labelled Building AK) as a conjoining pair that faced eastwards on to the via decumana, being separated by the spine wall (G13:10a, foundation/robber trench H13:24) rather than by a north-south aligned partition wall.
The evidence is examined in detail below, the suggested partitions being represented by fragmentary remains of possible walling and robber trenching. However the spread of rubble representing the south wall did appear to extend right up to ET/Contubernium 3, implying that the three eastern contubernia did indeed form a single block. At the western end of the range, the officer’s house (labelled Building W by Daniels) was remodelled internally, but retained many structural elements from the previous phase including the north and east walls, the latter having previously functioned as the partition wall separating the house from the contubernia in the Period 2/3 barrack. The remodelled building may have been L-shaped in plan, with a stone walled, cobbled yard occupying the remaining south-west corner. These quarters appear to have faced westward onto the intervallum road and probably continued to perform the same function as their Period 2/3 predecessor.
Thus the building had a peculiar hybrid layout incorporating elements of a traditional barrack with what appeared to be adjoining contubernia at the east end of the range, and two structurally independent, or largely independent ‘chalet’ contubernia in the centre. The spine wall not only ran through the three adjoining contubernia, but also one of the otherwise freestanding chalets. Nevertheless there were elements of pronounced regularity in the range, nowhere more evident than in the standard module size apparently adopted for at least some of the contubernia. The exemplar for this was provided by the best preserved chalet, U (Figs 16.05, 16.06). This was the only case where substantial lengths of both the east and west side walls were reasonably preserved, providing clear evidence for the width of the contubernium, at 6.20m externally (4.80m internally). Much of the south wall remained, but no trace of the north wall survived. If the latter existed it may be assumed to have lain on the same line as the stone north wall of Building 9 and like that structure to have been removed by modern drain trenches. However it quite possible that the chalet was open-fronted like the examples at Housesteads, Vindolanda and elsewhere, in which case the north end may simply have been closed off by some form of timber shuttering.
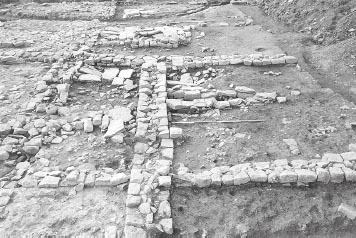
Figure 16.05: Range 9, Chalet U from the north with the central drain and both east and west walls visible and the west wall of ET just in shot on left.
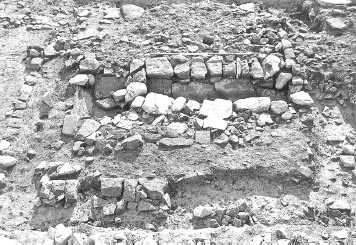
Figure 16.06: Chalet U from the east. Note the earlier south wall of Building 9 (left) probably incorporated in the floor along with flagging, but perhaps still used here as a room divider.
The alley separating Chalet U from the east wall of Chalet V (E13:08), which, crucially, also survived, was 1.30m wide. The west wall of Chalet V did not survive, but, if the same dimensions are applied to the width of Chalet V and the alley to its west as held true for Chalet U and the intervening alley, we arrive precisely at north-south wall E:13:17, which had formed the dividing wall separating the officer’s quarters and the contubernia in the Building 9 Phase 2, and was retained as the east wall of Chalet W. Similarly the surviving east face of Chalet ET’s west wall (no Daniels’ context no. assigned) was found to be in precisely the correct position, assuming the same alley width of 1.30m and a wall width of approximately 0.65m. The east wall of Chalet ET had largely been robbed out, but its position can be determined by the point where the robbed wall crossed the earlier spine wall F13:10. A few facing stones of the wall (G13:16) survived at this point, just sufficient to show clearly that the chalet wall intersected with the spine wall. The internal width of this contubernium was again 4.80m, the same as that of U. The chalet east wall again occupied the precise line which would be expected, assuming a standard chalet width of c. 6.20m.
The two remaining contubernia (1–2/AK) to the east cannot be fitted so readily into this standard size format, whether they were orientated facing north as suggested by the 1997–8 excavators or east onto the via decumana, and whichever of the possible wall lines in this area is valid. It is clear that this part of the building was laid out according to slightly different principles, although there seems no reason to doubt the essential point that it accommodated two contubernia of broadly similar size to those in the rest of the range.
In the following detailed descriptions the Daniels codes are used with the TWM contubernium designations in brackets.
The officer’s house was remodelled internally, but much of the basic structure was retained from the previous phase of Barrack 9. The north range was largely preserved including the pre-existing north wall (D12:46, E12:13), part of west wall and the east wall (E13:17), which was probably extended to the south. The east-west medial partition wall (D13:04, E13:26) also remained in use as the south wall of this range. The east end of the building may have extended southwards incorporating another room as a southeast wing, perhaps giving the building an L-shaped plan, whilst the south-west corner was occupied by a cobbled yard.
Figure 16.07: General view of chalet phase (Period 4) levels in the decurion’s quarters (W and AB) of Range 9 and 10, viewed from the south.
Figure 16.08: The shortened urine pit in the decurion’s quarters (Chalet W) of Chalet Range 9, viewed from the north.
Figure 16.09: Flagged access and cobbled yard south of Range 9 decurion’s quarters (Chalet W) extending towards the north wall of Range 10 (AK), looking west.
The north range was divided into three rooms. In the western room, which measured 4.00m by 4.00m internally, the urine sump (D12:49, D13:46) continued in use, but was reduced in length to 2.35m and narrowed to a width of 0.60m (Fig. 16.08). The outlet drain (D13:52/53) was also taken out of use and backfilled (D13:69). The side walls of the sump were raised by the addition of an extra course of stone blocks, bring the top of the sump up to the level of a new stone floor (D12:50, D13:39, 48) which was laid in the room. The west side wall of the outlet drain was incorporated in this surface and the fill of this drain (D13:69) was identical in composition to the overlying surface (D13:48). There may have been an entrance in the middle of the west wall of this room, the evidence for which was a pivot setting (D13:63, recorded in a site notebook sketch plan) and an apparent gap (D13:54) in the robber trenches (D13:22) of the west wall. The central room was separated from the western room by a north-south wall, one face of which survived (D12:55, D13:51), and which probably occupied a similar position to the Phase 2 partition. To the east the room was closed off by another stone wall (D13:12, E13:25), giving it internal dimensions of 4.00m (north-south) by c. 2.20m (east-west). The relatively narrow proportions of this chamber suggest that this room functioned as an entrance passageway, with opposing doorways in the south and north walls. This supposition was supported by the pronounced pattern of wear identified by the 1997–8 excavators over a 1m wide area of the via quintana street surface immediately outside the north wall (TWM 7973, cf. Hodgson 2003, 99). A line of flagstones (D12:54) in the corresponding position just inside the north wall, at the north end of the passageway, may have formed part of the threshold with the flagging having presumably continued through the doorway before the north wall was robbed out. The only possible floor recorded in the passageway was a rubble level (D13:11) over a layer of soil and stone (D13:55). This was bounded to the south by a distinct line of flagstones (D13:10), that appeared to mark the edge of a flagged surface (D13:08) extending between the entrances to the east and west rooms and through the pre-existing doorway in the south wall, which lay directly opposite the doorway at the north end of the passageway. The east room had internal dimensions of 4.00m north-south by 3.45m and was furnished with a flagged floor (E13:29). Access to the room from the central passageway was in the south-west corner. The entrance to the western room occupied the corresponding position on the west side of the passageway.
The south-west corner of the house was covered by a grey-black, slightly stony, sandy soil which covered the remains of the south-west room of the Period 2/3 officer’s quarters (including the robber trench for the earlier west wall – D13:35) and was initially interpreted by the 1978 excavators as a garden soil. It is unclear whether this represented a dereliction level associated with the demolition of the previous phase. This was in turn covered by a cobbled surface (D13:28) which was enclosed by a wall along its west (D13:24) and south (D13:32) sides, possibly of drystone construction. For the most part only a single face of this wall survived, but the two sides of what was interpreted as a gateway (D13:31) through the south wall were also identified. To the east of the cobbling, a flagged floor (D13:20) was laid over the earlier flagged room of the Period 2/3 building and extended over the robbed out remains of the former south wall of the officer’s house (Fig. 16.09). This flagging continued southwards through the gateway (D13:31) without any evident interruption and thence westwards, covering the alley (D13:33, D14:40) between the walled yard and the presumed officer’s quarters of Chalet Range 10 (Chalet AB). The presence of flagging here could imply that this area still formed part of a room interior, but no trace was uncovered of a masonry wall dividing such a room off from the yard. The north-south wall belonging to the previous phase (D13:21) was probably demolished. Facing stones which probably derived from this wall were spread over the earlier flagged floor (D13:19/ E13:32) to the east, apparently incorporated in the new floor (D13:20). A very large oblong stone (D13:27), flattened on top, which probably functioned as a post-pad, was set directly on the flagstones of the earlier floor. This was directly in line with two of the post holes identified in this area in 1978 and 1997–8 (D13:40, 41, the latter equivalent to TWM 7722). Together these posts may have formed part of a timber wall screening the area off from the yard, as the 1978 excavators suggested. The presence of large, somewhat irregular stones, immediately to the south of posthole D13:41, suggests that the yard wall did not terminate at gateway D13:31, but instead turned the corner and continued northward along the west side of the flagging to meet the line of postholes. The existence of this continuous flagged passage between W and AB suggests the two chalets, which both probably functioned as officer’s houses, were intimately linked.
The yard walls were subsequently demolished and the remains incorporated in a new cobbled surface (D13:25) laid over the south-west corner. These cobbles were close set and noticeably worn.
Four post holes (D13:40, 41, 42, 67) were identified in 1978, three of which followed a north-south alignment. Several more were revealed when the area was re-excavated in 1997–8. Unfortunately the relationship of these post holes to the latest levels was not clearly defined in 1978, with some lying beneath modern intrusions (D13:14, 17) which obscured the stratigraphic relationship. The context records, however, confidently associated the post settings with flagged floor D13:20, and there were reasons to believe this judgement valid in the case of two of the post holes (D13:40, 41) and the post pad stone discussed above (D13:27). Three clusters of upright stones, marked on site plans P90e and P90g, may represent a line of post settings which cut through the late cobble/rubble dereliction levels recorded by those plans. The most southerly of these settings was equivalent to post hole D13:42, but the other two were not assigned context numbers and do not correspond to D13:40–41 or 67, which were not evident at this level. The 1997–8 excavators concluded that the post settings identified in 1978 and 1997–8 represented a substantial timber rebuild, which probably replaced the southern part of the officer’s house, but noted that these features need not all belong to the same phase (cf. Hodgson 2003, 101, & fig 68 for full discussion). Thus some might be associated with the flagged surface in the south-east corner (D13:20) and relate to the initial phase of the Period 4 officer’s house, as outlined above, whilst others may postdate the demolition of much of the house.
The excavators were unsure whether the remains first exposed on clearing the site, represented a final phase of occupation in Building W or its demolition and covering over with layers of rubble and cobbles. Two alternative versions were presented in the archive text. The rubble over the southern part of the building was interpreted by the excavators as a disturbed street level (D13:06, D14:06, E13:27). The stone floor in the north-west room was covered by a layer of grey-black sandy soil (D12:53, D13:34), which in turn was overlain by a spread of very small, worn sandstone slabs (D12:28, D13:02). The latter was interpreted as a floor level and this might have been associated initially with the secondary cobbled surface over the yard to the south (D13:25), with the overlying layer (D13:06) forming part of a further, much disturbed, remetalling. The line of three post settings shown on site plan P90e (including D13:42) might also be associated with just such a structural phase. The sandstone rubble (D12:11), which covered the latest surviving road surface on the via quintana, subsequently extended over the worn stone floor in the north-west room. The chalet’s walls (for example D13:04, D12:46/E12:13) must still have protruded through into these levels, since their robber trenches (e.g. D13:16, 22, D12:18, 57) cut through the rubble and cobbles, indicating that prior to robbing the walls must still have been visible, even if only at footing level, and they may indeed still have been part of a functioning building.
This building was very largely destroyed, with only the east wall and south-east corner remaining, so that its dimensions must be estimated by reference to those of Building U. The north wall had disappeared in the same disturbance that took away the north wall of Building U. The east wall (E13:09, E14:10, F13:18) was about 0.85m wide and only survived one course deep in its southern part. The remaining length was marked by traces of the rubble core though there was no sign of a robber trench (E13:10, F13:30). Enough of the south wall was intact to show the position of the south-east corner. The 1997–8 excavators suggested that a further stretch of the south wall was marked by a very slight depression in the earlier street surface on which it sat (Hodgson 2003, 98, cf. 96, fig 67). A similar suggestion was made in relation to the west wall. The groove identified in this area lay no more than 0.40 m from the east wall of the officer’s house (W), implying a much narrower space on this side of the building than on the east side where V was separated from U by an 1.30m wide alley. However Daniels site plan P122 shows that shallow modern drain trenches ran on the same alignment as the suggested west wall and it may well be the bottom of these which was recorded here. As outlined above there is reason to suppose that the alley on the west side of V may have been the same width as that on the east side which would give the contubernium practically the same dimensions as the better preserved chalet, U, which had an internal width of c. 4.80m. None of the wall locations were marked by distinct robber trenches. In view of the extensive damage to the west side of the building it would not be at all surprising that shallowfounded chalet-phase walls could have disappeared without trace. No interior floors attributable to this phase were found.
Building U was the best preserved of the chalet-contubernia belonging to this phase of Barrack 9. The chalet was oriented to face north. Its northern limit was considered by Daniels to have probably lain on the line of the earlier north wall, which had been completely removed by modern disturbance. Its frontage may have been closed off by timber shuttering, rather than masonry walling. The 1997–8 excavators considered that the frontage may have lain further south, noting the position of two postholes (F13:47–8; TWM 7754, 7800) towards the northern end of surviving remains. However these post settings might be associated with the internal arrangements in the previous phase of the stone barrack block. At the other end, the chalet extended well beyond the south wall of the Phase 2 block, over the earlier road surface. The new south wall (F14:15) was 0.60–0.65m wide and rested directly on the road surface (F14:14), with up to two courses surviving. It was bonded with the west wall (F13:14, F14:20), also 0.65m wide. This too was set directly on the earlier road surface, continuing over the remains of the earlier south wall (F13:11) and a flagged floor belonging to the Phase 2 barrack (F13:15, 27). Its interior face was abutted by the west end of the spine wall (F13:10) which formed the main internal partition dividing the contubernium into north and south rooms. The east wall (F13:06, F14:07) had no surviving link with the south wall due to modern disturbance, but there is no reason to doubt that it was built at the same time. Where it survived, it consisted of a single course resting on the cobble street, continuing to the north of the former south wall of Building 9 often three courses deep and embedded well below the clay loam spreads which comprise the interior levels of the barrack (e.g. F13:44, 52). There was no sign of a construction trench for the wall which abutted the east-west spine wall (F13:10) on both sides.
A possible doorway through the spine wall into the south room was identified hard by the west wall (F13:31) on the basis of the wear on the surface of the spine wall’s surviving masonry. This doorway was about 0.65m wide and to the east was a facing stone with a socket 0.06 by 0.07 m. A stone-lined drain (F13:17) ran down the centreline of the north room (Fig. 16.11). This feature was c. 0.90m wide overall, the channel being wider at its southern end (c. 0.40m) where it was best preserved. There the drain was 0.20m deep, with a rough stone bottom, edged on either side by one or two courses of facing stones. To the north it narrowed to about half the width and its side walls were badly disturbed. To the east of this drain a very disturbed stone floor level (F13:33) was evident, which contained quite a lot of reused building stones. This had been cut away by a modern drain channel along the east side of the room. A deposit of stone and clay loam (F13:34) edged by a line of stones, filled the depression where the earlier flagged floor had subsided into the urine sump, on the north side of the spine wall immediately in front of the suggested doorway (F13:31). Internally, the room measured at least 4.50m north-south by 4.90m east-west.
Figure 16.11: The stone-lined drain in the north (stable) half of Chalet U from the south, with the spine wall in the foreground.
The south room was at least 4.60m north-south by 4.90m east-west and may have been further partitioned into two smaller chambers. Traces of a timber partition were identified, which divided off a passageway along the east side of this room (Fig. 16.12). The evidence took the form of a line of packing stones (F14:29), with what appeared to be flagged thresholds at both the northern and southern (F14:48) ends. The presence of two such possible thresholds suggested that the remainder of the south room may have been divided into two smaller chambers, each with its own entrance. The demolished remains of the earlier south wall of Building 9 (F13:11/F14:08) perhaps served as the base of an east-west partition separating these two smaller chambers. At the north end of the passageway, right next to the east wall, the 1997–8 excavators identified a possible blocked doorway (TWM 8554) through the spine wall which probably provided access from the north room. Here, a 0.90m long section of the spine wall comprised just a single course, worn on its upper surface. Where the second course began it presented a neatly dressed face, whilst a single sandstone block prolonged the alignment of that face into the north room, perhaps acting as a jamb of some kind (Hodgson 2003, 98). One note of caution should be expressed with regard to this interpretation, however, as a modern drain cut through the spine wall at precisely this point. Part of the Phase 2 flagged floor (F13:15) may have remained in use in the northerly of the two smaller rooms. In the southernmost room there was a thin deposit of yellow-orange sandy clay loam (F14:45, 46) directly on top of the earlier street surface. This yellow-orange material was interpreted as daub collapsed from the walls of the building, but it could represent makeup for a floor constructed of some perishable material such as wood. Post-Roman robbing of a stone flagged floor is unlikely in view of the survival of the walls.
Figure 16.12: The possible stone-packed partition slot F14:48, running north-south in the rear room of Chalet U, looking north.
Most of the walls of this contubernium had been destroyed by modern drain cuts. The north wall on the line of the north wall of Building 9 had been entirely lost. The course of the south wall was followed with remarkable diligence by a modern drain running east-west. The west wall had likewise largely been removed by a north-south drain, but one stretch of its east face did survive in F13 (no context no. assigned in 1978; TWM 7525), in the form of a 1.90m length to the north of the spine wall. This lay just under two metres from the east wall of Chalet U, which would accord with an alley width of 1.30m and a wall width of approximately 0.65m. The east wall of Chalet ET had largely been robbed out, but its course was indicated by the disturbed masonry of the spine wall (G13:10) at the point where this robbing intersected with the latter. A few facing stones of the chalet wall (G13:16) still survived in situ at this junction. In addition, the 1997–8 excavators noted a slight trench (8507) through the earlier Alley 5 surface, which may have marked the southern end of this wall and part of the south wall. In contrast, the full length of the east-west spine wall survived, bisecting the contubernium into front and back rooms. Thus restored, the chalet was c. 6.20m wide like the other central chalet-contubernia in Range 9. A worn cobble and flagstone floor (G13:14) similar to that found in the north-west corner of AK survived on the north side of the spine wall, covering much of the interior of the contubernium here. This overlaid a yellow sandy clay layer (G13:17/19) which covered the Period 2/3 barrack levels and might represent a makeup layer for this phase of Building 9. There was a 0.25m wide gap between the western edge of this surface and the face of the west wall, which was interpreted by the 1997–8 excavators as the remains of a drain (7717) running along the west side of the north room. On the south side of the spine wall, the surface was composed of coarse flagging (G13:37), including facing stones, which was laid on a clay and rubble base, the floor level together totalling up to 0.25m in depth. This might represent the reuse of an earlier barrack floor. No floor surface survived at the southern end of this room where the contubernium extended over the former road surface (G14:09, H14:22).
A group of structures overlying ET provided evidence that the layout of this part of Barrack Range 9 was later substantially remodelled. The remains of two parallel walls were noted, set on the earlier cobble and flagstone floor (G13:14, G13:37). Both survived fragmentarily on either side of the spine wall, implying that they extended across the full width of the barrack range, and followed the same, roughly north-south orientation as the side walls of contubernium (see Fig. 16.14, cf. Hodgson 2003, 97, fig. 70). The more westerly wall (G13:12, G14:14) had a heavily worn surface. Its stones were very large and irregular and it did not survive well enough to measure its width. Just to the east was a second wall (G13:11, G14:15) about 0.70m wide. It butted on to G13:10 on both sides. To the west of G13:11 a new surface of flagstones (G13:18) was laid, mainly on the south side of the spine wall G13:10, but also extending over the surviving remains of that wall, which exhibited similar wear on the surface of its uppermost course, demonstrating it had now gone out of use and been demolished. The earlier cobble surface (G13:14) ran up to the spine wall on its north side and probably remained in use here. The wear on top of the facing stones of the westerly wall G13:12/G14:14 suggests its demolished remains were subsequently incorporated into floor surface G13:18.
It is uncertain whether both these walls were initially constructed at the same time, with the western example going out of use before the eastern and being incorporated in the new flagged surface, or whether the eastern wall replaced the western.
Still less clear is the significance of these structural alterations for the overall layout of the barrack range, other than the obvious implication that they reflect a substantial remodelling affecting at least the central parts of the barrack. Daniels interpreted this structural evidence as signifying that double chalet, AK, at the east end of the range was extended westwards by the construction of a new west wall (G13:12/G14:14) to enclose an additional chamber, aligned north-south, which occupied part of the area of the former chalet-contubernium, ET. The width of the new room would have been something between 3.50m and 4.00m. A further phase was envisaged involving a reduction in the width of the additional chamber to no more than 3.00m by the construction of a new end wall (G13:11/ G14:15) a little to the east of the previous one, with wall G13:12/G14:14 being demolished and its remains incorporated in a new flagged surface (G13:18) laid in the area between the enlarged AK and Chalet U. Daniels considered that the area between AK and U was left empty in both of these phases.
The 1997–8 excavators suggested that the new walls may have represented a rearrangement of partitions in a generally persisting building. The western wall (G13:12/G14:14, TWM 7519) perhaps formed the eastern side wall of a contubernium replacing ET and the east wall of U provided the other side wall. Wall G13:11/G14:15 (7520) could have formed the west side of a free-standing contubernium, which would have enabled three such contubernia to be fitted into the space between there and the eastern end of the range (Hodgson 2003, 101). This is entirely possible, but the pocket of surviving stratigraphy is too small to enable any definitive reconstruction of the possible arrangements. However, the general point regarding the likely persistence of a coherently organised barrack is surely valid.
The east end of Building 9 had suffered greatly from post-Roman robbing and disturbance, which made interpretation of this structure very problematic as only very fragmentary traces of walling from this period survived. This is reflected in the differing interpretations of its layout that were presented by the 1978 and 1997–8 excavation teams. The building was restored by Daniels as a double chalet (AK), the two contubernia being separated by the spine wall (G13:10a), with their long axes aligned east-west. In contrast the 1997–8 excavators interpreted this end of the building as comprising two north-facing contubernia (1 and 2).
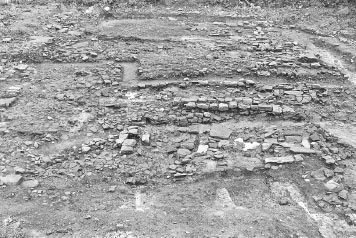
Figure 16.14: View of the later walls G13:12/G14:14 and G13:11/G14:15 and flagged surface G13:18 in the centre of Chalet Range 9 from the east.
As envisaged by Daniels, the north wall of AK reused that of Building 9, or at any rate followed the same line. This had largely been destroyed by the construction of modern field drains with only a length of rubble foundation surviving intact towards the east end (h13:26). The east wall of 9 certainly continued in use (H14:19, foundations H13:25/H14:26) and was extended southward over the early road (H14:19). The wall was 0.75–0.80m wide with a foundation cut into the road cobbles. A new south wall (G14:10/H14:20, foundations H14:27), constructed in a similar manner, ran west from the south-east corner about a metre from Chalet Range 10. A doorway into the building was identified at this corner on the basis of the heavy wear evident on their surface of the foundations here, although, at 0.60m, it was admittedly rather narrow.
Daniels considered that AK did not directly adjoin ET to the west, believing instead that the west wall of the combined contubernia was independent of the neighbouring chalet. What was thought to have been the corner stone of south wall was identified, plus the remains of the west wall extending north from that point as far as the spine wall. These remains took the form of a yellow-brown band of silty clay with crushed stones (G13:13, G14:13), interpreted as the remains of a robber trench or perhaps more precisely the remains left by the removal of wall footings. However this proposed wall line was separated from the east wall of ET (G13:16) by the narrowest of gaps, perhaps as little as c. 0.15m to judge from site plan P141, and no trace of it was recorded with any certainty to the north of the spine wall (G13:10a). An apparent continuation of the yellow clayey strip into this area shown on a site notebook sketch plan was dismissed in the context entry for G13:13 and may simply represent a strip of the sandy clay layer (G13:19) underlying the stone floor G13:14, which had been exposed by the excavation. The worn cobble surface (G13:14) survived covering a fairly extensive area north of the spine wall in the north-west corner of AK and in ET. The underlying yellow sandy clay level (G13:19), which might represent a makeup level, was also present in both buildings. The stone surface respected the line of the east wall of ET (G13:16), but extended over the projected line of ‘robber trench G13:13. A small pocket of yellow clay (H14:16) also remained in the south-east corner, overlying the earlier street surface (H14:22), and presumably formed a clay floor or makeup layer.
As restored, the north-south dimensions of the two contubernia, including the spine wall, were 6.10m in the case of the southern one and 5.80m in the case of the northern, i.e. they were broadly comparable in width to the central trio, V, U and ET (the irregularity between the two being accounted for by the slightly eccentric position of the spine wall).
There were a number of differences in the way the 1997–8 excavators reconstructed the easternmost contubernia of the barrack in this phase. Principally they restored this area as two north-facing contubernia which adjoined Contubernium 3/ET to the west to form a block of three conjoining units. The best evidence that the two contubernia of AK adjoined ET is provided by the remains of the south wall. There is no evidence that the supposed corner stone revealed here was anything other than an ordinary facing stone, other than the presence of the suggested robber trench G13:13/G14:13. Indeed the 1978 site plan P122 shows a band of rubble, which may have formed part of the foundations or disturbed remains of the south wall, continuing beyond the ‘corner stone’ as far as the line of the robbed out east wall of ET (G13:16). This would certainly support the 1997–8 excavators’ case and calls into question Daniels interpretation of silty clay band G14:13/G13:13. As noted above this was not traced with any certainty to the north of the spine wall and the 1978 excavators themselves suggested an alternative interpretation in the relevant context entries – ‘debris fallen beside lost wall’ (presumably referring to the adjacent G13:16 though this is not explicitly stated).
The 1997–8 excavators restored a north-south partition wall some 6.20m from the east end of the block (8515, 7585, foundations 7586), which they interpreted as separating the two north facing contubernia, 1 and 2, giving them internal widths of 6.20m and 4.60m respectively. These features are evident on Daniels site plans and photographs but were not interpreted as the remains of a wall. The suggested masonry north of the spine wall (G13:34 = 7585) was treated as flagging belonging to an earlier barrack floor (perhaps Phase 1), butting against partition slot G13:33 which was traced along its western edge (G13:33 was said under the secondary clay floor G13:24).
As with the rest of the range (except the officer’s house at the west end) the 1997–8 excavators suggested that the north frontage may have been retracted southwards. This was based on the position of two post holes at the northern end of U/ Contubernium 4 and one in Contubernium 2 (G13:28, TWM 8549; cf. G13:27) which were thought to have been associated with a timber frontage. All these post settings were recognised by Daniels, along with another example 0.7m west of G13:28 (G13:27). They have been attributed here to the Phase 2 stone barrack. They clearly cut the clay floor associated with that phase of the barrack (G13:24), but not the stone floor G13:14. They are also recorded as cutting the sandy clay level G13:19 which may represent a makeup (or floor?) level for the chalet phase. However the same is true of post holes G13:29 and 30 to the south, which coincided with the partition line between the front and rear rooms of the Phase 2 Contubernia 6 and 7. It is noteworthy that the context entries for all four post holes originally recorded that they cut clay floor G13:24, but this was later crossed out and replaced with overlying layer G13:19, and it is unclear whether this emendation was made on the basis of firm observation or some degree of inference.
On balance the 1997–8 excavators restoration of as a conjoining block of three contubernia appears more convincing than Daniels’ interpretation that AK and ET were separate single and double chalet-contubernia. The orientation of the contubernia is more difficult to determine, however. The destruction of the north wall and much of the east wall makes it renders it impossible to determine where doorways were located or whether the wall was replaced by a timber frontage. This applies irrespective of whether partition wall 7585/8515 is accepted as a genuine feature since it could either separate two north-facing contubernia similar to ET or divide two east-facing ones into front and back rooms as appears to have been the case in Chalet X at the east end of Barrack Range 10 (see below).
FINDS
Copper alloy: enamelled stud (no. 224, G13:19)
Samian stamp: Mid to late Antonine (no. S130, D13:24)
Copper alloy: brooch (no. 3, D13:28)
Decorated samian: c.160–90 (no. D4, D13:55).
Glass: window (no. 42, D13:55)
Coin: Antoninus Pius, 153–5 (no. 94, D13:06), late second century, illegible (no. 252, D13:06)
Copper alloy: brooch (no. 37, D13:06), rod (no. 39, D13:06), skillet (no. 78, D13:34)
Iron: spearhead (no. 11, D13:34), lift key (no. 30, D13:34)
Quern: (nos 52–3, D13:47, D13:11, D13:39)
Samian stamp: 125–50 (no. S7, F14:14)
Copper alloy: medical implement (no. 103, G13:14); button-and-loop fastener (no. 197, G13:14); strip (no. 302, G13:14)
Iron: stud (no. 50, G13:14)
Samian stamp: c.160–200 (no. S10, G13:03), c.145–75 (no. S106, F13:12)
Decorated samian: c.125–50 (no. D50, F13:16), c.70–85 (no. D64, G13:03), c.130–60 (no. D65, G13:03), c.130–60 (no. D75, H13:09)
Graffito: (no. 7, G13:03), (no. 22, F13:16)
Coin: Vespasian, 72–3 (no. 15, F13:16), Antoninus Pius, 139–61 (no. 86, G13:03), Antoninus Pius 153–4 (no. 93, F14:24), Faustina I (posthumous), 141–61 (no. 99, H14:38), Constantius II, 355–61 (no. 203, G13:03) Copper alloy: bead or collar (no. 58, F13:16), collars (no. 67, G13:03; no. 70, H13:08), stud (no. 288, F13:16)
Iron: chisel (no. 25, G14:13), sheet (no. 71, G13:03)
Bone: handle (no. 6, F13:12)
Glass: bead (no. 15, G13:03), bead (no. 16, D12:18), bead (no. 17, G14:16)
Stone: whetstone (no. 8, G13:03), throwing stone (no. 111, H13:08)
The possible make-up layer of clay under the cobbles and flagstones (G13:19) contained pottery dating to the late second century or third century, with only a single sherd of Nene Valley ware certainly dating to the third century. The pottery from the cobble and flagged surface (G13:14) was very similar in makeup to the clay below it. The wall robber trenches produced little pottery, but what there was was all late second century or later in date. The spine wall in ET (G13:10) apparently produced only a single sherd of pottery, which was a late fourth-century Crambeck mortarium, but this is very different in character to the rest of the assemblage.
The small quantities of pottery from Chalet U, the alley between U and ET and the later wall in ET could again be dated to either the late second or third century, with only an occasional piece of thirdcentury Nene Valley ware.
Most of the small assemblage of pottery from the Phase 1 features can be dated only generally to the late second century or later, apart from a sherd of thirdcentury Nene Valley ware in the stone floor D13:48. The cobbled surface of the yard had a third-century Dales-type rim and also a Nene Valley bead-rimmed funnel neck beaker, probably of the late third century or later (D13:28).
The make-up for the new flooring produced a large group of pottery. It included a large part of the lower section of a thick-walled Crambeck reduced ware jar of the later third century or later (D13:09), a sherd of another Crambeck reduced ware vessel, a sherd of calcite-gritted ware and a Lower Nene Valley mortarium rim dated to the late third or fourth century (D13:34). The new floors themselves contained a small amount of mainly third-century material, including a sherd of Campanian amphora of the second half of the century or later, and only two sherds of calcite-gritted ware likely to be of the late third century or later. The later cobbled surface in the yard contained a BB1 flanged bowl of the late third century or later (D13:25), and the cobbled surface west of the chalet produced another sherd of calcite-gritted ware (D13:29).
The post Roman robbing and dereliction produced a large quantity of pottery including late third-century or later material such as a Nene Valley bead-rimmed beaker, Crambeck reduced ware and calcite-gritted ware (G13:03, D13:06), late gritty grey ware and a proto-Huntcliff type rim (H13:09, H13:07). Context D13:06 also produced a late fourth-century Huntcliff type rim. The robber trench of the north wall of chalet W contained sherds from a crambeck reduced ware dish, and six Huntcliff type rims of the late fourth century (D12:18).
These contexts also produced a little post-Roman pottery. G13:03 and H13:24 each had one sherd of C17+ english redware. D13:06 had two sherds of post-medieval pottery, and D14:06 also had a possible sherd of post-medieval pottery.
As reconstructed, this phase of Building 9 represents a curious hybrid structure, partly a barrack of traditional form rebuilt with stone partition walls similar to the blocks in the praetentura, though of greater width, and partly a range of freestanding chalets comparable to the remainder of the Period 4 retentura barracks. Particularly puzzling is the continuation of the spine wall through Chalet U. Here, the unity implied by a common spine wall seems completely at odds with the structural independence demonstrated by the contubernium in all other respects. Such structural autonomy was in all probability the whole point of chalet construction, enabling each squad of contubernales to maintain and adapt its own quarters without disruption to its neighbours. In the eastern part of the barrack, the spine wall may have helped to support a shared east-west roof-line, extending unbroken over Contubernia 1–3 (ET-AK). In Chalet-Contubernium 4/U, by contrast, the ridgeline of the roof is likely to have been aligned north south and the only function the spine wall could have performed here would have been that of an internal partition.
One possible explanation may be derived from a comparison with the third-century barracks in the northern part of the fort. Here the infantry barracks were also rebuilt in stone, but in a more traditional form as barrack blocks rather than ranges of freestanding contubernia. Stone partition walls replaced timber/wattle-and-daub examples, the extra space taken up by the stone walls generally resulting in a slight reduction in the number of contubernia. In the east praetentura two barrack blocks of this type (Buildings 2 and 3) were laid out, plus a stable building (Building 1), all of which stood independently of their neighbours. In the west pratetentura, there is evidence – albeit fragmentary because of the extent of post-Roman destruction in this part of the fort – for further, slightly wider blocks of similar form.
It is conceivable that something similar was initially planned for the third-century barracks in the retentura. It is noteworthy that the character of the four ranges differs. For example there are elements of pronounced regularity in the plan of Barrack Range 9 and it may conceivably have been the first of the four to be constructed, whilst Chalet Range 10 appears quite regular but its individual chalets were considerably smaller than those in Building 9. The layout of 11 and 12 differed again, possibly including back-to-back chalets. All this may signify that ideas regarding the appropriate form of barrack accommodation were changing as construction progressed or were viewed differently by the turmae of the four buildings. The remodelling of Building 9 involved reorientating the barrack to face north and extending it southward partway over the street lying between it and Building 10. It may have been the intention to similarly extend Building 10 northward over the remainder of the street to back onto Building 9. The new south wall of Building 9 would thus have formed a party wall separating the two enlarged blocks, providing more ample accommodation for their respective cavalry turmae.
The hybrid layout which finally emerged, however, suggests there was a change plan during construction. After completion of Contubernia 1–3, at the eastern end of Barrack 9, the scheme for blocks of conjoining contubernia was apparently abandoned in favour of ranges of free-standing rooms. Construction of the spine wall, which was evidently intended to form the medial partition in all the contubernia, had presumably progressed further than the other principal structural elements and so was incorporated in the Chalet-Contubernium 4/U, which was otherwise entirely freestanding. The range was completed to the more ample dimensions initially envisaged for the enlarged block, with Contubernia 3–5 perhaps laid out according to a uniform module. When reconstruction of Building 10 commenced, however, it was remodelled as a straightforward chalet range, and retained the more restricted dimensions of the original block.
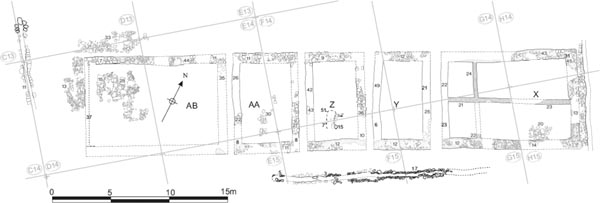
Grid squares: D14, E14, E15, F14, F15, G14, G15, H14, H15
In common with other barracks in the southern part of the fort, Building 10 was reconstructed as a range of free-standing contubernia or ‘chalets’. The individual structures were smaller than those of Chalet Range 9, but the overall layout and proportions were very similar. The range comprised three central chalets orientated north-south (AA, Z, Y), of which very little was left apart from the outside walls, and, at either end, a larger structure orientated east-west (AB, X). The eastern building (X) comprised a pair of eastfacing chalets sharing a common party wall, possibly of timber, and each possessing a small rear room again closed off by a timber partition. The western example (AB) overlay the former officer’s quarters and, like Chalet W in Range 9, probably maintained that function.
The south ends of the chalets overlying Building 9 extended over the early road between Buildings 9 and 10, leaving a gap of as little as 1.00m between the two new ranges of late buildings. This alley was now too narrow to have provided the main access to the chalets, with the implication that the central trio of Chalet Range 10 must therefore have faced southward onto the via sagularis, as, in all probability, did the earlier contubernia (see Chapter 15). The end buildings, AB and X, probably faced onto the west intervallum road and the via decumana respectively.
Although very similar in layout to Chalet Range 9, this phase of Building 10 was notably smaller, being confined within the limits of the earlier barrack block. Both the north and south walls of the barrack were re-used, though probably only after they had been substantially rebuilt. The way that the east wall of Chalet AA (F14:27) and the west wall of Chalet Z (F14:43) apparently butt up against the north wall of Building 10 confirms that the latter wall continued in use in some form, functioning as the northern limit of Chalet Range 10 (archive: Plan P136; Photos B36/18, 24). Similarly, there was no firm evidence that the chalets extended beyond the south wall of Building 10 on to the intervallum roadway, in the way that Chalet Range 9 encroached on to the road between 9 and 10, although such a southward extension would have been quite feasible and would have increased the size of the individual chalets. The only possible indication that this might have been the case was represented by a 1.70m length of large cobbles, some of them pitched, set in clean orange clay (G15:03) and running parallel to the south wall of Building 10 some 1.50m south of the building (archive: Plan P116; Photo B36/3). This was initially, tentatively, interpreted as a possible chalet-phase wall foundation, although this idea was subsequently discarded.
Lying mainly over the officer’s end of Building 10, this building had suffered very badly from modern disturbance including cellars and drains as well as the robbing of the east wall.
The north wall of AB was the old north wall of Building 10 which survived mainly as a flagged base course over the foundation. At the north-west corner the early wall had been shortened and the old west wall completely demolished (Fig. 16.16). Some of the north wall actually survived (D14:07), and showed evidence of having been rebuilt, being very different in character to the rest of the Building 10 north wall. The 3.50m surviving stretch of walling was composed of large, roughly square or oblong blocks, with relatively little wall core, and lacked the flat plinth course, which characterised the north wall of Building 10 to the east. In addition it sat on a distinct secondary foundation layer of angular rubble (D14:21), over the original clay and rubble foundations (D14:25). The position of the new west wall was marked by the sharp edge to the new intervallum street cobbling (D14:13), and a line of dark grey soil 0.10m-0.15m wide (D14:37) between the street and the flagged floor of the interior. This would be consistent with the slot for some kind of timber wall or shuttering, rather than a robber trench for a stone wall. The use of timber frontage was a common feature of chalet barracks and suggests that the officer’s house now faced westwards onto the intervallum road. The east wall of the officer’s quarters was removed presumably in conjunction with the erection of the new building and the clay loam filling of the trench provided a valuable group of pottery (E14:39). The east wall of AB itself was seen in a short length of robber trench up to 0.65m wide where the impressions of four or five stones survived (E14:35) towards its north end. The rest was lost in modern disturbances, as was the whole of the south wall. As with the other chalets of the range, X, Y, Z and AA, it was assumed that the south wall of Building 10 was re-used to form the south wall of AB.
The overall dimensions of AB in its first phase were 12.00m (east-west) by 8.50m (north-south). No floors could be confidently attributed to the building, unless the Building 10 floor D14:15/27 remained in use. The likelihood of this occurring was questioned by one of the excavators (IDC), but the uppermost stone flags incorporated in floor D14:15/27 were at a similar level to those which formed part of a later phase of AB (D14:17). The continuation in use of floor surfaces from the Phase 2 barrack to the chalet phase, in this way, is, admittedly, not certainly established in any other case, though it does appear likely that part of the earlier flagging (F13:15) in Barrack 9 Contubernium 3 was reused in Chalet U. To the north of the chalet, surface D14:40 corresponded to D13:33 (the successive phases of AB possibly correspond with those of Building W). The north-south drain (D14:11) in the intervallum road to the west continued in use.
Figure 16.16: Range 10, the north-west corner of the decurion’s quarters (Chalet AK), showing the rebuilt stretch of north wall (left) and successive west frontages, looking east.
Traces of all four walls of this chalet were extant. The south wall seemed to be the south wall of Building 10. Of the west wall only a 1.05m length of the foundation and a few stones of a flagged base course survived (E14:22), the remainder of the wall to the north being marked by a shallow robber trench (E14:26). To the south, the wall line was removed by modern pitting. The east wall (F14:27, F15:08), also 0.60m wide, was substantially intact to a height of one course over the southern half of the building. Its robber trench to the north (F14:28) was also clear though very shallow. One side of the north end apparently overlay the plinth course of the north wall of Building 10. The superstructure of the latter wall was probably reused or rebuilt to form the north wall of Building AA.
Little survived of the interior of the building but a scattered level of flagging may have formed part of the floor (E14:30). The overall dimensions of the building were 8.50m (north-south) by 5.40m (east-west). It was separated from Building AB by a narrow alley only 0.60m in width and from Chalet Z by another alley 0.70m wide.
Figure 16.17: Chalet Z in Range 10 from the south with the east wall of AA (F14:27) to the left and the robbed west wall of Y on the right.
The west wall (F14:43) was virtually destroyed by modern robbing of its stones. In much of its length even the shallow robber trench found elsewhere over Building 10 was indistinct (F14:42, F15:18). However, two stones were found abutting and partially overlying the base course of the north wall of Building 10. A considerable amount of the east wall (ca. 0.70m wide) was intact though only one course high (F14:36, F15:09; robber trench: F14:37, F15:10). The south wall was almost entirely robbed though the foundation (i.e. of the south wall of Building 10) was found clearly (F15:12).
The overall dimensions of Z were c. 8.50m northsouth by 5.00m east-west. It was separated from Building Y to the east by an alley which varied in width between 0.50m and 0.90m. An oval pit (F14:51, F15:07), faced by stone blocks along its east side (F14:52, F15:15), was revealed the medial line of this chalet, the western side wall having presumably been robbed out. Flagstones associated the Phase 1 floor (F15:23) were exposed in the bottom of the feature. The drain was attributed to this phase because it occupied the medial line of the chalet whereas it would have been well to one side of the relevant contubernium in the earlier Period 2/3 barrack. The use of narrow drains, with side walls constructed of stone blocks, as a means of dealing with the waste from the cavalry horses stabled in front of the contubernia, was more typical of the chalet period rather than the Period 2/3 cavalry barracks, when slab-sided urine pits tended to be employed instead.
The area covered by this building was heavily robbed in modern times and overlain by huge spreads of clay and coal which may have originated in the disturbance which took away the intervallum street. This cut away the deposits to the south of the building and ran slightly to the north east of the Roman building alignment and gradually removed more of the Roman levels as it ran eastward. South of Y only the south half of the intervallum street was lost. However, all the stone from the walls of Y had gone. The north and south wall foundations of Building 10 were intact (F14:12, G14:12; G15:12). Shallow robber trenches marked the east (G14:21, G15:25) and west (F14:49, F15:06) walls. They were generally no more than 0.05m deep and about 0.70m wide. The east wall in particular was very clear with the impression of many stones left in the underlying clay-loam (G15:25). No definite interior floor levels survived, but a layer of grey clay soil (G14:19, 20, G15:11) overlying the structural features of Building 10 was considered to be a transitional deposit between that building and Chalet Y. The overall dimensions were 8.40m (northsouth) by 4.65–5.00m (east-west). The alley separating Y and X was 0.95m wide.
Building X comprised a large, double chalet with its long axis aligned east to west, measuring 11.70m (east-west) by 8.25–8.50m (north-south) overall. Very little remained of the building, with almost none of the superstructure surviving, other than at the east end. Its north, south and east walls followed the same lines as the corresponding walls of Barrack 10, but probably with some rebuilding. Only the west wall, indicated by a robber trench, was totally new.
The north wall was represented mainly by the foundations (G14:12, H14:43) and characteristic flat, thin base course of Building 10’s north wall. At the north-east angle several of the inner facing stones of the base course survived (H14:31; H14:45), linking the north and east walls. Midway along the east wall, however, a short length (0.85m) of the outer face was observed which stood two courses high and may represent chalet-phase rebuilding (archive B36/4–6, 33–4). It was distinguished by a much taller base course and a very narrow offset, whilst an awkward junction with the southward continuation of the thin base course and foundation was evident.
The foundations of the south wall were partially removed by the modern disturbance south of the building. However, damage was limited and there was no doubt about the line of the wall and the position of the corner (G15:12, H15:14). The west wall was entirely robbed, but there was little problem in fixing the position of the wall although the robber trench was less marked than in other cases (G14:22, G15:23).
Internally, there were traces of foundations for partition walls dividing the building into four unequally-sized rooms; two small rooms, measuring 2.00–2.20m by 3.00m (north-east room) and 2.25m by 3.00m to the west and, to the east, two larger rooms, aligned east to west and measuring 7.50–7.70m by 3.00–3.50m (north-east) and 7.60–7.80m by 3.00m (south-east). The north-south foundation (G14:24), situated rather west of the centre, was 0.50m wide and consisted mainly of yellow and pink clay though it was not completely uniform. The east-west foundation was also composed of clay to the west (G15:21) but further east this was overlaid by small stones, quite clearly laid down with care (H15:23). This also was 0.50m wide. These foundations were rather narrow for stone walls, but wide for partition slots; they may represent the full width of timber plastered walls. The most plausible interpretation of this arrangement, as noted above, is that Building X comprised two adjoining, east-facing chalets, separated by a timber partition. These chalets were in turn each divided by the north-south partition into two rooms, a small one to the rear and a larger area to the fore. The function of the small rear rooms is unclear.
In the two eastern rooms there was quite a lot of stone, some slightly worn but rather haphazardly set, which may have been part of a contemporary floor level, though not certainly so (H14:40; H15:24; H15:26 – not shown on Fig. 16.15). There was some uncertainty in the archive as to which phase this flagging should be attributed to. In context list phasing it is assigned to a secondary phase of the preceding barrack contubernia, though the possibility of it belonging to the chalet phase is admitted. However site plan P126 clearly shows some of the stones (H15:24) running over the east-west partition slot, suggesting the whole layer may simply represent later spreads of rubble. More definitely part of the interior was a rectangular patch of heavily-worn stone and flagging, 1.30m (north-south) by 1.70m (east-west), in the south-east part of the building (H15:20), next to the south wall. Again however there is some dispute in the archive over the phasing of this flagging with the context listing attributing it to a secondary phase of Building 10.
FINDS
Copper alloy: mount loop (no. 232, D14:12)
Decorated samian: mid to late Antonine (no. D68, G15:16)
Pottery: (no. 81, G15:16)
Lead: rod (no. 5, G15:11)
Samian stamp: late second to first half of third century (no. S43, F15:06)
Coin: Constantius II/Constans, 346–8 (no. 217, E14:09)
The pottery from Chalets X, Y and Z (F14:36, G14:19– 20, G15:11, 16, H15:23) is almost all material that could date to any time after the late second century, with a single sherd of third-century Nene Valley ware (G15:11). There is also an intrusive late fourth-century Huntcliff-type rim (G14:19). The pottery from Phase 1 of Chalet AB consisted of more third-century material, consisting of a high proportion of BB2 and allied fabrics, as well as Nene Valley colour-coated ware (D14:13, D14:22, E14:39). Context E14:39 in particular – robber trench fill relating to removal of original east wall of the (Period 2/3) officer’s house – represents a good sealed context.
Two successive modifications to the west end of Building AB were noted. The first was represented by a strip of sticky pink clay, 0.15m-0.20m wide and up to 0.15m deep (D14:20), along the north side of the pre-existing north wall (D14:07). This continued 2.60m beyond the original west frontage and turned south as a band of clay about 0.50m wide (D14:39), increasing the overall length of the chalet to 14.60m. Both clay-filled trenches cut the existing road surfaces. Similar material was packed along the southern side of wall D14:07 (D14:16). The excavators considered that the clay-filled trenches might only represent the foundations for a timber lean-to extension to the existing structure. However the previous frontage was probably formed by a timber wall or shuttering, which required far less substantial structural arrangements (a simple slot E14:37) than those represented by the clay foundations. Three facing stones adjacent to the northern trench may form the remnant of a stone wall which sat on the clay. These stones were evidently part of the south face, but they were in line with the north face of pre-existing north wall D14:07, and it is possible that the latter was rebuilt at this stage, being widened on the north side, with the previous north face now being reused as the south face of the rebuilt wall. A pot was set into that part of the road surface now enclosed by the clay-founded walls (D14:10). The former road surface D14:13 was apparently used as the floor of the extension. No other floors associated with this phase survived.
The clay fill of trenches D14:16, 20, 39 was very similar and pottery from this material essentially formed a single group. The fill from the section of the trench (D14:16) along the south side of the pre-existing north wall (D14:07) contained one sherd of Antonine samian, two sherds of late-second century or later BB2 and allied fabrics, and a sherd of third-century Nene Valley ware. The equivalent fill on the north side also contained third-century Nene Valley ware and a sherd from a samian bowl dating to the late second or first half of the third century (D14:20).
Further modification to the west end of AB reduced the chalet’s size again. The Phase 2 walls were demolished and a third west wall (D14:14), 0.60m wide, was laid slightly to the west of the first wall, but well within the earlier clay foundation, reducing the overall length of the building to 13.00m. The main surviving large stone on the east face of this wall had a shallow rectangular recess cut into that face, perhaps to receive a timber screen or shuttering. The wall was laid straight on to the intervallum street surface (D14:13) and a new surface of cobbles (D14:12) laid against the external face of the wall. This surface had a centrally placed drain of large faced stones (D14:11). A floor associated with this phase, consisting of a mixture of flagstones and orange grit and small pebbles (D14:17), survived on the east side of the new wall.
Phase 3 produced third-century pottery (D14:02, 07, 17), with the only later pottery, two sherds of calcitegritted ware probably of the late third century, coming from the filling of the intervallum drain (D14:38).
Opposite the eastern part of Chalet Range 10 the earlier orange gravel and small cobble surface of the intervallum road (E15:04, F15:05, G15:07) was replaced by medium- to large-sized stones (of fine-grained sandstone), some of them faced, to form a well-laid but not heavily-worn surface, which may represent a later repair (G15:08). Nene Valley ware was associated with this secondary surface, suggesting a thirdcentury date. Elsewhere any upper road surfaces had presumably all been destroyed by post-Roman activity.
Roughly along its centreline, some 2m south of Building 10, the earlier road surface was cut by a stone-lined drain (E15:05, F15:03, G15:07 – no direct relationship with later patching G15:08 survived). This was traced over a distance of 15m opposite the central section of Building 10 and probably ran the full length of the building but had been destroyed to the west and east, in the latter case by an eighteenthcentury waggonway which pursued a north-easterly course continuing towards Building 11. This was attributed to Daniels’ Fort Phase 3 (i.e. the chalet phase) by the excavators, which would imply it belonged to Period 4 like the chalet ranges. Its side walls were up to 4 courses high in grid G15, where the drain was fully emptied, and its width ranged from 0.20m-0.30m (bottom) to 0.50m-0.60m (top). The uppermost course of the sidewalls was worn on top, implying there were no cover slabs over the drain. The presence of one vertically set slab against the north sidewall may suggest that the drain was subsequently repaired in the manner characteristic of the later drains in the fort (cf. G11:04, H15:16). Where it was fully emptied a lower fill of mixed pale grey and yellow clay and silt (G15:32) was noted beneath an upper fill of dark, slightly blue-grey clayey silt, brown sandy silt and stone (E15:06, F15:04, G15:18).
FINDS
Decorated samian: 130–60 (no. D52, F15:04)
The resurfaced patch of the south intervallum road produced a sherd of third-century Nene Valley ware (G15:08). The fill of the drain (F15:04) contained a probably third-century Mancetter-Hartshill mortarium rim, two third-century Gillam type 151 rims and a sherd of BB1 with obtuse angle lattice, dating to after c.225.
In Period 4, Buildings 11 and 12 were transformed from conventional stable-barrack blocks into ranges of free-standing chalet-contubernia and officer’s quarters, like the other retentura barrack accommodation. As these closely linked if not actually conjoined they are discussed together.
As initially reconstructed by the 1978–9 excavators in their summaries of the structural sequence, Range 11 comprised six contubernium-sized structures (AC (W), AC (E), AD, AE, AF, AI), plus a larger, roughly-square, block at the east end (AN). Two of the contubernia formed an adjoining pair (AC (W), AC (E)), whilst the remainder were freestanding, with independent sidewalls separated from the neighbouring contubernia by narrow alleys in the typical manner of chalet-barracks (see Chapter 1: Fig. 1.07). The larger Building AN, at the east end of the range, probably represented the officer’s quarters. The earlier barrack north wall survived quite well in grid squares L15 and M15, and was thought to have been retained in use as the north wall of the new chalet-contubernia, with the probable exception of AN which clearly did project north of the earlier wall at some stage in its life (the earlier north wall had been removed by modern disturbance in this area). However two curious annexes, extending just over a metre north of the earlier north wall, were restored by the excavators, one spanning an area 5.00m wide, internally (east-west), to the north of AE and part of AF and the other encompassing a 5.60m wide area on the north side of AI and the alley between AI and AF. As thus conceived, these annexes did not exactly correspond to the chalets immediately to the south and were not therefore simply northward extensions of Chalets AE and AI. All traces of the southern part of the chalets had been destroyed by an eighteenth/nineteenth-century waggonway, the disturbance having removed progressively more of the range from west to east. However, despite this, it was clear that the range faced south (as the conventional Barrack 11 had done), since the contemporary remodelling of Barrack 12 effectively shifted the new chalet-contubernia southward, with respect to the earlier barrack block, narrowing the street between Ranges 11 and 12 (Alley 6) to such a degree that any entrance on this side would have been obstructed. All the evidence for the entrances to the chalets of this range has thus been lost. Nevertheless its south face was presumed to lie on the same line as the south wall of Building 11, as the surviving remains of the building’s south-east corner and adjacent south intervallum road provided no indication that the chalet-barrack extended further south than its predecessor, over the via sagularis, (just as there was no firm evidence that Chalet Range 10 in the western retentura extended southward beyond the limits of the earlier Barrack 10, over the intervallum street).
A similar range of freestanding contubernia was restored in the case of Building 12. In this case there were five free-standing, chalet-contubernia (AG (I & II), AH, AJ, AL), which occupied a more southerly footprint than the former barrack block, as noted above, plus a larger, more squarely proportioned, structure at the east end (AM). This latter, which probably represented the officer’s house for the remodelled barrack, occupied the same area as its counterpart in the earlier barrack and was thus positioned a little further north than the chalet-contubernia. It had an attached yard on its west side. No firm evidence for the position of the south end walls of the chalet-contubernia was recovered but they were considered to lie immediately adjacent to the north walls of the annexes attached to Building 11. The alley between 11 and 12 was thus reduced to a narrow alley, little more than 2m in width, and in some places was completely blocked.
Following re-excavation of Chalet Range 12 by Tyne and Wear Museums in 1997–8, a somewhat different interpretive scheme was proposed for the two barrack ranges (Hodgson 2003, 101–14). The principal difference involved reinterpreting the north walls (L15:04, M15:06) of the two supposed annexes attached to Chalet Range 11, together with the north wall of AN, as the surviving fragments of a single continuous structure, which formed a common rear wall shared by both ranges. This spine wall ran the full length of the barrack ranges which effectively formed rows of back-to-back chalets, like the thirdcentury infantry barracks recorded at Vindolanda (Bidwell 1985). The proposed layout also envisaged enlarged officer’s quarters of roughly similar size at the east ends of both barrack ranges. According to this interpretation, Daniels’ Chalet AI formed part of the officer’s house of Range 11, along with AN, and both ranges would thus have been comprised five chalet-contubernia and an officer’s house. A further feature of the suggested layout of Range 11 was the retraction of the chalet-contubernia frontage further to the north to match the length of the chalet-contubernia of Range 12, although no evidence survived to substantiate this, whilst, conversely, it was envisaged the officer’s house was extended southward over part of the intervallum road.
If the arrangement proposed by the 1997–8 excavators is correct the chalet side walls associated with Range 11 must have originally ridden over the top of the north wall of the earlier Barrack 11. Unfortunately no chalet wall survived to a sufficient height to demonstrate whether this was definitely the case or not and the only clear example – L15:10 – where a chalet wall was seen to continue beyond the former north wall of Building 11 towards the south wall of Range 12 probably formed part of a later remodelling of Chalet Range 11.
In fact Daniels’ assumption that the north wall of building 11 was retained in use as part of the succeeding chalet range was not unreasonable, given the state of the remains as they appeared when uncovered in 1978, and is paralleled in the similar reuse of the south wall of Barrack XIII at Housesteads as the rear wall of the subsequent chalet range around the end of the third or beginning of the fourth century (Rushworth 2009a). The north wall of Building 11 survived best towards the east, where a 17.70m length of masonry was revealed standing up to two courses high (L15:07, M15:03), although the easternmost stretch, in the area of Chalet AN – the putative officer’s house – had been destroyed by the course of the waggonway. The lowest courses of the chalet side walls – all that remained of these walls – butted up against the masonry footings of the north wall L15:07/M15:03 and the state of preservation of all these structures appeared to be very similar (Figs 16.21, 16.22). Further west, only foundations of the north (J15:09, K15:04) and west (J15:10) walls remained. These were composed of angular rubble set in orange clay and were 0.95m wide. The excavators’ observations with regard to these less well-preserved stretches, set out in the context records for J15:09 and J15:10, seem to provide explicit evidence that these walls were rebuilt as part of the chalet phase remodelling (which at that stage was considered to be fourth-century in date). The foundations appeared to cut the clay floor associated with the Phase 2 barrack block (J15:19), sat at a relatively high level in relation to the internal flagging of the early barrack and the street to the north (J14:09), and were abutted by the lowest courses of chalet side walls (J15:11, 12). Fragmentary surfaces survived in the northeast and north-west corners of Chalets AC (w) and AC (e), respectively, apparently associated with the secondary phases of these structures. These not only abutted the chalet side walls but also appeared to sit at the same level as the north wall foundations J15:09/ K15:04, suggesting the latter wall was still functioning.
Figure 16.21: Chalet Range 11: the side walls of Chalets AE and AF running up to the north wall of earlier Barrack 11.
Figure 16.22: The south wall of Chalet Range 12 (possible chalet spine wall) to the left and Barrack 11 north wall to the right with later alterations beyond, looking east.
However, the positioning of two, north-south aligned features in range 11, identified as possible drains by Daniels, could imply that the chalets of this range extended further north than their predecessors, the barrack block contubernia, and thereby support the 1997–8 excavators’ suggested layout. The two drains (K15:17, 20), which survived only fragmentarily, were located on or close to the centreline of their respective chalets and sat relatively high in the stratigraphic sequence, indicating they must have belonged to the chalet period. It is clear that the south rooms in the Period 2/3 Barrack 11 represented the front rooms (arma) of their respective contubernia and accommodated the horses of the resident cavalry troop. The same must have been true of the succeeding chalet range, since the alley to the north, even if not eliminated altogether as suggested by the 1997–8 excavators, would certainly have been narrowed by the southward shift of Chalet Range 12 to such an degree that it could not have served as the mustering point for cavalry emerging from either range. Yet the two drains were apparently positioned further north than the urine channels in the contubernia of the preceding barrack block, restricting the space for an inner north room (papilio) if the north wall of Building 11 had continued to function as the north wall of the chalet range.
In actuality the interpretation of both of these features is problematic once subjected to more intensive scrutiny. Thus K15:17 lay on the same line as a very poorly preserved, secondary chalet side wall (K15:09) and it is unclear whether it really did represent a drain or just masonry belonging to the wall and fragments of a stone floor abutting the latter. Site plan P127 suggests that K15:20 formed part of an almost continuous spread of stone extending right up to the north wall. To the west the spread appears to terminate abruptly, creating one of the apparent drain edges, but this appears to be the result of a modern linear intrusion K15:02 running down the west side of the chalet. Beyond the intrusion more stone (J15:16) can be seen abutting the inner face of side wall. It seems likely that K15:20 and J15:16 represent parts of the same floor which extended continuously from the western edge of the Chalet-contubernium. Only at its southern end can two drain side walls be discerned and this might represent the north end of a drain or urine pit in the southern room. Both features are analysed in detail below but on balance their interpretation is too uncertain to sustain any broader hypothesis regarding the chalet layout.
Chalet Range 12 was the only one of the late barracks in the retentura to preserve significant details regarding the front (north) walls and doorways of its constituent chalet-contubernia (Fig.16.20, cf. Figs 16.27–16.29 below). The staggered nature of this combined frontage, with each individual contubernium recessed slightly in relation to its neighbour to the east, would suggest that the course of the eastern via quintana had been altered slightly, making it an easier turn for traffic between that street and the via decumana. There is no indication that a similar pattern prevailed in the western retentura. The frontage of Chalet Range 9 had been largely destroyed by a modern sewer trench and Range 10 was poorly preserved in general, but both appear to have displayed more regular, rectangular layouts, their frontages probably lying on the same line as the north and south walls respectively of the earlier stable-barracks, 9 and 10. Similarly, virtually all trace of the actual frontage of the south-facing Range 11 had been removed by the eighteenth-century waggonway. The only potential evidence for the position of the frontage was represented by a drain (M16:03), set in the uppermost south intervallum surface towards the eastern end of the range, which might represent the continuation of a channel formed by a narrow alley between the easternmost chalet-contubernium, AI, and the decurions’s quarters (AN). This could therefore indicate that the frontage of the chaletbarrack remained on essentially the same line as its predecessor, but the phasing and interpretation of this structure are too uncertain for any definite conclusion.
Whether or not the two chalet-barracks in the eastern retentura were laid out in a back-to-back arrangement or as separate ranges it is evident that there were significant differences in the construction techniques employed in the two barracks. In Range 12, the side walls of several of the chalet-contubernia were set on foundations composed of river-washed cobbles and sandstone rubble, whereas the chalet side walls in Range 11 were constructed of squared blocks from footings upwards with nothing resembling a distinct foundation level. Such variations seem characteristic of chalet-barracks. The evident differences in size and plan between Chalet Ranges 9 and 10 have already been noted above. Together these seem to demonstrate that although the chalet-barracks were constructed according to certain common principles there was no single rigid blueprint which might have resulted in a series of identical structures and suggests that in each case construction work was undertaken by the particular turma destined to occupy the barrack in question.
At the east end of the two ranges, the 1997–8 excavators restored large, roughly square officer’s houses, as noted above, whereas Daniels envisaged somewhat smaller buildings (AM and AN), similar in size to the earlier decurions’ houses. In Range 11 he also added another chalet-contubernium (ai), immediately to the west of AN, within the area interpreted as part of the large officer’s quarters in 1997–8. Most of the remains at the east end of 11 had been removed by the colliery-era waggonway, and as a result the evidence there was inconclusive, whilst the corresponding part of Range 12 was largely masked by the later substantial remodelling of the chalet layout in that area (AL). However examination of the Daniels excavation records does reveal the existence of features in the area immediately to the west of AM which cast doubt on the large officer’s houses proposed in 1997–8. Specifically, a series of foundation deposits were exposed there in 1979, comprising pitched stones (M14:21), pink clay (M14:48) and cobble and rubble (M14:51–53), the latter being characteristic of the chalet side walls in that range. These clearly post-dated the dereliction deposits associated with the end of the Period 2/3 stable-barrack (M14) and could represent the remains of another chalet of conventional size and proportions which had largely been removed when the initial chalet-phase structures in this area were later substantially remodelled. Its position in Range 12 corresponded to that occupied by Daniels’ Chalet AI, next to the officer’s house (AN), in Range 11. Furthermore, the officer’s houses envisaged by the 1997–8 excavators were not only considerably larger than the earlier examples associated with Stable-Barracks 11 and 12, but also the equivalent chalet-phase houses at the west end of Ranges 9 and 10. It is unclear why such larger houses should be necessary in the two eastern barrack ranges.
The 1997–8 layout would mean that Ranges 11 and 12 each contained five contubernia just like the chalet-barracks in the western retentura, whereas the modified Daniels scheme would entail six chalet-contubernia in each of the two eastern ranges. However such differences could be explained simply by slight variations in the strength of the turmae of the Wallsend garrison. In any case, regardless of whether there were five or six chalet-contubernia in each range, this marks a significant reduction on nine contubernia, the number encountered in the earlier stable-barrack blocks. The implications of this change for the overall size of the third-century garrison’s cavalry component were considered in Chapter 2.
Grid squares: J15, K15, L15, M15–16, N15–16
Two different systems were used following the 1978–9 and 1997–8 excavation campaigns to designate the individual chalet-contubernia of Range 11. The 1997–8 excavators treated them as a straightforward series of contubernia numbered from 1 to 5 (the sequence beginning at the west end of the range), with a decurion’s house to the east of these. This better reflects their interpretation of the chalet range as an integrated barrack, housing a distinct cavalry turma under the command of a decurion, a view which is accepted here. Daniels, by contrast, used a series of lettered building codes (AC (w) and AC (e), AD etc.). He considered that the chalets accommodated individual military households, with the degree of overall integration being uncertain. Cross-referencing to both systems is provided here.
The two westernmost chalet-contubernia of Range 11 were treated as a single building by the excavators of 1978, which they labelled AC, the extant remains being restored as a double-width chalet separated into east and west rooms by a medial wall. However the survival of certain features – notably a stub wall parallel to the medial wall – suggest that, initially at least, ‘AC’ actually represented a pair of normally proportioned chalet-contubernia separated from one another by an intervening alley, like Chalets AD, AE and AF. The two chalets have been relabelled AC (w) and AC (e) for convenience. At least two subsequent phases of alterations saw the two structures combined to form a single double-width chalet with a linking doorway.
The west wall of Chalet AC (w) probably occupied the same position as the former west wall of Building 11. Only a stone foundation (J15:10) survived at this point, and it appeared to be of one build with the adjacent stretch of the north wall foundation (J15:09). Daniels interpreted these as a chalet phase rebuild on the basis of their apparent relationship to the earlier barrack floor levels. Only the northernmost stub (J15:11) of the east wall remained, the rest having been removed when the two chalets were subsequently united. The wall was 0.50m wide and overlay a small area of rubble (J15:30). Thus reconstructed, Chalet AC (w) would have an internal width of c. 4.70m (c. 5.70m overall). If the north and south walls of the building were in the same position as those of Building 11 the chalet-contubernium would have an overall length in the order of 9.00m, but if it extended further north as argued by the 1997–8 excavators it could have been as much as 11m in length.
It is noteworthy that the well-preserved, stonelined drain (J15:20) associated with the south room of Building 11 Contubernium 9 was conveniently positioned in relation to Chalet AC (w) as well, lying in the southern part of the chalet on its central axis. This raises the possibility that the drain might have been retained in use in the new chalet-contubernium, although such reuse of stable drains is not normal.
A 3.00m length of the west wall of AC (e) survived, divided into two parts (J15:12, 14) by a later doorway, where only a single course of the east face was retained as a threshold (J15:13). At the south end of this surviving stretch, where it had been robbed away, it was clear that wall must have overlain the earlier drain (J15:32). Of the east wall only a 1.30m stub (K15:07) survived towards its north end, the remainder to the south having been removed by robbing or destroyed by the colliery-era waggonway. This would give Chalet AC (e) an internal width of 4.00–4.20m (5.25m overall). It was separated from Chalet AC (w) by an alley 0.40–0.50m wide. The north-south length of the chalet was uncertain. Daniels considered that the north wall of Building 11 was reused or rebuilt to form the north wall of the chalet, whereas the 1997–8 excavators argued that the chalet shared a common rear wall with its counterpart in Range 12 to the north, Chalet AG II. In any case, the exact position of the chalet’s southern frontage is unclear.
Alongside the inner face of the west wall, six large stones (J15:16) probably formed the remnant of a much more extensive stone floor in AC (e) which had been cut away immediately to the east by a band of modern soil- and mortar-filled disturbance (K15:02), which did not however appear to form a distinct robber trench. The floor was present on the east side of K15:02 in a more disturbed condition as a strip of sandstone rubble (K15:20) extending from the chalet’s north wall along its central north-south axis. This was initially interpreted as a drain, but two actual side walls could only be discerned at the southern end of the spread. They can be traced on site plan P127 over a distance of 0.60m and might indeed represent the north end of a drain or urine pit in the southern room. Further north, however, the apparent ‘side wall’ was more probably a false edge created by the modern intrusion.
In its initial phase, AD can be restored as a rectangular, south-facing chalet-contubernium of similar width to the others in the range. Part of the west wall survived as a line of rubble (K15:08), but the rest had been robbed and the southernmost stretch totally destroyed. The surviving length was located immediately to the south of the former north wall of Building 11. Even less remained of the primary east wall, as this had probably been removed during the chalet’s secondary phase, and its course was not recognised during excavation. The 1978–9 excavators instead interpreted wall L15:08 as the east wall of Chalet AD, although, at 5.30m internally (6.50m overall), this made AD abnormally wide in relation to the other chalet-contubernia of the range (e.g. AF, AI, AC (w & e). However, examination of site plan P127 reveals a line of three facing stones appropriately positioned to form part of the chalet’s east wall if the normal spacing applied (all would have belonged to the wall’s west face). The remainder of the wall was probably removed during later remodelling of the range. On this basis AD was c. 5.30m wide over the walls (4.10m wide internally). The west wall was 0.40–0.50m from Chalet AC to the west.
Daniels considered that the chalet’s north wall lay on the same line as the former north wall of Building 11 (K15:04). However two more facing stones to the north of that wall might have formed part of the chalet’s east wall, which would imply that the chalet extended further northward, backing up against the rear wall of Chalet Range 12, which may have served as a common spine wall for the two ranges, as suggested by the 1997–8 excavators. However the two stones, which probably belonged to the wall’s east face, are not quite on line and may have been slightly displaced.
No floor surfaces were preserved and the only possible internal feature associated with this phase of the chalet-contubernium was a short length of stonework interpreted as a drain (K15:17), positioned roughly on the centreline of the building. However, it is more likely that this structure was associated with a wall belonging to the secondary chalet phase (K15:09) and the remains are accordingly discussed in connection with the later modifications to the chalet range.
As restored by Daniels, Chalet AE was somewhat narrower than the other chalets of Range 11, an interpretation which was subsequently accepted by the 1997–8 excavators. This was based on the assumption in 1978–9 that wall L15:08 marked the east side of Chalet AD, whilst L15:09, immediately adjacent, represented the west wall of AE. However in this case AE would have been abnormally narrow (2.80–2.90m internally, 4.00–4.20m overall), just as AD would have been correspondingly wider than the standard primary chalets in this range. This problem is resolved by the evidence noted above for the primary east wall of AD, which occupied a position more consistent with typical chalet spacing. This in turn implies that wall L15:08 could plausibly have functioned as the initial west wall of Chalet AE, whilst L15:09 was associated with a later remodelling of the chalet.
Up to two courses of wall L15:08 were found. It was about 0.63m wide with a narrow gap at its junction with the footings of the north wall of Building 11. A further series of stone blocks located beyond north wall of Building 11 (L15:07) might represent the continuation of wall L15:08. This would imply that the chalet extended northward beyond the footprint of the earlier stable-barrack and backed up against the rear of Chalet Range 12, as suggested by the 1997–8 excavators, whereas Daniels considered the north wall of the chalet occupied the same line as the north wall of the earlier Building 11. However the stonework in question appeared disturbed and did not provide conclusive evidence.
Three courses of the chalet’s east wall (L15:11) survived with their width varying from 0.60m at the top to 0.68m at the bottom. Again there was a small gap between its surviving remains and the north wall, but it clearly cut the latter’s foundations. The resultant internal width of the chalet was 4.80m (6.00m overall). The depth of wall L15:11 suggested to the excavators that it may have originated as a partition wall in the earlier stone barrack block which was subsequently re-used in Chalet AE. However this appears improbable as no other stone partition walls were associated with contubernia of Stable-Barrack 11. A patch of brown and grey sandy soil containing much grey ash (L15:23) in the northern part of the chalet was interpreted as debris belonging to a possible hearth associated with this phase.