Most pastries use butter for its special flavour. It also helps give the pastry a good colour. Butter to be rubbed in needs to be at the right temperature: cold yet pliable.
Once made, many pastry doughs are left to ‘relax’ in the fridge before rolling out. If your kitchen is warm the dough may need extra chilling until it firms up. If you forget your pastry is in the fridge, just leave it (still wrapped) on the worktop to ‘come to’ – if you try to roll out very hard pastry it just cracks.
To ensure individual pastries turn out crisp and golden, don’t overcrowd the baking sheet: leave plenty of room around the pastries so the air can circulate and they can expand.
For neat slices leave quiches and custard-filled tarts to cool and firm up before cutting. Cheesecakes are better after a day and night in the fridge. Choux buns (cooled and unfilled) can be made ahead and stored in an airtight container, or frozen. Just warm through in the oven to re-crisp before serving.
Recipe List
Coffee and Chocolate Choux Buns
Caramelised Lemon Cheesecake Slices
Rich Savoury Shortcrust Pastry
Tangy Blue Cheese Buns with Pecan Dip
As soon as they come out of the oven, these flaky puffs get a brushing of maple syrup glaze for a classy pastry-shop finish. You can use home-made or bought puff pastry.
MAKES 6
YOU WILL NEED: 1 BAKING SHEET, LINED WITH BAKING PAPER
1 large Bramley cooking apple (about 325g)
3 tablespoons maple syrup
1 tablespoon water
1 small cinnamon stick
½ × quantity Puff Pastry (see here) OR 375g ready-made all-butter puff pastry, thawed if frozen
For the glaze
3 tablespoons icing sugar
2 teaspoons maple syrup
1 Make the filling first as it has to cool before using. Peel and quarter the apple. Cut out the core, then cut each quarter across into 6 slices. Put them into a medium pan with the maple syrup, water and cinnamon stick. Set over medium-low heat and simmer gently, stirring every minute or so, until the apples feel soft when you prod them with the spoon and all the liquid has evaporated. (If the apples are ready but there is still liquid in the pan, turn up the heat and cook for another minute, stirring carefully so the apples don’t burn.) Leave the apples until completely cold.
2 Lightly dust the worktop and rolling pin with flour, then roll out the pastry to a 23 × 34cm rectangle. Using an 11cm plain round biscuit cutter, cut out 6 circles (or cut around a saucer of this size using a small sharp knife).
3 Remove the cinnamon stick from the apples (leave it to dry on kitchen paper and use to add flavour to a curry). Spoon a sixth of the apple filling on to one half of each pastry circle, leaving a 1cm border of pastry around the edge.
4 Dip a pastry brush in cold water and lightly brush the 1cm border of each pastry circle to dampen it. Fold the uncovered half of each circle over the filling, so the edges meet neatly. Seal the edges firmly together with your fingers, then press them with the back of a fork to make a neat pattern.
5 Place the half-moon pastries, slightly apart, on the lined baking sheet. Make a small hole in the centre of each pastry with the tip of a small knife. Put the baking sheet in the fridge so the pastry can firm up for 15 minutes. While the puffs are chilling, heat your oven to 200°C/400°F/gas 6.
6 Place the apple puffs in the heated oven and bake for about 15 minutes until a good golden brown. Meanwhile, put the icing sugar and maple syrup into a small bowl and stir well to make a smooth, runny mixture.
7 Remove the baking sheet from the oven and set it on a heatproof surface. Gently brush the maple glaze over the hot puffs. If the glaze seems too stiff to brush on easily (it will melt on contact with the hot pastry) stir in a teaspoon of water. Leave to cool for 10 minutes, then transfer to a wire rack. Serve warm, or cool completely and store in an airtight container. Eat the same or the next day.
What makes puff pastry so delicious is its butteriness – it’s made with as much butter as flour – and what makes it so flaky is the way the butter is rolled into the initial dough to make literally hundreds and hundreds of layers. The lightness is the result of the water in the dough turning to steam in the oven and puffing up the fragile layers.
It’s difficult to make puff pastry in small quantities, but after it has had four ‘turns’ it can be kept in the fridge for 4 days or frozen – the last two ‘turns’ can then be done when you want to use the dough. Save any pastry trimmings: stack on top of each other and then re-roll; don’t knead them together. Chill thoroughly, then use to make Crunchy Tapenade Straws (see here).
MAKES ABOUT 750G
300g plain flour
½ teaspoon salt
300g unsalted butter, cold but not rock-hard
1 teaspoon lemon juice
about 140ml ice-cold water
1 Put the flour and salt into the bowl of a food processor and ‘pulse’ a few times just to combine and aerate the flour. Cut 50g of the cold butter into small pieces and add to the bowl, then process until the mixture looks like fine crumbs.
2 Mix the lemon juice with the water. With the machine running, add to the bowl through the feed tube to make a ball of slightly moist dough. (This initial dough can also be made by rubbing the butter into the flour and then stirring in the lemon and water mix with a round-bladed knife.) Turn out and cut a deep cross in the top of the dough ball. Wrap in clingfilm and chill for 15 minutes.
3 Sprinkle a little flour on the remaining piece of butter, then set it between two sheets of clingfilm. Pound it with a rolling pin until it is half the original thickness. Remove the film and fold the butter in two, then cover with the film and pound again. Keep doing this until the butter has a pliable texture (it should still be very cold – if it gets warm it will be hard to handle, so if necessary put it back in the fridge to firm up slightly). Beat it into a 13cm square.
4 Put the ball of dough on the floured worktop and roll out in four directions (north, south, east and west) to make a shape with four flaps and a thicker square in the centre. Lightly dust the beaten butter with flour, then set it on the centre square and fold the flaps of dough over to enclose it. Gently press the seams with the rolling pin to seal in the butter. Flip the dough over and lightly press with the rolling pin to flatten it – not too hard because you don’t want to squeeze out the butter.
5 Gently roll out the dough away from you into a rectangle about 54 × 18cm. Fold the dough in three like a business letter: fold the bottom third up to cover the centre third, then fold the top third down to cover the other two layers and make a neat square. (Before completing each fold, brush off excess flour with a dry pastry brush.) Lightly press the open edges with the rolling pin to seal. This is your first ‘turn’.
6 Lift up the dough and give it a quarter turn anti-clockwise so the folded edges are now on the right and left. Roll out the dough into a rectangle and fold it in three again, just as before. This is your second ‘turn’. Wrap and chill the dough for 15 minutes, then give it two more ‘turns’.
7 Wrap and chill the dough as before, then give it two more ‘turns’ to make a total of six before a final chilling. It is now ready to use.
For these mini fruit tarts there’s no need to bake the pastry cases ‘blind’ – setting the tray on a heated baking sheet will ensure crisp pastry. Choose apricots that will fit neatly into the holes in the mince pie or bun tray.
MAKES 12
YOU WILL NEED: 1 × 12-HOLE MINCE PIE OR BUN TRAY, VERY LIGHT GREASED WITH BUTTER IF NOT NON-STICK
½ × quantity Puff Pastry (see opposite) OR 375g ready-made all-butter puff pastry, thawed if frozen
For the topping
50g unsalted butter, softened
50g caster sugar
1 medium free-range egg, at room temperature
50g ground almonds
40g amaretti biscuits
6 medium apricots
1 Sprinkle your worktop with flour and roll out the pastry to a rectangle about the size of your mince pie tray. Dip a 7.5cm plain round cutter in flour, then stamp out rounds of pastry, re-flouring the cutter when it starts to stick. Pile up the trimmings, re-roll and cut out more rounds until you have 12.
2 Press a round into each hole in the tray, making sure the pastry edge comes up above the rim of the hole. Prick the base of each pastry case with a fork, then cover the tray lightly with clingfilm and chill for 20 minutes while you make the topping.
3 Heat your oven to 200°C/400°F/gas 6 and put a baking sheet in to heat up. Put the soft butter and sugar into a mixing bowl and beat with a wooden spoon until creamy. Lightly beat the egg in a small bowl with a fork, just to mix, then add to the butter mix along with the ground almonds. Beat until thoroughly combined.
4 Put the amaretti into a plastic bag and tie closed, then bash the bag with a rolling pin to crush the amaretti into crumbs. Tip into the bowl and stir in.
5 Cut the apricots in half and remove the stones. Set one half, cut side up, in each pastry case. Spoon the amaretti mixture into the hollow where the stone was.
6 Place in the heated oven and bake for 20–25 minutes until the topping is a good golden brown and just firm when gently pressed. Serve just warm, or at room temperature, the same day, with cream.
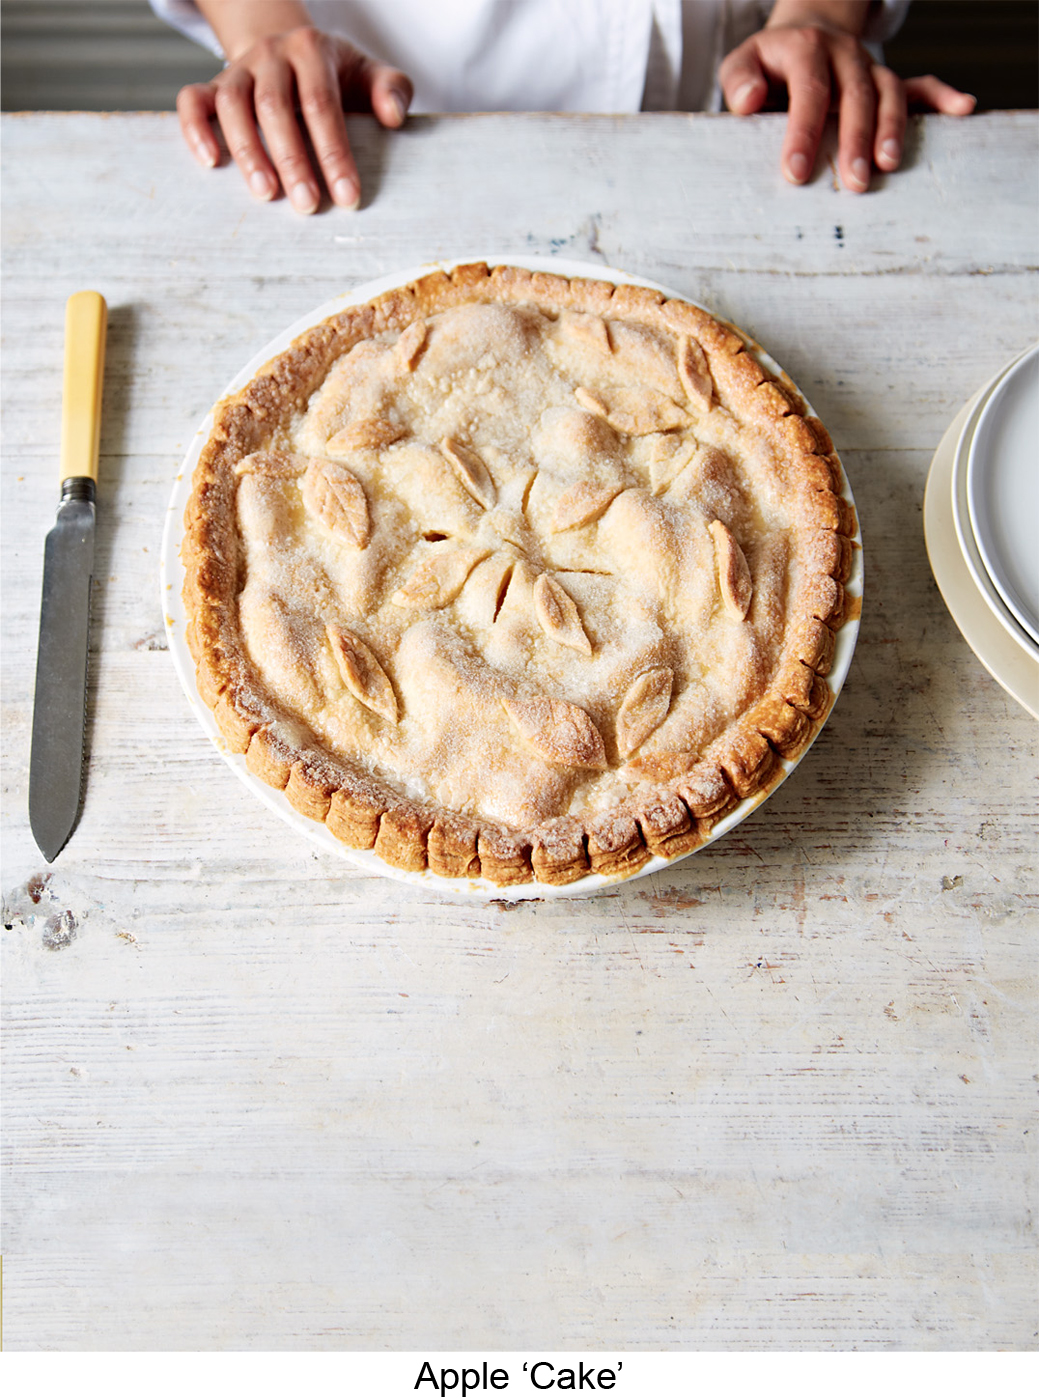
You can use a mix of apple varieties for this deeply filled, Yorkshire pie – it’s a really good use of windfalls. The soft, slightly spongy pastry is made with milk and baking powder.
MAKES 1 LARGE PIE
YOU WILL NEED: 1 × 26CM PIE PLATE OR DEEP OVENPROOF PLATE
For the pastry
300g plain flour
good pinch of salt
¾ teaspoon baking powder
3 tablespoons caster sugar
20g unsalted butter, chilled and diced
finely grated zest of 1 small lemon
1 medium free-range egg yolk
4 tablespoons milk
For the filling
50g unsalted butter, softened
3 tablespoons caster sugar, plus extra for sprinkling
finely grated zest of 1 small lemon
1 tablespoon lemon juice
850g dessert apples (about 8 medium)
1 Put the flour, salt, baking powder and caster sugar into the bowl of a food processor and ‘pulse’ a few times just to mix the ingredients. Add the pieces of butter and run the machine until the mixture looks like fine crumbs. Add the lemon zest and ‘pulse’ a couple of times. Mix the egg yolk with the milk. With the machine running, add the yolk mix through the feed tube. Stop the machine as soon as the dough comes together in a ball. If there are dry crumbs and the dough feels dry and hard, add more milk, a teaspoon at a time. (Alternatively, make the pastry dough by hand – see here.) Turn out the dough, flatten into a disc about 3cm thick and wrap in clingfilm. Chill for about 20 minutes until firm.
2 Meanwhile, make the filling. Put the soft butter, sugar, and lemon zest and juice in a bowl and beat with a wooden spoon until soft and creamy – don’t worry if it looks a bit curdled. Set aside until needed. Peel, core and thinly slice the apples into a mixing bowl. If you are using different varieties make sure they are well mixed.
3 Heat the oven to 190°C/375°F/gas 5 and put a baking sheet into the oven to heat up. Lightly dust the worktop and your rolling pin with flour. Cut off one-third of the pastry for the base (rewrap the rest and set aside on the worktop) and roll out to a circle about 1cm larger than your pie plate. Wrap the pastry loosely around the rolling pin and lift it over the plate. Unroll to drape over the plate, then flour your fingers and gently press the pastry on to the base and rim. Leave any excess pastry hanging over the rim for now.
4 Carefully arrange the apples slices in neat layers on the pastry, mounding them up and adding dabs of the butter mixture, evenly spaced, between each layer. Finish with a layer of apples, and leave the pastry rim clear of filling. Brush the rim with cold water.
5 Roll out the rest of the pastry to a circle that is large enough to cover the mound of apples. Roll it around the pin, as before, and drape it over the pie. Gently but firmly press the pastry on to the dampened rim to seal the two layers together.
6 Use a sharp knife to trim off any pastry hanging over the rim of the plate. With the back of a small knife, ‘knock up’ the edge by making small horizontal cuts into the pastry rim so it looks like the pages of a book. Then scallop the pastry edge: place 2 fingers on the edge and gently draw a knife between them; continue doing this all the way round. Cut a small slit or steam hole in the centre of the pastry lid. If you like, gather up the pastry trimmings, re-roll and cut out leaves, small apples or other fancy shapes for decoration. Stick them on to the pie lid with a dab of water. Lightly brush the pastry with water and sprinkle with sugar.
7 Set the pie plate on the heated baking sheet in the oven and bake for about 20 minutes until the pastry is starting to colour. Turn down the oven to 180°C/350°F/gas 4 and bake for a further 20–25 minutes until the pastry is a good golden colour. Leave to cool for 15 minutes, then serve with custard or ice cream. If there are any leftovers, gently warm them before serving so the buttery filling starts to melt again.
Tarts filled with red fruits – raspberries, strawberries, cherries, tayberries and loganberries, and redcurrants – look and taste wonderful if you brush them with a glossy ‘red’ glaze. Redcurrant jelly, from a jar, makes the simplest and best jelly glaze as it adds a clear pink colour and is slightly sharp rather than sickly sweet. The quantity here makes enough glaze for a tart filled just with fruit; if there is a layer of crème pâtissière or other filling in the tart case under the fruit, you’ll only need about 6 tablespoons to glaze the surface of the fruit.
MAKES ABOUT 225ML
225g redcurrant jelly
1 tablespoon water
1 Put the jelly and water in a small pan and gently melt, stirring constantly with a wooden spoon. Once melted, beat well with the spoon to make a smooth, thick syrup. Remove the pan from the heat before the syrup boils and immediately brush over the fruit.
2 If the syrup cools and thickens before you’ve finished glazing the tart, gently reheat. Any leftover glaze can be cooled and then kept in a covered container in the fridge for up to a week. Reheat before using.
For tarts filled with golden or yellow fruits – peaches, apricots, apples, gooseberries, mangoes, banana – you need an apricot jam glaze. You can find ready-made apricot glaze in supermarkets, but it’s easy to make your own with a jar of good apricot jam. If you want to be extravagant, add ½–1 tablespoon apricot liqueur to the hot glaze before using. You’ll need about 4 tablespoons glaze for a medium – about 23cm – fruit-filled tart.
MAKES ABOUT 300ML
1 × 340g jar apricot jam
1 tablespoon lemon juice
2 tablespoons water
1 Gently warm the jam with the lemon juice and water in a small pan until melted, stirring with a wooden spoon, then bring to the boil. Pour and scrape the jam into a sieve set over a clean pan and press through the sieve to remove the lumps of fruit and skin.
2 Bring the sieved jam back to the boil, stirring, and boil to make a thick syrup. If it is too thick to brush on thinly, add another tablespoon of water and bring back to the boil; if the syrup is too thin then gently boil it, stirring constantly, until it is thick enough to cover the fruit without running off.
3 Brush the hot glaze over the fruit. Any leftover glaze can be cooled and then stored in a covered container in the fridge for a week. Reheat before using.
Early spring is the time for tender, delicate pink forced rhubarb. Try this crumble-in-a-tart warm from the oven with a jug of custard.
MAKES 1 MEDIUM TART
YOU WILL NEED: 1 × 23CM DEEP LOOSE-BASED FLAN TIN
1 × quantity Rich Sweet Shortcrust Pastry (see here)
For the filling
50g gingernut biscuits (about 5)
600g tender young pink rhubarb, cut into 1.5cm pieces
2 tablespoons cornflour
3 tablespoons caster sugar, or to taste
2 lumps (about 25g) stem ginger in syrup, drained and finely chopped
For the topping
70g plain flour
80g light muscovado sugar
60g unsalted butter, chilled and diced
50g gingernut biscuits (about 5)
2 lumps (about 25g) stem ginger in syrup, finely chopped
icing sugar, for dusting (optional)
1 Sprinkle the worktop and your rolling pin lightly with flour, then roll out the pastry and use to line the flan tin (see here). Prick the base of the pastry case well, then chill for 15 minutes.
2 Heat your oven to 190°C/375°F/gas 5. Bake the pastry case ‘blind’ (see here). Remove from the oven, set on a heatproof surface and leave to cool for 10 minutes. Put a baking sheet into the oven to heat up.
3 Make the filling and topping while the pastry case is baking. Finely crush the gingernuts in a food processor, or put into a plastic bag and bash with a rolling pin. Put the rhubarb in a mixing bowl, sprinkle over the cornflour, sugar and chopped ginger, and mix well. Set aside.
4 To make the topping, mix the flour with the sugar in another bowl. Add the butter and rub in to make very coarse, slightly lumpy, crumbs. Roughly crumble the gingernuts into the bowl so there are some fine crumbs and some larger pieces. Add the chopped ginger and mix well.
5 When ready to assemble the tart scatter the gingernut crumbs in the base of the pastry case (this helps keeps the pastry crisp). Stir the rhubarb mixture once more, then spoon on top of the crumbs and spread evenly. Scatter the crumbly topping mixture over the fruit, making sure the fruit is completely and evenly covered.
6 Set the flan tin on the heated baking sheet in the oven and bake for about 35 minutes until the topping is golden and crisp, and the fruit is just tender when prodded with the tip of a sharp knife. Remove from the oven and leave to firm up for about 5 minutes before carefully unmoulding. Serve warm, dusted with icing sugar, if using. Best eaten the same day.
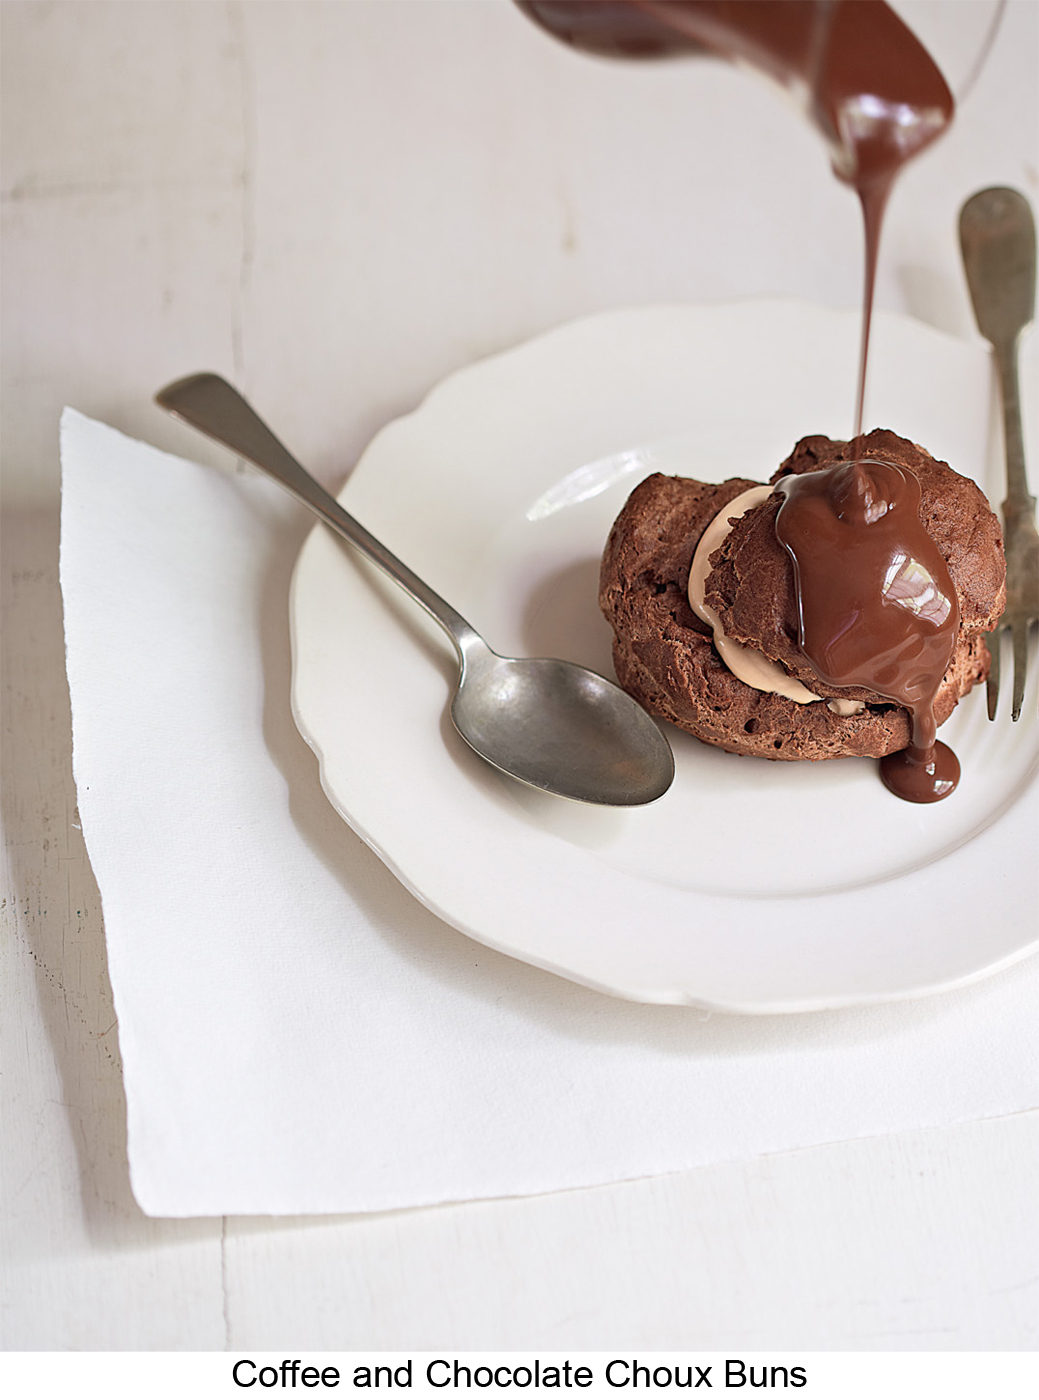
Here choux pastry is sweetened and flavoured with cocoa, then used to make large puffs. To ensure the puffs turn out crisp and light, you need to get rid of the steam, so follow the method carefully. When cold, split the puffs and fill with an easy white chocolate and coffee mousse, and serve with a mocha or chocolate sauce.
MAKES 8
YOU WILL NEED: 1 BAKING SHEET, LINED WITH BAKING PAPER
1 × quantity Choux Pastry (see here) – add 1 tablespoon cocoa powder and 1 teaspoon caster sugar, sifting them with the flour
icing sugar, for dusting
1 × quantity Mocha Sauce (see here) or Hot Chocolate Sauce (see here), to serve
For the mousse
100g good-quality white chocolate, broken into small pieces
100ml double cream
2 teaspoons instant coffee granules or powder
125ml whipping cream, well chilled
1 Heat your oven to 200°C/400°F/gas 6. Spoon the choux pastry in 8 large mounds, about 6cm across and 4cm high, on the lined baking sheet, spacing the mounds well apart to allow for spreading. Place in the heated oven and bake for 20 minutes.
2 Reduce the oven temperature to 180°C/350°F/gas 4. Quickly open and close the oven door, just to let out the steam, then bake for a further 15 minutes until the puffs are crisp.
3 Remove the baking sheet from the oven. Carefully make a small hole in the side of each puff using a cocktail stick or skewer to let out the steam. Return to the oven and bake for a further 5–10 minutes until the pastry is completely crisp. Transfer to a wire rack and leave to cool.
4 Meanwhile, make up the mousse filling. Put the chocolate in a heatproof bowl, set over a pan of hot water and melt very gently, stirring frequently. Remove the bowl from the pan and leave to cool until needed.
5 Heat the double cream in a saucepan until steaming hot but not boiling. Sprinkle over the coffee and stir or whisk in until dissolved. Leave to cool to the same temperature as the chocolate, then whisk the cream into the chocolate (the mixture will darken in colour) until smooth. Leave on the worktop until cooled to room temperature.
6 Whip the whipping cream until it will stand in soft peaks when the whisk is lifted out of the bowl. Whisk in the mocha cream mixture (on the lowest speed possible if using an electric mixer). Stop whisking as soon as the mixtures are combined. Cover and chill until firm.
7 To assemble, split the buns open horizontally and spoon in the mousse. Dust with icing sugar and serve as soon as possible with hot mocha or chocolate sauce.
It’s quite amazing that a lump of thick, sticky paste made in a saucepan can be transformed in the heat of the oven to a crisp and light ball of air, but that is just what happens with choux pastry. Make sure you don’t underbake the shaped dough, otherwise it will turn out flabby rather than crisp.
MAKES ENOUGH FOR ABOUT 12 ÉCLAIRS, 48 PROFITEROLES OR 8 CREAM PUFFS
100g plain flour
175ml water
¼ teaspoon salt
75g unsalted butter, diced
3 medium free-range eggs, at room temperature
1 Sift the flour on to a sheet of greaseproof paper. Put the water, salt and butter into a medium-sized pan and heat gently until the butter has completely melted – don’t let the water boil and begin to evaporate. Then quickly bring the mixture to the boil and tip in the flour all in one go. Remove the pan from the heat and beat furiously with a wooden spoon. The mixture will look a mess at first but don’t worry – as you beat it will turn into a smooth, heavy dough.
2 Set the pan back on low heat and beat the dough for about 2 minutes to slightly cook it, until it comes away from the sides of the pan to make a smooth, glossy ball of dough. Tip the dough into a large mixing bowl and leave to cool until barely warm.
3 Beat the eggs in a small bowl with a fork, just to mix. Using an electric mixer (a wooden spoon won’t give the same result), gradually beat the eggs into the dough, beating well after each addition, until it is very shiny and paste-like and just falls from a spoon when lightly shaken. You may not need to add the last tablespoon or so of beaten egg: the dough needs to be stiff enough to pipe or spoon into shapes – if it is too wet it will spread out rather than puff up in the oven.
4 The dough is now ready to shape. Use immediately or cover the bowl tightly, keep at cool room temperature and use within 4 hours.
Enjoy this coffee-chocolate sauce with profiteroles and choux buns as well as coffee ice cream. Any leftover sauce can be cooled and kept, covered, in the fridge overnight. Gently reheat before serving.
MAKES ABOUT 300ML
1 tablespoon instant coffee granules or powder
1 tablespoon boiling water
100g dark chocolate (about 70% cocoa solids), chopped or broken up
175ml single cream
1 tablespoon icing sugar
1 Dissolve the coffee granules or powder in the boiling water in a small pan (off the heat), then allow to cool until warm.
2 Add the chocolate pieces, cream and sugar. Warm gently – on the lowest heat – stirring frequently, until the chocolate has melted and the sauce is smooth and hot. Do not let the sauce come to the boil. Serve hot or warm.
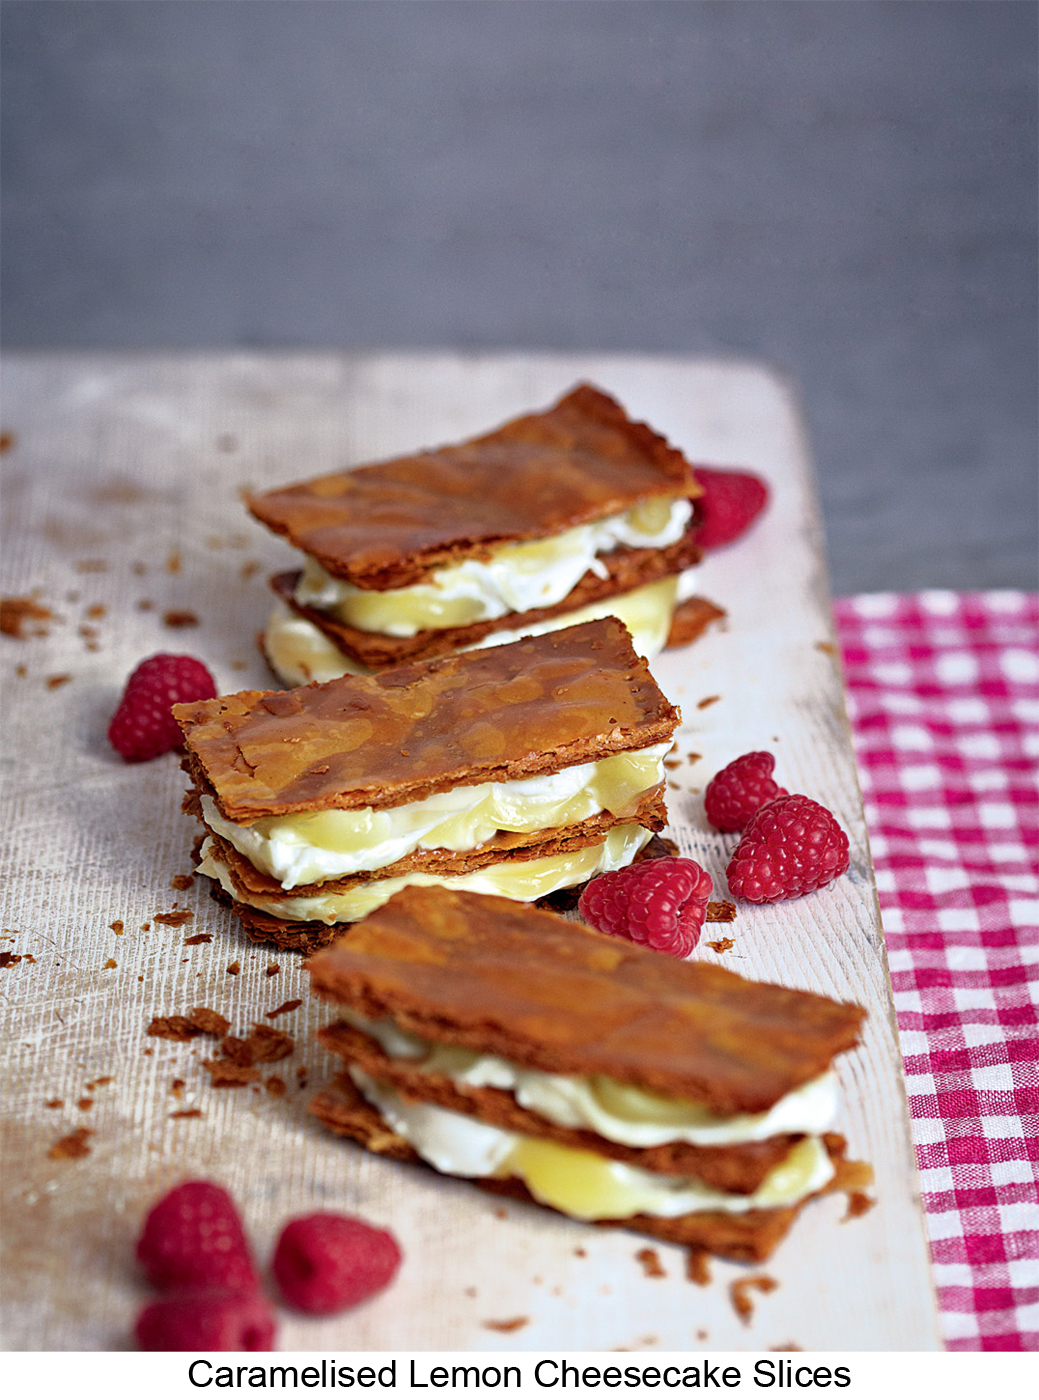
Baking puff pastry a second time with a dusting of icing sugar turns it a shiny, deep golden-brown and adds a nutty, sweet flavour. Instead of the usual cream or custard cream filling, these millefeuille pastries are sandwiched with creamy cheese and lemon curd.
MAKES 6
YOU WILL NEED: 2 LARGE BAKING SHEETS, LINED WITH BAKING PAPER
½ × quantity Puff Pastry (see here) OR 375g ready-made all-butter puff pastry, thawed if frozen
40g icing sugar, for dusting
For the filling
½ × quantity Lemon Curd (see here) OR 175g ready-made lemon curd
150g mascarpone
150g fromage frais
fresh berries or Fresh Raspberry Sauce (see here), for serving (optional)
1 Lightly dust the worktop and rolling pin with flour, then roll out the pastry into a thin 31cm square. Trim the edges to neaten using a pizza wheel-cutter or large sharp knife (take care not to drag the knife as this can give the pastry sheet wonky sides).
2 Loosely roll the pastry square around the rolling pin, then lift it over on to one of the lined baking sheets and gently unroll so the pastry is upside down on the sheet. Brush off the excess flour with a dry pastry brush, then prick the pastry well with a fork. Cover with a second sheet of baking paper. Place in the fridge to chill for 20 minutes.
3 While the pastry is chilling, heat your oven to 180°C/350°F/gas 4. Gently set the second baking sheet on top of the paper on the pastry square (if you don’t have a second baking sheet use an upturned wire rack). This is to make sure the pastry cooks and puffs evenly.
4 Place in the heated oven and bake for about 25 minutes until the pastry is crisp and an even golden brown. If it needs more baking, check it every couple of minutes so it doesn’t get too dark. Remove from the oven and set on a wire rack. Carefully lift off the top baking sheet (or rack) and the covering paper. Leave the pastry square to cool completely on its lining paper on the baking sheet, which will take about an hour. You can turn off the oven for now.
5 When ready to finish, heat the oven again, to 230°C/450°F/gas 8. Using a pizza wheel-cutter or large sharp knife, cut the pastry square into 3 strips, each about 10 × 30cm, then cut each strip across into 6 rectangles. Leave them exactly where they are on the baking sheet. Dust the pastry with a thick, even layer of icing sugar.
6 Place in the heated oven and bake for 3–4 minutes until the sugar melts and caramelises – watch carefully and rotate the sheet after 2 minutes so the pastry colours evenly; don’t let the edges catch. As soon as the pastry is a shiny rich brown, remove the baking sheet from the oven and set it on a wire rack. Leave the pastry to cool before gently separating the rectangles, using the tip of the knife or pizza cutter to help.
7 To make the filling stir the lemon curd until smooth. In another bowl stir the mascarpone and fromage frais together until thoroughly combined, then stir the lemon curd through the mixture so it looks marbled. If not using immediately, cover and chill for up to 6 hours.
8 To assemble, first choose the 6 best-looking rectangles for the tops. For each slice, layer up 3 pastry rectangles with the lemon cheese filling. Serve within an hour with fresh berries or fresh raspberry sauce.
Crumbly, buttery and slightly sweet this is the pastry for your apple pies, jam tarts or mince pies. Use good butter, well chilled for the best results, and don’t skip the chilling stages before and after rolling out – the pastry will thank you! The quantity here is enough for 12 jam tarts or 6 mince pies; to line a 23cm deep flan tin; or to cover a deep (about 1 litre) pie dish.
MAKES ABOUT 350G
200g plain flour
pinch of salt
2 tablespoons caster sugar
125g unsalted butter, chilled and diced
about 2½ tablespoons ice-cold water
1 To make the pastry by hand, sift the flour, salt and sugar into a large mixing bowl. Add the pieces of cold butter and toss them lightly in the flour so they become coated. Using a round-bladed knife cut the butter into the flour so the pieces get smaller, coating them with flour as you go. Then rub the butter into the flour with your fingertips until the pieces of butter have disappeared and you are left with a bowl of fine crumbs.
2 Sprinkle the water over the crumbs. Stir the mixture with the round-bladed knife, gradually adding more water, a teaspoon at a time, if needed, until the crumbs come together into a dough. Gather the dough into a ball, kneading it gently in the bowl just for a couple of seconds until smooth. (Don’t over-handle the dough or it will start to become greasy.)
3 Alternatively, make the pastry in a food processor. Put the flour, salt and sugar into the processor bowl and ‘pulse’ a couple of times until combined. Add the pieces of cold butter and process for about a minute – just until the mixture looks like fine crumbs. With the machine running pour in the water through the feed tube. The crumbs should come together in a ball of dough within a minute. If this doesn’t happen, and there are dry crumbs in the bottom of the processor bowl, add more water a teaspoon at a time.
4 Wrap the ball of dough in clingfilm and chill for 15–20 minutes until firm but not hard. The dough is now ready to be rolled out as needed in your recipe.
Reduce the sugar to 1 tablespoon and replace the water with a mix of 1 medium free-range egg yolk lightly beaten with about 2 tablespoons ice-cold water.
Omit the sugar and add a bit more salt (a good pinch) plus a good pinch of pepper.
Omit the sugar. Increase the butter to 150g and replace the water with a mix of 1 medium free-range egg yolk lightly beaten with 1½ tablespoons ice-cold water.
You only need a small slice of this ultra-rich, heavenly match of toasted nuts, ganache and biscuit-like pastry. For the best flavour use fresh nuts from an unopened bag (hazelnuts quickly go off because of their oils) and a mixture of chocolates – you could use all dark chocolate, but milk chocolate adds a nice rounded flavour – in the filling. The rich pastry is best made in a food processor.
MAKES 1 MEDIUM TART
YOU WILL NEED: 1 × 23CM LOOSE-BASED DEEP FLAN TIN
For the biscuit pastry
200g plain flour
good pinch of salt
80g icing sugar
100g unsalted butter, chilled and diced
4 medium free-range egg yolks
½ teaspoon vanilla extract
For the filling
250g blanched (skinless) hazelnuts
400 ml double cream
150g good-quality milk chocolate (about 34% cocoa solids)
150g dark chocolate (about 70% cocoa solids)
¼ teaspoon sea salt flakes, slightly crushed
1 Put the flour, salt and icing sugar into the bowl of a food processor and ‘pulse’ a couple of times just to combine. Add the pieces of cold butter and process until the mixture looks like fine crumbs. With the motor running, add the yolks and the vanilla through the feed tube. Stop the machine as soon as the dough comes together in a ball, which will take about 1 minute. Remove the dough from the bowl, flatten it into a disc about 3cm thick and wrap in clingfilm. Chill for 30 minutes to firm it up.
2 Lightly dust the worktop and your rolling pin with flour, then roll out the pastry to a circle about 32cm across. Use to line the flan tin (see here). Prick the base of the pastry case well, then chill for 15 minutes.
3 Heat your oven to 180°C/350°F/gas 4. Bake the pastry case ‘blind’ (see here); after removing the paper and beans, turn down the temperature to 160°C/325°F/gas 3 and bake for a further 7–9 minutes. (The pastry isn’t going to be baked any more after this so it needs to be cooked through.) Remove from the oven and set the tin on a wire rack to cool. Turn the oven back up to 180°C/350°F/gas 4.
4 While the pastry case is cooling, make a start on the filling. Tip the nuts into an ovenproof dish or tin and toast in the oven for 8–10 minutes until golden brown. Remove from the oven and leave the nuts to cool.
5 Set aside 12 nuts for decoration, then weigh out 50g of the remainder and process until very finely chopped (don’t let them start to form a sticky paste). Heat the cream in a medium pan until steaming hot. Remove from the heat and stir in the finely chopped nuts. Cover and leave to infuse for at least 45 minutes (up 2 to hours if possible), stirring from time to time.
6 Finely chop or break up both types of chocolate and put into a heatproof bowl. Gently reheat the cream/nut mixture until steaming hot, then pour through a sieve on to the chocolate. Gently stir until melted and smooth. Discard the chopped nuts in the sieve.
7 Roughly chop the rest of the hazelnuts (not the 12 saved for the decoration) and add to the chocolate mixture with the salt. Beat well with a wooden spoon for about a minute until the mixture is thick, then scrape it into the cooled pastry case and spread evenly. Scatter the reserved whole nuts over the top. Lightly cover the tart (still in the tin) with clingfilm and chill for 20 minutes to firm up.
8 Carefully unmould the tart and leave at room temperature for 20 minutes before serving. Store in an air tight container in a cool place or the fridge; bring back to room temperature before serving. Best eaten within 4 days.
The best puff pastry straws should be thin, crisp and flaky so they just melt in the mouth, and should taste of butter and something deliciously savoury. Here, the flavouring is tapenade, a speciality of Provence, made from black olives, anchovy fillets, garlic and capers.
MAKES 30
YOU WILL NEED: 2 BAKING SHEETS, LINED WITH BAKING PAPER
½ × quantity Puff Pastry (see here) OR 375g ready-made all-butter puff pastry, thawed if frozen
4 tablespoons ready-made tapenade or black olive paste
1 Lightly flour the worktop and your rolling pin, then roll out the pastry to a thin rectangle about 40 × 25cm (if the pastry sticks to the worktop as you are rolling, sprinkle with a little more flour).
2 Spread the tapenade evenly over the pastry, right to the edges, using a palette knife. Fold the pastry lengthways in half to make a rectangle 40 × 12.5cm. Gently roll the rolling pin over the pastry, just to seal the layers – you don’t want to make it any thinner.
3 Using a large, sharp knife or a pizza-wheel cutter, cut the rectangle across into 30 even strips each 1.5cm wide and 12.5cm long. Try not to drag the knife or pull the dough out of shape as this can spoil the flaky pastry layers.
4 Hold one end of a pastry strip and, with the other hand, twist the strip several times. Lay it on a lined baking sheet. Repeat with the rest of the strips. Lightly cover with clingfilm and chill for 20 minutes to firm up and ‘relax’ so the pastry doesn’t shrink or toughen in the heat of the oven.
5 Heat your oven to 200°C/400°F/gas 6. Uncover the pastry strips and place in the heated oven to bake for about 15 minutes until crisp and a good golden brown. Carefully transfer to a wire rack and leave to cool. Serve warm the same day, or store in an airtight container and gently reheat the next day (in an oven heated to 180°C/350°F/gas 4, for about 5 minutes).
Variation: Mustard Cheese Straws
Instead of tapenade, spread 3 tablespoons mild mustard, or herb-flavoured mustard, over the rolled-out pastry. Mix 90g grated Parmesan cheese with 2 teaspoons mild smoked paprika and sprinkle over the mustard. Press the cheese into the mustard, then fold the pastry in half and continue as above. When you twist the pastry strips, sprinkle any cheese that drops off back on the straws.
A rich combination of crisp pastry and a classic smoked fish soufflé. Most of the preparation – the pastry case baked blind, the fish poached and the sauce made – can be done up to 12 hours ahead. Keep the fish and sauce, covered, in the fridge until needed, then gently warm the sauce before continuing with the recipe.
MAKES 1 MEDIUM TART
YOU WILL NEED: 1 × 23CM LOOSE-BASED DEEP FLAN TIN
1 × quantity Rich Savoury Shortcrust Pastry (see here) – sift ¼ teaspoon salt and 2 good pinches of cayenne pepper or smoked hot paprika with the flour
For the filling
1 × 250g piece undyed smoked haddock fillet
250ml milk (full-fat or semi-skimmed)
25g unsalted butter
25g plain flour
125g Gruyère cheese, grated
½–1 teaspoon wholegrain mustard salt, pepper and cayenne pepper to taste
3 medium free-range eggs, separated, plus 1 egg white, at room temperature
1 Lightly dust the worktop and your rolling pin with flour, then roll out the pastry and use to line the flan tin (see here). Prick the base well, then chill for about 20 minutes.
2 Heat your oven to 190°C/375°F/gas 5. Bake the pastry case ‘blind’ (see here); after removing the paper and beans, turn down the temperature to 180°C/350°F/gas 4 and bake for a further 7 minutes. Remove from the oven and set aside on a wire rack to cool. Turn the oven back up to 190°C/375°F/gas 5 and put a baking sheet into the oven to heat up.
3 Make the filling while the pastry case is being baked blind and then cooling. Put the fish into a medium-sized pan and pour over the milk. Bring to the boil, then turn down the heat, cover the pan and simmer for 2 minutes. Remove from the heat and leave the fish to cool in the milk. Lift out the fish (keep the milk for later) and flake on to a plate, discarding the skin and any bones. Set aside.
4 Melt the butter in a large pan. Stir in the flour with a wooden spoon and cook over low heat for a minute. Stir in the saved milk, then cook, stirring constantly, until the mixture comes to the boil and thickens to make a thick, smooth sauce. Simmer, stirring, for a minute to cook out any floury taste.
5 Remove the pan from the heat and set it on a heatproof surface. Stir in 100g of the grated cheese, the mustard and seasoning. Taste and add more mustard, salt, pepper and cayenne as needed (make sure the sauce isn’t bland). Stir in the 3 egg yolks.
6 Put the 4 egg whites in a large, very clean bowl with a pinch of salt and whisk with an electric mixer until they will stand in stiff peaks. Using a large metal spoon or rubber spatula, fold about a third of the whites into the cheese sauce mixture. Then carefully fold in the remaining whites in 2 batches.
7 Arrange the flaked fish in the cooled pastry case (still in the tin), then spoon the cheese soufflé mixture on top. Scatter the remaining cheese over the filling. Set the tin on the heated baking sheet in the oven and bake for about 25 minutes until the top is a good golden brown and feels firm when touched in the centre (it should be much firmer than a normal soufflé as it has to be cut in slices).
8 Remove the tin from the oven and leave the tart to cool and firm up for about 10 minutes before carefully unmoulding. Serve warm. Best eaten the same day.
The classic sauce for Eggs Benedict (poached eggs plus a slice of ham or bacon on a toasted English muffin), as well as steamed asparagus or poached salmon, hollandaise is really a warm mayonnaise made with melted butter instead of oil. This easy method uses a food processor or blender, and the result is a very light, but rich-tasting buttery sauce. You can flavour it with chopped fresh herbs added to the processor at the last minute.
MAKES ABOUT 250ML
3 medium free-range egg yolks, at room temperature
2 tablespoons water
juice of ½ medium lemon, or to taste
175g unsalted butter
salt and pepper
1 Put the egg yolks, water and lemon juice into the bowl of a food processor or blender. Add a little salt and pepper and process briefly until just combined – about 10 seconds.
2 Melt the butter in a small pan over low heat. Skim the froth off the surface with a small spoon, then heat the clear butter until very hot but not quite boiling.
3 With the motor running, pour the hot butter into the processor bowl through the feed tube in a thin, steady stream. Stop the machine as soon as all the butter has been added and the sauce is creamy and thick. Taste and add more salt, pepper or lemon juice, if needed. Serve as soon as possible.
This slow-cooked venison curry – spiced with coarsely ground black pepper and flavoured with tamarind (an essential ingredient in Worcestershire sauce) and soy sauce – has an easy topping of crisp, golden filo pastry. The filling can be cooled, then covered and kept in the fridge for up to 48 hours. Bring back to room temperature before continuing with the recipe.
MAKES 1 MEDIUM PIE
YOU WILL NEED: 1 × 1.25–1.5 LITRE PIE DISH
1 × 270g pack filo pastry (about 6 sheets)
50g unsalted butter, melted
For the filling
500g boneless braising venison, cubed
2 medium onions, roughly chopped
4 large garlic cloves, roughly chopped
1 × 4cm piece fresh root ginger, roughly chopped
3 tablespoons rapeseed oil
¼ teaspoon coarsely ground black pepper, or to taste
¼ teaspoon freshly grated nutmeg
1 cinnamon stick seeds from 4 cardamom pods, crushed
3 tablespoons soy sauce, or to taste
3 – 4 teaspoons tamarind paste, to taste
1 tablespoon dark muscovado sugar
250ml vegetable or beef stock
1 If the pastry is frozen, thaw following the instructions on the pack. Meanwhile, start the filling as the meat needs long, slow cooking. Check the pieces of venison and cut if necessary so they are all roughly the same size. Put on one side until needed.
2 Put the onions, garlic and ginger in a food processor and chop very finely – almost to a purée (you can also do this with a large knife on a chopping board, but it takes time). Heat the oil in a deep, heavy-based flameproof casserole or saucepan over medium heat and stir-fry the onion mixture for 2–3 minutes until it is just starting to change colour (don’t let the mixture burn).
3 Add the pieces of meat and stir-fry for 3–4 minutes until starting to colour. Stir in the ground pepper, nutmeg, cinnamon stick and crushed cardamom, followed a minute or so later by the soy sauce, tamarind paste, sugar and stock. Bring to the boil, then stir well, cover the casserole or pan tightly and turn down the heat. Simmer very gently, stirring occasionally, for 1¼–1½ hours until the meat is very tender.
4 The sauce should be fairly thick, not a thin runny gravy, so if necessary remove the lid and simmer until the excess liquid has been cooked off. Taste the mixture – it should be spicy/hot with a balance of sweet and sour. Add more black pepper if the filling needs more ‘heat’, more tamarind paste if it is too bland, or more soy sauce if it lacks salt. When you are happy with the flavouring, tip the mixture into the pie dish and remove the cinnamon stick. Leave to cool.
5 Heat your oven to 180°C/350°F/gas 4. Brush the rim of the pie dish with water to dampen it. Unwrap the pastry and remove one sheet from the pack; keep the rest covered with a slightly damp tea towel (or sheet of clingfilm) to prevent it from drying out and becoming hard to use. Lay the sheet of pastry flat on the worktop and brush it lightly with melted butter. Cover it with a second sheet of pastry and brush this lightly with butter. Lift both sheets over the filling in the pie dish and gently press the pastry on to the rim; leave any excess pastry hanging down.
6 Brush another pastry sheet lightly with butter, then tear into strips – they don’t have to be neat or even of similar size. Drape the strips, slightly crumpled, on top of the pie. Repeat with the remaining 3 sheets of pastry to cover the top completely and evenly, taking care not to compress the strips (which would make the topping heavy and soggy). Now trim off the overhanging pastry with kitchen scissors.
7 Set the pie dish on a baking sheet (in case of drips) and place in the heated oven. Bake for 30–40 minutes until a good golden brown. Serve hot.
Unlike a quiche, this tart is made without a custard, and should be eaten warm from the oven. You can vary the filling very easily: try adding a few thin slices of prosciutto or cooked ham between the mustard and cheese layers, or use pesto and goats’ cheese instead of mustard and Gruyère.
MAKES 1 MEDIUM TART
YOU WILL NEED: 1 × 23CM LOOSE-BASED DEEP FLAN TIN
For the rosemary shortcrust pastry
200g plain flour
1 teaspoon finely chopped fresh rosemary
140g unsalted butter, chilled and diced
3–4 tablespoons ice-cold water
For the filling
800g ripe tomatoes (about 10 medium)
1½ tablespoons Dijon mustard
175g Gruyère cheese, coarsely grated
1½ tablespoons virgin olive oil
½ teaspoon fresh thyme leaves OR a couple of pinches of dried herbes de Provence
salt and freshly ground black pepper
1 Put the flour, ¼ teaspoon salt and the rosemary into the bowl of a food processor and ‘pulse’ a couple of times to mix. Add the pieces of butter and run the machine just until the mixture looks like fine crumbs. With the machine running, add the water through the feed tube. Stop as soon as the mixture comes together in a ball of soft but not sticky dough. If the dough feels dry and hard, or won’t come together, or there are dry crumbs in the bottom of the bowl, add more water a teaspoon at a time. (Alternatively, make the pastry dough by hand; see here.) Flatten the pastry into a disc about 3cm thick, wrap in clingfilm and chill for 15 minutes.
2 Lightly dust the worktop and your rolling pin with flour, then roll out the pastry to a circle about 32cm across. Use to line the flan tin (see here). Prick the base of the pastry case well, then chill for 15–20 minutes.
3 Heat your oven to 190°C/375°F/gas 5. Bake the pastry case ‘blind’ (see here). Remove from the oven and set on a wire rack to cool. Turn up the temperature to 200°C/400°F/gas 6, and put a baking sheet in the oven to heat up.
4 While the pastry case is baking and cooling, prepare the tomatoes for the filling. Cut into slices about 5mm thick, discarding the stalk ends. Put the slices in a colander and leave to drain for 30 minutes. Give the colander a gentle shake from time to time to dislodge as much excess liquid as possible.
5 Spread the mustard over the base of the cooled pastry case (still in the tin). Scatter the grated cheese evenly over the mustard. Arrange the well-drained tomato slices on top of the cheese, slightly overlapping and at an angle propped up against each other. Sprinkle the oil over the tomatoes and season to taste with salt and pepper. Finish with the herbs.
6 Set the flan tin on the heated baking sheet in the oven and bake for 20–25 minutes until the edges of the tomatoes are turning colour. Remove from the oven and leave to cool for 5 minutes before carefully unmoulding. Serve warm.
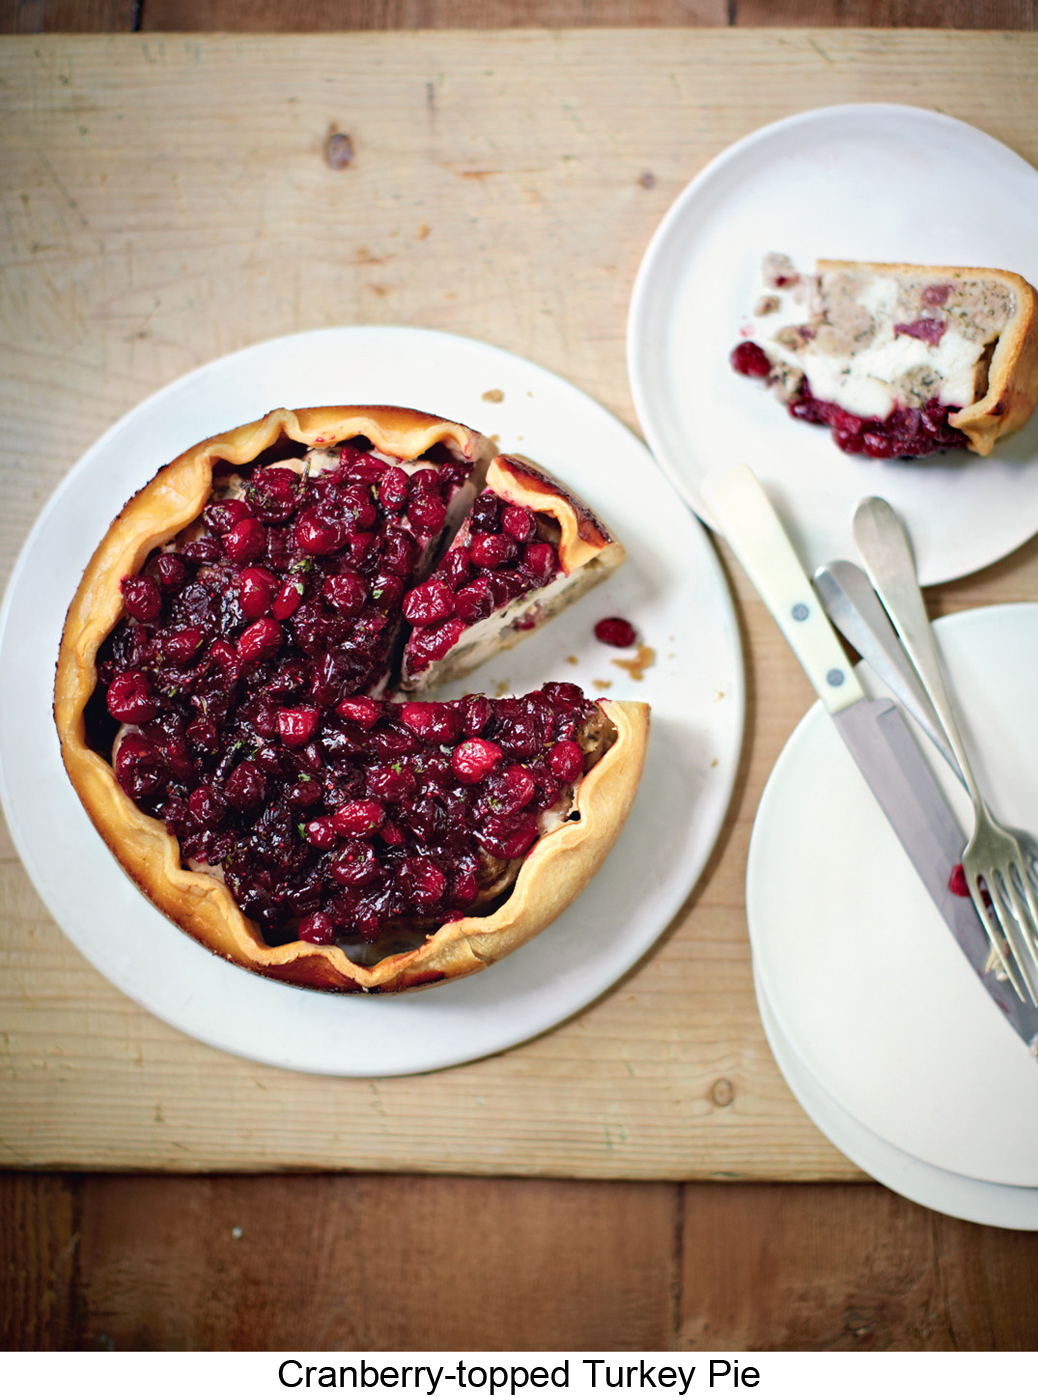
Everything for this large, open-topped pie – the filling of turkey strips and tiny stuffing balls, the hot water crust pastry and the cranberry chutney topping – can be made in stages. The pie really tastes best made a day or so before cutting.
MAKES 1 LARGE PIE
YOU WILL NEED: 1 × 20.5CM SPRINGCLIP TIN, LIGHTLY GREASED WITH BUTTER
For the filling
1kg skinless, boneless turkey or chicken breast
2 tablespoons brandy
250g good pork (or chicken or turkey sausages
1 tablespoon rapeseed oil
1 medium shallot, finely chopped
2 tablespoons finely chopped fresh herbs (parsley plus a sage leaf and a sprig each of rosemary and thyme if possible)
50g fresh breadcrumbs
80g cranberries (fresh or frozen)
For the pastry
300g strong white flour (not extra strong Canadian flour for breadmakers)
70g white fat
30g unsalted butter
150ml water
For the topping
2 tablespoons rapeseed oil
1 medium shallot, finely chopped
1 garlic clove, finely chopped
220g cranberries (fresh or frozen)
2 tablespoons caster sugar
1 tablespoon red wine vinegar
salt and freshly ground black pepper
1 tablespoon chopped fresh herbs (a mixture of parsley, sage, rosemary and thyme if possible)
1 To make the filling, cut the turkey or chicken into strips roughly 2 × 7cm. Put them in a large mixing bowl with the brandy, ¾ teaspoon salt and ¼ teaspoon black pepper. Mix thoroughly, then cover the bowl and chill for several hours if possible, or while preparing the other ingredients.
2 Next, make the stuffing balls. Squeeze the sausage meat out of the skins into a mixing bowl. Heat the oil in a small pan, add the chopped shallot and cook gently for about 3 minutes until softened. Cool, then add to the sausagemeat with the herbs and breadcrumbs. Season with a little salt and pepper. Mix everything together thoroughly. Roll the mixture into about 35 tiny balls, no bigger than 2.5cm. Put on a plate, cover and chill. If using frozen cranberries, remove them from the freezer (those for the topping too).
3 To make the pastry, sift the flour and ¾ teaspoon salt into a heatproof bowl and make a well in the centre. Put the white fat and butter into a pan with the water and heat gently until the fat melts; don’t let the mixture boil. Pour into the centre of the flour and mix vigorously with a wooden spoon to make a soft, paste-like dough – don’t worry that it looks and mix vigorously with a wooden spoon to make a soft, paste-like dough – don’t worry that it looks a mess to begin with; it will come together as you beat. When the dough is cool enough to handle turn it out of the bowl on to a worktop lightly dusted with flour.
4 Heat your oven to 200°C/400°F/gas 6. Dust your rolling pin with flour and roll out the dough to a circle large enough to line the tin – about 34cm. Lightly flour the pastry circle with flour, then fold it in four and lift it into the tin. Unfold the pastry and press it on to the base and up the sides of the tin so it reaches the rim. Make sure there are no cracks or holes (the soft pastry is easy to mould and press together).
5 Add the stuffing balls and cranberries to the turkey strips and gently mix together until everything is evenly distributed. Pack the filling into the pastry case, making sure there are no pockets of air. Fold the pastry that extends above the filling over it to make a 1cm rim (trim off any excess with kitchen scissors).
6 Cover the tin tightly with foil to seal, then set it on a baking sheet. Place in the heated oven and bake for 15 minutes. Turn down the oven temperature to 180°C/350°F/gas 4 and bake for a further 2 hours.
7 While the pie is baking make the topping. Heat the oil in a medium pan, add the chopped shallot and garlic and cook gently for about 3 minutes until softened, stirring frequently. Add the cranberries, sugar, vinegar, ¼ teaspoon salt and the herbs. Cook gently, stirring occasionally, until the juices start to run, then simmer until the cranberries are soft and starting to break up, and the mixture is thick and jammy. Taste and add more salt, sugar or vinegar as needed to make a sweet/sour chutney-like mixture. Remove from the heat and set aside until needed.
8 Remove the pie from the oven and set it, on its baking sheet, on a wire rack. Remove the foil. Carefully run a round-bladed knife inside the tin to loosen the pastry (it will still be soft); do not unclip the tin yet. Stir the cranberry mixture, then spoon on top of the pie to completely cover the turkey filling. Leave until cool, then carefully unmould. Serve at room temperature. Store tightly wrapped or in an airtight container in the fridge and eat within 5 days.
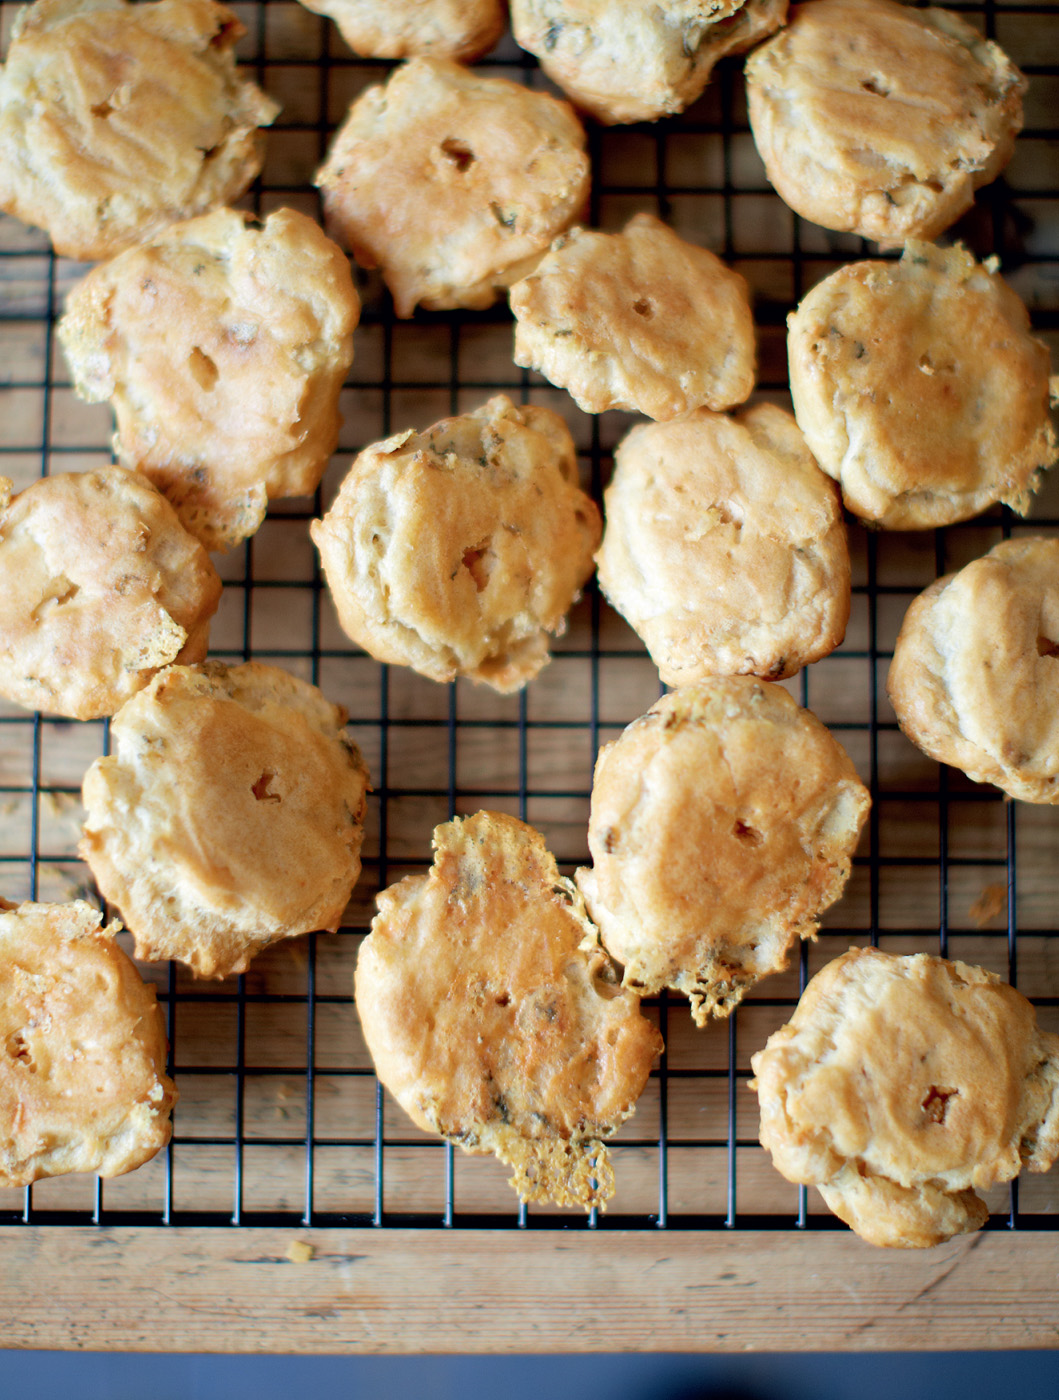
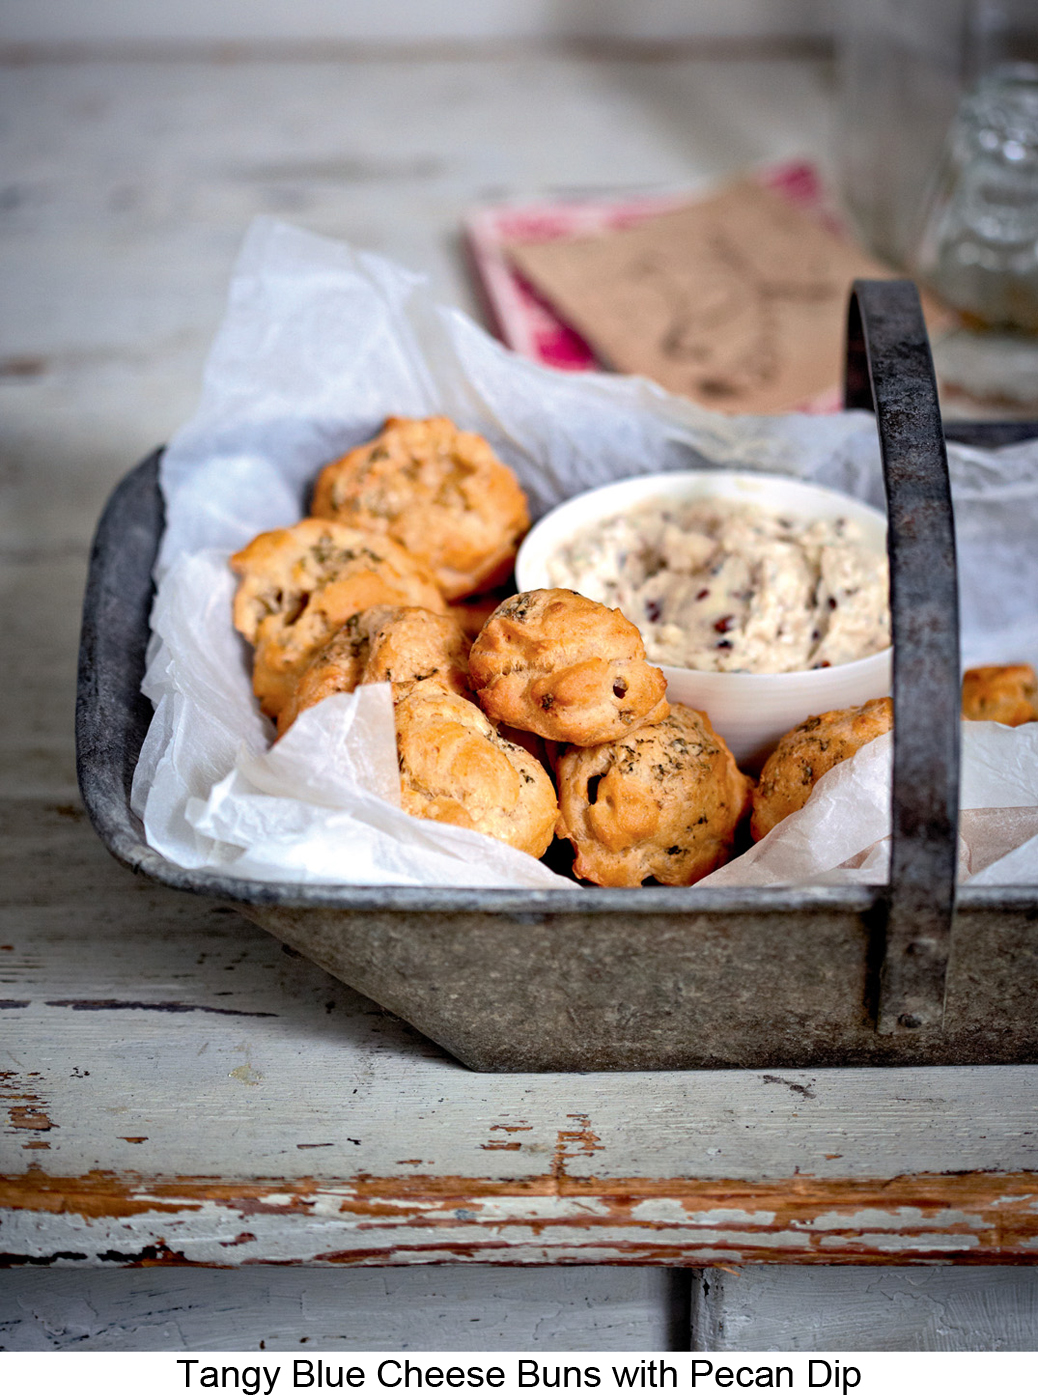
Adding a well-flavoured blue cheese, like a piquant Stilton, turns a basic choux dough into a crisp savoury treat. The simple dip is made from three cheeses plus crunchy pecans. If, when making the choux pastry, you don’t need the last tablespoon or so of egg, mix it with a teaspoon of water and use instead of a fresh egg for glazing.
MAKES ABOUT 30
YOU WILL NEED: 1–2 BAKING SHEETS, LINED WITH BAKING PAPER
1 × quantity Choux Pastry (see here) – sift ¼ teaspoon cayenne pepper, or to taste, with the flour
75g tangy blue cheese, crumbled
1 medium free-range egg, lightly beaten with a pinch of salt
For the dip
50g pecan halves
50g tangy blue cheese
good pinch of cayenne pepper, or to taste
5 tablespoons fromage frais
75g mascarpone
1 tablespoon milk (optional)
1 Heat your oven to 200°C/400°F/gas 6. When you have finished beating the eggs into the choux pastry, mix in the crumbled cheese using a wooden spoon or plastic spatula. Spoon the choux pastry on to the lined baking sheets to make about 30 small mounds, each 3.5cm wide and 2.5cm high (the easiest way to do this is to take a heaped teaspoonful of the dough and use another teaspoon to push it off).
2 Lightly brush the mounds with the beaten egg to glaze, taking great care you don’t accidentally ‘glue’ the pastry to the paper. Place in the heated oven and bake for about 20 minutes until the puffs are golden. Reduce the oven temperature to 180°C/350°F/gas 4, and quickly open and close the oven door to let out the steam. Bake for a further 5 minutes until the puffs feel crisp and firm.
3 Remove from the oven. Make a small hole at one side of each puff using a cocktail stick or skewer, to let out the steam. Return to the oven and bake for 4 minutes to make sure the centres are dry. Transfer to a wire rack and leave to cool until warm; leave the oven on. (The puffs can be stored in an airtight container for up to 24 hours.)
4 To make the dip, put the pecans in an ovenproof dish or tin and toast in the oven for 5 minutes. Leave to cool, then chop finely. Mash the blue cheese in a mixing bowl with a fork, then stir in the cayenne, fromage frais and mascarpone. If the mixture is a bit stiff for dipping, work in a little milk. When thoroughly combined stir in the pecans. Taste and add more cayenne if needed. Cover and chill until ready to serve (up to 24 hours).
5 If you’ve made the puffs ahead of time, gently reheat in the oven at 180°C/350°F/gas 4 for 5 minutes. Spoon the dip into a serving bowl, set on a large platter and surround with the warm puffs.
Roasting turns sweet potatoes into a rich, moist filling for pasties made with a Cheddar shortcrust. These are best eaten the same or next day (store in an airtight container in a cool place, but not the fridge).
MAKES 6
YOU WILL NEED: 1 BAKING SHEET, LINED WITH BAKING PAPER
For the filling
1 large sweet potato, about 375g, cut into 4–5cm chunks
2 tablespoons rapeseed or olive oil
1 large garlic clove, or to taste, finely chopped
1 small sprig fresh rosemary, finely chopped
few grinds black pepper OR good pinch of dried chilli flakes
salt
2 tablespoons pine nuts or chopped roasted hazelnuts (optional)
1 × 120g log goats’ cheese
1 medium free-range egg, for glazing
For the cheese shortcrust
200g plain flour
¼ teaspoon salt
cayenne pepper
100g unsalted butter, chilled and diced
100g mature Cheddar cheese, grated
about 3 tablespoons ice-cold water
1 Heat your oven to 200°C/400°F/gas 6. Put the sweet potato into a roasting tin or ovenproof dish, add the oil and toss with your hands so the chunks are coated in oil. Place in the heated oven and roast for 30 minutes until the chunks are tender and the edges are turning brown.
2 Make the pastry while the sweet potatoes are roasting. Put the flour, salt and a couple of good pinches of cayenne into a food processor and ‘pulse’ a couple of times until combined. Add the pieces of cold butter and process for about a minute – just until the mixture looks like fine crumbs. Add the cheese and ‘pulse’ until mixed in. With the machine running, pour in the water through the feed tube. The crumbs should come together in a ball of dough within a minute. If this doesn’t happen, and there are dry crumbs in the bottom of the processor bowl, add more water a teaspoon at a time. (Alternatively, you can make the pastry by hand – see here.) Shape into a ball and flatten into a disc about 3cm thick, then wrap in clingfilm and chill for about 15 minutes.
3 Remove the tin of sweet potatoes from the oven, set it on a heatproof surface and stir in the garlic, rosemary, pepper or chilli flakes, and a couple of pinches of salt. Return the pan to the oven to roast for a further 3 minutes. Leave to cool for about 15 minutes. Turn down the oven to 180°C/350°F/gas 4.
4 Roughly mash the sweet potatoes with a fork – there should be some lumpy bits. Add the nuts and mix everything together so the nuts and herbs are evenly distributed. Cut the goats’ cheese log into 6 even slices.
5 Lightly sprinkle the worktop and your rolling pin with flour, then roll out the dough to a rectangle about 26 × 39cm. With a large, sharp knife cut the rectangle lengthways in half, to make 2 strips 13 × 39cm. Cut each strip across in 3, to make six 13cm squares.
6 The squares are going to be folded in half diagonally to make triangles, so the filling should be placed on one side of a diagonal line: spoon a sixth of the potato mixture on to each square, leaving a 1cm border clear around the two outer edges. Set a slice of goats’ cheese on top of each mound of potato filling.
7 Beat the egg in a small bowl with a fork, just to mix. Using a pastry brush, lightly brush the edges of each square with beaten egg. Fold the pastry over the filling to make triangular pasties. Press the seams firmly together to seal, then press all the way round with the back of a fork to give a striped pattern.
8 Arrange the pasties, slightly apart, on the lined baking sheet. Brush them with beaten egg, then place in the oven and bake for 25–30 minutes until a good golden brown. Leave the pasties to cool on the baking sheet for 4–5 minutes, then transfer to a serving plate and eat warm, or leave to cool on a wire rack and eat at room temperature.