834 Cool Treatment Options
CONSTRAINT-INDUCED THERAPY FOR THE ARM AND HAND
_______________
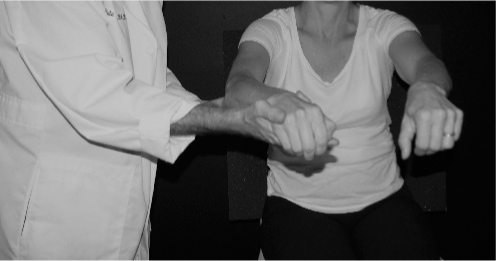
The basis of most recovery from stroke is neuroplasticity (see the section Use Your Fantastic Plastic Brain in Chapter 1). There are several ways of activating the neuroplastic process. The most famous is constraint-induced therapy (CIT). CIT is the most researched and the most clinically proven stroke recovery option. In traditional CIT, the “good” hand and arm are immobilized with either a sling and/or mitt while the “bad” hand and arm do a lot of repetitive practice. In the clinic, the exercises are repeated for six to eight hours a day, for two to three weeks. Added to that practice is another element of CIT. When they are at home during those two to three weeks, there is added work: Patients have to wear a sling and/or mitt 90 percent of their waking hours. If this schedule seems tough, consider the fact that athletes and musicians often spend multiple hours a day skill building. And they do it year in and year out. A stroke survivor who is trying to recover is just like an athlete or musician; they are always trying to rewire theirs brain by practicing with their limbs.
How Is It Done?
There are facilities that provide structured CIT programs. The most famous is the Taub Therapy Clinic, located in Birmingham, Alabama. This clinic is run by Edward Taub, PhD, originator of CIT.
• Taub Therapy Clinic, Birmingham, Alabama
• Website: www.taubtherapy.com
• Phone: 866-554-TAUB
84This clinical intervention is intense; it lasts for either two or three weeks, and it is done multiple hours a day. This therapy is expensive because it requires many hours of occupational and physical therapy, and a therapist’s time is expensive.
Another form of CIT is called modified constraint-induced therapy (mCIT). Developed by stroke-recovery researcher Dr. Stephen J. Page, mCIT is now available in many facilities across the United States. mCIT is different from traditional CIT in terms of the number of hours a day that are needed to see the treating therapist. With classic mCIT, the stroke survivor sees the therapist three times a week, but wears a constraint on the affected arm and hand for up to five hours a day during active hours when they are at home. Compared to traditional CIT, mCIT uses less clinical hours, with more of the work being done at home. Less time in the clinic makes mCIT a less expensive option. The multiple hours required by traditional CIT makes it impossible for many therapists to schedule. Because the amount of time spent in the clinic is radically reduced, therapists can fit mCIT into their normal working day.
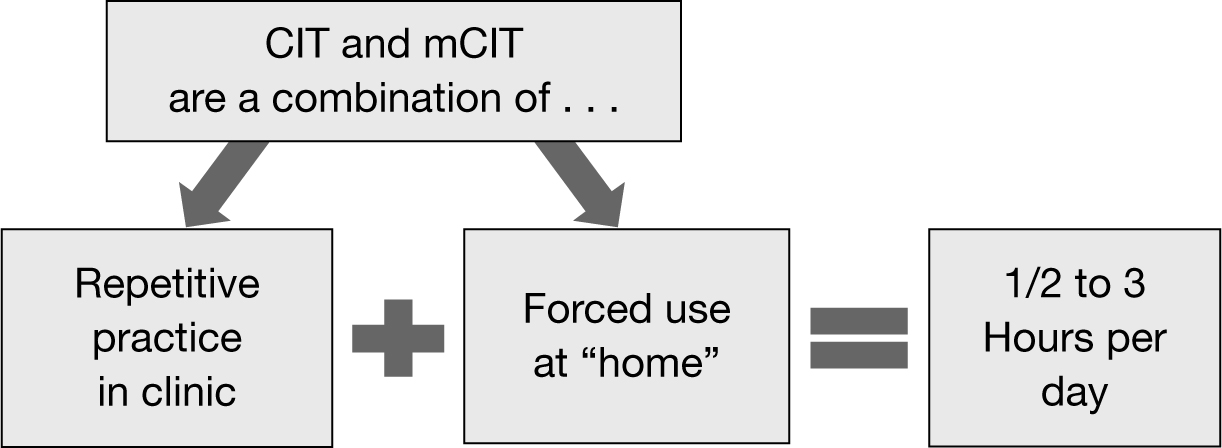
Note that any form of constraint-induced therapy is some combination of repetitive practice (done in the clinic) and forced use (done at home).
The question of how much time is spent on each is flexible and is determined by the needs and wishes of the clinicians (doctors, therapists, etc.) and survivors. This combination of factors helps determine the “dose” of CIT.
Analysis of research has led to an accepted total amount of hours spent of CIT per day as somewhere between one-half and three hours.
Therapists have been modifying mCIT ever since the mid-2000s to fit their set of skills and incorporate the resources of their particular hospital or rehab facility.
86Here is a partial list of facilities that provide some form of CIT or mCIT:
• Kessler Institute for Rehabilitation, West Orange, New Jersey
Website: kessler-rehab.com
Phone: 973-731-3600
• Garden State Physical Therapy P.C., Hasbrouck Heights, New Jersey
Website: marketingconsultant.powweb.com/id11.html
Phone: 201-998-6300
• Burke Rehabilitation Hospital, White Plains, New York
Website: burke.org
Phone: 914-597-2500
• Sunnyview Rehabilitation Hospital, Schenectady, New York
Website: sunnyview.org
Phone: 518.382.4500
• Magee Riverfront, Philadelphia, Pennsylvania
Website: mageerehab.org/rehab-services/outpatient-and-specialties/constraint-induced-movement-therapy
Phone: 215-218-3900
• Braintree Rehabilitation Hospital, Braintree, Massachusetts
Website: healthsouthbraintree.com/en/our-approach/conditions-we-treat/stroke
Phone: 781-348-2500
• Spaulding Rehabilitation Hospital, Boston, Massachusetts
Website: spauldingnetwork.org
Phone: 617-573-7000
• Fairlawn Rehabilitation Hospital, Worcester, Massachusetts
Website: fairlawnrehab.org
Phone: 508-471-9322
• CarePartners Health Services, Asheville, North Carolina
Website: www.carepartners.org/services_atoz_ci.html
Phone: 828277-4800
• Emory Healthcare’s HealthConnections, Atlanta, Georgia
Website: emoryhealthcare.org
Phone: 404-778-7777
• Siskin Hospital for Physical Rehabilitation, Chattanooga, Tennessee
Website: siskinrehab.org/patient/costraint.asp
Phone: 423-634-1200
• Shirley Ryan Ability Lab Chicago
Website: sralab.org/conditions/stroke-recovery
Phone: 800-354-7342
• University of Michigan Health System, MedRehab, Ann Arbor, Michigan
Website: med.umich.edu
Phone: 734-998-7911
• Advanced Recovery Rehab Center, Sherman Oaks, California
Website: advancedrecovery.org
Phone: 818-386-1231
• Mercy General Hospital, Sacramento, California
Website: mercygeneral.org
Phone: 916-453-4621
• Precision Rehabilitation, Long Beach, California
Website: precisionrehabilitation.com
Phone: 562-988-3570
• Providence Health & Services Alaska, Anchorage, Alaska
Website: alaska.providence.org/locations/pamc/services/rehabilitation
Phone: 907-212-6300
• Manchester Neuro Physio, Manchester, Liverpool and Cheshire, UK
Website: www.manchesterneurophysio.co.uk/index.php
Phone: 0161.883.0066
Constraint-induced therapy (and mCIT) will not work if there is no jumping-off point. Research shows that you need some movement in the hand to start with. Here are some of the tests that researchers and clinicians have used to determine if CIT or mCIT is appropriate for someone:
• The ability to actively lift hand, thumb, and at least two fingers from a relaxed (drooped) position
• The ability to release a grasped tennis ball
• The ability to pick up and release a cloth off a table top using any type of grasp/release
There is research that has shown success with survivors with even less movement. One such standard is simply the ability to wipe a towel across a table. Therapists have used similar standards in the clinic.
88Can someone do CIT alone at home? Certainly; there are elements of CIT that you can do at home, safely, and with little training and setup. But there are also mistakes that can be made when attempting CIT. Mistakes can make the therapy ineffective and, worse, can put the stroke survivor at risk of injury. CIT should be done, at least to begin with, while working with an occupational or physical therapist. CIT is simply a way to stop, and reverse, what researchers call learned nonuse. Learned nonuse is when stroke survivors essentially teach themselves not to use their “bad” limbs.
Here is an example of learned nonuse:
You try to open your hand to pick up a glass. But opening your hand is difficult, time-consuming, and clumsy. Every time you pick up a glass with liquid you run the risk of spilling it all over yourself. So you don’t try to pick up a glass (all you’ll do is spill!). The less you attempt any movement, the 89more the part of the brain that controls that movement shrinks. That’s the way the brain works; it is very “use it or lose it.” In this case, it’s move it or lose it. The overall effect of not using the movement is the movement becomes more difficult. Meanwhile, every time you use the “good” side, everything works great. In a sense you are rewarded for using your “good” side and punished for using your “bad” side. As a result, you use the “bad” limb even less, which means even less dedicated brain power, and so the downward spiral continues. In this way the stroke survivor “learns” not to use the affected “bad” limb. And the brain adds to the problem. After a stroke, the damaged side of the brain gets less active, while the undamaged side becomes more active. Your brain is working against you! But remember, you are in control. Your brain (the object) takes directions from your mind (your free will).
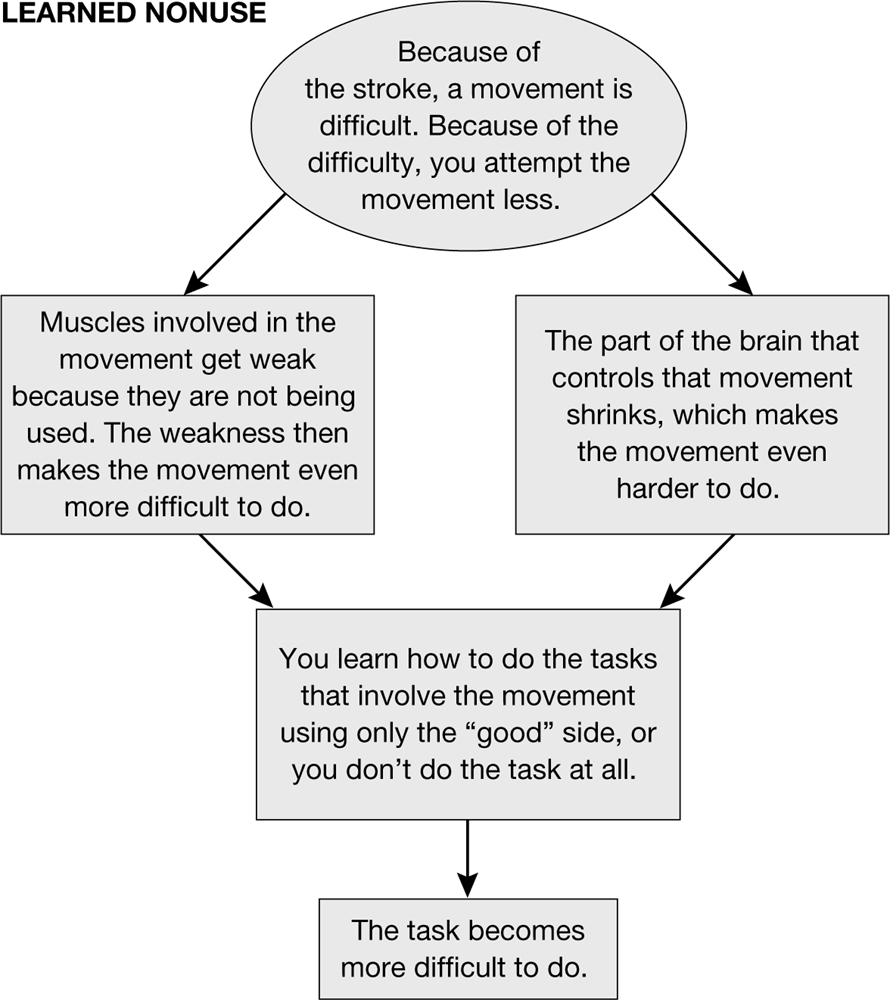
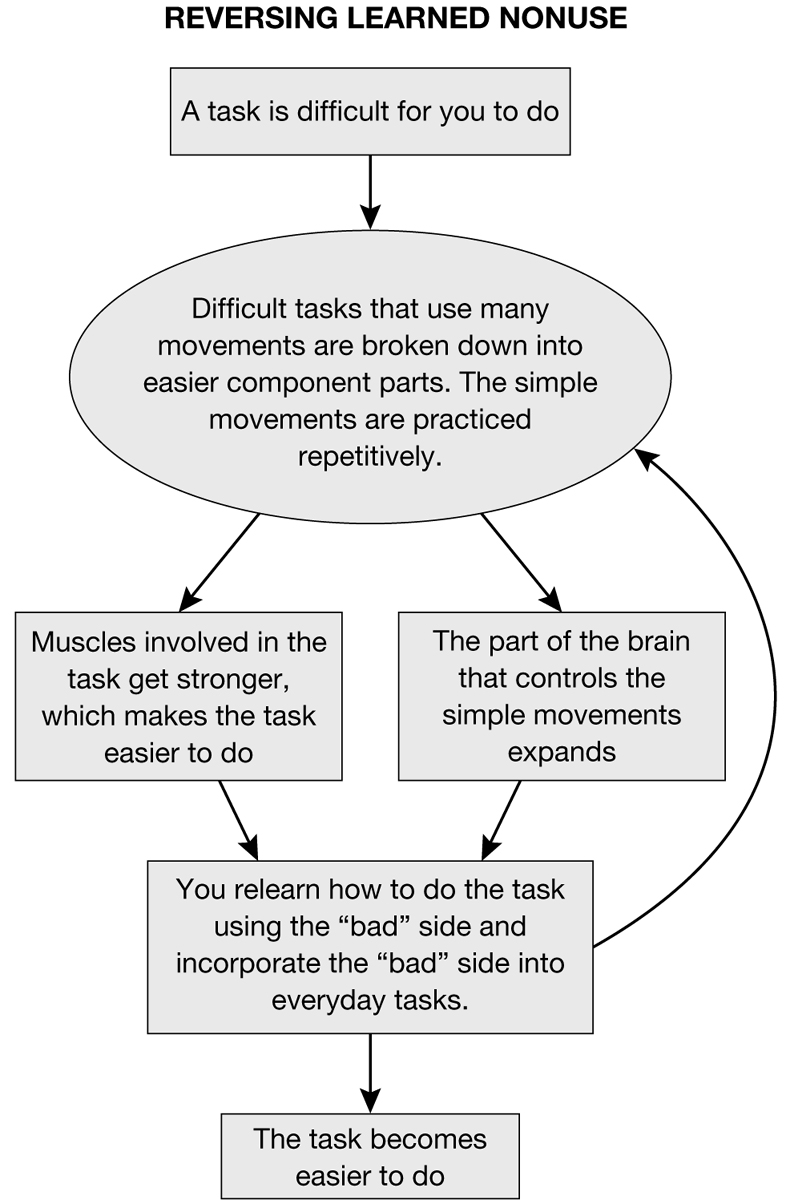
90CIT is considered a behavioral therapy. The idea behind behavioral therapies is simple: The way you live your life (behave) changes the way your brain is wired. This is true with regard to any kind of behavior, and is certainly true with stroke recovery. With CIT, the behavior you are changing is “nonuse” of your “bad” arm and hand. More directly, you are behaving in a way that uses the “bad” arm and hand more.
To review: The more brainpower devoted to that movement, the easier the movement becomes. The opposite is also true: As you use the limb less, less brainpower is directed to that movement. The less brainpower dedicated to the movement, the worse the limb moves. Constraint-induced therapy (CIT) attempts to reverse the downward spiral of learned nonuse by forcing you to use the “bad” limb. CIT uses repetitive practice of the “bad” limb to promote recovery.
What is practiced are “valued tasks,” which are tasks that the survivor is very motivated to do. (See the section titled The Mind, the Brain, and Sticking to the Task in Chapter 2 for more about why valued tasks are essential to recovery.) Small parts of the task, called “component parts,” are practiced over and over. As each of the component parts of the task are learned, all the parts are put together and the entire task is practiced. The process of developing component parts needed for one task helps with other tasks, as well. Consider that component part of lifting your arm at the shoulder as part of reaching for a cup. Once the ability to lift the arm is learned, it can be used to do many other tasks, from writing (to get the arm to the table) to turning on a light switch. This process of building small parts of a movement into an effective whole movement is the basis of CIT.
CIT should be taught by a trained rehabilitation professional. Once you understand the basic ideas behind using CIT to recover movement, you can easily use the spirit of CIT and mCIT in other areas of your recovery.
Leg Constraint-Induced Therapy (Leg CIT)
The spirit of CIT is that the “good” limb essentially does nothing, while the “bad” limb does all the work. Research into leg CIT lags far behind arm/hand CIT because it is difficult to respect the spirit of CIT and keep you safe. Remember, CIT involves constraining, with a sling and/or mitt, the “good” arm and hand. A quick look at leg CIT reveals the problem. How do you safely constrain a leg? How do you have only one limb do all the work and still engage in the primary function of the legs—walking? Leg CIT has another problem. 91The core of CIT involves practice with the “bad” side for a half-hour to three hours a day. You can survive this tough schedule when doing arm/hand CIT because you are sitting most of the time. But for much of leg CIT, the survivor is standing. Because it is done while standing, leg CIT provides a significant challenge to endurance. Also, the muscles of the arm are small, relative to the leg. Since the leg muscles are much bigger than the arm muscles, you burn much more energy. This makes the harsh scheduling of CIT difficult to maintain.
Because of these inherent problems, leg CIT is done less often clinically. Clinics that attempt this treatment use similar techniques to those used in arm/hand CIT. Leg CIT involves a lot of intense exercises for the “bad” leg. The goals of these exercises are twofold. First, the idea is to strengthen the muscles of the “bad” leg so that the limb is at least as strong as the “good” leg. Second, this strategy provides many repetitions of component parts of walking (i.e., dorsiflexion, or lifting the foot) to cause the necessary neuroplastic change.
What Precautions Should Be Taken?
Make sure, before any CIT or mCIT program is started, that the version that the facility or therapist is using is shown to be effective in research that is published in peer-reviewed literature. Facilities and individual clinicians often claim they do CIT. But a closer look reveals that they have watered down the therapy so much that it is ineffective. CIT involves a strict schedule in the clinic and/or at home. CIT also involves significant paperwork. If either of these (often hours a day and paperwork) are not part of the CIT treatment, be skeptical.
DO NOT constrain the unaffected hand and arm unless under the supervision of a physician or therapist. There are safety issues that must be considered when restricting the “good” extremity. Constraining the “good” arm and hand can lead to falls, burns, and other dangers. Note that there is a general consensus that the least amount of constraint possible should be used. In other words: Whatever is used as constraint (sling, mitt, glove, etc.) should be no more than a reminder to use the affected limb. There are inherent risks in wearing, for instance, a sling on the “good” side. If a survivor is in the process of falling and tries to stabilize themselves with their “good” arm, the sling will restrict their movement and the survivor could fall. So the constraint should be little more than a reminder to use the “bad” limb as much as possible. There is a general shift away from a sling and toward a glove or a mitt. A glove or 92mitt allows for protective extension (stabilizing against a fall) but still provides a hedge against learned nonuse.
Lower-extremity CIT exists but has to be done under the direct supervision of a therapist. Some of the facilities that offer CIT for the arm and hand also have CIT programs for the leg. Never attempt lower-extremity CIT without therapist supervision. DO NOT tie up the leg and/or foot. Constraint of the lower extremity is not done in any form of lower-extremity CIT.
GET YOUR HAND BACK
_______________
Generally speaking, the shoulder, elbow, and wrist are simply delivery systems for the hand. That is, the entire arm exists to bring the hand to where it needs to be. If the hand can be used in some sort of real-world way, all the muscles of the arm will work very hard to get the hand where it needs to be. In other words, a useable hand will help the entire arm recover.
But what if your hand does not yet work? Typically, the hand is the last body part to recover. Arm recovery tends to begin in muscles and joints close to the body and move down the limb, toward the hand. Stroke survivors typically regain movement in this order:
1. The muscles that move the shoulder blade
2. The muscles that move the shoulder joint (which moves the upper arm)
3. The muscles that move the elbow
4. The muscles that rotate the forearm (palm up and palm down)
5. The muscles that move the wrist
6. The muscles that move the hand and fingers
Remember, the arm has a strong chance of recovering if the hand is working. But, because the hand comes back last, it is impossible to use the hand to help recovery in the rest of the arm. Recently however, researchers, entrepreneurs, and bioengineers have begun to solve the riddle of the hand. What has come of this research and experimentation has been the clinical use of a variety of gizmos, orthotics, machines, and techniques to “jump start” the hand.
93How Is It Done?
How to jump start the hand depends on how much movement the hand has to begin with. Stroke survivors often grossly underestimate the movement in their hands. They tend to think that, since the hand is not useful in any real-world way, any movement it has is not important. But a small amount of movement is important to one thing: recovery.
If you have any movement, in any joint, you can build on that movement by using repetitive practice. Repetitive practice means using the little movement you have, over and over, to try to “hit the end ranges” of that movement. In the fingers, this would mean opening and closing the fist as much as possible. “Hitting the end ranges” would involve extra focus on the tail end of both of those movements. So you would open the fingers as much as possible and then try to open them just a little bit farther. Then you would try to close the hand and then close it a little bit more.
The movement to open the hand may not amount to much more than the ability to relax the fingers enough to allow the fingers to “relax open.” This ability to relax the fingers so they open slightly is important because it takes two to tango. The muscle that opens the fingers has to fire, but equally important, the muscles that close the fingers have to relax. It is this dance between the muscles groups that presents the challenge when you try to open and then close your hand. Once you can open and close even one finger, repeat it for as long as you can tolerate it. Do it while you watch TV, talk on the phone, wherever and whenever. With luck, the other fingers and, eventually, the thumb, will follow if you try to repeat, over and over, the grasp/release movement of opening and closing the fingers.
But what if you have no movement? Or what if, as is the case with most stroke survivors, you can make a tight fist, but releasing that fist is impossible? This is where the machines and gizmos can help.
• Cyclic electrical stimulation: One sort of machine that you can try uses cyclic electrical stimulation. This is electrical stimulation to, in this case, activate the muscles that open the hand. These muscles are located on the back of the forearm. The machine simply stimulates the hand to open, and then the machine stops the stimulation. On and off it goes usually for five seconds or so of hand opening, followed by ten seconds or so of no stimulation. These machines are relatively inexpensive, and once a doctor or therapist trains you on the machine, you can do it at home. If help is also needed to close the hand, then the machine can be programmed to first open, provide no stimulation, and close the hand. For more information about this treatment see Electrical Stimulation for Frugal Dummies in this chapter.
• EMG-based electrical stimulation: These machines ask for some sort of effort before the electrical stimulation is sent into the muscles. Here’s how it works: There is either a sound or a visual cue to open the hand. The survivor attempts to move the muscle. Once the muscles contract, even slightly, stimulation opens the hand. These machines are sensitive, so they can pick up muscle activity even if you can’t see movement in the hand. These machines include the Mentamove, Biomove, NeuroMove™, and Saebo MyoTrac Infiniti.
• Electrical stimulation orthotic: This orthotic is rigid plastic that forms perfectly around the forearm and provides the stimulation to the muscles that need it. This orthotic has an advantage over other forms of electrical stimulation—you can move the arm and hand around and do real-world activities. The only orthotic to provide this is the Bioness H200™.
• Spring-loaded finger extension orthotic: This orthotic uses springs and pulleys attached to a rigid orthotic to facilitate opening the fingers. You can move the arm and hand around and do real-world activities while you perform grasping activities. The orthotic helps the fingers “release” once objects are grasped. The only orthotic to provide this is the SaeboFlex®.
Some of the machines suggested require specially trained therapists. In some cases, contacting the manufacturer is the best way to find therapists in your area who are using these machines. See Chapter 9: Recovery Machines for more information on all of the machines reviewed here.
All these machines have the potential of providing a small amount of voluntary movement. Once there is voluntary movement you can start doing repetitive practice on your own.
Here are three other ideas to help develop movement in the hand that do not involve machines.
• Passively moving the joints: Recent research has revealed that passively moving a joint will begin to slightly rewire the brain. This may provide a small spark to begin the neuroplastic process. Much more neuroplastic change will happen when you initiate the movement yourself, but for low-level stroke survivors, passively moving the joint may help. It is interesting to note that many of the robots used for rehabilitation, including the products made by Myomo™ (www.myomo.com), use some passive movement to promote recovery. These robots only help where help is needed, however. The more movement that you can do yourself, the more recovery you will get.
• Repetitive practice into flexion: Although it may not seem to make sense at first glance, tightening your fingers into a fist may help to gain control over your hand. The reason that stroke survivors have a hard time opening the hand is spasticity in the muscles that close the hand and fingers. As discussed in the section Neuroplastic Beats Spastic (see Chapter 7), spasticity is caused by too much spinal cord control and not enough brain control. Squeezing the hand will work the muscles to help re-establish brain control over those muscles. This will lead to less spasticity. If you choose this strategy, also work on relaxing the hand: You would first squeeze and then relax, squeeze, relax. To keep the fingernails from biting into the palm and also to practice this in different hand postures, squeeze an object. The classic example is a tennis ball. You can also use any number of squeeze toys or anything that will passively open the hand so you can make the next attempt at gripping the object. Mix repetitive practice into flexion with a robust stretching program. The fingers should be stretched into the most possible nonpainful extension of both the fingers and wrist at the same time (“prayer position”).
• Mirror therapy (discussed fully in the section entitled Mirror Therapy later in this chapter) has been shown in some studies to jump start the neuroplastic process in lower-level stroke survivors. Mirror therapy involves observing the “good” side in a mirror so that the “bad” side looks like it’s moving perfectly well. This therapy can be done even when there is little to no movement in the “bad” arm and hand.
So that continuum would be this: Use something (a machine, technique, etc., as outlined previously) to get just a little bit of movement. Use that movement repetitively. Once repetitive practice provides enough movement, you can use constraint-induced therapy (CIT) to take you the rest of the way.
96What Precautions Should Be Taken?
Any sort of repetitive practice takes a lot of effort. You are working your muscles and your brain in ways that are “new” (new since the stroke). Both your muscles and your brain are changing. This change requires a lot of energy. Fatigue can cause less focus on safety. Less focus on safety can lead to injury, and injury can stop recovery. Be sure you are well rested.
IMAGINE IT!
_______________
Athletes do it. Musicians do it. Just about every motivational speaker recommends doing it. “It” is mental practice (MP)—also known as imagery. It has been used since the beginning of humankind to imagine an event before the event happens. This gives humans the unique ability to “practice” a task before it takes place. Although MP is done without actually moving, research has found that mental practice is not a passive process.
Mental practice, used alternately with actual practice, is an effective tool for recovery from stroke. It has the advantage of being easy, inexpensive, and safe, and it can be done almost anywhere.
Mental practice is actually an active process because:
• When you imagine moving your body, the muscles involved in those movements actually flex slightly, in exactly the same pattern they do during the actual movement.
• When you move you use a particular portion of your brain to do those movements. When you do MP of those same movements, the same areas in the brain are used.
• Mental practice has been shown to rewire the brain after stroke. Studies have shown that, in certain circumstances, mentally practicing something promotes as much neuroplastic change as actually practicing it!
• Mental practice is an active mental repetition of the task. Mental practice represents repeated attempts to imagine moving as one did prior to the stroke. Mental practice involves active, disciplined, and focused “mental attempts.”
97Immersive virtual reality (VR) has been shown to aid recovery after stroke (see You Are Game—Virtual Reality, later in this chapter). Immersive VR involves a “wrap-around” experience; wherever you turn your head, the virtual (artificial) environment is there. Mental practice resembles VR, but uses your mind instead of technology.
How Is It Done?
Mental practice has two elements to it:
• Practicing the movement mentally: Whatever movement you are actually physically practicing, that’s what should be mentally practiced. So, if you are working on actually walking, support that actual practice with mental practice. Mental practice does not work well when there is no concurrent actual practice. The first thing to do is make an audio recording. The recording should first take you through a period of deep relaxation. The main idea during relaxation is to make yourself comfortable, empty the mind, and control breathing. The deep relaxation part of the tape should last three to five minutes. Following deep relaxation is the actual mental practice portion of the recording. This portion will describe the task that will be mentally practiced. The recording should involve every aspect of the experience, including the size of the room and full description of the movement, as well as the feel of the movement. It should sound something like, “Imagine you are sitting in your favorite chair. The room is quiet. There is a table in front of the chair. . . .” Later, the details of the movement are filled in: “. . . Imagine there is a glass on that table with fresh apple juice in it. Feel yourself reaching for the glass. Feel the weight of your arm as you reach out. Feel your elbow straightening and your wrist extending. Your hand opens, and your fingertips touch the cool glass . . .” and so on.
It may be possible to do mental practice without the aid of an audio recording, but this has not been tested in research. Certainly athletes, musicians, and other performers use mental practice without audio recordings, so it may merit a try for stroke survivors as well. Just proceed through deep relaxation and then picture the movement. The more realistically you can imagine the task, the more effective the mental practice will be.
• Practicing the movement in the real world: Once the audio recording has been listened to a few times, practice the movement in reality. The ratio should be approximately three listening sessions to one actual practice session.
• When you are receiving therapy (occupational, physical, or speech therapy), mental practice can be used as an adjunct to actual practice. You can “expand the therapeutic footprint” by mentally practicing whatever you physically practiced in therapy. The “downtime” between therapy sessions can be used to magnify the positive effect of therapy with mental practice. (See the section Expanding the Therapeutic Footprint in Chapter 6, for more ideas on how to amplify the effect of therapy on your own.)
Again, please note: It is not necessary for you to have an audio recording to do mental practice. Let’s say you are relearning to walk after stroke (called gait training). You can magnify gait training by going back to your room, relaxing, closing your eyes, and remembering how it felt to walk prior to your stroke. Try to make what you imagine as pristine as possible. That is, imagine walking down the street or path you know well. This will help you to clearly visualize walking as you did prior to the stroke.
What Precautions Should Be Taken?
Just because it is mentally practiced “perfectly” does not mean it can actually be done perfectly. The reality is that the stroke survivor may or may not move better after mental practice. Therefore, if the stroke survivor is attempting to walk, it is necessary to understand the difference between the perfect movements imagined during mental practice sessions and the real-world realities of gravity, effort, and endurance.
ELECTRICAL STIMULATION FOR FRUGAL DUMMIES
_______________
Let’s say you wanted to do electrical stimulation (e-stim) to help your recovery. But there are two things stopping you:
1. You don’t know what to do
2. E-stim is really expensive
Here’s some good news: E-stim is easy and cheap.
99How Is It Done?
There are three parts to any e-stim setup:

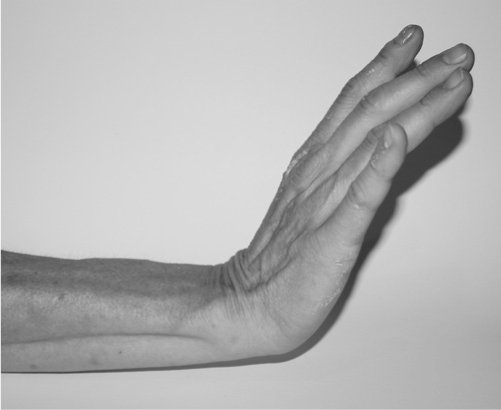
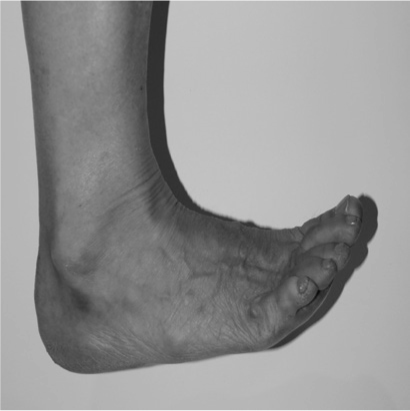
Put electrodes (they’re usually sticky) over the muscle you want to work. Typically after stroke there are two sets of muscles that everyone focuses on:
The finger and wrist extensors; these will pull the wrist up and open the fingers.
The muscles that lift the foot and end drop foot.
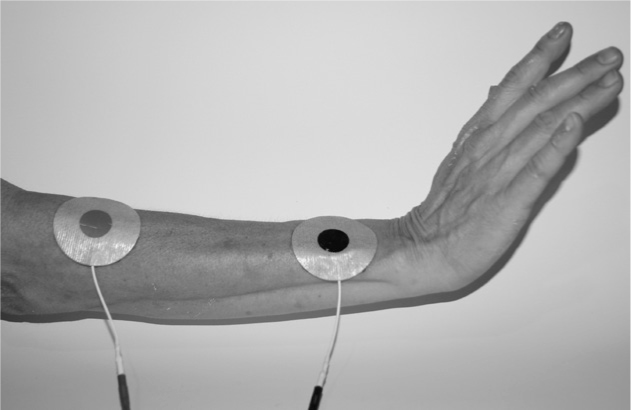
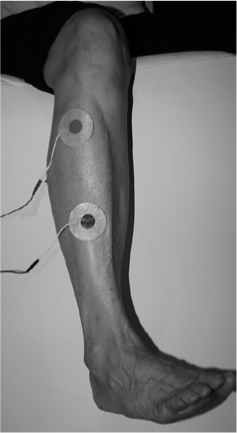
So, where do the electrodes go again?
100Wrist/fingers:
The muscles that lift the foot:
1. Attach the lead wires from the machine to the electrodes.
2. Stick on the electrodes according to the images preceding. Optimal placement will vary from person to person because everyone’s anatomy is different. And, after stroke, every survivor’s deficit will require slight changes in electrode placement according to their needs.
3. Turn up the e-stim. If you are getting the movement you want, take a photo of the electrode placement, or put a pen mark on your skin.
How long should I do it for? There have been a lot of “dosing” clinical trials for e-stim. Figuring dosing for e-stim is just what like figuring dosing for a drug:
• How much should I “take”? Is it different for every survivor? Yes.
• Does it depend on how much brain damage there was? Yes.
• Does it depend on other things as well? Yes.
The only way you’ll learn how much e-stim you need and learn how to use the machine is to use the machine. Manuals and rules are nice, but practice 101is better. Put the electrodes on and turn up the e-stim slowly. Once you get the movement you want, note the amount of e-stim you used (measured in milliamps or mA). Two important notes:
1. Make sure you gradate up the e-stim. Basically, it’s the same as any exercise program: Start slowly, and work up to more over time. Why gradate up? When e-stim is used and there is muscle contraction, that muscle is being worked. It is firing. Just like with any muscle work, you can end up sore and worse if you do too much too soon. So gradate up something like this:
• Day 1: Two minutes
• Day 2: Four minutes
• Day 3: Six minutes
• Day 4: Ten minutes
• Day 5: Five minutes twice a day
• Day 6: Eight minutes twice a day
• Day 7: Ten minutes twice a day
And so on . . . until you hit the optimal dose and then stay there. This will give your muscles time to build gradually. If you get sore, reduce the dose.
1. Make sure you ramp up the e-stim. When E-stim makes your muscle fire it does not just affect that muscle. It also affects that muscle’s antagonist (the muscle that moves in the opposite direction). An example is the elbow flexors (benders) and extensors (straighteners). If you e-stim the muscles that straighten the elbow, if done properly, the muscles that bend the elbow will be forced to relax. In most survivors where the elbow is always bent, it would be good (great!) to relax the muscles that bend the elbow. This phenomenon—when one muscle contracts, its opposing muscle relaxes—is called reciprocal inhibition. So that’s good: You use e-stim to contract one muscle and relax the opposite muscle. But there is one problem . . .
If the highest amount of e-stim that is set happens all at once, a paradoxical thing happens. The muscle that should relax (the opposite or antagonist muscle), actually fires. It fires because it is trying to protect itself from being overstretched. So now both muscles are firing and essentially fighting each other.
102To correct this, make sure the “ramp up time” is at least two seconds. The machine will let you control the amount of ramp up time. Make it two to five seconds; this will give the antagonist muscle time to not feel threatened and to relax.
So it will look something like this:
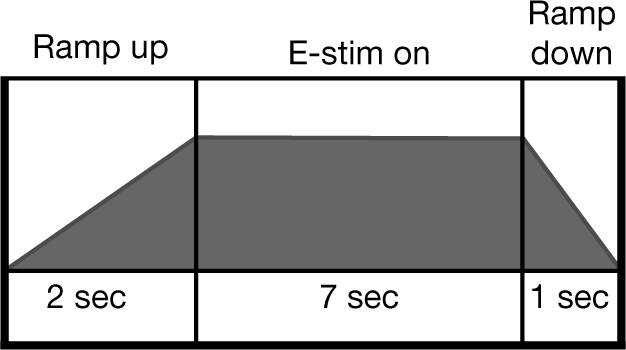
The cost is . . . cheap!
E-stim is inexpensive, and the web is a great place to start shopping. You’re looking for NMES (neuromuscular electrical stimulation—where the muscle actually fires) not TENS (where you can feel it but the muscle does not fire).
What Precautions Should Be Taken?
Always consult your doctor when adding e-stim to your recovery plan. Some e-stim requires a doctor’s prescription. Recovery options that involve e-stim have serious precautions and contraindications. Discuss these with your medical doctor prior to using any e-stim. Here is a partial list of contraindications and precautions for recovery options that use e-stim:
• Pregnancy
• Skin irritation
• Epilepsy/seizures
• Sensitive skin
• Compromised sensation
• Heart disease
• Pacemakers or defibrillators
• Recent surgery if muscle contraction may disrupt healing
• Electrode placement over the carotid sinus in the neck
• Existing thrombosis
103STIMULATE YOUR STRIDE
_______________
Stroke survivors often have difficulty lifting their foot at the ankle (dorsiflexion). This problem is called “drop foot” or “foot drop.” Foot drop leads to what is essentially an ongoing series of trips unless a style of walking is used that raises the leg enough to have the foot safely clear the floor. There are four types of walking patterns stroke survivors typically use when they have foot drop:
• Steppage gait involves lifting the foot high off the ground by overly bending the knee and hip.
• Circumduction involves sweeping the “bad” leg way out to the side so the foot can swing by.
• Vaulting involves raising the heel on the “good” leg in order to swing the affected leg through.
• Hip hiking involves lifting the “bad” leg by using the muscles in the trunk to “hike” the pelvis upward on the “bad” side. This allows the “bad” leg to swing through.
All of these styles of gait may bring a stroke survivor safely from point A to B. There is a downside to these sorts of unnatural walking patterns, however. Bone, cartilage, ligaments, and tendons work best during normal walking. The walking patterns often used after stroke cause stress on joints, the trunk, and back, which lead to arthritis and other disorders over time. Also, these altered forms of walking expend a lot more energy than “normal” walking. Most importantly, drop foot causes a gait that has the potential to lead to falls.
Doctors will prescribe an ankle/foot orthosis (AFO) for most stroke survivors who have drop foot. There are good reasons to wear AFOs; they:
• Lift the foot so that the survivor does not trip and the leg swings forward more naturally
• Stabilize the ankle so it does not twist—a twisted ankle can lead to a fall
• Allow walking to be safer
• Make walking take less energy, so you can walk farther
However, there is a downside to using AFOs. An AFO is used every day and, usually, for the rest of your life. Because the AFO lifts the foot, you will never need to lift your foot again. Once the AFO is consistently used, several 104things can happen to the brain and muscles that can eliminate the chance of ever walking without an AFO again. Use of an AFO:
• Weakens the muscles that are normally used to lift the foot
• Reduces the amount of brain dedicated to lifting the foot (learned nonuse). A sort of reverse neuroplasticity occurs in the brain, so that the stroke survivor eventually loses any ability (or any future ability) to lift the foot on his or her own
• Reduces passive range of motion. The ankle is rarely taken through its full natural range of motion because the AFO inhibits normal movement. The soft tissue surrounding the joints shortens, and passive range of motion is lost.
You can “jump start” the process of lifting your foot on your own again, however. There are special functional electrical stimulation (FES) systems that can reverse the bad trends initiated by AFOs. These FES systems increase quality of movement, range of motion, and strength, and make walking safe and efficient. Research has shown that FES improves overall movement in the leg and improves walking ability.
How Is It Done?
There are muscles at the front of the lower leg, just to the outside of the shin bone, that lift the foot. These are the muscles that, when weakened by stroke, cause drop foot. FES systems provide low levels of electrical stimulation to the muscles that lift the foot while walking. Unlike an AFO, FES allows the stroke survivor’s own muscles to do the work of lifting the foot. The stimulation is sent from a machine, either down a wire or through radio signals, into an electrode that lies against the skin, just over the muscles and nerves that lift the foot. A doctor or therapist adjusts the system to obtain the best foot movement for the highest quality of walking.
Companies that make FES systems for walking include (in no particular order) are NESS L300™ and the WalkAide® System. These devices are outlined, with websites included, in Chapter 9: Recovery Machines.
Functional electrical stimulation for walking may have more benefits than just helping you walk better. These systems may also:
• Strengthen muscles that are weak or paralyzed
• Stretch spastic muscles and other soft tissue
• Reduce spasticity
• Increase active range of motion
• Increase the amount of brainpower dedicated to lifting the foot
• Reduce falls
There is no sugar coating this one: These systems are expensive. We can assume that the cost will steadily decrease because of competition and other market forces.
What Precautions Should Be Taken?
This is not an off-the-shelf treatment. These systems require a prescription from a doctor and have to be fitted by a doctor or therapist. The stroke survivor needs specific training to start the therapy. The healthcare workers involved in the process will detail all the necessary precautions. Many questions (“Is this system appropriate for me?” “Is there a rental option or do you sell used machines?” “Who in my area is trained in this technology?”) are often best answered by the vendors themselves. These vendors all have a website with a phone number.
MIRROR THERAPY (MT)
_______________
Please note: In this section, the word “limb” will be used for either the hand and/or arm or the foot and/or leg.
During mirror therapy (MT) you use a mirror to look directly at your “good” limbs. At the same time, your “bad” limbs are out of view, hidden behind a mirror. What you see looks a lot like both limbs moving perfectly well. But it’s an illusion. What you are actually seeing is your good limb twice. One, of course, is your real limb; the other image is the reflection of your “good” limb. The reflection of your “good” limb makes it appear that both limbs are moving normally. Some research indicates that seeing the reflection of the “good” limb tricks the brain into believing the “bad” limb is moving perfectly well. The mirror provides proper visual input so the brain can “remember” how the “bad” limbs should move.
Most of the neuroplastic change outlined in this book involves rewiring the area of the brain 106that controls movement. MT may rewire both (1) the area that of the brain that controls sensation, and (2) the area of the brain that controls movement. MT may help make a visual connection to muscle control. This may strengthen the sensory-motor (feeling-moving) connection between muscle and the brain. MT has a motivating and encouraging quality. It is believed that the mirror encourages the survivor because the “bad” arm looks like it is moving correctly.
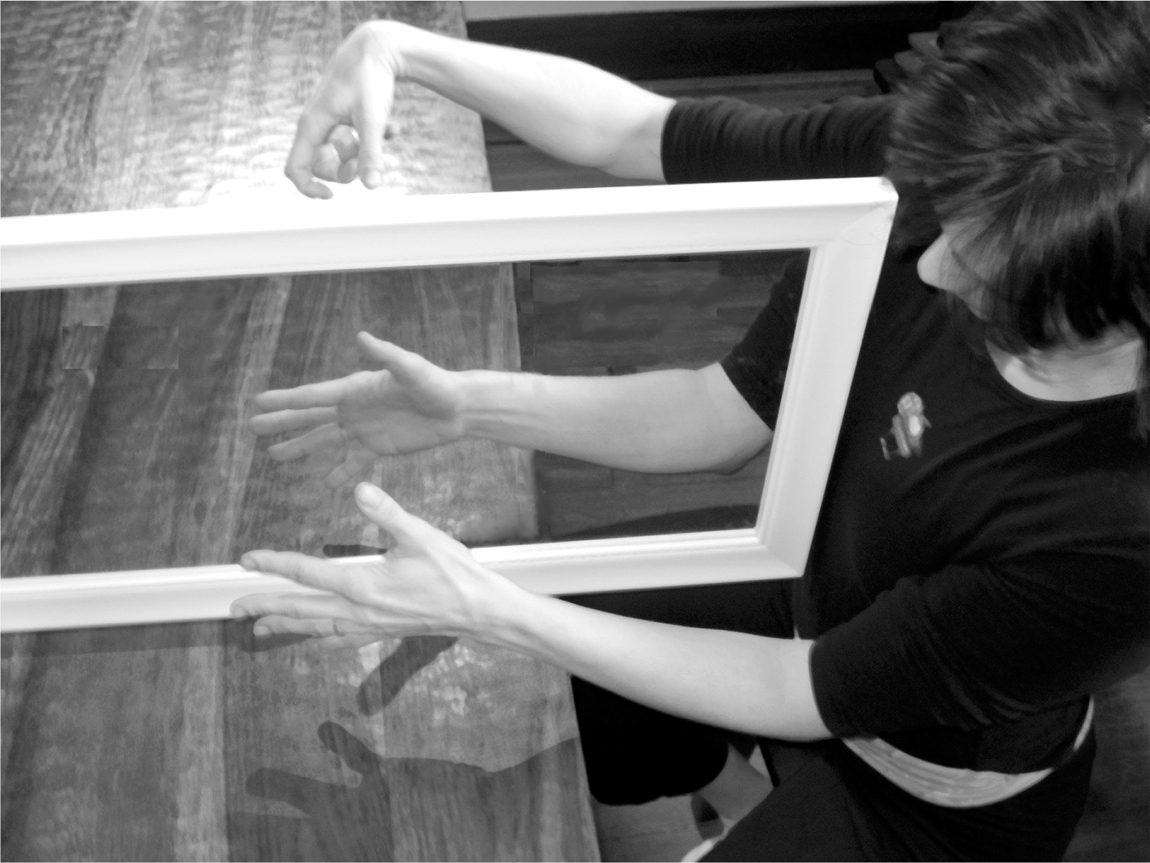
Brain scanning during MT has shown something rather curious. Even though the “good” limb is doing most of the work during MT, it is the “bad” side of the brain that is active. The illusion created by the mirror is so complete that it fools the injured side of the brain into working. And this phenomenon is seen even in low-level stroke survivors who cannot yet move their bad” limb.
How Is It Done?
You can use any sturdy and stable mirror to do MT. To set up: Sit with the mirror facing the “good” side of your body. Look at the reflection of the “good” limb and make sure you cannot see the “bad” limb. When you look in the mirror you will only see the “good” limb.
107MT can be used at any point in recovery:
• Before the survivor is able to move: The survivor moves the “good” limb and observes it moving in the mirror. The “bad” limb does not move at all. MT can be in this way before the survivor can move the “bad” limb.
• When the survivor can move: Both sides are moved at the same time. The “bad” limb attempts to make the same movement as the “good” limb. The movements are done with both limbs at the same time. As much as possible the “bad” hand attempts to copy what the “good” hand is doing. Both hands are moved in the same way (symmetrically) at the same time, but only look at the “good” limb. The movements should be as equal as possible, like conducting an orchestra.
The movements attempted should be basic and may include . . .
Arm/hand:
1. Opening and closing the hand
2. Flipping the forearm and hand from palm down to palm up
3. Bending and straightening the wrist
4. Touching the thumb to the fingertips
Two things that you should keep in mind when deciding what movements to work on:
1. Work on movement that is on the edge of your ability. For instance, let’s say you cannot yet open your hand but when you relax your hand it naturally falls open. Opening your hand is on the edge of your ability. Use hand opening on the “good” side while viewing it in the mirror.
2. As you gain ability, work bilaterally. That is, when your “bad” arm and hand get better movement, attempt to copy the “good” side movement. You’ll be looking at the mirror, so it will look like you’re doing it perfectly well (the mirror image of the “good” arm/hand). While you’re actually moving the “bad” arm/hand—and maybe not even very well—you are viewing only the good movement. This bilateral work should only be attempted once the “bad” side is able to reasonably copy what the “good” side is doing.
MT can be done for the leg as well. It is usually done with the survivor sitting in a chair. The mirror is positioned between the two legs and the head is positioned on the side of the mirror that reflects the “good” leg. The survivor 108then looks at the mirror, which provides the reflection of the “good” leg. Two movements are usually the focus of lower extremity mirror therapy:
Foot/leg
1. Moving the foot up and down at the ankle (dorsiflexion).
2. Sliding the foot forward and backward (toward you). To make the sliding easier, wear a sock on a hard floor, or place a cloth under the foot.
In both the upper and lower limbs, the amount of mirror therapy that has been tested is 30 minutes per day. Typically the dosage will look something like this:
30 min 5 days a week for 4 weeks
2x daily 30 min; 2 days/week for 5 weeks
2x daily for 15 min; 6 days/week for 4 weeks
As is true with many treatment options for stroke, the exact dosage has not yet been determined. Therapists can help you figure out how long to do mirror therapy, and what movements should be practiced.
Note: Mirror therapy has been shown to reduce pain associated with shoulder-hand syndrome (SHS). Reduction of pain is achieved with exactly the same use of MT as outlined. A full explanation of SHS is available in the glossary.
What Precautions Should Be Taken?
Mirror therapy should be done in the seated position. Foot/leg mirror therapy may be done with the legs and feet while lying down or seated. Make sure that the mirror is stable so there is no risk of breakage.
RECOVERY OF FEELING
_______________
Human beings are great athletes. What makes us really special athletes is the ability to practice things repetitively. Although other animals practice skills repetitively, they tend to practice a very small set of survival skills. We can practice anything from throwing to climbing, and from tennis to kickboxing. We have another advantage: We, not instinct, determine the amount we practice. Animals also will only practice to the point in which they are good enough to use the skill to survive. We practice to the point of excellence.
109Whenever we practice something we don’t just practice the movement, we also practice the feeling of the movement. The feeling of movement (sensation) is essential to quality movement itself. Without the ability to feel, the movement becomes uncoordinated. In fact, the main reason we have sensation is to guide our movement.
In stroke survivors, the following is usually true:
• When sensation improves, movement usually improves.
• When movement is improved, sensation often recovers.
Sensation recovery involves the same rules of neuroplasticity as recovery of movement. The recovery of movement and sensation requires the same thing: repetitive and demanding practice. That is, if you feel something over and over and over, the portion of the brain that listens to that feeling expands. If a sensation is delivered repeatedly, over time that sensation is “felt” by the brain more strongly. Sensation follows the same rules of neuroplasticity as movement. What works to recover movement also works to recover sensation, and this is good news. You don’t have to learn a completely new set of ideas in order to improve sensation.
It should be pointed out that researchers know a lot less about recovery of sensation than they know about recovery of movement. This is true for two reasons:
• There is a belief that recovery of movement is more important than recovery of sensation. Recovery of movement is what everybody wants. Therapists want it, stroke survivors want it, and insurance companies want it. Of course, everyone wants recovery of sensation, as well. Sensation is the Ying to movement’s Yang; neither does well in isolation. But in the clinic, the focus is almost always on recovery of movement, not sensation.
• Recovery of movement is easy to see and measure. But recovery of sensation is impossible to observe and difficult to measure. You can see if somebody is moving better, but how do you tell if they’re feeling more? It’s a lot easier to treat what you can test than to treat what you can’t observe.
There are two forms of sensation that most impact stroke recovery:
• Proprioception: The ability to know where parts of your body are without looking at them. Proprioception is essential to normal movement. Some stroke survivors have great movement, but because they have poor proprioception, they don’t move well. Lack of proprioception is called apraxia.
• Tactile sensation: The feeling of pressure on the skin; the sense of touch.
How Is It Done?
Repetitive practice of a movement makes that movement better. Repetitive practice works because every time you attempt to make a movement, the area in the brain that controls movement gets bigger. That’s the essence of neuroplasticity: Whatever it is that you do repetitively changes the brain. The same is true for recovery of sensation. Repetitive feeling helps re-establish sensation. But movement and sensation depend on each other. In fact, the representation in the brain of movement and sensation are very close to each other. Both reside from about the crest of the ear to the top of the skull. And both are somewhat intertwined. They are so intertwined that every time you relearn a movement, you relearn sensation. This is a common theme often lost on doctors and even some therapists: Movement is good, even if the movement is not functional or necessary or pretty. Movement helps retrain movement, and it also helps retrain the sensation of movement (proprioception). So one way of recovering sensation you already know if you have read this far in the book: constraint-induced therapy (CIT). CIT involves many repetitions of movements. It also involves using the “bad” side limb during the many hours when the survivor is not in the clinic. CIT is believed to improve proprioception. Every time you move, the feeling of that movement is felt. That is, movement itself seems to drive increases in sensation. In reality, movement and sensation are two parts of the same thing. The more you move, the more the sensation of movement becomes ingrained into the neurons of the brain.
But what if you want to focus only on recovery of sensation. That is, what if you want to work on sensation more than just as a by-product of movement? If this is your goal, you have to “exercise” the sensation part of the brain. Efforts specific to sensation recovery involve two broad strategies:
• Passive: The survivor tries to feel something that’s happening to them.
• Active: The survivor tries to feel something and then report what he or she feels.
111Passive Training of Sensation (PTS)
Passive training of sensation (PTS) involves some tool that does something to the survivor. The survivor then attempts to feel what the tool is doing. The most common PTS involves electrical stimulation (e-stim). On the “good” side, stroke survivors can feel e-stim when it’s turned up a little bit (typically around five milliamps). Of course, if you were to move those electrodes over to the “bad” side, the survivor with sensation loss would not be able to feel the e-stim. And that’s exactly how e-stim is used to help recover sensation: The e-stim is turned up to just below where the survivor can feel it. They are then given a chance to sit quietly, often with their eyes closed, while trying to feel the “tap, tap, tap” that e-stim would normally deliver. Once they can feel that, they are “challenged” by having the e-stim turned down. If things go well, the e-stim can be turned down to close to the same level as the“good” side.
When you talk to your therapist about this, you can explain it easily by saying “TENS on the affected side.” TENS is a term that therapists know well. It stands for transcutaneous electrical nerve stimulation. This sort of electrical stimulation is typically given for reduction of pain. However, it can also be used to retrain sensation after stroke.
The amount of time for which this treatment should be used is different for every survivor. Researchers have used single sessions of long duration. They also use multiple sessions spanning a long period of time (i.e., 30 minutes applied five days a week for eight weeks). Work with your therapist to figure out the right dosage for you. Note that e-stim does have some contraindications, so work with your healthcare professional to stay safe. However, once the proper treatment is determined, e-stim can often be used safely at home, and e-stim machines are relatively inexpensive (approximately $40).
There are other PTS treatments that have been used to help recover sensation, including . . .
• Pneumatic compression (a machine gently and repeatedly squeezes a limb on the affected side)
• Thermal stimulation (hot pack and cold pack, repeatedly)
• Vibration (a machine the gently vibrates a part of the body)
Massage can be helpful, as well. Massage repeatedly sends messages to the brain. This will expand the area of the brain that listens to those 112messages. With regard to massage, there is a very interesting phenomenon with some survivors. Some survivors can feel it when they massage themselves, but can’t feel it when others do it. In this way, self-massage may help retrain sensation.
Active Training of Sensation (ATS)
Active training of sensation (ATS) involves having the stroke survivor continuously report what he or she is feeling. The following are some examples of ATS. All of the following involve two people: The stroke survivor and a helper (clinician, caregiver, etc.).
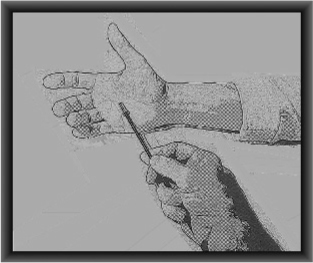
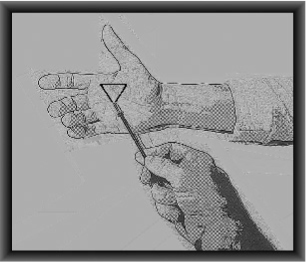
• Localization: The stroke survivor closes her eyes. The helper touches the survivor on the “bad” arm/hand or leg/foot. The survivor then puts her “good” side finger where she was touched.
• Graphesthesia: The stroke survivor closes his eyes. The helper uses the tip of a paperclip to draw simple designs on the “bad” arm/hand or leg/foot. The survivor then opens his eyes and attempts to draw the design with a pen.
• Stereognosis: The helper places common objects (e.g., walnut, marble, feather, shells, teaspoon, button, ring, coin, key) in the survivor’s affected hand. The survivor tries to identify the object.
Recovery of proprioception (the feeling of movement) is important because it is difficult to move if you can feel the movement. Here is an example of a technique designed to retrain proprioception:
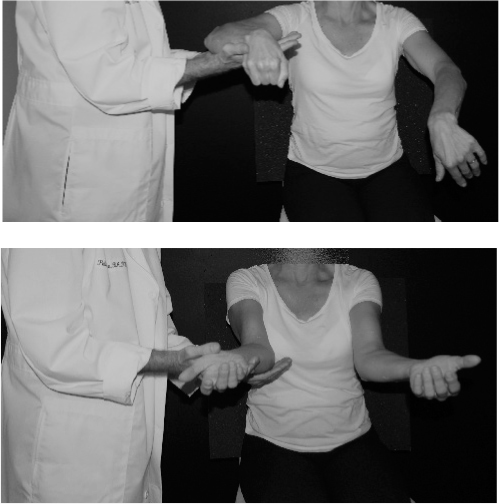
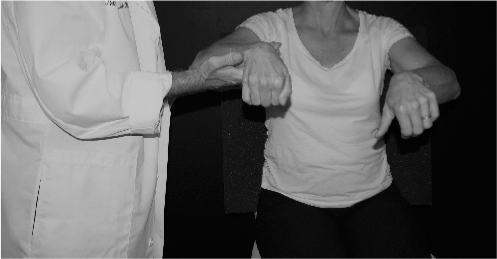
• Proprioception: The stroke survivor closes her eyes. The helper places and holds the “bad” arm/hand in a random position. With the eyes remaining closed, the survivor attempts to copy the position of the “bad” arm/hand with the “good” arm/hand. The survivor then opens the eyes and notes the position of both the “good” and “bad” side. This process is repeated. If things go well, the survivor begins to accurately copy where their “good” limbs are with their “bad” limbs.
The approximate dosage from research for active training of sensation is a few minutes per day of each task (localization, stereognosis, proprioception, etc.) over 30 treatment sessions.
| 113 SENSATION TYPE |
WHAT THE HELPER DOES |
WHAT THE SURVIVOR DOES |
Localization “Where am I being touched?”
|
Touches the survivor lightly on some part of their body on the affected side. |
Touch—with the “good” side—the same spot the “bad” side was touched. |
Graphesthesia “What shape is being traced on my skin?”
|
Lightly traces a shape on the skin on some part of the body on the affected side. |
Guess (or draw with the “good” hand) the same shape that was traced on the “bad” side. |
SENSATION TYPE |
WHAT THE HELPER DOES |
WHAT THE SURVIVOR DOES |
Kinesthesia
|
Places and holds the “bad” side in a position. |
Attempts to match the static position of the “bad” side with the “good” side. |
|
Moves the “bad” side |
Attempts to match the movement of the “bad” side with the “good” side. |
What Precautions Should Be Taken?
The forms of passive training of sensation (PTS) discussed previously require oversight by the appropriate healthcare provider. For example, both e-stim and hot/cold packs have the potential to seriously injure.
SPEAK MUSICALLY
_______________
The left side of the brain contains the language centers. Stroke on the left side of the brain may cause aphasia (trouble speaking or understanding what others are saying).
What if another area of the brain could take over for the damaged language portion of the brain? For instance, what if you could use a part of the right side of your brain for language? That is the aim of a therapy called melodic intonation therapy (MIT). This therapy uses a person’s innate ability to process music in retraining the ability to speak after stroke. The right side of the brain is where music is perceived.
It is remarkable to hear someone who can barely talk, sing beautifully, with diction and word-finding in full bloom. This ability to use the intact “music portion” of the brain to communicate is one of the bright spots in emerging research on rehabilitation from aphasia. MIT may be able to jump start the ability of the brain to rewire itself neuroplastically.
114How Is It Done?
A speech therapist takes the stroke survivor through the process of retraining speech using MIT. This therapy may be effective in stroke survivors with certain deficits but who also have particular strengths. For instance, the best candidates for MIT are folks who:
• Can presently speak very little
• Can process sound correctly
• Understand when they make mistakes
• Are able to correct mistakes
• Are emotionally stable
MIT involves exaggerating the sing-song aspect of speech. The stroke survivor is encouraged to express language as a series of tones, allowing words to form notes, and sentences to form melody. Imagine the song-like quality of children as they memorize a nursery rhyme, repeat their ABCs, or learn to count. This is much the same technique used to emphasize the pitch and rhythm of language. This may stimulate the right side of the brain to provide some of the power needed to speak.
What Precautions Should Be Taken?
This therapy is done under the supervision of a speech therapist.
CONSTRAINT-INDUCED THERAPY FOR SPEECH
_______________
Constraint-induced therapy (CIT) in the arm and leg involves focusing the entire treatment on the “bad” side. In the upper extremity, the “good” arm and hand is constrained, usually with a sling or a mitt. This makes CIT in the arms relatively straightforward. In the leg, there is a problem, because if you tie up the “good” leg, you’re asking for trouble! Therapists handle the challenge of using CIT in the leg by overloading the leg with large amounts of safe exercises. CIT for expressive aphasia, called constraint-induced aphasia therapy (CIAT), shares many of the same techniques used in arms and legs.
115How Is It Done?
All of the constraint therapies require:
• Hours per day of focused and dedicated practice for approximately two to three weeks
— CIT: Between five and seven hours a day of movement practice
— CIAT: Delivered with schedules of two to three hours a day. Research indicates that this level of intensity is necessary to rewire the language areas of the brain
• Forcing the stroke survivors to work on their weakness
— CIT: Uses a sling or mitt to constrain the “good” hand
— CIAT: Prevents nonverbal communication, including hand gestures, writing, and drawing
• Repetition of desired behavior
— CIT: Movements are practiced over and over
— CIAT: Sounds, words, and sentences are repeated
• Constant challenge
— CIT: Movements attempted are made difficult over time
— CIAT: More difficult sounds, words, and sentence structures are attempted over time
For better speech to occur, intense, focused, and repeated attempts have to be made. This will provide new pathways for neurons (nerve cells) in the brain. These pathways become stronger with each repetition and end up “hard wiring” to each other, allowing the stroke survivor to speak better.
In some ways, CIAT is designed to do exactly the opposite of what stroke survivors with aphasia tend to do naturally. Here are some examples:
• Folks who are aphasic tend to not speak much because they feel that communicating may not be worth the effort. They often simply stop trying to talk at all or give up in the middle of sentences. CIAT does not allow not talking, or abandoning what you want to say. In fact, it forces hours of speaking a day.
• Folks who are aphasic tend to use other forms of communication, like gesturing, tone of voice on a single repeated word, or writing. This is where the constraint part of CIAT comes in. During CIAT you are not allowed to communicate in any way that does not involve talking.
CIAT is done under the supervision of a speech therapist. Constraint therapies tend to be expensive because of the large number of clinical hours involved. Insurance does not typically pay for CIT or CIAT. Of course, just like many of the ideas in this book, certain elements of CIAT can be done on your own. There are elements of all the constraint therapies, including CIAT, that you can adopt and make part of your recovery effort. Repetition of sounds, words, and sentences and focused, dedicated practice can be done at home to augment what you learn with your speech therapist.
What Precautions Should Be Taken?
Consult your doctor prior to starting this therapy. CIAT is nothing if not vigorous, and the implications of the effort and frustrations inherent in relearning to talk may have global health implications.
YOU ARE GAME—VIRTUAL REALITY
_______________
Virtual reality (VR) has the potential to make recovery fun while being safe and challenging. You can become involved in the game either by wearing a VR mask or goggles, or by looking at a TV or computer screen. While playing, you are physically challenged. For instance, a game may ask the player to catch a virtual ball or use a plastic saber to slay characters on the screen. The great thing about VR is that you can challenge yourself in new and imaginative ways, safely seated in the most comfortable chair in your home.
People love video games because they are designed to have an interesting and realistic look. They are fun, competitive, and challenging. Many people look at video games as passive entertainment. But for the stroke survivor, VR provides a physical challenge that has one strong advantage over real-world rehabilitation: safety. With video games, you can walk, run, and ski . . . perform almost any activity within the safety of an armchair. Stroke survivors can use VR to help develop better balance, better arm and hand movement, and increased strength. Unfortunately, much of stroke recovery can be boring. Many repetitions of a movement are needed to rewire the brain to make that 117movement better. But repeating a movement thousands of times is not the most interesting way to spend your time. This is especially true because, during recovery from stroke, you are not learning new and exciting skills. You are simply relearning skills that you did perfectly prior to your stroke. VR allows repetitive practice to occur while using your own natural sense of competition and creativity in an engaging environment. In short, VR makes repetitive practice fun.
How Is It Done?
VR gaming systems are available in toy stores for under $50. The fact that many of the games are inexpensive allows you to be creative while managing your own recovery. Use games that are challenging, fun, and maintain safety.
VR technology can be an effective way of increasing active movement in the hands and arms after stroke. The trick is finding a game that will challenge the hand and arm in a way that is interesting and fun. Therapies that engage you tend to be more productive, so make sure the game is interesting to you. Make sure the game challenges you in a way that promotes recovery. Using virtual reality as a recovery tool can be as simple as a joystick. For instance, if you decide that you need help with small amounts pronation (forearm palm down) and supination (forearm palm up), then a joystick might be the perfect recovery tool.
Many of these games are “plug and play” so that they plug right into your TV. However, VR that is immersive is more effective than games played on flat screens. Immersive means that you are wearing a head-mounted display or 3-D glasses. As you turn your head, you are completely surrounded by the visual experience.
The bottom line is that VR can help make motor learning after stroke fun. So indulge in the fun! When else are you, as an adult, allowed to play hours and hours of a video game and call it “work”?
What Precautions Should Be Taken?
VR may not be a safe option for balance exercises in some stroke survivors. However, leg exercises can be made safe by using your legs to play the game while you are sitting. For instance, if the game asks you to kick a ball, make sure you can accomplish this while sitting in a chair.
118Just like any exercise, VR should be done within the recommendations of your doctor. Discontinue any exercise if it causes pain. Because VR is engaging, you might be less aware of discomfort or safety issues. It is prudent to consult with a therapist prior to using rehabilitation gaming so that the training is effective and safe.
THE GOOD TRAINS THE BAD—BILATERAL TRAINING
_______________
Most of the movements people do are bilateral (using either the arms/hands or the two legs working together). Even the movements that you think are done with just one limb involve the other limb without you even thinking about it. Consider handwriting. It turns out that the nonwriting hand has an important role in shifting the paper. Handwriting will get much slower and sloppier if the nonwriting hand is not involved. Another example is threading a needle. It would be easy to believe that if the needle was held steady in a vise that it would be easier to thread because the needle would be held perfectly stationary. Yet, when someone encounters this situation, the first instinct is to hold the needle. It turns out that when a person threads a needle, both hands are involved in an intricate and effective dance to get the needle threaded as efficiently as possible.
For folks who have not had a stroke, research has shown something remarkable. When both hands are used together in tasks, the movement of the nondominant hand (in most of us, the left hand) improves movement quality, accuracy, and speed. Researchers have found a similar dynamic in stroke survivors. When the “good” arm and “bad” arm are doing the same movements at the same time, the “bad” arm moves better. This is also true when the two arms do equal and opposite movements. When the two limbs are moved together, the movement in the affected limb improves its quality and accuracy. Using bilateral training helps the unaffected side train the affected side. In the leg, walking provides automatic bilateral training. Since you can’t walk with one leg, the “bad” leg is forced to work, bilaterally, with the “good” leg. This may be one reason that the leg tends to recover faster than the arm. The arm and hand also benefit from this sort of training, but recovery efforts have to be specifically set up to allow for this type of training in the arm and hand.
This idea of having “the good side train the bad side” is appropriate for stroke survivors with limited available movement. This is one of the things that set bilateral training apart from other stroke recovery options. There are many repetitive practice options that work well with survivors who have 119“some” movement. For example, with some finger movement, more finger movement can be gained with repetitive practice.
There are few options for stroke survivors that have very limited amounts of movement. Bilateral training is appropriate for survivors with limited movement for two reasons:
1. Bilateral training in the arm and hand only requires a little available movement in the shoulders and elbows. Because recovery tends to be from proximal (close to the body) to distal (farther away from the body), bilateral training may initiate the process. The same is true for the lower extremity. Although the ankle may not yet be moving, bilateral training of the hip and knee may begin to promote ankle movement.
2. It is believed that bilateral training works because the two extremities communicate (one arm with the other and one leg with the other). And this communication is not through the brain—but through the spinal cord. The mechanism that allows this communication is believed to reside in the spinal cord and is known as the “central pattern generator” (CPG). The CPG is evident in many animals that exhibit rhythmic behavior. The CPG is the system that allows young infants to take “steps” suspended over the floor.
That the two limbs communicate with each other without the brain is good news for folks that have brain injury, like stroke. The “good” side training the “bad” side before the brain is involved is especially important for stroke survivors with very limited movement.
How Is It Done?
The best way to allow for bilateral training of the arm and hands is to promote movement where the two extremities do the same (or equal) but opposite movements. The arm will follow what the hand attempts, so the hand will be the primary focus in the following exercises.
Bilateral training can take two forms:
• Equal and at the same time: The two hands can work in unison (the same movement at the same time, as in a mirror image):
— Throwing a two-handed basketball pass
— Folding clothes symmetrically
— Pretending to conduct an orchestra to classical music
— Drumming both hands at the same time (add challenge by playing to music)
— Placing objects (blocks, cups, cones) close to you and then away from you at the same time
— Spooning out dry ingredients with both hands at the same time
• Equal and alternating (reciprocal): The two hands can work in equal opposition (each arm and hand does equal but opposite movements):
— Alternate punching
— Drumming
— Asymmetrical cloth folding
— Hand-.over-hand rope pulling
— Alternating wiping of a table with a towel
— Tapping a target while alternating hands
— Tapping a balloon from one hand to the other (add difficulty by tossing a ball from one hand to the other)
The possibilities are endless. All of these can be done to a rhythm (see the section Rhythm Rehab for the Arms and Hands later in this chapter), which will make you focus on equal movement done during equal amounts of time. The rhythm in music or the constant click of a metronome can be used to make the two limbs do the task within the same time limits.
All of the previously listed suggestions involve the arms and hands, but similar exercises can be performed with the legs and feet. With the leg and foot, the rules are the same as the arm and hand: Whatever movement one leg does, the other matches (equal and at the same time, and equal and alternating).
The more you match the movements of the “good” limb, the better. If you find matching the two limbs is too easy, add difficulty by adding speed. That is, accelerate the movement of the “good” limb, and try to continue to match the movement with the “bad” limb. Rhythmic movements with the legs and feet can be done while lying on the back, sitting, or in a recumbent position.
What Precautions Should Be Taken?
Most of these exercises can be done in a seated position with little or no significant risk. If any of these exercises are done in a standing position, added stress 121is put on balance, leg strength, and stamina. For this reason, do not perform this sort of bilateral training while standing without the recommendation of your doctor and the guidance of physical and/or occupational therapy staff.
RHYTHM REHAB FOR THE ARMS AND HANDS
_______________
It’s a cliché that many people have heard: “Rhythm is essential to life.” Much of what we do, from the grand cycles of life and death, to the pulse of heartbeats and the pattern of breathing, is rhythmic. There is power in rhythm that can be used to recover from stroke. Some aspects of recovery are naturally rhythmic. Walking and stationary cycling movements are rhythmic, but both are lower-extremity exercises. Setting up challenges that involve rhythm for the upper extremity requires a little creativity and ingenuity.
You need some sort of machine to provide a beat. This can be a metronome, which is a machine that musicians use to keep a constant rhythm. Inexpensive metronomes cost about $10. Most electronic keyboards, which usually have some sort of beat-keeping mechanism built in, can be used. Of course, the easiest way to involve a beat in recovery is listening to music. As long as the music has a constant beat, music will work. Music has an added advantage: It takes your mind off the fatigue factor. There is a reason that most exercise videos involve music: Listening to music provides a distraction from the difficulty of the exercise. This is the same reason that so many runners listen to music and the reason music headsets are banned from many running races. Because it mitigates pain, music is thought to provide an unfair advantage to athletes during strenuous athletic events.
Music may have the added benefit of providing motivation. Nothing motivates people like their favorite music. Music can become the soundtrack of your life that, just like in movies, adds color to recovery efforts.
How Is It Done?
Here is a simple way a beat can be used to help the “good” arm/hand to train the “bad” arm/hand:
• Place two towels on a table.
• Measure how far the “bad” hand can reach while sliding the towel across the table. Make sure the affected elbow is at its fullest extension (most straight) and your back is against the seat back. Place a piece of tape at the furthest point you can reach, directly in front of the hand. Repeat the process for the “good” hand.
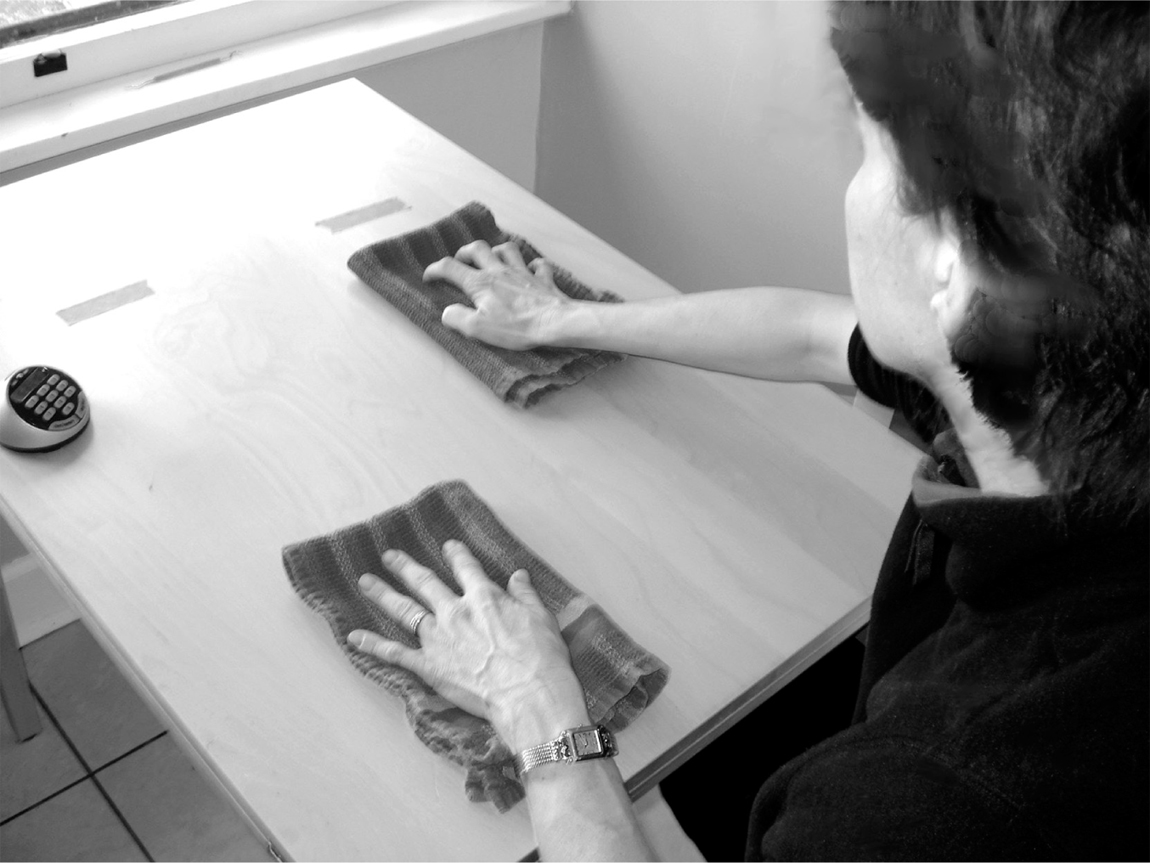
• Sit at the table so that one hand and wrist is on each towel. Keep your back against the seat back.
• Set the metronome so you can hit the targets on clicks. With each successive click, have your unaffected hand and then your affected hand push the towel forward until the tape target is met.
• Movement can be done in opposite: When one hand goes forward the other goes back. Or the movement can be done equally: Both hands go in the same direction at the same time.
• Increase the speed of the beat or the distance reached to increase challenge.
The same basic rules would apply to any exercise you devise. Simply follow these guidelines:
• The targets for each may be different, with each limb being asked to do what it can. For instance, the “good” limb may be asked to reach forward sixteen inches. The “bad” side limb may—depending where that limb is in the arc of recovery—only be asked to do five inches.
• Set a rhythmic rate that is slow and easy. This is not about going as fast as possible. This is about hitting the target on the beat.
• Set a timer so you know when to start and when to stop. If you use music, use the length of the song or piece as the start and stop points.
• Keep the rhythm!
What Precautions Should Be Taken?
Special emphasis should be placed on the possibility of spikes in blood pressure and pulse rate because this type of therapy can increase both.
For the upper extremities, this is a relatively safe technique, but again, if used for walking, marching, or anything that involves balance, be extra cautious, and consult your physician and physical therapist.
WALKING IN RHYTHM
_______________
Physical therapists focus on the mechanics of gait (how the legs and feet are used during walking). There is another important aspect to walking that gets less attention: rhythm. Walking after a stroke is often like bicycling on two square tires; there is a lack of a predictable rhythm. Researchers have successfully used what is called rhythmic auditory cuing to revive proper rhythm during walking. Any sort of rhythmic movement in the legs, arms, or a combination of all four limbs can benefit from this technique. This may even be worth a try with expressive aphasia. If words come out slowly, matching words to an increasing rhythm may accelerate the rate at which words can be formed. Using rhythm for recovery in the legs involves listening to and matching a beat while you walk. This can help re-establish the natural rhythm of gait. Developing a good and natural rhythm will help walking look and feel smoother and more symmetrical.
How Is It Done?
This sort of auditory cuing is simply a constant “click,” like the ticking of a clock. In research experiments, a metronome (a device that musicians use to keep time while practicing their instruments) is used. Metronomes can be 124purchased for less than $10. There are many free metronome phone apps. Any device that produces a constant and predictable beat can be used. As long as the speed of the beat can be altered, a drum machine, a keyboard with programmable beats, or a metronome can be used. Music can be used, as well. The company Biodex has a treadmill specifically designed to provide audio feedback to encourage symmetry in walking. The company Interactive Metronome makes a product called the Gait Mate, which helps to re-establish rhythmicity by giving the survivor constant feedback. Sensors are put in the shoe under the heel, and those sensors tell the survivor, through headphones, when their foot is hitting the floor. This technology further attempts to re-establish rhythmicity by matching the survivor’s footfalls against a constant beat. All this is done with real-time feedback to the survivor. (see Chapter 9: Recovery Machines).
However, simple technologies can be used as well. A metronome either heard through headphones or carried by the therapist as the survivor walks can be used to recover the rhythmicity of gait. Plugging the ears using standard noise-reducing plugs can boost the volume of footfalls to make them obvious to the survivor. The task is then to match the footfalls to the beat.
The trick is finding a constant rhythm that is close to the rhythm of comfortable walking. Researchers have often found it difficult to have patients match the beat of music precisely during walking. This therapy can be done while marching in place and while holding on to something strong, solid, and immobile. A wall-mounted bar or a sturdy chair may provide the necessary element of safety while marching in place. During treadmill walking, rhythm can be used to establish the rhythm of footfalls.
When the foot hits the ground (cadence) can be sped up or slowed down by changing the length of your steps. Shortening steps will speed up cadence, and lengthening steps will slow down cadence.
This concept of using rhythm to help the timing of movement may also help in other ways. Experiments have shown that people who run while listening to music feel less fatigue than those who don’t listen to music. The same may be true with stroke survivors. Music can provide a hypnotic escape from an otherwise boring exercise routine.
What Precautions Should Be Taken?
The lower extremities of stroke survivors are notoriously hard to lock into a beat. The differences in strength and coordination between the “good” and “bad” sides make keeping a constant and steady beat while walking near impossible. 125Even for folks who have not had a stroke, walking in perfect rhythm is difficult. There is a reason that the military spends so much time having soldiers walk in rhythm; it’s hard to do. For this reason, the following recommendation exists:
Do not do this sort of rhythmic training while standing or walking without the recommendation of your doctor and the guidance of physical and/or occupational therapy staff.
SHOCKING SUBLUXATION
_______________
When someone has a stroke, there is often a period of time when the muscles on the affected side are completely limp (flaccid). During this stage of recovery, there is no muscle activity. Even basic reflexes that keep muscles tight (spastic) in later stages of recovery are not present. Muscles are usually flaccid right after the stroke, but flaccid muscles can continue for years. When the muscles that hold the shoulder joint in place are flaccid, the shoulder will often dislocate. In stroke survivors, shoulder dislocation is called subluxation of the shoulder.
The shoulder is an unusual joint. It is called a ball-in-socket joint, but should be called a “ball-on-a-flat-surface joint.” Unlike other four-limbed animals, humans have developed forelimbs (arms) that have a huge range of motion at the shoulder. This gives us the ability to move our hands around in a wide area, which gives us the ability to do everything from throwing to climbing.
Humans pay a price for this great movement: The shoulder joint is relatively weak. The joint is formed by one round surface (the round top or “head” of the bone that makes up the upper arm) and a flat area, which is part of the shoulder blade. The shoulder joint is held together rather weakly by muscles that surround the joint. If these shoulder muscles become either weak or paralyzed, the weight of the arm pulls the joint apart. In some stroke survivors, the shoulder muscles reawaken as recovery continues, and the shoulder joint is pulled back into proper alignment. In other stroke survivors, shoulder subluxation can continue for years.
Along with the naturally weak human shoulder joint and the increased weakness of the joint after stroke, stroke survivors have an added risk: well-meaning people pulling on their affected arm. During transfers (e.g., sitting to standing, lying down to sitting) it is common for healthcare workers or caregivers to use the “bad” side arm to pull the stroke survivor into position. It “makes sense” to move the survivor in this way because the “bad” arm provides leverage for the weak side of the body. But resist the temptation to move a survivor 126with the arm if it puts pressure on the shoulder joint! Using the shoulder to move the survivor can cause permanent damage and pain to the shoulder.
When a muscle is completely flaccid after stroke, only one thing can make it contract: electrical stimulation (e-stim). This treatment is called neuromuscular electrical stimulation (NMES). NMES involves sticky electrodes that are put on the skin over the target muscles. Wires go from the electrodes to the NMES machine. E-stim goes . . .
• From the machine to
• The wires to
• The electrodes to
• The skin and
• Into the muscles under the skin.
The e-stim can be turned up to the point where the muscle will contract. When using e-stim for shoulder subluxation (dislocation) after stroke, e-stim goes into the muscles that surround the shoulder joint.
When the stimulation enters the muscle, the muscle contracts and pulls the top arm bone (humerus) into proper position. The e-stim actually contracts (tightens) the muscles, in much the same way the stroke survivor would, if they could. E-stim can, over time, strengthen the muscles surrounding the shoulder joint. For some stroke survivors, this helps normal muscle activity hold the joint together permanently.
How Is It Done?
You’ll need a clinician to determine the proper electrode placement for e-stim/dislocation. The following may be of more interest to clinicians than survivors:
There has been some debate about where electrodes should be placed for NMES and subluxation. Traditionally, the placement has been the deltoid and supraspinatus. However, it has been pointed out that the placement over the supraspinatus is problematic because the supraspinatus is covered by the upper trapezius. It is thus unlikely that the supraspinatus can be activated by surface stimulation. A better choice is the deltoid and the infraspinatus and teres minor.
Many machines on the market can provide electrical stimulation, in the proper dose, to resolve subluxation. A doctor’s order and a therapist’s guidance will establish the best electrode placement and type of stimulation parameters.
127Percutaneous (performed through the skin) intramuscular stimulation (perc-NMES) is another option. This form of stimulation is much like NMES, but the electrodes are placed directly into the weakened muscles. This means that less e-stim is needed because there is less tissue between the machine and the muscles. Perc-NMES also has the advantage of being able to more accurately target the specific muscles that can help reduce subluxation. This treatment involves minor surgery.
Note that NMES is different from the form of e-stim that is often used clinically, called transcutaneous electrical nerve stimulation (TENS), often used to reduce pain, even the pain of subluxation. The TENS sort of e-stim does not make the muscle contract, and so would be ineffective in reducing subluxation.
What Precautions Should Be Taken?
Your doctor will let you know if this therapy will be effective and safe for you. There are some contraindications for e-stim because the electrical output can interfere with other electrical devices (e.g., pacemakers). Always consult your doctor before attempting this therapy. Have your occupational or physical therapist help you decide how and where the stimulation should be used. Once your doctor and therapist are consulted, e-stim may be able to be administered with an inexpensive machine, at home.
THE NEUROPLASTIC MODEL FOR “PUSHER” SYNDROME
_______________
Pusher syndrome (PS) is an altered sense of balance. Survivors with PS believe they’re vertical (upright) when they are leaning toward the “bad” side. When they are forced upright by someone else (usually a therapist), they feel like they’re leaning too far toward the “good” side. They see any attempt to get them truly vertical as a serious threat that inspires fear. “Pushers” react to this fear by “pushing” toward the “bad” side. Another term for pusher syndrome is listing phenomenon. This may be a more accurate term because “pushers” only become “pushers” when they are pushed. Anyone who was shoved out of balance would push back!
There are other terms that have been used for PS, including:
• Ipsilateral pushing
• Contraversive pushing
• Pusher behavior
128Survivors with PS have damage to a portion of the brain that relays information about body posture from the body to the brain. The area damaged, near the middle of the brain, is called the posterolateral thalamus. When stroke damages this area, survivors can develop PS. PS affects approximately 5 percent of all stroke survivors. However, some estimates are as high as 50 percent.
How Is It Done?
Survivors with PS have trouble knowing when they’re standing or sitting upright. In other words, they have trouble with balance. Balance is determined by three systems controlled by the brain:
1. Vision
2. Vestibular (inner ear)
3. Proprioception (feeling where your body is in space)
PS is damage to only one of the three systems: proprioception. Survivors with PS can retain balance by focusing on the systems that are still intact. Therapists help survivors develop strategies to overcome balance problems caused by PS. These strategies include focusing on vertical visual cues in the room. The idea is to use vision to overcome the lack of proprioception. The survivor is asked to reorient himself or herself to vertical. As is true with many of the recovery options that drive neuroplastic change, it is repeated self-correction that rewires the brain. Therapists will challenge survivors with PS by having them repeatedly reach for objects on the “bad” side. The survivor is then instructed to bring himself or herself back to vertical. This allows for neuroplastic rewiring of the brain through repetitive practice. The survivor is asked to repeatedly lean toward the “bad” side and then back to vertical. It is important that the survivor is in control of the attempts to come back to upright. Therapists can provide tricks and strategies to help the survivor move back to vertical. It is beneficial for survivors with PS to carry what they learned in the clinic to their everyday life. No matter what the activity, adjusting body posture to vertical will help survivors recover the ability to maintain proper balance.
What Precautions Should Be Taken?
Note that some research indicates that most survivors with PS spontaneously and completely regain their sense of balance within six months.
