6 |
Specific phobias |
Most people know the meaning of the word ‘phobia’ – an intense fear that is excessive for the situation, which causes avoidance and interferes with your daily life. If you think you might have a phobia or you know that you definitely have this problem, then working your way through this chapter should help you to better understand why you have your phobia, what keeps it going, and how to overcome it.
After many years of treating people with specific phobias, starting in the mid 1970s, Lars wondered what would happen if he used a session that was long enough to get rid of all someone’s anxiety in one extended session of three hours rather than weekly for an hour. The first evaluation of the treatment for twenty patients found that 65 per cent were completely recovered and another 25 per cent much improved, and that 90 per cent showed a good long-term outcome. Other research has subsequently produced the same findings. The treatment that you will read about here is based on the extended treatment session that shows such good outcomes. It therefore has an extremely good chance of helping you get over your phobia so that you can go on to lead a fulfilled and unrestricted life.
People with a specific phobia have a marked and persistent fear that is excessive or unreasonable. This fear is brought on by the presence or anticipation of a specific object or situation (e.g. flying, heights, animals, having an injection, seeing blood). When confronted by the object/situation, an immediate anxiety response is provoked that can be like a panic attack (see Chapter 7). In children, anxiety may be expressed by crying, tantrums, freezing or clinging. If you have this fear, you will recognize that when you are in a calm situation, away from the object or feared place, you can see that the fear is excessive or unreasonable, but it is hard to appreciate this at the time. People with phobias tend to avoid the objects and situations of which they have a phobia, or they endure them with intense anxiety or distress. For it to be the kind of phobia that warrants a treatment programme like the one described in this chapter, the avoidance, anxious anticipation, or distress felt in the feared situation(s) interferes significantly with your normal routine, work, studying or socializing, and you will be upset about having the phobia. You will probably have had this phobia for many months or years.
Surriane’s story
Surriane was a 26-year-old woman who had a lifelong fear of spiders. She could not recall a specific incident that triggered this fear, but she did remember hating Halloween and all the cobwebs and spiders that were around at that time. She also recalled seeing an enormous spider in the bath when she was about eight that she described as ‘menacing’. Her brother and parents didn’t like spiders but they were not petrified of them in the way that she was. She recalled with great detail that she begged her mother to kill the spider but her mother refused, put it in a glass, and took it outside. She didn’t see her mother do this but began to worry soon after that, in fact, the spider had jumped out of the jar and was lurking somewhere in the house. Since then she always looks out for spiders when she goes to a new place, shakes out her duvet cover, sheets and pillowcases, and only showers rather than bathes in case a spider comes up the plughole into the bath, even though rationally she knows this to be an impossibility if the plug is in place. She came for treatment because she was embarrassed by her fear of spiders with her new partner, and because she was refusing to let him watch the TV channel with I’m a Celebrity . . . Get Me Out of Here! on it in case there was an trailer for it that had a spider crawling across the screen.
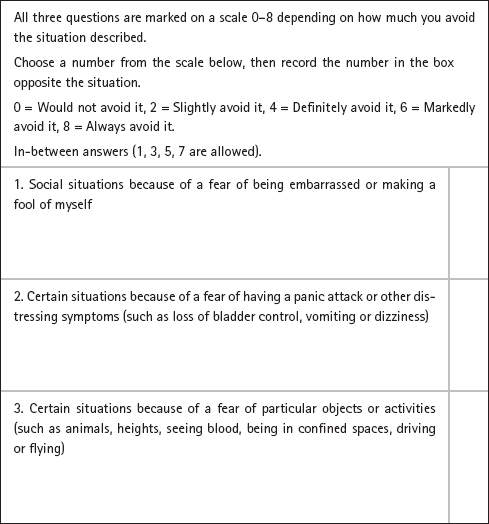
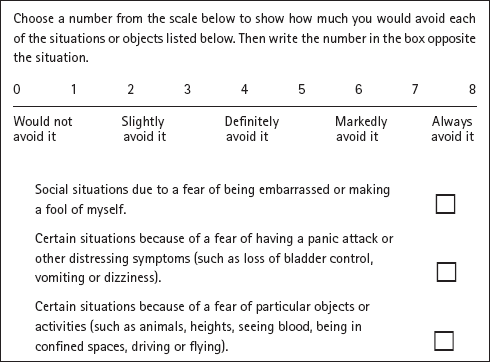
The questions below are taken from the national ‘Improving Access to Psychological Therapies’ assessment measures – www.iapt.nhs.uk. These are measures widely used by the UK National Health Service in their treatment of anxiety and depression.
Reproduced with kind permission from Department of Health, IAPT Data Handbook, 2010, www.iapt.nhs.uk/silo/files/iapt-data-handbook-appendices-v2.pdf (p. 24). If you scored 4 or above on question 1, then Chapter 9 on social phobia is probably best for you; if you scored above 4 on question 2, then look at Chapter 7 on panic disorder. If you scored 4 or above on the third question, then the programme described in this chapter is appropriate for you. A longer, more detailed measure to assess the severity of your phobia is given at the end of the chapter. If you have decided that you do indeed have a phobia that needs treatment, you need to try to understand what is keeping your phobia going. Why is it so persistent?
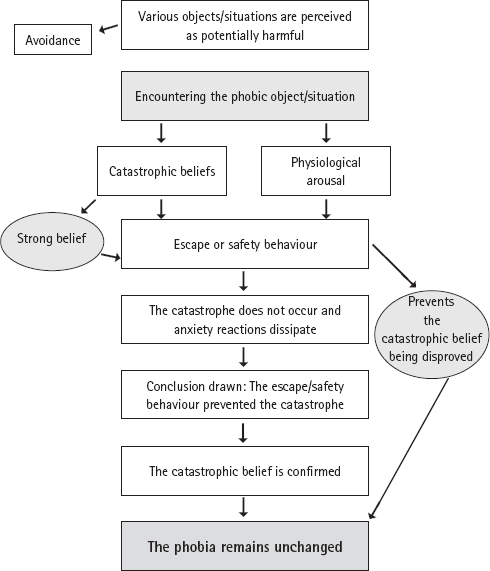
In Part 1, we talked about how cognitive behaviour therapy focuses on what is keeping the problem going. Indeed, all effective cognitive behavioural treatments are based on a model that specifies how the disorder in question is maintained once it has started. In each chapter in Part 2 of this book you will see such models. People with specific phobias see particular objects/situations as potentially harmful and, unsurprisingly, this leads them to avoid the objects or situations. When you fail to avoid your feared object (such as a snake, spider, injection), then you’re likely to have thoughts of something terrible happening, such as being attacked by the spider, fainting, going crazy and losing control, being sick, and so on. You are also likely to have feelings in your body that are associated with your thoughts of danger, consistent with the fight-or-flight response (see pp. 5–6). Your heart may race, you may get butterflies in your stomach, you may feel sick, your throat may tighten, and you may feel dizzy. These feelings in your body and your thoughts can affect each other, with some people thinking that the feelings in their body show that the thing they are worried about (going crazy, being attacked, fainting etc.) will come true. The result of this is that the feelings in your body and your thoughts about danger escalate even further.
It is understandable, given the thoughts of danger and the strong physical sensations, that you’d try to leave the situation causing the problem.
This is a natural reaction. If you are unable to leave the situation, then you’re likely to try to do something in order to reduce the danger and prevent the disaster from occurring. Such ‘safety behaviour’ is described in Part 1 and occurs with all anxiety disorders.
After leaving the situation or using ‘safety behaviour’, the short-term good news is that the dangerous event doesn’t occur (e.g., the spider doesn’t attack you; you don’t go crazy) and the strong feelings in your body begin to fade away. The longer-term bad news is that you do not learn that there is little (if any) danger in the situation: you continue to have your phobia. After leaving the situation, when your anxiety has faded, you are likely to conclude that it was only by escaping or carrying out the safety behaviour that you prevented the danger from occurring. Your original belief about the dangerousness of the object/ situation is confirmed and the phobia remains unchanged. In cognitive behaviour therapy you will be helped to find out that this conclusion is incorrect and the reason that the dangerous event did not occur is that there was in fact minimal danger – or even no danger – in the first place.
Our understanding about what keeps phobias going can be summed up as follows:
Everyone has some fears about particular situations, but if you have a phobia you will almost certainly think that your feared object/situation is more dangerous than it really is. You will feel anxiety because of this perceived danger. By leaving the situation or engaging in certain behaviours to prevent the danger from occurring, your original belief about the danger of the particular feared object/situation remains unchanged and you continue to have a phobia.
Figure 6.1 illustrates this.
Figure 6.1: How specific phobias are maintained. Reproduced with kind permission from Intensive One-Session Treatment of Specific Phobias, T. Davis, T. Ollendick and L-G. Öst (eds), New York, Springer 2012, (Chapter 4).
The figure above indicates that you should focus your effort to change on obtaining new information that can correct the false beliefs about danger and about what would happen if you came face to face with the object of your phobia. By facing your fear situation and staying in the situation until anxiety fades, your belief in the dangerousness of the object/ situation will diminish. This is because you are getting new information that the object or situation is much less dangerous than you first thought. When you do not avoid the phobic object/situation, have no anxiety symptoms in your body, and no longer believe that the object/situation is dangerous, then you have recovered.
Simply knowing that avoidance keeps your phobia going and that you need to reduce avoidance is not enough to get better.
You need to find out what kinds of beliefs about danger you have about the phobic object or situation you fear. This is illustrated below in a conversation between Surriane and her therapist.
Another example is given below for Pete, 48, who suffered from claustrophobia.
Ask yourself the following questions to work out your own beliefs.
1. What do you think will happen if you confront your phobic object/ situation and cannot leave?
2. And then what do you think would happen?
3. What is the worst thing that would happen?
4. Imagine you are in the situation where you confront your phobic object/situation and cannot leave. How certain would you be when in the situation that it will lead to the worst thing happening?
5. And now, when you are sitting here reading this book, how certain are you that it would lead to the worst thing happening?
Once you have worked out your belief about the danger, ask yourself: ‘When I am in contact with the object/situation I fear and have this belief, do I do anything to prevent the danger from happening?’ Maybe you cannot remember using any safety behaviours, but when you start to make changes and face your fear it will usually be obvious what you do. When you identify your safety behaviours you will need to let them go in order to see whether the danger occurs or not. This is easier said than done, but is necessary in order to change your belief, and some of the information about behaviour experiments in Part 1 should help you to find the courage to do this.
• Help the person you are supporting think of times when they had a specific belief about some danger but then found out that their belief was not correct and the situation was less ‘dangerous’ than they first thought. For example, a time when they were convinced they had upset someone and they hadn’t; a time when they had done some work and thought it wasn’t very good but it was – anything will do! Discuss together how they found out their belief was wrong, and what would have happened if they had not had the opportunity to test it.
• It can also be valuable to ‘normalize’ your friend’s phobic behaviour by saying something like: ‘Since you believe so strongly in the danger it is logical to want to avoid or escape the phobic situation. But this prevents you from obtaining new information that can correct your false belief, and your phobia remains unchanged!’
• It may even help to tell your friend that if you believed, for example, that there is a 90 per cent chance that you would get run over by a car and die when crossing a busy street at a pedestrian crossing while the WALK sign is lit, it would be rational to avoid this. Instead you would walk a long distance to find a bridge across or a tunnel underneath the street.
Figure 6.1 on p. 92 illustrated that escape, avoidance and other safety behaviour keep your belief going.
The aim of the treatment is for you to face your fears of the particular objects/situations in a controlled way, thus enabling you to realize that the consequences you fear do not actually occur. The treatment in this chapter should be completed in a single three-hour session and should be seen as a start: you must continue to face your phobic situations in everyday life after you have gone through the treatment described in this chapter. A phobia of twenty–thirty years’ duration will not completely vanish after only one three-hour session. However, the single, extended session will enable you to continue on your own with facing your fears: by following a voluntary ‘keeping it up’ programme that we will describe at the end so that, within a few months, any remaining phobic symptoms and responses will disappear.
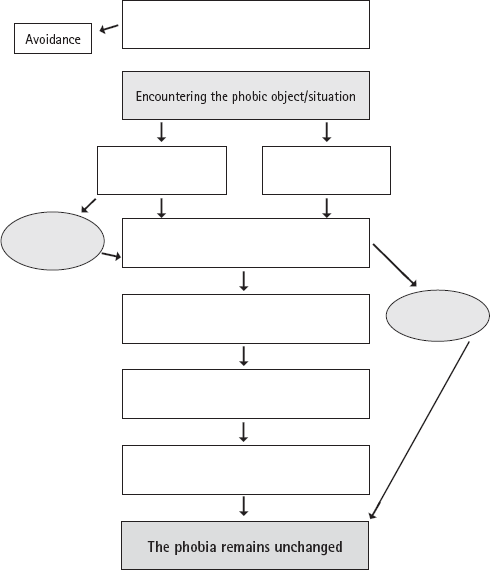
Having asked yourself the questions on pp. 95–6 to work out your own beliefs and any safety behaviour you might be using, fill in the diagram in Figure 6.2 (p. 99) to get a picture of what is keeping your phobia going. If you find this difficult, find a supporter to help you.
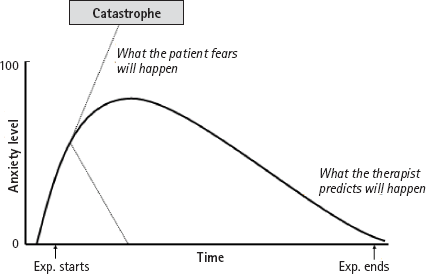
A picture of what happens when you encounter a phobic object/situation is shown in Figure 6.3. This shows two important things. Firstly, that when you encounter the phobic object/situation, your anxiety level will increase rapidly because you fear you are in danger. Once you leave the situation your anxiety quickly fades. Secondly, it shows that you are likely to think that your anxiety will increase catastrophically and may itself lead to danger; whereas an alternative prediction (and one we would make) is that your anxiety will level out and then gradually decrease while you continue to face your fears. It is important to be clear about what 100 on the y-axis means: it is the highest degree of anxiety that you have ever experienced in the phobic situation before the treatment starts. It is worth replotting your anxiety at the end of treatment so you can see the changes you have made and if the level of anxiety you experience in those particular situations has come down at all.
Figure 6.2: Discovering what maintains your phobia
Figure 6.3: The anxiety curve Reproduced with kind permission from Intensive One-Session Treatment of Specific Phobias, T. Davis, T. Ollendick and L-G. Öst, New York, Springer, 2012 (Chapter 4).
There are important differences between natural encounters with phobic objects/situations and being exposed to your fears during treatment. First, in natural situations the exposure is unplanned, ungraded, and uncontrolled, whereas during the treatment it is planned, graded and controlled. Second, in natural situations the exposure is usually brief, whereas in treatment it is prolonged (up to three hours). This time difference means that there is ample opportunity to test the two predictions about what will happen to you and your anxiety, and find out which one is correct. Finally, in natural situations you are often alone, whereas when you are doing the treatment, even in a self-help format, it is a good idea to have a supporter available to help you deal with your phobic reactions. A supporter can provide the encouragement you need to keep going with the treatment, even if you feel anxious.
• At the beginning of treatment, emphasize how you are there to support your friend and that you will do your utmost to help them in carrying out the treatment, and achieving a good result. Acknowledge that this kind of therapy is hard work and emphasize that you will both fulfil your part in the team-work.
• Many people fear that some kind of ‘shock treatment’ may be used, e.g. that you might suddenly take out a spider and throw it in your friend’s lap. It is important to inform them that you will never do anything unplanned, but that, instead, you will work together with your friend to decide what will happen, you will demonstrate it, and finally will get their permission to do it. Although you will work together to find the right number of steps in the exposure, it is always the person with the phobia who has the final word on whether he/she will carry it out.
Another fear that you may have is that you will be subjected to such a high level of anxiety over such a long time (three hours) that you will not be able to cope with it, mentally or physically. You may believe, for example, that you will suffer a heart attack and die from anxiety. Here it is important that you think back on the most anxiety-arousing situation you have ever experienced in relation to your phobia (call this 100%). You can be assured that even if this session exposes you to much more contact with your feared object than you ever have experienced in natural situations, you will not ‘break your personal record’ of anxiety in the phobic situation. This is because the planned, gradual and controlled way the exposure is carried out means that your anxiety will never be higher than you have experienced in unexpected natural encounters. This information is comforting, because it means you have survived your most anxiety-arousing situation. Many people believe that a high level of anxiety is necessary to help you overcome your fear. This is not the case. You can become fear-free even if your anxiety does not rise above 40–50 out of 100, as long as you have not been engaging in avoidance and you have obtained new knowledge to help you correct your erroneous beliefs about the phobic object.
When this treatment is used for people with animal phobia, it consists of a combination of facing your fear in real-life and in demonstrations from a supporter, whereas other specific phobias do not require such demonstrations. If you do not have a supporter, you can still make significant progress on your own.
Facing your fear. The purpose of exposure is to help you change your beliefs about the danger relating to the phobic object/situation or resultant anxiety that you have learned from the cognitive-behavioural model on p. 92, Figure 6.1. The exposure is set up as a series of behavioural experiments (see pp. 63–9) to evaluate your beliefs about danger; such behavioural experiments are highly specific and not simply ‘facing your fear’ in the general sense. Carrying out a specific exposure (behavioural experiment) can help you to achieve your goal of changing your beliefs about the danger you believe you face in a much shorter timeframe than traditional exposure programmes. The general principles for these behavioural experiments are as follows:
• You make a commitment to remain in the exposure situation until your anxiety fades away (it will, we promise – but you have to find out for yourself!).
• You agree to try to approach your feared object/situation as much as possible, and remain in contact with it until your anxiety has decreased.
• You will not leave the ‘therapy session’ (i.e., working your way through this chapter) until the level of your anxiety has been reduced by at least 50 per cent, and preferably completely vanished.
It may be helpful to demonstrate how to behave with the phobic object/ situation. At this step it is important to get the person you are supporting to continuously watch what is happening, and not close their eyes or look away. After doing this for a while, you should help them to come closer to the object/situation, e.g. by first holding their hand, then their arm, and then gradually reducing your physical assistance. It may be that you have to reduce and increase the physical help a number of times before they are ready to proceed to the next step of interacting with the feared object on his/her own.
The treatment for a spider phobia is described below, but should not be considered as the only way of doing the treatment, but instead as how it can be done. You will need to have some flexibility regarding the specific content of your own treatment and the description that follows is just an illustration of the principles of the therapy. As you will see, it helps if you have a supporter to help you overcome your phobia. Ideally you would have a supporter who is not afraid of spiders and who would be able to stay calm themselves during the treatment.
Ask your supporter to prepare for the treatment by catching three or four spiders in increasing sizes, from 0.5 to 3 cm and placing each in a separate glass jar with a lid on it. Have ready a glass and a postcard. The spiders should be the kind that you will encounter in natural situations where you live.
During the entire treatment you should keep the spider you are working with in a large plastic bowl (50 X 30 X 15 cm) to keep it from falling on to the floor.
The first step is for you to try to catch the smallest spider with a glass and a piece of paper (e.g. a postcard) and throw it out of the house, which is the goal for natural – in other words, non-therapy – situations. What are you thinking right now? ‘AAAAHHH! I CAN’T DO THAT!’? Trust us: you can and you will. The 90 per cent of people who went on to make significant improvements all thought the same thing. So, ready to start?
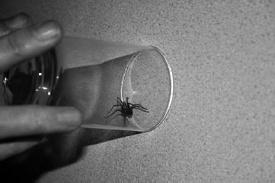
You can be at the opposite end of the room to your supporter if you like, but you should be able to see what they do. Your supporter should put the glass upside down over the spider in the bowl, and slide the postcard under it. The postcard functions as a ‘lid’ and by putting one’s fingers under the postcard the glass can be turned upright and the postcard removed carefully in case the spider has spun a thread on the card. After you have watched your supporter do this from a distance, try approaching and watch your supporter doing it again. Then it is your turn to do the same thing, catching the spider with the glass and the postcard. After you have done this three or four times, you should hold the glass in the palm of your dominant hand and close to your body. Figure 6.4 illustrates this process. At this point you will carry out a brief role play to help you to look closely at the spider. The role play consists of you describing what you are looking at in the glass as if you were describing it to a blind person. For example, ‘The spider has eight legs, two eyes, and it is dark brown.’ Try not to use any judgemental words like ‘disgusting’. This exercise usually leads to a marked reduction in anxiety over time.
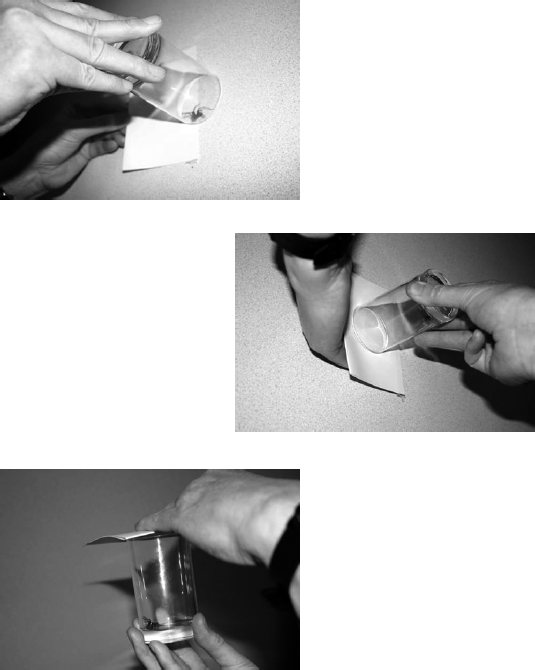
Figure 6.4: Illustration of treatment of spider phobia
The next step involves touching the spider. Before starting this step you should ask yourself what you believe will happen if you put your hand in the bowl. Almost 100 per cent of people say that the spider will crawl up on their hands, up their arm and underneath their clothes. This prediction can be tested by your supporter putting his/her hand in the bowl, then touching the spider from behind with their finger. What will happen, much to your surprise we are sure, is that the spider usually runs away. By repeating this ten times you will realize that the spider gets tired quickly and runs gradually shorter distances. The same procedure is then repeated from the left side, from the right side, and from the spider’s head. You will soon realise that the spider does not crawl up on your supporter’s finger. Next, it is your turn to touch the spider in the same way, which usually involves your supporter helping you. By doing this for long enough, your assumption that the spider will react differently towards you for some reason (perhaps because it ‘senses’ your fear), will change.
The third step involves letting the spider walk on your hands. If you are just reading the first two steps, rather than actually doing them, you may think that this is impossible. However, if you have actually done the first two steps, you will be able to realize this is an achievable goal. Honest! Your supporter should first of all take the spider on his/her hands, letting it walk from one hand to the other. Then you, with your supporter’s help, should put your index finger on your supporter’s hand so that the spider can walk across your finger and back on to your supporter’s hand. This is repeated a number of times, until the spider is gradually allowed to walk on all your fingers, on the whole hand, and across to your other hand. Gradually your supporter withdraws their physical support, letting you manage on your own, just following their guidance. During this step the goal is to have the spider walk up to your elbow (on both arms), allowing you to realize that you can move your hands faster than the spider can run and that you can prevent it from crawling underneath your clothes.
Throughout this three-hour session you are learning that you can have indirect control over the spider by gradually being more accurate in predicting what the spider is going to do. You will learn that the spider isn’t going to turn 180 degrees and suddenly run in the opposite direction. Basically, it will crawl in the direction that its head is pointing.
If you are skim reading and read this before you have started, it will seem extreme. Don’t let this put you off now – once you have made a start these steps will seem much less extreme and more manageable. And remember that this is your therapy and you are in control. If you decide you don’t want to go this far then it is up to you.
The fourth step involves having the spider walk on your body. You can start putting it on your trousers (at knee level) and ‘guide’ it as it crawls up towards your waist. When this has been done a number of times, and your anxiety has been reduced, the spider can be put on your shirt at waist level and have it crawl up to your neck. Naturally, this has to be repeated until you notice a marked reduction in your anxiety. As with the other other steps, it is best if your supporter does this first.
The above four steps should then be repeated with another two or three spiders of gradually increasing size, the largest being about 3 cm (including legs). When you have accomplished this, we would encourage you to have the two largest spiders walking on your hands simultaneously. This step is, of course, more difficult, but by being relaxed in your arms and hands you should be able to control the spiders.
If you are really enthusiastic and the above session has gone extremely well, you may want to go through ‘over-learning’, which probably is not necessary in order to obtain a good result. This means first having the largest spider put in your hair, while your supporter is standing behind you to watch the spider and prevent it from crawling underneath the neckband of your shirt. You may think, ‘You must be joking!’ but by the time you have done the previous steps, this will seem more manageable. During this step you should indicate exactly where you think the spider is by pointing with your index finger. It is common for people to be wrong because they cannot really feel the spider. The final step is to have the spider put on your cheek. You should hold one hand over your neckband to prevent the spider from falling inside your shirt while your supporter cautiously puts the spider on your cheek. Your supporter needs to make sure the spider does not crawl on your ear, eye, nose or mouth. It is fine, though, for the spider to walk a bit on the cheek.
Whether you decide to use the ‘over-learning’ approach or not, the final goal is for you to be able to handle spiders with low or no anxiety and to no longer believe that the spider poses any danger.
We do not know how well this technique works if you are alone. Practically, there are a number of problems. How do you get the spiders in the jars in the first place and how do you read the written guidance at the same time as you are trying to implement the treatment? It is for this reason that we would encourage you to try to find a supporter who can help. It may be that if you contact your GP or share this book with your practice nurse or therapist, then he/she will be able to act as the supporter and prepare the spiders. Alternatively, you could see if there is a local self-help charity such as NoPanic in the UK (www.nopanic.org.uk) who would be able to help. We would strongly encourage you to try to find someone. If you absolutely cannot, or feel too ashamed to ask for help, then we encourage you to use the principles above of gradually facing your phobic object/situation in a controlled and graded way, focusing on getting the experience that you need to disconfirm your belief that the feared object or situation is highly dangerous.
We recognize the practical difficulties of getting hold of a snake and finding someone who is happy to be a supporter. Nevertheless we have included this section on the treatment of snake phobia because it is a common problem, and we hope that therapists and those with a snake phobia will find it helpful to understand the principles and practicalities of treatment.
When the work on treating people with snake phobias began, three snakes in different sizes would be used, for example a corn snake, a python and a boa constrictor, just like using different sizes of spiders. However, because it can be difficult to obtain three different snakes for the session, we currently use only a corn snake that is about four feet long. This is what we suggest you do as well. For your treatment, you should, it goes without saying, only use a non-poisonous snake and the snake should be accustomed to being handled frequently by people. It is best to do this treatment in a fairly large room so that you can be seated in one end when your supporter brings out the snake in the other. It is vital that you have free passage to the door of the room. Knowing that you can leave the room without having to pass by the snake will reduce your anxiety and make leaving the situation less likely.
The first step of the treatment is that your supporter brings out the snake and holds it in their hands/arms at a distance from you (as far away as the room allows). Your job is to watch the snake at all times, observing its colours, pattern of the skin, movements, tongue, etc. It is also important for you to rate your anxiety at regular intervals. When there has been a reduction in your anxiety and you are ready, you should move about three feet closer. When you are as close as you can manage, you should stay there until your anxiety has decreased further. Continue with this approach until you are sitting down on a chair 2–3 feet away from the snake. After a while you can move the chair closer so that you can reach out and touch the snake. You should attempt this after you have become adjusted to having the snake at such a short distance. Since most people with snake phobia fear the mouth and the tongue of the snake (which makes sense!) you will start by touching the tail. Before you do this, predict what it will feel like touching the snake. Do you think that the snake will be slimy and warm? If so, you will be surprised when you realize that it is dry and cool, the same temperature as the room. The first touch is usually done by your supporter holding the snake’s head away from you while you touch its tail. Since you will want to touch the tail only very briefly, you will have to build up to doing it for longer periods by repeating the process a number of times. When this is going well, you should try to touch the snake gradually closer and closer to its head. You should hold one hand around the snake’s stomach and let it glide in the palm of your hand as it moves. Then you can hold the snake with both hands and get acquainted with its movements, and how the muscles feel. All the time it is absolutely necessary that you know your supporter is in control of the snake. It is very difficult to do this completely alone because you need to be certain that your supporter will intervene should the snake do anything unforeseen.
Since you are likely to try to avoid close contact with the snake’s head it is necessary to build up to this step. First, predict what will happen if you put a finger in front of the snake’s mouth. People usually believe that the snake will bite their finger. This should first be tested by the supporter putting his/her fingers in front of the snake’s mouth, giving it ample opportunities to bite, while you watch closely. After this you should ask yourself whether what you had thought would happen did really happen. Then you will do the same thing with your own hand, allowing the snake to be so close that you can feel its tongue on the skin of your hand. When this has been done with reduced anxiety you should draw a final conclusion concerning the probability of being bitten by this snake. In this situation it may also be a good idea to discuss with your supporter under what circumstances a snake of that particular species would bite: to kill its prey or if it was threatened, e.g. being trodden on by accident.
The next step is to gradually let your supporter move the snake onto your lap. Your supporter should enable this to happen in whichever way is necessary to both maintain your calmness and be mindful of the snake (e.g., ensuring the supporter does not accidentally drop the animal and harm it). When you feel fairly comfortable handling the snake in your lap it is time to let it move around more, e.g. crawling around your waist, up one arm, etc.
The final step could involve having the snake around your neck, feeling its skin against your neck and cheek. If you are willing, you could even put the snake under your shirt or blouse, trying to get it to crawl around your waist. This should, of course, be viewed as an extra step and is not compulsory. Before ending your session, it is important to make sure that all the catastrophic beliefs that you had initially have been tested. If one, or more, remains untested there may be a risk of your starting to avoid snakes again.
In contrast to people with other phobias, who experience increased heart rate, blood pressure etc., people with blood-injury phobia experience a drop in blood pressure when confronted by their phobia, which can lead to fainting. Many people have indeed fainted when faced with blood or injury. A specific treatment method for blood phobia called applied tension has been developed and shown to be effective. This is an intensive five-session treatment which has two aims: teaching you to recognize the first signs of a drop in blood pressure, and teaching you to apply a rapid and effective tension technique to reverse the drop in blood pressure. In this treatment, after practising the tension technique at home you would be shown up to thirty slides of wounded people, blood donation at a blood donor centre, and of a real operation, such as lung or open-heart surgery. The treatment given in this chapter has now been reduced to a one-session format lasting a maximum time of two hours.
There is a good reason for using the method of applied tension, as it is an effective way of reversing a drop in blood pressure that occurs in phobic situations and will prevent fainting. You will first need to become aware of the first sign of your blood pressure dropping. These signs can be individual to you, but include cold sweat, an unpleasant sensation in the stomach, tunnel vision and singing in the ears. To find out which are the most common signs for you, think back in detail about the past few times you had this experience.
The next step involves learning the tension technique. Ideally, your supporter will be able to demonstrate this. This technique involves your tensing body muscles (arms, chest and legs) as much as possible and to keep tensing for 15–20 seconds. This is followed by releasing the tension and returning to normal, but without completely relaxing. After a thirty-second pause you tense again, and then release the tension, and so on. Continue for about thirty minutes, regularly assessing your blood pressure using a kit purchased from a pharmacy. This should show you that the tension technique leads to an increase in blood pressure, and usually heart rate.
After the tension technique, have a brief pause and then start the application training. In this phase you should find ten colour images of wounded people, mainly traffic or work-related accidents. You should be able to find these easily by searching for ‘images’ on your internet search engine. As in the other phobias you should initially predict what will happen when you are exposed to the pictures, and rate the strength of this belief. For example, you might think, ‘I will pass out’, and believe this 100 per cent. In a formal therapy session, the first picture would be projected on the screen giving a picture size of about 3–4 feet, but this may be difficult to do at home, unless you have a projector. Instead, just sit close to your computer screen and ensure that the picture is as large as you can make it. Watch the picture without screwing up or closing your eyes, or looking away. At the same time, scan your body for the first signs of a drop in blood pressure, and as soon as you notice any drop, apply the tension technique for as long as necessary. The goal is to be able to watch the picture without feeling faint. When you have achieved this, briefly pause before moving on to the next picture, using the same procedure. If you wish, after you have worked through ten pictures you can start to be exposed to other things, for example, pricking of a finger, watching fake blood in a test tube, and fake blood-stained bandages, while applying the tension technique. The reason why this treatment lasts two hours instead of three, as in other specific phobias, is that you would get sore muscles after practising tension for such a long period. At the end of the session, re-rate your belief in the feared outcome, for example, your belief that you will faint. If you have a supporter, they can encourage you to implement the tension technique and continue with the programme.
The reason you are reading this chapter is that you have a phobia that is interfering with your life. In the case of injection phobia, your anxiety can actually threaten your health by preventing you from getting the medical treatment that you may need. The treatment for this phobia consists of intense prolonged exposure to three procedures that most people with injection phobia find anxiety-inducing: pricking of fingers, subcutaneous injections and venepuncture (drawing blood from a vein in the bend of the arm). The goal is to prick ten fingers, to do 10–12 subcutaneous injections and 2–4 venepunctures.
As with the other phobias, it is essential to identify what you think will happen to you if you have an injection, and what you do when confronted with a situation that involves an injection. About 50 per cent of people with an injection phobia have a history of fainting in these situations, and if this has happened to you then it may be that this is what you fear will happen. In this case, you need to use the tension technique described on pp. 111–3 for blood phobia so that you are prepared to act should a drop in your blood pressure occur. On the other hand, it may be that you are mostly frightened of the pain, or of embarrassing yourself, and your thoughts revolve around how unbearable the pain of the injections will be.
Alternatively, it may be you experience a strong feeling of disgust when a needle, or any sharp object, penetrates the skin. Then again you could have a belief that is specific to you, for example that if a blood vessel has been penetrated with a needle it will not stop bleeding and that you will die of blood loss, or that the needle will break. All of these beliefs have to be taken seriously, and you and your supporter need to be creative enough to set up behavioural experiments to test how true your beliefs are in reality.
It is very difficult – almost impossible – to do this without professional help. Your professional helper should be experienced in giving injections and qualified to do so. Nurses working in GP practices, or people who take blood in phlebotomy services, can be very helpful. Ideally this treatment will take place in an environment that is as different as possible from the ordinary hospital or outpatient settings in which you have had your negative experiences. Such places tend to have a certain smell that you might associate with anxiety, failure and perhaps fainting. It would therefore be better if your phobia treatment could take place in an ordinary therapy room in which you can feel comfortable. It is important that during this treatment, each small step in the procedure is demonstrated to you and that you then give your permission to your professional helper to perform the particular step. It is extremely important that you can trust them and that nothing is done without your explicit permission. This means that you have to be highly motivated. When you are ‘ready’, your professional helper should ask you, ‘Can I prick now?’ If you say ‘yes’, the professional helper will perform the procedure. If the response is a ‘no’, then you will need to work with your professional helper to become motivated. It may be that you don’t say ‘no’, but at the same time can’t say ‘yes’ and a non-verbal signal such as a nod of the head may work best.
As it is likely that you will find venepuncture the most difficult of these procedures, followed by subcutaneous injections, and then pricking of fingers, the first phase will involve you having your fingers pricked. Start by predicting (and rating your belief in your prediction) what will happen if you prick your finger. Your professional helper will demonstrate the lancet and how it works, the grip he/she would want to take of your fingertip, etc. If you are very fearful of the pain you might put a plaster on your fingertip before pricking it, which you may perceive as less painful. When your first fingertip has been pricked, you should rate how anxious you felt and the pain you experience, and compare this to what you predicted. After a brief pause, continue with the next finger, and so on. This phase is over when all ten fingers have been pricked. Before proceeding to the next phase, rate your belief in your original prediction.
The second phase involves subcutaneous injections in the back of the upper arms, and as always you should predict what you will think will happen and rate your belief in your prediction, after you have understood what is about to happen but before the procedure has started. In this phase you will learn from your professional helper what a subcutaneous injection is, how far the needle will be inserted in the fat tissue, etc. You may not feel the needle prick: if the needle doesn’t hit a pain cell or a pressure cell there is no signal going to the central nervous system. Knowing this, you may want to consider the possibility that it is only a matter of chance if the prick will cause you pain or not.
This phase is divided into two parts: the first involves just inserting the needle and immediately taking it out, and the second involves injecting 0.5 ml of saline solution. You will usually need to have 4–6 trials of each. As with the previous phase, you should prepare yourself mentally before the needle is inserted. If you experience too much anxiety at the prospect of getting pricked by the needle, your professional helper will help you to take smaller steps. One smaller step would be to handle the syringe with the needle and ‘play’ with it for a while. Another step would be to tape a needle on the inner side of the lower arms so that the tip of the needle is close to the skin. Sometimes a piece of cling film can be put between the needle and the skin to make it easier initially. This is then withdrawn gradually. When you are happy, the needle will be inserted and again you should rate how anxious you felt and the pain you experienced. Usually, it is the first trial that is the most difficult, and it gets easier the further you proceed in this phase. Once you have completed 4–6 needle insertions and the same number of actual injections (half of them in each arm), or earlier if your anxiety level has been very much reduced beforehand, this step is complete. As in the previous phase, the last step is to rate your current belief.
The last phase involves drawing blood from a vein in the bend of the elbow (venepuncture). As in the previous procedures, after the procedure has been explained to you but before it starts you will need to predict what you think will happen and rate how strongly you believe your prediction. Initially, it should be explained how the vacutainer blood collection tube works: you will be shown the two sharp ends of the needle and allowed to listen to the sound when the vacuum is broken; the reason a tourniquet is used will also be discussed. You will then be prepared to have your blood taken. Sometimes it is difficult to obtain blood, especially if the vein is small and deeply embedded, but it may not be necessary to actually take the blood. The important thing is that you give permission to insert the needle. Usually, you will want to have one venepuncture in each arm but, depending on your anxiety it may be that two are needed before your anxiety reduces. This phase will end with you rating the strength of your original belief and discussing with your supporter any remaining beliefs that haven’t been dealt with.
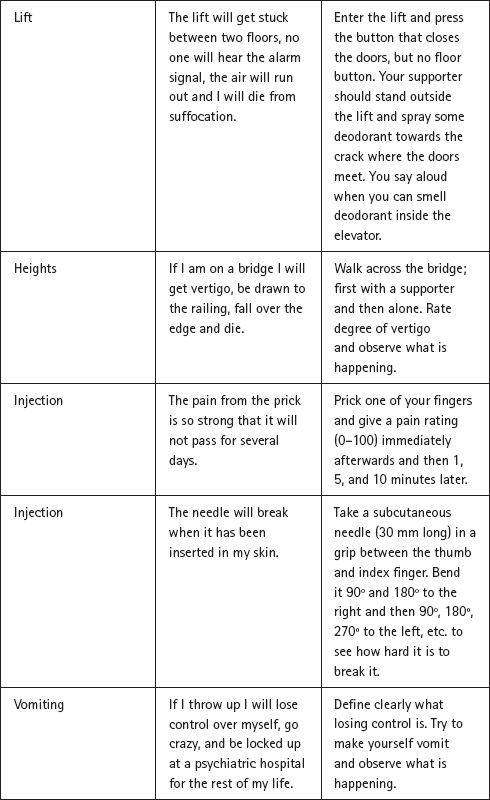
The treatment described in this chapter works for phobias of mice and rats, dogs, cats, horses, cows, frogs, worms, hedgehogs, ants and other insects. Besides these animal phobias it has also been successfully used for the treatment of phobias of heights, choking, vomiting, thunder and lightning, and deep water. The principles for using the treatment are the same irrespective of the content of the specific phobia and so the descriptions above should be enough for you, together with a supporter, to adapt and adjust them to any other specific phobias not described. Table 6.1 provides a list of examples of different phobias and related beliefs and behavioural experiments for you to try.
Table 6.1 Examples of catastrophic beliefs and behavioural experiments in specific phobias
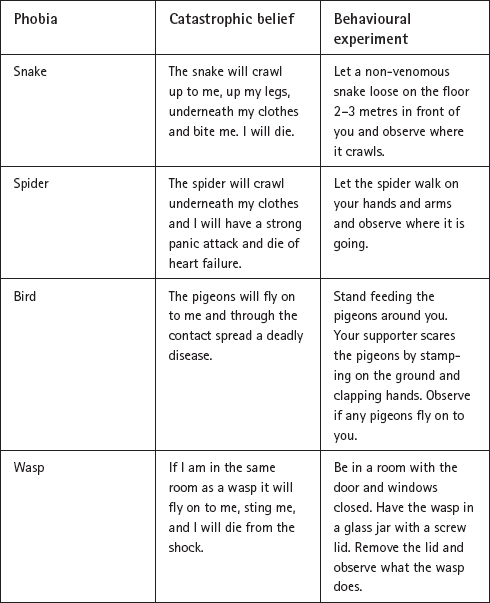
Reproduced with kind permission from Intensive One-Session Treatment of Specific Phobias, T. Davis, T. Ollendick and L-G. Öst, New York, Springer, 2012 (Chapter 4).
When you have worked your way through the one-session treatment, there are two things to bear in mind. Firstly, you must not avoid/escape from contact with the previously phobic object/situation in the future. Whenever you encounter it in a natural situation it should be welcomed as a good opportunity to test the skills you have learned during this treatment. Secondly, you should be aware that if you have had a history of nightmares about the phobic object/situation, then you may experience these at an increased frequency during the first week after having done this work, but this is normal and they will fade quickly.
One week after doing the programme described in this chapter, make an appointment with yourself and/or your supporter for a post-treatment session. First review what happened when you followed the programme, starting by describing what your phobia looked like when you started the treatment. Next briefly repeat the different steps included in the treatment and describe thoroughly how your phobia, including the beliefs about the perceived danger, changed during the treatment.
Chapter 14 describes relapse prevention strategies to help you maintain the gains you have made. You can think of the analogy of a person learning to drive a car. After getting one’s driving licence one is still not a skilled driver. It is necessary to continue driving a car to experience different traffic conditions, and to learn to handle these effectively, progressively refining one’s skill. The same principle applies to the skills you have gained through this treatment.
Anxiety is a normal reaction. Anxiety, in its many forms, is a natural part of life (see Part 1), so there is a good chance that you will experience some anxiety in the future and because of this you need to continue to practise the skills acquired during treatment, in order to be better able to use the skills should it be necessary to do so. It is, however, not necessary to practise as much as during the treatment session, just to think about the programme you followed and how you can build on what you have learned.
Setback versus relapse. Many people with anxiety problems tend to think in all-or-nothing terms (see Part 1). If this is true for you, it may make it hard to distinguish between a minor setback and a relapse, or you may believe that having got rid of the anxiety reactions you will never experience anxiety again. If this is the case, try to remember that there is no treatment available today, and there probably will not be one in the future, that can vaccinate a person against all anxiety. Indeed, it is important for you to be able to distinguish between a setback (or a lapse) and a complete ‘relapse’ or feeling that you are ‘back to square one’. Chapter 14 describes a relapse prevention programme to help you maintain all the gains you have made, even at times of setbacks.
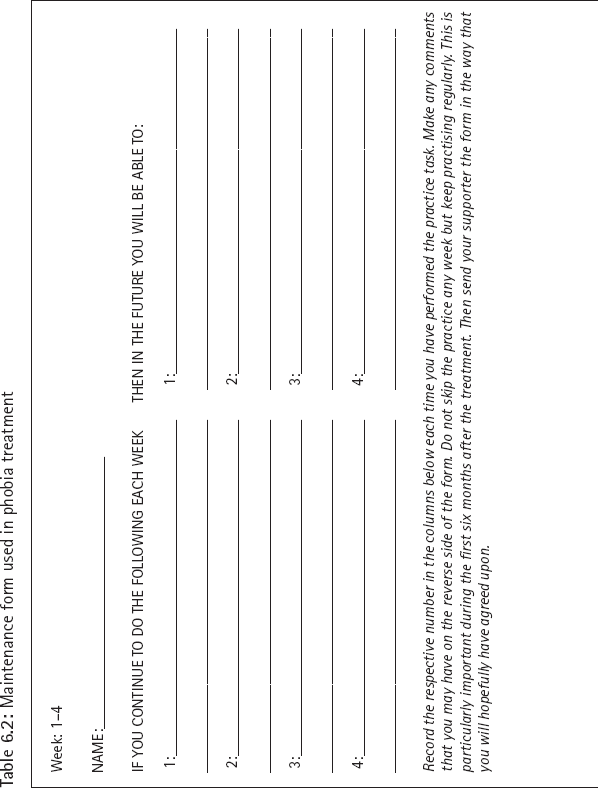
Forms for maintenance practice. In Table 6.2, you will see a set of forms for recording the continued maintenance practice over a six-month period. These forms should be filled out and reviewed in a quiet ‘self-session’ every four weeks for twenty-four weeks either alone or with your supporter. When you go through the forms, think about what has happened in terms of your anxiety reactions and applying the learned skill. This usually takes 10–15 minutes. In the top of the form, fill out (for the first four-week period) what maintenance practice you will use and how often (left column), and what consequences this will have for your daily life (right column). After four weeks, a new form can be filled out so that further improvement after the end of treatment can be incorporated in your maintenance programme. This will enable you to gradually confront more difficult situations. In the middle part of the form, write down your catastrophic belief before the start of treatment and rate how much you believed it. Then write a sentence saying what you think about that particular belief after the programme and how much you also rate your belief after treatment.
Many people’s lives are dominated by phobias. This chapter contains a treatment programme that has been shown to work, is brief and can make a difference to your life. It can be a difficult programme to undertake, especially if you are on your own, but we would strongly encourage you to try it so that you can go about your daily life in the way you choose, unrestricted by situations or objects that you happen to encounter.
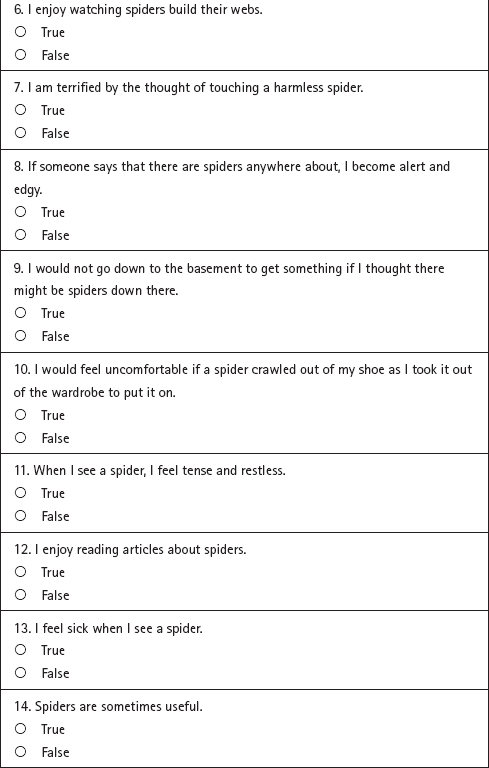
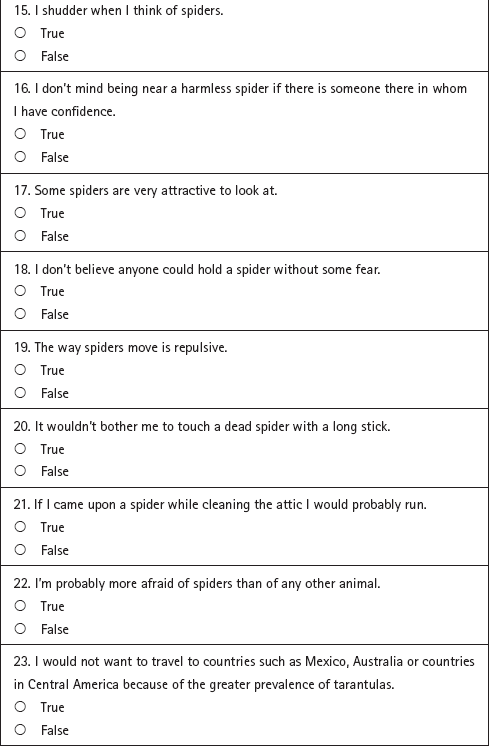
Table 6.3: Spider phobia questionnaire
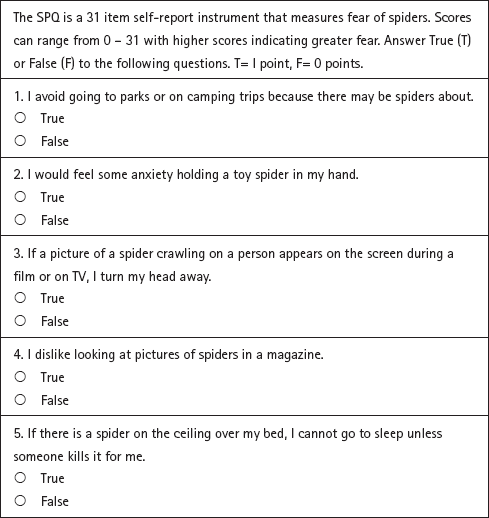
Reproduced with kind permission from R. Klorman, J. Hastings, T. Weerts, B. Melamed, & P. Lang (1974). Psychometric description of some specific fear questionnaires. Behavior Therapy, 5, 401
Reproduced with kind permission from Department of Health, IAPT Data Handbook, 2010, www.iapt.nhs.uk/silo/files/iapt-data-handbook-appendices-v2.pdf (p.24).