* ⅓ yard or 1 fat quarter each of 8 coordinating prints for the row houses and small park center squares (fabrics A-H)
* ⅛ yard each of 4 blue prints for the sky (fabrics I to L)*
* ⅓ yard each of 6 print fabrics for the park center and the tree appliqués (fabrics M-R)
* ¼ yard of contrasting felt for the top and bottom park borders
* ⅛ yard each of 3 colors of wool or wool blend felt for the window, door, bicycle, wagon, and flower cart appliqués
* ⅛ yard each of 2 shades of brown wool or wool blend felt for the puppy and squirrel appliqués and the flower cart appliqué
* 1⅞ yards of contrasting fabric for the quilt border (With this amount, there is no piecing.)
* 2¼ yards of contrasting fabric at least 42” wide for the quilt backing
* 1¼ yards of contrasting fabric for a ruffle and ½ yard contrasting fabric for facing or ½ yard of contrasting fabric for a binding
* 3 yards of woven cotton fusible interfacing
* 1 yard of tearaway stabilizer for the appliqués
* Quilt batting, 44” × 60”
* Freezer paper
* 13 yards of elastic cord for gathering ruffle (optional)
*You’ll be using the wrong side of the sky fabrics, so turn them over to see how you like them. Even prints with darker colors, such as brown, work well.
Patterns are available to print from (http://tinyurl.com/InspiredToSew-Patterns)
note: Before you cut the squares for the half-square roof and sky triangles, see Keeping It Real: Cutting Half-Square Triangles (page 110).
Row houses:
* Cut 2 pieces 4½” × 6½” and 4 squares 2⅞” × 2⅞” from fabric A.
* Cut 2 pieces 4½” × 8½” and 4 squares 2⅞” × 2⅞” from fabric B.
* Cut 2 pieces 4½” × 6½” and 4 squares 2⅞” × 2⅞” from fabric C.
* Cut 2 pieces 4½” × 7½” and 4 squares 2⅞” × 2⅞” from fabric D.
* Cut 2 pieces 4½” × 6½” from fabric E.
* Cut 2 pieces 4½” × 5½” from fabric F.
* Cut 2 pieces 4½” × 7½” from fabric G.
* Cut 2 pieces 4½” × 5½” from fabric H.
Sky:
* Cut 8 squares 2⅞” × 2⅞” from fabric I.
* Cut 6 pieces 4½” × 1½” and 6 squares 2⅞” × 2⅞” from fabric J.
* Cut 8 pieces 4½” × 1½” from fabric K.
* Cut 14 pieces 4½” × 1½” and 2 squares 2⅞” × 2⅞” from fabric L.
Park center:
* Cut 8 squares 4½” × 4½” from fabrics A-H (1 square from each fabric).
* Cut 10 squares 8½” × 8½” from fabrics M-R (1–3 squares from each fabric).
Top and bottom park borders:
* Cut 2 strips 2½” × 32½” from contrasting felt.
Border:
* Cut 2 strips 38” × 4½” and 2 strips 60” × 4½” from the border fabric.
Window and door appliqués:
From felt color 1:
* Cut 1 strip 18” × 1½”; subcut into 6 pieces 1½” × 3”.
* Cut 1 strip 1” × 32”; subcut into 32 pieces 1” × 1”.
* Cut 2 circles, pattern C.
* Cut 3 half-circles, pattern HC.
From felt color 2:
* Cut 1 strip 12” × 1½”; subcut into 4 rectangles 1½” × 3”.
* Cut 1 strip 28” × 1”; subcut into 28 squares 1” × 1”.
* Cut 4 circles, pattern C.
* Cut 3 half-circles, pattern HC.
* Cut 1 strip 18” × 1½”; subcut into 6 pieces 1½” × 3.
* Cut 1 strip 1” × 20”; subcut into 20 squares 1” × 1”.
* Cut 2 circles, pattern C.
* Cut 2 hearts, pattern H.
Tree, bicycle, and other appliqués:
* See Make the Appliqués (page 122).
Quilt backing:
* Cut 1 piece width of fabric × 60”.
Ruffle and facing (as shown):
* Cut 10 strips 4” × 44” from the ruffle fabric.
* Cut 5 strips 2½” × 44” from the contrasting fabric of your choice for the facing.
or
Binding (optional):
* Cut 5 strips 2¼” × 44” from the binding fabric.

Assembly diagram
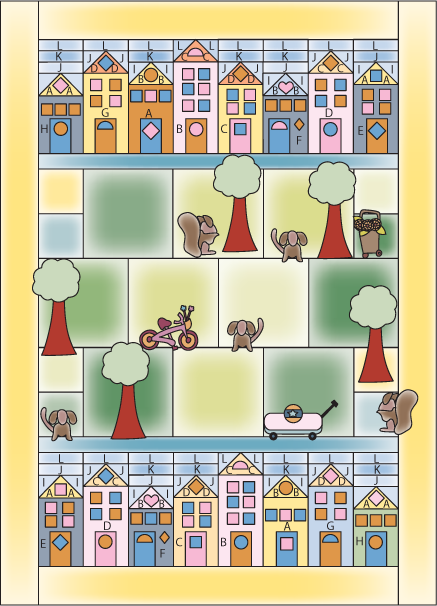
To make the row houses with window and door appliqués, refer to the assembly diagram (at left) and the instructions for the Sweet Home Chicago Pillow (pages 109–116). Note that for the quilt, you will create 2 panels of row houses—1 for the top of the quilt and 1 for the bottom.
note: For all machine appliqué, use tear-away stabilizer underneath the fabric on the wrong side.
Sew together the pieces cut from the 6 park center fabrics, referring to the assembly diagram (page 121). Piece together the 4 sets of 4½” × 4½” squares first; then piece them to their coordinating rows and piece the rows together.
1. Fold the park center in half vertically to find the center, and mark the top and bottom centers with a pin. Do the same with the felt border pieces.
2. Match the border pieces with the park center top and bottom edges, right sides together, and pin in place. Sew the borders to the park center, stitching from the center to the edge in each direction.
1. Fold the row house panels in half vertically to find the centers and mark with a pin on each side.
2. Match the panels with the felt borders and sew in place, stitching from the center to the edge in each direction.
1. Sew the short border strips to the top and bottom of the quilt. Trim the edges even with the quilt sides.
2. Sew the long border strips to the side edges of the quilt. Trim the ends even with the top and bottom edges of the quilt.
Appliqué patterns are available to print from (http://tinyurl.com/InspiredToSew-Patterns)
You will need 5 of tree pattern T1 and 5 of tree pattern T2. These appliqués, which are cut from cotton fabric, are made with edges turned under using the freezer paper appliqué method. For instructions, see Keeping It Real: Freezer Paper Appliqué (page 124). Refer to the assembly diagram for placement.

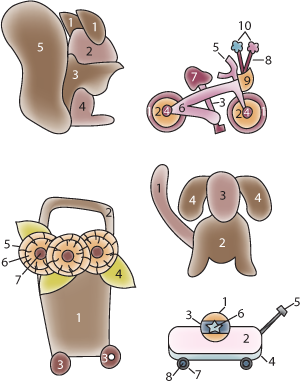
Trace the pattern pieces from the pullout page and cut them from the wool felt fabrics. You will need 2 (reverse 1 set) of each squirrel pattern piece, 3 (reverse 1 set) of each puppy pattern piece, and 1 each of the other pattern pieces.
Use appliqué glue to place them, referring to the assembly diagram, and machine or hand appliqué them as you did the windows and doors (see page 113).
Make a quilt “sandwich.” Lay the quilt backing flat, wrong side up, smooth the batting on top, and lay the quilt top, right side up, on top. Hand baste the layers together using long stitches, or pin at close intervals with safety pins.
I had my quilt professionally quilted on a longarm quilt machine, but if you wish, you can quilt it on your home machine. For more information on quilting, consult a good basic book such as Show Me How to Machine Quilt by Kathy Sandbach or Foolproof Machine Quilting by Mary Mashuta, both available from C&T Publishing.
If you want to bind your quilt, refer to the directions in Keeping It Real: Binding Quilts and Other Sewn Projects (page 81).
To make a ruffle, piece the ruffle strips together using ¼” seam allowances. Once the ruffle is attached, you will add a facing strip to finish the edge.
1. Sew together the ruffle strips in a continuous circle and create a ruffle using a ruffler foot or elastic cord as for the Sweet Home Chicago Pillow (page 114).
2. Fold the ruffle strip in half and mark the center of each side with a pin. Fold the quilt in half vertically and mark the center of the top and the bottom with a pin.
3. On the right side of the quilt, match the centers of the ruffle to the centers of the top and bottom with raw edges aligned. Distribute the ruffle evenly to each corner on the top and the bottom, and pin the raw edges in place.
4. Distribute the fabric evenly by pinning between each corner and the center of each side that you just pinned in place. Continue pinning the center between pins until you have the ruffle evenly distributed across each side.
5. Sew the ruffle onto the quilt, using a scant ¼” seam allowance. Press the stitching. Do not press the ruffle away from the quilt until the facing has been applied.
1. Sew the short ends of the facing strips together and press.
2. With the quilt right side up, start at the center bottom edge and pin the facing strip right side down around the edges. The quilt, ruffle, and facing raw edges should all be even. Turn under and overlap the facing short ends.
3. Sew the facing in place using a ¼” seam allowance. Trim the corners. Press the facing to the back of the quilt and the ruffle away from the quilt.
4. Turn the facing raw edge under and hand stitch in place.