The best way to master the Flash CS5 Professional workspace is to divide and conquer. That means you first focus on the three main work areas: the stage, the timeline, and the Panels dock. Then you gradually learn how to use all the tools in those areas.
One of the common problems for Flash newbies is that the Flash workspace can be customized. You can open bunches of panels, windows, and toolbars. You can move the timeline above the stage, or you can have it floating in a window all its own. Once you're a seasoned Flash veteran, you'll have strong opinions about how you want to set up your workspace so the tools you use most are at hand. If you're just learning Flash with the help of this book, though, it's probably best if you set up your workspace so that it matches the pictures in these pages.
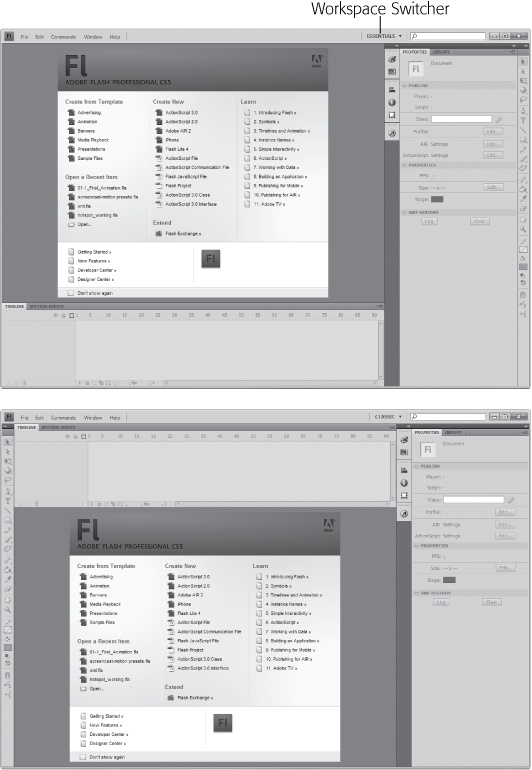
Fortunately, there's an easy way to do that. Adobe, in its wisdom, created the Workspace Switcher—a tool that lets you rearrange the entire workspace with the click of a menu. The thinking is that an ideal workspace for a cartoon animator is different from the ideal workspace for a rich Internet application (RIA) developer. The Workspace Switcher is a menu in the upper-right corner of the Flash window, next to the Search box. The menu displays the name of the currently selected workspace; when you first start Flash, it probably says Essentials. That's a great workspace that displays some of the most frequently used tools. In fact, it's the workspace used throughout most of this book.
Here's a quick little exercise that shows you how to switch among the different workspaces and how to reset a workspace after you've mangled it by dragging panels out of place and opening new windows.
Start Flash.
Flash opens, displaying the Welcome screen. Unless you've made changes, the Essentials workspace is used. See Figure 1-4 top.
From the Workspace menu near the upper-right corner of the Flash window, choose Classic.
The Classic arrangement harks back to earlier versions of Flash, when the timeline resided above the stage (Figure 1-4 bottom). If you wish, go ahead and check out some of the other layouts.
Choose the Essentials workspace again.
Back where you began, the Essentials workspace shows the timeline at the bottom. The stage takes up most of the main window. On the right, the Panels dock holds toolbars and panels. Now's the time to cause a little havoc.
In the Panels dock, click the Properties tab and drag it to a new location on the screen.
Panels can float, or they can dock to one of the edges of the window. For this experiment, it doesn't matter what you choose to do.
Drag the Color and Swatches toolbars to new locations.
The Color toolbar has an icon that looks like an artist's palette at the top. Like the larger panels, toolbars can either dock or float. You can drag them anywhere on your monitor, and you can expand and collapse them by clicking the double-triangle button in their top-right corners.
Go to Window→Other Panels→History.
Flash has dozens of windows. Only a few are available now, because you haven't even created a document yet.
Tip
As you work on a project, the History panel keeps track of all your commands, operations, and changes. It's a great tool for undoing mistakes. For more details, see Other Flash Panels.
From the Workspace menu, choose Reset 'Essentials'.
The workspace changes back to the original Essentials layout, even though you did your best to mess it up.
Anytime you want your workspace to match the one used throughout most of this book, do the "Essentials two-step": Choose Essentials from the Workspace Switcher (if you're not already there), and then choose Reset 'Essentials'. As shown in Figure 1-4 when you use the Essentials workspace, the Flash window is divvied up into three main work areas: the stage (upper left), the timeline (lower left), and the Panels dock (right). Before exploring each of these areas in detail, a few words about Flash's menu bar.
Like most computer programs, Flash gives you menus to interact with your documents. In traditional fashion, Windows menus appear at the top of the program window, while Mac menus are always at the very top of the screen. The commands on these menus list every way you can interact with your Flash file, from creating a new file—as shown on Starting Flash—to editing it, saving it, and controlling how it appears on your screen.
Some of the menu names—File, Edit, View, Window, and Help—are familiar to anyone who's used a PC or a Mac. Using these menu choices, you can perform basic tasks like opening, saving, and printing your Flash files; cutting and pasting artwork or text; viewing your project in different ways; choosing which toolbars to view; getting help; and more.
To view a menu, simply click the menu's title to open it, and then click a menu option. If you prefer, you can also drag down to the option you want. Let go of the mouse button to activate the option. Figure 1-3 shows you what the File menu looks like. Most of the time, you see the same menus at the top of the screen, but occasionally they change. For example, when you use the Debugger to troubleshoot ActionScript programs, Flash hides some of the menus not related to debugging.
Tip
You'll learn about specific commands and menu options in their related chapters. For a quick reference to all the menu options, see Appendix B.
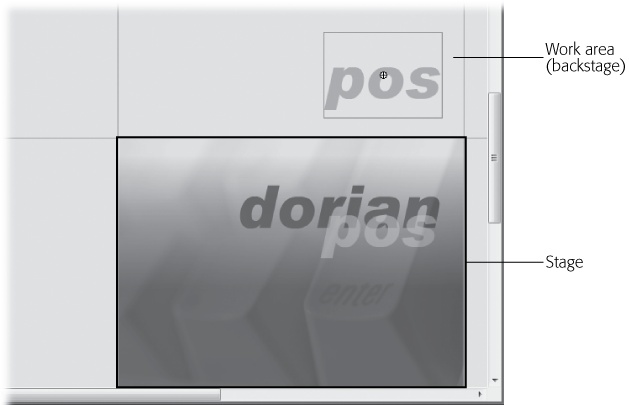
As the name implies, the stage is usually the center of attention. It's your virtual canvas. Here's where you draw the pictures, display text, and make objects move across the screen. The stage is also your playback arena; when you run a completed animation—to see if it needs tweaking—the animation appears on the stage. Figure 1-5 shows a project with animated text.
Figure 1-5. The stage is where you draw the pictures that will eventually become your animation. The work area (gray) gives you a handy place to put graphic elements while you figure out how you want to arrange them on the stage. Here, a text box is being dragged from the work area back to center stage.
The work area is the technical name for the gray area surrounding the stage, although many Flashionados call it the backstage. This work area serves as a prep zone where you can place graphic elements before you move them to the stage, and as a temporary holding pen for elements you want to move off the stage briefly as you reposition things. For example, let's say you draw three circles and one box containing text on your stage. If you decide you need to rearrange these elements, you can temporarily drag one of the circles off the stage.
Note
The stage always starts out with a white background, which becomes the background color for your animation. Changing it to any color imaginable is easy, as you'll learn in the next chapter.
You'll almost always change the starting size and shape of the stage depending on where people will see your finished animation—in other words, your target platform. If your target platform is a web-enabled cellphone, for example, you're going to want an itty-bitty stage. If, on the other hand, you're creating an animation you know people will be watching on a 50-inch computer monitor, you're going to want a giant stage. You'll get to try your hand at modifying the size and background color of the stage later in this chapter.
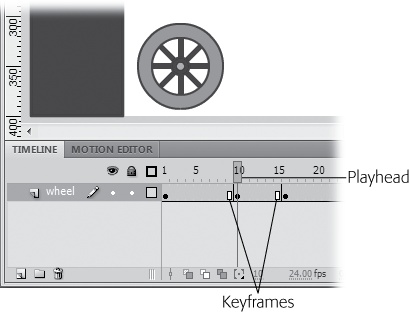
When you go to the theater, the stage changes over time—actors come and go, songs are sung, scenery changes, and the lights shine and fade. In Flash, you're the director, and you get to control what appears on the stage at any given moment. The timeline is the tool used to specify what's seen or heard at a particular moment. The concept is pretty simple, and if you've ever used video editing software, it will be familiar. Flash animations (or movies) are organized into chunks of time called frames. Each little box in the timeline represents a frame or a point in time. You use the playhead, shown in Figure 1-6 to select a specific frame. So when the playhead is positioned at Frame 10, the stage shows what the audience sees at that point in time.
Figure 1-6. The playhead is a red box that appears in the timeline; here the playhead is set to Frame 10. You can drag the playhead to any point in the timeline to select a single frame. The Flash stage shows exactly what's in your animation at that point in time.
The timeline is laid out from left to right, starting with Frame 1. Simply put, you build Flash animations by choosing a frame with the playhead and then arranging the objects on the stage the way you want them. The timeline uses a special tool called a keyframe (see Figure 1-6) to remember exactly what's on stage at that moment. You'll learn more about the keyframes and other timeline tools in Chapter 3. Most simple animations play from Frame 1 through to the end of the movie, but Flash gives you ways to start and stop the animation and control how fast it runs—that is, how many frames per second (fps) are displayed. Using some ActionScript magic, you can control the order in which the frames are displayed. You'll learn how to do that on Using ActionScript to Start a Timeline.
Tip
The first time you run Flash, the timeline appears automatically, but occasionally you want to hide the timeline—perhaps to reduce screen clutter while you concentrate on your artwork. You can show and hide the timeline by selecting Window→Timeline or pressing Ctrl+Alt+T (or for the Mac, Option-⌘-T).


