Even if you're familiar with animation software (but especially if you aren't), you need to know a few quick things before you roll up your sleeves and dive into Flash—sort of like the quick where's-the-turn-signal once-over you do when you jump into a rental car for the first time.
In this section, you'll find out how to get around the stage and how to customize your Flash document's properties. You'll also learn a couple of basic Flash terms you need to understand before you use the drawing tools (which you'll see how to do on Creating Original Artwork).
But first you need to open a new Flash document page so you can follow along at home. To do so, launch Flash. Unless you've turned it off (Starting Flash), the first thing you see is Flash's Welcome screen. Under Create New, choose Flash File (ActionScript 3.0). If you've turned off the Welcome screen, you can create a new file using the Flash main menu. Here's how:
From the main menu, choose File→New.
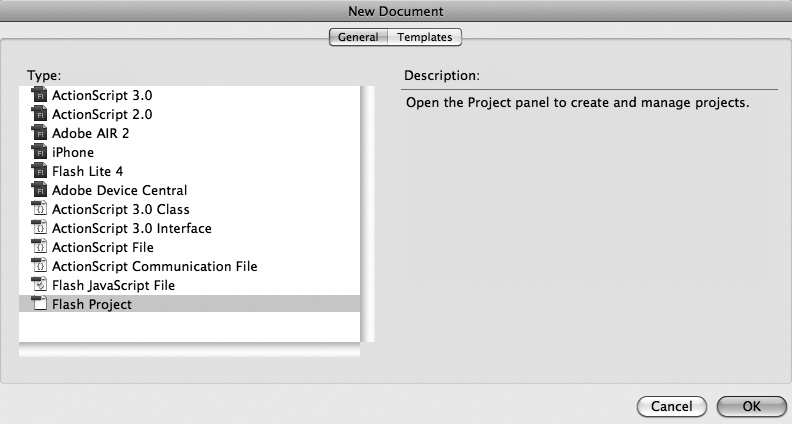
The New Document window opens. If the window doesn't show the General tab, as in a Figure 2-2 then click that tab to make it active.
Figure 2-2. In every case but one (Flash Project), selecting a document type and then clicking OK tells Flash to create a crisp, new document for you. (Flash projects are really nothing more than lists of other files with version control added so that multiple designers can work on the same Flash project without overwriting one another's changes.)
In the Type list, select the type of new file you want to create, and then click OK.
(If you're not sure what file type you want, choose ActionScript 3.0; see the box on Understanding Flash File Formats for the reason why.) The New Document window disappears, and Flash displays a brand-new blank document. You can tell it's a new document by the name Flash gives it—for example, Untitled-1.
The stage, as you may recall from Chapter 1, is your electronic canvas: It's where you draw your lines and shapes and add your text. Figure 1-1 shows what the stage looks like the first time you create a new document in Flash. There's certainly nothing wrong with it, but you may want to change the size or color. Or, as described on Adding Measurement Guides, you might want to make other changes to the stage to help you draw. For example, you can tell Flash to display guidelines that help you align objects and draw accurately. These guides show while you're creating, but your audience won't see them in the final animation. This section shows you how.
The size of your stage is also the size of your finished animation. The standard 550 x 400 pixel Flash stage, which worked well in the past, is pretty small by today's standards. You may want to bump it up to 800 x 600 or even larger, depending on your target audience. If you're creating something for those itty-bitty mobile devices, you need to shrink the stage accordingly. In the case of the Lotta Caffeina banner ad, you want a wide, short stage (typically somewhere around 640 x 40).
The best way to ensure that your finished animation is the right size is to start with the right size stage out of the gate. Figure 2-3 shows how to change the stage dimensions using the Document Settings dialog box. There are several ways to open this box, which contains settings related to the stage and your animation:
Press Ctrl+J (⌘-J).
Right-click the stage. From the shortcut menu that appears, choose Document Settings.
In the menu bar, choose Modify→Document.
Press Ctrl+Shift+A (Shift-⌘-A) to make sure nothing is selected—that way the Properties panel shows the document settings. If necessary, open the Properties subpanel. (Yep, there's a Properties subpanel in the Properties panel.) Click Edit.
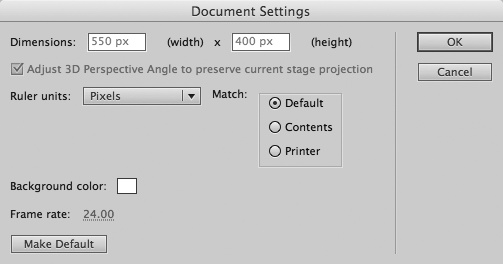
Figure 2-3. You use the Document Settings window to set the size and color of your stage (which will also be the size and background color of your finished animation). When you type the dimensions, you can type out the units of measurement (px, or even pixels, for example). But it's not necessary: The value in the Ruler units menu tells Flash which unit of measurement you're using.
Once the Document Settings window is open, you can type new height and width numbers in the Dimensions box. The Match radio buttons let you automatically set the stage size. By selecting Default, you can change the stage size by typing in new values. Choose Contents, and Flash automatically sizes the stage to fit the elements on it—a nice snug fit, no more, no less. If you know you're going to be printing your work, choose the Printer option, and the stage will fit nicely on a single sheet of paper.
In the center of the Document Settings box, there's a menu where you set the units used to measure the stage. These units are used for rulers, guidelines, and grids—all of which are covered later in this chapter. Out of the box, Ruler units is set to pixels, which is good for animations that will be viewed on a computer screen or a handheld device. In other cases, you may prefer points, inches, or metric units.
This dialog box is also where you change the stage color by clicking the Background color box and selecting a new color, as shown in Figure 2-4. (You'll learn more about frame rates in Chapter 15, but for now, just note that this is one of the places where you can change that setting. For now, leave it at 24.00 frames per second.)
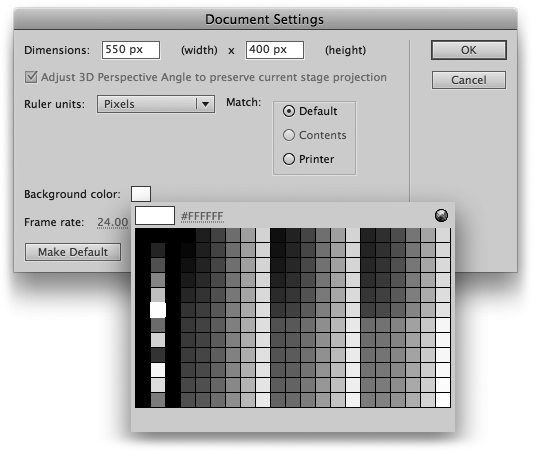
Figure 2-4. Changing the color of the stage is an easy way to change the way your drawing looks. It can also make constructing your drawing easier. For example, if you're working with light-colored shapes, a nice dark background will help you see what you're doing—even if you end up changing the stage back to a lighter color when your design is finished.
Note
Because the background color changes the way foreground objects appear, you might want to experiment with the color of the stage, beginning with one color and changing it as you add objects to the stage until you get the effect you want. (You can change the color of the stage at any time, even after you've completed your drawing.) When you're working on your animation, it may be easier to change the stage background color in the Properties panel. Select Properties→Properties→Stage, and then choose a color from the color picker.
Even professional artists can't always draw a straight line or estimate three inches correctly. Fortunately, with Flash, they don't have to, and neither do you. Flash has several tools that help you spot precisely where your objects are on the stage and how much space they take up: rulers, a grid, and guides. You can see an example of these tools as they appear on the stage in Figure 2-5.

Figure 2-5. Grids, guides, and rulers are Flash's answers to graph paper and a T square. To change the unit of measurement for the ruler, press Ctrl+J (⌘-J) to open the Document Settings box. From the "Ruler units" menu, select whatever measurement unit you want. You can also change the unit of measurement for the guides and the grid. To do so, right-click (Control-click) the stage, and then choose Guides→Edit Guides or Grid→Edit Grid.
You can fine-tune your ruler, grid, and guides using the View menu or the shortcut menu that pops up when you right-click (or, on a Mac, Control-click) the stage. Here's what each tool does and how to display each of them:
Rulers. This tool displays a ruled edge along the left and top of the stage to help you determine the location and position of your objects. To turn on rulers, right-click (Windows) or Control-click (Mac) the stage. Then, from the shortcut menu, choose Rulers.
Grid. This tool divides the stage into evenly sized rectangles, which is great for helping you get the location of objects exact. To turn on the grid, right-click (Control-click) the stage. Then, from the shortcut menu choose Grid→Show Grid. You can fine-tune the grid to your taste, right-click the stage and choose Edit Grid. Among your options: You can set the width and height of the grid rectangles; you can have the grid appear over or under graphics on the stage; and you can have lines and shapes automatically "snap to" the grid as you draw.
Guides. If you want a tool that helps with straight-edge alignment—like the grid—but you want more control over where the straight edges appear on the stage, then you want guides. To add guides, you first have to turn on rulers (see above). Then, right-click (Control-click) the stage and, from the shortcut menu, choose Guides→Show Guides. A checkmark appears next to Show Guides to indicate that they're turned on, but you don't actually see any guide lines until you drag them onto the stage. You can drag as many guides as you want down from the top ruler or over from the left ruler. To add a guide, click a ruler (don't let go of the mouse) and drag your cursor to the stage. Release the button when you get to the spot where you want your guide to appear.
To lock the guides, so you don't accidentally move them as you're drawing, right-click (Control-click) the stage and choose Guides→Lock Guides. When Lock Guides is set, you can't move any existing guides, but you can still add new ones. To remove a guide, make sure Lock→Guides is turned off, and then just drag the doomed guide back to the ruler. Poof, it's gone.
Tip
Grids and guides would be helpful enough if all they did was help you eyeball stuff, but Flash takes them one step further. If you turn on snapping and then drag, say, a circle around the stage, Flash helps you to align the circle precisely with either a grid or a guide mark. When the circle is close to a grid or guide line, it snaps into position. To turn on snapping, simply right-click (Control-click) the stage, and then choose Snapping→Snap to Guides (or Snapping→Snap to Grid). For more on the joys of snapping, see Aligning Objects.