Chapter 9
Dynamic Postures: The Rejuvenation Sequence and Sun Salutation
In This Chapter
 Trying the 7-step sun salutation
Experiencing the 12-step sun salutation
The sun has long captured humanity’s attention for its life-giving power, but you don’t have to be a sun worshiper to benefit from yoga’s sun salutation (surya namaskara, pronounced soor-yah nah-mahs-kah-rah). This exercise — a special sequence of postures — is considered so profound that many people practice it on its own. It works well (with modifications) for people of all ages, from children to seniors. Respected for its excellent effects, the sun salutation reputedly provides an array of physical benefits, such as stretching the spine and strengthening the muscles that support it; improving posture, coordination, and endurance; and improving lung function and oxygen delivery to cells. Yoga masters claim that the sun salutation, which links body, mind, and breath, has deeper psychological and spiritual implications because it stimulates subtle vital energies leading to states of higher awareness.
 The sun salutation helps you remember the yogic idea that your body is condensed sunlight. The saluting gesture, called namaskara mudra in Sanskrit (pronounced nah-mahs-kah-rah mood-rah), is a salute to the highest aspect within yourself — the spirit.
Warming Up for the Sun: Rejuvenating in 9 Steps
 Do you need a more user-friendly version of the sun salutation? Do you have a hard time kneeling (as the 7-step sun salutation requires later in this chapter) or stepping through (as the 12-step sun salutation requires later in this chapter)? Then try the 9-step rejuvenation sequence, direct from California, using the focus breathing technique from Book II, Chapter 1. For help with the rejuvenation sequence, check out the video at
 www.dummies.com/go/yogaaiofd.
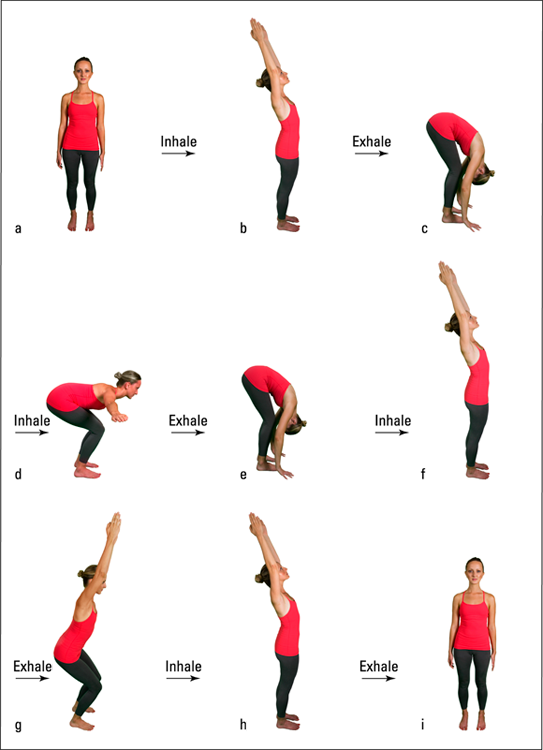
- Stand in the mountain posture, with your feet at hip width and arms at your sides (see Figure 9-1a).
- As you inhale, slowly raise your arms out from the sides and overhead (see Figure 9-1b); then pause.
-
As you exhale, bend forward from the waist and bring your head toward your knees; bring your hands forward and down toward the floor in the standing forward bend (see Figure 9-1c).
Keep your arms and legs soft (see Book I, Chapter 3 for an explanation of Forgiving Limbs); then pause.
- Bend your knees quite a bit and, as you inhale, sweep your arms out from the sides and raise halfway up with your arms in a T (half forward bend), as in Figure 9-1d; then pause briefly.
- As you exhale, fold all the way down again and hang your arms in the standing forward bend (see Figure 9-1e).
- As you inhale, sweep your arms from the sides like wings, and bring your torso all the way up again, standing with your arms overhead in the standing arm raise (see Figure 9-1f).
-
As you exhale, bend your knees and squat halfway to the floor.
Soften your arms, but keep them overhead; look straight ahead (see Figure 9-1g).
- As you inhale, bring your torso all the way up again, standing with your arms overhead in the standing arm raise (see Figure 9-1h).
- As you exhale, bring your arms back to your sides, as in Step 1 (see Figure 9-1i).
Repeat the entire sequence six to eight times slowly.
 To make the sequence harder on the last round, stay for 6 to 8 breaths in the half forward bend (Step 4), the standing forward bend (Step 5), and the half squat or half chair (Step 7). To make it much harder, do the entire sequence standing on your toes.
Gliding through the 7-Step Kneeling Salutation
If you aren’t quite ready to tackle the 12-step sun salutation, the following 7-step variation can give you many benefits and also help you get in shape for the standing variety. Use focus, chest-to-belly, or belly-to-chest breathing techniques from Book II, Chapter 1, and follow these steps.
Just follow your breath — inhale when you’re opening, exhale when you’re folding. Move slowly, pausing after each inhalation and exhalation.
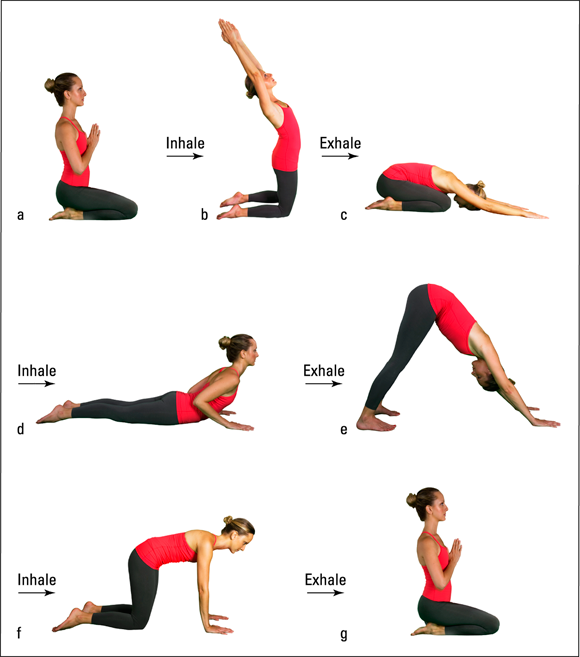
- Sit on your heels in a bent-knee position, bring your back up nice and tall, and place your palms together in the prayer position, with your thumbs touching the sternum (breastbone) in the middle of your chest (see Figure 9-2a).
- As you inhale, open your palms and slightly raise your arms forward and then overhead; raise your buttocks away from your heels, arch your back, and look up at the ceiling, as in Figure 9-2b.
- As you exhale, bend forward slowly from the hips, placing your palms, forearms, and then forehead on the floor; pause, relaxing your hips, as Figure 9-2c shows.
-
Slide your hands forward on the floor until your arms are extended; slide your chest forward, bending your elbows slightly, and arch up into cobra II (see Figure 9-2d).
Flip to Book II, Chapter 8 for instructions on cobra II.
- As you exhale, turn your toes under, raise your hips, extend your legs, and bring your chest down, keeping both hands on the floor for the downward-facing dog (see Figure 9-2e).
- As you inhale, bend your knees to the floor, with your gaze toward the floor, slightly in front of you, as in Figure 9-2f.
- As you exhale, sit back on your heels and return your hands to the prayer position, as in Step 1 (see Figure 9-2g).
Repeat the entire sequence 3 to 12 times.
If you’re not able to sit on your heels in Steps 1 and 7, simply keep your palms in the prayer position and stand on your knees instead. You can also fold a blanket under your knees for comfort. If you find this 7-step salutation too difficult for you, head to the following section and try Steps 1 through 3 only of the 12-step version until you’re ready to do more.
Advancing to the 12-Step Sun Salutation
To enjoy the greatest benefit from this sequence (as well as all your yoga postures), execute each part with full participation of your mind. When you stand, really stand; plant your feet firmly on the ground. When you bend or stretch, bend or stretch with complete attention. Your mind makes your practice not only elegant but also potent. Use any of the yoga breathing techniques from Book II, Chapter 1, and follow these steps:
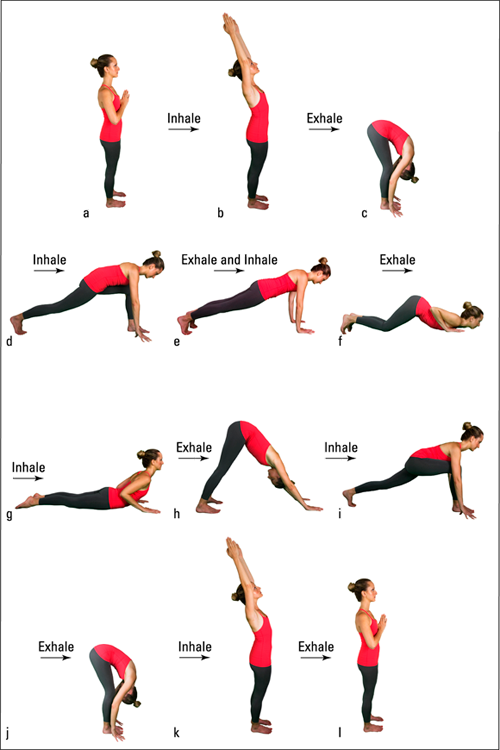
- Start in a standing position, with your feet at hip width, and place your palms together in the prayer position, with your thumbs touching the sternum (breastbone) in the middle of your chest (see Figure 9-3a).
- As you inhale, open your palms slightly and raise your arms forward and overhead; arch your back and look up toward the ceiling without throwing your head back (see Figure 9-3b).
- As you exhale, bend forward from the hips, soften your knees (as in Forgiving Limbs, which Book I, Chapter 3 covers), and place your hands on the floor; bring your head as close as possible to your legs, as Figure 9-3c shows.
-
As you inhale, bend your left knee and step your right foot back into a lunge.
Make sure that your left knee is directly over your ankle and your thigh is parallel to the floor so that your knee forms a right angle. Your gaze should be downward, a few inches in front of you on the floor, keeping your neck in a long and neutral position. Figure 9-3d gives you a visual of this step.
- As you exhale, step your left foot back beside the right and hold a push-up position; if your arms tire, bend your knees to the floor and pause on your hands and knees (see Figure 9-3e).
- Inhale and then, as you exhale, lower your knees (from the push-up), chest, and chin to the floor, keeping your buttocks up in the air (see Figure 9-3f).
- As you inhale, slide your chest forward along the floor, and then arch back into cobra II, as in Figure 9-3g.
-
As you exhale, turn your toes under, raise your hips, extend your legs, and bring your chest down, keeping both hands on the floor (see Figure 9-3h).
This pose is the same downward-facing dog position from Book II, Chapter 3.
-
As you inhale, step your right foot forward between your hands and, again, point your gaze toward the floor a few inches ahead of you (see Figure 9-3i).
- As you exhale, step your left foot forward, parallel to and even with your right foot; soften your knees and fold into a forward bend, as in Step 3 (see Figure 9-3j).
-
As you inhale, raise your arms either forward and overhead from the front, or out and up from the sides like wings; then arch back and look up, as in Step 2 (see Figure 9-3k).
If you have back problems, lifting up from the forward bend with your arms to the front or sides may cause you some discomfort. If so, you can try the roll-up: Keep your chin on your chest and roll up, stacking the vertebrae one at a time, with your arms hanging at your sides and your head coming up last. When you’re fully upright, bring your arms forward, up, and overhead from the front; arch your back just a little; and look up.
- As you exhale, return your hands to the prayer position, as in Step 1 (see Figure 9-3l).
Repeat the entire sequence 3 to 12 times. First lead with the right foot, and then alternate with the left foot for an equal number of repetitions (each side counts as half a sequence).
If you’re ready for greater challenges, consider Power Yoga’s advanced sun salutations (Book IV, Chapter 5), or check the Internet for the Iyengar sun salutation or various “flow” sequences.