Apple’s specialty has always been taking complex, expensive technologies and somehow making them simple, attractive, and magical. They’ve done it with video editing, digital photos, DVD authoring, wireless networking, Web design, music production, podcasting—you name it.
Popularizing one particular task, however, has continued to elude Apple: programming.
Through the years, Apple has introduced various new technologies for helping novices write their own software:
AppleScript was the first Apple tool for automating your Mac. You type out English-like commands in a text file called a script, one command per line, and click Run to have your Mac carry out the result (Figure 7-1, bottom).
AppleScript is a power user’s dream come true, but it’s still a programming language. If you want to automate even a simple custom job like converting music files to MP3s, you have to get your hands dirty hunting for the AppleScript command that does exactly what you want—and that can be a real pain.
Automator is a newer program that lets you create your own programs by assembling a series of visual building blocks called actions. Drag actions into the right order, click a big Run button, and your Mac faithfully runs through the list of steps you’ve given it (Figure 7-1, top).
You have a list of preprogrammed actions at your fingertips, so you never have to do any coding or learn any programming language. Creating the little software robots (called workflows) is exceptionally easy.
On the other hand, your selection of building blocks is limited to what other programmers have already written, so Automator workflows are limited in what they can do. You can’t automate a complex newspaper layout using Automator alone, for example, because nobody has written the building-block actions necessary to control all the stages of newspaper production.
Figure 7-1. The two faces of Mac automation. Top: Automator uses a visual, step-by-step metaphor for automation; the down-pointing arrows indicate how each building block “feeds” its result into the next action. You can usually tell what an Automator workflow does at a glance. Bottom: Script Editor (the program you use to write and edit Apple-Script code) is geekier. There’s a good amount of programmerese here, and you have to know basic AppleScript syntax before you can begin to understand this script—let alone write your own.
For novices, the most exciting feature might be Watch Me Do mode. It lets you just do what you want Automator to learn, as Automator watches and memorizes each keystroke, mouse click, and menu selection. Later, Automator can replay those steps faithfully, like a true-blue macro program.
Services have been completely overhauled in Snow Leopard. These are smart, handy commands, available in most Mac programs and in shortcut menus in the Finder. It’s a place to list those Automator and AppleScript apps you’ve created, making them available everywhere—along with a couple of dozen ready-made ones from Apple.

This chapter covers these three build-your-own software technologies: Services, Automator, and AppleScript. True, the latter two require some technical ability. But even if you consider yourself a technophobe, at least read the section about Services. Some real gems await you, and you don’t have to do anything but click them.
Apple has always dreamed of a software architecture that would let you mix and match features from different programs—the Mac’s spell checker in Microsoft Word, the drawing tools of PowerPoint in your email, and so on. (Remember Apple’s OpenDoc software project? Neither does anybody else.)
For several generations of Mac OS X, a menu called Services sat in every single program’s Application menu, listing such interchangeable functions. And for all those years, most people pretty much ignored them.
That’s because the Services menu was baffling. It listed all kinds of weird commands. Most of them, most of the time, were dimmed and unavailable. None of them were described or explained anywhere. They sort of felt like a mistake.
In Snow Leopard, Apple gave Services an extreme makeover, in hopes of making them useful again. They’re still a little baffling, but there have been some forward strides.
For starters, Services commands are now contextual, meaning that they show up only when relevant; when a photo is selected, the text-related commands don’t appear.
They can appear in many more places, too:
The Services submenu, which is in the Application menu of every single program.
The shortcut menu that appears when you Control-click (or right-click) a Finder icon.
The shortcut menu that appears when you Control-click (or right-click) highlighted text in a Services-compatible program.
Figure 7-2 shows what the Services menu looks like when you’ve highlighted some text in TextEdit.
You can now turn off Services you never use (in System Preferences), thereby hiding them, and you can even assign your own keystrokes to the Services you do use. Finally, you can very easily create your own Services menu items, using Automator.
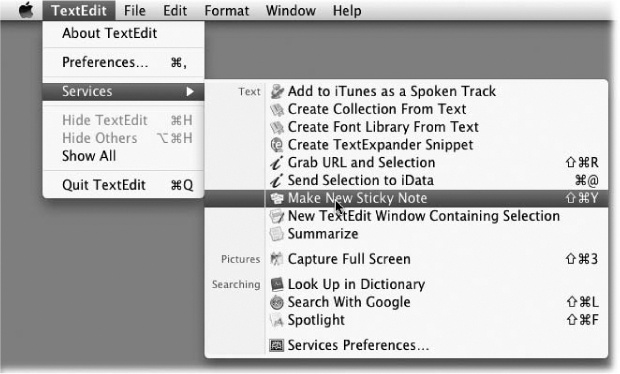
Figure 7-2. The new, improved Services menu has several improvements over the old one. First, each command has a tiny icon to help you distinguish it. Second, the commands are grouped by category of function. Third, whatever keyboard shortcuts you’ve established appear right in the menu to remind you. Fourth, they’re available from the shortcut menus and the  menu in the Finder, too.
Now, Services still aren’t first-class Mac citizens. They show up in most of the everyday Apple programs (Safari, Mail, TextEdit, iChat, Stickies, Terminal, and so on). But weirdly enough, they’re not available in any of the commercial Apple programs, like iLife (iPhoto, iMovie, iDVD, GarageBand), iWork (Pages, Keynote, Numbers), or the professional apps like Aperture and Final Cut.
Even so, with any luck, the new “appear only when relevant” approach will give Services another shot at stardom.
If you visit System Preferences→Keyboard→Keyboard Shortcuts, you see that Snow Leopard comes with a big set of starter Services. A lot of them are turned off at the outset (see the checkboxes?). That’s because a lot of them are fairly obscure or technical.
If you’d like a complete catalog of what they are and what they do, download the free bonus PDF appendix to this chapter from this book’s page at www.missingmanuals.com.
In the meantime, here are some examples of what you can do using the built-in Services. These examples also illustrate some of the different ways you can trigger these commands.
You’re trying to explain to your mom, or your teacher, or your boss, how to connect to another Mac on the network. What you really need to create is an illustrated step-by-step guide.
So you open TextEdit and type up the first step. When it comes time to pop in an illustration, you Control-click (or right-click) the spot on the page; from the shortcut menu, you choose Capture Selection From Screen.
A message appears: “Drag over the portion of the screen you want to capture.” You do so, and snap!—a picture of the screen area you selected appears right in your document. You continue on that way, typing and illustrating as you go.
Someone just sent you the most wicked cool digital photo. It’s sitting on your desktop.
So you Control-click (or right-click) it. From the shortcut menu, you choose Set Desktop Picture. Bam!—that picture is now your desktop wallpaper, saving you a clunky trip to System Preferences.
You’re reading on the Web, and you find an article that totally settles the argument you’ve been having with your buddy. You select the text. From the Safari→Services menu, you choose New Email With Selection.
Bing! Your Mac opens the Mail program and pastes the highlighted text into the body of a new outgoing email message. You’re saved the trouble of copying, launching Mail, creating a new message, and pasting.
You like to read The New York Times’ main stories in the morning, but there’s never time before work. Or you’re supposed to read some document before school. It hits you: Too bad you couldn’t listen to these documents, read to you on your iPod or iPhone as you exercise or commute.
Now you can. In Safari, TextEdit, Mail, or wherever, select the text you want converted to audio. Control-click (or right-click) it. From the shortcut menu, choose Add to iTunes as Spoken Track.
Zap! In a flash, you’ll find a new file called Text to Speech in your iTunes Library, ready to sync to your iPod or iPhone. It’s an audio file of someone reading the article aloud. (That someone, of course, is Alex, one of the Mac’s built-in digital voices.)
You find a phone number, address, Web address, sage proverb, whatever, in an email message, a TextEdit document, on the Web. You highlight it and then press Shift-⌘-Y. Pow!—it’s now pasted into a new yellow sticky note in Stickies.
(Shift-⌘-Y, it turns out, is the keyboard shortcut for the Make New Sticky Note command in Services. Any Services command can have a keystroke, and you can change them at will—including this one. See Control the Toolbar.)
Someone has sent you a speech or proposal or breakup letter. You haven’t got time for the pain. “Just gimme the executive summary,” you mutter to yourself.
So you highlight all the text, Control-click (or right-click) it, and choose Summarize. Bing! Your Mac analyzes the sentences you’ve highlighted and, after a moment, launches Summary Service. This little program, which you probably never even knew you had, displays a greatly shortened version of the original text. Figure 7-3 offers details.
Note
Lots of add-on Mac programs stock the Services menu with commands of their own. Skype, for example, adds options like Call, Send Message, and Send SMS, so you can call or text someone right from a phone number you encounter in a text document or on the Web. QuicKeys, RealPlayer, iData, Google Quick Search, and many other programs add to the Services menu, too.
The preceding pages describe the best of the built-in Services. But there are hundreds more available on the Web.
Consider visiting www.macosxautomation.com, for example. That’s a Web site maintained by veteran automation fans for the benefit of anyone who’s interested. Here, when you click Services, you can find a Download page filled with useful, ready-made services. A few examples:
New Disk Image with Selection. Highlight a folder or a group of icons. Choose this command from the
menu—presto, a new disk image file (.dmg) containing the selected Finder items.Send Photo to Everyone in the Picture. You choose some photos in iPhoto, and then select this command from the Services menu. The Mac creates a new outgoing message in Mail, containing the selected iPhoto images, addressed to the people in the selected images, as determined by iPhoto’s Faces feature.
Change File Type. Highlight some photo files in a Finder window. From the
menu, choose this command. It auto-converts them to the new graphics-file format of your choice.Encrypt File. Highlight a PDF document in the Finder, and then choose this command from the
menu or the file’s shortcut menu. You get duplicates of the PDF files, encrypted with a password you supply, with the word “(encrypted)” appended to their names.
Clearly, there’s all kinds of fun (and utility) to be found in Services.
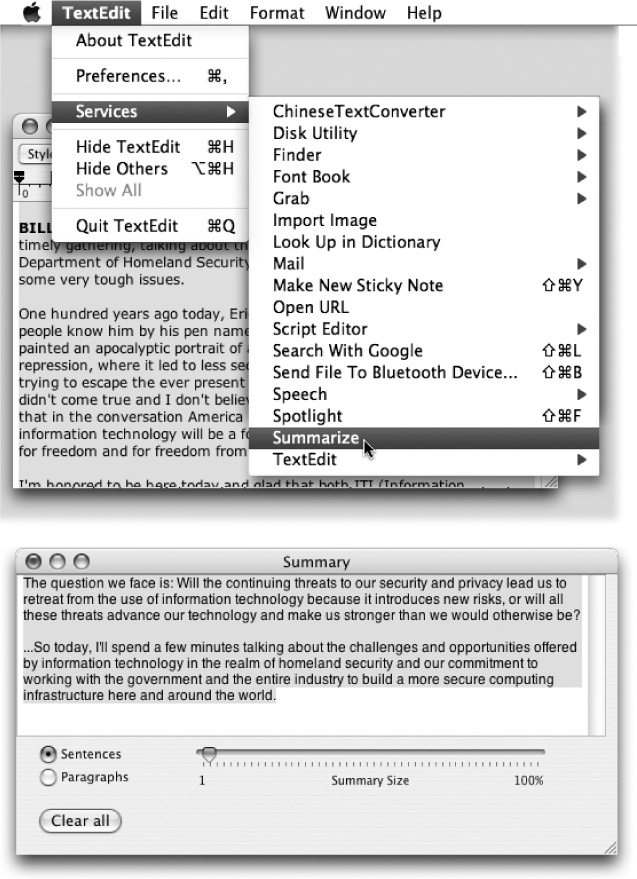
Figure 7-3. Use the Summarize command to create a one-paragraph summary (bottom) of a longer passage (top). Once the summary appears in the Summary Service program, you can make it more or less concise by dragging the Summary Size slider. You can also ask it to display the most statistically relevant paragraphs instead of sentences, just by clicking the appropriate radio button at the lower left. (Bear in mind that Summary Service doesn’t do any creative rewriting; even Mac OS X can’t come up with something coherent if the original wasn’t. Instead, Summary Service chooses the most statistically significant sentences to include in the summary.)
The Services command center is in the System Preferences→Keyboard→Keyboard Shortcuts pane. (You can also get there by choosing Services→Services Preferences from any program’s Application menu.)
Here, turn the checkboxes on or off to choose which Services you want available.
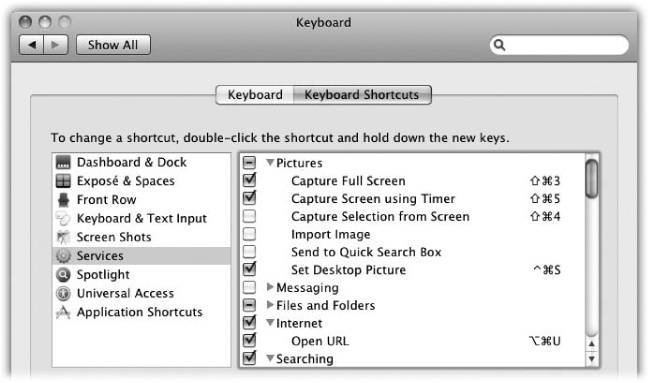
Figure 7-4. Here’s the Services command center. You can purge your shortcut menus and Services menus of the useless Services by turning off their checkboxes. You can also assign (or change) keyboard shortcuts. Click a Service’s name and then press Return to open the Keyboard Shortcut box; then press the desired keystroke on your keyboard.
Handier still, you can double-click to the right of a Service’s name and then press a keyboard combination. That will become its new keyboard shortcut, available systemwide. (The usual caveats apply: Any keystroke you make up here overrides the same keystrokes that your programs may use for themselves, so be careful.)
Automator is the Mac OS X program that lets you create your own little programs—and your own Services, if you like. Like most programs on your Mac, it sits waiting in your Applications folder. Double-click its icon to open it for the first time. (Automator’s robot icon is supposedly named Otto. Get it? Otto Matic? Stop, you’re killing us!)
As you’ll soon discover, building an Automator workflow is a satisfying intellectual exercise and a delicious talent to acquire. But if the point of all the effort is to create a timesaving, step-saving software robot, you’ll need some way to trigger it—to run it, just the way you run an email program or a Web browser.
Fortunately, you can save a workflow as a regular, double-clickable application, if you like, or turn it into a Service, as described above, or embed it in shortcut menus all over your Mac. In fact, when you fire up Automator, the first thing it wants to know is: What is the desired destination for this workflow?
You’re offered seven options in the template screen shown in Figure 7-5:
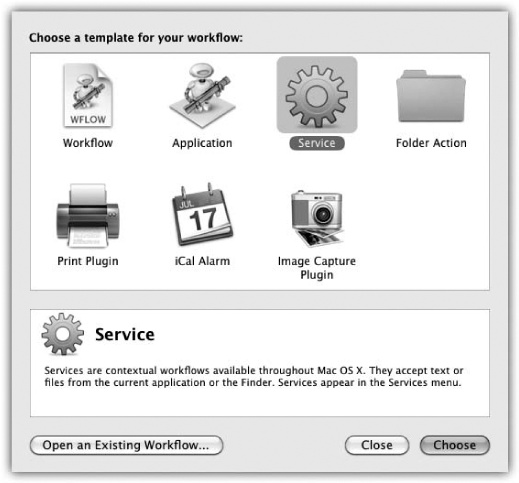
Figure 7-5. Automator has seven choices for the final form of your workflow. If you’re not sure which format you’ll want to use for a particular workflow, choose Workflow for now. Later, if you change your mind about the final product of your masterpiece—for example, you realize it would have been better as a Service or an iCal Alarm—you can create a blank document in one of the other types, then drag the actions from your saved workflow into the new, blank project.
Workflow. An Automator Workflow file (with file name extension .workflow) is what you create if you want to study and refine your project. It’s not the best format for using your homemade app, though, because to run it, you have to open Automator and click the Run button.
Application. A workflow saved as an application has all the benefits associated with normal Mac OS X programs. You can double-click its Finder icon to launch it, drag it to the Dock for one-click launching, or just leave it in your Applications folder, nestled among all the “professional” programs.
So why wouldn’t you just save your workflows as applications all the time? First, workflow applications are much larger than workflow documents—as much as 20 times larger. That’s worth remembering if you plan to distribute your workflows online or via email.
Also, when a workflow application runs, it doesn’t give you access to the Workflow log (see the box on Checking a Workflow’s Progress)—a big downside if you want to monitor the progress of your workflow in minute detail. Instead, you get a dinky action indicator in the menu bar, as shown in Figure 7-6.
Figure 7-6. The three-part menu-bar indicator tells you that the workflow application is, in fact, running (the spinning progress indicator)—and, more specifically, which action is running (the text next to it). If you want to cancel a workflow halfway through, click the Stop sign.
Finally, it’s a pain to edit a workflow application if something goes wrong; you have to open the whole thing in Automator and resave it.
Service. Ahhh, now we’re talking. Yes, that’s right: You can now build your own Services, as described above—and give them all the privileges of Apple’s own Services. One sample benefit: You can assign your own keyboard shortcuts to them, as described on Control the Toolbar.
The beauty of Automator-created Services is that they show up instantly in all the places where Services show up: in the Services menu, in the shortcut menu that appears when you right-click a Finder icon or selected text, and in the Finder’s
menu—all ready to use. In other words, enhancing and debugging your workflow is incredibly easy, because it’s immediately ready to try out in the “real world” of your Mac.Folder Action. Folder Actions are workflows that run automatically when you do something to a folder in the Finder—opening it, say, or adding files to it. Folder Actions are extremely powerful for image processing, network backup jobs, and much more, but they’re also extremely complicated. For an explanation of the ins and outs, read this chapter’s bonus AppleScript appendix (on this book’s “Missing CD” page at www.missingmanuals.com).
Print Plugin. Print Workflows show up as menu items inside the Print dialog box’s PDF menu (Fonts—and Font Book). If you save a workflow as a Print Workflow plug-in, you can easily run the workflow on a document you’re about to print—applying a ColorSync filter to the document to compensate for slight discolorations, for example.
iCal Alarm is a powerful plug-in format that lets you schedule workflows to run at specific times. When you save a workflow in this format, iCal opens and creates a new event named after your plug-in; you’re supposed to drag and edit this event to whatever time and day you want the workflow to run. (You can even use iCal’s “repeat” pop-up menu to have the workflow run every day, week, and so on.)
This is a fantastic tool. If you have a workflow that plays an iTunes song, for example, you can easily build an alarm clock using nothing more than iCal alarms.
Image Capture Plugin. Image Capture is a program for importing photos from a camera or scanner (Image Capture as Spycam). If you save a workflow as an Image Capture plug-in, you can choose to run the workflow whenever you import new photos—so you can easily shrink the new images to a smaller size, for example.
You can click these icons one at a time to read capsule descriptions. You don’t have to make a choice now, though; you can click Close to get rid of these template offerings, build a workflow now, and then decide what to do with it later.

Now, go forth and automate!
Tip
You can find extra Automator resources, including useful workflows and actions, at sites like www.automatorworld.com and of course www.macosxautomation.com.
Once you’ve chosen a finished format for the workflow you’re about to create, you wind up in Automator itself. A tour may be in order:
At the top of the Automator window, the toolbar offers five fairly self-explanatory buttons. From left to right (Figure 7-7):
Hide Library. This button hides the entire left Library pane of Automator, where all the prefab building-block steps are listed. You wind up with one big Workflow pane.
Media. Click to open the standard Media Browser box that pops up all over Mac OS X. You can drag your music, photos, or movies from the Media Browser directly into the Workflow pane, or into an action itself (one with a matching data type, of course) to use that media in your workflow.
Record. Click to enter Watch Me Do mode, where Automator memorizes the steps that you perform manually (Watch Me Do mode).
Skip, Stop, Run. These buttons control playback of the workflow you’re building.
Tip
To save screen space, you can hide the entire Automator toolbar by choosing View→Toolbar, or by clicking the capsule-shaped button in the upper-right corner of the window. (You can bring the toolbar back by choosing View→Show Toolbar or clicking the pill button again.)
While the toolbar is hidden (and even when it’s visible), you can still start and stop playback by choosing Workflow→Run (⌘-R) and Workflow→Stop (⌘-period).
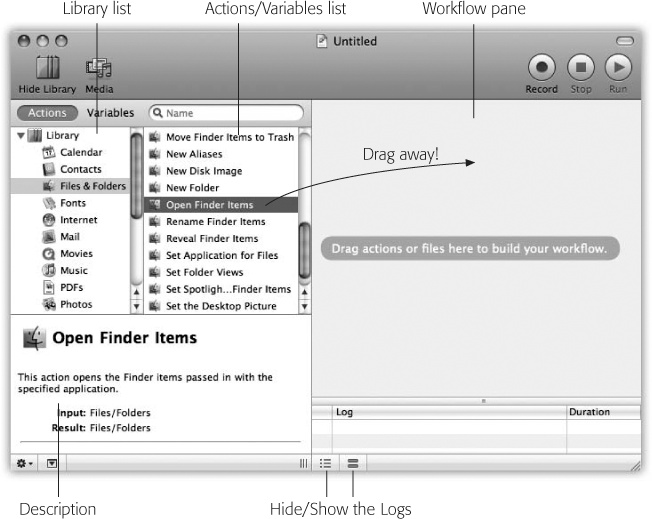
The Library pane is the entire left section of the Automator window. It includes the Search box, Library list, Description field, and the list of Actions or Variables. These are described on the following pages.
Like Mac OS X’s other Search boxes, this one works in real time—it displays matching actions or variables as you type.
If you start by selecting a folder in the Library list at left, you’re telling Automator, “Search only within this folder of actions or variables.” If you want to search for actions that can process files in the Finder, for example, click Files & Folders in the Library list, and then type file in the Search box.
Or, to search all of Automator’s folders, click Library at the top of the Library list before searching. (That’s the best way to find an action or variable if you’re not sure what folder it’s in.)
Your search results appear in the Actions/Variables list, ranked by relevance to your search terms. You can begin dragging actions directly into the Workflow pane at the right side to build a workflow, as described shortly.
Click the  button in the Search box to return to the complete list of actions or variables.
Above the Library list, two buttons appear that govern what’s displayed in the Library pane:
Actions. When you click Actions, the Library lists all the features and data that Automator actions can control: Files & Folders, Music, Photos, Text, and so on. When you click a folder, the Actions list on the right shows every action related to that type of data. For example, when you click Photos in the left-side list, the right-side list of actions offers steps like Flip Images, Crop Images, and so on.
When you find an action you want to use in your workflow, drag it to the right into the large Workflow pane.
Variables. Variables are memorized info chunks that you can reuse in an Automator workflow, exactly as in real programming languages. The Variables list is divided into categories like Date & Time (today’s date, today’s month, and so on), Locations (the paths to various folders on your Mac), and User (your name, phone number, and other information).
Later in this chapter, you’ll see how it’s useful to incorporate these information tidbits into your workflows.
When you click an action or variable in the list, the Description box provides some terse, superficial information on how to use it. You might see what the action does, what kind of data it expects to receive from the previous action (input), and what the action sends on to the following action (result).
If the variable is editable (it has a V icon), you get to see what parts of it you can change.

The button in the lower-left corner of the window is a pop-up menu. Its four commands let you create and delete customizable collections called groups and smart groups. They behave exactly like playlists and smart playlists in iTunes. For example, you can create a group that holds the actions you use most often, so you don’t have to keep hunting for them.
Smart groups are constantly updated with actions that match the criteria you set for that smart group. (They’re available only for actions, not variables.) For example, you can create a smart group that lists only actions that work with iPhoto, or actions with input types that contain the word “image.” Add more criteria by clicking the  button.
Tip
Automator’s Library list comes with three factory-installed smart groups: Most Relevant, which displays all the actions relevant to the action you have selected in the Workflow pane; Most Used, which displays the actions you’ve used the most in your workflows; and Recently Added, which displays actions added by newly installed applications, for example, or actions you downloaded and added yourself.
The Workflow pane is Automator’s kitchen. It’s where you put your actions in whatever order you want, set any action-specific preferences, and fry them all up in a pan.
The Workflow pane also shows how the information from one action gets piped into another, creating a stream of information. That’s how the Workflow pane differentiates Automator from the dozens of non-visual, programming-based automation tools out there. Figure 7-8 shows what a piece of a workflow might look like in the Workflow pane.
When you drag an action out of the Actions list into the Workflow pane, any surrounding actions scoot aside to make room.
Under the Workflow pane on the left are two tiny buttons, identified in Figure 7-8. They hide and show two useful pop-up panels that contain logs (mini-reports): the Workflow log, which shows which actions ran successfully, which failed (if any), what each action did, and so on; and the Variables log (Figure 7-9), which shows all the variables used in your workflow. When you run the workflow, the Value list shows you what information was stored in each variable after the workflow finishes.

Automator comes with four prebuilt workflows that show off its capabilities. Find them by clicking Help→Open Examples Folder; open one of these workflows for inspection by double-clicking it.
Tip
In Snow Leopard, you don’t actually have to open an Automator document to see how it’s set up. Simply select a workflow in the Finder and hit the space bar to activate Quick Look (Quick Look), which gives you a preview of the entire workflow—actions and all.
(This doesn’t work on workflows saved in the old Mac OS X 10.4 format, though, at least not until you open them and re-save them in Snow Leopard.)
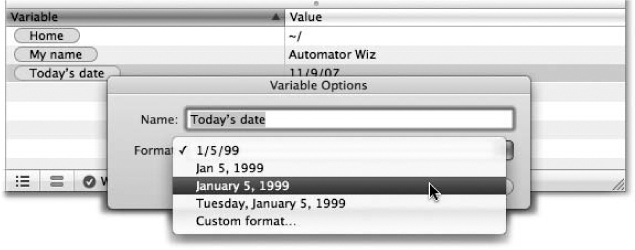
Figure 7-9. The Variables log shows you all the variables you’re using in your workflow. The light blue variables are editable; double-click one to modify the variable’s name and its settings (in this case, the format for “Today’s date”).
To many people’s surprise, the included workflows are quite useful:
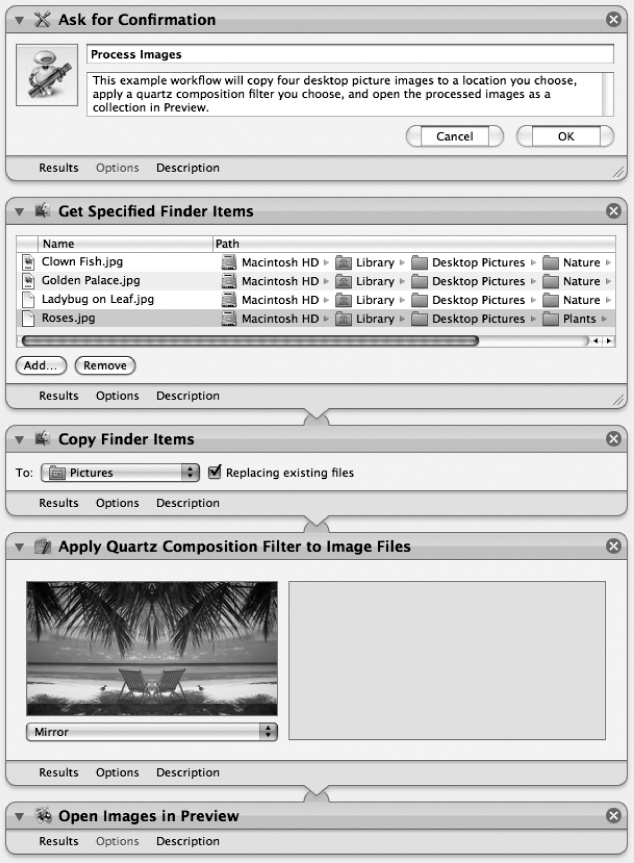
Process Images applies special visual effects to whatever photos you specify in the workflow. No, people haven’t exactly been clamoring for an automated way to create mirror-image camera shots, but this workflow does show you the basics of batch-processing photos. You can use it as a template for building your own “Convert to JPEG” or “Scale to 640 x 480 pixels” workflow, for example.
Import MobileMe Photo Album into iPhoto works only if you have a MobileMe account (Chapter 18). It slurps the photos from a photo album you’ve previously posted on your MobileMe site (say, while you were on vacation) and copies them into iPhoto. From there, you can view a full-screen slideshow of the images, or even edit them and post them back onto your MobileMe site.
Display Trailers in Safari is intended to show you how you can create workflows that work with Web addresses. This one sneaks out to Apple’s popular movie-previews Web site, rounds up the list of the latest movie ads, and opens each in a new Web-browser tab.
Copy Unread Mail to iPod Notes copies any new Mail messages into your iPod’s text-notes folder. Later, when you’re on the train to work, you can pull out your iPod and read whatever mail you didn’t get to at home.
Tip
There are two more great Automator examples at the Ground Zero of Automator, www.macosxautomation.com. “Welcome to the Party!” for example, cleverly demos two new features of Automator—variables and the Loop action—by showing you how to create a workflow that takes photos of your friends and turns them into a cool, party-ready screen saver.
Before you build your own workflows, it’s a good idea to understand how actions work together to process information. Here’s a step-by-step analysis of the Process Images workflow described above (Figure 7-10), which will give you deeper insight into building your own workflows.
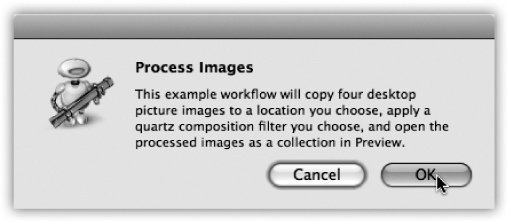
Ask for Confirmation.
This common action, available in the Utilities category (in the Library list), produces a dialog box that tells the innocent bystander what’s about to happen (Figure 7-11). It’s often smart to begin each of your own workflows with a box like this, to remind yourself (or your minimum-wage minions) what the workflow actually does.
In this case, the message informs your audience that the workflow is about to open a folder full of pictures, apply some wacko effects to them, and then open them up in Preview to display the results.
Tip
If you want the dialog box to appear with a bright warning sign—to inform you, for example, that you’re about to erase your entire hard drive—click the robot icon in the upper-left corner of the Ask for Confirmation action. Automator swaps in a robot-with-yellow-triangle icon.
Keep in mind, too, that the entire Ask for Confirmation action is 100 percent customizable. Not only can you change the text that appears in the dialog box—you can even change the names of the Cancel and OK buttons.
Figure 7-10. The Process Images workflow consists of only five actions. (The first action, which just displays an explanatory dialog box, shouldn’t even count.) Still, this simple action does in 10 seconds what would take most humans at least 5 minutes: applying the same photo effect to several images.
The next step in the Process Images workflow comes from the Files & Folders Library category. Here’s where you specify which files you want your workflow to operate on. You can use the Add and Remove buttons to edit the list—to add your own images to be mirrored, for example—or you can drag files straight from the Finder into this list.
Figure 7-11. A dialog box created by the Ask for Confirmation action. Feel free to edit the action with your own text; the stuff Apple provides is pretty dry.
When this action is finished, it passes on a list of files and/or folders to the next action, ready for further processing.
Copy Finder Items.
This is a very important Files & Folders action: It makes a copy of the specified files and folders (in this case, the ones you identified in step 2) so you don’t gum up the originals. You can change where you want the copies stored by editing the “To” pop-up menu in the action. The menu lists obvious locations like Pictures and Desktop, or you can choose Other to select any folder you like.
Note
The “Replacing existing files” checkbox tells Automator that, if there are old files in the Pictures folder with the same names as your new files, you want to delete the old files automatically.
If you click Options in the action, you see that the “Show this action when the workflow runs” checkbox is turned on. That way, when your workflow runs, Automator will ask where to store the copies, so that the destination can be different each time. Otherwise, the files will automatically be copied to whatever folder you select in the pop-up menu right now.
Apply Quartz Composition Filter to Image Files.
This action (which came from the Photos category folder) processes the newly duplicated images from step 3; in this case, it applies a mirror filter to them. The action then passes the newly mirrored images on to step 5. If you prefer, you can choose a different filter from the pop-up menu—to make the image look like a comic-book drawing, for example—instead of applying the mirror filter.
Note
The Quartz Composition Filter, a piece of Mac OS X’s Quartz display technology, can modify images and photos in real time. Photo Booth uses this technology, which is why many of Photo Booth’s effects are also in the action’s Filter pop-up menu. (See http://developer.apple.com/graphicsimaging/quartz for the incredibly nerdy details on Quartz.)
Since “Show this action when the workflow runs” under Options is turned on, you’ll have the chance to choose a different filter each time this workflow runs.
(By the way, the image of the beach is intended to demonstrate the filter’s effect; it’s not actually one of your photos.)
Open Images in Preview.
This final action, which also comes from the Photos category, takes the post-filter images from step 4 and opens them in Preview. From there, you can flip, resize, or resave the images.
Try running the workflow by clicking Run. The bottom of the Workflow pane tells you which step of the workflow is running at the moment. As each action finishes, a green checkmark appears in its lower-left corner.
Note
If something goes wrong while your workflow is running (or if you click Cancel in a dialog box), your workflow stops in its tracks. To identify the offending step, look for the red X in an action’s lower-left corner, or check the Log.
Unfortunately, if your workflow shuts down in the middle, you can’t restart it from there. When you click Run the next time, the workflow plays from the beginning.
You could spend all day playing with the workflows Apple gives you, making minor tweaks and seeing how they affect the workflow’s progress. You could even download more preassembled workflows from www.automatorworld.com, http://macscripter.net, or www.macosxautomation.com, if you were so inclined.
Still, those options don’t give you the kind of hands-on experience you need to automate your Mac on your own.
That’s why the following pages walk you through building two different Automator workflows from scratch. Along the way, you’ll learn several tricks that you’ll find handy when you start building your own workflows.
Tip
If you’re feeling lazy, you can download the completed workflow projects from this book’s “Missing CD” page at www.missingmanuals.com.
Wouldn’t it be cool if you could just click a file’s icon in the Finder—and choose “Send This File as an Email Attachment” right from its shortcut menu? One step, instead of the tedious business of opening your mail program, creating a new message, clicking Attach, finding the file, choosing it, and so on. Windows has had this feature for years, and it’s absolutely indispensable.
And now you can have it, too. A couple of steps in Automator, and this little gem is yours forever.
In Automator, choose File→New (or press ⌘-N).
The templates dialog box appears (shown back in Figure 7-5).
Double-click Service.
You want this puppy to be available from any Finder icon’s shortcut menu—and that’s the beauty of the Service.
You wind up with a new panel at the top of the workflow, bearing the peculiar legend, “Service receives selected text in any application” (where the underlined phrases are pop-up menus).
Remember, Services are contextual; they’re smart enough to know when to show up in your menus. That’s the purpose of these two pop-up menus: to let you specify when your new Service should appear. In this case, you want the menu to appear only if you’ve opened the shortcut menu for a file icon, in the Finder.
From the first pop-up menu, choose “files or folders.” From the second, choose Finder (Figure 7-12, top).
In future experiments, you could choose, from the first menu, “image files,” “PDF files,” “movie files,” or whatever; the Service would then appear only when you’ve right-clicked that kind of file.
OK: You’ve now established what kind of file the Service will work on, and in which program. Now you have to tell Automator what you want to do with that file: attach it to a new, outgoing email message.
In the Library list at left, click the Mail category.
(Make sure the Actions button is clicked above the list.) You’ve just narrowed down the list of available actions to those that pertain to Apple’s email program.
From the Actions column, drag the action called New Mail Message into the Workflow pane.
(Use the Search box at the top if you don’t feel like reading through the list of Actions.)
Figure 7-12. Top: You want this Service to appear in your shortcut menus only when you’ve right-clicked a file or folder, and only in the Finder. If you have more than one email account, you can select the one you’d like to send the message from in the pop-up menu at the bottom of this window. You can also specify, in advance, an addressee, subject line, body, and so on. Bottom: Once you’ve saved your Service, your Send As Attachment command is ready to go! Control-click (or right-click) any icon in the Finder to see it and trigger it. Just address, click Send, and your message is on its way. (You could even add the Send Outgoing Messages action to the end of your workflow to do this step automatically.)
If you leave this action as it is, your workflow will autocreate an empty, unaddressed outgoing mail message; you’ll fill in the recipient name, subject line, and so on, when you run it. Which is fine.
But you could, if you liked, take a moment now to pre-specify the recipient, subject, and body message for your new email message—great if you have to send the same stuff to the same people every week, for example. (You can even add an email address straight from your Address Book. Just click the address-card button in the upper-right corner.)
Tip
If you use Microsoft Entourage for your email instead of Mail, you’ll notice that your Library list offers actions for operating Entourage by remote control, too. So in this step, you’d drag the Create New Entourage Mail Message instead of Create New Message.
If you look at the description for this action, you’ll see that the Input accepts “(Files/ Folders, Text).” It explains that if a file is passed from the previous action, it will automatically be attached to the email.
Choose File→Save. In the dialog box, name your new Service command. Click Save.
You can call it “Send As Attachment,” or “Send By Email,” or “Send This Baby Off!” Whatever you like.
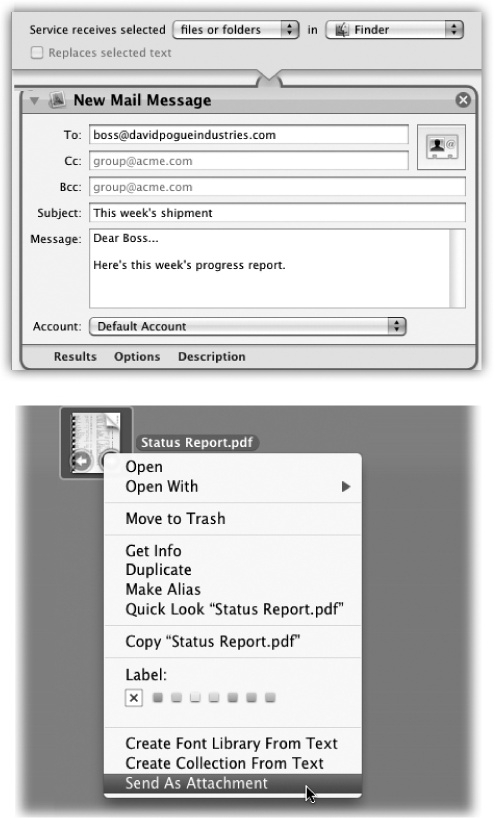
That’s actually all there is to it. Now for the testing. Switch to the Finder and Control-click (or right-click) any file icon (Figure 7-12, bottom). From the shortcut menu, choose Send As Attachment (or whatever you called your Service).
Tip
If there are more than four Services at the bottom of the shortcut menu, your new command will be added to a submenu called Services. If you’d rather avoid this extra step—preferring a longer list of Services right there in the shortcut menu—then download the free Services Menu Items Utility from this book’s “Missing CD” page at www.missingmanuals.com. It lets you stack up to 25 Services in the shortcut menu without segregating them into a Services submenu.
Instantly, the Mac opens your email program and creates a new outgoing message—with your selected file already attached. You just saved about 35 steps.
iPhoto is a fantastic program for organizing digital photos. It even has its own photo-backup feature, which burns selected albums’ photos to a blank CD or DVD.
However, those backup discs maintain iPhoto’s complex and user-hostile Library folder structure. That’s great if you expect one day to restore the backup to iPhoto, because the backup maintains all your keywords, ratings, albums, comments, and other iPhoto data.
But it’s not so great if you want to hand the CD or DVD to anyone who doesn’t use iPhoto (like an OS 9 or Windows person), because they’ll have a devil of a time figuring out where the photos are in the convoluted Library folder structure.
If you build an Automator workflow to back up your photos instead, you (a) can burn a disc containing only the photos in one simple folder; (b) have more control over which photos are backed up; and (c) learn even more tricks for automating sophisticated operations. Figure 7-13 shows what the final workflow looks like.
Here’s how to put it together:
Create a new Automator workflow (⌘-N).
The template screen appears. In this example, you’ll create a standalone, double-clickable program. You’re a programmer now, baby! (Well, sort of.)
Double-click Application.
You arrive at the main workflow-construction area.
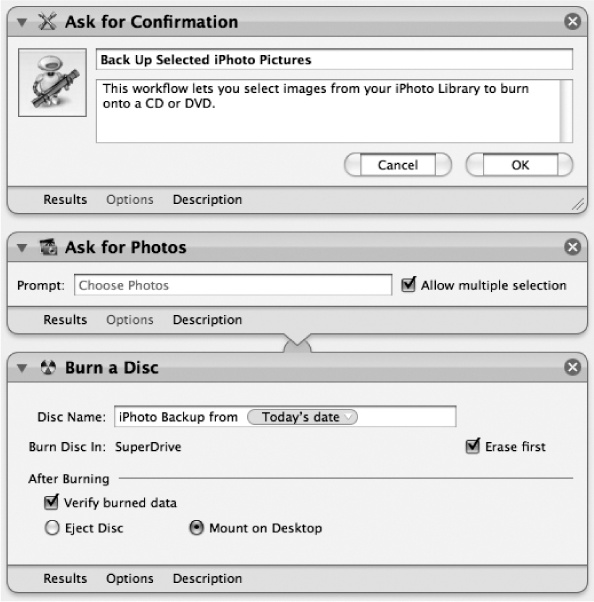
Click the Photos category folder. In the list of available actions, find Ask for Photos. Drag it into the empty workflow area.
Your newly hatched workflow, when it runs, will begin by asking you which photos you want to back up.
Figure 7-13. Top: The first action presents a dialog box telling you what this workflow does. Middle: The second action lets you select from your iPhoto Library the images you want to back up. Bottom: The last action, in a single step, burns those images onto a CD or DVD. It works regardless of whether your Mac has an internal or external burner. Try that simplicity on a PC!
Tip
What you really want is to round up only the latest batch of photos—since your last backup, for example. Fortunately, one of the actions in the Photos folder is called Find iPhoto Items, and it lets you specify a time period like “Within the last 2 weeks.” It would be perfect for this workflow—if it weren’t so buggy. (For example, it finds multiple copies of each photo.)
For best results, then, create a Smart Album in iPhoto that lets you filter photos based on certain criteria—all your photos taken in the past two months, for example. When you run the workflow, you can choose that album to back up, so that you get only the most recent shots.
In the Library list, click the Utilities folder. Drag the Ask for Confirmation action into the Workflow pane, above the Ask for Photos action. Fill in the text as shown at the top of Figure 7-13.
Be sure to drag it above the Ask for Photos action so it’s the first thing that happens when you run your workflow. Now you’ve just directed Automator to begin its work by displaying a dialog box (Figure 7-14).
Drag the “Burn a Disc” action to the bottom of the Workflow pane.
Just to make this extra nice, why not make an options box pop up at the time of burning?
Click Options, and turn on “Show this action when the workflow runs.”
The options box will ask you to name the CD, choose a burning speed, and so on.
In the Disc Name field of the Burn a Disc action, type “iPhoto Backup from” (that’s a space after “from”).
This is going to be the proposed name for the CD.
Click Variables above the Library list.
Those variables are about to come in handy. You’re going to complete the phrase “iPhoto Backup from” with whatever the date of the backup is.
Click the Date & Time folder in the Library list. Drag the “Today’s date” variable into the Disc Name field after “from.”
The CD or DVD’s name will be something like “iPhoto Backup from 4/9/10,” making it easy for you to see when you made the backup disk. The date automatically changes whenever you run the workflow.
Choose File→Save. Type a name for your new program (like Back Up This Month’s iPhoto Pix to CD), and save it wherever you like (on the desktop, for example).
Now try it out. Double-click your newly forged program; your workflow springs into action, asking you to specify the photos you want, asking for a blank disc, and then burning it!

Automator is not a static, this-or-nothing program: It’s a versatile, expandable tool with ever-increasing potential. There are two especially good ways to increase Automator’s power beyond using the factory-installed actions: adding more actions yourself, and using the new Watch Me Do feature.
Automator comes with dozens of actions, but you’re bound—eventually—to find yourself wishing there were a few more. Perhaps you’d like some Automator actions to control non-Apple programs like Photoshop, or you’d just like to have a few extra actions to control Mac OS X itself.
Fortunately, Automator can handle actions written by non-Apple programmers, too. Just visit any of the Web sites devoted to Automator actions (like www.automatorworld.com. or www.macosxautomation.com), and download any actions you’d like.
If the action’s programmers did their jobs right, you can just download the action, run the installer, and sit back and watch as Mac OS X unpacks, copies, and installs the action automatically. The next time you open Automator, the new action will be listed in the correct folder in the Library list.
If, on the other hand, the action’s programmer did not create a self-installing action, you may have to manually double-click the .dmg, .sit, or .zip file you downloaded. Inside the folder or disk image that results, you should find a file ending in .action. Drag that file into either your Home→Library→Automator folder (to install the action for use under only your account) or to your Library→Automator folder (to install the action for all users on your Mac). In either case, if this is the first time you’re installing an Automator action by hand, you may have to create the folder yourself.
Once in Automator, you can use your new actions just as you’d use the ones that came bundled with your Mac: dragging and dropping them in whatever order you want, customizing their settings, and so on.
Before you run any new actions, though, look at the Description field to discover the actions’ inputs and outputs. With that information in hand, you’ll never accidentally connect, say, your new Sauté Vegetables action to an unrelated action like Burn a Disc.
And finally, if you’re interested in writing your own Automator actions (warning: programming experience necessary), visit http://developer.apple.com/documentation/AppleApplications/Conceptual/AutomatorConcepts/Automator.html for an introduction.
Sometimes, you’ll run into a task that Automator can’t accomplish with any action, no matter how nicely you ask: opening multiple folders of bookmarks in several Safari windows, for example, or automating some no-name program that doesn’t know anything about Automator and doesn’t come with any actions.
Enter Watch Me Do. In this mode, you click a Record button. The Automator window disappears, and a black “Automator: Recording” window takes its place. From now until you hit the Stop button, every mouse click and keystroke is recorded, step by step, into Automator. Later, you can survey the list of steps you took and clean them up.
When you run the workflow, your mouse actually moves to reproduce your clicks, and the Mac actually types the same keystrokes you did. It’s like watching a ghost control your computer, or maybe a really annoying little brother who won’t stop mimicking you.
You can even manipulate the individual steps—delete one, for example, edit the playback speed, or change how long it takes before the step “times out” (gives up).
It’s far easier to create workflows using Watch Me Do than having to drag the correct actions into the correct sequence; you’re leaving even more of the programming to Automator.
Unfortunately, there are drawbacks to Watch Me Do, too:
The conditions on the screen when you run the action must be identical to the way they were when you recorded. If some window isn’t the same size, or in the same position, or if some button isn’t where it used to be, the workflow derails.
Watch Me Do relies on the Mac’s accessibility features—the same ones that form the guts of VoiceOver and other tools for the disabled—and different programs have been “accessibilitized” to wildly varying degrees. You can record and play back steps that involve System Preferences with amazing success, for example. But operating other programs can be hopeless.
That’s why Watch Me Do may seem incredibly flaky. For best results, use keystrokes and keyboard shortcuts as much as possible, and avoid the mouse.
Here’s an example:
If you use Boot Camp to run Windows on your Mac (Chapter 8), you may find yourself having to open the Startup Disk pane of System Preferences with alarming frequency. And unfortunately, there’s no Change Startup Disk action in Automator to make that job less repetitive.
Fortunately, Watch Me Do can automate the process, so you can switch your startup disk with one click on an Automator-created application on your desktop or Dock. Creating the workflow is simple:
Create a new workflow (⌘-N). Double-click Application in the template-selection panel.
Since you’re just going to work with Watch Me Do, you won’t be messing with any predefined actions this time.
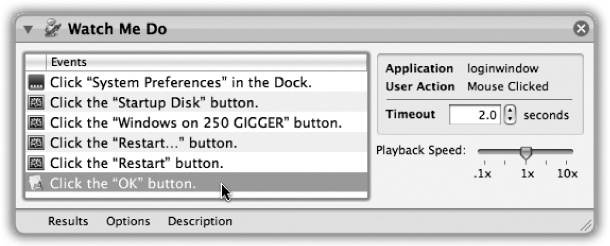
Click the Record button.
The Automator window disappears, and the black Recording window pops up. Everything you do is being recorded right into Automator.
Click System Preferences in the Dock.
If System Preferences isn’t in your Dock, put it there before beginning the recording. (It’s in your Applications folder.) Choosing its name from the
 menu generally doesn’t work, thanks to some typical Watch Me Do flakiness.
In System Preferences, click Startup Disk, and then click either your Windows partition or your Mac partition.
Later, you can create a second workflow to choose your other disk, if you want.
Click Restart. In the confirmation box, click Restart again.
Don’t worry; you’re not actually going to restart right now. Instead, Automator pops to the front, nagging you about the fact that it has an open document with unsaved changes—that is, the workflow you’re in the middle of making!
Click Cancel.
Now Mac OS X tells you that Automator canceled the restart you had asked for. Which, of course, you already know.
Click OK. Click Stop in the Recording window.
The Automator window reopens with a new Watch Me Do action in your workflow (Figure 7-15). The Events list shows you everything you did, step by step—right down to the clicking of the OK button in step 7. And that step should not be part of the workflow.
Click the final step in the workflow action (which says “Click the ‘OK’ button”) and press Delete.
When you run the workflow, you’ll see your cursor magically move from one step to the next, all by itself (well, with a little help from Automator). It repeats every hesitation, misstep, and pause in your original mouse motion. Fortunately, you can speed up a particular step by up to 10 times using the Speed slider (also shown in Figure 7-15).
All in all, the mantra to use when dealing with Automator and Watch Me Do is simple: If you can perform a task with a specific action, use the action. Use the Watch Me Do mode sparingly.
AppleScript is a powerful computer language that’s been around since the days of Mac OS 7. Despite its maturity, however, AppleScript is often criticized by seasoned Mac programmers for being too simple, too easy to learn, and too much like English.
Of course, those are precisely the traits you want in a computer language—assuming, of course, that you want to use a computer language at all. If you’re an everyday Mac fan—as opposed to some computer-science Ph.D.—AppleScript is by far the easiest programming language to use for automating your Mac.
You can think of AppleScript programs (called scripts) as software robots. A simple AppleScript might perform some daily task, like backing up your Documents folder. A more complex script can be pages long. In professional printing and publishing, where AppleScript has hard-core fans, a script might connect to a photographer’s hard drive elsewhere on the Internet, download a photo from a predetermined folder, color-correct it in Photoshop, import it into a specified page-layout document, print a proof copy, and send a notification email to the editor—automatically.
Even if you’re not aware of it, you use the technology that underlies AppleScript all the time. Behind the scenes, numerous components of your Mac communicate by sending Apple Events, which are messages bearing instructions or data that your programs send to one another. When you use the Show Original command for an alias, or the Get Info command for a file or folder, an Apple Event tells the Finder how to respond.
AppleScript has several important advantages over Automator—not least of which is its even greater power. It comes with a dedicated program just for writing out these scripts. It’s the AppleScript Editor program that’s sitting in your Applications→Utilities folder. (It was called Script Editor before Snow Leopard.)
Still, AppleScript is a very deep subject—so deep, in fact, that you’d need an entire book to do it justice. This chapter is an appetizer; a book like AppleScript: The Missing Manual is the seven-course meal.
Tip
You can also download an entire chapter about AppleScript—the chapter that appeared in the previous edition of this book—from this book’s “Missing CD” page at www.missingmanuals.com.
Here are a couple of very simple AppleScripts, just to give you a taste.
The first one opens your Applications folder. Sure, you can do that in the Finder easily enough, but this one works no matter what program you’re in.
Open up AppleScript Editor (which is in your Applications→Utilities folder). Type this:
tell application "Finder"
activate
open folder "Applications" of the startup disk
end tell
The result looks like Figure 7-16.
Now try it. Click the Run button. The first thing AppleScript Editor does is check your script for typos and syntax; if all is well, you’ll see the script format itself, putting the verbs in bold, indenting pairs of matched commands, and so on. If that part went well, the script runs—and your Applications folder appears before you. Woo-hoo!
Now you can save your script (File→Save); choose Application as the file type. In the unlikely event that this were an actual useful script, instead of a lame sample, you could stash the new program on your Dock for anytime access.
So what do those commands mean? Here’s the rundown:
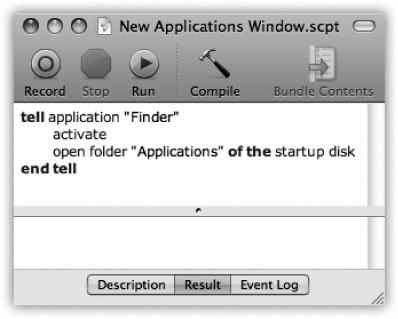
Figure 7-16. If you’ve never seen an AppleScript before, you may be surprised at how simple it looks. As you can probably guess from the commands in the window, this script simply opens the Applications folder in the Finder.
tell application “Finder” tells Mac OS X which program is supposed to obey the following commands.
activate brings the Finder to the foreground, much as you would by clicking its Dock icon.
open folder “Applications” of the startup disk tells the Finder to open a new window, displaying the Applications folder on your main hard drive.
end tell directs the Finder to go about its regular business, ignoring further Apple-Script commands.
Mac OS X comes stocked with dozens of programs—everything but the kitchen sink. All right, everything but the kitchen sink and a metronome. How are you ever going to play the piano in even rhythm without a steady clicking sound provided by your Mac? Sure, sure, you can use GarageBand’s metronome in a pinch, but that’s like using an industrial pile driver to kill an ant.
Instead, you can use AppleScript to do the job for you. Open a new document in Script Editor (File→New, or ⌘-N), and type this:
display dialog "Welcome to the AppleScript Metronome"
set bpm to the text returned of (display dialog ¬
"How many beats per minute?" default answer 60)
set pauseBetweenBeeps to (60 / bpm)
repeat
beep
delay pauseBetweenBeeps
end repeat
Note
Don’t actually type the ¬ character. That’s programmerese for, “This is really all supposed to be on the same line, but I ran out of space on the page.”
When you run this script, you see a dialog box that asks how many beats per minute you want the metronome to tick. Whatever number you type (for example, 120) gets stored in a variable—a temporary holding tank within the script—that you’ve named bpm.
Next, the script calculates how long it must pause between beeps, and puts that fraction of a second into the “pauseBetweenBeeps.” If you told the script to beep 120 times per minute, for example, “pauseBetweenBeeps” would be 0.5, since the script would have to pause half a second between beeps.
Finally, the script creates an endlessly repeating loop: beeping, pausing for the proper period, and then repeating.
Click Run to test out your script, and click Stop when you’ve had enough beeping.
AppleScript has hundreds and hundreds of uses: automating layout workflows that are too complicated for Automator, controlling programs that Automator doesn’t recognize, and programming things that Automator can’t handle.
Yet if all you do is look at AppleScript as a second choice to Automator, you’re missing out on a lot of power. Truth is, AppleScript lets you do more than Automator will probably let you do in the next 10 years; it’s just a lot geekier.
In the end, stick with Automator for simple things. If you need to use AppleScript to automate some aspect of your Mac, though, take pride; you’re stepping up to a true power tool. (You can even combine the two, building AppleScripts right into your Automator workflows, thanks to the Run AppleScript action.)