The Macintosh may be only the 8 percent solution in the mainstream business world, but in the graphics and printing industries, it’s the 800-pound gorilla. You’d better believe that when Apple designed Mac OS X, it worked very hard to keep its graphics and printing fans happy.
This chapter tackles printing, faxing, fonts, graphics, ColorSync, and PDF files, which Mac OS X uses as an everyday exchange format—one of the biggest perks in Mac OS X.
One of the most attractive features of Snow Leopard is that it takes up so much less space on your hard drive. Overall, this operating system is half the size of the previous version.
As it turns out, though, a substantial chunk of that savings comes from printer drivers. Mac OS X used to come preloaded with the printing software for every conceivable printer model from every conceivable printer company—Epson, HP, Lexmark, Canon, and others, several gigabytes’ worth. Clearly, most people wound up with about 900 wads of printing software they’d never use.
When you install Snow Leopard, though, you get only the printer drivers for the printers you actually have, or are nearby on the network. If you ever encounter a different printer model later, Mac OS X downloads it for you on the spot.
Note
If you don’t have an Internet connection, you can also install all those hundreds of other drivers from the Snow Leopard DVD. Just click Customize on the first screen of the installer, as described in Appendix A.
Setting up a printer for the first time is incredibly easy. The first time you want to print something, follow this guide:
Connect the printer to the Mac, and then turn the printer on.
Inkjet printers connect to your USB jack. Laser printers hook up either to your USB jack or to your network (Ethernet or wireless).
Open the document you want to print. Choose File→Print. In the Print dialog box, choose your printer’s name from the Printer pop-up menu (or one of its submenus, if any, like Nearby Printers).
Cool! Wasn’t that easy? Very nice how the Mac autodiscovers, autoconfigures, and autolists almost any USB, FireWire, Bluetooth, or Bonjour (Rendezvous) printer.
Have a nice afternoon. The End.
Oh—unless your printer isn’t listed in the Printer pop-up menu. In that case, read on.
Note
“Nearby Printers” refers to printers that aren’t connected directly to your Mac but are accessible anyway: a printer connected to an Apple Time Capsule or AirPort base station, certain network printers that speak Bonjour (Disconnecting Yourself), or printers connected to other Macs that you’ve shared, as described later in this chapter.
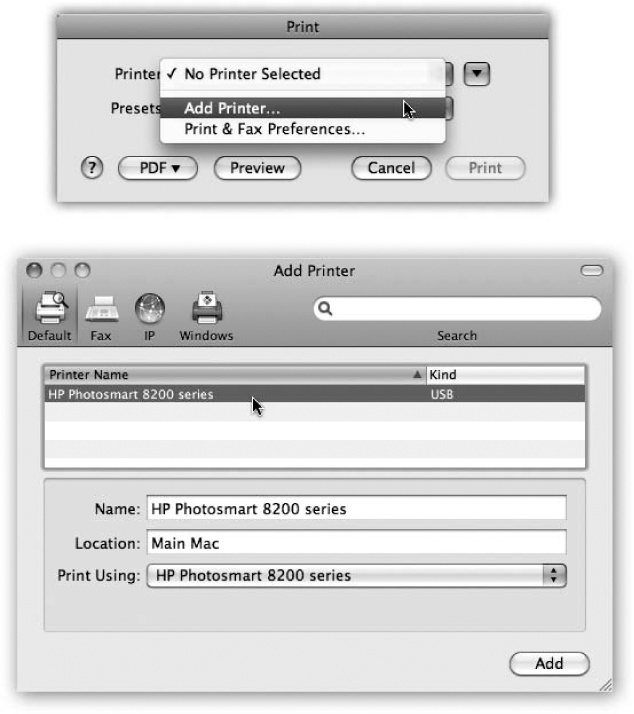
From the Printer pop-up menu, choose Add Printer (Figure 14-1, top).
A special setup window opens (Figure 14-1, bottom), which is even better at auto-detecting printers available to your Mac. If you see the printer’s name here, click it, and then click Add (Figure 14-1, bottom).
You’re all set. Have a good time.
Unless, of course, your printer still isn’t showing up. Proceed to step 4.
Click the icon for the kind of printer you have: Default, IP, or Windows.
Default usually does the trick, especially if you have an inkjet printer. Choose IP if you have a network printer that’s not showing up in Default—especially if you have an old AppleTalk printer (see the box on The Death of AppleTalk). And choose Windows if there’s a Windows-only printer out there on your office network.
After a moment, the names of any printers that are turned on and connected appear in the printer list. For most people, that means only one printer—but one’s enough.
Click the name of the printer you want to use.
As an optional step, you can open the Print Using pop-up menu at the bottom of the dialog box. Choose “Select a driver to use,” and then, in the list that appears, choose your particular printer’s model name, if you can find it. That’s how your Mac knows what printing features to offer you when the time comes: double-sided, legal size, second paper tray, and so on.
After a moment, you return to the main Printer Browser window (Figure 14-1, top), where your printer now appears. You’re ready to print.
Note
If you still don’t see your printer’s name show up, ask yourself: Is my Mac on a corporate network? Does the network have an LPR (Line Printer Remote) printer? If you and your company’s network nerd determine that the printer you want to use is, in fact, an LPR printer, click IP Printing at the top of the Printer Browser dialog box. Fill in the appropriate IP address and other settings, as directed by your cheerful network administrator.
If you’re lucky enough to own several printers, repeat the steps above for each one. Eventually, you’ll have introduced the Mac to all the printers available to it, so all their names show up in the printer list.
TROUBLESHOOTING MOMENT: The Death of AppleTalk
Like most 800-pound-gorilla computer companies, Apple can be a frustrating partner. It throws its hairy weight behind some technology, gets all the other companies to adopt it—and then moves on to something else.
That’s why AppleTalk is no longer with us, much to the dismay of thousands of Mac fans who own Apple-Talk printers.
AppleTalk was a networking system that was part of the Mac since 1984. Hundreds of networkable printer models, especially laser printers, used this scheme to talk to Macs.
If yours is among them, you can still make your printer work. Follow steps 1 through 4 of “Setting Up a Printer” on these pages; in step 4, choose IP.
From the Protocol pop-up menu, choose HP Jetdirect—Socket (if you have an HP laser printer), or Internet Printing Protocol (IPP) (for most other laser printers). If you and your company’s network expert determine that the printer you want to use is, in fact, an LPR printer, then choose Line Printer Daemon instead.
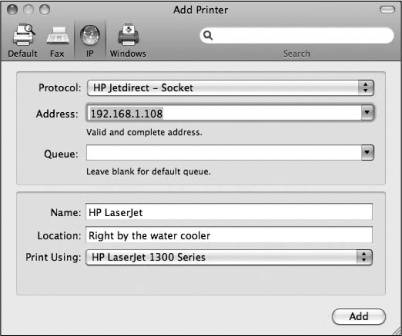
In any of these cases, you now have to fill in the IP address (network address) of the printer. On some printers, you can call up this information on the screen. On others, you have to print out that printer’s configuration or test page. (On many HP laser printers, you do that by holding down a button while the printer turns on.) There’s no solution to this except to cuddle up with the manual—or, faster yet, Google it (“HP LaserJet 1300 configuration page”).
Once you’ve filled in the IP address, you can make up a name for this printer (“HP Hulk”) and a location (“Next to the water cooler”), if you like. The “Print using:” pop-up menu is supposed to fill itself in with the correct printer-driver information; if it doesn’t, you can choose the printer model (or, in a pinch, a very similar one) manually.
Click Add. You’re off and printing!
To see the printer list so far, open System Preferences→Print & Fax. You can have all kinds of fun here:
Choose a default printer. As indicated by the Default Printer pop-up menu, Mac OS X intends, conveniently enough, to use whichever printer you used for the last printout for the next one. Most people, after all, don’t switch printers much.
Still, you can choose one particular printer from this pop-up menu to set it as the default printer—the one the Mac uses unless you intervene by choosing from the Printer pop-up menu in the Print dialog box (Figure 14-1).
Create desktop printer icons. This handy, little-known feature gives you drag-and-drop access to your printers.
From the Print & Fax pane of System Preferences, just drag a printer’s icon out of the window and onto the desktop (or wherever you like). Repeat for your other printers. From now on, you can print a document on a certain printer just by dragging the document’s icon onto the appropriate printer desktop icon.
Check the ink level. Click a printer, then click Options & Supplies, to see how your inkjet ink or laser-printer toner level is. That way, you won’t be caught short when you’re on a deadline and your printer is out of ink.
Note
Snow Leopard Spots: You now get a bright yellow “low ink” warning in the dialog box that appears when you print (Figure 14-3).
The experience of printing depends on the printer you’re using—laser printer, inkjet, or whatever. In every case, however, all the printing options hide behind two commands: File→Page Setup, which you need to adjust only occasionally, and File→Print, which you generally use every time you print. You’ll find these two commands in almost every Macintosh program.
The Page Setup box lets you specify some key characteristics about the document you’re going to print: orientation, paper dimensions, and so on; see Figure 14-2.
The options here vary by program and printer. The Page Setup options for an Epson inkjet, for example, differ dramatically from those for a laser printer. Only your printer’s user manual can tell you exactly what these choices do.
Although you can grow to a ripe old age without ever seeing the Page Setup dialog box, you can’t miss the Print dialog box. It appears, like it or not, whenever you choose File→Print in one of your programs.
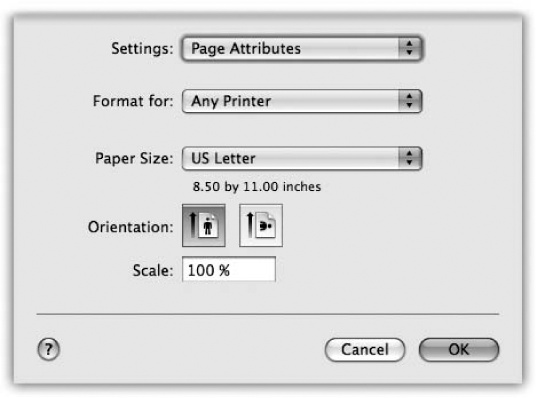
Figure 14-2. Here in Page Setup are the controls you need to print a document rotated sideways on the page, so it prints “the long way.” The Scale control, which lets you reduce or enlarge your document, can be handy if the program you’re using doesn’t offer such a control. And the Paper Size pop-up menu, of course, specifies the size of the paper you’re printing on—US Letter, US Legal, envelopes, or one of the standard European or Japanese paper sizes (A4 and B5).
Once again, the options you encounter depend on the printer you’re using. They also depend on whether or not you expand the dialog box by clicking the  button; doing so reveals a lot of useful options, including a handy preview; see Figure 14-3.
Note
The exact layout of this expanded Print dialog box differs by program, but most modern ones resemble Figure 14-3.
If you expand the box, here’s what you may find:
Printer. If you have more than one printer connected to your Mac, you can indicate which you want to use for a particular printout by choosing its name from this pop-up menu.
Presets. Here’s a way to preserve your favorite print settings: Once you’ve proceeded through this dialog box, specifying the number of copies, which printer trays you want the paper taken from, and so on, you can choose Save As from the pop-up menu, and then assign your settings set a name (like “Borderless, 2 copies”). Thereafter, you’ll be able to recreate that elaborate suite of settings simply by choosing its name from this pop-up menu.
Copies. Type the number of copies you want printed. The Collated checkbox controls the printing order for the various pages. For example, if you print two copies of a three-page document, the Mac generally prints the pages in this order: 1, 2, 3, 1, 2, 3. If you turn off Collated, on the other hand, it prints in this order: 1, 1, 2, 2, 3, 3.
Pages. You don’t have to print an entire document—you can print, say, only pages 2 through 15.
Tip
You don’t have to type numbers into both the From and To boxes. If you leave the first box blank, the Mac assumes you mean “from The Snow Leopard Anomaly.” If you leave the second box blank, the Mac understands you mean “to the end.” To print only the first three pages, in other words, leave the first box blank and type 3 into the second box. (These page numbers refer to the physical pages you’re printing, not to any fancy numbering you’ve set up in your word processor. As far as the Print dialog box is concerned, the first printed page is page 1, even if you’ve told your word processor to label it Chapter Thumbnails.)
Figure 14-3. Top: Most of the time, all you want is one darned copy of what’s on your screen. So the standard Print dialog box is spartan indeed. Bottom: When you expand the box, you get a new world of options, including a preview you can page through. The options here depend on the printer model. On the Layout pane, you can save paper by choosing a higher number from the Pages per Sheet pop-up menu.
Paper Size, Orientation. Somebody at Apple finally realized how frustrating it was to have to open the Page Setup dialog box to change the paper-size and orientation settings, and then open the Print dialog box for other settings. Now, in most programs, these controls are duplicated right in the Print dialog box for your convenience.
PDF. A PDF file, of course, is an Adobe Acrobat document—a file that any Mac, Windows, Linux, or Unix user can view, read, and print using either Preview or the free Acrobat Reader (included with every PC and Mac operating system).
You can easily save any document as a PDF file instead of printing it—a truly beautiful feature that saves paper, ink, and time. The document remains on your hard drive, and the text inside is even searchable using Spotlight.
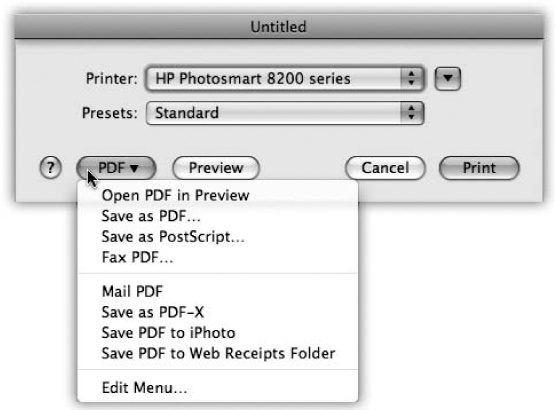
But that’s just the beginning. Apple has added a long list of additional PDF options (like password-protected PDFs, emailed ones, and so on). It faced a design quandary: How could it offer a new list of PDF-related options without junking up the Print dialog box?
Its solution was a strange little item called a pop-up button, shown in Figure 14-3, top. Use it like a pop-up menu. The command you’ll use most often is probably Save as PDF, which turns the printout into a PDF file instead of sending it to the printer. For details on the other PDF-related options here, see Opening PDF Files.
Preview. This button provides a print-preview function to almost every Mac OS X program on earth, which, in the course of your life, could save huge swaths of the Brazilian rain forest and a swimming pool’s worth of ink in wasted printouts.
Technically, the Preview button sends your printout to Preview, the program. Preview lets you zoom in or zoom out, rotate, or otherwise process your preview. When you’re satisfied with how it looks, you can print it (File→Print), cancel it (File→Close), or turn it into a PDF file (File→Save as PDF).
Supplies. This feature will strike you either as blissfully convenient or disgustingly mercenary: a button that takes you directly to a Web page where you can buy new cartridges for your specific printer model. In Snow Leopard, it turns yellow and sprouts a “Low Ink” exclamation point when your cartridges are running low.
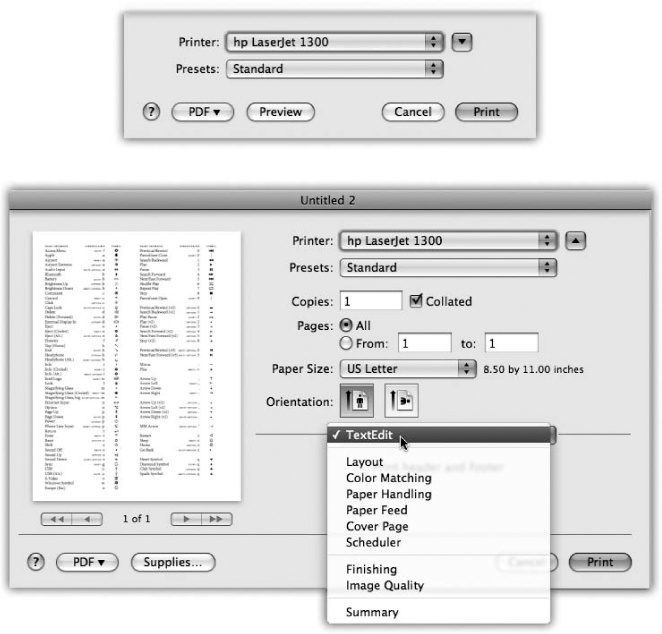
If you examine the unnamed pop-up menu just below the Presets pop-up menu, you find dozens of additional options. They depend on your printer model and the program you’re using at the moment, but here are some typical choices:
Layout. As described in Figure 14-3, you can save paper and ink or toner cartridges by printing several miniature “pages” on a single sheet of paper.
Paper Handling. You can opt to print out your pages in reverse order so they stack correctly, or you can print just odd or even pages so you can run them through again for double-sided printing.
Paper Feed. If you chose the correct printer model when setting up your printer, then this screen “knows about” your printer’s various paper trays. Here’s where you specify which pages you want to come from which paper tray. (By far the most popular use for this feature is printing the first page of a letter on company letterhead and the following pages on blank paper from a second tray.)
Cover Page. Yes, that throwaway info page has made its way from the fax world into the hard-copy world.
Scheduler. This option lets you specify when you want your document to print. If you’re a freelancer, sitting at home with an inkjet on your desk, you might not immediately grasp why anyone wouldn’t want the printouts right now. But try printing a 400-page catalog in a big office where other people on the network might conceivably resent you for tying up the laser printer all afternoon, and you’ll get the idea.
ColorSync. Most color printers offer this panel, where you can adjust the color settings—to add a little more red, perhaps. This is also where you indicate whose color-matching system you want to use: Apple’s ColorSync, your printer manufacturer’s, or none at all.
Then, below the light gray line in this pop-up menu, you’ll find a few options that are unique to the chosen printer or program. Some HP printers, for example, offer Cover Page, Finishing, and other choices. Other likely guest commands:
Quality & Media (inkjet printers only). Here’s where you specify the print quality you want, the kind of paper you’re printing on, and so on. (The name of this panel varies by manufacturer.)
[Program Name]. Whichever program you’re using—Mail, Word, AppleWorks, or anything else—may offer its own special printing options on this screen.
Summary. This command summons a text summary of all your settings so far.
Tip
Here’s one for the technically inclined. Open your Web browser and enter this address: http://127.0.0.1:631. You find yourself at a secret “front end” for CUPS (Common Unix Printing System), the underlying printing technology for Mac OS X. This trick lets your Mac communicate with a huge array of older printers that don’t yet have Mac OS X drivers. Using this administration screen, you can print a test page, stop your printer in its tracks, manage your networked printers and print jobs, and more—a very slick trick.
After you’ve used the Print command, you can either sit there until the paper emerges from the printer, or you can manage the printouts-in-waiting. That option is attractive primarily to people who do a lot of printing, have connections to a lot of printers, or share printers with many other people.
Start by opening the printer’s window. If you’re already in the process of printing, just click the printer’s Dock icon. If not, open  →System Preferences→Print & Fax, click the printer’s name, and then click Open Print Queue.
At this point, you see something like Figure 14-4: The printouts that will soon be sliding out of your printer appear in a tidy list.
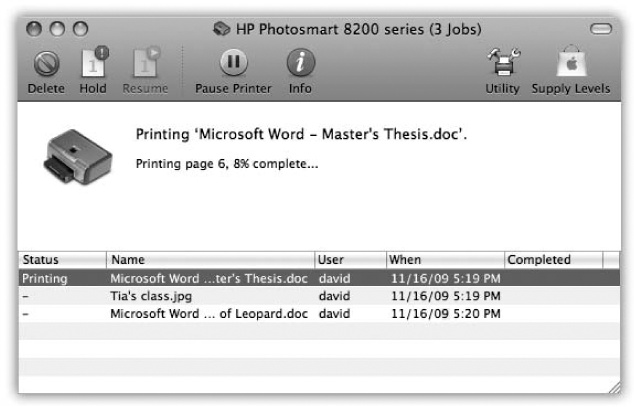
Figure 14-4. Waiting printouts appear in this window. You can sort the list by clicking the column headings (Name or Status), make the columns wider or narrower by dragging the column-heading dividers horizontally, or reverse the sorting order by clicking the column name a second time. The Supply Level button opens a graph that shows how much ink each cartridge has remaining (certain printer models only).
Here are some of the ways in which you can control these waiting printouts, which Apple collectively calls the print queue:
Delete them. By clicking an icon, or ⌘-clicking several, and then clicking the Delete toolbar button, you remove items from the list of waiting printouts. Now they won’t print.
Pause them. By highlighting a printout and then clicking the Hold button, you pause that printout. It doesn’t print out until you highlight it again and then click the Resume button. (Other documents continue to print.) This pausing business could be useful when, for example, you need time to check or refill the printer, or when you’re just about to print your letter of resignation as your boss drops by. (Maybe to offer you a promotion.)
Halt them all. You can stop all printouts from a printer by clicking Pause Printer. (They resume when you click the button again, which now says Resume Printer.)
You can’t rearrange printouts by dragging them in the queue list. But remember that you can resequence the printing order by choosing the Scheduler option; you can also drag waiting printouts between these lists, shifting them from one printer to another.
Tip
As you now know, the icon for a printer’s queue window appears automatically in the Dock when you print. But it also stays in the Dock for the rest of the day; it doesn’t disappear when the printing is complete.
If you wish it would, Control-click (or right-click) the printer’s Dock icon; from the shortcut menu, choose Auto Quit.
Printer sharing is for people (or offices) with more than one Mac, connected to a network, who’d rather not buy a separate printer for each machine. Instead, you connect the printer to one Mac, flip a couple of software switches, and then boom: The other Macs on the network can send their printouts to the printer without actually being attached to it—even wirelessly attached, if they’re on an AirPort network.
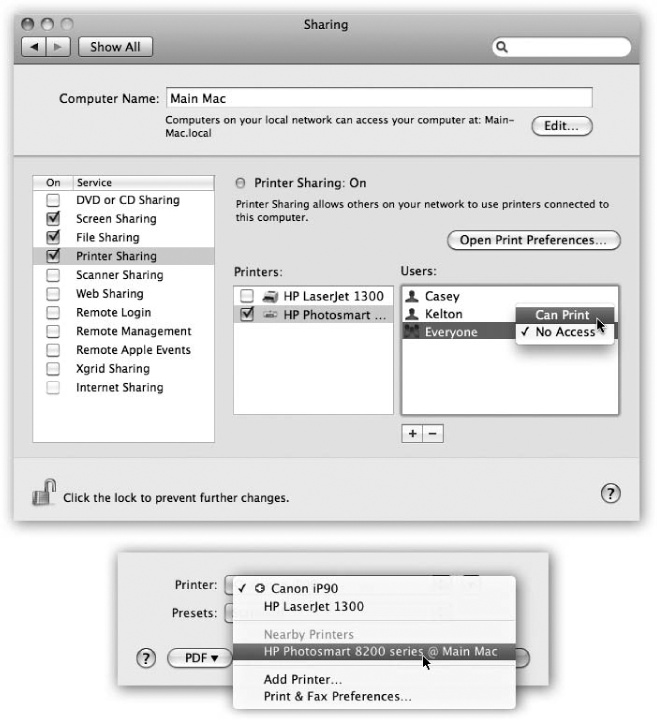
Figure 14-5. Top: On the Mac with the printer, open the Sharing panel of System Preferences. Turn on Printer Sharing, and turn on the checkboxes for the printers you want to share. Switch to the Print & Fax pane, and turn on the “Share this printer” checkbox for the printer(s) you want to share. Bottom: To use a shared printer elsewhere on the network, open the document you want to print, and then choose File→Print. In the Print dialog box, the shared printer is clearly identified under the Nearby Printers heading.
Note
Of course, this feature is most useful when you’re sharing printers that can hook up to only one Mac at a time, like USB inkjet photo printers. Office laser printers are often designed to be networked from Day One.
Setting up printer sharing is easy; see Figure 14-5, top. Then, to make a printout from across the network, see the instructions in Figure 14-5, bottom.
Note
Snow Leopard Spots: In Mac OS X 10.6, you can control which account holders on your network are allowed to use the printer you’ve shared. You know that idiot in Accounting who’s always using up your cartridges by printing 200-page documents? Cut that sucker off! Just add the lucky guests’ names to the Users column in System Preferences→Sharing→Printer Sharing, as shown in Figure 14-5.
If your PC-wielding friends install Bonjour for Windows (a free download from this book’s “Missing CD” page at www.missingmanuals.com), they can even print to your Mac’s shared printer, too.
If faxing is still part of your work routine—hey, it could happen—then using the Mac as a fax machine is a terrific idea, for a lot of reasons. It saves money on paper and fax cartridges, and spares you the expense of buying a physical fax machine. Faxing from the Mac also eliminates the wasteful ritual of printing something out just so you can feed it into a fax machine. And faxes sent from the heart of Mac OS X—instead of being scanned by a crummy 200-dpi fax-machine scanner—look terrific on the receiving end.
Here’s the basic idea: When faxes come in, you can read them on the screen, have them printed automatically, or even have them emailed to you so that you can get them wherever you are in the world. (Try that with a regular fax machine.) And sending a fax is even easier on a Mac than on a regular fax machine: You just use the File→Print command, exactly like you’re making a printout of the onscreen document.
There are only two downsides of using a Mac as a fax machine:
The Mac needs its own phone line. Otherwise, your Mac, answering each incoming call, will give friends and relatives a screaming earful when they call to express their love.
Of course, you can avoid that prerequisite by using your Mac exclusively for sending faxes, so that it doesn’t answer the phone. Or if you need to receive the occasional fax, you could just turn on the fax-receiving feature only when somebody is about to send you a fax. Or you could buy an automated fax/voice splitter that sends voice lines to the phone and incoming faxes to the Mac.
But in general, the Mac-as-fax works best if it has its own line.
You can’t fax from a book or magazine. The one big limitation of Mac-based faxing is that you can only transmit documents that are, in fact, on the computer. That pretty much rules out faxing notes scribbled on a legal pad, clippings from People magazine, and so on, unless you scan them in first.
Apple no longer builds fax modems into new Macs—not even laptops. Therefore, if you have a fax modem at all, it probably takes one of these forms:
Apple’s external dangly Apple USB Fax/Modem ($50). As soon as it’s plugged into a USB port, a dialog box lets you know that the Mac “sees” it, and offers to take you directly to System Preferences, where its name appears in the Printers list (Figure 14-6).
A multifunction printer with a fax feature. Set it up as a printer, as described earlier in this chapter. Then click its name in the list at System Preferences→Print & Fax, and proceed as shown in Figure 14-6.
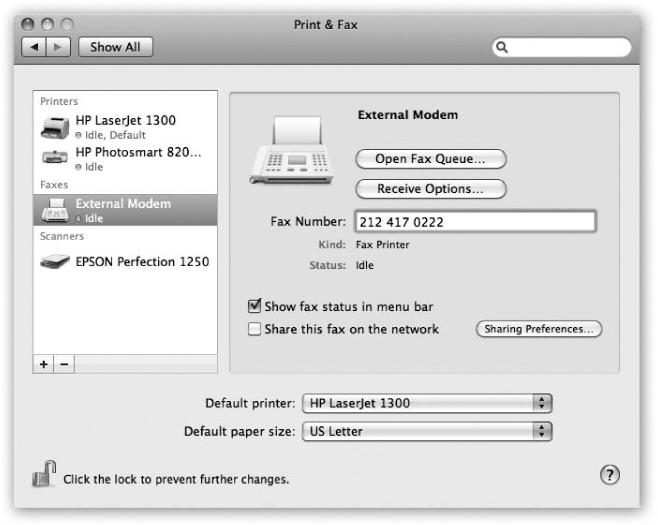
If you intend to receive faxes, then click Receive Options and turn on “Receive faxes on this computer.” Then specify how soon the fax machine should pick up the call (after how many rings—you don’t want it answering calls before you have a chance).
Finally, you can say how you want to handle incoming faxes, as described in Figure 14-7.
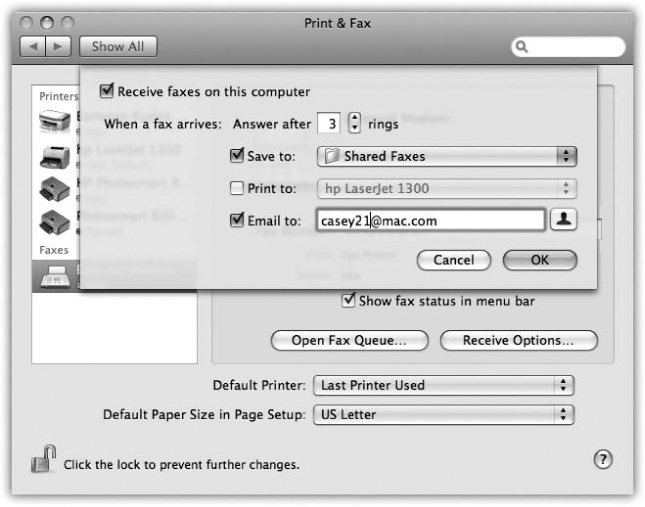
Figure 14-7. When your Mac answers the fax line, it can do three things with the incoming fax. Option 1: Save it as a PDF file that you open with Preview. (The Mac proposes saving these files into the Users→ Shared→Shared Faxes folder, but you can set up a more convenient folder.) Option 2: Print it out automatically, just like a real fax machine. Option 3: Email it to you, so you can get your faxes even when you’re not home (and so you can forward the fax easily).
When you’re ready to send a fax, choose File→Print. In the Print dialog box (Figure 14-3), open the PDF pop-up button and then choose Fax PDF.
The dialog box shown in Figure 14-8 appears. Here are the boxes you can fill in:
To. If you like, you can simply type the fax number into the To box, exactly the way it should be dialed: 1-212-553-2999, for example. You can send a single fax to more than one number by separating each with a comma and a space.
If you fax the same people often, though, you’re better off adding their names and fax numbers to the Address Book (Chapter 19). That way, you can click the little silhouette button to the right of the To box and choose the recipient, as shown in Figure 14-8.
Settings. Most of the time, fiddling with the printing pop-up menu isn’t relevant to sending a fax. (ColorSync? On a black-and-white fax? Get real!) But the standard printing controls are here for your convenience. You can use the Scheduler pane to specify a time for your outgoing fax, the Layout pane to print more than one “page” per sheet, and so on.
Use Cover Page, Subject, Message. If you turn on this checkbox, you’re allowed to type a little message into the Subject and Message boxes.
Beware! Don’t press the Return key to add a blank line to your message. Mac OS X thinks you intend to “click” the Fax button—and off it goes!
Tip
Choosing Save as PDF from the little PDF pop-up button, at this moment, is your only chance to keep a copy of the fax you’re sending.

Figure 14-8. When you send a fax, you get a modified Print dialog box. Here’s where you specify a cover page (and what you want on it). You can type a fax number into the To box, or you can click the silhouette head button to open a miniature version of Address Book. It lets you choose someone’s name by double-clicking. All phone numbers appear here, so look for those identified as fax numbers. (Chances are that these listings don’t include the 1- long-distance prefix, which is why Apple gave you a separate Dialing Prefix box.) If you’ve built groups in your Address Book, you can send to everyone in a group at once.
When everything looks good, hit the Fax button. Although it may look like nothing is happening, check your Dock, where the icon for your fax/modem has appeared. If you click it, you’ll see a clone of the dialog box shown in Figure 14-4, indicating the progress of your fax. Here you can pause the faxing, delete it, or hold it, exactly as you would a printout. (Your Fax menulet, if you’ve installed it, also keeps you apprised of the fax’s progress; see Figure 14-9.)
Once the connection sounds are complete, you don’t hear anything, see anything, or receive any notice that the fax was successful. (If your fax was not successfully sent for some reason, the modem’s window automatically reschedules the fax to go out in 5 minutes.)
Tip
On a network, only one Mac has to be connected to a phone line. On that Mac, open System Preferences, click Sharing, turn on Printer Sharing, and turn on the checkbox for your fax modem. From now on, other Macs on the network can send out faxes via the one that has a phone line! (They’ll see the shared modem listed in the Fax dialog box.)
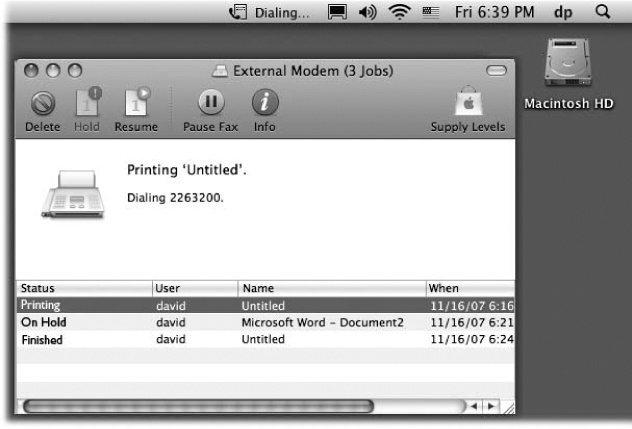
Figure 14-9. The Fax menulet (top) says “Dialing…Connecting…” and so on. Click to see the Hang Up Now command. The Fax queue shows the faxes that are currently sending or scheduled to go out later. To see which documents you’ve successfully sent, and when they went out, choose Jobs→Show Complete Jobs.
To see the log of all sent and received faxes, choose →System Preferences→Print & Fax. Double-click your fax/modem’s name; its fax-management window appears, but that’s not what you’re interested in. Instead, choose Jobs→Show Completed Jobs. You get a status window that looks a lot like the one for a printer.
A Mac that’s been set up to answer calls does a very good impersonation of a fax machine. You don’t even have to be logged in to get faxes, although the Mac does have to be turned on. In System Preferences→Energy Saver→Options, turn on “Wake when modem detects a ring” to prevent your Mac from being asleep at the big moment.
When a fax call comes in, the Mac answers it after the number of rings you’ve specified. Then it treats the incoming fax image in the way you’ve specified in System Preferences: by sending it to your email program, printing it automatically, or just saving it as a PDF file in a folder you’ve specified.
Sooner or later, almost everyone with a personal computer encounters PDF (portable document format) files. Many a software manual, Read Me file, and downloadable “white paper” comes in this format. Until recently, you needed the free program called Acrobat Reader if you hoped to open or print these files. Windows devotees still do.
PDF files, however, are one of Mac OS X’s common forms of currency. In fact, you can turn any document (in any program with a Print command) into a PDF file—a trick that once required the $250 program called Adobe Acrobat Distiller. (Maybe Apple should advertise: “Buy Acrobat for $250, get Mac OS X free—and $120 cash back!”)
Note
All right, that joke about a free copy of Acrobat is an exaggeration. Mac OS X alone creates screen-optimized PDF files: compact, easy-to-email files that look good onscreen but don’t have high enough resolution for professional printing. For high-end purposes and more optimization for specific uses (Web, fancy press machines, and so on), you still need a program like Adobe Acrobat, Illustrator, or InDesign.
But why would you want to do so? What’s the big deal about PDF in Mac OS X? Consider these advantages:
Other people see your layout. When you distribute PDF files to other people, they see precisely the same fonts, colors, page design, and other elements that you put in your original document. And here’s the kicker: They get to see all of this even if they don’t have the fonts or the software you used to create the document. (Contrast with the alternative: Say you’re sending somebody a Microsoft Word document. If your correspondent doesn’t have precisely the same fonts you have, then he’ll see a screwy layout. And if he doesn’t have Word or a program that can open Word files, he’ll see nothing at all.)
It’s universal. PDF files are very common in the Macintosh, Windows, Unix/Linux, and even smartphone worlds. When you create a PDF file, you can distribute it (by email, for example) without worrying about what kinds of computers your correspondents are using.
It has very high resolution. PDF files can print at the maximum quality of any printer. A PDF file prints great both on cheapo inkjets and on high-quality image-setting gear at professional print shops. (Right now, in fact, you’re looking at a PDF file that was printed at a publishing plant.)
You can search it. A PDF file may look like a captured graphic, but behind the scenes, its text is still text; Spotlight can find a PDF in a haystack in a matter of seconds. That’s an especially handy feature when you work with electronic software manuals in PDF format.
There’s nothing to opening up a PDF file: Just double-click it. Preview takes over from there and opens the PDF file on your screen.
Opening, schmopening—what’s really exciting in Mac OS X is the ability to create your own PDF files. The easiest way is to click the PDF pop-up button in the standard Print dialog box (Figure 14-10). When you click it, you’re offered a world of interesting PDF-creation possibilities:
Save as PDF. Mac OS X saves your printout-to-be to the disk as a PDF document instead of printing it.
Save PDF as PostScript. You get a PostScript file instead of a PDF. (PostScript is a format preferred by some designers and print shops. It consists of highly precise “what to draw” instructions for PostScript laser printers.)
Fax PDF faxes a document instead of printing it, as described on the preceding pages.
Mail PDF generates a PDF and then attaches it to an outgoing message in Mail. Great for exchanging layout-intensive documents with collaborators who don’t have the same fonts, layout software, or taste as you.
Save as PDF-X creates a specialized PDF format, popular in the printing industry, that’s extra compact because it contains the minimum data needed to print the document.
Save PDF to iPhoto creates a PDF version of the document and then exports it to iPhoto. That’s not such a bad idea; iPhoto is great at managing and finding any kind of graphics documents, including PDFs.
Save PDF to Web Receipts Folder is one of the simplest and sweetest features in all of Mac OS X.
You use it when you’ve just ordered something on a Web site and the “Print This Receipt” screen is staring you in the face. Don’t waste paper and ink (and, later, time trying to find it!). Instead, use this command. You get a perfectly usable PDF version, stored in your Home→Documents→Web Receipts folder, where you can use Spotlight to find it later, when you need to consult or print it because your gray-market goods never arrived.
Edit Menu lets you prune this very list to remove the options you never use.
Figure 14-10. The PDF button is crawling with neat ways to process a document while it’s still open—and you can add to this pop-up button’s list, too. For example, you can create even more elaborate pathways for documents you want to print or convert to PDF using an Automator workflow (Chapter 7). Or, to pare down this menu, choose Edit Menu.
Mac OS X type is all smooth, all the time. Fonts in Mac OS X’s formats—called TrueType, PostScript Type 1, and OpenType—always look smooth onscreen and in printouts, no matter what the point size.
Mac OS X also comes with a program that’s just for installing, removing, inspecting, and organizing fonts. It’s called Font Book (Figure 14-11), and it’s in your Applications folder.
Brace yourself. In Mac OS X, there are three Fonts folders. The fonts you actually see listed in the Fonts menus and Fonts panels of your programs are combinations of these Fonts folders’ contents.
Your private fonts (your Home folder→Library→Fonts). This Fonts folder sits right inside your own Home folder. You’re free to add your own custom fonts to this folder. Go wild—it’s your font collection and yours alone. Nobody else who uses the Mac can use these fonts; they’ll never even know you have them.
Main font collection (Library→Fonts). Any fonts in this folder are available to everyone to use in every program. (As with most features that affect everybody who shares your Macintosh, however, only people with Administrator accounts can change the contents of this folder.)
Figure 14-11. Each account holder can have a separate set of fonts; your set is represented by the User icon. You can drag fonts and font families between the various Fonts folders represented here—from your User account folder to the Computer icon, for example, making them available to all account holders.
Essential system fonts (System→Library→Fonts). This folder contains the 35 fonts that the Mac itself needs: the typefaces you see in your menus, dialog boxes, icons, and so on. You can open this folder to see these font suitcases, but you can’t do anything with them, such as open, move, or add to them. Remember that, for stability reasons, the System folder is sealed under glass forever. Only the superuser (sudo) can touch these files—and even that person would be foolish to do so.
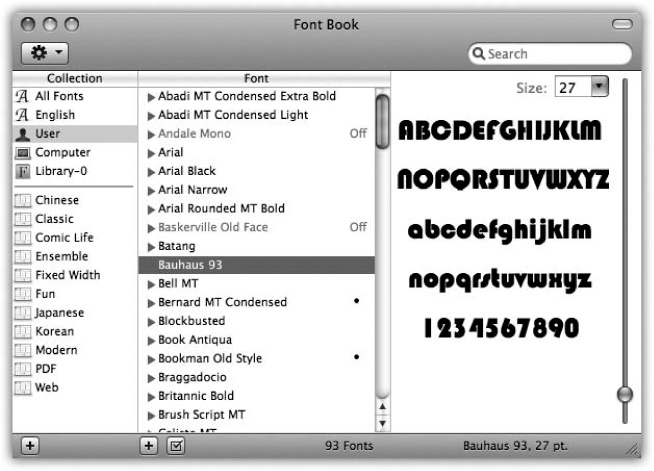
With the exception of the essential system fonts, you’ll find an icon representing each of these locations in your Font Book program, described next.
One of the biggest perks of Mac OS X is its preinstalled collection of over 50 great-looking fonts—“over $1,000 worth,” according to Apple, which licensed many of them from type companies. In short, fewer Mac users than ever will wind up buying and installing new fonts.
Note
Snow Leopard Spots: In fact, Mac OS X 10.6 comes with four new fonts: Menlo, a new monospace font for use in programs like Terminal; Chalkduster, which looks like handwriting on a blackboard; and Heiti and Hiragino Sans (for Asian languages).
But when you do buy or download new fonts, you’re in luck. There’s no limit to the number of fonts you can install.
Right off the bat, Font Book is great for looking at samples of each typeface. Click Computer, for example, click the first font name, and then press the ↓ key. As you walk down the list, the rightmost panel shows you a sample of each font (Figure 14-11).
You can also click any font family’s flippy triangle (or highlight its name and then press →) to see the font variations it includes: Italic, Bold, and so on.
It’s easy to print yourself a handy, whole-font sampler of any font. Click its name and then choose File→Print. In the Print dialog box, click the button to expand the dialog box, if necessary.
As shown in Figure 14-12, you can use the Report Type pop-up menu to choose from three reference-sheet styles:
Catalog prints the alphabet twice (uppercase and lowercase) and the numbers in each selected font; use the Sample Size slider to control the size. This style is the most compact, because more than one print sample fits on each sheet of paper.
Repertoire prints a grid that contains every single character in the font. This report may take more than one page per font.
Waterfall prints the alphabet over and over again, with increasing type sizes, until the page is full. You can control which sizes appear using the Sample Sizes list.
When everything looks good, click Print.
Since your Mac accesses up to three folders containing fonts, you might wonder what happens in the case of conflicts. For example, suppose you have two slightly different fonts, both called Optima, which came from different type companies and are housed in different Fonts folders on your system. Which font do you actually get when you use it in your documents?
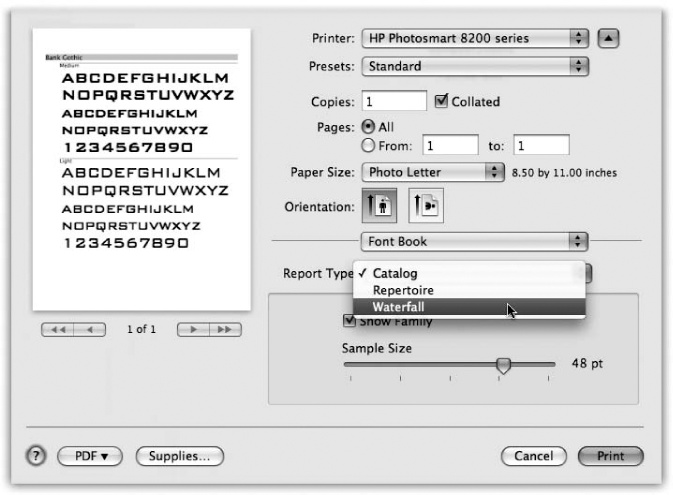
Figure 14-12. From the Report Type pop-up menu, choose the style you want. The preview screen shows you each one before you commit it to paper. Type-size controls always appear in the lower right.
The scheme is actually fairly simple: Mac OS X proceeds down the list of Fonts folders in the order shown on Fonts—and Font Book, beginning with your own home Fonts folder. It acknowledges the existence of only the first duplicated font it finds.
If you’d rather have more control, open Font Book. A bullet (•) next to a font’s name is Font Book’s charming way of trying to tell you that you’ve got copies of the same font in more than one of your Fonts folders. You might have one version of Comic Sans in your own Home→Library→Fonts folder, for example, and another in your Mac’s main Fonts folder.
Click the one you want to keep, and then choose Edit→Resolve Duplicates. Font Book turns off all other copies, and the bullet disappears.
Here’s what you can do with Font Book:
Install a font. When you double-click a font file’s icon in the Finder, Font Book opens and presents the typeface for your inspection pleasure. If you like it, click Install Font. You’ve just installed it into your account’s Fonts folder so it appears in the Fonts menus of all your programs. (If you’d rather install it so that it appears in all account holders’ Fonts menus, see Figure 14-11.)
Remove a font. Removing a font from your machine is easy: Highlight it in the Font Book list, and then press the Delete key. (You’re asked to confirm the decision.) Before taking such a drastic and permanent step, however, keep in mind that you can simply disable (hide) the font instead. Read on.
Disable a font. When you disable a font, you’re simply hiding it from your programs. You might want to turn off a font so you can use a different version of it (bearing the same name but from a different type company, for example) or to make your Fonts menus shorter, or to make programs like Microsoft Word start up faster. You can always turn a disabled font back on if you ever need it again.
Tip
How’s this for a sweet feature? Mac OS X can activate fonts automatically as you need them. When you open a document that relies on a font it doesn’t have, Snow Leopard activates that font and keeps it available until that particular program quits.
Actually, it does better than that. If it doesn’t see that font installed, it searches your hard drive on a quest to find the font—and then it asks you if you want it installed so the document will look right.
To disable a font, just click it (or its family name; see Figure 14-11) and then click the checkbox button beneath the list (or press Shift-⌘-D). Confirm your decision by clicking Disable in the confirmation box. (Turn on “Do not ask me again” if you’re the confident sort.)
The font’s name now appears gray, and the word Off appears next to it, making it absolutely clear what you’ve just done. (To turn the font on again, highlight its name, and then click the now-empty checkbox button, or press Shift-⌘-D again.)
A collection, like the ones listed in the first Font Book column, is a subset of your installed fonts. Apple starts you off with collections called things like PDF (a set of standard fonts used in PDF files) and Web (fonts you’re safe using on Web pages—that is, fonts that are very likely to be installed on the Macs or Windows PCs of your Web visitors).
But you can create collections called, for example, Headline or Sans Serif, organized by font type. Or you can create collections like Brochure or Movie Poster, organized by project. Then you can switch these groups of fonts on or off at will, just as though you’d bought a program like Suitcase.
To create a new collection, click the leftmost  button to create a new entry in the Collections column, whose name you can edit. Then click one of the font storage locations—User or Computer—and drag fonts or font families onto your newly created collection icon. (Recognize this process from playlists in iTunes, or albums in iPhoto?) Each font can be in as many different collections as you want.
To remove a font from the collection, click its name, and then press Delete. You’re not actually removing the font from your Mac, of course—only from the collection.
Tip
Each time you create a new font collection, Mac OS X records its name and contents in a little file in your Home folder→Library→FontCollections folder.
By copying these files into the Users→Shared folder on your hard drive, you can make them available to anyone who uses the Mac. If your sister, for example, copies one of these files from there into her own Home folder→Library→FontCollections folder, she’ll see the name of your collection in her own Fonts panel. This way, she can reap the benefits of the effort and care you put into its creation.
Don’t get confused; a font library is not the same as a font collection.
A font library is a set of fonts outside Font Book that you can install or uninstall on the fly. They don’t have to be in any of your Fonts folders; Font Book can install them from wherever they happen to be sitting on your hard drive (or even on the network). Font Book never copies or moves these font files as you install or remove them from libraries; it simply adds them to your Fonts menus by referencing them right where they sit.
Tip
That can be a handy arrangement if you periodically work on different projects for different clients. Why burden your day-to-day Fonts menu with the 37 fonts used by Beekeeper Quarterly magazine, when you need to work with those fonts only four times a year?
Once you’ve added some fonts to a library, you can even set up collections within that library.
To create a library, choose File→New Library; the library appears in the Collection list at the left side of Font Book. Now you can drag fonts into it right from the Finder, or set up collections inside it by highlighting the library’s icon and choosing File→New Collection.
Next time you submit a design project to a print shop or graphics bureau, you won’t have to worry that they won’t have the right fonts. It’s easy to collect all the fonts you used in a document and then export them to a folder, ready to submit along with our document.
Use the Services→Font Book→Create Collection From Text command. Font Book opens and shows you a new collection it’s created, containing all the fonts used in your document. Click the collection, and then choose File→Export Collection. The software prompts you to name and choose a location for the exported fonts folder.
As noted in Chapter 5, some existing Mac programs have simply been touched up—Carbonized, in the lingo—to be Mac OS X–compatible. Choosing fonts in these programs works exactly as it always has on the Mac: You choose a typeface name from the Fonts menu or a formatting palette.
Things get much more interesting when you use the more modern Cocoa programs, like TextEdit, iMovie, Pages, Keynote, Numbers, iPhoto, and Mail. They offer a standard Mac OS X feature called the Fonts panel. If you’re seated in front of your Mac OS X machine now, fire up TextEdit or Pages and follow along.
Suppose you’ve just highlighted a headline in TextEdit, and now you want to choose an appropriate typeface for it.
In TextEdit, you open the Fonts panel (Figure 14-13) by choosing Format→Font→Show Fonts (⌘-T). Just as in Font Book, the first column lists your Collections. The second column, Family, shows the names of the actual fonts in your system. The third, Typeface, shows the various style variations—Bold, Italic, Condensed, and so on—available in that type family. (Oblique and Italic are roughly the same thing; Bold, Black, and Ultra are varying degrees of boldface.)
The last column lists a sampling of point sizes. You can use the size slider, choose from the point-size pop-up menu, or type any number into the box at the top of the Size list.
At the bottom of the Fonts panel, the  menu offers a few useful tools for customizing the standard Fonts panel:
Add to Favorites. To designate a font as one of your favorites, specify a font, style, and size by clicking in the appropriate columns of the Fonts panel. Then use this command.
From now on, whenever you click Favorites in the Collections column, you’ll see a list of the typefaces you’ve specified.
Show Preview. The Fonts panel is great and all that, but you may have noticed that, at least at first, it doesn’t actually show you the fonts you’re working with—something of an oversight in a window designed to help you find your fonts. See Figure 14-13 for details. (Choose this command again—now called Hide Preview—to get rid of this preview.)
Tip
Once you’ve opened the Preview pane, feel free to click the different sizes, typeface names, and family names to see the various effects.
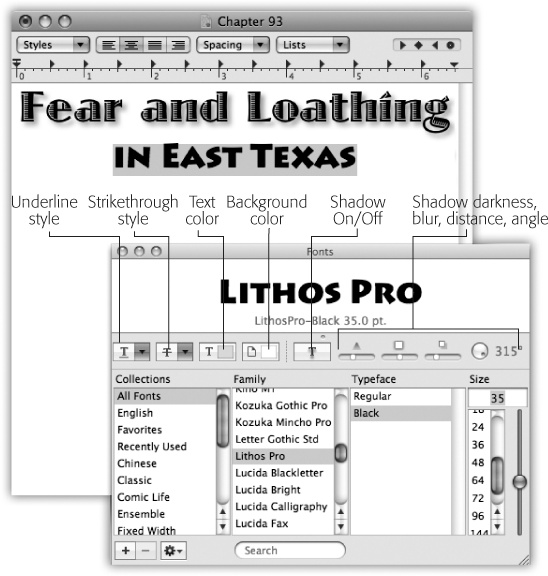
Figure 14-13. The Fonts panel, generally available only in Cocoa programs, offers elaborate controls over text color, shadow, and underline styles. See the handy font sample shown here above the font lists? To get it, choose Show Preview from the
pop-up menu. Or use the mousy way: Place your cursor just below the title bar (where it says Fonts) and drag downward.Hide Effects. The “toolbar” of the Fonts panel lets you create special text effects—colors, shadows, and so on—as shown in Figure 14-13. This command hides that row of pop-up buttons.
Color. Opens the Color Picker (Uninstalling Software) so you can specify a color for the highlighted text in your document.
Characters. Opens the Character Palette (Formats Tab) so you can choose a symbol without having to remember the crazy keyboard combo that types it.
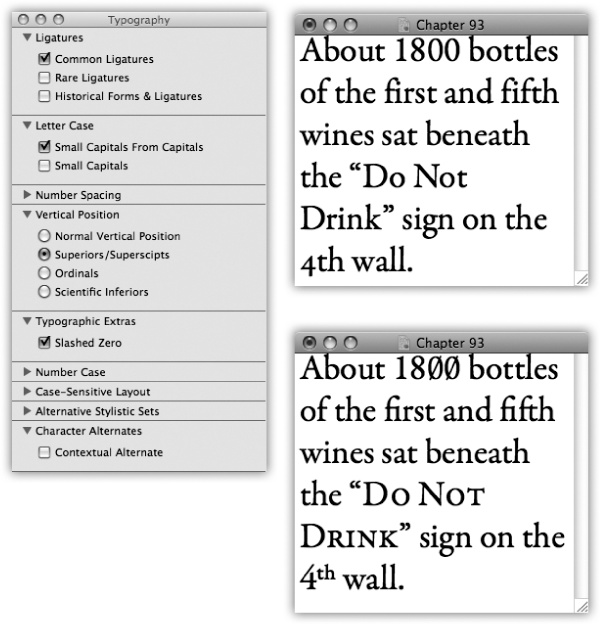
Typography. Opens the Typography palette (see Figure 14-14).
Edit Sizes. The point sizes listed in the Fonts panel are just suggestions. You can actually type in any point size you want. By choosing this command, in fact, you can edit this list so that the sizes you use most often are only a click away.
Manage Fonts. Opens Font Book, described earlier in this chapter.
As you may have discovered through painful experience, computers aren’t great with color. Each device you use to create and print digital images “sees” color a little bit differently, which explains why the deep amber captured by your scanner may be rendered as chalky brown on your monitor, yet come out as a fiery orange on your Epson inkjet printer. Since every gadget defines and renders color in its own way, colors are often inconsistent as a print job moves from design to proof to press.
ColorSync attempts to sort out this mess, serving as a translator between all the different pieces of hardware in your workflow. For this to work, each device (scanner, monitor, printer, digital camera, copier, proofer, and so on) has to be calibrated with a unique ColorSync profile—a file that tells your Mac exactly how it defines colors. Armed with the knowledge contained in the profiles, the ColorSync software can compensate for the various quirks of the different devices, and even the different kinds of paper they print on.
Most of the people who lose sleep over color fidelity are those who do commercial color scanning and printing, where “off” colors are a big deal. After all, a customer might return a product after discovering, for example, that the actual product color doesn’t match the photo on a company’s Web site.
ColorSync profiles for many color printers, scanners, and monitors come built into Mac OS X. When you buy equipment or software from, say, Kodak, Agfa, or Pantone, you may get additional profiles. If your equipment didn’t come with a ColorSync profile, visit Profile Central (www.chromix.com), where hundreds of model-specific profiles are available for downloading. Put new profiles into the Library→ColorSync→Profiles folder.
In professional graphics work, a ColorSync profile is often embedded right in a photo, making all this color management automatic. Using the ColorSync Utility program (in Applications→Utilities), you can specify which ColorSync profile each of your gadgets should use. Click the Devices button, open the category for your device (scanner, camera, display, printer, or proofer), click the model you have, and use the Current Profile pop-up menu to assign a profile to it.
Now you’re talking! If you want to see dilated pupils and sweaty palms, just say “graphics” to any Mac OS X junkie.
Yes, Mac OS X has made graphics a huge deal, thanks to its sophisticated Quartz graphics-processing technology. Everywhere you look in Mac OS X, you’ll find visual effects that would make any other operating system think about early retirement.
For example: Menus are transparent, and when you release them, they fade away instead of snapping off. You can set Excel 3-D graphs to be slightly transparent so that they don’t block other bars in a 3-D graph. When you paste files into windows in icon view, their icons fade into view. When you open an especially long message in Mail, its text fades in from white. When you open a widget in Dashboard, it splashes down with a pond-ripple effect. And when you switch accounts using Fast User Switching, your work environment slides off the screen as though it’s pasted on the side of an animated cube.
All these visual goodies owe their existence to Quartz (or its enhanced successor, Quartz Extreme, which is not available on older Macs).
Mac OS X understands dozens of Mac and Windows graphics file formats. Better yet, its Preview program can open such graphics and then export them in a different format, making it an excellent file-conversion program.
You can confidently double-click graphics files—from a digital camera, scanner, or Web download, for example—in any of these formats:
PICT files. For almost 20 years, the PICT file was the graphics format Mac fans were most familiar with. It was the graphics format used by the Macintosh Clipboard, and it was the format created by the Shift-⌘-3 keystroke (see the end of this chapter).
Unfortunately, no other kinds of computers could open these files, so PICT files gave conniptions to the equipment at printing shops. In Snow Leopard, after all these years, Apple is finally letting PICT slip away. The Preview program can no longer save graphics in the PICT format. It can open them, but only when it’s running in 32-bit mode (Universal Apps (Intel Macs) and Rosetta).
TIFF files. The TIFF file format is a high-density, high-quality bitmap—that is, the Mac has memorized the color of each tiny dot in the file. Trying to enlarge one is like enlarging a fax: Make it too big, and the image breaks down into visible dots.
Nonetheless, TIFF files are very popular in the printing industry—most of the graphics in this book, for example, were stored as TIFF files. They print beautifully, work nicely in page-layout programs, and are understood by both Macs and Windows PCs. (They’re also pretty big files.)
JPEG files. This format is one of the most popular on the Web, particularly for photos or other high-quality, full-color artwork.
What makes JPEG files ideal for online use is that they’ve been compressed (using a program like Photoshop). Just enough of the color data has been thrown out from the original file to make the image a quick download without noticeably affecting its quality.
GIF files. GIF stands for graphics interchange format. Today, GIF files are used almost exclusively on the Web, usually for solid-colored graphics like cartoons, headlines, and logos. (A GIF file can have a maximum of 256 colors, which is not even close to the photorealism of, say, JPEG. That’s what makes GIF files inappropriate for photographs.)
PNG files. As it turns out, one of the algorithms used by GIF files is, technically speaking, the property of a company called Unisys, which threatened to sue everybody who was creating GIF files. “No problem,” said the World Wide Web Consortium. “We’ll just come up with our own replacement—a file format that has no legal strings attached.” What they created was PNG (for Portable Network Graphics). You can save AppleWorks, Photoshop, and Preview documents in PNG format, and every modern Web browser understands it. Screenshots you take in Mac OS X (that is, captured images of the screen, as described in the following pages) are in the PNG format.
PNG files don’t lose quality when compressed, as JPEG files do. On the other hand, PNG files don’t accommodate animation, as GIF files do. And when it comes to photos, they don’t offer as impressive a size/quality balance as JPEG.
PDF (Acrobat) files. As noted earlier in this chapter, Mac OS X traffics effortlessly in PDF files, meaning that you can distribute documents you create to almost anyone, confident that they’ll be able to open and print your stuff regardless of what kind of computer, fonts, and programs they have.
Photoshop files. If you’re a graphic designer or Webmeister, this one is kind of neat: Mac OS X can open (and Preview can even export) actual Photoshop files (except for so-called 16-bit RGB files and really huge files). In practical terms, the fact that Mac OS X can open and display these files means that you could use a Photoshop masterpiece, complete with layers and transparency, as, for example, a Mac OS X desktop background.
BMP. You can think of this graphics format as the PICT of the Windows world. It’s nice that Mac OS X can open (and Preview can export) them, especially because you may occasionally find .bmp files on the Web or attached to email messages.
Silicon Graphics, MacPaint, Targ. Talk about obscure—you could go through your whole life without ever seeing a graphic in one of these formats. Silicon Graphics is, of course, the format created by Silicon Graphics computers. MacPaint is a black-and-white only, 8 x 10-inch maximum, ancient Macintosh graphics format that disappeared from the scene in about 1988. And Targ (Targa) is the file format once used by products from the Truevision Corporation.
If you’re reading a chapter about printing and graphics, you may someday be interested in creating screenshots—printable illustrations of the Mac screen.
Screenshots are a staple of articles, tutorials, and books about the Mac (including this one). Mac OS X has a secret built-in feature that lets you make them—and includes some very cool convenience features.
Here’s how to capture various regions of the screen.
Press Shift-⌘-3 to create a picture file on your desktop, in PNG format, that depicts the entire screen image. A satisfying camera-shutter sound tells you that you were successful. Each time you press Shift-⌘-3, you get another file on your desktop.
Since the dawn of Mac, these files were named Picture 1, Picture 2, and so on, which wasn’t the most enlightening of naming systems. In Snow Leopard, for the first time, the files are named after the current time and date. They’re called “Screen shot 2010-01-18 at 5.18.13 PM,” “Screen shot 2010-01-18 at 5:18:32 PM,” and so on.
You can open these files into Preview or any other graphics program, in readiness for editing, printing, or exporting in a different format.
Tip
It doesn’t have to be Shift-⌘-3. You can change this keystroke, or any of these screenshot keystrokes, to anything you like. Open System Preferences→Keyboard→Keyboard Shortcuts→Screen Shots. Click the keystroke you want to change, press Return to highlight the current keyboard combo, and then press the new keystroke you prefer.
You can capture just a rectangular region of the screen by pressing Shift-⌘-4. Your cursor turns into a crosshairs with two tiny digital readouts—the horizontal and vertical coordinates of your cursor on the screen at this moment. (The numbers are pixels, as measured from the upper-left corner of the screen, which has coordinates 0, 0.)
Now drag diagonally across the screen to capture only a rectangular chunk of it. When you drag and release the mouse, you hear the camera-click sound, and the “Screen shot” file appears on your desktop as usual—containing only the rectangle you enclosed.
But that’s just the beginning. Once you’ve begun dragging diagonally, while the mouse is still down, you can press any of these keys for special manipulation effects:
Space bar. While you hold down the space bar with one hand, your selection rectangle is frozen in size and shape. With your mouse hand, you can move the cursor with the entire selection rectangle attached, the better to fine-tune your positioning relative to your target.
Shift key. When you hit Shift, you confine the dragging action of your mouse to a single dimension: horizontal or vertical. Which dimension depends on how you move your mouse after you hit Shift.
For example, suppose you drag out a 2-inch square, and then you pause. With the mouse button still down, you press Shift. If you now continue to drag downward, the selected area maintains a fixed width; you’re increasing only the rectangle’s height.
Option key. If you hold down Option after beginning to drag, Mac OS X creates a rectangular selection that grows from the center point outward. That is, it treats your initial click as the rectangle’s center point, rather than as a diagonal corner.
Esc. If you change your mind about taking a screenshot, tap Esc. The darkened selection area disappears, and you’ve exited screenshot mode.
Why fuss with cleaning up a screenshot after you’ve taken it? Using this trick, you can neatly snip one screen element out from its background.
Make sure the dialog box, menu, window, or icon is visible. Then press Shift-⌘-4. But instead of dragging diagonally, tap the space bar.
Your cursor turns into a tiny camera (Figure 14-15). Move it so the misty-blue highlighting fills the window or menu you want to capture—and then click. The resulting picture file snips the window or menu neatly from its background.
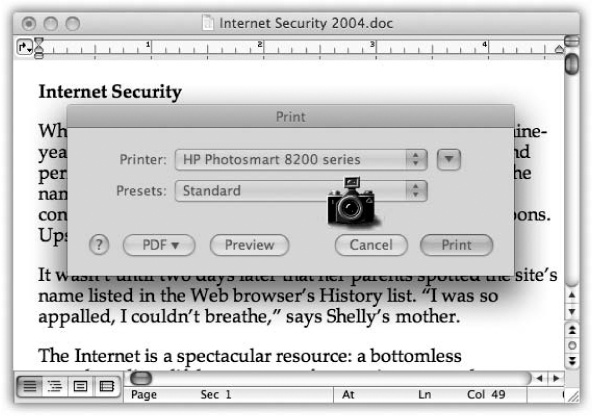
Figure 14-15. To capture just one dialog box, use the old Camera Cursor trick. That is, invoke Shift-⌘-4 and then tap the space bar to produce the cursor shown here. Click the element you want to snip from its background. (Press the space bar a second time to exit “snip one screen element” mode and return to “drag across an area” mode.) If you ever change your mind about taking any kind of screenshot, press ⌘-period or the Esc key.
Shift-⌘-4 and then the space bar also captures the Dock in one quick snip. Once you’ve got the camera cursor, just click any blank spot in the Dock (between icons).
Tip
If you hold down the Control key as you click or drag (using any of the techniques described above), you copy the screenshot to your Clipboard, ready for pasting, rather than saving it as a new graphics file on your desktop.
Snow Leopard comes with other ways to create screenshots:
Grab. Grab is a program in your Applications→Utilities folder. Grab’s chief selling point is its timer option, which lets you set up the screen before it takes the shot.
Preview. You can use the File→Take Screen Shot submenu commands to take screenshots (whole screen, selection, just one window) and open the result directly into Preview, rather than dumping the result onto your hard drive. The advantage here is that you can use all of Preview’s image-manipulation skills—changing resolution, cropping, annotating, color-adjusting, exporting in various graphics formats—before committing the thing to your hard drive.
Services. The Capture commands in the Services menu (Chapter 7) trigger the same screen-capturing function. They work, however, only when your cursor is in a Cocoa program that accepts pasted graphics (TextEdit, Stickies, Mail, and Pages, for example).
Tip
One picture may be worth a thousand words, but sometimes a video is worth a thousand pictures. Don’t forget that QuickTime Player (Chapter 15) can record video of your screen activity, for when a single still frame doesn’t quite cut it.