The original 1984 Mac didn’t make jaws drop because of its speed, price, or sleek looks. What amazed people was the simplicity and elegance of the user interface. At some point in every Apple demo, the presenter copied a graphic drawn in a painting program (MacPaint) and pasted it directly into a word processor (MacWrite), where it appeared neatly nestled between typed paragraphs of text.
We take these examples of data input and data exchange for granted today. But in those days, that little stunt struck people like a thunderbolt. After all, if this little computer let you copy and paste between different programs, it could probably do anything.
Today, the Mac is even more adept at helping you enter, move, and share your hard-won data. Mac OS X offers several ways to move information within a single document, between documents, between programs, and even between the Mac and Windows computers. This chapter leads you through this broad cycle of data: from entering it with the mouse and keyboard, to moving it around, to backing it up.
All through this book, you’ll find references to certain keys on Apple’s keyboards. “Hold down the  key,” you might read, or “Press Control-F2.” If you’re coming from Mac OS 9, from Windows, or even from a typewriter, you might be a bit befuddled. (The reader email generated by previous editions of this book made that quite clear. “The alphabet has 26 letters,” one went. “Why do I need 101 keys?”)
To make any attempt at an explanation even more complicated, Apple’s keyboards keep changing. The one you’re using right now is probably one of these models:
The current keyboard, where the keys are flat little jobbers that poke up through square holes in the aluminum (Figure 6-1). That’s what you get on current laptops, wired keyboards, and Bluetooth wireless keyboards.
The older, plastic desktop keyboard, or the white or black plastic laptop one.
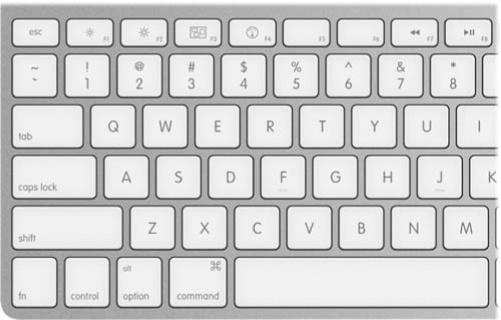
Figure 6-1. On the top row of aluminum Mac keyboards, the F-keys have dual functions. Ordinarily, tapping the F1 through F4 keys correspond to Screen Dimmer, Screen Brighter, Exposé, and Dashboard. Pressing the Fn key in the corner changes their personalities.
Here, then, is a guided tour of the non-typewriter keys on the modern Mac keyboard:
Tip
To see closeups of Apple’s current wired and wireless keyboards, visit www.apple.com/keyboard.
Fn. How are you supposed to pronounce Fn? Not “function,” certainly; after all, the F-keys on the top row are already known as function keys. And not “fun”; goodness knows, the Fn key isn’t particularly hilarious to press.
What it does, though, is quite clear: It changes the purpose of certain keys. That’s a big deal on laptops, which don’t have nearly as many keys as desktop keyboards. So for some of the less commonly used functions, you’re supposed to press Fn and a regular key. (For example, Fn turns the ↑ key into a Page Up key, which scrolls upward by one screenful.)
Note
On most Mac keyboards, the Fn key is in the lower-left corner. The exception is the full-size Apple desktop keyboard (the one with a numeric keypad); there, the Fn key is in the little block of keys between the letter keys and the number pad.
You’ll find many more Fn examples in the following paragraphs.
Numeric keypad. The number-pad keys do exactly the same thing as the numbers at the top of the keyboard. But with practice, typing things like phone numbers and prices is much faster with the number pad, since you don’t have to look down at what you’re doing.
Now, at first glance, only desktop keyboards appear to have these blocks of number keys. But on some older Mac laptops, you may see that the numbers 0 through 9 have actually been painted onto a block of letter keys near the right side. (1, 2, and 3 are J, K, and L, for example.)
You can turn those letter keys into their numeric alter egos in either of two ways. First, you can press the NumLock key at the top of the keyboard, which turns the numbers on and keeps them on until you press NumLock again. Or, for just a couple of quick numbers, you can hold down the Fn key with your left hand.
Eventually, Apple eliminated this embedded-keyboard effect from its laptops, having discovered that almost nobody was using it.
 ,
,  (F1, F2). These keys control the brightness of your screen. Usually, you can tone it down a bit when you’re in a dark room, or when you want to save laptop battery power; you’ll want to crank it up in the sun.
 (F3). This one fires up Exposé, the handy window-management feature described on Exposé: Death to Window Clutter.
 (F4). Tap this key to open Dashboard, the archipelago of tiny, single-purpose widgets like Weather, Stocks, and Movies. The end of Chapter 5 describes Dashboard in detail.
 ,
,  (F5, F6). Most recent Mac laptops have light-up keys, which is very handy indeed when you’re typing in the dark. The key lights are supposed to come on automatically when it’s dark out, but you can also control the illumination yourself by tapping these keys. (On most other Macs, the F5 and F6 keys aren’t assigned to anything. They’re free for you to use as you see fit.)
 ,
,  , and
, and  (F7, F8, F9). These keys work in the programs you’d expect: iTunes, QuickTime Player, DVD Player, and other programs where it’s handy to have Rewind, Play/Pause, and Fast-forward buttons.
Tip
Tap the
or key to skip to the previous or next track or chapter. Hold it down to rewind or fast-forward.Weirdly, the
key is hard-wired to open the iTunes program. And no, you can’t change that assignment! (Fortunately, when you’re already in a playback program like DVD Player or QuickTime Player, the key resumes its duties as the Play/Pause control.) ,
,  ,
,  (F10, F11, F12). These three keys control your speaker volume. The key means Mute; tap it once to cut off the sound completely, and again to restore its previous level. Tap the repeatedly to make the sound level lower, the key to make it louder.
With each tap, you see a big white version of each key’s symbol on your screen, and you hear a little audio pop—your Mac’s little nod to let you know it understands your efforts. (Press Shift to silence the pop sound.)
- . This is the Eject key. When there’s a CD or DVD in your Mac, tap this key to make the computer spit it out. If your Mac has a DVD tray (rather than just a slot), then hold down this button for about a second to make the tray slide open.
Home, End. “Home” and “End” mean “jump to the top or bottom of the window.” If you’re looking at a list of files, the Home and End keys jump to the top or bottom of the list. In iPhoto, they jump to the first or last photo in your collection. In iMovie, the Home key rewinds your movie to the very beginning. In Safari, it’s the top or bottom of the Web page.
(In Word, they jump to the beginning or end of the line. But then again, Microsoft has always had its own ways of doing things.)
On keyboards without a dedicated block of number keys, you get these functions by holding down Fn as you tap the ← and → keys.
Pg Up, Pg Down. These keys scroll up or down by one screenful. The idea is to let you scroll through word processing documents, Web pages, and lists without having to use the mouse.
On keyboards without a numeric keypad, you get these functions by pressing Fn plus the ↑ and ↓ keys.
Clear. Clear (on the full-size desktop keyboard only) gets rid of whatever you’ve highlighted, but without putting a copy on the invisible Clipboard, as the Cut command would do.
Esc. Esc stands for Escape, and it means “cancel.” It’s fantastically useful. It closes dialog boxes, closes menus, and exits special modes like Quick Look, Front Row, slideshows, screen savers, and so on. Get to know it.
Delete. The backspace key.
 . Many a Mac fan goes for years without discovering the handiness of this delightful little key: the Forward Delete key. Whereas Delete backspaces over whatever letter is just to the left of the insertion point, this one (labeled Del on older keyboards) deletes whatever is just to the right of the insertion point. It really comes in handy when, for example, you’ve clicked into some text to make an edit—but wound up planting your cursor in just the wrong place.
The full-size Apple keyboard has a dedicated key for this. On all other keyboards, you get this function by holding down Fn as you tap the regular Delete key.
Return and Enter. In almost all programs, these keys do the same thing: wrap your typing to the next line. When a dialog box is on the screen, tapping the Return or Enter key is the same as clicking the confirmation button (like OK or Done). Very few programs treat these keys differently, although Microsoft Excel is one of them.
⌘. This key triggers keyboard shortcuts for menu items.
Control. The Control key triggers shortcut menus, described on Notes on Right-Clicking.
Option. The Option key (labeled Alt on keyboards in some countries) is sort of a “miscellaneous” key. It’s the equivalent of the Alt key in Windows.
It lets you access secret features—you’ll find them described all through this book—and type special symbols. For example, you press Option-4 to get the ¢ symbol and Option-y to get the ¥ (yen) symbol.
Help. In the Finder, Microsoft programs, and a few other places, this key opens up the electronic help screens. But you guessed that.
As the previous section makes clear, the F-keys at the top of modern Mac keyboards come with predefined functions. They control screen brightness, keyboard brightness, speaker volume, music playback, and so on.
But they didn’t always. Before Apple gave F9, F10, and F11 to the fast-forward and speaker-volume functions, those keys controlled the Exposé window-management function described in Chapter 5.
So the question is: What if you don’t want to trigger the hardware features of these keys? What if you want pressing F1 to mean “F1” (which opens the Help window in some programs)? What if you want F9, F10, and F11 to control Exposé’s three modes, as they once did?
For that purpose, you’re supposed to press the Fn key. The Fn key (lower-left on small keyboards, center block of keys on the big ones) switches the function of the function keys. In other words, pressing Fn and F10 triggers an Exposé feature, even though the key has a Mute symbol () painted on it.
But here’s the thing: What if you decide that you use those F-keys for software features (like Cut, Copy, Paste, and Exposé) more often than the hardware features (like brightness and volume)?
In that case, you can reverse the logic, so that pressing the F-keys alone triggers software functions, and they govern brightness and audio only when you’re pressing Fn.
To do that, choose  →System Preferences→Keyboard. Turn on the checkbox “Use all F1, F2, etc. keys as standard function keys.”
And that’s it. From now on, you press the Fn key to get the functions painted on the keys (, , , , , , , , and so on).
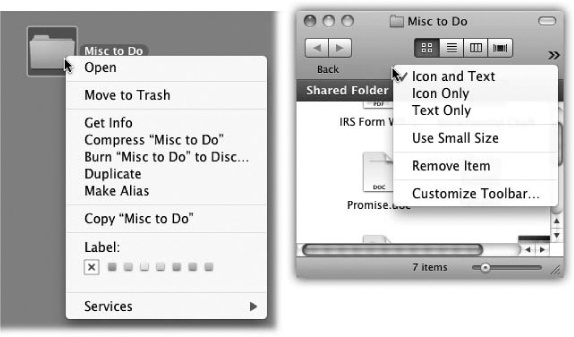
Figure 6-2. A shortcut menu is one that pops out of something you’re clicking—an icon, a button, a folder. The beauty of a shortcut menu is that its commands are contextual. They bring up useful commands in exactly the spots where they’re most useful, in menus that are relevant only to what you’re clicking.
Apple isn’t too proud to steal good ideas from Microsoft; goodness knows, Microsoft has stolen enough from Apple. So in Snow Leopard, shortcut menus are more important than ever (Figure 6-2).
They’re so important, in fact, that it’s worth this ink and this paper to explain the different ways you can trigger a “right-click” (or a secondary click, as Apple calls it, because not all these methods actually involve a second mouse button, and it doesn’t have to be the right one):
Control-click. For years, you could open the shortcut menu of something on the Mac screen by Control-clicking it—and you still can. That is, while pressing the Control key (bottom row), click the mouse on your target.
Right-click. Experienced computer fans have always preferred the one-handed method: right-clicking. That is, clicking something by pressing the right mouse button on a two-button mouse.
“Ah, but that’s what’s always driven me nuts about Apple,” goes the common refrain. “Their refusal to get rid of their stupid one-button mouse!”
Well, not so fast.
First of all, you can attach any old $6 USB two-button mouse to the Mac, and it’ll work flawlessly. Recycle the one from your old PC, if you like.
Furthermore, if you’ve bought a desktop Mac since late 2005, you probably already have a two-button mouse—but you might not realize it. Take a look: Is it a white, shiny plastic capsule with tiny, gray scrolling track-pea on the far end? Then you have a Mighty Mouse, and it has a secret right mouse button. It doesn’t work until you ask for it.
To do that, choose
→System Preferences. Click Mouse. There, in all its splendor, is a diagram of the Mighty Mouse. (There’s a picture on MobileMe.)Your job is to choose Secondary Button from the pop-up menu that identifies the right side of the mouse. (The reason it’s not called a “right button” is because left-handers might prefer to reverse the right and left functions.)
From now on, even though there aren’t two visible mouse buttons, your Mighty Mouse does, in fact, register a left-click or a right-click depending on which side of the mouse you push down. It works a lot more easily than it sounds like it would.
Use the trackpad (old way). If you have a Mac laptop, you can “right-click” right there on the trackpad.
Figure 6-3. The Trackpad pane of System Preferences looks different depending on your laptop model. But this one shows the two ways to get a “right-click.”
To do that, point to whatever you want to click. Rest two fingers on the trackpad—and then click. (You turn this feature on and off in System Preferences→Trackpad, where you can also see a little video on how to do it.
Use the trackpad (new way). Two fingers plus thumb? That is quite a lot of digits just to get a right-click, and Apple knows it. So on the latest Mac laptops, you can “right-click” by clicking either the lower-right or lower-left corner of the track-pad—one finger only.
(Your laptop is eligible if it has no separate clicker button. Instead, the whole trackpad surface is a clicker. You turn on this clicking method in System Preferences→Trackpad, as shown in Figure 6-3.)

Something strange has been quietly taking place at Apple: Typing has been getting a lot of attention.
It began when Apple created a system-wide spelling checker. For the first time in computer history, the operating system took over spelling fixes. You didn’t have to maintain a separate spelling checker for each program you used. Now there’s just one, and it works in most Apple programs: TextEdit, Stickies, iChat, Mail, iCal, Safari, Pages, iPhoto, iMovie, and so on. Add a word to the dictionary in one program, and it’s available to all the others.
In Mac OS X 10.5 (Leopard), Apple added a grammar checker.
Now, in Snow Leopard, there’s much more. There’s text substitution, where you type addr and the system types out “Irwina P. McGillicuddy, 1293 Eastport Lane, Harborvilletown, MA, 02552.” (The same system auto-corrects common typos like teh instead of the.) There’s also a case-flipping feature that can change selected text to ALL CAPS, all lowercase, or First Letter Capped. Both of these new features are available in most Apple programs and in any other programs that tap into Mac OS X’s built-in text processing circuitry (although not, alas, Microsoft programs).
Mac OS X can give you live, interactive spelling and grammar checking, just as in Microsoft Word and other word processors. That is, misspelled words or badly written sentences or fragments get flagged (with a dashed red underline for spelling problems and a green one for grammar problems) the moment you type them. Here’s the crash course:
Check the spelling of one word: Highlight the word. Choose Edit→Spelling and Grammar→Show Spelling and Grammar. The spell-check dialog box opens, with the proposed corrections visible.
Check spelling as you type. Choose Edit→Spelling and Grammar→Check Spelling While Typing. (If Check Grammar With Spelling is turned on in the same submenu, you’ll get a grammar check, too.)
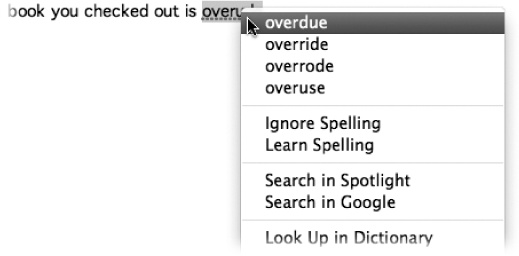
Now, as you type, you’ll see those red and green underlines on words the Mac thinks represent spelling or grammar mistakes. To fix one, Control-click (right-click) the underlined word, and proceed as shown in Figure 6-4.
Check spelling after the document is finished. Choose Edit→Spelling and Grammar→Show Spelling and Grammar (or press ⌘-:). The Spelling dialog box appears. The first error it spots appears in the top box, with the proposed corrections in the bottom one.
If you like one of Apple’s proposals, click it and then click Change. If the word was correct already (for example, the guy’s last name really is Teh), then click Find Next (“leave the word as I typed it”), Ignore (“it’s OK everywhere in this document”), or Learn (“never flag this word again”).
Handily enough, you can also click Define to look up a highlighted word (one of the spelling suggestions, for example) in the Mac’s built-in Dictionary app. Also handily enough, the spelling checker is smart enough to maintain different spelling checkers (dictionaries) for different languages—and to recognize, within a single document, which language you’re using!
Fix spelling as you type. Note the difference. Checking your spelling just means “finding the misspelled words.” Fixing means autocorrecting the errors as they occur, as you type. You might not even notice that it’s happening!
This most tantalizing option is Edit→Spelling and Grammar→Correct Spelling Automatically. And sure enough, when this option is turned on, common typos like teh and frmo and dont get fixed as you type; you don’t have to do anything to make it happen.
It’s not perfect. It doesn’t correct all errors (or even most of them). It occasionally even corrects a word you didn’t mean to have corrected, like turning brb (Internet shorthand for “be right back”) into bribe, or arent into arrant. (When it makes a mistake, hit ⌘-Z, the Undo command, to restore what you typed.) And sometimes it doesn’t make the change until you’re halfway through the sentence.
Still, though. Kind of cool.
This one’s kind of cool: a new Snow Leopard feature that auto-replaces one thing you type with something else. Why? Because it can do any of these things.
For example, Snow Leopard can insert attractive “curly quotes” automatically as you type “straight ones,” or em dashes—like this—when you type two hyphens (--like that). It can also insert properly typeset fractions (like 1/2) when you type 1/2.
You can see the list of built-in substitutions—and create your own—in the System Preferences→Language & Text→Text tab, as shown in Figure 6-5.
Apple doesn’t want to drive you nuts, though, so it makes sure you’re sure you really want these swappings to take place. So you have to turn on each of these features manually, in each program. (These commands are available anywhere you do a lot of typing, like TextEdit, Mail, and Stickies.)
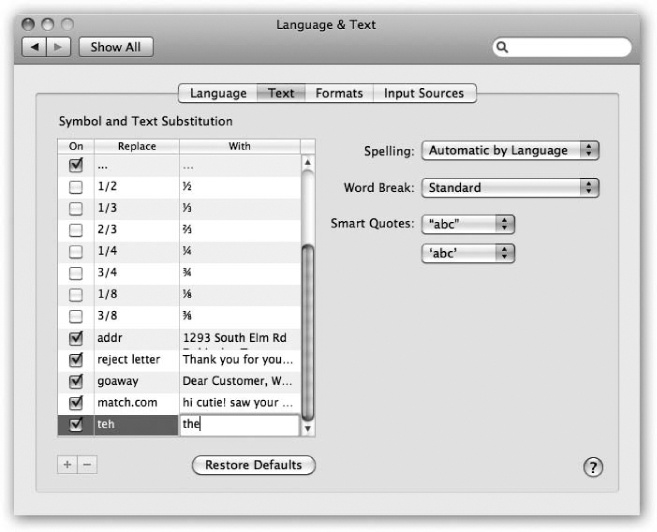
Figure 6-5. This is where you can manage Mac OS X’s typographic substitutions. You can see already that typing common fractions are set to turn into typographically fancy ones as you type them. But you can add all kinds of auto-typo-corrections and even boilerplate text paragraphs.
Auto-quotes. To make the quotes curlify themselves, choose Edit→Substitutions→Smart Quotes, so that a checkmark appears.
Auto-dashes. To turn double hyphens into these (—) long dashes, choose Edit→Substitutions→Smart Dashes, so that a checkmark appears.
Smart links. There’s also an option to create Smart Links, where any Web address you type turns into a blue, underlined, clickable link to a Web page. Turn on Edit→Substitutions→Smart Links.
That is, you can program addr to type your entire return address. Create two-letter abbreviations for big legal or technical words you have to type a lot. Set up goaway to type out a polite rejection letter for use in email. And so on.
This feature has been in Microsoft Office forever (called AutoCorrect), and it’s always been available as a shareware add-on (TypeIt4Me and TextExpander, for example). But now it’s built right into most Apple programs, plus any others that use Apple’s text-input plumbing.
You build your list of abbreviations in the System Preferences→Language & Text→Text tab, shown in Figure 6-5. See the list at left? Click the  button to create a new row in the scrolling table of substitutions.
Click in the left column and type the abbreviation you want (for example, addr). Click in the right column and type, or paste, the text you want Mac OS X to type instead.
Tip
Don’t be shy—you’re not limited to short snippets. The replacement text can be pages long, which is handy if you’re a lawyer and you build your contracts out of boilerplate chunks of canned text.
You can even create multiple paragraphs—but not by hitting Return when you want a new line; no, hitting Return means, “I’m finished entering this text” and closes up the box. Instead, press Option-Return when you want a paragraph break.
Here again, you have to explicitly turn on the text-replacement feature in each program (TextEdit, Mail, Stickies, and so on). To do that, choose Edit→Substitutions→Text Replacement, so that a checkmark appears.
That’s it! Now, whenever you type one of the abbreviations you’ve set up, the Mac instantly replaces it with your substituted text.
The final new chunk in Snow Leopard’s text-massaging tool chest is case swapping—that is, changing text you’ve already typed (or pasted) from ALL CAPS to lowercase or Just First Letters Capitalized.
This one’s simple: Select the text you want to change, and then choose from the Edit→Transformations submenu. Your options are Make Upper Case (all caps), Make Lower Case (no caps), and Capitalize (first letters, like a movie title).
GEM IN THE ROUGH: The Least-Known Typing Feature of Mac OS X
This may come as a shock if you think you know your Mac pretty well, but here goes: Mac OS X actually offers system-wide autocomplete of big words, just like the iPhone.
We’re not talking about the spelling checker, and we’re not talking about text substitution. We’re talking, you start typing a word, and the Mac finishes it for you. It’s ideal when you’re in a hurry, when you’re not sure how to finish a word (is it independance or independence?), or when you’re trying to solve a crossword puzzle. It works in all the standard Mac programs (TextEdit, Mail, Safari, Pages, and so on).

Once you’ve begun typing a word, press either F5 or Option-Esc to produce the list of possible word completions, as shown here. If the Mac correctly anticipates the rest of the word, great; press Tab, Return, or the space bar to accept the suggestion, and then keep right on typing. If it guesses wrong, you can either select a different word in the list (using the mouse or the arrow keys), or tap Esc and continue typing.
Keep that in mind the next time some raving lunatic SENDS YOU AN EMAIL THAT WAS TYPED ENTIRELY WITH THE CAPS LOCK KEY DOWN.
Apple has always taken pride in its language-friendliness, and Snow Leopard is no exception. You can shift from language to language on the fly, as you type, even in midsentence—without reinstalling the operating system or even restarting the computer.
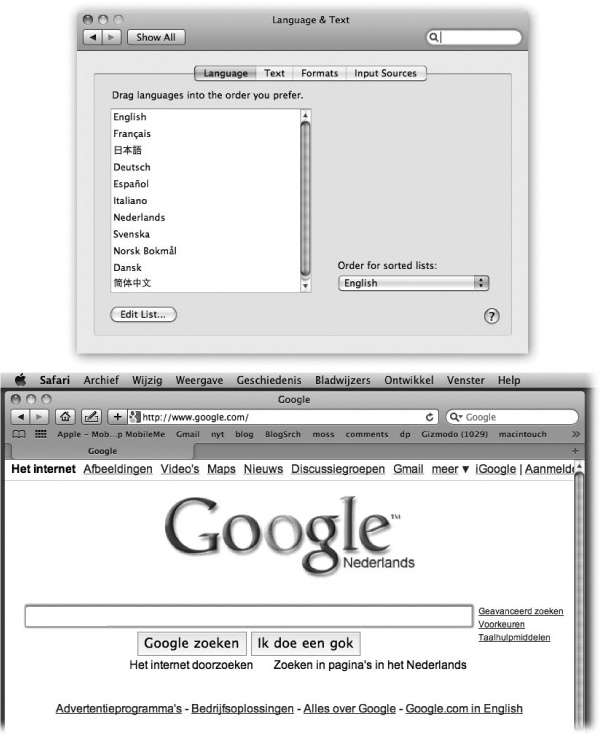
Figure 6-6. Top: This is the list of the 18 “system localizations” that you get with a standard Mac OS X installation. Bottom: Here’s Safari running in Dutch. Actually understanding Dutch would be useful at a time like this—but even if you don’t, it can’t help but brighten up your work day to choose commands like Spraakfunctie or Knip. (Alas, your success with this trick varies by program.)
First, tell your Mac which languages you’d like to have available. Open System Preferences→Language & Text. On the Language tab, you see a listing of the different languages the Mac can switch into, in the corresponding languages—Français, Español, and so on. Just drag one of the languages to the top of the list to select it as the target language, as shown in Figure 6-6.
Note
Snow Leopard Spots: In Snow Leopard, you can mix English with right-to-left languages like Hebrew and Arabic. There’s even a split-cursor option that makes the pointer flip directions at the boundary between right-to-left and left-to-right text.
Now launch Safari, TextEdit, Mail, or Stickies. Every menu, button, and dialog box is now in the new language you selected! If you log out and back in (or restart) at this point, the entire Finder will be in the new language, too.
Note
Programs differ widely in their “language awareness.” If you use a language beyond the 18 in the list, adding it (with the Edit List button) ensures that its relevant features will be available in all programs. (You may still have to add additional language software to make your menus and dialog boxes change.)
GEM IN THE ROUGH: Draw Those Chinese Characters
In Apple’s demos, it was one of the coolest features of Snow Leopard: If you want to write in Chinese, you can now draw the characters you want, right on your laptop’s trackpad. (This trick requires a recent Mac laptop, one of the multitouch models.)
To set this up, turn on Chinese–Simplified, choose the Chinese writing system you prefer, and turn on Trackpad Handwriting, in the System Preferences→Language & Text→Input Sources pane.
Then, when you’re actually writing, use the flag (Input) menulet to choose Pinyin—Simplified (or whichever system you like). Now press Shift-Control-space bar to make the writing panel appear, as shown here.
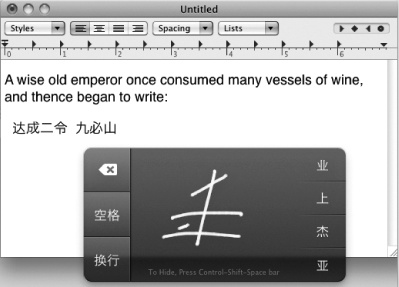
The trick here is to understand that the panel is a full map of your trackpad. You can’t move the panel. Draw your character by dragging across the trackpad; white lines appear as you go.
On the right side of the onscreen panel, you see the Mac’s interpretations of your character; to choose one, tap the corresponding spot on the outside edges of your actual trackpad. (Or, to delete your most recent line, tap the upper-left corner of your trackpad.) The Mac drops the character into your document.
Press Shift-Control-space bar again to hide the panel, and shake your head in wonder.
Of course, if you’re really French (for example), you’ll also want to make these changes:
On the Formats tab, choose your French-speaking country from the Region pop-up menu, so that time and date formats, number punctuation, and currency symbols also conform to your local customs. (Turn on “Show all regions,” if necessary.)
For example, the decimal and thousands separator characters for displaying large numbers differ from country to country. (The number 25,600.99, for example, would be written as 25 600,99 in France, and as 25.600,99 in Spain.) And what appears to an American to be July 4 (the notation 7/4), to a European indicates April 7.
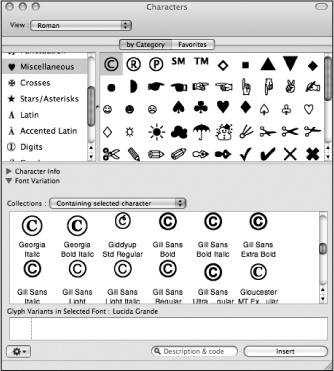
GEM IN THE ROUGH: The Character Viewer
There you are, two-thirds of the way through your local matchmaker newsletter, when it hits you that you need a heart symbol. Right now.
You know there’s one in one of your symbol fonts, but you’re not about to type every single key combo until you produce the heart symbol. You can’t help wishing there was an easier way to find those special symbols that hide among your fonts—fancy brackets, math symbols, special stars and asterisks, and so on.
The Keyboard Viewer (next page) is one solution. But there’s a better one: the Character Viewer. To make it appear, choose Edit→Special Characters.
Most Cocoa programs have this command. If yours doesn’t, here’s the long way: Open System Preferences, click the Language & Text icon, click the Input Sources tab, and turn on the Character Viewer checkbox.
You’ve just installed the Keyboard menulet.
Next time you’re word processing or doing page layout, choose Show Character Viewer from this menu.
The resulting window rounds up all symbols from all your fonts at once. To find a particular symbol, click the “by Category” tab, and then click the various category headings: Arrows, Stars/Asterisks, Math, and so on. Or, for an even more mind-blowing assortment (musical notes, Braille…), choose All Characters from the View popup menu.
You can preview variations of the same symbol by opening the Font Variation triangle. You can also use the Search box to find a symbol by name: “heart” or “yen” or “asterisk,” for example. When you find the symbol you want, double-click it.
If you’re using a Cocoa program, the correct symbol pops into your document. (If not, you may get the correct character in the wrong font. In that case, change the font of the inserted character manually. To find out what font it came from, click the Font Variation flippy triangle to see the font name.)
If, for some reason, Apple’s preprogrammed settings aren’t right for your region, you’ll see Customize buttons that let you override them.
Choose the French keyboard layout from the Input Menu tab, as explained on Input Menu Tab.
Tip
Every program capable of switching languages is also clogging up your hard drive with a lot of language files you’ll never use. A program like DeLocalizer can sweep through all your programs and delete those files, leaving your software in perfect condition but more svelte. You can get DeLocalizer from this book’s “Missing CD” page at www.missingmanuals.com.
While the Mac can display many different languages, typing in those languages is another matter. The symbols you use when you’re typing in Swedish aren’t the same as when you’re typing in English. Apple solved this problem by creating different keyboard layouts, one for each language. Each rearranges the letters that appear when you press the keys. For example, when you use the Swedish layout and press the semicolon key, you don’t get a semicolon (;)—you get an ö.
Apple even includes a Dvorak layout—a scientific rearrangement of the standard layout that puts the most common letters directly under your fingertips on the home row. Fans of the Dvorak layout claim greater accuracy, better speed, and less fatigue.
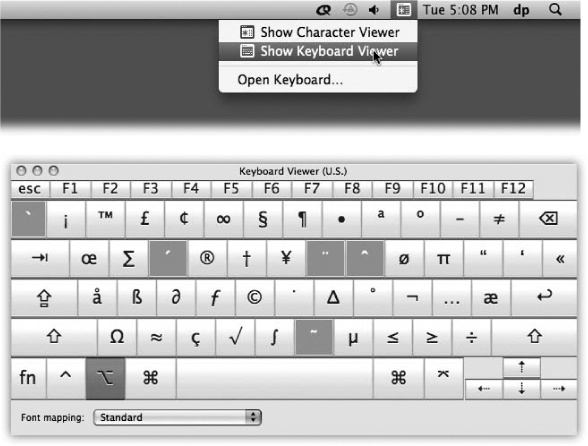
Figure 6-7. How do you make a π symbol? Top: Open Keyboard Viewer by choosing its name from the keyboard (flag) menulet. Bottom: Keyboard Viewer reveals the answer. When you press the Option key, the Keyboard Viewer keyboard shows that the pi character (π) is mapped to the P key. To insert the symbol into an open document, just click it in the Keyboard Viewer window.
Use the list in the Input Sources pane to indicate which keyboard layout you want. If you select anything in the list, “Show input menu in menu bar” turns on automatically. A tiny flag icon appears in your menu bar—a keyboard menulet that lets you switch from one layout to another just by choosing its name. (To preview a certain keyboard arrangement, launch the Keyboard Viewer program described next.)
Note
Snow Leopard Spots: In Snow Leopard, the icon of the Input menulet changes. If you’ve selected a different language, it becomes a colorful flag to show the currently selected language. If you haven’t turned on any additional languages, though, it takes on the look of the Character Palette, described on Formats Tab.
Keyboard Viewer, which is descended from the Key Caps program of old, consists of a single window containing a tiny onscreen keyboard (Figure 6-7). When you hold down any of the modifier keys on your keyboard (like ⌘, Option, Shift, or Control), you can see exactly which keys produce which characters. The point, of course, is to help you learn which keys to press when you need special symbols or non-English characters, such as © or ¢, in each font.
Note
Keyboard Viewer shows only the symbols you can produce by typing keystrokes. A font may contain thousands of other characters that can’t actually be typed; the Character Palette (Formats Tab) is the only way to access these other symbols.
It’s a great tool—if you can find it.
Here’s how. Open System Preferences→Language & Text, click Input Sources, and turn on Keyboard & Character Viewer at the top of the list. The window shown at top in Figure 6-7 appears. (Thereafter, you’ll be able to choose its name from the Input menulet at the top of the screen, as shown at top in Figure 6-7.)
To see the effect of pressing the modifier keys, either click the onscreen keys or press them on your actual keyboard. The corresponding keys on the onscreen keyboard light up as they’re pressed.
Note
Snow Leopard Spots: You’re not stuck viewing the characters in a 12-point font size—a good thing, because some of them are hard to read when displayed that small. You can make the Keyboard Viewer window as large as you want—fill the screen with it, why don’t you?—by clicking its Zoom button or dragging its lower-right corner. That will magnify the Keyboard Viewer window and its font size.
Here’s a cool step-saver, something no other operating system offers—a little something Apple likes to call data detectors.
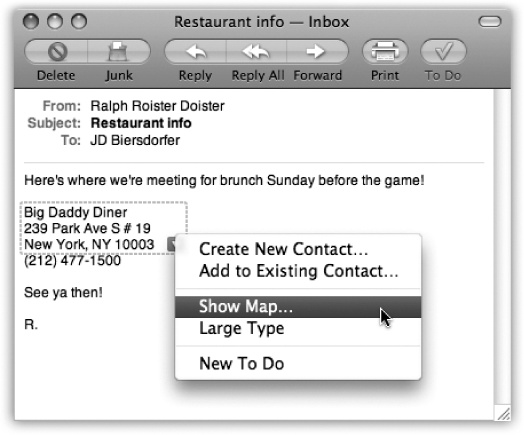
In short, Mac OS X recognizes commonly used bits of information that may appear in your text: a physical address, a phone number, a date and time, and so on. With one quick click, you can send that information into the appropriate Mac OS X program, like iCal, Address Book, or your Web browser (for looking up an address on a map).
Here’s how it works: When you spot a name, address, date, or time, point to it without clicking. Mail draws a dotted rectangle around it. Control-click inside the rectangle, or right-click, or click the pop-up  at the right side.
As shown in Figure 6-8, a shortcut menu appears. Its contents vary depending on what you’re pointing to:
A mailing address. You can choose Show Map from the shortcut menu; your Web browser opens automatically and shows you that address on a Google map.
Figure 6-8. Mail can detect street addresses, phone numbers, dates, and times. When it spots something you may want to add to another program, like Address Book or iCal, it draws a dotted line around the info when you point to it without clicking. Click the little
to get a shortcut menu for further options—like automatically adding the address to your Address Book program or seeing the address pinpointed on a Google map.Alternatively, you can choose Create New Contact (to add an Address Book entry for this address) or Add to Existing Contact (if the person is in your Address Book—just not the address). Like magic, a little editing box sprouts out of the data-detected rectangle, prefilled with the information from the message, so that you can approve it.
A date and time. The shortcut menu offers two useful commands. Create New iCal Event opens Mac OS X’s calendar program and creates a new appointment at the date and time identified in the message. It’s up to you to type a name for the date, set an alarm, and do all the other appointment-setting things described in Chapter 10.
Tip
If, while working in iCal, you ever forget where this event came from, double-click it. In the Info balloon, you’ll see a link that takes you right back to the original Mail message that started it all.
If you choose Show This Date in iCal, though, you go to iCal, which opens directly to the specified date and/or time. The logic of this feature is overwhelming; after all, when someone emails you to ask if you’re free for drinks next Thursday at 10, what’s the first thing you usually want to do? Check your calendar, of course.
A phone number. As with mailing addresses, the shortcut menu here offers you things like Create New Contact and Add to Existing Contact. The third one, Large Type, is great when you want to call this person right now—it displays the phone number in huge type, filling your screen, so you can see it from across your mansion.
A flight number. There’s a new data detector in Mac OS X 10.6: flights. When you highlight flight information in a text document (for example, “AA 152”), the data detector offers a Show Flight Information command. It opens the Flights widget of Dashboard, so you can see the flight’s departure time, arrival time, and other details. It works only if the airline is represented as a two-letter code, and as of Mac OS X 10.6.1, only in Mail and iChat.
You can’t paste a picture into your Web browser, and you can’t paste MIDI music information into your word processor. But you can put graphics into your word processor, paste movies into your database, insert text into GraphicConverter, and combine a surprising variety of seemingly dissimilar kinds of data.
The original copy-and-paste procedure of 1984—putting a graphic into a word processor—has come a long way. Most experienced Mac fans have learned to trigger the Cut, Copy, and Paste commands from the keyboard, quickly and without even thinking. Here’s how the process works:
Highlight some material in a document.
Drag through some text in a word processor, for example, or highlight graphics, music, movie, database, or spreadsheet information, depending on the program you’re using.
Use either the Edit→Cut or the Edit→Copy command.
Or press the keyboard shortcuts ⌘-X (for Cut—think of the X as a pair of scissors) or ⌘-C (for Copy). The Macintosh memorizes the highlighted material, socking it away on an invisible storage pad called the Clipboard. If you chose Copy, nothing visible happens. If you chose Cut, the highlighted material disappears from the original document.
At this point, most Mac fans take it on faith that the Cut or Copy command actually worked. But if you’re in doubt, switch to the Finder (by clicking its Dock icon, for example), and then choose Edit→Show Clipboard. The Clipboard window appears, showing whatever you’ve copied.
Click to indicate where you want the material to reappear.
This may entail switching to a different program, a different document, or simply a different place in the same document.
Choose the Edit→Paste command (⌘-V).
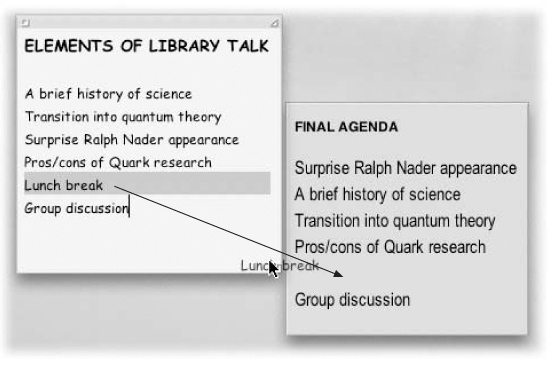
Figure 6-9. To use drag-and-drop, highlight some material. Click anywhere in the highlighted area and press the mouse button for about half a second. Now, with the button still pressed, drag to another place in the document, into a different window, or into a different application. As your cursor enters the target window, a shaded outline appears inside the window’s boundaries—the Mac’s way of letting you know it understands your intention. When you release the mouse, the highlighted material appears instantly in its new location.
The copy of the material you had originally highlighted now appears at your insertion point—if you’re pasting into a program that can accept that kind of information. (You won’t have much luck pasting, say, a movie clip into Quicken.)
The most recently cut or copied material remains on your Clipboard even after you paste, making it possible to paste the same blob repeatedly. Such a trick can be useful when, for example, you’ve designed a business card in your drawing program and want to duplicate it enough times to fill a letter-sized printout. On the other hand, whenever you next copy or cut something, whatever was already on the Clipboard is lost forever.
As useful and popular as it is, the Copy/Paste routine doesn’t win any awards for speed. After all, it requires four steps. In many cases, you can replace that routine with the far more direct (and enjoyable) drag-and-drop method. Figure 6-9 illustrates how this works.
Note
Most Cocoa programs (Two Kinds of Programs: Cocoa and Carbon) require you to press the mouse button for a split second before beginning to drag.
Virtually every Mac OS X program works with the drag-and-drop technique, including TextEdit, Stickies, Mail, Sherlock, QuickTime Player, Preview, iMovie, iPhoto, and Apple System Profiler, not to mention other popular programs like Microsoft applications, America Online, and so on.
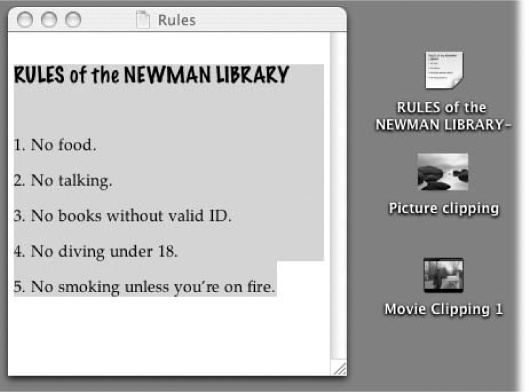
Figure 6-10. When you drag material out of the document window and onto the desktop, you get a clipping file. Its icon depends on the kind of material contained within: (from top) text clipping, picture clipping, or movie clipping. (For easy identification, Mac OS X conveniently titles text clippings by the first line of the text contained inside.) You can view a clipping just by double-clicking it, so that it opens into its own window (left).
As shown in Figure 6-9, drag-and-drop is ideal for transferring material between windows or between programs—from a Web page into Photoshop, for example. It’s especially useful when you’ve already copied something valuable to your Clipboard, since drag-and-drop doesn’t involve (and doesn’t erase) the Clipboard.
Its most popular use, however, is rearranging text within a single document. In Word or Pages, for example, you can rearrange entire sections, paragraphs, sentences, or even individual letters, just by dragging them—a wonderfully efficient editing technique.
You can also use drag-and-drop in the one program you use every single day: the Finder itself. As shown in Figure 6-10, you can drag text, graphics, sounds, and even movie clips out of your document windows and directly onto the desktop. Graphics and movies turn into ordinary graphics or movie files; text becomes an icon called a clipping file.
Note
Snow Leopard Spots: Nobody seems to mention it—not even Apple—but clipping files have been greatly upgraded in Snow Leopard. For example, you can now examine a clipping’s contents using Quick Look—just select its icon and then tap the space bar.
Second, you can double-click a clipping file and then select a portion of the text to copy (in the past, you could copy only the entire contents). Note, too, that an open clipping has a fully functional title bar. You can even ⌘-click the title to see the usual pop-up list of folders-within-folders, so you know where the thing is sitting on your hard drive.
When you drag a clipping from your desktop back into an application window, the material in that clipping reappears. Drag-and-drop, in other words, lets you treat your desktop itself as a giant, computer-wide pasteboard—an area where you can temporarily stash pieces of text or graphics as you work.
Tip
When the material you drag to the desktop contains nothing but an Internet address, such as an email address or Web page URL, Mac OS X gives it a special icon and a special function: an Internet location file. See Internet Location Files for details.
When it comes to transferring large chunks of information—especially address books, spreadsheet cells, and database records—from one program to another, none of the data-transfer methods described so far in this chapter does the trick. For these purposes, use the Export and Import commands found in the File menu of almost every database, spreadsheet, email, and address-book program. (In some programs, the Save As command serves this function.)
These Export/Import commands aren’t part of Mac OS X, so the manuals (if any) of the applications in question should be your source for instructions. For now, however, the power and convenience of this feature are worth noting—it means that your four years’ worth of collected addresses in, say, some old email program can find its way into a newer program, like Address Book, in a matter of minutes.
Considering how many ways there are to move files back and forth between Macs, it seems almost comical that anybody complained when Apple discontinued built-in floppy disk drives. Here’s a catalog of the different ways you can move your files from one computer to another, including some that might not have occurred to you.
Best for small files. High on convenience; computers can be in different countries.
With about $50 worth of equipment (or $200, if you want to go wireless), you can connect your Macs together into a network. Once you’ve done so, you can keep an icon for each Mac’s hard drive on your screen. You can open files from the other drives, copy stuff back and forth—anything you would do with your own disk. Step-by-step instructions are in Chapter 13.
Best for files of any size, when the computers are in the same building.
Tip
And for $0, you can create an ad hoc network, meaning a tiny wireless network between just two computers (or a handful). Great when you’re in the car somewhere, or in the airport waiting lounge, or a hotel lobby, and someone says, “Hey, can I have a copy of that?” Details are on AirPort Networks.
One of the principal virtues of a MobileMe account (Chapter 18) is the iDisk, which is basically like a hard drive on the Internet. You can pull it into the screen of any computer, Mac or PC, and copy files to or from it. It therefore makes a very convenient way station for transferring files of any size; there’s even a feature that lets you email anything on your iDisk to anyone without worrying about file size.
The only inconvenience, really, is the $100 a year you’ll have to pay for MobileMe.
You can always burn your files onto a blank CD or DVD and then carry or mail it to the recipient. Awfully slow and clumsy, but does result in a safety copy of whatever you’re transferring.
FireWire Disk Mode is a brilliant but little-known Macintosh-only feature that lets you turn one Mac into an external hard drive for another. This is by far the fastest method yet for transferring a lot of data—even faster than copying files over a network. It’s extremely useful in any of these situations:
You’re traveling with a laptop. You want to copy your life onto it from your main Mac, including your entire 2 GB email folder and project files, before taking it on a trip, and then unload it when you return.
You have a new Mac. You want to copy everything off the old one, without having to wait all night.
One Mac won’t start up. You want to repair it using another Mac as a “front end.”
Unfortunately, not all Macs have FireWire anymore; on some laptops, Apple made the tragic mistake of eliminating it. If you’re not so unfortunate, you can use FireWire like this. (In the following steps, suppose your main Mac is an iMac and you want to use a MacBook as an external hard drive for it.)
Using a FireWire cable, connect the FireWire jacks of both computers.
For this trick, you need a 6-pin FireWire cable—not the one that connects a cam-corder to a Mac. The one you need has the same large connector on both ends.
Note
If both Macs have Apple’s FireWire 800 jacks, use a 9-pin FireWire cable instead for much greater speed. If only one Mac has a FireWire 800 jack, use that computer’s traditional FireWire 400 connector instead. Otherwise, you need either a special FireWire 800–to–FireWire 400 cable, or the 400-to-800 adapter that came with your Mac.
On the MacBook, choose
→System Preferences. Click Startup Disk.The Startup Disk panel opens.
Click Target Disk Mode. In the confirmation box, click Restart.
The MacBook turns off, then on again. A giant yellow FireWire icon (
 ) bounces around the laptop screen.
Now take a look at the iMac’s screen: Sure enough, there’s the MacBook’s hard drive icon on the desktop. You’re ready to copy files onto or off of it, at extremely high speeds, and go on with your life.
When you’re finished working with the MacBook, eject it from the iMac’s screen as you would any disk. Then turn off the laptop by pressing the power button.
The next time you turn on the MacBook, it’ll start up from its own copy of Mac OS X, even if the FireWire cable is still attached. (You can disconnect the cable whenever you please.)
Note
The steps above describe the Snow Leopard method of setting up Target Disk Mode. But the old way still works, too.
Leave the iMac turned on, but shut down the MacBook. (Make sure it’s plugged in. You wouldn’t want the battery to die in the middle of this process.) Now turn the MacBook on again, but hold down the T key immediately after the chime. After a moment, you see the big yellow Y-shaped FireWire icon on the laptop screen, and the laptop’s hard drive shows up on the iMac’s desktop. Continue from step 4 above.
This method is arguably quicker because you don’t have to open up System Preferences.
An iPod is an extremely fine music player with enormous capacity. That’s because it contains an actual hard drive (or a bunch of memory) that stores the songs.
But because the modern iPod has a USB connector, most models make dandy portable hard drives for everyday files, too—not just music.
To set the iPod up for data transfer, proceed like this:
Connect the iPod to your Mac with its white USB cable. Open iTunes. Click the iPod icon in the left-side Source list.
The iPod Summary screen appears.
Turn on “Enable disk use.”
A dialog box warns you that even when you’re just syncing up your music collection (and not using the iPod as a hard drive for files), you have to manually eject the iPod after each use.
Click OK, and then OK again.
After a moment, you see the iPod’s icon appear on your desktop.
Now you’ve got yourself a multigigabyte external hard drive. Just drag your files onto or off the iPod icon, exactly as though it’s a disk (which it is). The iPod automatically keeps your data files separate from your music files; your files won’t be touched when you update your music collection from iTunes.
Whenever you’re finished using the iPod as a hard drive, eject it in any of the usual ways. For example, in the Finder, drag its icon to the Trash, or Control-click it and choose Eject from the shortcut menu.
A flash drive, also called a thumb drive, is a tiny keychain-like doodad that plugs into your USB port. Inside is little more than a big chunk of RAM (memory) that acts like a miniature hard drive. When the flash drive is plugged into your Mac, its icon shows up on the desktop as a disk. Use it as a tiny, 8-gigabyte hard drive (or whatever size you’ve bought).
The beauty of a flash drive is that it works instantly and automatically with any Mac or any Windows machine, without any software installation or configuration. It’s small and light enough to carry around on your keychain… and it’s so darned cool. If you regularly transfer documents between Macs or between Macs and PCs, a flash drive will change your life.
Bluetooth is a long-delayed, but promising, cable-elimination technology. It’s designed to let Bluetooth-equipped gadgets communicate within about 30 feet, using radio signals.
Bluetooth comes built into most computers and cellphones, plus the occasional printer, pocket organizer, even camera or camcorder.
Bluetooth is built into all recent Macs. It’s ready, therefore, to connect with Apple’s wireless keyboard and mouse; to get on the Internet using a Bluetooth cellphone as a cordless modem; and to transfer files through the air to similarly equipped gear.
Bluetooth isn’t especially fast—in fact, it’s pretty slow. (You get transfer speeds of 30 to 50 K per second, depending on the distance.) But when you consider the time you’d have taken for wiring, passwords, and configuration using any other connection method, you may find that Bluetooth wins, at least in casual, spur-of-the-moment, airport-seat situations.
And when you consider that Bluetooth works no matter what the gadget—Mac, Windows, cellphone—you can see it has tremendous potential as a universal file-exchange translator, too.
Note
For more detail on configuring your Mac for Bluetooth connections, see Bluetooth.
To shoot a file or two across the airwaves to a fellow Bluetooth-equipped Mac fan, first pair your Mac with the other Bluetooth machine, as described on Bluetooth. In System Preferences→Bluetooth, make sure your Mac is Discoverable. Discoverable means “Other Bluetooth gadgets can see me.” (Check the receiving gadget, too, to make sure it’s in Discoverable mode.) Then you’re ready to send:
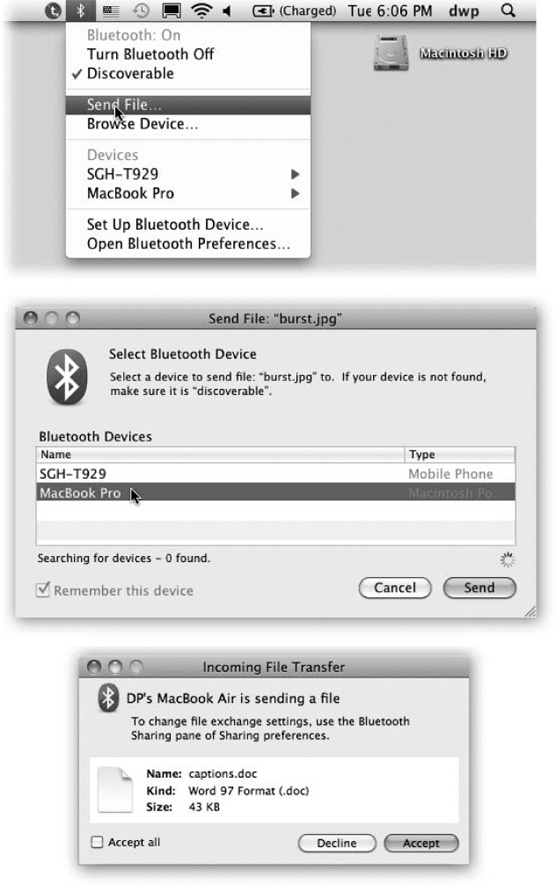
From the Bluetooth
 menulet (Figure 6-11, top), choose Send File.
If you don’t have the Bluetooth menulet on your menu bar, open System Preferences. Click Bluetooth, and turn on “Show Bluetooth status in the menu bar.”
After a moment, the Select File to Send dialog box appears. (You’ve actually succeeded in opening a program called Bluetooth File Exchange, which sits in your Applications→Utilities folder.)
Figure 6-11. Top: Once your Mac is paired with the other gadget, it’s super-easy to shoot a file to it wire-lessly. In this example, you’ll start by choosing Send File. (But you could save the second step by choosing the gadget’s name from this menulet and then Send File from the submenu.) Middle: OK. The Mac is saying: “Send this file to what gadget?” Click the one you want. (If the device isn’t in “discoverable” mode, then no other Bluetooth gizmos can see it.) Bottom: This is the view from the receiving machine (a Mac, in this case). “Someone’s sending you a file. Do you want it?”
Navigate to, and select, the files you want to send.
If you’re trying to send a bunch of them, you may find it easier to drag their icons onto the Bluetooth File Exchange icon in your Applications→Utilities folder.
Either way, a new Send File dialog box appears, showing the list of Bluetooth machines within range (Figure 6-11, middle).
In the list of found machines, click the name of the one you want to send your files to, and then click Send.
What happens now depends on how the receiving machine has been set up. In most cases, a dialog box tells the receiver that files are arriving (Figure 6-11, bottom); if she clicks Accept, the download proceeds. She’s then offered the chance to either (a) open each transferred file or (b) reveal its highlighted icon in the Finder.
Tip
In System Preferences→Sharing→Bluetooth Sharing, you can control what happens when someone sends you files via Bluetooth. Usually, you’ll want your Mac to ask whether or not to accept these files. (That’s what the option “Ask What to Do” means.) You can also specify where you want received files to wind up—for example, in your Downloads folder.
You can also perform this entire procedure in reverse. That is, you can go fishing through your buddies’ files without her explicitly having to send anything.
To make a Mac invadable, the person to be invaded must open System Preferences→Sharing and turn on Bluetooth Sharing. Here’s also where she can specify what folder is available to you for examination (the Mac proposes her Home→Public folder), and what kind of security she wants to set up.
Then all you have to do is choose Browse Device from your own menulet (you can see it in Figure 6-11)—and let the rummaging begin!
Documents can take one of several roads between your Mac and a Windows machine: via disk (such as a CD or Zip disk), flash drive, network, email, Bluetooth, iPod, iDisk, Web page, FTP download, and so on.
Without special adapters, you can’t plug an American appliance into a European power outlet, play a CD on a cassette deck, or open a Macintosh file in Windows. Therefore, before sending a document to a colleague who uses Windows, you must be able to answer “yes” to both of the questions below.
Most popular programs are sold in both Mac and Windows flavors, and the documents they create are freely interchangeable. For example, documents created by recent versions of Word, Excel, PowerPoint, FileMaker, FreeHand, Illustrator, Photoshop, Dreamweaver, and many other Mac programs don’t need any conversion. The corresponding Windows versions of those programs open such documents with nary a hiccup.
Files in standard exchange formats don’t need conversion, either. These formats include JPEG (digital photos), GIF (cartoon/logo graphics on Web pages), HTML (raw Web page documents), Rich Text Format (a word-processor exchange format that maintains bold, italic, and other formatting), plain text (no formatting at all), QIF (Quicken Interchange Format), MIDI files (for music), and so on.
But what about documents made by Mac programs that don’t exist on the typical Windows PC hard drive, like Keynote or Pages? You certainly can’t count on your recipient having it.
Do your recipients the favor of first saving such documents into one of those exchange formats. In Pages, for example, choose File→Export; in the resulting dialog box, click Word. Click Next. Now name this special version of the document (complete with the .doc suffix), and then click Save.
Every document on your hard drive has some kind of tag to tell the computer what program is supposed to open it: either a pair of invisible four-letter codes or a filename suffix like .doc.
Microsoft Windows uses only the latter system for identifying documents. Here are some of the most common such codes:
Kind of document | Suffix | Example |
|---|---|---|
Microsoft Word (old) | .doc | Letter to Mom.doc |
Microsoft Word (latest) | .docx | Letter to Mom.docx |
Excel | .xls or .xlsx | Profit Projection.xls |
PowerPoint | .ppt | Slide Show.ppt |
JPEG photo | .jpg | Baby Portrait.jpg |
GIF graphic | .gif | Logo.gif |
Web page | .htm | index.htm |
The beauty of Mac OS X is that most programs add these file name suffixes automatically and invisibly, every time you save a new document. You and your Windows comrades can freely exchange documents without ever worrying about this former snag in the Macintosh/Windows relationship.
Once you’ve created a document destined for a Windows machine, your next challenge is to get it onto that machine. One way is to put the file on a disk—a CD you’ve burned, for example—which you then hand to the Windows owner.
Macs and PCs format hard drives differently. The Mac can read Windows disks (which use unappetizingly named formatting schemes like FAT32 and NTFS), but Windows can’t read Mac hard drives.
CDs, DVDs, and flash drives use the same format on both kinds of computers, though, so you should have very little problem moving these between machines. Chapter 11 has details on disc burning.
Mac OS X can “see” shared disks and folders on Windows PCs that are on the same network. Complete instructions are in Chapter 13.
Chapter 22 offers details on FTP and Web sharing, two ways to make your Mac available to other computers—Windows PCs or not—on the Internet.
As the old saying goes, there are two kinds of people: those who have a regular backup system—and those who will.
You’ll get that grisly joke immediately if you’ve ever known the pain that comes with deleting the wrong folder by accident, or making changes that you regret, or worst of all, having your hard drive die. All those photos, all that music you’ve bought online, all your email—gone.
Yet the odds are overwhelming that, at this moment, you do not have a complete, current, automated backup of your Mac. Despite about a thousand warnings, articles, and cautionary tales a year, guess how many do? About four percent. Everybody else is flying without a net.
If you don’t have much to back up—you don’t have much in the way of photos, music, or movies—you can get by with burning copies of stuff onto blank CDs or DVDs (Chapter 11) or using the MobileMe Backup program described at the end of this chapter. But those methods leave most of your Mac unprotected: all your programs and settings, not to mention Mac OS X itself.
What you really want, of course, is a backup that’s rock-solid, complete, and automatic. You don’t want to have to remember to do a backup, to insert a tape, to find a cartridge. You just want to know that you’re safe.
That’s the idea behind Time Machine, a marquee feature of Mac OS X. It’s a silent, set-it-and-forget-it piece of peace of mind. You sleep easy, knowing there’s a safety copy of your entire system: your system files, programs, settings, music, pictures, videos, document files—everything. If your luck runs out, you’ll be so happy you set Time Machine up.
Here’s the bad news: Time Machine requires a second hard drive. That’s the only way to create a completely safe, automatic backup of your entire main hard drive.
That second hard drive can take any of these forms:
An external USB or FireWire hard drive.
An Apple Time Capsule. That’s an AirPort wireless base station/network backup hard drive in one; it’s available in gigantic capacities.
Another internal hard drive.
A partition of any one of those drives.
The hard drive of another Leopard or Snow Leopard Mac on the network. You must first mount its drive on your screen (Chapter 13).
Tip
It’s perfectly OK to back up several Macs onto the same external hard drive, as long as it’s got enough room. You can also back up onto a hard drive that has other stuff on it, although of course that means you’ll have less room for Time Machine backups.
In all cases, the backup disk must be bigger than the drive you’re backing up (preferably much bigger).

Figure 6-12. Top: The Mac has just encountered a second hard drive. Time Machine still works if there’s other stuff on the drive, but life is simpler if you don’t use that drive for anything but Time Machine. The more space Time Machine has to work with, the further back in time you’ll be able to go to recover deleted or mangled files. Bottom: The backup has begun. You know that because you see both a progress message and the  symbol that appears next to the backup drive’s name in your Sidebar.
Here’s what you can’t use as the backup disk: an iPod, an iDisk, a removable disk (like a CD or flash drive), or your startup drive.
Note
The backup drive must be a standard Mac-formatted hard drive. That’s a gotcha that befalls many a Mac fan who buys a new hard drive for backup purposes; many new drives come in Windows format, which Time Machine doesn’t recognize.
To make a new, empty drive like this ready for Time Machine, open Disk Utility (Disk Utility, the hard drive repair program). Click the drive’s name, click the Erase tab, choose Mac OS Extended (Journaled) from the Volume Format pop-up menu, and then click Erase.
Sure, it sounds like an Apple plot to sell more hard drives. But you’d be surprised at how cheap hard drives are. At this writing, you can buy a 1-terabyte hard drive (1,000 gigabytes) for $75, for goodness’ sake—and hard drive prices-per-gigabyte go only down.
The first time the Mac sees your second hard drive, it invites you to use it as Time Machine’s backup drive (Figure 6-12, top). That could be the moment you connect an external drive, or the first time you turn on the Mac after installing an internal drive.
If you click Use as Backup Disk, you’re taken immediately to the Time Machine pane of System Preferences (Figure 6-13). It shows that Time Machine is now on, your backup disk has been selected, and the copying process has begun. The Mac copies everything on your hard drive, including Mac OS X itself, all your programs, and everyone’s Home folders.
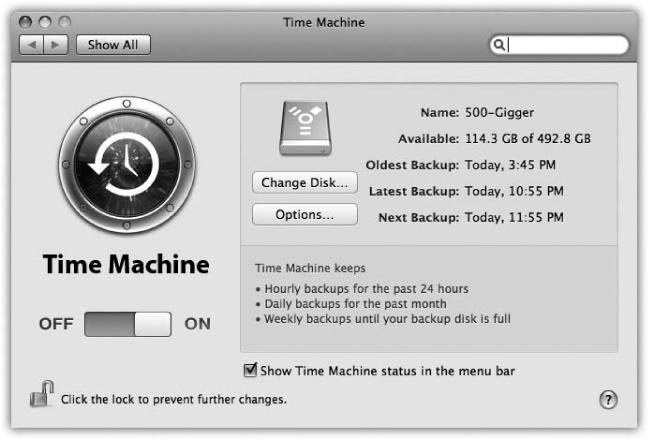
Figure 6-13. Use the big On/Off switch to shut off all Time Machine activity, although it would be hard to imagine why you’d want to risk it. You can click Choose Backup Disk to choose a different hard drive to represent the mirror of your main drive (after the first one is full, for example).
Your total involvement has been one click. And that, ladies and gentlemen, is the easiest setup for a backup program in history.
Note
Time Machine doesn’t use any compression or encoding; it’s copying your files exactly as they sit on your hard drive, for maximum safety and recoverability. On the other hand, it does save some space on the backup drive, because it doesn’t bother copying cache files, temporary files, and other files you’ll never need to restore.
Now go away and let the Mac do its thing. The first backup can take hours as the Mac duplicates your entire internal hard drive onto the second drive (Figure 6-12, bottom). The Mac may feel drugged during this time.
Note
Snow Leopard Spots: This first backup is much faster in Snow Leopard than it was before. It might take two hours instead of all night, for example. Subsequent Time Machine backups are much faster, too, especially in the “preparing backup” stage. (Maybe best of all: Stopping a Time Machine backup—for example, if you feel that it’s slowing down your Mac—is much faster, too.)
From now on, Time Machine quietly and automatically checks your Mac once per hour. If any file, folder, or setting has changed, it gets backed up at the end of the hour. These follow-up backups, of course, take very little time, since Time Machine backs up only what’s changed.
So, should disaster strike, the only files you can lose are those you’ve changed within the past 59 minutes.
Tip
And even then, you can force more frequent backups if you want to. Just choose Back Up Now from the Time Machine menulet. Or choose Back Up Now from the shortcut menu of the Dock’s Time Machine icon.
You can pause the backup the same way—if you need to use the backup drive for another quick task, for example. Open System Preferences→Time Machine and turn the big switch Off. Don’t forget to turn the backing-up on again when you’re finished.
By the end of the day, you’ll have 24 hourly backups on that second disk, all taking up space. So at day’s end, Time Machine replaces that huge stash with a single daily backup. You can no longer rewind your system to 3:00 p.m. last Monday, but you can rewind to the way it was at the end of that day.
Similarly, after a month, Time Machine replaces all those 30 dailies (for example) with four weekly backups. Now you may not be able to rewind to October 24, but you can rewind to November 1. (Apple assumes it won’t take you a whole week to notice that your hard drive has crashed.)
Tip
You can see these backups, if you want. Open your backup drive, open the Backups.backupdb folder, and open the folder named for your computer. Inside, you’ll find a huge list of backup folders, bearing names like 2010-03-22-155831. That’s the backup from March 22, 2010 at 15:58 (that is, 3:58 p.m.) and 31 seconds.
The point is that Time Machine doesn’t just keep one copy of your stuff. It keeps multiple backups. It remembers how things were in every folder—not just yesterday, but last week, last month, and so on. It keeps on making new snapshots of your hard drive until the backup drive is full.
At that point, the oldest ones get deleted to make room for new ones.
Tip
Ordinarily, Time Machine alerts you when it has to start deleting old backups. If you’d rather have it just do it without bothering you, open System Preferences, click Time Machine, click Options, and then turn off “Warn when old backups are deleted.”
By the way, if a backup is interrupted—if you shut down the Mac, put it to sleep, or take your laptop on the road—no big deal. Time Machine resumes automatically the next time you’re home and connected.
Time Machine has four faces. There’s the application itself, which sits in your Applications folder; open it only when you want to enter Restore mode. There’s its Dock icon, which also enters Restore mode, but which has a shortcut menu containing useful commands like Back Up Now (and Stop Backing Up).
There’s the Time Machine menulet, which may be the handiest of all. It identifies the time and date of the most recent backup; offers Back Up Now/Stop Backing Up commands; and has direct access to Time Machine’s restore mode and preferences pane.
Tip
If you Option-click the Time Machine menulet, you get a secret new command: Browse Other Time Machine Disks. Yes, it’s perfectly possible to back up onto multiple hard drives—to keep one offsite so you won’t be hosed in case of fire, flood, or burglary, for example—and this is how. (Control-clicking the Time Machine icon on the Dock is another way to get this command.)
Finally, there’s its System Preferences pane, where you adjust its settings (Figure 6-13). To see it, choose →System Preferences→Time Machine. Or choose Time Machine Preferences from Time Machine’s Dock icon or menulet.
POWER USERS’ CLINIC: Declaring Stuff Off-Limits to Time Machine
The whole point of Time Machine is to have a backup of your entire hard drive. That’s how most people use it.
It’s conceivable, though, that you might want to exclude some files or folders from the Time Machine treatment. There are two reasons.
First, you might not want certain, ahem, private materials to be part of your incriminating data trail.
Second, you might want to save space on the backup drive, either because it’s not as big as your main drive or because you’d rather dedicate its space to more backups of the essential stuff. For example, you might decide not to back up your collection of downloaded TV shows, since video files are enormous. Or maybe you use an online photo-sharing Web site as a backup for all your photos, so you don’t think it’s necessary to include those in the Time Machine backup.
To eliminate certain icons from the backup, open the Time Machine pane of System Preferences. Click Options.
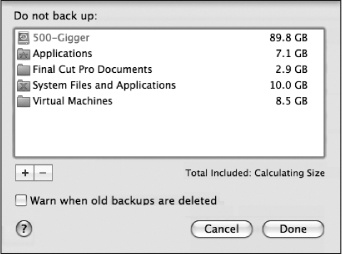
In the resulting list, click the button; navigate your hard drive, and then select the files or folders you don’t want backed up. Or just find their actual icons in the Finder and drag them into the list here. (Use the  button to remove items from the list, thereby excluding them from the excluded list.)
If you’re strapped for disk space, one logical candidate to exclude is the System folder on your main hard drive—that is, Mac OS X itself. After all, if you lose your hard drive, you already have a copy of Mac OS X: the original installation DVD. (Of course, it doesn’t have all the Apple updates that may have come out since the original version.)
When you add the System folder to the exclusion list, Time Machine makes another space-saving offer: “Would you like to also exclude other files installed with Mac OS X, such as system applications and UNIX tools?”
Agreeing (by clicking Exclude All System Files) saves you another several gigabytes of backup space.
All right, you’ve got Time Machine on the job. You sleep easy at night, confident that your life’s in order—and your stuff’s backed up.
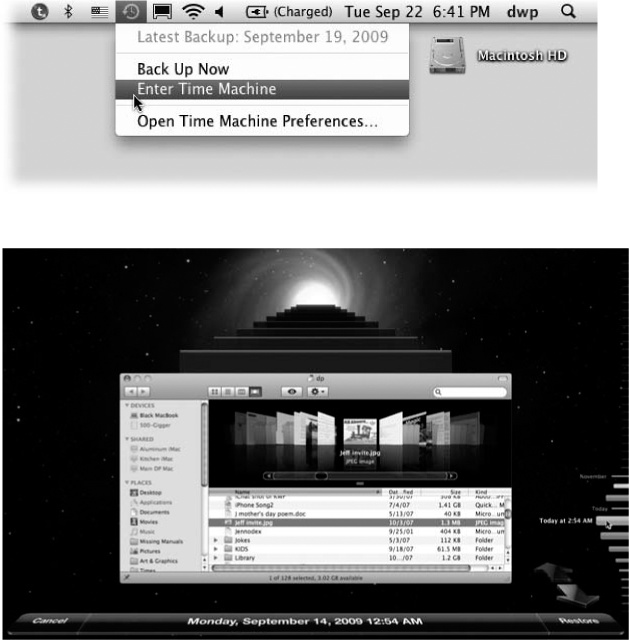
Figure 6-14. Top: Choose Enter Time Machine from the menulet. (If you don’t see this menulet, turn on “Show Time Machine status in the menu bar,” shown in Figure 6-13.) Bottom: This is the big payoff for all your efforts. The familiar desktop slides down, dropping away like a curtain. For the first time, you get to see what’s been behind the desktop all this time. Turns out it’s outer space. Time Machine shows you dozens of copies of the Finder window, representing its condition at each backup, stretching back to the past.
Then, one day, it happens: Your hard drive crashes. Or you can’t find a file or folder you know you had. Or you save a document and then wish you could go back to an earlier draft. Some kind of disaster—sunspots, clueless spouse, overtired self—has befallen your files. This is Time Machine’s big moment.
Start by pinpointing what you’re looking for, in one of these two ways:
Open the disk or folder window where the missing or changed item was.
Type what you’re looking for into the Search box at the top of any Finder window. Click the location button that makes the most sense: “This Mac” or the name of the window you’re in.
In the case of deleted files or folders, the search will probably come up empty; that’s totally OK.
Now click the Time Machine icon on the Dock, or choose Enter Time Machine from the menulet (Figure 6-14, top). Don’t look away; you’ll miss the show.
Your desktop slides down the screen like a curtain that’s been dropped from above. And it reveals…outer space. This is it, the ultimate Apple eye candy: an animated starry universe, with bits of stardust and meteors occasionally flying outward from the massive nebula at the center.
Front and center is your Finder window—or, rather, dozens of them, stretching back in time (Figure 6-14, bottom). Each is a snapshot of that window at the time of a Time Machine backup.
You have four ways to peruse your backup universe:
Click individual windows to see what’s in them.
Drag your cursor through the timeline at the right side. It’s like a master dial that flies through the windows into the past.
Click one of the two big, flat perspective arrows. The one pointing into the past means “Jump directly to the most recent window version that’s different from the way it is right now.”
In other words, it’s often a waste of time to go flipping through the windows one at a time, because your missing or changed file might have been missing or changed for the past 25 backups (or whatever). What you want to know is the last time the contents of this window changed. And that’s what the big flat arrows do. They jump from one changed version of this window to another. (Or, if you began with a search, the arrow takes you to the most recent version backup with a matching result.)
Use the Search box in the corner of the window. You can search for whatever you’re missing in the current backup.
As you go, the very bottom of the screen identifies where you are in time—that is, which backup you’re examining.
Tip
OK, it’s all very dazzling and all. But if you’re technically inclined, you don’t have to sit still for the big show. Just open the backup disk itself, whose icon appears on your desktop. Inside, you’ll find nested folders, neatly representing every computer, every backup, every day and every hour—which you can rummage through by hand.
In many ways, the recovery mode is just like the Finder. You can’t actually open, edit, rename, or reorganize anything here. But you can use Quick Look (Quick Look) to inspect the documents, to make sure you’ve got the right version. And you can use icon, list, column, or Cover Flow view to sort through the files you’re seeing.
If you’re trying to recover an older version of a file or folder, highlight it and then click the flat arrow button that’s pointing away from you; Time Machine skips back to the most recent version that’s different from the current one.
If you’re trying to restore a deleted file or folder that you’ve now located, highlight it and then click Restore (lower-right). The Mac OS X desktop rises again from the bottom of the screen, there’s a moment of copying, and then presto: The lost file or folder is back in the window where it belonged.
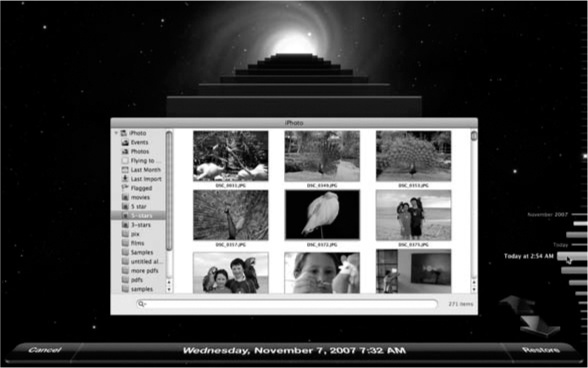
Figure 6-15. The Time Machine version of iPhoto is a weird, simplified, viewing-only version. You can’t do much here besides browse your backups—but when you’re in dire straits, that’s enough.
Note
Time Machine prides itself not just on recovering files and folders, but also on putting them back where they belong.
If you recover a different version of something that’s still there, Mac OS X asks if you want to replace it with the recovered version.
And if you’re recovering a document whose original folder no longer exists, Time Machine automatically re-creates the folder so that the recovered item feels at home.
The Finder isn’t the only program that’s hooked into Time Machine’s magic. iPhoto, Address Book, and Mail work with Time Machine, too. Other software companies can also revise their own applications to work with it.
In other words, if you want to recover certain photos, addresses, or email messages that have been deleted, you don’t start in the Finder; you start in iPhoto, Address Book, or Mail.
Then click the Time Machine icon on the Dock. Once again, you enter the starry recovery mode—but this time, you’re facing a strange, disembodied, stripped-down copy of iPhoto, Address Book, or Mail (Figure 6-15).
You’re ready to find your missing data. Click the Jump Back arrow to open the most recent version of your photo library, address book file, or email stash that’s different from what you’ve got now. (You can also use the timeline on the right if you remember the date when things went wrong.)
Tip
If you’re looking for something particular, specify that before you start clicking. For example, select the iPhoto Event or album first, or type a name into the Address Book search box.
At this point, you can select individual photos (or albums, or events), Address Book entries, or email messages to restore; just click the Restore button.
Often, though, you’d rather reinstate the entire iPhoto library, Address Book file, or email collection from the backup. That’s what the Restore All button is for.
If you click it, the experience is slightly different. iPhoto asks if you’re sure you want to replace your iPhoto library. Address Book may discover a lot of duplicate name-and-address entries and invite you to step through them, deciding which ones “win” (the old or the new).
Every hard drive will die at some point. You just hope it won’t happen while you own the computer.
But the great gods of technology have a mean-spirited sense of humor, and hard drives do die. But you, as a Time Machine aficionado, won’t care. You’ll just repair or replace the hard drive, and then proceed as follows:
Connect the Time Machine backup disk to the Mac. Insert the Snow Leopard installation DVD. Double-click the Install Mac OS X icon.
The Mac OS X installer opens up as though it’s going to lead you through the process of putting Snow Leopard on the new, empty hard drive. But don’t fall for it.
At the Welcome screen, choose Utilities→Restore System from Backup.
The Restore Your System dialog box appears.
Click Continue.
Now you’re shown a list of Time Machine backup disks. You probably have only one.
Click your Time Machine backup disk. In the list of backups, click the most recent one.
The installer goes about copying everything from the backup disk onto your new, empty hard drive. When it’s all over, you’ll have a perfect working system, just the way it was before your series of unfortunate events.
Tip
You can use these steps to rewind to a previous version of Mac OS X 10.6, too—for example, after you install an Apple software update (10.6.2, say) and discover that it “breaks” a favorite program.
Beware, however: Restoring your earlier version also erases any files you’ve created or changed since you installed the update. Back them up manually before you proceed!
Then follow the steps above; when you’re asked to choose a backup to restore, choose the most recent one. When it’s all over, copy the latest files (the ones that you manually backed up) back onto the hard drive.
Weirdly enough, you can also use Time Machine as a glorified data bucket that carries your world from one computer to another. You can bring over some or part of any Time Machine backup to a totally different Mac.
On the new machine, connect your backup disk. In the Applications→Utilities folder, open the program called Migration Assistant. On the first screen, click “From a Time Machine backup.” The subsequent screens invite you to choose which backup, which Home folder, and which elements (applications, settings, files) you want to bring over. (You can use the Snow Leopard installation DVD for this purpose, too, as described above.)
Time Machine is a very different kind of backup program, and a real departure for longtime Mac addicts. A few questions, therefore, are bound to come up—like these:
Can I back up more than one Mac onto the same disk? Yes. Each Mac’s backup is stored in a separate folder on that disk.
Does the backup disk have to be dedicated to Time Machine? No. It can have other files and folders on it. Keep in mind, though, that the more space that’s available, the further back your backup trail can go.
Can I use more than one backup disk—like one at the office and one at home? Yes. Just use the Time Machine panel of System Preferences (or the Time Machine Dock icon’s shortcut menu) to select the new backup drive each time you switch.
Can I delete something for good, from all the backups at once? Yes. Click the Time Machine icon on the Dock to enter the Restore (outer-space) mode. Find and select the file or folder you want to obliterate. From the
 menu, choose Delete From All Backups. (Sneaky, huh? That command is never in the menu except when you’re in Time Machine restoring mode.)
Can Time Machine back up other hard drives besides the main internal one? Yes. Open System Preferences→Time Machine. Click Options. Your secondary drives are listed here on the excluded-items list. If you want them backed up, too, then remove them from the list (click the drive name and then click the
button.)Anything else you want to get off your chest? Yes. Time Machine has trouble in two situations:
First, FileVault (FileVault). If you’ve encrypted your Home folder using FileVault, then Time Machine can back up your Home folder only when you’ve logged out. And when things go wrong, it can recover only your entire Home folder (not individual files or folders). It scarcely seems worth the trouble.
Finally, remember that Time Machine backs up entire files at a time—not pieces of files. If you edit huge, multigigabyte files like video files, therefore, keep in mind that each giant file gets recopied to the backup drive every time you change it. That is, one 2-gig video file that you work on all day could wind up occupying 48 gigabytes on the backup drive by the end of the day. Consider adding these files to the exclusion list, as described above.